Chapter Two. The Checklist
How many times as a child did you hear “look both ways before you cross the street”? If you’re a parent, you’ve probably said things like that many, many times. I think we can all agree that being careful and proceeding with caution is a pretty good rule for most things in life. Why then do we dive right into Photoshop and start using tools, layers, and filters without “looking both ways” first?
Of course the answer is that Photoshop is such an amazing tool with so many possibilities that we just can’t wait to use it. Or maybe you’ve been using Photoshop for so long that you feel confident you can “get across the street” without any challenges. In reality, there are many factors that can get in the way, slow down progress, or even bring things to a complete halt.
This chapter contains an approach to help track down the cause of problems and ways to potentially avoid those problems altogether. While the Q&A chapters in this book attempt to provide quick answers to common questions, this is a chapter that—hopefully—will fundamentally change the approach you take in Photoshop.
I don’t want to oversimplify things, but I really believe that a simple change of habit can help solve many of the problems people run into in Photoshop. The change? Slow down, and go through a quick checklist before you start doing anything. It’s easy to say, but it can be a real effort; I mean, let’s face it—Photoshop is fun, and we want to jump right in and start doin’ stuff. But honestly, it’s that desire to “get going” that can lead to problems.
For example, you want to get to work with the Brush tool (B) so you click on it and start painting. Before you know it, you have a brush that’s way too big, you’ve got the wrong color, you’re painting on the wrong layer, or worse—you get the “I’m-sorry-I-can’t-let-you-do-that” symbol. The typical response is to think, “Hey, why did that happen?” followed by a quick undo and an attempt to figure out what went wrong. Instead, before clicking with the Brush tool, go through a quick checklist:
• Make note of the shape and size of the brush you’re using.
• Make note of the settings in the Options Bar, such as Opacity, blend mode, etc.
• Know what Foreground color the brush will use.
And that’s just for the operation of the tool itself. You also should check these factors:
• Is anything selected (this will affect the way the tool works)?
• Should you select an area first before painting?
• Are you painting on a separate layer? Should you create a new layer first?
• If you have multiple layers, is the correct layer targeted (active)?
• Are you attempting to paint on a layer that can’t be used (Type layers) or a locked layer (does the Lock icon appear to the right of the layer’s name)?
• Is the Caps Lock key on (this changes the brush size to the precise cursor)?
Here’s the tricky part: When you change your tool settings, the items in your checklist will also change. Hey, I didn’t say it was going to be easy and that you’d get the hang of it right away, but the concept of checking first—before using a tool—is easy enough. It’s important to remember that any setting you change becomes the default setting from then on, until you change it again. For instance, if the last time you used the Lasso tool (L) was a few days ago and you had set the Feather setting to 12 pixels in the Options Bar, the Lasso tool will continue to use that Feather amount “forever”—even if you quit and restart Photoshop. That suggests that you should either (1) make sure you check the Feather setting before using the Lasso or (2) leave the Feather amount in the Options Bar at 0 pixels and use Select>Feather to add feathering to the Lasso selection.
Here’s the other side of the checklist: You have started working (without really checking things first), and you run into a problem. The same checklist can be used to track down why you’ve encountered the problem. Yes, you heard it here first—this multipurpose checklist can help you before you start and if you run into some difficulties. For example, consider these two problems and some of the possible answers:
Q: Why isn’t the Fill command (Edit>Fill) working properly?
A: The layer is set to Lock Transparent Pixels.
A: The target layer is hidden.
A: More than one layer is selected.
A: The wrong area is selected.
A: The blend mode is wrong in the Fill dialog.
Q: Why can’t I get the Clone Stamp tool (S) to work?
A: A Type layer is active.
A: The target layer is hidden (meaning its Eye icon is turned off).
A: The tool’s settings are incorrect in the Options Bar.
A: There’s an area selected that shouldn’t be.
If our checklist concept were applied before attempting to use the Fill command or the Clone Stamp tool, perhaps these questions wouldn’t have even come up.
With that said, here are some of the key parts of your ongoing checklist, somewhat in the order of their importance:
Layers
Since so many operations rely on layers, checking the Layers palette should be first on your checklist. You need to ask yourself:
• Am I on the correct layer?
• Is the target layer hidden?
• Is the layer active?
• Is the layer locked?
• Should the layer be locked?
• Is the layer part of a clipping mask?
• Is the correct thumbnail active (layer versus mask)?
• Is more than one layer selected by mistake?
• Should I have multiple layers selected?
• Are layers linked that shouldn’t be?
• Am I clicking on a Group rather than a layer?
• Are the layers stacked in the correct order?
• Am I attempting to work on a Smart Object rather than an image layer?
• Are the Opacity and Fill percentages appropriate?
• Is the layer blend mode set correctly?
• If I’m adding a new layer, have I clicked in the appropriate part of the layer stack?
Phew, a lot of stuff to check, right? And that’s just the Layers palette! But it’s the answers to questions like these that cover some of the most common roadblocks people face. Okay, you’ve checked all of the Layers issues, so what’s next?
Options Bar
Needless to say, the Options Bar plays a vital role in our checklist because it holds the settings for every tool. Later on we’ll look at each tool in detail, but for now, here are the fundamental questions that apply to many of Photoshop’s tools:
• Is a Tool Preset chosen?
• Is the correct blend mode chosen?
• Is the Opacity at 100%? If not, should it be?
• Is the correct brush size, shape, or font chosen?
The choices in the Options Bar change depending on what tool you’re using, but before you start using any tool, check the Options Bar first!
Selections
Many operations in Photoshop start with a selection, or are affected by whether an area is selected or not. So, before you start your next task or if something just isn’t working properly, here are a few questions to ask yourself about selections:
• Did you forget that you had something selected?
• Did you mean to select something first, and didn’t?
• Is there too much feather, not enough feather, or no feather?
• Did you forget that you chose to hide the selection, so you can’t see the selection edges anymore (View>Extras)?
• Are the Options Bar settings correct for the selection tool you’re using?
• Are you on the correct layer?
If you think that part of the problem might be that you have the wrong area selected, or you just want to make sure that nothing is selected, press Command-D (PC: Control-D). That is the shortcut to deselect and is the quickest way to make sure that nothing is selected, even if you can’t see the selection edges (a.k.a. marching ants).
Color
Before using the painting tools and the Fill command, you need to check your colors by asking yourself the following questions:
• Have I chosen the correct Foreground color?
• Is the color appropriate for the color mode I’m in, or will be using? (For example, some colors will not print in CMYK.)
If you’re adding canvas, using the Eraser tool (E) on the Background layer or using the Gradient tool (G), you’ll also need to ask yourself:
• Have I chosen the correct Background color?
Another factor to consider is the color mode of the document, since some operations only work in RGB mode, for example. So take a moment to look under the Image>Mode menu and ask yourself:
• Am I in the appropriate color mode?
• Should I be working in 8-bit or 16-bit depth?
Transforming
If you are transforming a layer or a selection (with either Free Transform or any of the transformation commands), you cannot perform any other operation until you’ve finished that transformation. So if you see menus grayed out, press Enter to lock in your transformation or press the Escape key to cancel the transformation—then you’ll be able to continue.

Specific Tools
In addition to the overall questions we’ve already explored, you also have to consider the specific settings in the Options Bar for each tool. Here, in their order of appearance in the Toolbox, are the key settings to check for each tool, along with a few examples of typical problems.
Marquee (M):
Double-check the group of four buttons to determine the proper selection: New Selection, Add to Selection, Subtract from Selection, or Intersect with Selection. Also check the Style pop-up menu: Normal, Fixed Aspect Ratio, or Fixed Size. Typical Problem: Last time you used the Marquee tool to make a fixed-sized selection, and it’s still set to that fixed size as opposed to Normal.
If you have the wrong Marquee tool active, press Shift-M to switch between the Rectangular and Elliptical Marquee tools.
Move (V):
Double-check the following: Auto Select Layer, Auto Select Groups, and Show Transform Controls. Typical Problem: Auto Select Layer only works if the layer has an Opacity of more than 50%, so if you’re trying to click on a very transparent layer, Auto Select Layer will prevent you from being able to move that layer. You’ll have to decide when you need this option turned on—it can be extremely helpful in selected layers, but if you have semi-transparent layers, it will cause you problems.
Lasso (L):
Check the following: New Selection, Add to Selection, Subtract from Selection, and Intersect a Selection buttons, and the Anti-alias checkbox.
If you have the wrong Lasso tool active, press Shift-L to toggle among the three Lasso tools.
Polygonal Lasso:
Double-check the following: New Selection, Add to Selection, Subtract from Selection, and Intersect a Selection buttons, and the Anti-aliased checkbox.
Double-check the following: New Selection, Add to Selection, Subtract from Selection, and Intersect a Selection buttons, Anti-alias checkbox, Width, Edge Contrast, and Frequency fields, and the Tablet Pressure button (if you have a stylus tablet).
Magic Wand (W):
Double-check the following: New Selection, Add to Selection, Subtract from Selection, and Intersect a Selection buttons, Anti-alias, Contiguous, and Sample All Layers checkboxes, and the Tolerance field. Typical Problem: You unchecked the Contiguous checkbox the last time you were working in Photoshop so you could select all areas of the same color at once. Now you want to select just contiguous pixels, so you’ll need to choose that option.
Crop (C):
Double-check the following: Width, Height, and Resolution fields. Click the Clear button to clear the settings and enter your own specific size or resolution in the fields.
Slice (K):
Check to be sure you have the correct Style selected: Normal, Fixed Aspect Ratio, or Fixed Size. If you are entering your own settings for the Width and Height fields, don’t click on the Slices From Guides button, as this will automatically populate those fields.
Spot Healing Brush (J):
Double-check the following: the Mode pop-up menu, Type (Proximity Match or Create Texture), and the Sample All Layers checkbox. Typical Problem: This isn’t so much of a problem with tool settings as it is with how the tool operates. It’s best to use this tool for small areas or “spots,” unless the area you’re trying to remove is surrounded by a fairly large area of the same texture.
If you have the wrong blemish-correction tool active, press Shift-J to toggle among the four correction tools: Spot Healing, Healing, Patch, and Red Eye.
Double-check the following: the Mode pop-up menu, Source (Sampled or Pattern), and the Aligned and Sample All Layers checkboxes.
Patch:
Double-check the following: Source, Destination, and Transparent. Typical Problem: The terms “Source” and “Destination” can be a little confusing. Click on Source if you want to select the problem and then drag it to the “fix.” Click on Destination if you plan to select the “fix” and drag it over the problem.
Red Eye:
Double-check the following: Pupil Size and Darken Amount.
Brush (B):
Double-check the following: Flow slider, the Mode pop-up menu, and Airbrush button. Typical Problem: If you press a number shortcut using the numeric keypad on the keyboard to change the tool’s Opacity and nothing happens, it probably means the Airbrush button is on. You need to turn this button off to use the number keyboard shortcut for changing Opacity.

If you have the wrong brush tool active, press Shift-B to toggle among the three brush tools: Brush, Pencil, and Color Replacement.
Pencil:
Double-check the following: the Mode pop-up menu, Opacity, and the Auto Erase checkbox.
Color Replacement:
Double-check the following: the Sampling buttons (Continuous, Once, or Background Swatch), the Limits pop-up menu (Discontiguous, Contiguous, or Find Edges), the Mode pop-up menu, and the Tolerance slider. Typical Problem: Wherever you drag the cursor, all colors are being replaced, not just the one you want. This often happens when the Sampling is set to Continuous as opposed to Once. With Sampling set to Once, the first place you click will determine the color that’s being replaced, even if you drag the cursor over a different color.
Clone Stamp (S):
Double-check the following: the Mode pop-up menu, Flow slider, Airbrush button, and the Aligned and Sample All Layers checkboxes. Typical Problem: It can be difficult to understand when to deselect the Aligned checkbox. Generally, you should leave it checked so that the distance between the pixels you’re sampling and the area you’re cloning over stays constant. Deselecting the Aligned checkbox means the Clone Stamp tool will always start cloning from the place you first Option-clicked (PC: Alt-clicked) to establish the reference point.
If you have the wrong stamp tool active, press Shift-S to toggle between the Clone Stamp and the Pattern Stamp tools.
Pattern Stamp:
Double-check the following: the Mode pop-up menu, Flow slider, Airbrush button, and the Aligned and Impressionist checkboxes.
Double-check the following: the Mode pop-up menu, Flow slider, and Airbrush button. Typical Problem: The History Brush works in conjunction with the History palette, so you need to check both to ensure the correct History State (source) is set for the History Brush.
If you have the wrong History tool active, press Shift-Y to toggle between the History and Art History Brush tools.
Art History Brush:
Double-check the following: the Mode pop-up menu, the Style pop-up menu, and the Opacity, Area, and Tolerance fields.
Eraser (E):
Double-check the Mode pop-up menu, Flow slider, Airbrush button, and Erase to History checkbox. Typical Problem: If you’re erasing on the Background layer, you also need to ensure your Background color swatch is set to the appropriate color.
If you have the wrong Eraser tool active, press Shift-E to toggle among the three Eraser tools.
Background Eraser:
Double-check the following: Sampling buttons (Continuous, Once, or Background Swatch), the Limits pop-up menu, Tolerance slider, and Protect Foreground Color checkbox.
Magic Eraser:
Double-check the following: Contiguous and Sample All Layers checkboxes, Tolerance, and Opacity.
Double-check the following: correct gradient chosen in Gradient Picker, Style buttons, the Mode pop-up menu, Opacity, and Reverse, Dither, and Transparency checkboxes. Typical Problem: Your gradient colors are black and white, but when you change the Foreground and Background colors, the gradient is still black and white. This happens when the Gradient Picker is set on the Black to White gradient rather than the Foreground to Background gradient.
Paint Bucket:
Double-check the following: the Fill and Mode pop-up menus, Opacity, Tolerance, and the Contiguous and All Layers checkboxes.
Blur (R):
Double-check the following: the Mode pop-up menu, Strength, and Sample All Layers checkbox. Typical Problem: The default 50% setting for Strength is usually too high for most situations, so if you’re using this tool, make sure the Strength percentage is set to a lower amount.
If you have the wrong retouching tool active, press Shift-R to toggle among the three tools: Blur, Sharpen, and Smudge.
Sharpen:
Double-check the following: the Mode pop-up menu, Strength slider, and Sample All Layers checkbox.
Smudge:
Double-check the following: the Mode pop-up menu, Strength slider, and Sample All Layers and Finger Painting checkboxes.
Double-check the following: the Range pop-up menu, Exposure, and Airbrush button. Typical Problem: Here’s another example of a tool with a default setting that’s usually too high. Change the Exposure setting to a lower amount such as 15–20% for a more subtle effect.
Burn:
Double-check the following: the Range pop-up menu, Exposure, and Airbrush button.
Sponge:
Double-check the following: the Mode pop-up menu, Flow slider, and Airbrush button. Typical Problem: Although many people think of the Sponge tool as the “Desaturate tool,” it does have two different modes—Desaturate and Saturate—so remember to check that first.
Path Selection (A):
Double-check the following: Show Bounding Box, Add, Subtract, Intersect, and Exclude From Shape buttons, and Alignment buttons. Typical Problem: While it may look like the Selection tool you see in other programs like Illustrator, this is the Path Selection tool, meaning it only works when you are using paths.
If you have the wrong selection tool active, press Shift-A to toggle between the Path and Direct Selection tools.
Direct Selection:
No options.
For all of the Type tools—Horizontal/Vertical, Horizontal/Vertical Type Mask—double-check the following: Text Orientation button, Font, Font Style, Font Size, and Anti-aliasing pop-up menus, the Alignment buttons, and the Font Color swatch. Note: For most tools, you set the options and then use the tool. The Type tool is one of the few tools that allows you to alter settings (font size, color, etc.) after you’ve begun working with it.
Pen (P):
Double-check the following: Shape Layers, Paths, and Fill Pixels buttons, Auto Add/Delete checkbox, and the Add, Subtract, Intersect, and Exclude From Shape/Path Area buttons. If using the Shape Layers option, ensure the Color swatch is correct. Also double-check Pen Options.

Freeform Pen:
Double-check the following: Shape Layers, Paths, and Fill Pixels buttons, Magnetic checkbox, and the Add, Subtract, Intersect, and Exclude From Shape/Path Area buttons. If using the Shape Layers option, ensure the Color swatch is correct. Also check Freeform Pen options.

Add Anchor Point:
No options.
Delete Anchor Point:
No options.
Convert Point:
No options.
Double-check the following: Shape Layers, Paths, and Fill Pixels buttons, and the Add, Subtract, Intersect, and Exclude From Shape/Path Area buttons. If using the Shape Layers option, ensure the Color swatch is correct. If using the Fill Pixels option, ensure Mode and Opacity are set correctly. Also check Rectangle Options.

If you have the wrong drawing tool active, press Shift-U to toggle among the six drawing tools.
Rounded Rectangle:
Double-check the following: Shape Layers, Paths, and Fill Pixels buttons, the Add, Subtract, Intersect, and Exclude From Shape/Path Area buttons, and the Radius setting. If using the Shape Layers option, ensure the Color swatch is correct. If using the Fill Pixels option, ensure Mode and Opacity are set correctly. Also check Rounded Rectangle Options.

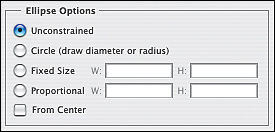
Ellipse:
Double-check the following: Shape Layers, Paths, and Fill Pixels buttons, the Add, Subtract, Intersect, and Exclude From Shape/Path Area buttons, and the Radius setting. If using the Shape Layers option, ensure the Color swatch is correct. If using the Fill Pixels option, ensure Mode and Opacity are set correctly. Also check Ellipse Options.
Double-check the following: Shape Layers, Paths, and Fill Pixels buttons, the Add, Subtract, Intersect, and Exclude From Shape/Path Area buttons, and the Sides setting. If using the Shape Layers option, ensure the Color swatch is correct. If using the Fill Pixels option, ensure Mode and Opacity are set correctly. Also check Polygon Options.

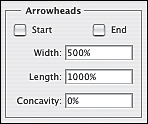
Line:
Double-check the following: Shape Layers, Paths, and Fill Pixels buttons, the Add, Subtract, Intersect, and Exclude From Shape/Path Area buttons, and the Weight setting. If using the Shape Layers option, check the Color swatch. If using the Fill Pixels option, ensure Mode and Opacity are set correctly. Also check Arrowheads options.
Custom Shape:
Double-check the following: Shape Layers, Paths, and Fill Pixels buttons, the Add, Subtract, Intersect, and Exclude From Shape/Path Area buttons, and the Shape pop-up menu. If using the Shape Layers option, ensure the Color swatch is correct. If using Fill Pixels option, ensure Mode and Opacity are set correctly. Also check Custom Shape Options.

Double-check the Author field, Size pop-up menu, and Color swatch.
Audio Annotation:
Double-check the Author field and Color swatch.
Eyedropper (I):
Double-check the Sample Size pop-up menu.
Color Sampler:
Double-check the Sample Size pop-up menu.
Measure:
No options.
Hand (H):
Double-check the Scroll All Windows checkbox.
Zoom (Z):
Double-check the following: Resize Windows To Fit, Ignore Palettes, and Zoom All Windows checkboxes, and the Zoom In and Zoom Out buttons.


Tool Review
Okay, let’s review this one more time, shall we? If you haven’t started using a tool yet, go through a quick checklist before you start:
• Check the tool’s settings in the Options Bar.
• Check the Layers palette to make sure everything is “as it should be.”
• Check to see if you do have or should have something selected.
On the other hand, if you’ve encountered a problem and you want to try to figure out why it has happened, go through a quick checklist:
• Check the tool’s settings in the Options Bar.
• Check the Layers palette to make sure that everything is “as it should be.”
• Check to see if you do have or should have something selected.
Just as saving multilayered PSD files should be an everyday work habit, so too should this checklist method become part of your everyday work in Photoshop CS2.