Chapter Four. Creating Flexible Documents
Okay, I admit it: I am a lazy person. If I can avoid working too hard, I will. If I can get away with doing less work, I will. Show me a way to save time so I can get back to the important task of doing nothing, and I’m all over that! That’s why I love using shortcuts in Photoshop—one quick keyboard command and I’ve saved a time-consuming trip to the menus. Oh, and you’ve gotta love pressing one key to activate a tool instead of dragging that mouse all the way across your screen!
That’s also why I’m a big believer in using the most flexible methods I can: to avoid having to re-do my Photoshop work. If I can use an adjustment layer to make a simple change when my client says “what would it look like in blue?” why not? That’s so much simpler (and lazier?) than having to start over again simply because I didn’t use a layer to make my color change the first time.
Sure, there are other benefits to using these flexible approaches, such as more accuracy and avoiding potential problems, but really, it’s all about laziness. Yessir, it’s all about the laziness.
By now I’m sure that you know there are usually anywhere from three to six different ways to do things in Photoshop. Some methods are faster and more accurate than others. But more importantly, some techniques offer a lot more flexibility, and these methods are the ones you should consider—particularly if you’re going to be doing a lot of editing after the fact.
Here’s a simple example: you want to lighten a portion of a photograph, so you make a feathered selection, then use the Levels command (Command-L [PC: Control-L]) to lighten the image. Finally, you deselect (Command-D [PC: Control-D]) and save the document. Although there’s nothing “wrong” with this method, it does have a significant drawback: the change is permanent. In this case, there’s really no possibility of changing your mind—you saved the document after lightening the selected area. If you decide it’s too light or you selected the wrong area, it’s too late to make an adjustment. Instead, why not use a Levels adjustment layer (simply select Levels from the Create New Adjustment Layer pop-up menu at the bottom of the Layers palette) to lighten the selected area? Then, even after saving the document, you can make further adjustments to the Levels, and you can use the layer mask to adjust the area that’s being affected. This simple change in approach makes a huge difference in the amount of flexibility you can have in your work.
With that in mind, here are my nominees for the most flexible Photoshop CS2 methods.
Let’s see some of our nominees in action...
Layers
First, here’s a detailed example of a method that creates the desired effect but is not very flexible, compared with the flexible way of achieving the same finished product. The result we’re going for is to create the look of a color snapshot on top of a black-and-white photo.
Destructive Editing Method
Step One: Make a rectangular selection of the area that you want to be in color using the Rectangular Marquee tool (M).
©DAVE MOSER

Step Two: Choose Select>Transform Selection and click-and-drag outside the bounding box to angle the selection. From the Select menu choose Inverse.

Step Three: From the Image menu choose Adjustments>Desaturate. Then press Shift-Command-I (PC: Shift-Control-I) to get back to your original selection.

Step Four: From the Edit menu choose Stroke. Enter 12 for the Width amount and change the Position to Inside.

You’ve created the look of a color snapshot on top of a black-and-white photo. But now you want to do some tweaking. If you take a look at the Layers palette, you’ll see that once you’ve saved and closed, it would be next to impossible to change anything since we worked directly on the Background layer, altering the pixels (this is often referred to as “destructive editing”).
Non-Destructive Editing Method
The alternate approach is a non-destructive, extremely flexible method that will often take a couple of extra steps to complete, but will save precious time if you need to make changes later. Here’s how it would work in this example:
Step One: Press the letter M to use the Rectangular Marquee tool to make a rectangular selection of the area that you want to be in color.
Step Two: Angle the selection by choosing Select> Transform Selection and grab the corners to rotate it.
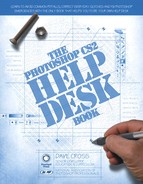
Step Three: Click on the Create New Adjustment Layer pop-up menu in the Layers palette and fill the selection with any color other than white by going to Edit>Fill.
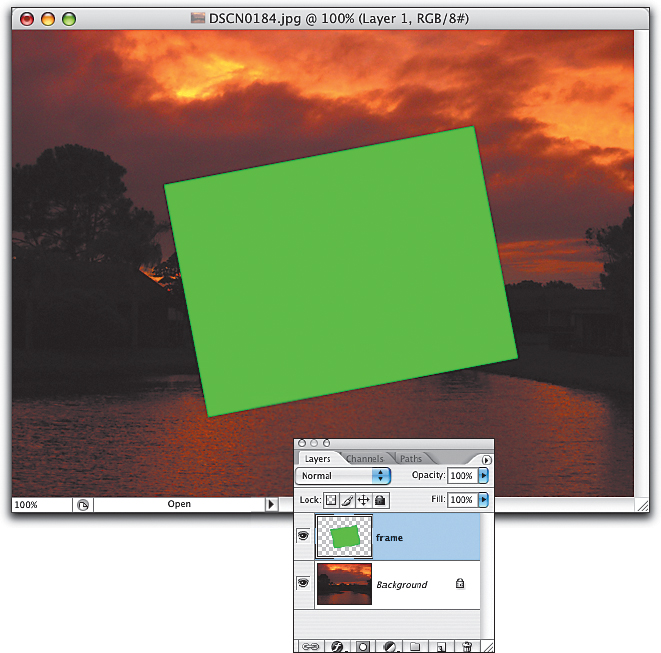
Step Four: From the Layers palette, use the Add a Layer Style pop-up menu to add a Stroke. Enter 12 points for the Width and change the Position to Inside. While still in that dialog, add a Drop Shadow.

Step Five: In the Layers palette, lower the Fill to 0%. (This will keep the layer effects visible but remove the fill color—that’s why the color was unimportant.) Double-click on this layer in the Layers palette and rename it “frame.”

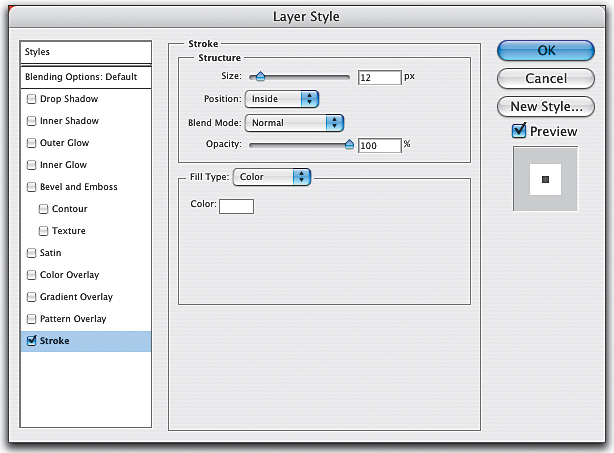
Step Six: Hold down Command (PC: Control) and click on the layer thumbnail to load the original selection. From the Create New Adjustment Layer pop-up menu choose Hue/Saturation.
Step Seven: In the Hue/Saturation dialog lower the Saturation to -100 and change the Lightness to around 16 (it will vary with the image). Click OK. Initially the image will be the opposite of what you want—the snapshot will be black and white and the remainder will be color—but we’ll fix that next.


Step Eight: Press Command-I (PC: Control-I) to Invert the layer mask and make the effects of the adjustment layer affect only the areas outside our “snapshot.”
Step Nine: Hold down Shift and select both the Frame layer and the adjustment layer. Using the Move tool (V), reposition the two layers while preserving the effect. You can even use Free Transform (Command-T [PC: Control-T]) to rotate or scale the original frame to change the effect.
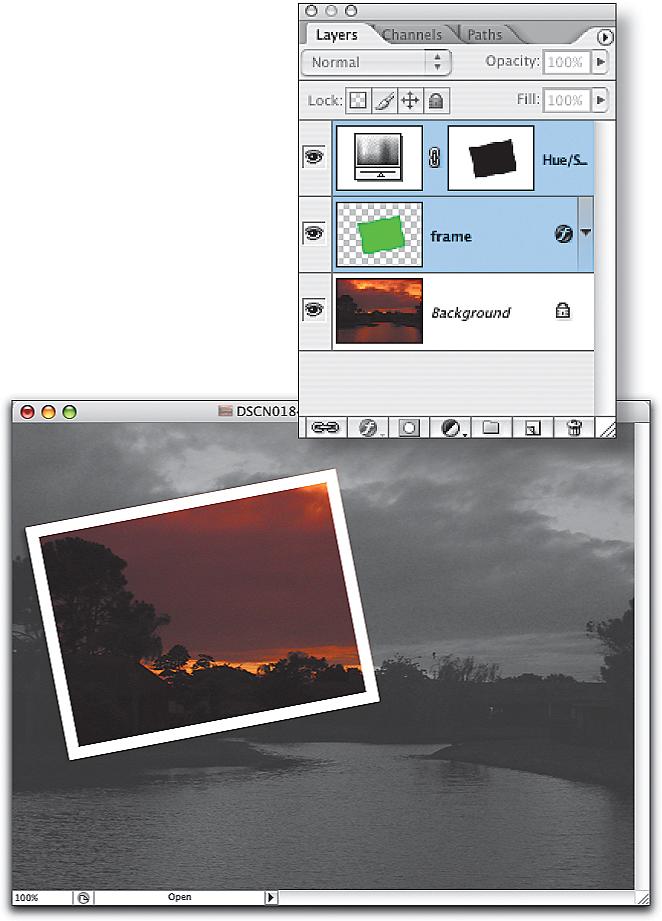

Now, compare this Layers palette with the first method: this time the Background layer is untouched, and the other layers offer as much flexibility as we will ever need. In this example we took advantage of the following methods:
• Used layer effects to add the stroke (rather than using Edit>Stroke).
• Lowered the Fill percentage to allow only the layer effects to show.
• Added an adjustment layer to “temporarily” change the look of the photo.
By using these effects we can:
• Decide to abandon the whole idea since the Background was left untouched.
• Adjust the angle, location, or size of the snapshot.
• Change the size or color of the stroke, and the look of the drop shadow.
• Alter the look of the image: for example, giving it a slight amount of color as opposed to completely gray.

The main purpose of that exercise was to demonstrate that using a non-destructive approach sometimes takes a step or two longer, but rewards you with greater flexibility, avoiding potential problems. So, with that last exercise in mind, let’s explore all of my nominees for the most flexible Photoshop CS2 tools and techniques.
Duplicating the Background Layer
Any time you’re tempted to work directly on the Background layer, stop! Instead, Press Command-J (PC: Control-J) to duplicate the Background layer so all your work will be done on a copy. Later on we’ll see some specific examples of this technique in action, but for now let’s just agree that, in most cases, it’s a good idea to duplicate the Background layer. (Yes, there may be some cases where it’s not absolutely necessary, but most of the time it’s a really good idea.)
Adjustment Layers
Adjustment layers rock! They are the most flexible way to adjust an image, since you can continue to tweak the effect by double-clicking on the adjustment layer. For many of the adjustments (see below), you can either go to the Image menu, under Adjustments, and select an adjustment method, or add an adjustment layer for the equivalent effect from the Layers palette. The difference is that using the Image>Adjustments menu is a much more “permanent” method, since you are altering the pixels in the image.
Here’s a simple example, exaggerated to make the point more obvious. In the first scenario, I pressed Command-L (PC: Control-L) to open the Levels dialog. After making an adjustment—deliberately overdone in this case—I clicked OK and saved the document.

©DAVE CROSS

If I later decide to work on the document, and open Levels again, the Histogram makes it pretty clear that it would be very difficult to make any further changes to “correct” the poor initial adjustment.

I always thought that Adobe could help us out a little bit when you’re faced with a histogram like this one by changing the Levels dialog to look more like this:

Contrast that with using a Levels adjustment layer: I still made a rather poor over-adjustment, but this time I have a safety net. Even after saving the document—without flattening—I can continue to make adjustments by double-clicking on the adjustment layer.


This time, instead of the nasty-looking histogram filled with big gaps, the Levels adjustment layer dialog opens just as I left it, ready to be tweaked (or in this case, rescued).
Here are the adjustment layers you can add from the Layers palette:
Levels
Curves
Color Balance
Brightness/Contrast
Hue/Saturation
Channel Mixer
Selective Color
Gradient Map
Photo Filter
Invert
Threshold
Posterize
That leaves a bunch of other adjustments that cannot be applied as adjustment layers:
Auto Levels
Auto Contrast
Auto Color
Desaturate
Match Color
Replace Color
Selective Color
Shadow/Highlight
Exposure
Variations
What to Do When You Can’t Use Adjustment Layers
To create the rough equivalent of an adjustment layer, duplicate the Background layer, and then apply one of the non-layer adjustments. Press Command-J (PC: Control-J) to make a copy of the Background (or whatever layer it is you want to affect), then apply the adjustment to the copied layer. Although you cannot double-click to edit the adjustment, you do have a little more control over the effect. You could lower the Opacity of the duplicated layer to lessen the effect (by letting the original Background show through), or you could delete the duplicated layer and start over, since the Background layer is untouched.
Faking “Filter” Layers
Okay, so there’s no such thing as a Filter layer (that would be cool though, wouldn’t it?). Instead, you can create a more flexible version of a filter—and change the effect—by duplicating the layer that you want to apply the filter to. Then change the Opacity to lessen the effect of the filter, or choose a blend mode to alter the look. In addition, you can add a layer mask to the filtered layer to restrict the effect to a portion of the layer. Take a look at these examples that show how you can lessen the effect of a filter, or get quite a different look.
Here, the Gaussian Blur filter (Filter>Blur) was applied to the copied background, using a setting of 12 pixels.
©DAVE CROSS


Here the Opacity is lowered:


Here’s the same blurry layer with the Opacity back to 100%, using different blend modes:


Remember, you can always get back to the original Background simply by dragging the copied version to the Trash icon.
Clipping Masks
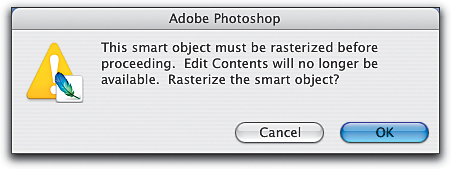
Next, let’s see how a clipping mask can avoid a potentially destructive move. If you attempt to apply a filter to a Type layer, you’ll get this warning:

This is a warning message that actually encourages you to do something that really isn’t a great idea: rasterizing a Type layer. Rasterizing a Type layer turns it into pixels, removing the ability to edit the text. Although it might appear as though this is a necessary step—especially based on the message in the warning dialog—you have other options (after clicking Cancel). First, you could duplicate the Type layer and then rasterize one of the two layers. At least this way you’d have a backup plan in case you want to change your mind later. With a few filters such as Lighting Effects, Gaussian Blur, or Brush Strokes, this method is the only answer.
The second option is to create a layer clipping mask. A clipping mask combines two or more layers so that the bottom layer “clips” the layer(s) immediately above it. It’s simple to create and can be extremely effective for many purposes, especially as an alternative to rasterizing a Type layer.
In this example, I am trying to use the Add Noise filter on a Type layer and, of course, I get the warning we saw previously. Rather than clicking OK, I press Cancel and instead use this method:

Step One: Click on the Create a New Layer icon to add a new layer above the Type layer and fill it with the same color as the type (Edit>Fill).

Step Two: Apply the Add Noise filter (Filter>Noise) with the appropriate settings.

Step Three: With the Add Noise filter layer still active, from the Layer menu, choose Create Clipping Mask, or press Command-Option-G (PC: Control-Alt-G).

Check out the Layers palette and you’ll see that the Type layer is underlined, indicating it is the clipping layer, while the layer immediately above (our Add Noise layer) is indented and has an arrow symbol, which indicates that this layer is being clipped (the clippee?). As a result of the clipping mask, the Add Noise filter layer is only visible within the type—and the Type layer remains editable.
It’s important to note that you can include multiple layers in a clipping mask: just repeat the same operation of positioning the layer above the clipping layer and pressing Command-Option-G (PC: Control-Alt-G).
Here I added two small images, positioned them and added them to the clipping mask by pressing Command-Option-G (PC: Control-Alt-G).

Clipping masks are not restricted to Type layers, but can be used with any layer (other than the Background layer). Whether it’s a Shape layer or a brush stroke created with the Brush tool, it’s the pixels on the bottom layer that create the clipping effect.

©DAVE CROSS

Layer Masks
If there actually were awards for the most flexible Photoshop method, layer masks would win hands-down (and probably be inducted into the Flexibility Hall of Fame). Layer masks offer the highest level of control and flexibility imaginable, or, said another way, use layer masks whenever possible! Simply stated, layer masks hide portions of a layer rather than deleting any pixels, which means that you can always get the contents of the layer back.
The concept of a layer mask is simple: paint with black to hide portions of a layer; paint with white (or leave areas white) to show those areas.
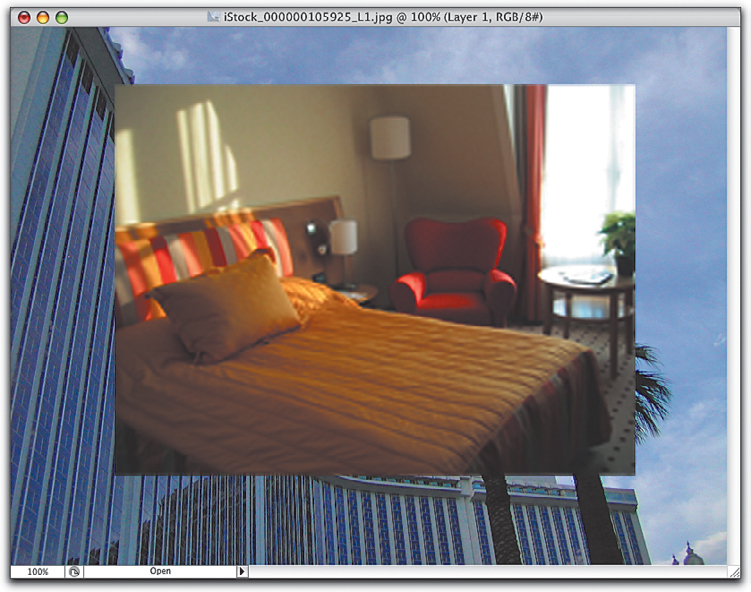
To fully understand the benefits of using layer masks, consider the following two methods. First, I made a feathered selection and dragged it into my main document.
©ISTOCKPHOTO/BRENT HATCHER, DAVID FREUND
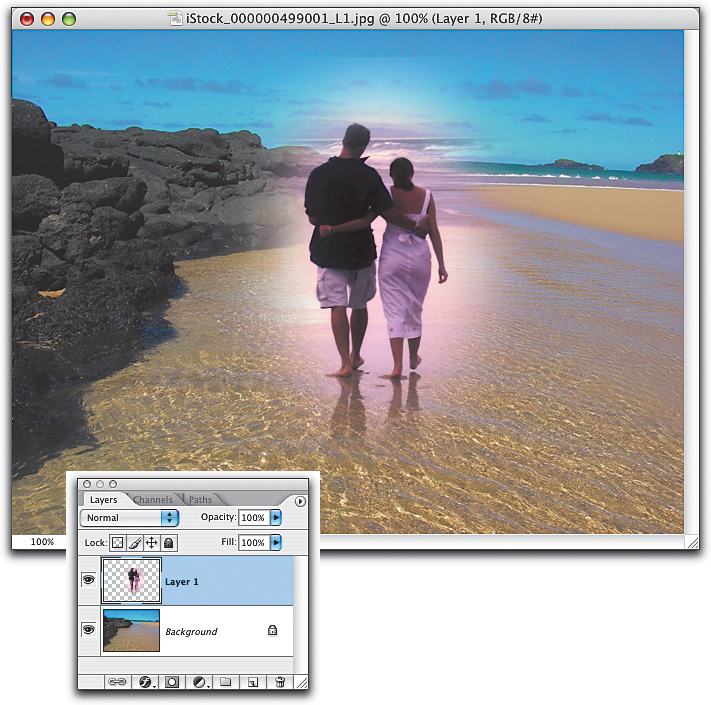
It’s a nice effect, but without much room to play. For example, if I decide that I want to reveal more of the photo I dragged over, I can’t, since I only dragged the selected area. I’d have to delete the layer, make a larger selection and drag it over.
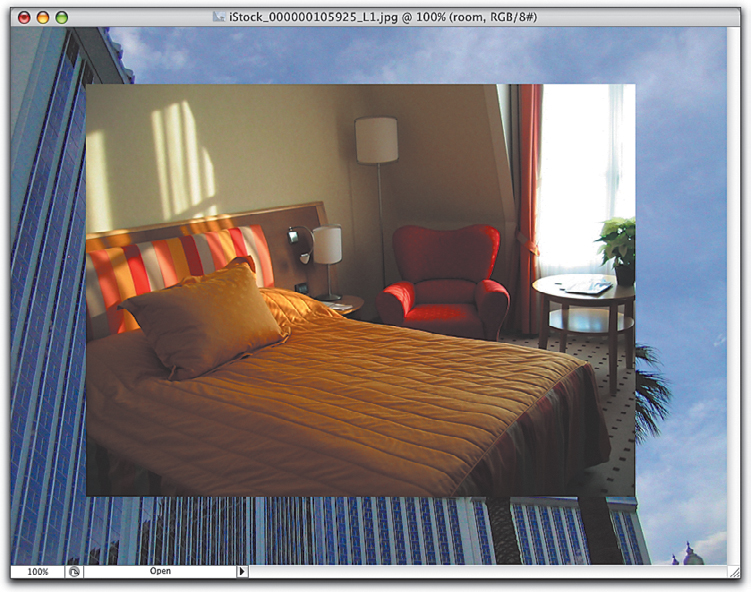
Here’s how much easier it can be with a layer mask. This time I drag the entire photo over—without selecting anything first. Then I click on the Add Layer Mask icon in the Layers palette.

Now I can hide any areas I don’t want—note the word hide versus delete—by painting with black. If I use a soft-edged brush, I can create the same effect as a feathered selection, but with one very important difference.

If I decide I need to reveal more of the layer, I simply switch my Foreground color to white and “paint” the hidden area back in. Remember, the black areas in the mask are hiding those portions of the layer; the white areas are visible.

Here’s another huge advantage of layer masks: painting with gray. While painting with black hides the layer and painting with white shows the layer, painting with gray makes the layer somewhat transparent.

Press X to switch between black and white; use the bracket keys to change the brush size: Left bracket ([) makes the brush size smaller, Right bracket (]) makes it larger.
Here are two examples of how you can use a layer mask to paste one photo inside another, and to make it look like one layer is “behind” the other.
Layer Masks: Example One
In this first example, I used the Polygonal Lasso tool to make a selection of the sign. (I didn’t worry about his hands—I can fix that later.)
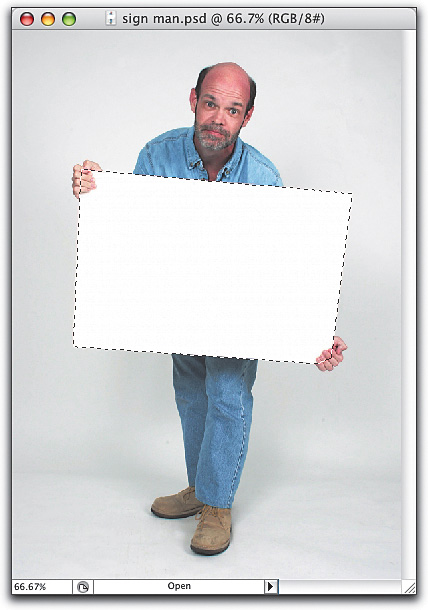
Then I switched to another photo, Selected All, and copied. I returned to the photo of the man with the sign and from the Edit menu, chose Paste Into (not Paste, but Paste Into). A few things happened when I did that: a new layer was created, and a layer mask was created based on my selection; the layer and its mask were not linked.
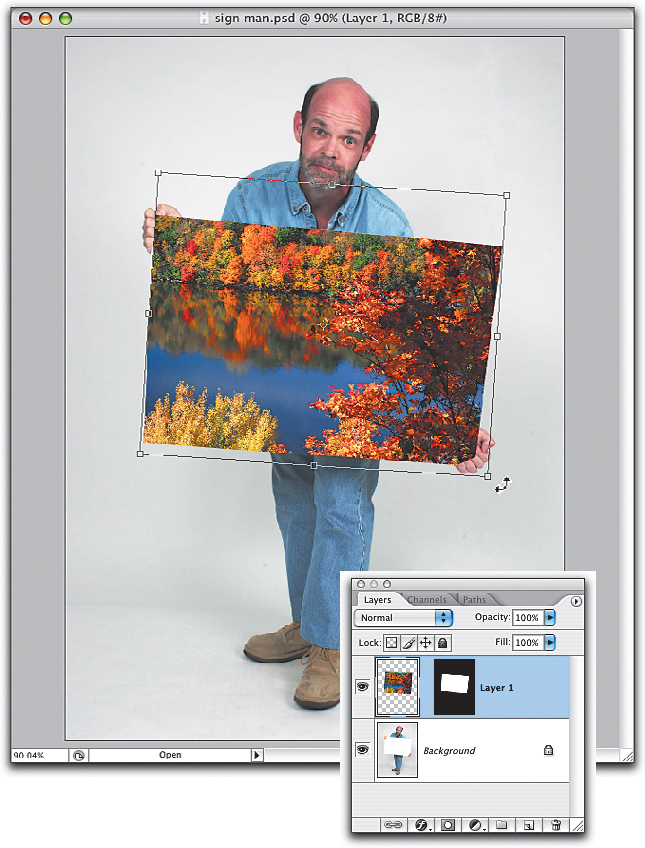
I pressed Command-T (PC: Control-T) for Free Transform, and then pressed Command-0 (zero) (PC: Control-0) so that I could see the transformation handles.
©ISTOCKPHOTO/PHIL WILKERSON, WILLIAM WALSH

I scaled the photo down to fit (while pressing the Shift key) and rotated it to match up with the angle of the sign. Then I pressed Enter to lock in my transformation.
Then I had to deal with the areas where the pasted image covered up his fingers. I hid the pasted photo by clicking on its Eye icon and used the Lasso tool (L) to make a selection around his fingers.

Then I made the pasted layer visible again and clicked on the layer mask thumbnail to make sure it was active. Finally, I filled the selection with black by pressing Option-Delete (PC: Alt-Backspace).

Note that the layer and its mask are not linked (this happens automatically when you use Paste Into). This allows me to reposition the pasted image while the mask “stays put.”

Layer Masks: Example Two
In this example I added a layer mask to a Type layer and painted with black to hide portions of the text, creating the illusion that it was behind the tower.
©ISTOCKPHOTO/ANNECLAIRE LE ROYE

Of course the type is still editable, as you can see here:

Smart Objects
This new Photoshop CS2 feature brings layer flexibility to another level, allowing you to link from one Photoshop document to another. There are two ways to create a Smart Object from another Photoshop document: use the Place command to import the document, or drag in the layers you need and convert them to a Smart Object. Let’s look at both options.
Option One
Here I used the File>Place command to bring a second image into our document. After resizing and pressing Enter, the layer indicates that this is a Smart Object.

I can rotate the image, change the blend mode, lower the opacity, or add a layer effect (you cannot apply adjustments to the Smart Object or use any painting-type tools such as the Brush or the Clone Stamp tool).
Then if I decide I need a different image—but want to preserve all the other changes—I simply use Layer>Smart Objects>Replace Contents and choose a different image. Click OK and the existing Smart Object is replaced with the new image, complete with any changes I made.

Option Two
In the following example, a multilayered document was created to make a small banner for a website.
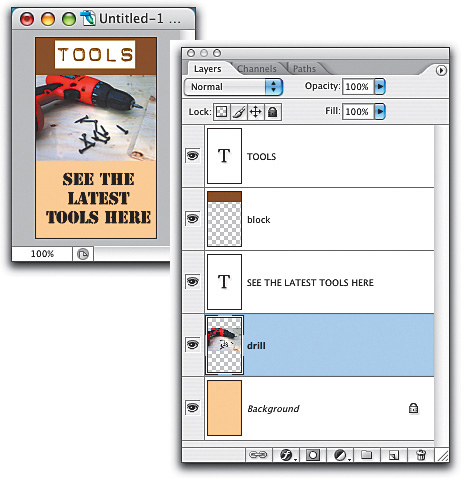
After Shift-clicking to select all the layers, I used the Move tool (V) to drag the layers into another document. Although I could keep all the separate layers, or put the layers into a Group, in this case I made a Smart Object instead. From Layer>Smart Objects I chose Group into New Smart Object. It looks as though the layers have been merged, and in a sense they have.
©ISTOCKPHOTO/MARTIN WORKMAN, JEFFREY SMITH

However, double-clicking on the newly created Smart Object will open a new document based on your Smart Object. (Note: It is not opening the original document from which I copied the layers, but a different document, in PSB format.)

Any changes I make to the document will be updated automatically by the Smart Object.

You can also select layers in a document and turn them into a Smart Object. It’s as simple as selecting them and then choosing Layer>Smart Objects>Group into New Smart Object. The only—and important—difference is that this Smart Object is not based on a separate document. If I double-click to edit the Smart Object, it will open a document that contains the layers in the Smart Object. Edit that document, save it, and the Smart Object will update in the original document.
If you place a Camera Raw file into another Photoshop document, it will also become a Smart Object—after launching the Camera Raw dialog. This means that you can apply the settings you want in Camera Raw, click OK, and then scale it to size in the other document. If you double-click on the Smart Object, it will launch Camera Raw so that you can tweak the settings.
Here’s another huge advantage of Smart Objects: the ability to scale an image and not lose quality. First, let’s look at the “traditional” method: I dragged-and-dropped one photo onto another and scaled the dragged copy to be very small.
©ISTOCKPHOTO/JOCELYN LIN, ANNETTE BIRKENFELD

Later I decided to make the small photo much larger, but when I use Free Transform to scale up the layer, the quality is very poor.
Look at the difference with a Smart Object: I use the File>Place command to import the Photoshop document, and then scale it way down.

When I decide to scale up the Smart Object, it refers back to the original document, and as long as the original is large enough, it in effect re-imports the image at the larger size without any loss in quality—while preserving any changes you made such as rotating, opacity, and layer effects.
Layer Styles
There are a number of reasons why layer styles are so useful, not the least of which is that they can add some pretty cool effects to a layer. The reason that they are on my “most flexible” list is that layer styles change with the content of the layer and can be edited at any time. For example, if you add a Stroke effect and a Drop Shadow to a Type layer, those effects will automatically update when anything about the Type layer changes. Plus, if you decide to edit the angle of the drop shadow or the thickness of the stroke, you can easily do that just by double-clicking on the effect in the Layers palette. (In contrast, if you were to manually create your own stroke with Edit>Stroke, it will not update if you change the font or the content of the Type layer.)
Layer Comps
Layer comps are included in my nominations for Most Flexible Method because you can take advantage of them to quickly change between various combinations of layers.

I suppose you could argue that layer comps should really be on the nominees list for “Photoshop techniques that can save you from making a whole bunch of separate documents,” but I include them on my list because they still offer a simple way to try different options, which is a kind of flexibility, isn’t it?
Sample All Layers
A number of tools offer this option, including the Healing Brush, Clone Stamp, Blur, Sharpen, etc. This option (found in the Options Bar) introduces flexibility to these tools that would otherwise alter the pixels of the layer you’re working on. With the Sample All Layers checkbox selected, you can add a blank layer above the image and clone (or heal or blur or sharpen...) and the results will appear on the blank layer, leaving the Background untouched. That way, if you don’t like the results, you can delete the contents of the layer and start again, or simply lower the opacity of the top layer so that the original starts to show through. This allows you to lessen the effects of the tool, taking advantage of the non-destructive nature of this method.
Save as Layered PSD
I have tried really hard to come up with even one situation when it would be a good idea to flatten and save an image, but I honestly can’t think of one. Yes, it’s probably a daily occurrence to make a flattened copy of a layered document, but that’s quite different. I often refer to Flatten as Photoshop’s “F word” and I’m only partially joking. Using the Flatten command is a potentially dangerous thing, since it literally removes all layers and gives you one layer called Background. Instead, if you need to save a flattened version of the document, just use File>Save As, and as soon as you pick a file format other than PSD or TIFF, the layers will be flattened anyway. However, using this method lets you preserve the original multilayered document in PSD format (or TIFF if you like) and make a separate copy that is flattened.
I confess, I tend to speak in absolute terms such as “never ever flatten,” and in reality, there will be some times when it makes sense to flatten. For example, let’s say you’ve scanned a really old photo that’s very faded. One way to improve it is to press Command-J (PC: Control-J) to duplicate the Background layer, change the blend mode to Multiply, and then keep duplicating until the image improves. In a case like this, there’s really no good reason to keep four or five duplicated layers when all you’re trying to do is improve the image. In this situation, go ahead and flatten the layers. My hope is that by saying dramatic things like “never flatten,” you’ll at least think twice before flattening, and ask yourself, “Perhaps I should save a flattened copy and keep the layered original?” (You should now be picturing Dave nodding his head vigorously in agreement.)
It’s probably clear to you at this point that it’s unlikely that my Most Flexible Photoshop Technique Awards will never see the light of day. A shame really; just imagine all the guest presenters we could line up. Oh well. The main thing is that you recognize the importance of thinking “flexibility first” and use these techniques. You can avoid many common Photoshop problems simply by using these alternative methods.