Using TOAD’s New Advanced Security
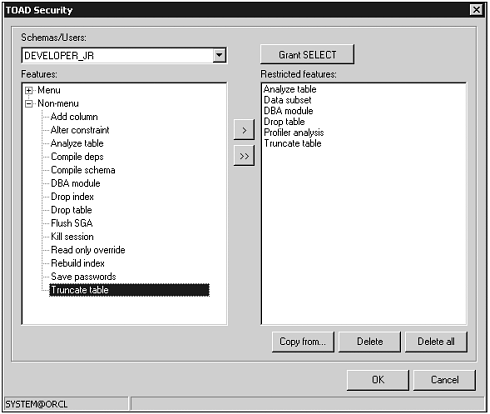
Beginning with version 7.3, TOAD offers an entirely new and completely customizable security mechanism. With it, you can very easily define what features or functions should work in TOAD by either database user or role. For example, you can take the DEVELOPER_JR database role from the prior section and further control what a junior developer can do within TOAD as shown in Figure 1.3. This screen is callable from the main menu at Tools, Toad Security. However, to use this screen, you must first have a TOAD schema (like the one created by TOADPREP.SQL) and then run the TOADSECURITY.SQL script (found in the TEMPS subdirectory of the TOAD install directory and shown in Listing 1.2).
Figure 1.3. TOAD Security screen.

Listing 1.2. TOADSECURITY.SQL Script
Examine Figure 1.3 in more detail. The left side shows a list of all the available functions, also considered enabled. These fall into two categories: menu and non-menu. Menu refers to actual menu items within TOAD, whereas non-menu means functions that might be accessible from multiple places within TOAD. The right side then shows just those functions you want to remove or disable for that user or role. Thus in Figure 1.3, the DEVELOPER_JR has had the following removed:
Menu: Data subset (cannot run data subset wizard)
Menu: Profiler analysis (cannot run TOAD profiler)
Non-Menu: Analyze table (cannot analyze tables)
Non-Menu: DBA module (cannot access DBA features)
Non-Menu: Drop table (cannot drop tables)
Non-Menu: Truncate table (cannot truncate tables)
Note that the left side offers a Non-Menu choice of “Read only override.” This is the new and preferable way to activate TOAD in read-only mode (see the preceding section). This is by far the easiest and most reliable method for defining your read-only TOAD users.
