
Set Scenes
As your accessory collection grows, home automation can go from being a novelty to a pain—constantly tinkering with accessories gets tiresome. Thankfully, HomeKit offers shortcuts, called scenes, that let you combine actions. For example, you could have a scene called Good Morning that turns on all of your lights, a scene called Leave Home that turns off your lights and turns down the thermostat, and a silly party scene that turns your living room red.
I argue that scenes are the most important aspect of home automation, and now that you’re thoroughly familiar with the basics of HomeKit, it’s time to learn about this powerful—and perhaps even life-changing—aspect.
Creating scenes is easy. Figuring out the right scenes to make is the tricky part.
Consider Your Scenes
First things first, I don’t recommend rushing into scene creation (that’s why I’ve taken so long to get to it!). As you tinker with your accessories, you’re probably going to come up with scene ideas naturally. For instance, when it’s getting late, you probably want to dim or turn off some lights all at once.
In fact, once you get into scene creation, you’ll probably want to create all sorts of fun scenes. And there’s nothing wrong with that! But I highly recommend starting with the four scenes Apple suggests: Good Morning, Good Night, Arrive Home, and Leave Home. If you plan carefully, these four scenes may be all the HomeKit control you ever need. In fact, you may only need just two of them. For example, consider what you do in the morning before leaving home: turn off lights and lock the doors. Is your routine that much different than when you go to bed?
When you’re just starting out, I recommend starting with and focusing on your Good Morning and Good Night scenes. The next time you go to bed, write down everything you do before you get in bed. That’s going to be the basis for your Good Night scene (and maybe your next HomeKit-related shopping trip!).
Similarly, when you wake up on a typical morning, think about what you need to turn on or adjust before you can even start the day. If you’re an early riser, there may be lights that need to be on before you can navigate to the bathroom or the coffee maker. And maybe you want to turn on the coffee maker from bed so it’s ready when you get to the kitchen (unfortunately, there aren’t any HomeKit coffee makers, so you’ll need a smart outlet and a dumb coffee maker). If it’s winter, maybe you want the house a little warmer.
The Good Morning scene inspires more creativity than Good Night, but don’t go crazy right away. Stick to just a few necessary actions until you get more comfortable with scenes.
One reason to keep it simple is that if you have a relatively simple setup, you can use Good Morning and Good Night as your main two scenes, which makes things all the simpler. Another reason is that it’s easy to overload a scene with so much stuff that it has unintended consequences, or you lose track of what’s going on. It’s better for both you and your housemates to start simple and add to scenes as needed, instead of starting with a confusing mess of a scene that you then have to scale back.
Also, when you create scenes, keep in mind that they’re the foundation for automations, which I cover in Set Your Home on Autopilot. For instance, you could make it so that your Good Morning scene activates before you even wake up!
When you have some good ideas in mind for your Good Morning and Good Night scenes, you’re ready to get started.
Make a Scene
To create a scene, tap the plus ![]() icon in the upper-right corner of the Home or Rooms screens and choose Add Scene. Home suggests some scene names, or you can create your own name by tapping Custom. The subsequent steps vary a little depending on whether you create a suggested scene or create a custom scene.
icon in the upper-right corner of the Home or Rooms screens and choose Add Scene. Home suggests some scene names, or you can create your own name by tapping Custom. The subsequent steps vary a little depending on whether you create a suggested scene or create a custom scene.
Create a Suggested Scene
For your first scenes, your best bet is to start with Apple’s suggested scenes:
Choose one of the predefined scenes: Good Morning, Good Night, Arrive Home, or Leave Home.
On the New Scene screen, accessories like switches and lights are included by default, and are set to either turn on or turn off depending on the scene. (Good Morning and Arrive Home have them set to turn on; Good Night and Leave Home have them set to turn off.)
You can add or remove accessories from the scene by tapping Add or Remove Accessories near the bottom (Figure 21). On the Add Accessories screen, included accessories are marked with a checkmark
 —tap an accessory to add or remove it from the scene. Tap Done when you’re finished.
Once you’ve decided which accessories are included in your scene, you can adjust what each should do: tap an accessory to have it turned on or off by the scene, or press it to set more options, such as brightness or color for a Hue light.
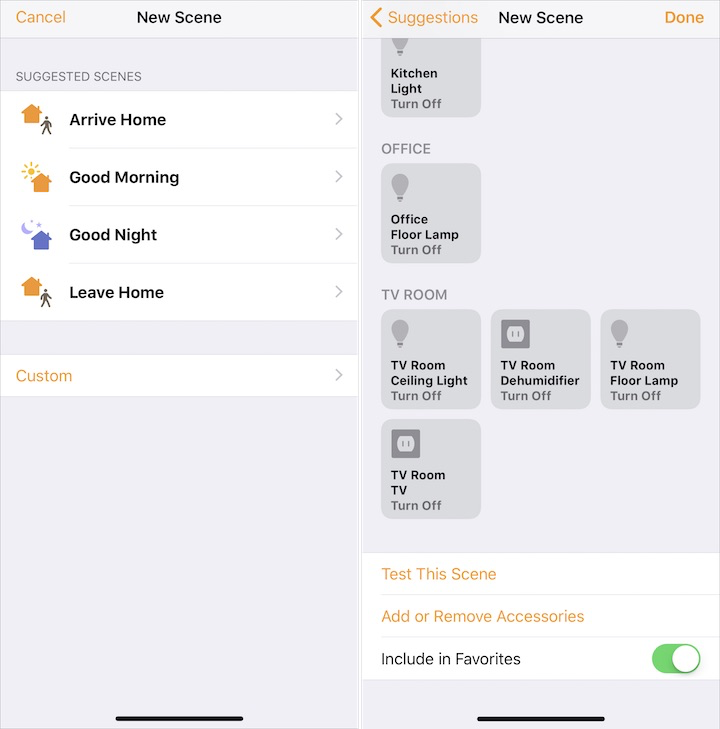
Figure 21: When you add a suggested scene (left), some accessories are added automatically, and you’ll have to tap Add or Remove Accessories (right) to remove those you don’t want included. After adjusting your scene settings, you can tap Test This Scene on the New Scene screen to see what it does.
Enable Include in Favorites if you want the scene included on the main Home screen in the Home app, in the Home item in Control Center, and in the Home app on the Apple Watch. For suggested scenes, which you’ll likely use often, this is a good idea.
Tap Done in the upper-right corner to finish.
Create a Custom Scene
Of course, you’re not limited to Apple’s suggestions. You can create any kind of scene you want.
Here’s how to create a custom scene:
On the New Scene screen, tap Custom.
Enter a name for the scene.
Tap Add Accessories. On the Add Accessories screen, tap the accessories you want to include; if you want to include all the accessories in a particular room, tap Add All. A checkmark
appears by those you’ve selected (Figure 22). Tap Done when finished.
Figure 22: On the Add Accessories screen, tap an accessory to add or remove it from the scene. Accessories not included in the scene are unaffected by it. On the next screen, adjust each accessory so that it does what you want it to do when you activate the scene (Figure 23). Tap an accessory to have it turned on (the icon appears as white) or off (the icon is gray) or press it to make further adjustments.

Figure 23: Here are a couple of examples of how you can adjust accessories in a scene. The left-hand screenshot shows my settings for Good Morning (both lights on) while the right-hand screenshot shows my Good Night settings (one light off, the other dimmed to 1%). Tap Test This Scene near the bottom of the screen to see what the scene does.
Tap Done in the upper-right corner when you’re finished.
Control Scenes
Apple offers a several ways to control scenes:
Home app: Each scene is listed under every room that contains an accessory used in the scene; favorite scenes are also displayed in the Home screen above favorite accessories (Figure 24).

Figure 24: Favorite scenes appear on the Home screen of the Home app. Tap a scene to turn it on or off. If it’s a scene like Good Morning that turns lights on, turning off the scene turns those lights off. However, if a scene turns light off, turning off that scene won’t turn them back on.
(Yes, I know what you’re thinking: if I can use a single scene to turn lights on and off, then why am I being told to set up a Good Morning scene to turn them off and a Good Night scene to turn them off? That’s because it’ll make it easier to set up automations, as I explain in Set Your Home on Autopilot.)
If you press on a scene in the Home app and tap Settings, you can adjust settings for that scene as I described earlier. In Mojave, Control-click a scene and choose Settings.
As mentioned above, favorite scenes also appear in Control Center and in the Home app of the Apple Watch. Apple gives you a bunch of ways to control scenes.
Control Center: First, if you haven’t already, you must enable the Control Center Home button in Settings > Control Center > Customize Controls. Tap the plus
 button to add it to Control Center if it’s not already enabled.
Next, bring up Control Center—on most iOS devices by swiping up from the bottom of the screen, or on the iPhone X by swiping down from the right-hand “ear.” Tap the Home button to bring up a platter with up to nine of your favorite accessories.
By default, this panel shows your nine favorite accessories; tap the Scenes button in the upper-right corner to instead show your nine favorite scenes. The Home Control Center platter now shows scenes by default until you switch back to accessories by tapping Accessories in the upper-right corner of the platter (Figure 25).

Figure 25: In the Home platter of Control Center, a button in the upper-right corner switches between favorite accessories and favorite scenes. The scenes buttons here work just as they do in the Home app, except that you cannot adjust Settings from Control Center.
Apple Watch: In the Home app, favorite scenes are listed at the top. Tap one to turn it on or off.
iOS Home screen: If you’re using an iPhone with 3D Touch, press on the Home app icon on either the Home screen or in Spotlight search to reveal a list of favorite scenes and a shortcut to create a new scene (Figure 26).
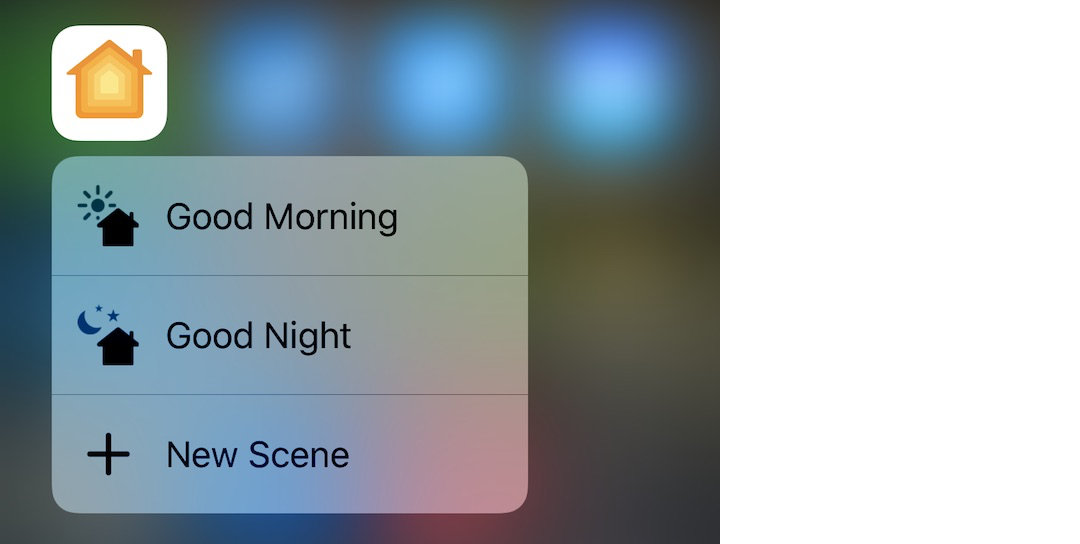
Figure 26: If you have a 3D Touch-equipped iPhone, you can press on the Home app icon to see scene shortcuts. Siri: Often, you can merely speak a scene name to Siri. I try to always name my scenes so that’s all that’s needed. The built-ins like Good Morning, Good Night, and I’m Home work well for this, as do more unique scene names like Margaritavilla and Sexy Party. But for more stubborn scene names, you can add “set scene” before the scene name. So while telling Siri “Merry Christmas” gets me either a holiday greeting or a warning that it is not in fact Christmas, saying “set scene Merry Christmas” turns on my Christmas lights.
Ponder These Scene Ideas
If you’ve followed my advice, you’ve set up your Good Morning and Good Night scenes, and you may have even found that they’re the only scenes you need most of the time. If you’re wondering about other potential scenes, here are some of my own to give you an idea of my thought process.
Revisit Good Morning and Good Night
At my previous house, our bedroom was on one end of the single-story house and the laundry room that served double duty as my wife’s closet was on the other. Every morning, she had to walk from our bedroom, past a bathroom, through a kitchen adjacent to the living room, through the music room, and into the laundry room.
My Good Morning scene there served to light up the house sufficiently to navigate in the morning, without being painfully bright: It turned on the smart outlets that controlled the lamps in the laundry and music rooms, and set the living room lamps to 40% brightness.
My Good Night scene did the opposite, though it dimmed the living room lamps instead of turning them completely off, so we wouldn’t have to stumble in the dark if we got up at night. (Even though we had Hue bulbs in our bedrooms at the time, those scenes didn’t touch the Hue bulbs, because I often wanted to keep the bedroom lamp on so I could find my way around before I went to bed.)
I’ve lived in my current house only a few months, so I’m still getting a feel for how I want the lighting set up every morning, but my Good Night scene is a bit easier. It turns off my kitchen light, my ceiling light in the TV room, and my office lamp, and it dims the floor lamp in my TV room.
Currently, my Good Morning scene turns on my kitchen light to 100% brightness, turns on my TV room ceiling light, and turns on my TV room floor lamp to 100% brightness. (Unfortunately, my kid runs to the TV room first thing in the morning, so that’s where we need the most lighting to get him ready for school.)
You’ll notice that while Good Night turns off my office lamp, Good Morning doesn’t turn it on. That’s because my office is well lit by the sun in the morning (sometimes a bit too well lit) so I don’t need the lamp until much later in the day, if at all. So I don’t always need to turn it on, but I always need to make sure it’s off when I go to bed.
Revisit Arrive Home and Leave Home
I’m a big believer in simplicity, so I actually don’t tend to use Apple’s suggested Arrive Home and Leave Home scenes—typically, whatever we’d want to happen when we leave home is the same as when we go to bed.
But that may not be the case for you:
If you have a HomeKit thermostat, you may want to turn your heating or air conditioning off when you’re away from home—something you may not want to do when you’re going to sleep!
For security purposes, you may want to actually turn on a few lights when you leave home.
If you have a HomeKit lock, you may want to set it to lock when you leave home without actually turning off any lights.
If you have a HomeKit lock or, if you’re really fancy, a HomeKit garage door, you may want to set up your Arrive Home scene to unlock your door or open your garage door when you get home. I’ll discuss that more in Set Your Home on Autopilot.
Quickly Adjust Light Brightness
If you find yourself adjusting individual lights frequently, you may want to set up scenes to quickly adjust several of them at once. At my previous house, I had scenes like Living Room Bright, Living Room Dim, and Living Room Dark (Siri didn’t like names like Bright Living Room—go figure) that quickly set those light settings.
In my current TV room, I could set up a scene like Watch TV, which would set the Hue-enabled lamp to 50% and turn off the overhead light. I could even have the scene dim or turn off my kitchen light (since my kitchen and TV room are adjacent).
Or you might want something even simpler: once you gather a sufficient number of automated lights, you may want to set up one scene that turns them all on at max brightness and another that turns them all off. (Yes, you could just set up one to turn them all on at max brightness and toggle it to turn the lights off, but you might want a scene that turns them all off immediately.)
Get Ready for a Movie
One step beyond merely adjusting light brightness, if you’re a home theater buff, you may want to set up a scene called, say, Movie Mode that dims the lights even further and adjusts color.
If your lights tend to reflect off your TV, and there’s no way to move them to a better position, here’s a little trick: if you replace their bulbs with color smart bulbs, blue light tends to be less bothersome when reflected than most colors. I had this problem at my old house, so my Movie Mode scene made the living room lights a very dim blue.
If you’re a super home theater buff, you might even consider different movie modes for different sorts of movies. A warmer, orange light works well for light-hearted movies, green adds a bit of spookiness, and red adds tension.
Have Fun with Scenes
One of my favorite things about home automation, especially with color smart bulbs like those from Philips, is making up silly scenes to show off to guests. Bonus points if they have fun names to say out loud to Siri. Here are a few ideas:
Margaritaville: Set your living area lights to green.
Red Alert: Set your lights to bright red.
Romantic Evening: Make your living area and bedroom lights a dim amber.
Sexy Party: Set your living area lights to some gaudy color like purple and make them sort of dim.
These are just a few examples of the thought process and experimentation required to create quality scenes. When configuring the Good Morning and Good Night scenes, the settings depend on your accessories and living situation. Think carefully about what to activate and why. The tech side of it is easy; thinking through you and your family’s habits and needs is much tougher.