Set Up Accessories
You understand the basic gestalt of HomeKit, and you’ve chosen some accessories to start with. Now it’s time to install them and set them up.
The instructions that come with many devices tell you to download that company’s app for setup, but you may not need to—you can set up most HomeKit devices right in the Home app. In cases where the company’s own app provides more features, you can still use it later—devices you set up using Home are automatically configured in the other app.
Identify the HomeKit Code
The first step in setting up a HomeKit accessory is identifying the HomeKit code on the accessory itself. The HomeKit code is used to authenticate the accessory with HomeKit. There are two formats for the HomeKit code label: the older format with just an 8-digit code, and the new format, which is much smaller and features the QR code alongside the 8-digit code (Figure 4).

Treat the HomeKit code like a password—a password you can’t change or reset! Don’t share the HomeKit code, and be sure to copy it down in a secure location. I’ve created a secure note in 1Password to store my HomeKit codes. When you write down the code, be sure to clearly label which accessory is associated with that code. If you have multiple units of the same device, you may even want to write down the serial number associated with each HomeKit code. Your accessory may also come with a card featuring the HomeKit code—if so, store those in a secure place.
When you set up an accessory, you can either scan the numeric code with your iOS device’s camera, scan the QR code with the camera, enter the code manually, or on some newer devices, use near-field communication (NFC) to wirelessly authenticate the device—look for the NFC ![]() icon on the accessory if you have an iPhone 7 or later.
icon on the accessory if you have an iPhone 7 or later.
Activate Accessories
Now that you’re caught up on the code, it’s time to set up your first HomeKit accessory. For this part, you’ll need:
The accessory itself
The HomeKit code for the accessory
Your primary iOS device: iPhone, iPad, or iPod touch
A power source for the accessory
The precise setup instructions depend on your device—for instance, you have to first set up the Philips Hue system with its own app before setting it up with HomeKit—so check your manufacturer’s documentation (see Set Up Hue Lights). But most HomeKit accessories can be configured directly from Home. Here’s how (using an Eve Energy as an example):
Launch the Home app on the iOS device. If you’ve never launched it before, you’ll be prompted to tap Add Accessory. Otherwise, tap the plus
 button from the Home or Rooms screens and choose Add Accessory.
You’re prompted to scan the HomeKit code with the device’s camera (Figure 5), or, if your device supports it, hold it near the accessory if it has an NFC label. If either doesn’t work for some reason, tap “Don’t Have a Code or Can’t Scan?” to enter the code manually.

Figure 5: When Home identifies a HomeKit code, you’ll see the number highlighted in white, surrounded by a white box. The scan usually only takes a second or so. Make sure the accessory is connected to power or, if it uses batteries, that the batteries are installed.
You’ll be prompted to select an accessory to add to Home. It may take a moment before it appears, so you want to keep your iOS device near the accessory. When the accessory appears on the screen, tap it.
If all goes well, you’ll receive a confirmation message and be directed to a settings screen for the accessory.
Set Up Hue Lights
Philips Hue lights are super popular, and a great way to get started with home automation, but require a bit more setup than most HomeKit accessories. Hue has its own developer framework that competes with, but also corporates with, HomeKit. The upside of this is that there are many cool apps that can do stuff with your Hue bulbs that HomeKit can’t, like Light DJ. The downside is that you have to perform initial setup of Hue bulbs in their own app and then sync that configuration over to HomeKit:
Start things off by choosing where to place your Hue bulbs and screwing them in—it’s literally as easy as screwing in a light bulb.
Here are some tips on how to place them:
Use them in lights that you get tired of standing up to adjust or dim. Your living room is a terrific place to start.
Consider white vs. color bulbs. White Hue bulbs are cheaper and work well in less-fun rooms like offices and bathrooms. But color bulbs can be useful (and fun!) in living rooms and bedrooms.
- For best results, don’t mix white and color bulbs in the same room. Pick one or the other.
Hook up the Hue hub. It requires a wall outlet and an Ethernet connection to your home network—for the latter, most people will just plug it in an Ethernet port on their Wi-Fi router. You don’t need to fool with the hub often, but it should be in a position where you can reach the top button easily—you’ll need to press it to pair it to apps.
After connecting the hub, wait for the three blue lights on top of the hub to light up. If all three are not lit, the Hue app will not be able to connect to it (Figure 6). If there’s a problem, I’ve found that it’s usually related to the internet connection—make sure the Ethernet cable is plugged in firmly to both the hub and your router’s Ethernet port, and that your router is giving the hub a proper IP address.

Figure 6: Your Hue hub isn’t operational unless all three blue lights are on. Also note the big button on top of the hub (my thumb is resting on it)—it’s not just there for decoration! Download and launch the Philips Hue app for iOS.
Follow the on-screen prompts.
I won’t cover every single step of the app setup, because it could change at any time. However, I can offer some tips that have remained true through several versions of the app:
You have to press the big button on top of the Hue hub for the app to find it. You should be prompted to do this, but if you’re not, you’ll know to press it.
When you are prompted to pair the Hue bridge with HomeKit and Siri, do it! Also, agree to the prompt giving the Hue app access to HomeKit. You can adjust that later in the Hue app in Settings > Lights.
When you’re prompted to name your lights, you can tap the default name to flash the light so you know which one is which. The names you give to the lights carry over to Home.
When you find your lights in the Home app, there likely won’t be a room assigned to them. To assign one in the Home app, press the light’s button and then tap Settings.
You may be prompted to add scenes from the Hue app to HomeKit. Decline this for now. You can add them back after you read Set Scenes.
Add a Hue Light Later
If and when you purchase more Hue lights, you need to also set those up in the Hue app before you try to use them in Home. Here’s how:
In the Hue app, go to the Settings screen.
Tap Light Setup.
Tap Add Light.
On the resulting Add Lights screen, tap Search (Figure 8).

Figure 8: You have to add new Hue bulbs from the Hue app, but it’s a straightforward process. If everything works correctly, the new light appears on the Light Setup screen.
To finish setting up the Hue bulb for HomeKit, go to the Rooms screen of the Home app, tap the menu ![]() button, and choose Default Room. You new bulb should be listed there; long-press it and then tap Settings to view its configuration screen and assign it to the correct room.
button, and choose Default Room. You new bulb should be listed there; long-press it and then tap Settings to view its configuration screen and assign it to the correct room.
Tweak Accessories
Once you’ve successfully set up an accessory, you’ll be prompted to alter its settings. You can access most of these at any time by pressing an accessory’s button in Home and tapping Settings on the resulting control screen in iOS. In Mojave, you canControl-click an accessory and choose Settings:
Identify Accessory: Available only on the configuration screen immediately following initial setup, tapping this button activates your accessory so you can spot it in the real world, often with some sort of blink or flash. This is handy if you’re not quite sure which device in your house you’re working with. That might seem ridiculous, but just wait until you’re setting up multiple smart bulbs with names like SMARTBULBFN2187.
Accessory Name: By default, this is the factory name of the device, like “Eve Energy 810D.” I recommend changing it to something more descriptive, like Lamp if you just have one, or Corner Lamp if you need to distinguish them in a room (as I explain in Establish and Configure Rooms, the room name is visible alongside the accessory name in the Home app, so you don’t need to include the room name here). Simply tap on the name to edit it. Since you’ll also use this name to control the accessory with spoken Siri commands, make sure the name is something you can remember and pronounce. And since the name needs to fit into a small onscreen button, keep it on the short side!
Battery level: On battery-powered devices, like the Eve Room, this field displays the device’s battery level and if the battery is charging.
Room: From here, you should choose the room in which your accessory will live. The default is—get this—Default Room, which is sort of a waiting room for your accessories. If you haven’t yet set up a room, you can do so from the menu—just give it a name and choose a picture (the default is fine). More on this in Establish and Configure Rooms.
Type: This field describes the type of accessory (it won’t show up for every type of accessory). It’s important to set this for switches and outlets so Siri understands what’s connected to the accessory. But sometimes you’ll find that a different setting works better. For example, if I have an overhead light in my office connected to an Eve Light Switch that’s set to the Switch type, Siri acts confused when I ask it to turn the office lights off. But if I set the switch type to Light, Siri understands that the switch controls a light, so “Siri, turn off the office light” works as expected.
Include in Favorites: Enabling this switch makes the accessory appear in the Home screen of the Home app, as well as in Control Center. Unless you have a lot of HomeKit accessories (one TidBITS reader told me he has 75!), I recommend leaving this switch turned on. Otherwise, use it only for your most commonly used accessories—Control Center can only show 9 accessories and 9 scenes.
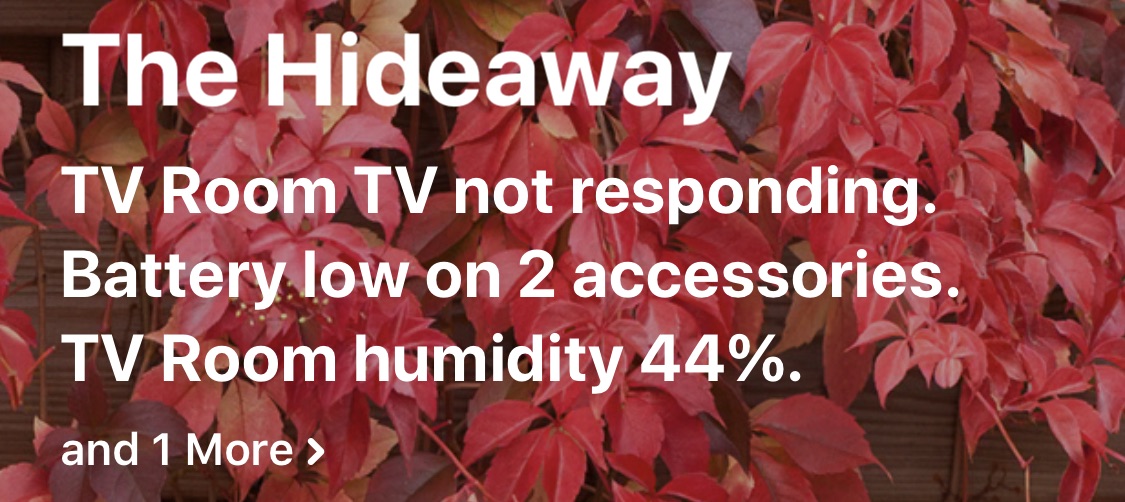
Status and Notifications: For most accessories, there is just a switch here to Include in Status. I recommend keeping that on, since it will warn you (on the Home screen within the Home app) about problems with your accessories and provide sensor information (Figure 9).
But some accessories can send your devices a notification if they detect something, like the Eve Motion (Figure 10). Eve tells me that whether a given device or class of devices can support notifications is up to Apple and under the control of the device manufacturer.

If your accessory supports notifications, here is a list of the options you’ll see in Status and Notifications:
Allow Notifications: A simple on or off switch. The following two options don’t appear unless it’s turned on. By default, when this is turned on, you’re notified every time the sensor is triggered. That’s likely not just annoying, but counterproductive, so thankfully Apple offers a couple of options to dial in exactly when you’re notified.
Time: This tells HomeKit to notify you only if the sensor is triggered during certain times of day: Any time, during the day, at night, or between times you specify (Figure 11).
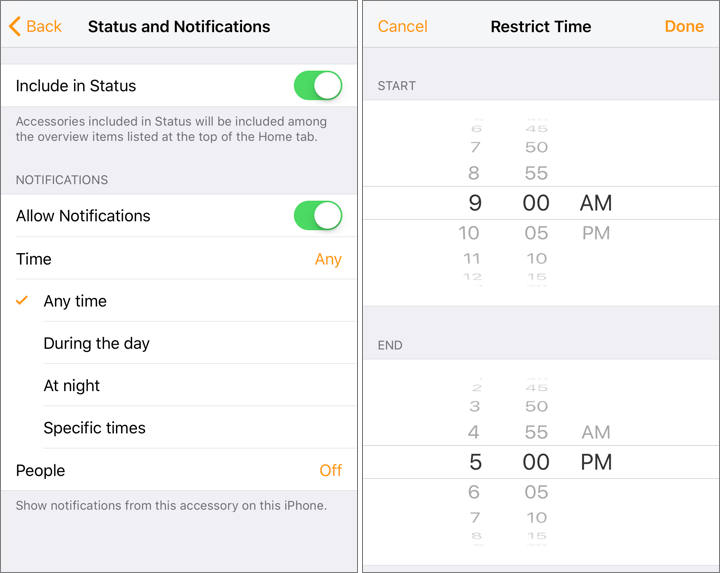
Figure 11: You can set a HomeKit sensor to notify you only between set times. People: This setting makes it so you’re notified only when the sensor is triggered if somebody is home, when you are home, when nobody is home, or when you are not home.
The People setting needs a little explaining. HomeKit can detect when you’re at home or away from home (a feature commonly called geofencing). This is mostly used to trigger automations, as I’ll explain later in Set Your Home on Autopilot. But as of iOS 11, HomeKit can base actions around not just your location, but on the locations of everyone you have shared HomeKit access with, which I explain how to do in Set Up Homes. So this way, if you’re not home but your spouse whom you share HomeKit access with is, you’re not getting pinged every five seconds because they set off the motion detector, and they don’t have to sit in a dark room because your “smart” home turns off the lights when you—specifically you—leave. (You can still set those location triggers to be specific to you, if you prefer, thus the When I Am Home and When I Am Not Home options.)
For example, my wife and I are both set up to use HomeKit on our iPhones, so I have my Eve Motion set to notify me only if it detects motion when nobody is home, because there shouldn’t be anyone or anything moving around the house.
If I had a HomeKit-enabled smoke detector, I’d probably have much more liberal settings that would allow notifications at any time, because that’s something that isn’t accidentally triggered nearly as often as a motion sensor, and when it’s triggered, there’s usually a good reason for it! (Hey, if someone just burnt some toast while I’m not home, I want to know about it!)
Group with Other Accessories: You can group multiple accessories together so they act as one. I usually use this for smart bulbs, like when two or three are in a single light fixture. Here’s how to group accessories:
Tap Group with Other Accessories.
Enter a name for the group. Just like with accessory names, keep it brief and pronounceable.
Check the accessories you want to group. The one you started with is pre-checked (Figure 12).

Figure 12: My kitchen’s light fixture contains two Hue bulbs, so I’ve grouped them together so I don’t have to manipulate them individually. Tap Done.
The grouped accessories now appear as a single accessory with the group name you gave it. You can later tap Ungroup Accessories in the Settings screen to split the group up.
To access an individual accessory in a group, from the Settings screen tap Accessories to see them listed individually. From there, you can manipulate them as I describe in Use Accessories.
Manufacturer, etc.: This section provides manufacturer data like serial numbers and links to the manufacturer app in the App Store, if there is one.
Troubleshooting Accessory Additions
In theory, you breezed through those steps and are now ready to tweak and use your accessory. But the reality is that things sometimes go wrong. Here are some troubleshooting steps to resolve common problems:
Accessory doesn’t appear: In my experience, this is the most common problem. Here are some things to do when it just won’t show up:
Tap Cancel in the upper-left corner and restart the process.
If the accessory is Bluetooth, make sure your iOS device is within a few feet of it.
Turn the accessory off and back on again. Unplug it or remove the batteries if you must.
Reset the accessory. Check your accessory’s documentation for complete instructions, but you usually reset an accessory by pressing and holding a physical button on it. Sometimes, the button may be recessed, in which case you’ll need a paperclip to reach it.
Accessory appears, but doesn’t work: Try removing the accessory from your Home, which you can find at the bottom of the accessory’s Settings screen, resetting the accessory (as in step 4 above) and adding it again.
“This accessory isn’t compatible with your Wi-Fi router”: Usually you’ll see this when you’re trying to connect a Wi-Fi enabled accessory to a 5 GHz Wi-Fi network when the accessory supports only the 2.4 GHz range.
The solution is usually pretty easy: go to Settings > Wi-Fi on your iOS device, connect to a 2.4 GHz network, and then try setting up the accessory again. You might even see your HomeKit device listed under Set Up New Device in Settings > Wi-Fi, and you can at least connect it to Wi-Fi from there, but you’ll still have to finish setup in Home.
Accessory not supported: It’s possible that you successfully add an accessory only for the accessory button to say Not Supported. In that case, you likely need a firmware update, which I explain how to do in Update Accessory Firmware.