
Consider Physical Parameters
Cameras and camera ecosystems that link them together have a huge array of choices. You can buy a no-name brand with a super-cheap price tag—and then worry if its security is up to snuff, and whether flaws will be fixed in software updates. You can spend a fortune and find that ongoing costs aren’t worth what you get out of it.
Pick a Brand Name?
I do not want to be the kind of technology person who tells you to trust brand names. As I am writing this book, the latest of several controversies and security issues is erupting with the Amazon-owned Ring camera system, which should put the lie to big brand names being the solution to worries about products.
But the converse is that what I might uncharitably call “no-name” products have their own set of problems. Because of the simplicity and low cost of creating new electronic products in China and some other Asian nations, the number of options for consumer products has exploded. Many are identical or nearly identical, relying on mass-produced hardware that is lightly customized for a particular buyer. I suspect if I wanted to, I could go to the Alibaba marketplace and create a GlennCam line of hardware to sell to you.
These products from small companies with no history or reputation by which to judge their performance often rarely update firmware for their cameras and apps used to access them after an initial sales period that can be less than a year. Security problems or updates to mobile operating systems render your cameras hobbled or unusable.
But to play devil’s advocate with myself, a number of well-known electronics companies have also been challenged in recent years with not updating firmware on hardware they sold that’s not very old and which has gaping security problems. For example, flaws a few years ago in implementations of Wi-Fi security that required updates in the firmware in Wi-Fi gateways revealed that several well-known firms weren’t that interested in producing updates for recent or even current products very quickly.
With internet-connected devices, it’s critical that security exploits in account management and firmware are dealt with right away. You need to trust the company to run a tight ship on security, to guard your privacy according to the promises they make (see Protect Privacy for more on that), and to release software and firmware updates quickly when exploits are uncovered.
I wish I had a magic formula to tell you which companies to trust, but I can offer this general advice:
Check that the company has a history. If you’ve never heard of the company, can’t find a trace of them on the internet, and they’re not operating offices in a country you live in or outside of China, you should likely not purchase a product from them.
Determine whether the company has a bad history. If they’ve faced similar problems in the past, no matter how large or long established they are, their response to those situations should be a guide.
See how well they provide answers on Amazon.com and other online forums. While reviews may be faked, user questions about problems and a lack of answers (or a hostile answer!) are generally true.
While reviews on product and retail sites are unreliable, it’s still worth looking through them and disregarding those that don’t provide specific information. In particular, try to find mentions on independent sites that specialize in security or electronics.
Tip: For more insight into picking a company you want to buy hardware from, see my article in TidBITS, How To Buy Hardware That’s Likely to Last.
Choose a Network Connection
You might think that Wi-Fi is the best option for video cameras, because it’s the easiest way to connect them to a local network. This is true, especially for battery-powered and outdoor units!
But Wi-Fi can also be a problem. Your existing network may be unable to handle constant streams of bandwidth-hogging video. Let’s look at the tradeoffs between Wi-Fi and Ethernet connections—without forgetting cellular, too!
Wi-Fi Connection
I would guess the Venn diagram of people who want a home security camera system and who have Wi-Fi installed is nearly a perfect single circle. And thus it might seem like your first and best choice would be to connect a camera via Wi-Fi.
However, despite having written about Wi-Fi for nearly 20 years and practically having Wi-Fi as my middle name, it’s not always the best choice.
Wi-Fi is designed to be robust, so if an adapter inside a device and the nearest Wi-Fi gateway to which it can connect are unable to communicate at the highest possible speed, the two devices perform a variety of handshaking until they agree on a lower speed, one that can change dynamically as conditions change, too.
This means that your “3 Gbps” or other marketing-word Wi-Fi network might be communicating with a camera at one edge of your house with various physical obstacles between it and the Wi-Fi gateway at 11 Mbps or 54 Mbps instead of hundreds of megabits per second or faster.
Because cameras are streaming a continuous and often high level of data, a slower connection occupies a larger percentage of the network’s available traffic slots than a faster connection.
That said, Wi-Fi may be your best or only choice in these circumstances:
No Ethernet: If you don’t have an Ethernet network in your home, except a connection on your broadband modem, Ethernet is likely a nonstarter unless you also want to string wires through the walls (or behind furniture).
Ethernet doesn’t reach: It can be expensive and frustrating to add an Ethernet outlet even if home is wired for it. You have to trade off the issue of consistent throughput for the camera versus the cost and effort of installation. Me, I’d add an inexpensive additional Wi-Fi access point, as I note below.
Outdoors: Most of us don’t have external Ethernet jacks on our houses. If we did, we’d also have to deal with weatherizing the jacks. In cold weather, Ethernet cables can crack and fill with water or ice and fail, and you’re supposed to rely on special, more expensive outdoor cables designed to weather heat, water, and ice.
If you’re certain you want to use Wi-Fi or you have no good choice other than wireless networking, you can ensure that your cameras don’t have video sputters or overwhelm the rest of your network:
Check your cameras’ settings. You may be able to reduce throughput requirements by picking a lower resolution or increasing compression (which adds artifacts and reduces quality) to achieve better video consistency.
Upgrade to 802.11ac. This is the fastest affordable flavor of Wi-Fi that’s widely available and supported. Some cameras may only include 802.11n equipment, but it’s fully compatible. (802.11ax is the latest Wi-Fi flavor, but it’s still not in wide use in early 2020.)
Add Wi-Fi access points. You can increase your network’s capacity and by adding units closer to the cameras you want to deploy. Several Wi-Fi gateways with the same network name and security method look like a single entity to Wi-Fi clients, which connect to (ostensibly) the nearest, strongest signal. Even 802.11ac gateways designed to extend networks can offer great throughput and cost as little as $50.
Switch to mesh wireless. This alternative to classic or traditional Wi-Fi lets each base station—called a node—communicate wirelessly with all the others and help provide optimum signal strength. It’s also very easy to add another node if you need better throughput with almost no configuration at all.
Ethernet Connection
Wires are cool. I mean, they’re completely not cool, but they really do fit the bill in delivering high-speed data reliably. While I love Wi-Fi and continue to write extensively about it and have four Wi-Fi base stations in my relatively small home, I connect all those base stations via Ethernet.
Why? Because gigabit (1 Gbps) Ethernet is inexpensive, reliable, and consistent. Ethernet switches for connecting devices and Ethernet cables are very cheap and typically reliable. (When something’s wrong with Ethernet, it’s almost always a bad cable, though!)
Not all cameras support Ethernet; many models are Wi-Fi only, because it’s a popular option and cheaper for the manufacturer. However, some multi-camera systems require Ethernet to feed data to a NVR (network video recorder), which handles compression and storage, because they send high-resolution feeds.
Cellular Is an Option, Too
You’re not limited to Wi-Fi and Ethernet—some camera models offer video capture to cloud storage and remote access over cellular data, too. This has a distinct advantage in a few ways:
No other broadband connection is required.
A criminal or accident severing a network connection doesn’t affect video capture (up until the moment the camera is disabled, if someone tries to take it out!).
Cameras can be put in locations where it would be difficult to reach via Wi-Fi or Ethernet.
Cameras can easily be placed temporarily in a location.
Solar-powered models can run indefinitely.
Such cameras are typically not designed to stream live video to a cloud service, reducing data use. Take the Reolink Go, for instance, which has 3G/4G LTE cell-data support. It’s designed to capture only motion-triggered events to a MicroSD Card and to the associated cloud service. The same is true of the LTE-only NETGEAR Arlo Go (Figure 8).
You really burn up large amounts of data only while watching a live feed: 1 GB per hour for the higher-quality mode and about one-tenth that for the lower-quality mode. Reolink suggests a few carriers, such as T-Mobile, which has pseudo-unlimited plans that only reduce throughput after a certain point (like 50 GB each month) when there’s congestion near the account user’s device.
NETGEAR works with four carriers, and you should be able to add an Arlo Go to an existing plan for as little as $10 a month (plus tax) to share existing pools of data or data allocated to each device.
Mull Mounts and Pick Power
Cameras are manufactured to different tolerances based on whether the model might be placed indoors or outdoors. All the established security camera makers offer one of each variety, combined indoor/outdoor units suitable for both, or variations based on weather severity or outdoor placement.
Coupled closely with location is how a camera will be powered: an electrical outlet is nifty, but battery power is necessary in many cases. But if you’re mounting a camera where it’s hard for someone to spot or disable, how often do you have to climb a ladder or get on the roof to recharge it?
Indoors and Outdoors
Cameras have different manufacturing and operating requirements depending on whether they are intended to be used only indoors or could be used either indoors or outdoors or only outside.
Indoor-only models are typically designed for a more modest range of temperatures and humidity, like most non-mobile electronic devices, such as a TV set or AC-powered speaker. Often, makers assume power is readily available.
Outdoor-capable or outdoor-only models come with a variety of mounting brackets or add-on options, and are resilient to severe temperatures and resistant to water intrusion. They’re almost always battery powered, though some have an AC option.
Let’s look at how models are designed for each purpose—or both.
Indoor Cameras
An indoor-intended camera is likely to be AC-powered or have an option or model that’s AC-powered, and come with a long cord if so. They usually have a simple stand. Mounting options tend to focus on an easy connection to a wall or, sometimes with an optional kit, attaching directly against a windowpane, facing outward (Figure 9).

Some cameras come with a simple stand, so you can place them on top of a cabinet, counter, or entertainment console.
Indoor cameras typically are designed for a narrower range of operating temperatures, which is usually only an issue in extreme climates and unheated spaces, like garages, the inside of outbuildings, and unfinished basements.
Most cameras equipped with Ethernet (either alone or with Wi-Fi) are intended for indoor use.
Outdoor Cameras
Cameras intended to be used outdoors almost all have a common set of typical parameters:
- Weather-resistant. The camera needs to be sealed against moisture, and may even been water-resistant or waterproof. It can also operate in a large temperature range, often well below freezing and up to 140°F (60°C). (The ambient temperature will never be that hot, but the reflected or absorbed temperature can be.)
Battery-powered. Often, an outdoor camera is hard to reach—which is kind of the point to have a better vantage to record and to be theft and damage-resistant. This makes it unlikely you could supply AC power—and you probably don’t want a cord that could be cut or pulled to grab the camera. Consider while determining placement how hard it will be to get to in order to unmount or remove a swappable battery, as you’ll be carrying that task out every few weeks to months forever. A long-lived battery is also therefore highly desirable. A battery may also be paired with a solar panel, removing the need to recharge it at all. (See more detail below under Pick a Power Source.)
Wireless. Per earlier discussions, running Ethernet to an outdoor camera may be tricky unless it’s directly attached to a house or other building.
Several mounting options: Because of the variety of outdoor locations, you often have your choice of mounts for a single model (typically sold for additional, but not outrageous cost), or models that each have a different mounting style (Figure 11). Third parties also offer universal mounts and some tailored to specific major brands.

You also may be inclined to want a tilt, pan, rotate, and zoom camera for outdoor use to provide more flexibility. See Movable Point of View for more details on those options.
Pick a Power Source
Cameras can be powered in two ways: by being plugged into an AC outlet or by an internal, rechargeable battery. But there are three related options to consider:
Solar power for outdoor units to avoid swapping batteries or retrieving a camera to plug it in to recharge its battery
Power over Ethernet (PoE), a way to deliver network and power in a single cable
An uninterruptible power supply (UPS) to ensure an AC-powered unit keeps working if there’s a power outage
AC Power
Outlet power is pretty straightforward: Plug ’er in. It’s done!
However, it’s worth checking specs on cameras, as the power-cord length can vary quite a lot from model to model. You may need a very long cord to reach from the camera’s location to the nearest outlet. An extension cord might suffice, but it can be ungainly and aesthetically displeasing. This is where PoE could come in, too, as noted just below.
Many cameras rely entirely on USB. There is often a jack on the camera, which is commonly a standard squarish USB Type-B slot, such as is found on printers and older hard drives. The camera comes with a cable that has a standard USB Type-A plug on the other end, and a USB adapter with a Type-A jack.
You may be able to plug into an existing USB power source, such as if you have a new outlet type or a power strip with USB jacks meant for charging. You may also be able to supply your own very long USB Type A-to-Type B cable instead of using the included one.
If you need an AC outlet, depending on your home construction (and whether you’re renting), you may be able to have an outlet added affordably near the location you want to place a camera.
Battery Power
A battery-powered camera typically costs a bit more than an AC-powered model, but it has so much more flexibility, it’s typically worth it. Some manufacturers sell only cameras that include a battery, although they may also offer an option for AC power or sell an AC adapter as an add-on.
A battery is generally appropriate only for cameras that record just a few minutes of motion-triggered video per day, mostly in daylight, as infrared illumination takes more energy. Above that or with mostly night-time recording, and you might have to recharge or swap a battery every few days or weeks instead of monthly or less frequently.
You must rely on AC power if you need tens of minutes of video a day or continuously streamed video.
Many makers let you remove the battery part of a camera, either as a battery pack that can be detached or extracted or as individual battery cells. These are almost always lithium-ion based, the same as used in smartphones and electric cars. Some cameras, such as the Amazon Blink camera line below, may require non-rechargeable, long-life lithium-metal battery cells. However, you will never wind up using alkaline and other rechargeables, as they can’t provide power for long enough (Figure 12).

There’s no single way to measure how much life you get out of a single battery charge, because no two camera makers use precisely the same battery and circuitry to hook it up.
Several factors play into how frequently you have to recharge or swap a camera’s batteries. I noted the duration of recording and infrared night-time capture above. Temperature is another issue: a camera operating far above or below about 68°F (20°C) will deplete a battery faster. As a rechargeable battery ages, it also decreases in capacity, requiring more frequent charging. If used in extreme temperatures, its capacity will decrease faster, too.
Manufacturers often provide guidance about the number of hours to weeks you can expect from a fully charged battery, although it’s often very vague and highly footnoted.
One new entry, Blink (owned by Amazon), promises two years’ service using replaceable, non-rechargeable lithium-metal batteries (Figure 13). This comes with a big footnote on a support page: “*A new set of non-rechargeable AA Lithium batteries should last for a total of 40,000 seconds of motion-activated video recordings and/or live video. We define standard, or typical use as approximately 10, 5-second video events per day.” That’s just over 11 hours of video.

Lorex Technology notes for its lithium-ion battery-powered cameras that “you can expect up to four months before having to recharge them.*” That footnote: “*This average is based on around 4 minutes of recording per day. High traffic areas will decrease their longevity since the camera will turn on more often.”
Solar Power
For many outdoor installations, you may not be able to get to a camera easily to charge or swap its battery. Or you might prefer the convenience of never having to do so! A solar panel can dramatically reduce your need to interact with the camera.
Several security camera companies offer an integrated, bundled, or add-on solar panel designed to provide just the right voltage to charge the battery during the day. This trickle charge can let you record far more video per day and night, although you’re still limited to motion-triggered events.
The cost is typically quite low: $25 to $80, depending on the features and thus battery draw of the camera. Reolink has a $25 panel for several of its camera models, Ring has a $30 add-on, and Reolink offers a high-wattage $80 panel for some of its more power-intensive cameras. Third parties also offer solar power options for cameras that don’t have a manufacturer-supplied product (Figure 14).

Solar panels should match or exceed the water-resistance IP rating discussed in Water, Water Everywhere nor Any Drop Intrudes. And some maintenance is required: every few months, or whenever you notice the charge isn’t topping up as fast, you need to wipe down the panel to remove dust and debris that reduce its charging capacity.
Power over Ethernet (PoE)
With Power over Ethernet, a camera draws both its power and its connection to a network hub from a single special type of Ethernet cable. In my survey of home security cameras, it appears that you will find PoE in camera systems that rely on a central hub.
This means that to use PoE, you have to run a cable directly from the hub, which often has a hard drive or can have one to act as an NVR, to each camera. Systems like those from EZViz and LaView, to name two, include one 100-foot (30.5 meter) Ethernet cable per camera, so you don’t have to acquire and pay for that separately. (Most PoE uses work within the power limits of standard modern Ethernet cable varieties, known as Cat 5E or Cat 6, the same kinds required for reliable gigabit Ethernet.)
Some camera makers instead offer a PoE splitter/injector pair. One set of the pair, the injector, has a jack to accept the normal AC/DC adaptor plug that normally connects to the camera and plugs into Ethernet, and then has a PoE Ethernet jack. The splitter has a PoE Ethernet jack on one side, and splits the DC power plug and Ethernet networking output on the other. These adapter sets are almost always product-specific, because every piece of electronics always seems to have slightly different DC power characteristics.
Definitely consider PoE if getting power or networking throughput to each camera is an issue and if you already were interested in centralized local network recording. If you don’t already have Cat 5E or Cat6 capable Ethernet, it means pulling wire—or more likely hiring someone to pull it for you and put in the appropriate jacks—but can be worthwhile compared to alternatives.
Uninterruptible Power Supply (UPS)
If you live in an area with regular power fluctuations or outages, you may already have a home generator that can kick in or that you power up. Your first concern with a power loss might not be your cameras, in any case.
However, some people may have the concern that a burglar would try to cut power to the house in order to disable an alarm system or cameras. Most conventional alarm systems include a multi-hour battery backup to keep working across brief power outages and a power cut. This can also allow an older system to call out over a wired phone line, as the traditional phone system doesn’t require power from a home to operate.
But smart-home alarms and sensors may be a mix of line power only, battery backup, and battery powered. Having a UPS that’s connected to a camera (or multiple small UPSes, scattered around) and your Wi-Fi gateway or Ethernet switch and broadband modem can make it possible to keep video streaming and remotely available even when power is out. You can spend under $100 for a small unit designed to keep those relatively low-power devices in action for minutes to hours.
How Cameras Capture a Scene
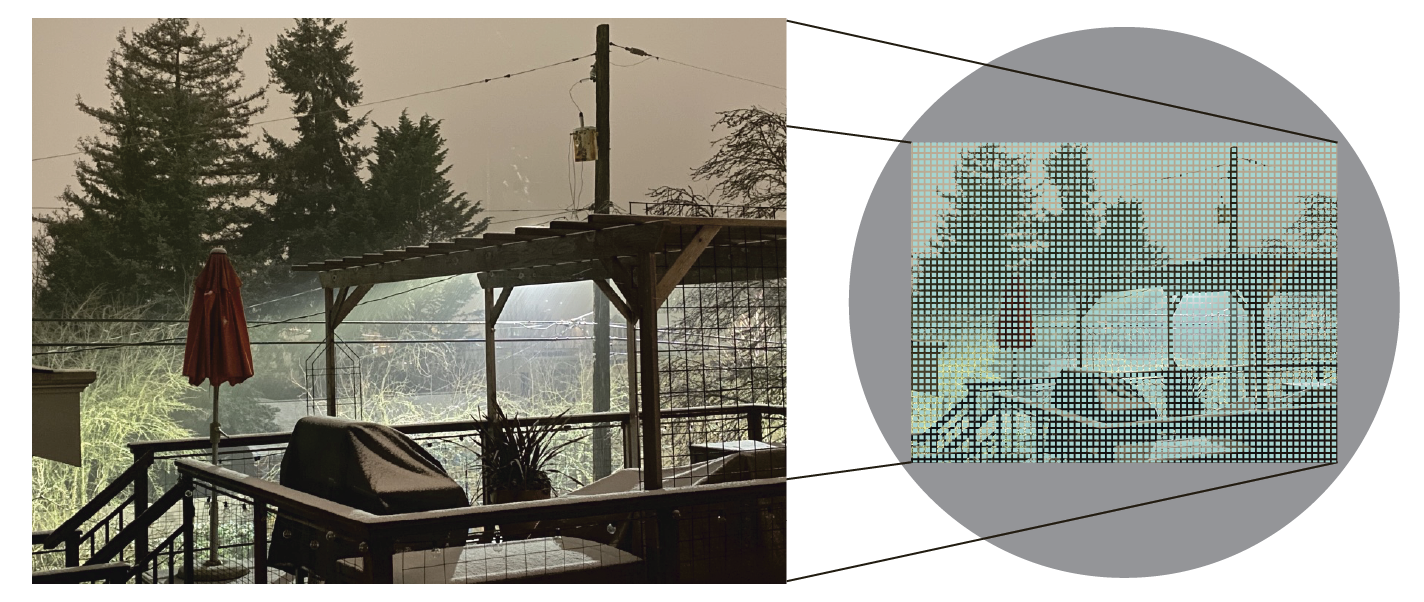
Security cameras are just like any other digital camera: a lens captures light and then focuses it on a sensor. The sensor is divided into light-sensing elements that produce an image in the form of a grid of pixels. So far, so good.
But there are many aspects of cameras and options to consider in figuring out the particulars of what is captured in a scene.
I break this down into two major characteristics: the part of the view that a camera’s lens is pointed at that it captures (and which can be cropped), and the way in which the camera remains fixed on a view or may move to alter what it sees.
A Lens Sets the View
A camera sees the world through its lens, and that lens is really a slice of the direction at which it points—its angle of view (Figure 15).
Angle of View
What’s called the field of view for a camera is more precisely defined as its angle of view, expressed as a single number in degrees (Figure 16). This number almost always represents just the horizontal arc from left to right. There’s also a vertical measure (from top to bottom), which is proportionate to the capture ratio.

Cameras capture effectively a two-dimensional plane, which is flat, but the measurement is in degrees, because it describes how big a hunk of the sphere around a camera that it captures.
A lens is round, so why does it capture a rectangle? Because camera sensors—whether for a DSLR, smartphone, or security camera—are rectangles, too.
For a standard HD-style 16:9 ratio (or crop, see below), for instance, a 180° field of view (edge to edge on a flat fronted camera) would mean about 100° from top to bottom.
The vertical angle is typically less important, because people and other animals walk on the surface of the Earth, and most of what we’re trying to see are the movement of non-flying living things from a street level to the top of a flight of stairs, say. In limited cases, you may want to rotate a camera with an appropriate stand or bracket so the default wider horizontal plane is at a different angle or even 90° rotated to capture a bigger top to bottom view.
However, some cameras can be mounted in a variety of orientations or manually rotated through 360° around a mount to fit your needs. (That’s separate from the tilt/pivot/rotate described in Movable Point of View.)
For a fixed-view camera, I highly recommend a horizontal angle of view of around 130° or more, which is commonly available (Figure 17). Many cheaper cameras must rely on a less-expensive set of optics, and have instead about a 110° angle of view. That captures too small a slice of a room and outdoors, except for some particular installations—like a room’s corner.

The tradeoff? A bigger angle of view means less detail captured when using the same sensor—such as 1080p. You may need to decide to go from 1080p to 2K or 4K to get the detail you need at the angle you’re planning for.
Focus on the Distance
Camera lenses have to focus on a view to provide a clear picture. Many security cameras have a fixed focus with a fixed depth of field (the range of distance from the camera that is in focus). That means that only items from several inches away to tens (or even hundreds) of feet away are sharp.
Focus is a mechanical property, like optical zoom, so cameras that can move about or zoom in and out typically also have a variable focus, which can affect the minimum distance at which objects start to be in focus and restrict the depth of field to a narrower range.
Crop the View
Some cameras may let you choose how to crop or frame the field of view, too. For instance, the Logitech Circle 2 offers wide, ultra-wide, and 180° framing (Figure 18). This can be handy if there are less salient or more salient things you want to observe depending on that cropping. The wider the view, the more distortion, as more of the most bulbous and distorted part of the fish-eye lens gets used.
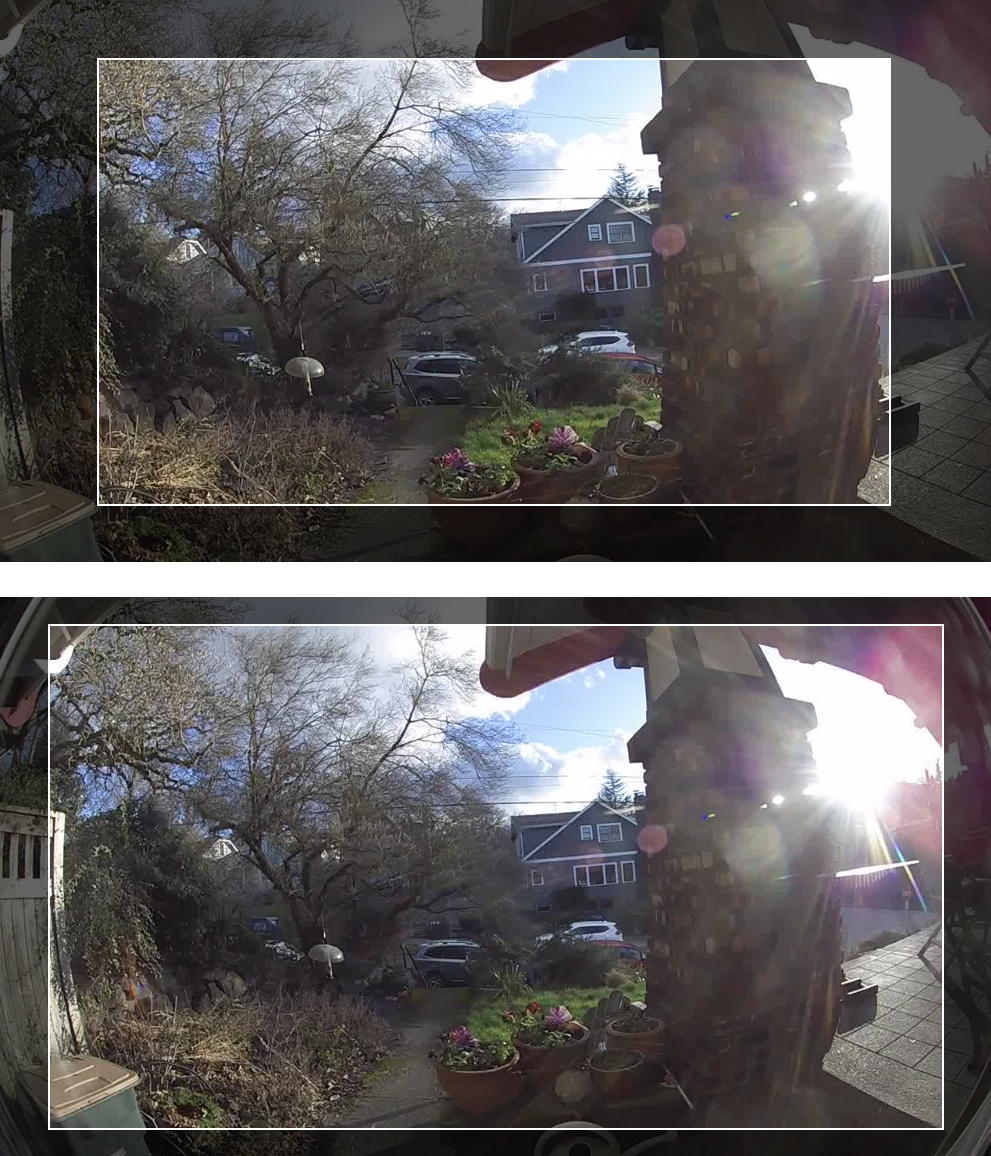
However, the Logitech and all fixed-view cameras lack digital zoom, discussed next in Fixed View.
The cropping doesn’t change how much of the lens’s captured light projects onto the image sensor, and the output resolution remains fixed at 480p, 720p, 1080p, 2K, or 4K, typically.
It’s possible that Logitech and others use sensors with higher pixel counts than are necessary for cropped views. That is, the lens on these cameras is always casting light from the entire lens (180° in the Circle 2’s case) onto the sensor. The sensor, however, might have enough pixels to provide a crisp 720p view even on the wide setting. Logitech and other makers don’t seem to provide this level of drill-down detail.
Fix a Lens or Move It Around
Early webcams and security cams had relatively low resolution, standard lenses, and low frame rates, and made up for it with motors and lenses, so a camera could be moved and zoomed to the right position—sometimes automatically tracking detected motion.
Over time, that changed as the quality of lens and size of image sensor improved dramatically while remaining within the budget of many people. Both fixed and movable options abound for home security cameras.
Fixed View
The majority of cameras aimed at home users have a fixed field of view: their lens has a set focal length, which determines the set of distances at which objects and people remain in focus. That’s usually from a few inches to tens of feet.
You put the camera on an indoor or outdoor mount attached to something or a stand that holds the camera in place. If you want to change the view, you have to move the camera.
Some fixed-view systems offer a digital zoom, which is just an enlargement of a subset of pixels captured in the image sensor. Blowing up pixels doesn’t add information, though it can better fit into video-playback formats or some upsampling algorithms make video appear smoother instead of pixelated, so it’s easier to pick out details in it.
A fixed-view camera is the easiest and most likely option to choose.
Movable Point of View
If you have a particular reason—from recurrent theft to bird watching—you may want a camera that can do typically two to four kinds of movement or change of view:
Pan: Horizontal movement left and right relative to a base, typically rotating around the base
Tilt: Vertical movement relative to the base, seen as up and down
Zoom: The ability to change magnification of the view through a motor that changes the relationship between lens elements, allowing a closer view
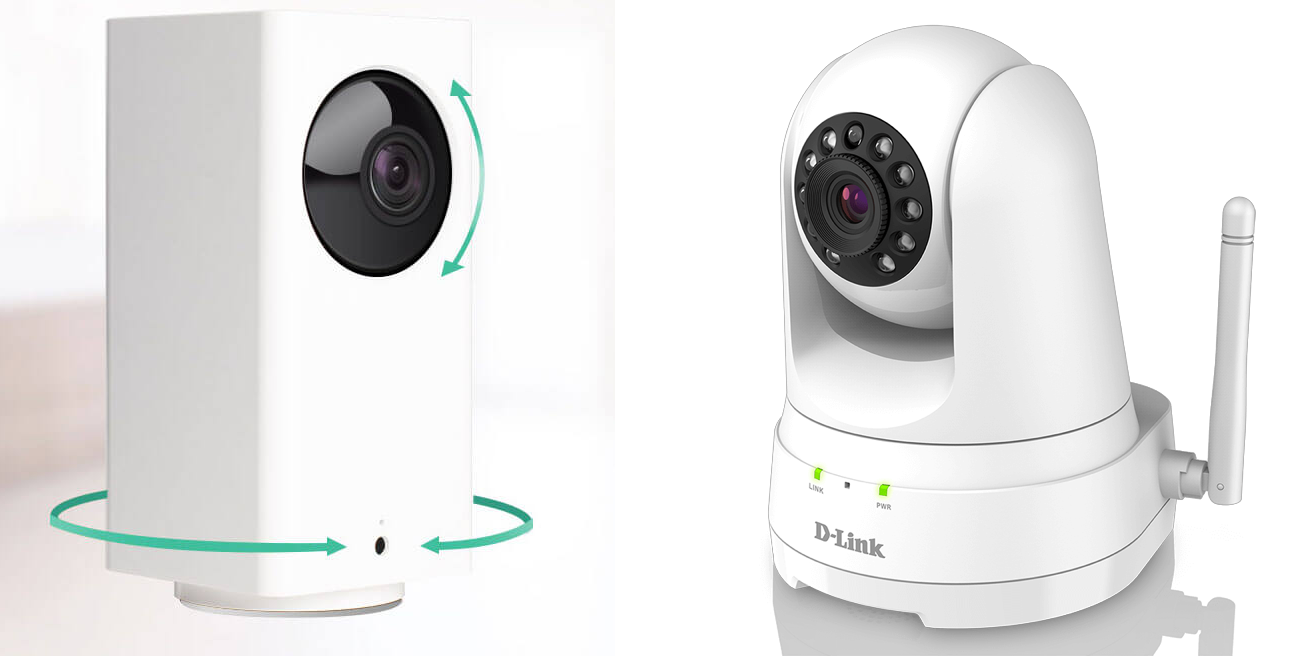
Each of those elements has a measurement associated. Pan and tilt are typically in degrees of motion; some cameras can pan nearly 360°, while others have much smaller axes (Figure 19).
Zoom may be measured as a multiple (like 2x or 10x) or by 35 mm lens equivalent—that’s like saying “the size of an average book” to help make a mental comparison if you’re used to 35 mm (and equivalent) cameras.
Cameras with mechanisms that let them move can always be controlled remotely by an operator with access to the device’s software interface. Some can be programmed to sweep in a pattern or even identify motion and track it.
And you can find models that can create a comprehensive snapshot panorama by methodically panning and tilting, something useful for navigating around a space, or to get a picture of the current state of things after a burglary or disaster.
A camera that can move around is typically of specialty interest. These cameras typically have much smaller fields of view, but may also capture more detail, because they’re projecting that smaller area onto sensors that have as many pixels as large field-of-view cameras.
The digital zoom can help in cases in which you have a real need to see far-away details much more crisply, but this tends to be the case in corporate security monitoring rather than home safety.
Pick Camera-Based Features
Once you have the big parameters figured out, you should also think about which features related to physical video capture you want in one or more cameras in your system. Not every camera needs to have the same features, and some manufacturers offer a large range of models with different options and price points that all work together.
Resolution and Quality
How much detail do you want in the video you capture? It’s a key question. When security cameras intended for the home were first introduced, they offered fairly coarse resolution, in the 320p to 480p range (to use modern terms). The frame rate could be quite low, the sensors were noisy, and infrared night recording was poor.
We are so far away from that that you face the opposite problem: if you want, you can capture 4K video at 30 frames per second (fps) with the crispness of near-television production quality. It’s unsettling.
Super-high resolution requires super-high local network throughput coupled with either terabytes of storage or gigabit internet or both. It’s rarely necessary or useful for home installations. If that’s what you need, it’s possible and affordable.
Many camera offer not just a selection of resolutions at which to record, but also controls over compression. With modern video compression, quite high levels can still allow for a lot of detail. But the more compression you employ, the less detail remains distinct, no matter how high a resolution you choose. It’s always good to experiment if you’re not sure what setting will work best from the location at which you deploy a camera. Because distance, detail, and clarity will all interact, that’s the only way to be sure of the right options.
More likely, you will want to pick 1080p with some degree of compression. This can provide quite a lot of detail, such as resolving faces, license plate numbers, or other elements at a distance as well as up close, but keeps local network transfer, storage, and broadband upload speeds moderate (Figure 20).

The difference in quality can be huge. Nest’s Cam IQ models consume 2 Mbps for “medium-high” quality capture and 4 Mbps for “high” quality.
The flip side of these options for resolution and quality is that if the bandwidth available isn’t high enough to pass through your selected options, the camera will typically dynamically adapt and increase compression or drop to a lower data rate to keep streaming video—just like Netflix does for watching programming.
Frame Rate
Every digital video camera is actually capturing a series of still images at some frequency and packing them in a compressed format for storage and playback. Resolution measures the area of an image, while the frame rate in fps measures how many are captured.
Most of the cameras that list a frame rate say they record at 30 fps—or sometimes, up to 30 fps without elaboration. A few cameras are notably slower, like the NETGEAR Arlo, all models of which seem to tap out at 24 fps, and the Wyze cameras, which operate at up to 15 fps.
The “up to” portion probably has to do with night vision, because the few manufacturers that make it explicit list a separate rate for day and night shooting.
Most cameras need a longer exposure to capture an image at night, not just the illumination of infrared LEDs. That means the frame rate slows down. The Arlo models run 15 fps in night mode, while Wyze drops to 10 fps.
The difference between 24 and 30 fps is not much in daylight, as long as the exposure is roughly the same, because you want crisp quick snapshots that don’t blur faces or other objects in motion.
At night, longer exposures and a lower fps mean blurriness combined with a jerky motion that may not provide enough detail for your purposes.
Some cameras specifically advertise features to improve low-light capture, like high-sensitivity camera sensors and high dynamic range (HDR) capture that combines multiple exposures for each frame.
For daytime use, most cameras have high-enough frame rates to ensure fast-enough exposures. At night, however, you should consider your purpose: Are you’re trying to capture crimes and need crisp faces, or spot whether your own cats and dogs are roaming around or if it’s other pets (or other animals)? Or do you want just a more general sense?
If night-time crisp captures are a must, focus your research on cameras that offer actual (not simulated) night-time footage on their sites and provide detail about how it works.
Night Mode
When our older kid was a baby, we purchased what was likely the last generation of CRT-based baby monitors that used a very noisy proprietary wireless signal. Its key feature? Night vision! Using infrared LEDs, invisible and harmless to the naked eye, we could keep our eyes on our little pumpkin.
Nowadays, the picture quality would be 50 times crisper and we’d be able to stream it not to a tiny weird black-and-white CRT but to our mobile phones. Home security cameras typically come with infrared LEDs as a basic option, although some makers offer it as a feature only in certain models to differentiate among tiers or offer a less-expensive alternative.
The LEDs are limited in how far they can cast light, and different cameras can have hugely varying ranges. Among models made by Reolink alone, the distance can be 33 feet (10 meters), 100 feet (30 meters), or 190 feet (60 meters).
Some companies go into very granular differences—one model offers 15 feet of illumination, another 20, and another 25. But those are all measured in particular conditions, and you’ll always need to test your own views.
The illumination distance can depend on whether the camera is battery-powered (and focused on conserving energy where possible), or optimized for both day and night recording and featuring high-intensity LEDs. Think about a penlight flashlight with one AAA cell battery versus a multi-LED flashlight with several AAs, and the difference in illumination between the two.
Generally, there’s no drawback to night-mode recording unless you’re preserving battery usage. The infrared LEDs kick on typically automatically when the light is too dim for normal capture, but they do pull some additional power on top of the camera’s normal function.
The night mode view is often in sharply contrasting and hard to distinguish black and white, but some newer cameras (like two Arlo models from NETGEAR) claim to offer color night vision, which must rely on highly sensitive camera sensors mixed with infrared inputs.
In some cases, you may want to disable infrared LEDs. In particular, if you use an inside window-mounted camera pointing outward, most models are built such that the infrared LEDs reflect within the window pane, making the image impossible to make out. Such models should offer a configuration option that allows disabling night mode.
Motion Triggers
Most people don’t need a continuously recorded feed stored for days or weeks or indefinitely of everything their cameras see. For particular purposes, like needing to monitor cameras and have footage later for security or law-enforcement purposes, sure.
But that’s not the case for the overwhelming majority of home security camera users, who mostly want to know when and if something happens. (For a little extra security, some systems can store full streaming video for a day or longer before dumping it, but might keep motion events longer or indefinitely.)
Most systems are designed around capturing or marking video only when a camera detects motion. Cameras rely on one of two sorts of detection:
Passive infrared (PIR), which detects changes in heat signatures. It’s a low-power method and generally effective (Figure 21). However, it works only over relatively short distances, from a few to tens of feet (roughly 1–10 meters). No visible light is required, but they don’t work through glass. And motion typically has to be perpendicular to the beam’s direction, which can affect where you mount and accuracy. PIR-equipped cameras may let you adjust the level of sensitivity, which corresponds to the size of object passing through the beam.

Figure 21: Someone has to pass across an infrared beam to trigger recording with PIR. Computer vision (CV), which uses frame analysis and machine learning to detect whether motion has occurred across successive frames (Figure 22). CV-based detection allows a user to define zones in the field of vision to watch or ignore, and with some cameras mark zones to only trigger if a person is detected, not motion in nature, by vehicles, or from animals. CV can also be used for facial recognition to identify particular people enrolled in a system. Some CV happens in a camera; other systems may analyze the video in a hub or in the cloud.

Figure 22: With computer vision, the camera (or, sometimes, the cloud) analyzes successive frames of video to detect motion. It may even identify whether it’s a person and attempt to recognize the face against stored profiles. Some cameras may combine both, as CV works particularly poorly in low illumination where PIR works as well as in daylight. In other cases, PIR is used when a camera is battery powered and CV when it’s plugged in. For a few camera models, CV is only available when a camera is powered and a subscription is active.
The different method of detection can also effect precisely when a recording starts. With PIR, the focus is on preserving battery life. Unless the PIR sensor is tripped, the camera is entirely off. (For cameras with PIR and AC power, you may be able to choose a different setting.)
That means if an event happens “off camera,” but audio, more-distant, or less-infrared-triggering behavior happened before the PIR tripwire, it’s not recorded at all.
With CV, the camera has to be on all time to perform the analysis, and buffers a small amount of video, sometimes as much as 30 seconds. If there’s a trigger, a video (and audio) clip including that preceding part will be streamed to the servers or marked as an event and retained if it’s automatically streaming everything to an NVR, memory card, or internet-based storage.
This PIR/CV “precognition” difference, where the camera appears to start recording before it “knows” something has happened, can be a make-or-break feature for many people—it is for me. I want a recording to include anything that happens before a major trigger’s threshold has passed; otherwise, I may miss the lead-in to an accident, disaster, vandalism, or theft.
Storage capacity, bandwidth, and motion-trigger capture are all interrelated, and I explain capacity issues for each kind of storage in Choose Where Video Lives. You then need to know not just which kind or kinds of storage a system you’re considering offers and you want to use, but how it manages motion-triggered clips versus full video storage. I dig into this in each of the camera system analysis in Camera Models at the end of the book.
Consider Extras Beyond Video
I’ve focused almost entirely on video so far in this book, because it represents the majority of the issues around decisions you make about storage, access, and features. But home security cameras often have additional features, and some have some bonuses on top of those.
Mic and Speaker
Many cameras including audio recording and speaker capability. This lets you record sound alongside video, a natural combination.
Depending on the camera, it might also function as a two-way intercom, which can be awfully handy at your front door with a doorbell camera or if you need to interact with a tradesperson, babysitter, or nanny in your house when you’re not there.
You can even yell at a thief! It’s been known to happen.
Sound picked up from a mic is almost always recorded alongside video and available with any video motion-triggered clips or stored full-length video. Some cameras may let you disable the mic (and speaker).
Doorbell and Chime
A popular category of multi-purpose camera is the doorbell cam. It makes sense: where do you want to see the most what’s happening and where do people mostly try to get your attention legitimately?
These combination devices often have a fish-eye style lens to bulge out from its spot on or near your door to capture the broadest (if distorted) view. The focus is very short, allowing views close up to just several or a dozen feet away, making it not as useful as a general-purpose camera.
These are typically mounted outside, which gives them good visibility, but also makes them susceptible to damage or theft. Some models can be installed through an existing peephole in a door or via hole you drive, like Ring’s Peephole Cam. (That sounds much dirtier than it is.)
Because these double as doorbells, someone approaching the camera will send you an alert, and the device has a button someone can press to send a more direct alert, too. Many models may be paired with an optional or included chime to sound off inside the home.
A doorbell cam also lets you pretend to be home. The person at the door might be able to peer through windows, but they know they’re being recorded when you say, “Hey, what’s up?”, even if they don’t think you’re really nearby.
Alarms, Lights, and Smart Stuff
A few security cameras integrate with or are part of smart-home and alarm systems. That means you can have one interface that lets you incorporate a siren, floodlights, non-camera-based motion detectors, glass-break sensors, smart switches and bulbs, and smoke detection, as well as calling a monitoring service (Figure 23).

This is still an emerging category, which makes me wary about recommending it. Most are also associated with extremely large companies that you might not want to provide additional information to or access to your home, like Amazon (Ring), Google (Nest Secure), and ADT (the home security monitoring company).
For now, I suggest picking the right set of products for the right job, even if it means having two separate systems. This is absolutely required if you’re fine with certain aspects of your home being remotely accessible and monitored while you want all video to be stored locally only. The smart-home/home-security ecosystems all rely on cloud-based storage of video.