Import Your Files into Photos
If you use iCloud Photos, the images you take on your devices automatically sync to all your other devices (see Sync with iCloud Photos), but sometimes you may end up taking photos with a standalone camera, or get handed a memory card or USB device loaded up with images or videos. Photos can handle these classic methods, of course (Figure 4).

You probably want to import your files directly into Photos, though there are some instances where you might prefer to import them into your device’s file system first and then add them to Photos later. If you plan to modify your images in some way before Photos ingests them, or (on a Mac) if you’d prefer to manually manage where your files are stored, use the second approach.
Import via USB
If you’re shooting photos (or capturing video) with a standalone camera, or with an iPhone or iPad that isn’t syncing with iCloud, you get your files into Photos by attaching the device or its memory card to your Mac, iPhone, or iPad.
When you attach a device that your Mac, iPhone, or iPad registers as one containing photos and/or videos, your device appears automatically in the Devices section of the sidebar (Mac) or an Import tab appears on the toolbar (iPhone or iPad).
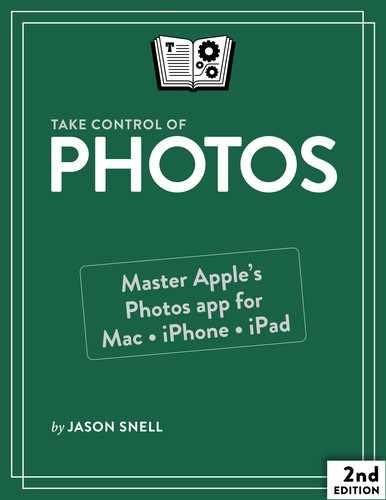
Skip Photos Already in Your Library
When you attach a device, Photos scans its contents and compares them to its current library. If Photos finds the same images in both places, it collects these items at the very top of the Import pane, marked as Already Imported (Figure 5). Below that, it shows photos that aren’t yet in the library, labeled as New Items.
Select Photos to Import
In most cases, you want to click Import All. To import only certain items do the following:
Click or tap to select those items—selections are indicated by a dimmed image with a blue checkmark in its lower-right corner (Figure 6).

Figure 6: Items selected for import (right) are dimmed and sport blue checkmarks. Click Import Number Selected on a Mac (Figure 7) or tap Import on an iPhone or iPad.

Figure 7: Click the button on the left to import only selected images.
If you’d prefer to import your photos directly into a specific album, you can do that. Choose the album in the Import To pop-up menu, click or tap Import Number Selected, and Photos automatically adds the images to that album.
Finding the Right Adapters
Depending on what hardware you’re using, you may find that you need adapters in order to bring in files from USB devices or memory cards:
If you’re using a USB-A device with a USB-C-only Mac laptop, you may need the $19 Apple USB-C to USB Adapter.
Many Apple products lack SD card slots, requiring an SD card reader. If your device has a Lightning port, you need the $29 Lightning to SD Card Camera Reader. If you’re using a Mac or iPad Pro, you need the $39 USB-C to SD Card Reader.
The $39 Lightning to USB 3 Camera Adapter and the $19 USB-C to USB Adapter are a bit more versatile. Yes, you can attach them to a camera via USB, but you can also use them to connect Lightning-based iPhones and iPads to other USB devices, such as microphones and network adapters.
View All Your Image Imports
Photos keeps track of your past photo-importing sessions and lets you review all the photos you imported at a specific time. To view this list, click the Imports entry in the Library section of the Photos sidebar on a Mac (Figure 8), or tap Albums and scroll down to the Imports item beneath the Other Albums header on iPad or iPhone (Figure 9). This is a great way to scroll back through your photo collection, organized by when the particular photos were imported into Photos.


This list doesn’t display photos synced from iCloud Photos, just images that were brought in to your Photos library via import from a device or a file on disk.
Adjust the Time Stamp on a Mac
Sometimes your library contains photos of the same event taken by different devices, and they’re out of sync with one another. This is annoying. You don’t want pictures of the bride walking down the aisle interspersed with the first dance at the reception.
The problem is that while our cellular devices are pretty good at staying in sync via a remote server that they’re constantly checking to set their internal clocks, standalone cameras and other devices aren’t always so punctual. What’s worse, sometimes the users of those devices set the time correctly but don’t change their time zone, leading to discrepancies of hours rather than minutes.
If you do a little detective work on a Mac by comparing photos taken at the same time on different devices and looking at what times are listed in the Info pane (press ⌘-I), you can figure out the time that one device (that SLR camera, probably) has lost or gained. I recently had to adjust some shots from a friend’s camera by five hours and four minutes, because he had both failed to adjust his time zone and his standalone camera’s clock was just a little bit off from the one on my iPhone.
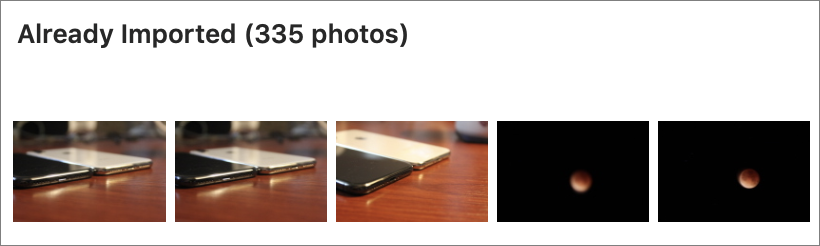
Once you’ve figured the time adjustment, select all the offending files. (The best way to do this is to look in the Imports list by clicking on Imports in the Photos sidebar.) Then, batch-adjust the date and time of all those images by choosing Image > Adjust Date and Time.
Photos shows you the first image you selected, and the time it thinks that photo was taken (Figure 10). Change that time, click Adjust, and the app moves the time of all the photos you selected by the same amount.
Ideally you get the adjustment time right the first time out, but frequently I discover that my first adjustment wasn’t quite right—the bride walking down the aisle is now interspersed with pictures of the officiant giving her speech—and I have to use the Adjust Date and Time command again to get it right. Eventually you’ll zero in on just the right time and everything will make sense again.
Manage Files Yourself on a Mac
By default, Photos imports all your files into your library, essentially outside of your control. If you don’t like the idea of letting Photos control everything for you, you can manage your media the old fashioned way on a Mac—in the Finder.
To do this, choose Photos > Preferences > General, and uncheck the “Copy items to the Photos library” box. If you leave this option turned off, Photos respects your location preferences.
Photos marks images imported by this means with a small icon—of an arrow coming out of a box—in the bottom-left corner (Figure 11).

All edits you make to the photo are stored inside the Photos library, but if you delete the original file in the Finder, Photos won’t let you edit that file again. So all the responsibility for managing your files is up to you.
User-managed files also won’t sync to iCloud. To add any of these files to iCloud, select them in the Photos library and choose File > Consolidate.