Shoot Smart
It’s easy to think that taking control of digital photos begins when you import the images into your computer, but the truth is that the process starts before you capture your first shot. For example, time stamps are the foundation of photo-management software, making it essential that your camera records the correct time. It is possible to fix errant time stamps later, but doing so throws a roadblock into your workflow. (And if enough roadblocks appear, you may decide to turn around and abandon the endeavor altogether.)
The advice in this section isn’t complicated, but it goes a long way toward ensuring the photos you shoot will be cleanly imported.
Check and Set the Clock
How many digital clocks do you set on a regular basis? These days the number is small because our devices—computers, smartphones, iPads, even some televisions—configure the date and time automatically by getting the info from the Internet. When Daylight Saving Time (DST) switches over, I need to change only a few holdovers such as the clock on my oven and an analog clock above the fireplace.
Oh, and my cameras. Although they include options for indicating whether DST is on or off, I mistakenly assume that because they’re also computers (specialized computers, that is) they inherit the correct time when it changes. And every spring and autumn I invariably forget to change one, resulting in imported photos that appear in my library shifted by one hour. That may not seem like a big deal, but if you then also import images from a properly set camera—such as an iPhone—you’ll end up with photos jumbled out of order.
Time and date stamps are the most crucial methods of organizing photos, so it’s important to get that information correct before you start shooting. When you travel to a new time zone, make a point of updating the time-zone setting in your camera so you don’t end up with daytime shots marked as captured in the middle of the night.
It’s even more important to make sure the time is correct if you’re also tracking your location using a GPS device or app, because you’ll need to match the camera’s and the device’s data for accurate reporting.
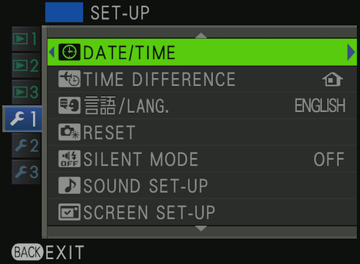
Setting the time varies by camera model, but the basics are the same. Go to the camera’s settings menu, and look for a Setup or Tools category. Choose Set Clock or World Time or similar, and use the camera’s controls to set the correct time (Figure 1). I use my computer or iPhone as the basis for “real” time, since they’re automatically updated via the Internet.
Don’t forget to check the Daylight Saving Time setting! (It’s also known as Summer Time in Europe.) Most cameras offer an On/Off toggle. Having trouble remembering which part of the year is DST? Look outside: if the days are longer—spring and summer—DST is on; otherwise DST is off. (If you live in Arizona in the United States, or Iceland, Belarus, or Russia—or much of the rest of the world—which don’t subscribe to the time-change scheme, just leave the setting off.)
Clear the Memory Card
Another strategy before you start capturing photos is to clear your memory card (making sure you’ve already imported the photos currently stored on it, of course!). With the large capacities of today’s cards, it’s easy to keep adding photos during subsequent photo shoots, but resist that urge. When the time comes to import those shots into your computer, having several events slows down the import process: instead of applying a set of keywords and metadata to all photos in one pass, you end up importing groups of photos in waves, changing the associated information each time.
Also, you don’t want to discover that your card is full while you’re in the middle of shooting and have to manually delete old pictures to make room for the new ones you’re missing.
Choose a Format
All digital cameras save photos in the JPEG (Joint Photographic Experts Group) format, which offers a good balance of image fidelity and compression (so you can store more images on a card). Many cameras, especially intermediate and pro models, also have the option of saving in raw format, which is the unedited data captured by the image sensor. I almost always shoot in raw to ensure I have the most flexibility when editing photos later.
If your camera produces only JPEG images, don’t fret: you’ll still get good photos. JPEG does a great job of translating light to pixels. The advantages of raw appear only when you’re editing the files in software that works with it. Feel free to skip this discussion.
This is a high-level overview of shooting in raw and JPEG formats, specifically as they pertain to managing your photos on the computer.
JPEG
When you snap a photo, the camera’s processor interprets the light hitting the image sensor and immediately edits it to create an image that’s pleasing to the eye. It also compresses the file and writes it to the memory card. JPEG is fast and efficient, and is often favored by photographers who need really fast performance—for example, sports shooters capturing a dozen or more photos per second in burst mode. JPEG is also universally recognized by photo software and operating systems.
Raw
This format is so named because you get the unedited data recorded by the image sensor. Raw—it’s not an acronym, even though it’s often incorrectly capitalized as RAW—is a generic way of referring to the native file type. Each camera manufacturer offers a custom raw format for nearly every camera. The benefit of shooting in raw is that you get a greater range of color and tone, because the camera’s processor isn’t interpreting the photo’s appearance and, crucially, isn’t throwing away image data, as JPEG compression does.
But choosing raw involves some tradeoffs, not only in terms of performance while shooting—raw files are much larger than JPEG files, so each shot occupies more space on the memory card and takes longer for the camera to process and transfer to the card—but also when incorporating the photos into your library. The raw specifications are closely guarded by camera manufacturers, and those companies aren’t always timely about sharing the specs with developers, even heavyweights like Adobe and Apple. That results in situations where a new camera comes to market, but no software (aside from the manufacturer’s own, which tends to be mediocre or sparse) is able to work with the raw photos for several weeks or longer. Fortunately, this lag has gotten shorter in recent years.
Raw files also pack more information than JPEG files, so they take up more disk space on your computer. Normally this shouldn’t be an issue, because the amount of free disk space shouldn’t trump image quality. But if your only option is saving massive raw files generated by, say, a Nikon D810—which each take up approximately 75 MB—to a small capacity SSD, you’re going to get frustrated.
Raw + JPEG
Cameras capable of shooting raw can also shoot in a Raw + JPEG mode, which captures a raw file and creates a JPEG file of the same image. That sounds like overkill—you’re using much more storage by saving two versions of the same image—but some situations benefit from having both formats at the same time:
- Some professional cameras can record to two memory cards simultaneously. That configuration enables the photographer to record the raw version of an image to one card and a JPEG version to the other card. For example, she can then submit the JPEG versions to editors or clients in a tight deadline situation, such as a sporting event where shots need to be published as soon as possible, and follow up later with the raw versions.
- If you’re importing to an iPad or iPhone, a Raw + JPEG workflow may make sense when you want to edit the shots before you get to your computer. Prior to 2016, iOS didn’t recognize raw formats for editing; if you shot and imported only raw images, you actually ended up editing the low-resolution JPEG previews that the camera created. But when you import raw and JPEG pairs, iOS works with the high-resolution JPEG image and treats the raw file as an unalterable original.
- Starting with iOS 10, shooting just in raw format is a possibility, but it still comes with caveats. The system can read raw files, though the ability to edit them natively is still up to third-party developers.
Adobe Lightroom mobile and Google’s Snapseed are examples of apps that can edit raw files. Even in those cases, however, the raw file itself isn’t touched; the apps keep track of which edits were made and send that information with the raw file to a synchronized application to reproduce the same results, such as between Lightroom mobile and Lightroom on the desktop. In the case of Snapseed, edits are saved back to the Photos library (with your permission) so all devices subscribed to the same iCloud Photo Library account view the same edited version. You can always revert to the original raw file. (I go into this topic in more detail in my TidBITS article Lightroom for iOS 2.4 Changes Mobile Photo Workflow.)
- Cameras with built-in wireless communication enable you to transfer images directly to an iOS app, but in most cases that I’m aware of, only JPEG images can be sent. Wireless transfer is wonderfully convenient, so it’s nice to have a high-resolution JPEG to share.
When it’s time to import the raw and JPEG files into your photo-management software, the two files are usually treated as one image. However, some applications give you control over whether you want to split them and import just the raw file, for instance. (I go into more detail in Import Your Photos the Smart Way.)
Geotag Your Photos
Photos capture not only moments in time but places, too. People exclaim “I want to be there” when seeing a fantastic travel photo, but often “there” isn’t listed or it’s something generic, such as “Australia.” Now, you can record and share the exact location a shot was taken using GPS technology. Many photo applications, as well as sites such as Facebook and Flickr, read that information and plot image locations on a map, or use it to filter search results (such as displaying all photos taken in Adelaide).
We’re not yet at the point where every camera includes a GPS sensor, but we’re inching closer. In the meantime, you can also use dedicated GPS tracking devices to record the data, or employ the GPS capability of the iPhone to keep tabs on your location.
Use a Geotag-capable Camera
The iPhone, cellular-capable iPads (which also include GPS hardware), and many other smartphones automatically record location data when a picture is captured. Some photo-viewing applications can then use this location data to place photos on a map.
A few cameras include built-in GPS hardware, while others offer ports to connect manufacturers’ GPS adapters. The advantage of these approaches is that the geotag information is embedded in the image file that you capture, so it travels with the picture from the camera to your computer. You don’t need to do anything else.
Geotag with a Tracking Device
Alternatively, you can record location data separate from the camera using a dedicated GPS device or a GPS app on the iPhone or iPad. To make this work, you start tracking at the beginning of your photo shoot and stop when you’re finished, saving a record of your locations during that time.
When you return to your computer and import your photos, you also import the GPS data (usually a specially-formatted text file with a .kmz extension). Photo software—such as Lightroom or a stand-alone app such as HoudahGeo—analyzes the time stamps on the photos and the GPS data and matches the location information. (I discuss this in more detail in Apply Geotags.) Taking this route makes it even more essential that you update your camera’s clock and synchronize it with the GPS device.
Geotag Manually
If tracking every step sounds like overkill or not worth the time required to merge the data—and you own an iPhone (or cellular-capable iPad)—you can still take advantage of GPS. After you capture some photos using your regular camera, take a quick snapshot using the iPhone. The photo itself doesn’t need to be great, because what you’re really after is the GPS data embedded in it. When you’re managing your photos on the computer, you can copy the location from that picture and apply it to the ones you shot using your main camera.