
Import Your Photos the Smart Way
Moving photos from a camera or memory card to the computer seems like mere transportation: bits captured and stored in one location are copied and saved to a new location. That sounds about as exciting as bringing groceries home from the market.
But what if those groceries could assemble themselves into prepared meals by the time you delivered them to your kitchen? And what if your photos could organize themselves on the way to your disk by detailing what’s in each image, where it was shot, and by whom?
Your computer can do more than just shuttle files from one location to another. By taking advantage of software’s capability to assign metadata during the import stage, much of the drudgery of organizing photos is handled upfront with minimal interaction required by you. And, you may also be able to set up your import such that you Choose Where Files Will End Up.
Apply Metadata at Import
Computers were designed for grunt work, whether that’s decrypting World War II ciphers or batch-applying keywords to hundreds of photo files in one go. Yes, you can always manually add metadata later, but will you, really? Maybe for a few terms here and there (which is inevitable, and useful, as I cover in Assign Keywords and Other Metadata), but probably not for all the images in a shoot.
Spending a tiny amount of time optimizing the import process—especially in applications that support metadata templates—gives you a tremendous advantage when locating photos down the line after you’ve moved on to the next batch of shots.
Specifically, what items are we talking about? In Lightroom (and Photoshop Elements in a limited way), you can apply the following metadata during import:
-
Keywords: Apply any descriptive terms for this set of photos that you are likely to search for later, such as the name of an event or landmarks that appear. For accuracy, include only keywords that apply to all the images being imported.
For example, if I’m importing 100 photos of trains and my friend Mark Smith appears in 30 of them, I would not include the keyword
marksmithduring the import process. It’s better to add the tag to those 30 shots later than to do a search for “mark smith” at some point and turn up 70 images that don’t contain Mark. It’s also easier to add new terms later than to dig out errant ones. - IPTC metadata: If IPTC presets didn’t make it so easy, I’d likely never assign this identifying information to my photos. (IPTC stands for International Press Telecommunications Council, the group that established this model of assigning uniform metadata.) Many of the fields are specific to industries or projects (IPTC Subject Code, Intellectual Genre) but basic fields such as Creator, Contact Email, and Copyright Notice are useful to anyone. If you need to submit the file somewhere, such as a file-sharing site, that information stays with the file (and can be useful for identifying ownership if someone swipes it when they shouldn’t).
- Caption: I use this to include contextual information that applies to every shot I’m importing, such as “California Science Center” or “Family Vacation 2017,” knowing that it will show up when friends and family view the images I upload to social media sites.
- Rating: In Lightroom, you can assign a rating for everything, such as giving each photo one star (I explain the reasoning behind this in Judge Your Photos).
Since some of this information—such as IPTC fields—typically remains the same from shoot to shoot, the best method of applying it is to create presets that fill in the data for you when the images are copied to your computer. You gain the benefit of valuable metadata without having to deal with it manually each time. Remember that this information is just a baseline—you can add specific keywords and other data in the import window before you begin the transfer.
Lightroom
Let’s look at an example of how this works by creating a new preset in Lightroom:
- Choose Metadata > Edit Metadata Presets. A dialog appears with fields for the metadata that Lightroom supports (Figure 16).
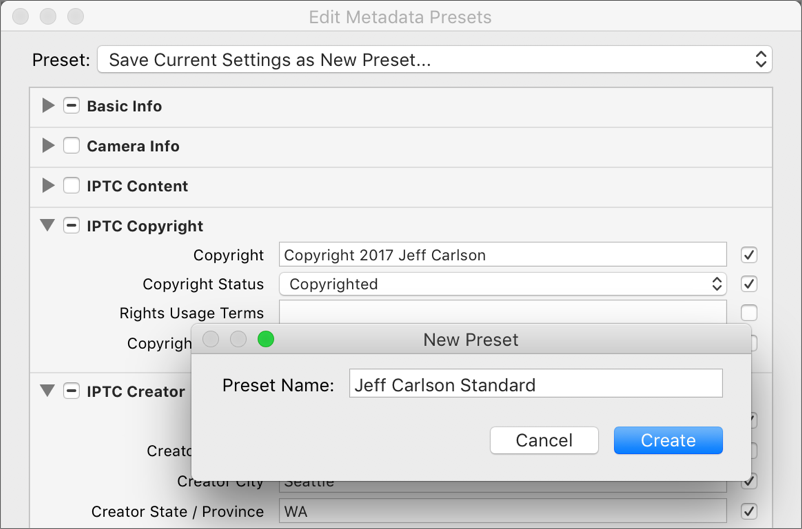
Figure 16: Creating a new metadata preset in Lightroom. - Fill in the fields you wish to be applied to the imported images.
- From the Preset pop-up menu, choose Save Current Settings as New Preset.
- Enter a name for the preset, and click the Create button.
- Click Done to exit the dialog.
In Lightroom’s Import window, expand the Apply During Import panel and choose your new preset in the Metadata field (Figure 17).

Photos for Mac
Photos offers no opportunity to apply any metadata during import. You can import all photos from a camera or memory card or you can select some to import. It pays attention only to the times the photos were captured.
You’re not entirely out of luck, though. After the files transfer to the computer, Photos displays them together in the Last Import album, giving you an opportunity to quickly batch-apply metadata after import. Select all the photos (press Command-A), choose Window > Info (or press Command-I) to reveal the Info window, and enter keywords and location data (if it applies) (Figure 18).

Photoshop Elements
Photoshop Elements has metadata presets, too, but good luck with stumbling upon how to create them. The Import window in the Elements Organizer application (the component of Elements that manages your library) includes only a pop-up menu for choosing presets, not a way to actually create them.
Here’s the skinny:
- Launch the Photoshop Elements Editor application (not the Organizer), and then open any image.
- Choose File > File Info.
- In the dialog that appears, enter the metadata you want to include.
- Click the first pop-up button at the bottom of the window (to the right of Preferences; the name depends on what was last selected), and choose Export.
- Give the preset a name and click Save.
- Click OK to close the dialog and apply the metadata to the open image.
To apply the preset during import in the Organizer, choose File > Get Photos and Video > From Camera or Card Reader. Click the Advanced Dialog button to reveal all the import settings, and then choose the preset that you created from the Template to Use pop-up menu under Apply Metadata.
I know, the process is kind of ridiculous, but once the template is set up it will save you the trouble of applying that information later.
Choose Where Files Will End Up
One of the core ideas behind Photos is that the software handles the organization for you. All imported photos are stored in one location on disk, and that location appears as a single library file. (As discussed earlier, the file is actually a package, a folder that looks like a file.) The idea is that you shouldn’t need to care where the actual image files are, because you’re interacting with the photos within the software.
That approach isn’t a terrible idea. However, it does have a couple of problems. One, photos continue to take up vast quantities of disk space at a time when many hard disk capacities are shrinking. Laptops and even desktop computers are moving to solid-state drives (SSDs), which offer fantastic performance but are still relatively short in the storage department. That means you need to split your library into pieces or relocate it to an external disk.
Two, the fact that you’re reading this book means you’re not a photographic beginner, which means you don’t necessarily need software to hold your hand every step of the way. I’m not suggesting you need to be able to field-strip a laptop blindfolded and build your own OS kernel, but you probably want more control over where the software is putting your files.
For example, Lightroom on my machine saves files in a sensible way, stored in my user folder at ~/Pictures/[Year]/[Year]-[Month]-[Day]/. A photo named IMG1234.JPG captured on July 4, 2016, can be found at ~/Pictures/2016/2016-07-04/IMG1234.JPG. If Adobe were to cancel Lightroom today and make it stop working (if Adobe had some black-helicopter, joy-hating division, I suppose), I could easily traverse my photo library or point another application at it without extricating the files from the package folder.
When possible, take advantage of the ability to specify where imported files will end up. This will give you more flexibility in how you deal with large libraries and archives. For example, on my computer, a MacBook Pro, imported photos are stored on a 1 TB internal hard disk, even though the bulk of my photo library exists on an external drive. If I take my laptop to a coffee shop to work, the most recent imported photos are available for editing. And then, every month or so, depending on how many photos I’ve shot and how much free space is available on the internal disk, I move the older photos to the large external disk. (I do that within Lightroom so the software keeps track of where the files are located.)
Most applications, other than Photos for Mac, give you the option of choosing where files from the camera or memory card will be saved.
Another file-related option is to automatically make a backup copy of each image to a separate location during the import process. This feature is good for creating immediate backups while you’re in the field (to a portable hard disk, for instance) or other specific uses. I don’t use this feature for general backups, however; I prefer to stick with a holistic backup system (see Back Up Your Photos).
Given that this is a book aiming to make photo-management easier, I understand that it sounds like I’m saddling you with a lot of work—you’re no doubt eager to import your photos quickly and start working with them! But applying this metadata at the start of the process, especially by setting up templates to automatically fill in the basics, reaps benefits later.