
In this section, I talk about three powerful iWeb features—shapes, layers, and masks. I touched on the topic of layers with respect to text objects in Work with Text, but there’s more to the story.
In iWeb, shapes are exactly what the name implies, pre-drawn shapes that you use to add excitement to your Web site. These include lines, arrows, circles, stars, rectangles, polygons, and even a comic speech balloon. Shapes can behave in three different ways on your page:
Inline: If you insert a shape just after clicking in a text block, when a text cursor is flashing, the shape goes in the text as an inline graphic, meaning it behaves just like a regular character.
Wrapped: You can change an inline graphic so that text in its paragraph wraps around it.
Fixed-object: You can drag the object around freely on the page and place it where you like. Text does not wrap around it. (See Fixed-object shapes, ahead.)
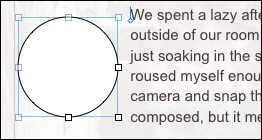
Follow along with me as I add an inline shape: First, I set the insertion point by clicking in the text where I want the shape to go. Next, I choose a circle from the Shapes pop-up menu in the toolbar. A blank white circle surrounded by handles appears (Figure 32).

I don’t like the way the shape looks, since it’s creating too much space above my paragraph. So, I keep the shape selected, open Inspector, click the Text button, and click the Wrap button. I check the “Object causes wrap” box and fill in the other options in the Inspector. My page now looks like Figure 33.
Caveat!
iWeb doesn’t provide full text wrap in the current version. Full text wrap would allow iWeb users to move the shape anywhere in the text and have the text literally wrap around it, following the outline of the shape.
Just having a white circle next to the text doesn’t make sense, but I have a plan: I want to put a picture of a cat in the circle. To do this, I:
Make sure the shape is selected and open the Graphic Inspector.
Choose Image Fill from the Fill pop-up menu.
iWeb opens an Open dialog.
Locate and open the image. I opened a picture of Spats the cat.
Choose Scale to Fill (this may vary depending on the picture you’re placing into the shape).
Spats the cat is now immortalized in his own circular frame on my Web page. To finish the job, in the Graphic Inspector, I removed the line around the shape by setting the stroke to none—stroke refers to the type (solid, dotted, or dashed) and the thickness of the line. I also added a shadow. Figure 34 (next page) shows the final product.

A fixed-object shape is movable anywhere on a page. While the name appears to be an oxymoron, it means that the object stays wherever you move it. To insert a fixed-object shape, make sure you do not have a typing cursor active in a text block and then choose the shape from the Shapes pop-up menu in the toolbar.
When a plain vanilla photo just doesn’t do it for me, I like to call up a shape, do an image fill, and then move the resulting photo anywhere on the page I please. As an example, take a look at Figure 35.

What I did here was create a new star shape, increase the size from the default by dragging one of the handles, perform an image fill (as described on the previous page), rotate using the Command-click mouse action described earlier in Text Rotation, and then add a shadow using the tools described in Styles. How long did it take me to complete this image? About a minute.
While all shapes can be resized by dragging a handle, some shapes have multiple settings:
Stars and polygons: When you create a star shape, a small slider appears under the star, allowing you to change the number of points from as low as 3 to as high as 20. The same slider appears with the polygon shape (3 to 11 sides).
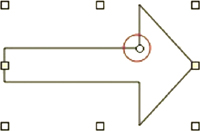
Arrows: You can change the width of the tail and the length of the head by dragging the circular control (inside the red circle in Figure 36). It’s called a circular control because of its shape and to differentiate it from a square handle.
Round rectangles: The circular control also has an effect on the rounded rectangle shape, where dragging the control can straighten or curve the corners.
There’s one more thing you can do with shapes—fill them with text. This is particularly useful for placing text in a confined area so that it can be moved to a specific spot on a page, perhaps to serve as a caption for a photo. Here’s how to do it:
Create a fixed-object shape (see Fixed-object shapes). For my example, I’m using the comic speech balloon.
Drag the shape to the location where you want it. I decided to put the balloon near a picture of me as a kid on my Journal page.
Resize the shape if you want it to be larger or smaller.
Double-click the shape. A text cursor appears inside the shape.
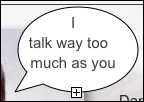
Start typing your text. If you type more text into a shape than can fit, a clipping indicator will appear (Figure 37). To see all your text, either remove some words or enlarge the shape.
You can change the shape’s background, border color, and thickness, and you can also apply formatting to the text in a shape. The final version of my speech balloon is on the example Web site.
I touched on the concept of layers earlier in this ebook (Make Text Sparkle). However, layers can be used for more than just making text look good. Layering graphic and text blocks is a wonderful way to create an interesting looking Web page.
The theory of layers is that you can stack different objects upon each other. By selecting one object and using the Forward and Backward buttons (![]() ) on the toolbar, you can move it in front of or behind other objects. To effectively use layers with graphics and text, you need to think about your page design in three dimensions–the height and width of your page, as well as the depth of the layers.
) on the toolbar, you can move it in front of or behind other objects. To effectively use layers with graphics and text, you need to think about your page design in three dimensions–the height and width of your page, as well as the depth of the layers.
The use of layers to make your Web pages more exciting is limited only by your imagination. To demonstrate the power of layers, follow along as I add a special page to the demonstration Web site.
We’re going create a special effect by using a picture as a backdrop to some text. Placing text directly on a picture can sometimes make the text unreadable, so putting a text-filled shape with a slight amount of opacity over the picture is a better way to create the effect.
We’ll begin by creating a new page and placing a large picture on it. Then we’ll create the effect:
Create a rounded rectangle shape over the darker portion of the photo. The shape is filled with the default white color at this point, blocking the picture.
Type your text. Don’t worry about the color of the text right now. At this point the picture and shape look like Figure 38.
Select the shape by clicking it.
Eight handles appear around the perimeter of the shape.
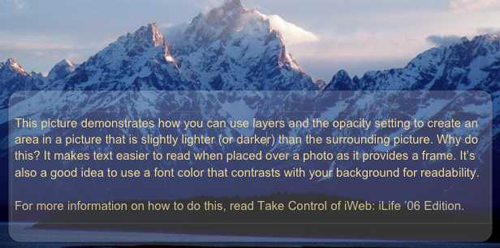
Open the Graphic Inspector and then adjust the opacity of the shape. In my case, 20% worked well to give the appearance of a slightly lighter text frame embedded in the picture.
Changing the opacity of the shape also changed the opacity of the text so it’s almost impossible to read. Select and cut the text, then click the picture and paste the text to create a separate text layer.
Move the text layer on top of the rounded rectangle and resize it so it fits within the boundaries of the shape.
Change the color of the text to readable and pleasant-looking hue. In my example, I grabbed the color of one of the sunlit peaks by using the magnifying glass icon in the Colors window to create a text color that contrasted with the dark blue of the mountains (Figure 39).

In this example, I inserted the lower layer (the photo), created a middle layer (the rounded rectangle shape), and placed a text layer on top. Experiment with moving layers around using the Forward and Backward buttons (![]() ) and you can find some surprising and wonderful effects to use in future Web sites.
) and you can find some surprising and wonderful effects to use in future Web sites.
A mask allows you to change what parts of a fixed or inline object are visible. A photographer would call this “cropping,” but there is a slight difference—cropping changes the original image by removing parts of it, while a mask retains the original image but hides portions of it behind an opaque cover.
You may have already experienced masks without knowing what was going on. Many of the image placeholders in iWeb templates have masks applied, so when you drag a photo to a placeholder and drop it, certain areas of your original photo aren’t visible.
Masks can be useful in cropping out distracting material in a photo, removing ex-husbands or ex-wives, and framing a photo so that it fits a space on your Web page. To demonstrate the mask tool, I’ve built a new entry for my blog. The text is written, I’ve made my formatting changes, and I’ve inserted a picture. I’d like to crop the picture so that I focus on the two main items in it—a sign and a chair (Figure 40).

Select the image and click the Mask button on the toolbar.
A mask is applied (Figure 41) to the image, and the button changes to Unmask. (If I decide to bring back the original image at some point, I can click the Unmask button.)
To resize the mask, I drag the mask’s handles until the mask covers only the portions of the image I don’t want to see (Figure 42). The darker part of the image is what will be visible to me. As I drag the handles, I make sure that the image is centered by watching the alignment guides.
Since the image is now masked the way I like it, I click anywhere on the Web page to accept the mask. I can resize and even reposition the image with the mask in place. If I want to be fancy, I can rotate the image by pressing Command while dragging a handle.


To see how the final image looks after masking, visit the example Web site and look at the Journal entry for March 29, 2006.