Chapter 13
Automating Your Work
Sometimes, you want to perform the same simple sequence of commands on many different images. With Photoshop’s Actions, you can automate repetitive imaging tasks by saving sequences of commands and applying them automatically to many image files. Other commands enable you to streamline your work by helping you create web photo galleries, picture packages, panoramas, and High Dynamic Range (HDR) images.
Batch Process by Using an Action
Customize Keyboard Shortcuts and Menus
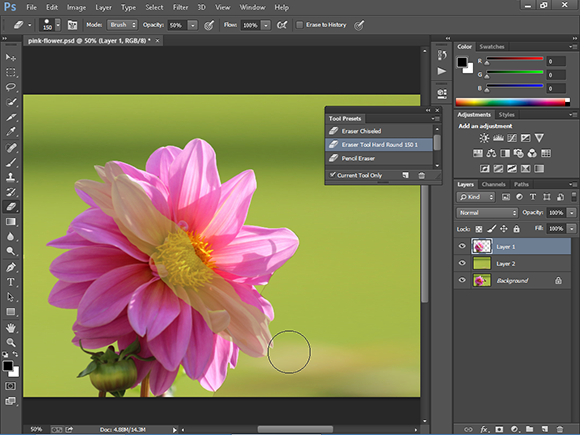
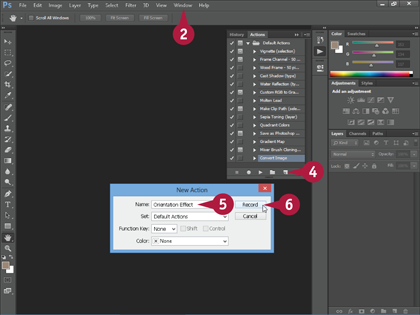
Record an Action
You can record a sequence of commands as an action and then replay it on other image files. This can save you time when you have a task in Photoshop that you need to repeat.
You can create actions that apply filters and styles, paint colors, and save files in specific formats. You can string together multiple commands to create actions that generate complex effects. After you record an action, you can play it. See the next section, Play an Action, for more.
Record an Action
![]() Click Window.
Click Window.
![]() Click Actions.
Click Actions.
The Actions panel opens.
![]() Click a set in which to create your action.
Click a set in which to create your action.
Photoshop starts with a single set called Default Actions.
A You can click the New Set button (![]() ) to create a new actions set.
) to create a new actions set.
![]() Click the Create New Action button (
Click the Create New Action button (![]() ) to open the New Action dialog box.
) to open the New Action dialog box.
![]() Type a name for your action.
Type a name for your action.
![]() Click Record.
Click Record.
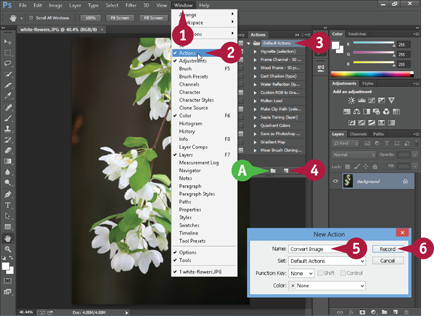
![]() Perform the sequence of commands that you want to automate on your images.
Perform the sequence of commands that you want to automate on your images.
B In this example, the first command, Auto Contrast, is performed by clicking Image and then Auto Contrast.
When automatically optimizing contrast, Photoshop performs a Levels adjustment.
Note: See Chapter 7 for more on adjusting colors and contrast.
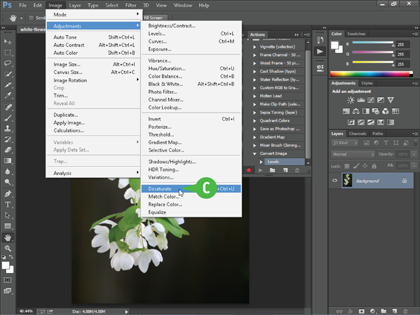
C In this example, the second command is performed by clicking Image, Adjustments, and then Desaturate. This converts the image to black and white.
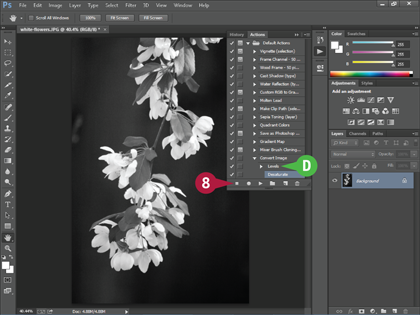
![]() Click the Stop button (
Click the Stop button (![]() ) to stop recording.
) to stop recording.
D The Actions panel lists the commands performed under the name of the action.
TIPs
What if I make a mistake when recording my action?
Record the action again by clicking the panel menu (![]() ) in the Actions panel and then clicking Record Again. This runs through the same actions, and you can apply different settings in the command dialog boxes. Alternatively, select the action, click the trash can icon (
) in the Actions panel and then clicking Record Again. This runs through the same actions, and you can apply different settings in the command dialog boxes. Alternatively, select the action, click the trash can icon (![]() ), and then rerecord it.
), and then rerecord it.
How can I control how fast the steps of an action are performed?
In the Actions panel, click the panel menu (![]() ) and then Playback Options. In the dialog box, insert a pause after each step of an action. This can help you review the changes Photoshop makes to an image as it performs an action. The default behavior in Photoshop is to complete the actions as quickly as possible.
) and then Playback Options. In the dialog box, insert a pause after each step of an action. This can help you review the changes Photoshop makes to an image as it performs an action. The default behavior in Photoshop is to complete the actions as quickly as possible.
Play an Action
You can play an action from the Actions panel on an image. This saves time because you can execute multiple Photoshop commands with a single click. You can also play a specific command that is part of an action by itself. Photoshop comes with a variety of default actions already defined that you can apply to your image projects.
Actions that you record by using one image can be played on other images. See the previous section, Record an Action, for more.
Play an Action
Play a Full Action
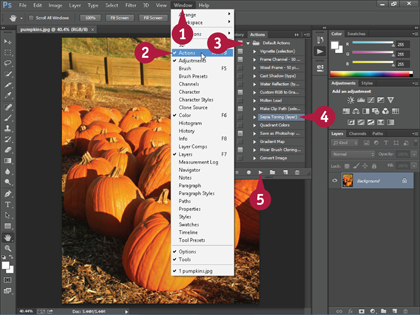
![]() Click Window.
Click Window.
![]() Click Actions.
Click Actions.
The Actions panel opens.
![]() Click
Click ![]() (
(![]() changes to
changes to ![]() ) to open an actions folder.
) to open an actions folder.
Note: To create your own action, see the previous section, Record an Action.
![]() Click the action that you want to play.
Click the action that you want to play.
![]() Click the Play button (
Click the Play button (![]() ).
).
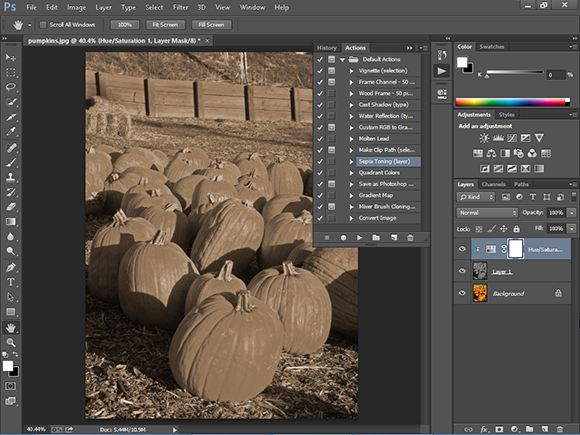
Photoshop applies the action’s commands to the image.
In this example, a sepia tone is applied to the image.
You can undo the multiple commands in an action by using the History panel.
Note: See the section Undo Commands in Chapter 2 for more on the History panel.
Play a Command in an Action
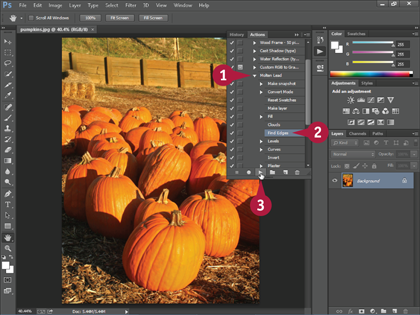
![]() In the Actions panel, click
In the Actions panel, click ![]() to reveal the commands that make up an action (
to reveal the commands that make up an action (![]() changes to
changes to ![]() ).
).
![]() Click the command that you want to execute.
Click the command that you want to execute.
You can ![]() +click to select multiple sequential commands.
+click to select multiple sequential commands.
![]()
![]() +click
+click ![]() (
(![]() +click
+click ![]() on a Mac).
on a Mac).
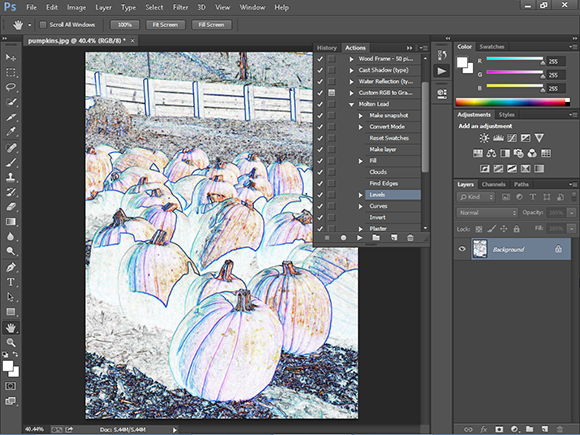
Photoshop executes the selected command but not the commands before or after it.
In this example, the selected command adds the Find Edges filter to the image.
Note: To execute a specific command and all of those after it in an action, select the command and then click the Play button (![]() ) without pressing
) without pressing ![]() (
(![]() on a Mac).
on a Mac).
TIP
How do I assign a special key command to an action?
In the Actions panel, click an action to select it. Click the panel menu (![]() ) to open the panel menu and select Action Options. In the dialog box that appears, select a key from the Function Key menu. Click OK to save the setting. Avoid assigning function keys already associated with a command. To view assigned key commands, click Edit and then Keyboard Shortcuts.
) to open the panel menu and select Action Options. In the dialog box that appears, select a key from the Function Key menu. Click OK to save the setting. Avoid assigning function keys already associated with a command. To view assigned key commands, click Edit and then Keyboard Shortcuts.
Batch Process by Using an Action
You can apply an action to multiple images automatically with Photoshop’s Batch command. The command is a great timesaver for tasks such as optimizing large numbers of digital photos. You can also use the Batch command to apply the same special effect, such as adding a border or drop shadow, to a folder full of images.
To execute an action on a single image, see the previous section, Play an Action.
Batch Process by Using an Action
![]() Place all the images you want to apply an action to in a source folder.
Place all the images you want to apply an action to in a source folder.
![]() Create a destination folder in which to save your batch-processed files.
Create a destination folder in which to save your batch-processed files.
Note: To work with folders, see your operating system’s documentation.
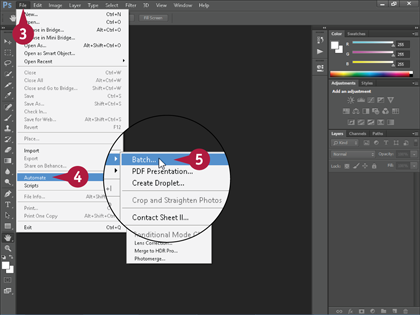
![]() In Photoshop, click File.
In Photoshop, click File.
![]() Click Automate.
Click Automate.
![]() Click Batch.
Click Batch.
The Batch dialog box opens.
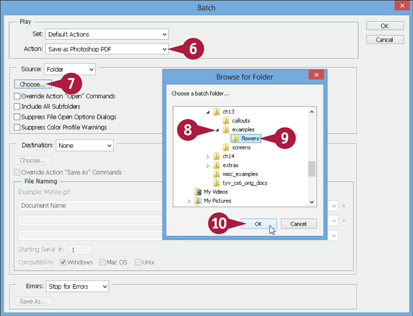
![]() Click here (
Click here (![]() ) to choose an action to apply.
) to choose an action to apply.
![]() Click Choose.
Click Choose.
The Browse for Folder (Choose a Batch Folder on a Mac) dialog box opens.
![]() In Windows, click
In Windows, click ![]() to open folders on your computer (
to open folders on your computer (![]() changes to
changes to ![]() ).
).
On a Mac, navigate to your source folder.
![]() Click the folder containing your images.
Click the folder containing your images.
![]() Click OK (Choose on a Mac).
Click OK (Choose on a Mac).
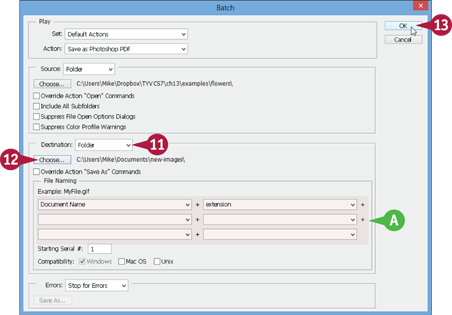
![]() Click here (
Click here (![]() ) to choose Folder.
) to choose Folder.
![]() Click Choose and then repeat steps 8 to 10 to select the folder where you want your batch-processed files to be saved.
Click Choose and then repeat steps 8 to 10 to select the folder where you want your batch-processed files to be saved.
A You can specify a naming scheme for saving the batch-processed files.
![]() Click OK (Choose on a Mac).
Click OK (Choose on a Mac).

B Photoshop opens each image in the specified folder one at a time and applies the action.
If the action includes a save step, Photoshop automatically saves each image in the destination directory.
C If the action does not include a save step, Photoshop prompts you with a Save As dialog box for each image.
Create a Conditional Action
You can create a conditional action that executes other actions based on some criterion in your image. For example, if an image has a landscape orientation, you can apply a particular special effect. If the image does not meet the criterion — for example, it has a portrait orientation — you can apply a different effect or do nothing.
Photoshop comes with a variety of preset conditions to work with. You can check whether the image has a certain size, a color mode, or multiple layers.
Create a Conditional Action
Define the Conditional Action
![]() Create the actions that you want to execute based on your conditions. See the section Record an Action for details about creating a custom action.
Create the actions that you want to execute based on your conditions. See the section Record an Action for details about creating a custom action.
![]() Click Window.
Click Window.
![]() Click Actions.
Click Actions.
The Actions panel opens.
![]() Click the Create New Action button (
Click the Create New Action button (![]() ).
).
The New Action dialog box opens.
![]() Type a name for your action.
Type a name for your action.
![]() Click Record.
Click Record.
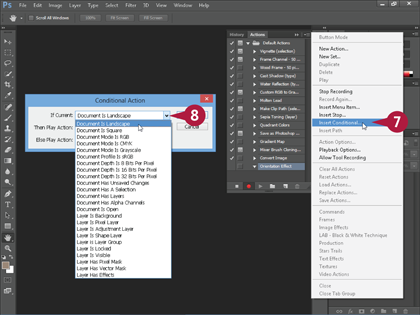
![]() Click
Click ![]() to open the panel menu and click Insert Conditional.
to open the panel menu and click Insert Conditional.
The Conditional Action dialog box appears.
![]() Click here (
Click here (![]() ) to select a condition.
) to select a condition.
![]() Click here (
Click here (![]() ) to select an action to execute if the condition is met.
) to select an action to execute if the condition is met.
![]() Click here (
Click here (![]() ) to select an action to execute if the condition is not met. You can select None to do nothing.
) to select an action to execute if the condition is not met. You can select None to do nothing.
![]() Click OK.
Click OK.
![]() In the Actions panel, click the Stop button (
In the Actions panel, click the Stop button (![]() ) to stop recording the action.
) to stop recording the action.
A The conditional step is added to the action.
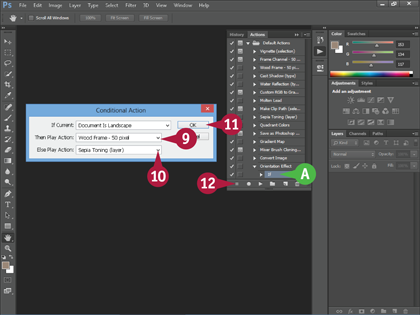
Play a Conditional Action
![]() Open an image.
Open an image.
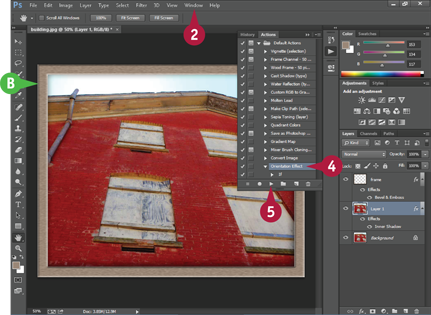
![]() Click Window.
Click Window.
![]() Click Actions.
Click Actions.
The Actions panel opens.
![]() Select the conditional action.
Select the conditional action.
![]() Click the Play button (
Click the Play button (![]() ).
).
Photoshop executes the commands for the action.
B In this example, because the image has a landscape orientation, a frame effect is applied.
Create a PDF of Images
Photoshop can automatically create a PDF (Portable Document Format) file that shows one or more of your photos. You can select from two PDF types, Multi-Page Document and Presentation. The Presentation type displays your photos as a slide show in many PDF viewers.
Most computers come with a program for viewing PDF files. This makes the PDF format convenient for sharing digital content. If you need a program for viewing PDFs, you can download the free Adobe Reader here: http://get.adobe.com/reader.
Create a PDF of Images
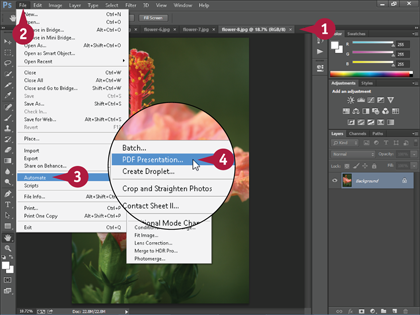
![]() Open the images you want to include in your PDF.
Open the images you want to include in your PDF.
![]() Click File.
Click File.
![]() Click Automate.
Click Automate.
![]() Click PDF Presentation.
Click PDF Presentation.
The PDF Presentation dialog box appears.
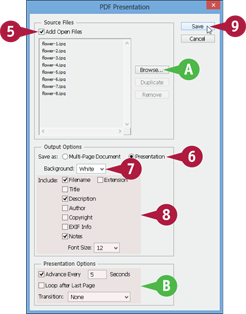
![]() Click Add Open Files (
Click Add Open Files (![]() changes to
changes to ![]() ).
).
A list of the images appears.
A You can click Browse to save images from a folder on your computer.
![]() Click a document type (
Click a document type (![]() changes to
changes to ![]() ).
).
![]() Click here (
Click here (![]() ) to specify a background color for space around your images.
) to specify a background color for space around your images.
![]() Click these options to display text information with the images in your PDF (
Click these options to display text information with the images in your PDF (![]() changes to
changes to ![]() ).
).
B If you save a Presentation document in step 6, you can choose slide show options.
![]() Click Save.
Click Save.
The Save As dialog box appears.
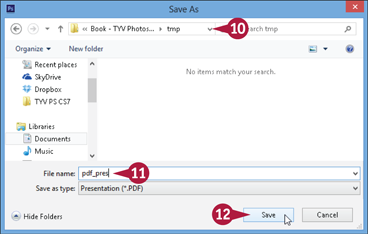
![]() Click here (
Click here (![]() ) to choose a folder in which to save the PDF file.
) to choose a folder in which to save the PDF file.
![]() Type a name for the PDF file.
Type a name for the PDF file.
Photoshop automatically assigns a .pdf extension if you do not specify an extension.
![]() Click Save.
Click Save.
A Save Adobe PDF dialog box appears.
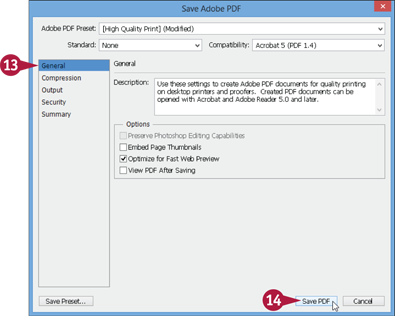
![]() You can select additional PDF-related settings. See the tip for details.
You can select additional PDF-related settings. See the tip for details.
![]() Click Save PDF.
Click Save PDF.
Photoshop saves the PDF.
Create a Panoramic Image
You can use the Photomerge feature in Photoshop to stitch several images together into a single panoramic image. This enables you to capture more scenery than is usually possible in a regular photograph.
Photoshop gives you stitching options to help ensure that your photos are combined appropriately. The final panoramic image can be relatively large. For tips on how to resize your image, see Chapter 3.
Create a Panoramic Image
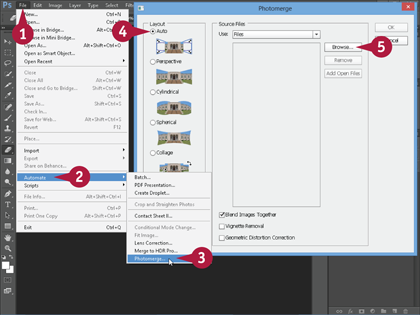
![]() Click File.
Click File.
![]() Click Automate.
Click Automate.
![]() Click Photomerge.
Click Photomerge.
The Photomerge dialog box opens.
![]() Click Auto (
Click Auto (![]() changes to
changes to ![]() ).
).
With the Auto setting, Photoshop automatically chooses the best method for stitching your photos together.
![]() Click Browse.
Click Browse.
The Open dialog box opens.
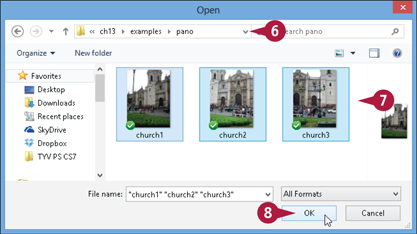
![]() Click here (
Click here (![]() ) to choose the folder that contains the images you want to merge.
) to choose the folder that contains the images you want to merge.
![]()
![]() +click (
+click (![]() +click on a Mac) the images you want to merge into a panoramic image.
+click on a Mac) the images you want to merge into a panoramic image.
![]() Click OK.
Click OK.
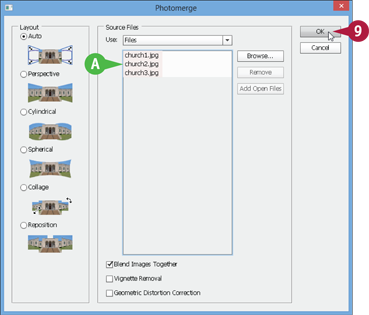
A The filenames of the images appear in the Source Files list.
![]() Click OK to build the panoramic image.
Click OK to build the panoramic image.
Photoshop merges the images into a single panoramic image.
B Parts of each image appear in separate layers in the Layers panel.
Note: For more on layers, see Chapter 8.
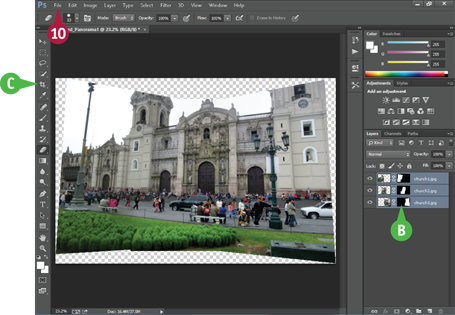
C You can use the Crop tool (![]() ) to remove extra space around the panorama.
) to remove extra space around the panorama.
Note: For more on cropping, see Chapter 3.
You can also fill in the space using the Content-Aware Fill feature. See Chapter 6 for more information.
![]() Click File.
Click File.
![]() Click Save to save the panorama.
Click Save to save the panorama.
Create an HDR Image
An HDR image is a composite image created from several photographs of the same scene, with each photograph having a different exposure. Photoshop combines the best lighting from each image to produce a single optimized image.
HDR images are good for scenes that have both light areas and dark areas. With the HDR feature, you can have details in both areas stand out, instead of having dark areas too shadowy or light areas too bright. HDR stands for High Dynamic Range.
Create an HDR Image
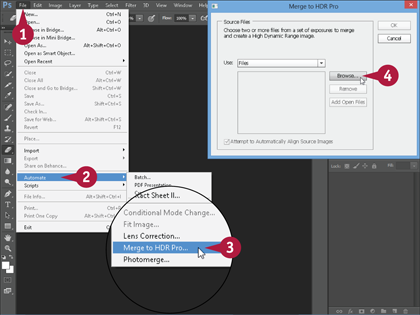
![]() Click File.
Click File.
![]() Click Automate.
Click Automate.
![]() Click Merge to HDR Pro.
Click Merge to HDR Pro.
The Merge to HDR Pro dialog box opens.
![]() Click Browse.
Click Browse.
The Open dialog box opens.
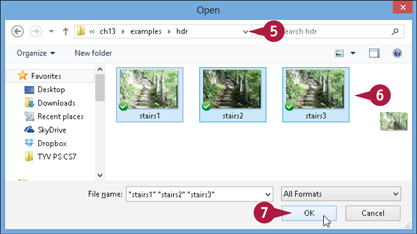
![]() Click here (
Click here (![]() ) to choose the folder that contains the images you want to merge.
) to choose the folder that contains the images you want to merge.
![]()
![]() +click (
+click (![]() +click on a Mac) the images you want to merge into an HDR image.
+click on a Mac) the images you want to merge into an HDR image.
![]() Click OK.
Click OK.
![]() Click OK in the Merge to HDR Pro dialog box.
Click OK in the Merge to HDR Pro dialog box.
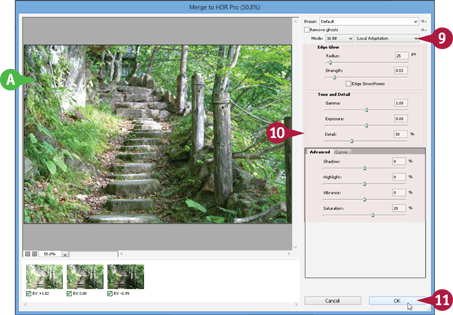
A Photoshop processes the images, merging their exposures and creating a single image.
![]() Click here (
Click here (![]() ) to choose the method by which Photoshop adjusts exposures.
) to choose the method by which Photoshop adjusts exposures.
In this example, Local Adaptation is chosen.
![]() For the Local Adaptation and Exposure and Gamma methods, you can click and drag the sliders (
For the Local Adaptation and Exposure and Gamma methods, you can click and drag the sliders (![]() ) to fine-tune the lighting and colors.
) to fine-tune the lighting and colors.
![]() Click OK.
Click OK.
Photoshop displays the HDR image.
B In this example, tones for the lighter part of the image are taken from the source image with the shorter exposure.
C The tones for the darker part of the image are taken from the source image with the longer exposure.
Convert File Types
You can quickly and easily convert images from one file type to another in Photoshop by using the Image Processor script. This makes it easy to convert a collection of TIFF files to the JPEG format for posting on the web.
The Image Processor script enables you to convert to the JPEG, PSD, and TIFF file formats only. Another option if you want to convert images to a different format, such as PNG, is to create an action that saves a file in that format and then apply the action as a batch. See the section Batch Process by Using an Action for details.
Convert File Types
![]() Place the images that you want to convert into a folder.
Place the images that you want to convert into a folder.
Note: To work with folders, see your operating system’s documentation.
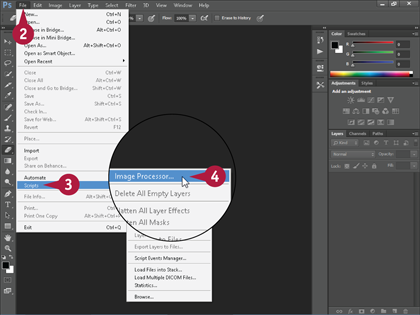
![]() Click File.
Click File.
![]() Click Scripts.
Click Scripts.
![]() Click Image Processor.
Click Image Processor.
The Image Processor dialog box opens.

![]() Click Select Folder.
Click Select Folder.
The Choose Folder (Choose a Folder on a Mac) dialog box opens.
![]() In Windows, click
In Windows, click ![]() to open folders on your computer (
to open folders on your computer (![]() changes to
changes to ![]() ).
).
On a Mac, navigate to your source folder.
![]() Click the folder containing your images.
Click the folder containing your images.
![]() Click OK.
Click OK.

![]() Specify where you want your processed images to be saved (
Specify where you want your processed images to be saved (![]() changes to
changes to ![]() ).
).
![]() Click an image file type (
Click an image file type (![]() changes to
changes to ![]() ).
).
A If you click Save as JPEG, you can also specify a quality setting from 1 to 12; the higher the quality setting, the larger the resulting file size.
You can click multiple format check boxes; Photoshop saves a separate image file for each format selected.
B You can click Resize to Fit (![]() changes to
changes to ![]() ) and type a new width and height; Photoshop resizes the images before saving.
) and type a new width and height; Photoshop resizes the images before saving.
Note: Photoshop leaves the proportions of any resized images unchanged.
C You can click Run Action (![]() changes to
changes to ![]() ) to have an action executed on each image before saving.
) to have an action executed on each image before saving.
![]() Click Run.
Click Run.
D Photoshop processes the images one at a time, saving them in the location specified in step 9.
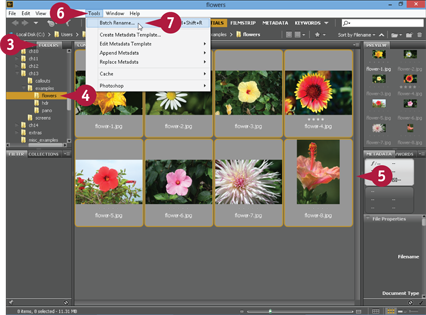
Batch Rename Images
You can change the filenames of multiple images automatically with Bridge’s renaming feature. You can customize the new name by using custom text, the date, sequential numbers, and more. You can copy or move the image files at the same time that you rename them.
Renaming can be useful if you want to associate a large number of photos with a particular place, time, or person. Digital cameras typically name photos with incremental numbers, which is not very descriptive.
Batch Rename Images
![]() Place the images that you want to rename into a folder.
Place the images that you want to rename into a folder.
![]() In Photoshop, open Adobe Bridge by clicking File and then Browse in Bridge.
In Photoshop, open Adobe Bridge by clicking File and then Browse in Bridge.
Note: For more on accessing Bridge, see Chapter 1.
![]() Click the Folders tab.
Click the Folders tab.
![]() Click the folder containing the images to rename.
Click the folder containing the images to rename.
![]()
![]() +click (
+click (![]() +click on a Mac) to select the images you want to rename.
+click on a Mac) to select the images you want to rename.
You can press ![]() +
+![]() (
(![]() +
+![]() on a Mac) to select all the images in the folder.
on a Mac) to select all the images in the folder.
![]() Click Tools.
Click Tools.
![]() Click Batch Rename.
Click Batch Rename.
The Batch Rename dialog box opens.
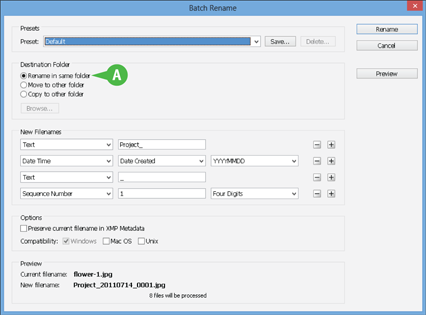
A By default, the renamed images are saved in the same folder.
B You can click Move or Copy (![]() changes to
changes to ![]() ) to save the images elsewhere. After you click Move or Copy, you can click Browse to select a destination folder.
) to save the images elsewhere. After you click Move or Copy, you can click Browse to select a destination folder.
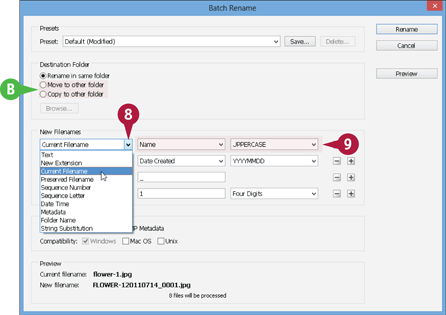
![]() Click here (
Click here (![]() ) to choose a file-naming option.
) to choose a file-naming option.
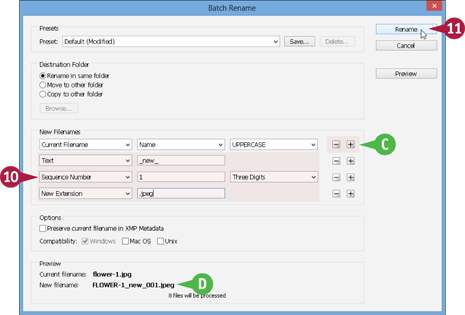
![]() Type in the text fields or choose from menus to customize the filename.
Type in the text fields or choose from menus to customize the filename.
In this example, the images are renamed with an all-caps version of their filenames.
![]() Repeat steps 8 and 9 for other parts of the naming scheme.
Repeat steps 8 and 9 for other parts of the naming scheme.
C You can add or remove naming scheme options by clicking ![]() or
or ![]() , respectively.
, respectively.
D An example of the new filename appears here.
![]() Click Rename.
Click Rename.
Photoshop renames the images in the folder.
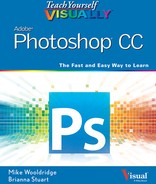
Using Tool Presets
You can specify commonly used options for a tool and then save that set of options for loading and using later. For example, it can be helpful to define presets for brush styles and opacities you use often.
Photoshop stores the presets in the Tool Presets panel. You can keep this panel open as you work to have easy access to useful versions of your editing tools.
Using Tool Presets
Define a Tool Preset

![]() Click a tool.
Click a tool.
![]() On the Options bar, specify the settings you want to save for that tool.
On the Options bar, specify the settings you want to save for that tool.
![]() Click here (
Click here (![]() ).
).
A Previously defined and default presets are listed.
![]() Click the Create New Tool Preset button (
Click the Create New Tool Preset button (![]() ).
).
The New Tool Preset dialog box opens.
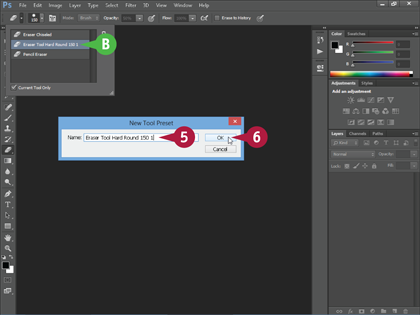
![]() Type a name for the tool preset.
Type a name for the tool preset.
![]() Click OK.
Click OK.
B Photoshop saves the tool preset and the preset appears in the list.
Load a Tool Preset

![]() Click Window.
Click Window.
![]() Click Tool Presets.
Click Tool Presets.
The Tool Presets panel opens, listing the presets available for that tool.
C You can click Current Tool Only (![]() changes to
changes to ![]() ) to display the presets for all the tools.
) to display the presets for all the tools.
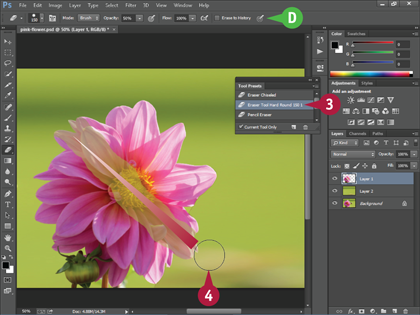
![]() Click a preset.
Click a preset.
D The tool settings on the Options bar change to reflect those defined in the preset.
![]() You can apply the tool to see the effects of the preset.
You can apply the tool to see the effects of the preset.
TIPs
How can I easily manage a large number of tool presets?
The Tool Presets panel menu (![]() ) features a variety of commands for managing your presets. You can click Preset Manager to view and organize your presets in a dialog box. You can click Save Tool Presets to save groups of presets as separate files on your computer. You can reload the saved sets later by clicking Load Tool Presets.
) features a variety of commands for managing your presets. You can click Preset Manager to view and organize your presets in a dialog box. You can click Save Tool Presets to save groups of presets as separate files on your computer. You can reload the saved sets later by clicking Load Tool Presets.
How can I reset the Toolbox tools back to their default settings?
In the Tool Presets panel menu (![]() ), you can click Reset Tool to reset the currently selected tool or click Reset All Tools to reset all the tools in the Toolbox.
), you can click Reset Tool to reset the currently selected tool or click Reset All Tools to reset all the tools in the Toolbox.
Customize Keyboard Shortcuts and Menus
You can assign keyboard shortcuts to Photoshop commands to streamline common tasks. Photoshop comes with many keyboard commands already assigned. For example, you can press ![]() +
+![]() (
(![]() +
+![]() on a Mac) to open an image. You can assign keyboard shortcuts to other commands if you find you use them often.
on a Mac) to open an image. You can assign keyboard shortcuts to other commands if you find you use them often.
You can also hide menu items that you rarely use to reduce clutter in your workspace and make the commands you do use easier to find. Photoshop displays a Show All Menu Items command in menus that have commands hidden.
Customize Keyboard Shortcuts and Menus
Define a Keyboard Shortcut

![]() Click Edit.
Click Edit.
![]() Click Keyboard Shortcuts.
Click Keyboard Shortcuts.
The Keyboard Shortcuts and Menus dialog box appears with the Keyboard Shortcuts tab selected.
![]() Click
Click ![]() to open the commands for a menu (
to open the commands for a menu (![]() changes to
changes to ![]() ).
).
![]() Click a command.
Click a command.
A A blank text box appears.
![]() Press a combination of keyboard keys to define a shortcut. A shortcut must include the
Press a combination of keyboard keys to define a shortcut. A shortcut must include the ![]() key and/or one of the function keys, which are the “F” keys located at the top of most keyboards.
key and/or one of the function keys, which are the “F” keys located at the top of most keyboards.
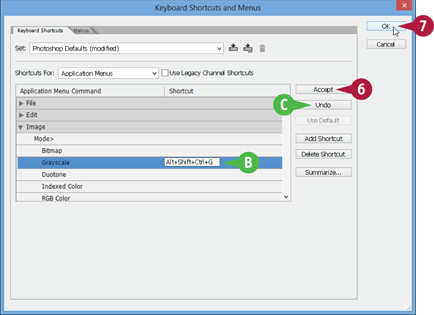
B The combination appears in the text box.
![]() Click Accept to save the shortcut.
Click Accept to save the shortcut.
C You can click Undo to cancel the shortcut. You can then press a different key combination.
![]() Click OK.
Click OK.
Photoshop closes the dialog box. You can now execute the command by pressing the key combination.
Customize a Menu
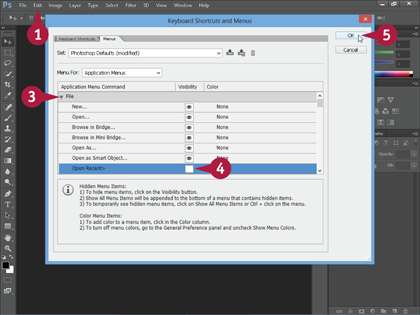
![]() Click Edit.
Click Edit.
![]() Click Keyboard Shortcuts.
Click Keyboard Shortcuts.
The Keyboard Shortcuts and Menus dialog box appears with the Menus tab selected.
![]() Click
Click ![]() to open the commands for a menu you want to customize (
to open the commands for a menu you want to customize (![]() changes to
changes to ![]() ).
).
![]() Click
Click ![]() to hide a menu command (
to hide a menu command (![]() changes to
changes to ![]() ).
).
![]() Click OK to save the settings and close the dialog box.
Click OK to save the settings and close the dialog box.
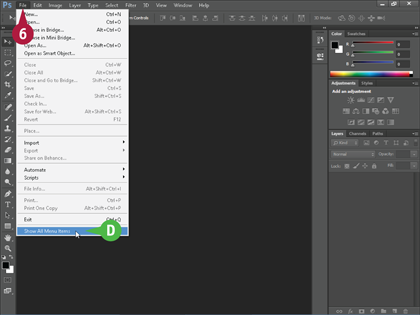
![]() Click the customized menu.
Click the customized menu.
The menu command does not appear. In this example, the command was hidden.
D You can click Show All Menu Items to access the hidden command.
Load HTML and CSS Colors
You can easily access the colors from a web page by loading its corresponding HTML or CSS file. HTML stands for Hypertext Markup Language and is the code for structuring web pages. CSS stands for Cascading Style Sheets and is the code for defining a page’s layout and style.
Photoshop can recognize the color codes in HTML and CSS files and load the corresponding colors into the Swatches panel.
Load HTML and CSS Colors
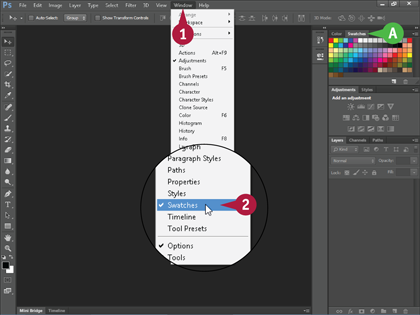
![]() Click Window.
Click Window.
![]() Click Swatches.
Click Swatches.
A The Swatches panel appears.
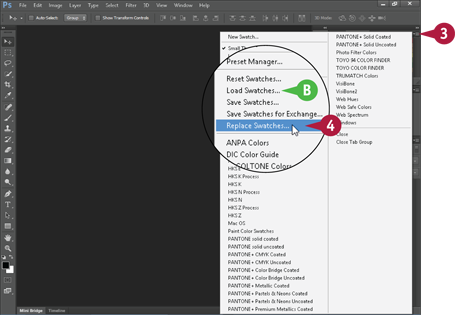
![]() Click the Swatches panel menu (
Click the Swatches panel menu (![]() ).
).
![]() Click Replace Swatches to replace the existing swatches with the colors from the file.
Click Replace Swatches to replace the existing swatches with the colors from the file.
B You can click Load Swatches to append the colors.
The Load dialog box appears.
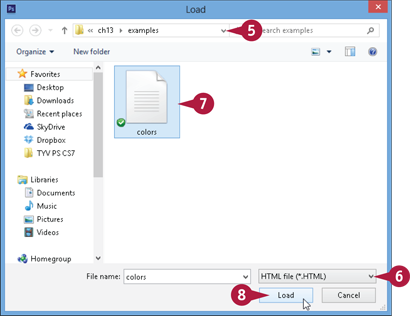
![]() Click here (
Click here (![]() ) to choose the folder that contains the HTML or CSS file.
) to choose the folder that contains the HTML or CSS file.
![]() Click here (
Click here (![]() ) to select HTML file or CSS file.
) to select HTML file or CSS file.
![]() Click the file.
Click the file.
![]() Click Load.
Click Load.
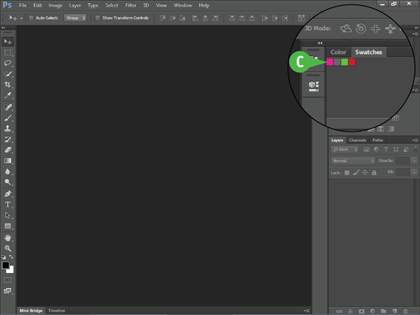
C Photoshop loads the colors from the file into the Swatches panel, replacing the existing swatches.
For more about the Swatches panel, see Chapter 6.