Chapter 6
Painting and Retouching with Color

You can add splashes, streaks, or solid areas of color to your image. This chapter also shows you how to apply color to repair, or retouch, your photos.
Select the Foreground and Background Colors
Select a Color with the Eyedropper Tool
Select a Color with the Swatches Panel
Select the Foreground and Background Colors
You can select colors to use with many of the painting and drawing tools in Photoshop by setting the foreground and background colors. The Brush and Pencil tools apply the foreground color, and the Eraser tool applies the background color when used on the Background layer. See the section Using the Brush Tool for more on how to paint on a photo. See the section Using the Eraser for more on using the Eraser.
Some filters in Photoshop apply their effects to your image based on the current foreground and background colors. See Chapter 10 for more about filters.
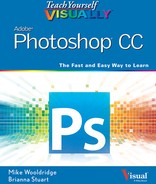
Select the Foreground and Background Colors
Select the Foreground Color

![]() Click the foreground color box.
Click the foreground color box.
The Color Picker dialog box opens.
A To change the range of colors that appears in the color box, click and drag the slider (![]() ).
).
![]() Click the color you want as the foreground color in the color box.
Click the color you want as the foreground color in the color box.
![]() Click OK.
Click OK.

B The selected color appears in the foreground color box.
![]() Click a painting tool in the Toolbox.
Click a painting tool in the Toolbox.
This example uses the Brush tool (![]() ).
).
Note: For more on the painting tools, see the section Using the Brush Tool.
![]() Click and drag to apply the color.
Click and drag to apply the color.
Select the Background Color
![]() Click the background color box.
Click the background color box.
The Color Picker dialog box opens.
C To change the range of colors that appears in the color box, click and drag the slider (![]() ).
).
![]() To select a background color, click the color you want in the color box.
To select a background color, click the color you want in the color box.
![]() Click OK.
Click OK.

D The selected color appears in the background color box.
![]() Click the Eraser tool (
Click the Eraser tool (![]() ).
).
![]() Click and drag the cursor (
Click and drag the cursor (![]() ).
).
The tool erases by painting with the background color.
Note: Painting occurs only when erasing in the Background layer; in other layers, the eraser turns pixels transparent. See Chapter 8 for a full discussion of layers.
Tips
How do I reset the foreground and background colors?
Click the Default icon (![]() ) to the lower left of the foreground and background color boxes. Doing so resets the colors to black and white. You can also press
) to the lower left of the foreground and background color boxes. Doing so resets the colors to black and white. You can also press ![]() to reset the colors.
to reset the colors.
What is a web-safe color?
Web browsers on some older monitors can display only colors from a specific 216-color palette. These colors are known as web-safe colors. You can click Only Web Colors in the Color Picker dialog box (![]() changes to
changes to ![]() ) to restrict your choices to web-safe colors.
) to restrict your choices to web-safe colors.
Select a Color with the Eyedropper Tool
You can select a color from an open image with the Eyedropper tool. The Eyedropper tool enables you to paint by using a color already present in your image. You place the tool over a color in your image and click to load that color as your foreground or background color. For more about setting colors, see the previous section, Select the Foreground and Background Colors.
Settings in the Options bar enable you customize the area of the image from which you are sampling.
Select a Color with the Eyedropper Tool

![]() Click the Eyedropper tool (
Click the Eyedropper tool (![]() ).
).
![]() Position
Position ![]() over your image.
over your image.
You can click Window and then Info to open the Info panel to see color values as you move ![]() .
.
![]() Click the color of the pixel beneath the tip of
Click the color of the pixel beneath the tip of ![]() .
.

A The color becomes the new foreground color.
To select a new background color, you can press ![]() (
(![]() on a Mac) as you click in step 3.
on a Mac) as you click in step 3.
You can temporarily employ the Eyedropper tool when using a painting tool, such as the Brush or Paint Bucket, by pressing and holding ![]() (
(![]() on a Mac).
on a Mac).
Select a Color with the Swatches Panel
You can select a color with the Swatches panel. The Swatches panel enables you to choose from a small set of commonly used colors. You place the Eyedropper tool over a color in the panel and click to load that color as your foreground or background color. For more about setting colors, see the section Select the Foreground and Background Colors.
You can also add colors to the Swatches panel using the Eyedropper tool. This is useful for saving colors you might want to use later.
Select a Color with the Swatches Panel

![]() Click Window.
Click Window.
![]() Click Swatches.
Click Swatches.
![]() Position your cursor over a color swatch.
Position your cursor over a color swatch.
![]() changes to
changes to ![]() .
.
![]() Click a color swatch to select a foreground color.
Click a color swatch to select a foreground color.

A The color becomes the new foreground color.
To select a background color, press ![]() (
(![]() on a Mac) as you click in step 4.
on a Mac) as you click in step 4.
You can use the Eyedropper tool (![]() ) to add the current foreground color to the Swatches panel. After selecting the tool, position it over the empty area of the panel and then click.
) to add the current foreground color to the Swatches panel. After selecting the tool, position it over the empty area of the panel and then click.
Using the Brush Tool
You can use the Brush tool to add patches of solid color to your image. You can use the tool to cover unwanted elements or to change the appearance of clothing or a backdrop. When applying the Brush tool, you can control the size of the brushstrokes by choosing a brush size. For realistic results, turn on the Airbrush feature to apply a softer line of color.
To limit where the brush applies color, create a selection before using the tool. For more, see Chapter 4. To customize the brush to apply different patterns of color, see the next section, “Change Brush Styles.”
Using the Brush Tool
![]() Click the Brush tool (
Click the Brush tool (![]() ).
).
![]() Click the foreground color box to select a color with which to paint.
Click the foreground color box to select a color with which to paint.
Note: For more, see the section Select the Foreground and Background Colors.
![]() Click here (
Click here (![]() ) to open the Brush menu to choose a brush size and type.
) to open the Brush menu to choose a brush size and type.
Note: To access different brush styles, see the next section, “Change Brush Styles.”

![]() Click and drag to apply the foreground color to the image.
Click and drag to apply the foreground color to the image.
To undo the most recent brush stroke, you can click Edit and then Undo Brush.
Note: To undo more than one brush stroke using the History panel, see the section Undo Commands in Chapter 2.

![]() Type a percentage value to change the opacity of the brush strokes.
Type a percentage value to change the opacity of the brush strokes.
A Alternatively, you can click here (![]() ) to adjust the Opacity slider.
) to adjust the Opacity slider.
![]() Click and drag to apply the semitransparent paintbrush.
Click and drag to apply the semitransparent paintbrush.

![]() Type a percentage value to change how much color the brush applies.
Type a percentage value to change how much color the brush applies.
B Alternatively, you can click here (![]() ) to adjust the Flow slider.
) to adjust the Flow slider.
![]() Click and drag to apply the customized brush.
Click and drag to apply the customized brush.
Photoshop applies color per your specifications.
Tips
What are the Pencil and Airbrush tools?
You can use the Pencil tool to draw hard-edged lines of color. To access it, click and hold the Brush tool (![]() ) and then click the Pencil tool (
) and then click the Pencil tool (![]() ). The Airbrush tool paints soft lines that get darker the longer you hold down your mouse button. You can convert your brush to an airbrush by clicking the Airbrush button (
). The Airbrush tool paints soft lines that get darker the longer you hold down your mouse button. You can convert your brush to an airbrush by clicking the Airbrush button (![]() ) on the Options bar.
) on the Options bar.
What is a virtual slider?
You can adjust certain slider-based settings, such as the Opacity and Fill settings in the Layers panel, by positioning the cursor over the setting’s label and clicking and dragging. For example, you can position your mouse pointer over Opacity and then click and drag to the left or right to decrease or increase the currently selected layer’s opacity.
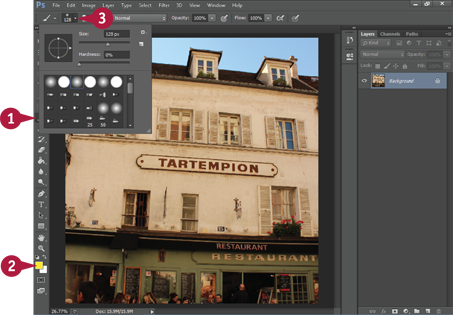
Change Brush Styles
You can select from a variety of predefined brush styles in Photoshop to apply color to your image in different ways. Brush styles can have hard or soft edges. Brush styles with specialized tips can apply speckled patterns of color to your image. Photoshop offers a variety of predefined brush sets that you can access in the Options bar.
Change Brush Styles
![]() Click the Brush tool (
Click the Brush tool (![]() ).
).
![]() Click here (
Click here (![]() ) to open the Brush menu.
) to open the Brush menu.
![]() Click here (
Click here (![]() ).
).
The Brush menu opens.
![]() Click a set of brushes.
Click a set of brushes.
A dialog box opens, asking if you want to replace your brushes.

![]() Click OK.
Click OK.
A To add the set of brushes to the currently displayed set, click Append.
If a dialog box opens asking if you want to save the current brush set, click No.
Note: You can reset your brushes to the original set by choosing Reset Brushes from the Brush menu.
The new set appears in the Brush list.

![]() Click a brush style.
Click a brush style.
![]() Click the boxes to set the foreground and background colors for the brush.
Click the boxes to set the foreground and background colors for the brush.
Note: See the section Select the Foreground and Background Colors for details.
![]() Click and drag to apply the new brush.
Click and drag to apply the new brush.
Photoshop applies color with the brush.
Tip
What are bristle-tip brushes?
With bristle-tip brushes, Photoshop models the behavior of real-world bristles to allow for lifelike strokes.
![]() Click Window and then Brush.
Click Window and then Brush.
The Brush panel opens.

![]() Click a bristle-tip brush.
Click a bristle-tip brush.
![]() Specify the bristle settings for the brush.
Specify the bristle settings for the brush.
A Photoshop displays the type of stroke that the brush applies.
Create a Custom Brush
You can use the Brushes panel to create one-of-a-kind brushes of varying sizes and shapes. For example, you can adjust the roundness and angle of a brush tip to create a slanted brush, or decrease the hardness to make a brush apply softer textures. You can even specify a brush shape that changes as it paints, enabling you to generate a random design.
After you design your new brush, you can save it in the Brush menu so you can quickly access it in the future.
Create a Custom Brush

![]() Click the Brush tool (
Click the Brush tool (![]() ).
).
![]() Click Window.
Click Window.
![]() Click Brush.
Click Brush.
The Brush panel opens.
![]() Click Brush Tip Shape.
Click Brush Tip Shape.
![]() Click a brush style to use as a starting point for your custom brush.
Click a brush style to use as a starting point for your custom brush.

![]() Click and drag the Size slider (
Click and drag the Size slider (![]() ) to change the brush size.
) to change the brush size.
![]() Type a Roundness value between 0% and 100%.
Type a Roundness value between 0% and 100%.
The lower the number, the more oval the brush.
You can adjust other settings to further define the tip shape.
![]() Click Shape Dynamics (
Click Shape Dynamics (![]() changes to
changes to ![]() ).
).

![]() Click and drag the Size Jitter slider (
Click and drag the Size Jitter slider (![]() ) to specify the amount your brush varies in size as it paints.
) to specify the amount your brush varies in size as it paints.
![]() Click and drag the Minimum Diameter slider (
Click and drag the Minimum Diameter slider (![]() ) to specify the smallest size to which the brush scales when Size Jitter is enabled.
) to specify the smallest size to which the brush scales when Size Jitter is enabled.
![]() Click and drag the other sliders (
Click and drag the other sliders (![]() ) to control how the brush angle and roundness change.
) to control how the brush angle and roundness change.
You can click other categories to define other settings.
![]() Click
Click ![]() to close the Brush panel.
to close the Brush panel.

![]() Click and drag inside the image.
Click and drag inside the image.
Photoshop applies the custom brush.
Tip
How do I save my custom brush in the Brush drop-down menu?
In the Brush panel, click the panel menu (![]() ) and click New Brush Preset from the menu that appears. The Brush Name dialog box opens. Type a name in the Brush Name dialog box
) and click New Brush Preset from the menu that appears. The Brush Name dialog box opens. Type a name in the Brush Name dialog box
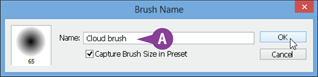
(A). Click OK to add your brush to the Brush menu.
Using the Mixer Brush
The Mixer Brush mixes colors that you paint, just as wet paint mixes on a real canvas. The tool enables you to produce effects similar to those you can get by using real watercolors and oils.
You specify what color the brush should apply as well as how much is deposited as you paint. You also specify a wetness setting that determines how much the existing color in the image is affected as you click and drag the tool. The Mixer Brush debuted in Photoshop CS5.
Using the Mixer Brush

![]() Click and hold the Brush tool (
Click and hold the Brush tool (![]() ).
).
![]() In the list that appears, click the Mixer Brush tool (
In the list that appears, click the Mixer Brush tool (![]() ).
).
![]() Click here (
Click here (![]() ) to choose a brush size.
) to choose a brush size.
![]() Click the color swatch to choose a color with which to paint.
Click the color swatch to choose a color with which to paint.

![]() Click here (
Click here (![]() ) to specify a Wet setting.
) to specify a Wet setting.
This controls how much color from the image the brush picks up.
![]() Click here (
Click here (![]() ) to specify a Load setting.
) to specify a Load setting.
This controls how much color is loaded on the brush prior to applying the brush.
![]() Click here (
Click here (![]() ) to specify a Flow setting.
) to specify a Flow setting.
This controls the rate at which the brush deposits color on the image.
A You can select from several presets to combine different brush settings.
![]() Click and drag to apply the color.
Click and drag to apply the color.

B Photoshop applies the color, mixing it with the colors already in the image.
![]() Click the color swatch to choose a different color to apply.
Click the color swatch to choose a different color to apply.
![]() Click and drag to apply the color to the image.
Click and drag to apply the color to the image.
C Photoshop applies the second color.
The second color is mixed with the first where the colors cross.
Tip
What are the different brush settings for the Mixer Brush?
• The Current Brush Load menu enables you to load the brush with the selected color or clean the brush, which removes the loaded color. Applying a clean brush mixes existing colors in the image without applying a new color.
• Selecting Load Brush (![]() ) adds color to the brush after each stroke. When the option is deselected, the brush dries out over successive strokes.
) adds color to the brush after each stroke. When the option is deselected, the brush dries out over successive strokes.
• Selecting Clean Brush (![]() ) removes any color on the brush after each stroke. When the option is deselected, color picked up from the image is applied over successive strokes.
) removes any color on the brush after each stroke. When the option is deselected, color picked up from the image is applied over successive strokes.
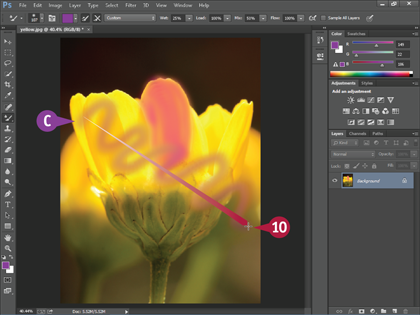
Apply a Gradient
You can apply a gradient, which is a blend from one color to another, to give objects in your image a radiant or 3-D look. You can apply a gradient to a selected portion of an image or to the entire image. Setting the geometry of a gradient controls the direction of the color blend. A linear gradient changes as it moves across your image. A radial gradient changes color from a center point moving outward.
The Gradient Editor enables you to choose from predefined color combinations for your gradient, or you can choose your own custom colors.
Apply a Gradient

![]() Make a selection.
Make a selection.
In this example, the entire image is selected.
Note: See Chapter 4 for more on making selections.
![]() Click the Gradient tool (
Click the Gradient tool (![]() ).
).
A A linear gradient is the default. This creates a gradient straight across your selection. You can select different geometries on the Options bar. For example, a radial gradient (![]() ) creates a circular distribution of color.
) creates a circular distribution of color.
![]() Click the gradient swatch.
Click the gradient swatch.
The Gradient Editor opens.

![]() Select a gradient type from the Presets area.
Select a gradient type from the Presets area.
B Photoshop shows the settings for the selected gradient.
You can customize the gradient by changing the settings.
![]() Click OK.
Click OK.

![]() Click and drag inside the selection.
Click and drag inside the selection.
The direction and transition of the gradient are defined.
Note: Dragging a long line with the tool produces a gradual transition; dragging a short line produces an abrupt transition.

C Photoshop generates a gradient inside the selection.
Tip
How can I customize the colors and opacity of my gradient?
Use the controls at the bottom of the Gradient Editor. Click the color stops

(A) to define the colors in a gradient. Click the opacity stops (B) to define the transparency of the gradient colors. You can click and drag the midpoint icon (C) to specify where the gradient’s transition occurs.
Stroke a Selection
You can use the Stroke command to draw a line along the edge of a selection. This can help you highlight objects in your image or add decoration to text. When you apply a stroke, you specify its color, width, and location. The location can be the inside, outside, or center of the selection border. You can apply a semitransparent line to an object by decreasing the opacity of the stroke.
A stroke may also be applied as a layer style. For more about layer styles, see Chapter 9.
Stroke a Selection

![]() Select an area of the image with a selection tool.
Select an area of the image with a selection tool.
Note: See Chapter 4 for more on the selection tools.
![]() Click Edit.
Click Edit.
![]() Click Stroke.
Click Stroke.
The Stroke dialog box opens.
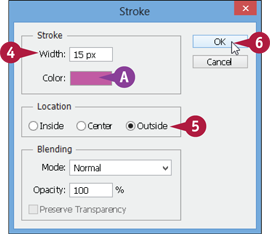
![]() Type a width in pixels.
Type a width in pixels.
![]() Click Inside to stroke a line on the inside of the selection, Center to stroke a line straddling the selection, or Outside to stroke a line on the outside of the selection (
Click Inside to stroke a line on the inside of the selection, Center to stroke a line straddling the selection, or Outside to stroke a line on the outside of the selection (![]() changes to
changes to ![]() ).
).
A You can click the Color box to define the color of the stroke.
![]() Click OK.
Click OK.
B Photoshop strokes a line along the selection.
You can select other areas and stroke them by using different settings.
C This stroke was applied to the inside of the selection at 50% opacity.
Tips
How do I add a colored border to my image?
Click Select and then All. Apply the Stroke command, clicking Inside as the location (![]() changes to
changes to ![]() ). Photoshop adds a border to the image. If you copy your image content to a separate layer first, you will have a borderless version for use later if you need it.
). Photoshop adds a border to the image. If you copy your image content to a separate layer first, you will have a borderless version for use later if you need it.
How do I stroke a line a fixed distance outside of an object?
After selecting the object, you can expand your selection and then stroke the line. To expand a selection, click Select, Modify, and then Expand. For more on making selections, see Chapter 4.
Fill a Selection
You can fill a selection with a solid color by using the Fill command, which is located in the Edit menu. This enables you to change the color of a selected object or to quickly paint over a large area. You can customize your fill by changing the opacity and mode. This can enable you to add color to your image and still let the texture of the original image show through the new fill color.
Fill a Selection

![]() Define the area you want to fill by using a selection tool.
Define the area you want to fill by using a selection tool.
Note: See Chapter 4 for more on the selection tools.
![]() Click Edit.
Click Edit.
![]() Click Fill.
Click Fill.
The Fill dialog box opens.

![]() Click here (
Click here (![]() ) to choose a fill option.
) to choose a fill option.
A You can also fill your selection with a custom pattern. For more on using this option, see the tip in the section “Using the Pattern Stamp.”
To fill the selection with other content from the scene, see the next section, Using Content-Aware Fill.
B You can decrease the opacity to fill with a semitransparent color or pattern.
![]() Click OK.
Click OK.
C Photoshop fills the area.

D You can select other areas and then fill them with different colors.
This example uses a fill with the mode set to Color.
Note: For more on blending modes, see Chapter 8.
Tips
How do I apply a “ghosted” white covering over part of an image?
Use a selection tool to define the area of the image that you want to cover, and then apply the Fill command with white selected and the opacity set to less than 50%.
How can I quickly fill similarly colored areas with a new color?
You can use the Paint Bucket tool (![]() ) to fill contiguous areas in your image with the current color. You can set the Paint Bucket’s tolerance value to determine the range of colors the paint bucket affects when you apply it. A low tolerance value affects a narrow range of colors, whereas a high tolerance value affects a wide range.
) to fill contiguous areas in your image with the current color. You can set the Paint Bucket’s tolerance value to determine the range of colors the paint bucket affects when you apply it. A low tolerance value affects a narrow range of colors, whereas a high tolerance value affects a wide range.
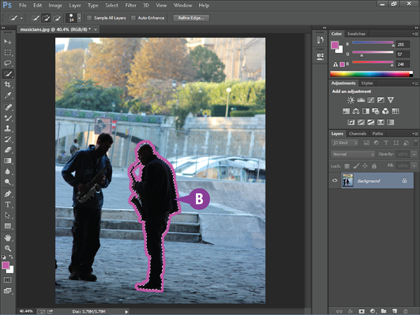
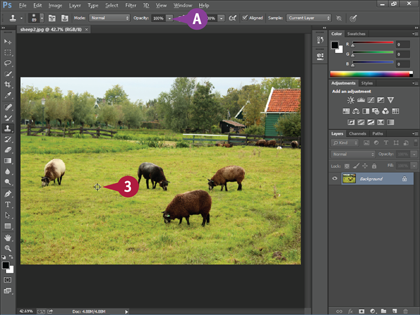
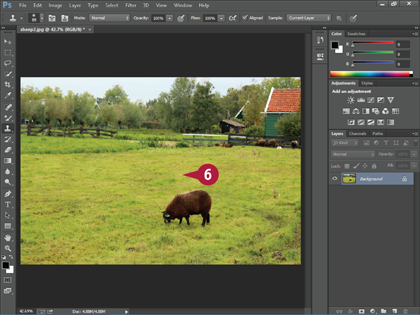
Using Content-Aware Fill
You can use the Content-Aware setting with the Fill command to automatically analyze the makeup of your image and intelligently fill a selection with other content in the scene. The setting works especially well in natural scenes with varying textures. To apply a more convincing fill, you can feather the edge of your selection before filling. To feather a selection edge, see Chapter 5.
Using Content-Aware Fill

![]() Define the area you want to fill by using a selection tool.
Define the area you want to fill by using a selection tool.
Note: See Chapter 4 for more on the selection tools.
In this example, the sheep is selected.
![]() Click Edit.
Click Edit.
![]() Click Fill.
Click Fill.
The Fill dialog box opens.
![]() Click here (
Click here (![]() ) to choose Content-Aware.
) to choose Content-Aware.
![]() Click OK.
Click OK.

A Photoshop fills the area with surrounding content.
![]() Click the Clone Stamp tool (
Click the Clone Stamp tool (![]() ).
).
![]() You can optionally apply the Clone Stamp tool to fix areas of the fill.
You can optionally apply the Clone Stamp tool to fix areas of the fill.
Note: For more on the Clone Stamp tool, see the next section, Using the Clone Stamp.
Tip
How do I apply a content-aware fill with the Spot Healing Brush tool?
The Spot Healing Brush tool gives you a free-form way of applying a content-aware fill, by stroking the effect onto your image.

![]() Click the Spot Healing Brush tool (
Click the Spot Healing Brush tool (![]() ).
).
![]() Click Content-Aware (
Click Content-Aware (![]() changes to
changes to ![]() ).
).
![]() Click and drag over the object you want to replace. Photoshop shades the area.
Click and drag over the object you want to replace. Photoshop shades the area.
Photoshop replaces the object with other content in the image.
Using the Clone Stamp
You can clean up small flaws or erase elements in your image with the Clone Stamp tool. The tool copies information from one area of an image to another. For example, you can use the Clone Stamp tool to remove unwanted blemishes of all kinds by cloning an area near the flaw and then stamping over the flaw.
You can adjust the opacity of the tool to copy information partially to the new location. Lowering the opacity and then copying from multiple areas in an image can sometimes be the best way to cleanly erase an unwanted object.
Using the Clone Stamp

![]() Click the Clone Stamp tool (
Click the Clone Stamp tool (![]() ).
).
![]() Click here (
Click here (![]() ) to open the Brush menu to choose a brush size and type.
) to open the Brush menu to choose a brush size and type.
![]() Press and hold
Press and hold ![]() (
(![]() on a Mac) and then click the area of the image from which you want to copy.
on a Mac) and then click the area of the image from which you want to copy.
A You can specify an opacity of less than 100% to partially apply the tool.
You do not need to select an area inside the current image; you can ![]() +click (
+click (![]() +click on a Mac) another open image.
+click on a Mac) another open image.
This example uses the tool to select an area of grass in the pasture.
![]() Release
Release ![]() (
(![]() on a Mac).
on a Mac).

![]() Click and drag to apply the Clone Stamp.
Click and drag to apply the Clone Stamp.
Photoshop copies the previously clicked area to where you click and drag.
B As you apply the tool, a preview of the content to be cloned appears in place of the brush cursor (![]() ).
).
C A ![]() appears at the location from which you are cloning.
appears at the location from which you are cloning.
![]() Click and drag repeatedly over the image to achieve the desired effect.
Click and drag repeatedly over the image to achieve the desired effect.
As you apply the tool, you can press ![]() (
(![]() on a Mac) and then click again to select a different area from which to copy.
on a Mac) and then click again to select a different area from which to copy.
Tip
How can I make the Clone Stamp’s effects look seamless?
To erase elements from your image with the Clone Stamp without leaving a trace, try the following:
• Clone between areas of similar color and texture.
• To apply the Clone Stamp more subtly, lower its opacity on the Options bar.
• After you click ![]() to open the Brush menu, choose a soft-edged brush shape.
to open the Brush menu, choose a soft-edged brush shape.
Using the Pattern Stamp
You can paint with a pattern by using the Pattern Stamp tool. This tool gives you a free-form way to add repeating elements to your images. You paint patterns onto your image by clicking and dragging with the tool.
Photoshop comes with a few basic patterns, but you can create more from your own images. You can select a rectangular area of your image and then set the area as a pattern with the Define Pattern command. The area will then show up in the Pattern menu for the tool to use.
Using the Pattern Stamp
Select a Pattern

![]() Click and hold the Clone Stamp tool (
Click and hold the Clone Stamp tool (![]() ).
).
![]() In the list that appears, click the Pattern Stamp tool (
In the list that appears, click the Pattern Stamp tool (![]() ).
).
![]() Click here (
Click here (![]() ) to open the Brush menu to choose a brush size and type.
) to open the Brush menu to choose a brush size and type.

![]() Click here (
Click here (![]() ) to open the Pattern menu.
) to open the Pattern menu.
![]() Select a pattern to apply.
Select a pattern to apply.
To create a custom pattern, see the tip.

A You can click Aligned (![]() changes to
changes to ![]() ) to make your strokes paint the pattern as contiguous tiles.
) to make your strokes paint the pattern as contiguous tiles.
![]() Click and drag to apply the pattern.
Click and drag to apply the pattern.
Photoshop applies the pattern wherever you click and drag.
Apply a Different Opacity

![]() Type a value of less than 100% in the Opacity box.
Type a value of less than 100% in the Opacity box.
![]() Click and drag inside the selection to apply the pattern.
Click and drag inside the selection to apply the pattern.
Decreasing the opacity causes the brush to apply a semitransparent pattern.
Tip
How do I define my own custom patterns?
Click the Rectangular Marquee tool (![]() ) and use it to select an area in your image to use as a pattern. Click Edit and then Define Pattern to open the Pattern Name dialog box. Your pattern appears in the preview in the dialog box
) and use it to select an area in your image to use as a pattern. Click Edit and then Define Pattern to open the Pattern Name dialog box. Your pattern appears in the preview in the dialog box

(A). In the Pattern Name dialog box, type a name for your pattern and then click OK.
Using the Spot Healing Brush
You can heal imperfections in your image with the Spot Healing Brush tool. You click and drag over an object in your image with the brush, and Photoshop intelligently copies nearby pixels to remove the object. The tool works best if the object in your image is in an area with consistent and continuous color and texture.
The Spot Healing Brush is a less interactive version of the Healing Brush. You can try the Healing Brush instead if your results with the Spot Healing Brush are less than optimal. See the next section, Using the Healing Brush, for details.
Using the Spot Healing Brush
![]() Click the Spot Healing Brush tool (
Click the Spot Healing Brush tool (![]() ).
).
![]() Click here (
Click here (![]() ) to open the Brush menu.
) to open the Brush menu.

![]() Specify a brush size.
Specify a brush size.
If the area you want to heal is small, choose a brush size that covers the area.
![]() You can click and drag
You can click and drag ![]() to adjust the shape of the brush.
to adjust the shape of the brush.

![]() Click the area you want to heal.
Click the area you want to heal.
Photoshop shades the area.
You can click and drag to paint over a large area.

A Photoshop automatically heals the selected area. It replaces the imperfection inside the selected area with the surrounding colors and textures.
Tips
What type setting should I use for the Spot Healing Brush?
You can click a type setting (![]() changes to
changes to ![]() ) in the Options bar to control how Photoshop heals the area of your image. Content-Aware is typically the best setting because it takes into account the edges and shadows around the selected area. Proximity Match uses the pixels adjacent to the edge of the selection, whereas Create Texture uses pixels within the selection.
) in the Options bar to control how Photoshop heals the area of your image. Content-Aware is typically the best setting because it takes into account the edges and shadows around the selected area. Proximity Match uses the pixels adjacent to the edge of the selection, whereas Create Texture uses pixels within the selection.
How can I reset a tool to its default settings?
Right-click (![]() +click on a Mac) the tool’s icon on the far left side of the Options bar and then click Reset Tool from the menu that appears.
+click on a Mac) the tool’s icon on the far left side of the Options bar and then click Reset Tool from the menu that appears.
Using the Healing Brush
You can correct defects in your image by using the Healing Brush. The Healing Brush is similar to the Clone Stamp in that it copies pixels from one area of the image to another. However, the Healing Brush takes into account the texture and lighting of the image as it works, which can make its modifications more convincing.
Another option is the Spot Healing Brush, which automatically heals the area of your image that you paint over. See the previous section, Using the Spot Healing Brush, for details.
Using the Healing Brush
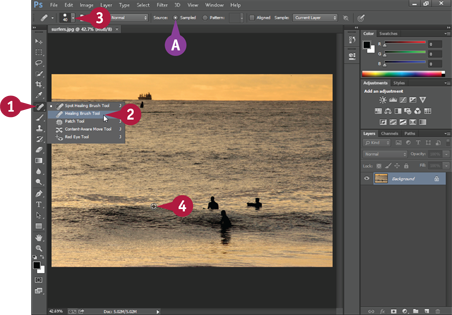
![]() Click and hold the Spot Healing Brush tool (
Click and hold the Spot Healing Brush tool (![]() ).
).
![]() In the list that appears, click the Healing Brush tool (
In the list that appears, click the Healing Brush tool (![]() ).
).
![]() Click here (
Click here (![]() ) to open the Brush menu to specify your brush settings.
) to open the Brush menu to specify your brush settings.
A Make sure to click Sampled (![]() changes to
changes to ![]() ).
).
![]() Press and hold
Press and hold ![]() (
(![]() on a Mac) and then click the source area of the image you want to heal with.
on a Mac) and then click the source area of the image you want to heal with.

![]() Release
Release ![]() (
(![]() on a Mac).
on a Mac).
![]() Click and drag to apply the Healing Brush.
Click and drag to apply the Healing Brush.
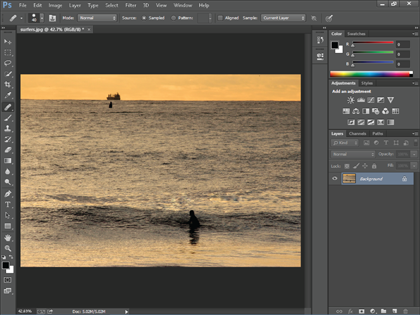
Photoshop copies the selected area wherever you click and drag.
![]() Stop dragging and then release the mouse button.
Stop dragging and then release the mouse button.
Photoshop adjusts the copied pixels to account for the lighting and texture present in the image.
Tip
How can I more easily work from several different source images?

![]() With the Healing Brush selected, click
With the Healing Brush selected, click ![]() in the Options bar.
in the Options bar.
The Clone Source panel opens. As you define source areas from your images, Photoshop makes them accessible here.
![]() Click
Click ![]() to clone from a source area.
to clone from a source area.
A You can click this option to turn off the cursor overlay (![]() changes to
changes to ![]() ).
).
Using the Patch Tool
The Patch tool enables you to correct defects in your image by selecting them and then dragging the selection to an unflawed area of the image. This can be useful if a large part of your image is free of flaws such as with a clear blue sky, lawn, or blank wall.
For other ways to correct defects in your image, see the sections Using Content-Aware Fill, Using the Clone Stamp, Using the Spot Healing Brush, and Using the Healing Brush.
Using the Patch Tool

![]() Click and hold the Spot Healing Brush tool (
Click and hold the Spot Healing Brush tool (![]() ).
).
![]() In the list that appears, click the Patch tool (
In the list that appears, click the Patch tool (![]() ).
).

![]() Click and drag to select the part of your image that contains the defects you want to patch.
Click and drag to select the part of your image that contains the defects you want to patch.
When you make selections, the Patch tool works similar to the Lasso tool.
Note: See Chapter 4 for more on the Lasso tool.
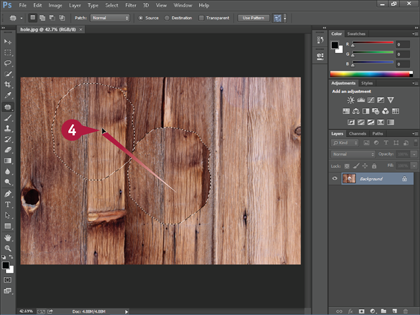
![]() Click inside the selection and then drag it to an area that does not have defects.
Click inside the selection and then drag it to an area that does not have defects.

A Photoshop uses pixels from the destination selection to patch the defects in the source selection.
B You can click Destination (![]() changes to
changes to ![]() ) to patch defects in the reverse order; flaws in the destination selection are corrected with the pixels from the source selection.
) to patch defects in the reverse order; flaws in the destination selection are corrected with the pixels from the source selection.
Tips
How does the Patch tool determine what the defects are in my selection?
It does this by comparing the colors and textures in the two selections. The tool then tries to eliminate the differences — the defects — while retaining the overall color and texture.
Can I use other selection tools to create my patch selection?
Yes. You can use selection tools, such as the Marquee tools and the Lasso tools, to define the area you want to patch. Then, you can use the Patch tool (![]() ) to click and drag the selection to complete the patch.
) to click and drag the selection to complete the patch.
Using the History Brush
You can use the History Brush tool to paint a previous state of your image from the History panel into the current image. This can be useful if you want to revert just a part of your image. You specify the image version that you want to copy from by defining a snapshot in the History panel. For example, you can define as a snapshot a version of your image before any filters were applied, and then paint parts of that version back onto the finished image. For more about the History panel, see the section Undo Commands in Chapter 2.
Using the History Brush
Paint a Previous State
![]() Click Window.
Click Window.
![]() Click History.
Click History.
The History panel opens.
![]() Click the Create New Snapshot button (
Click the Create New Snapshot button (![]() ) in the History panel.
) in the History panel.
A Photoshop puts a copy of the current state of the image into the History panel.
![]() Modify your image to make it different from the newly created snapshot.
Modify your image to make it different from the newly created snapshot.
In this example, the Solarize and Sponge filters were applied.

![]() Click to the left of the snapshot to select it as the History Brush source.
Click to the left of the snapshot to select it as the History Brush source.

![]() Click the History Brush tool (
Click the History Brush tool (![]() ).
).
![]() Click here (
Click here (![]() ) to open the Brush menu to specify your brush settings.
) to open the Brush menu to specify your brush settings.
![]() Click and drag inside the image.
Click and drag inside the image.
Pixels from the previous snapshot are painted into the image.
Using the Art History Brush

![]() Click and hold the History Brush tool (
Click and hold the History Brush tool (![]() ).
).
![]() In the list that appears, click the Art History Brush tool (
In the list that appears, click the Art History Brush tool (![]() ).
).
With the Art History Brush tool, you can paint in snapshot information with an added impressionistic effect.
![]() Click here (
Click here (![]() ) to open the Brush menu to specify your brush settings.
) to open the Brush menu to specify your brush settings.
![]() Click and drag to apply an artistic effect.
Click and drag to apply an artistic effect.
Tip
How do I paint onto a blank image with the History Brush tool?
Start with a photographic image, take a snapshot of it with the Create New Snapshot button (![]() ), and then fill the image with a solid color. See the section Fill a Selection for more. You can then use the History Brush tool (
), and then fill the image with a solid color. See the section Fill a Selection for more. You can then use the History Brush tool (![]() ) to paint in the photographic content.
) to paint in the photographic content.
Using the Eraser
You can use the Eraser tool to erase unwanted areas of your photo. When you apply the Eraser tool in the Background layer, the erased pixels are replaced with the current background color. When you erase in other layers, the Eraser tool turns the pixels transparent, revealing any underlying layers.
In the Options bar, you can control the size of the eraser and the softness of its edges. Using a soft-edged eraser can be useful for removing content around objects that have fuzzy edges. You can also change the opacity of the tool to only partially erase content in your image.
Using the Eraser
In the Background Layer

![]() Click the Background layer in the Layers panel.
Click the Background layer in the Layers panel.
If you start with a newly scanned image, the Background layer is the only layer.
Note: See Chapter 8 for more on layers.
![]() Click the Eraser tool (
Click the Eraser tool (![]() ).
).
![]() Click here (
Click here (![]() ) to open the Brush menu to choose a brush size and type.
) to open the Brush menu to choose a brush size and type.

![]() Click and drag inside the image.
Click and drag inside the image.
Photoshop erases the image by painting with the background color.
In a Regular Layer

![]() Click a layer other than the Background layer in the Layers panel.
Click a layer other than the Background layer in the Layers panel.
Note: See Chapter 8 for more on layers.
![]() Click the Eraser tool (
Click the Eraser tool (![]() ).
).
![]() Click here (
Click here (![]() ) to open the Brush menu to choose a brush size and type.
) to open the Brush menu to choose a brush size and type.

![]() Click and drag inside the image.
Click and drag inside the image.
Photoshop erases elements in the layer by making pixels transparent.
Tip
How can I quickly erase areas of similar color in my image?
If you click and hold the Eraser tool (![]() ) in the Toolbox, a list appears, and you can select the Background Eraser (
) in the Toolbox, a list appears, and you can select the Background Eraser (![]() ) or the Magic Eraser (
) or the Magic Eraser (![]() ). The Background Eraser works by sampling the pixel color beneath the center of the brush and erasing similar colors that are underneath the brush. The Magic Eraser also samples the color beneath the cursor but erases similar pixels throughout the layer. You can adjust the tolerance of both tools on the Options bar to control how much they erase.
). The Background Eraser works by sampling the pixel color beneath the center of the brush and erasing similar colors that are underneath the brush. The Magic Eraser also samples the color beneath the cursor but erases similar pixels throughout the layer. You can adjust the tolerance of both tools on the Options bar to control how much they erase.
Replace a Color
You can replace colors in your image with the current foreground color by using the Color Replacement tool. This gives you a free-form way of recoloring objects in your image while keeping the shading on the objects intact.
Replace a Color
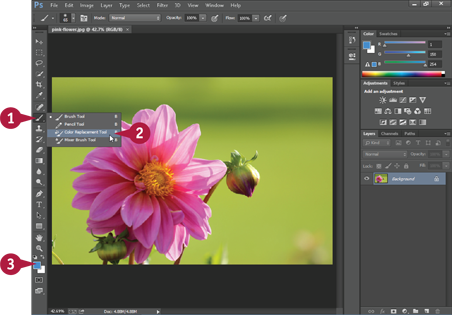
![]() Click and hold the Brush tool (
Click and hold the Brush tool (![]() ).
).
![]() In the list that appears, click the Color Replacement tool (
In the list that appears, click the Color Replacement tool (![]() ).
).
![]() Click the foreground color box to select a color for painting.
Click the foreground color box to select a color for painting.
Note: For more, see the section Select the Foreground and Background Colors.
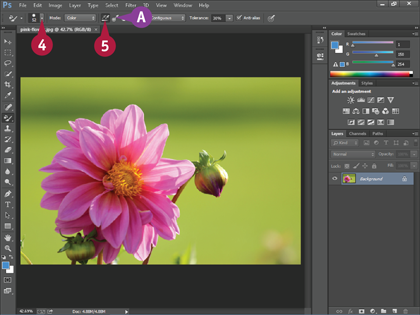
![]() Click here (
Click here (![]() ) to open the Brush menu to choose a brush size and type.
) to open the Brush menu to choose a brush size and type.
![]() Click the Sampling: Continuous icon (
Click the Sampling: Continuous icon (![]() ).
).
Sampling: Continuous samples different colors to replace as you paint.
A Sampling: Once (![]() ) samples only the first color you click.
) samples only the first color you click.

![]() Type a tolerance from 1% to 100%.
Type a tolerance from 1% to 100%.
The greater the tolerance, the greater the range of colors the tool replaces.
![]() Click and drag in your image to replace color.
Click and drag in your image to replace color.

![]() Continue to click and drag in your image.
Continue to click and drag in your image.
Photoshop replaces more color.
Fix Red Eye in a Photo
You can fix the red eye effect that occurs in pictures taken with flash in low light by using the Red Eye tool. When applied to the eye of your subject, the tool replaces the reddish pixels in the area with pixels of a predefined color.
Fix Red Eye in a Photo

![]() Click and hold the Spot Healing Brush tool (
Click and hold the Spot Healing Brush tool (![]() ).
).
![]() In the list that appears, click the Red Eye tool (
In the list that appears, click the Red Eye tool (![]() ).
).
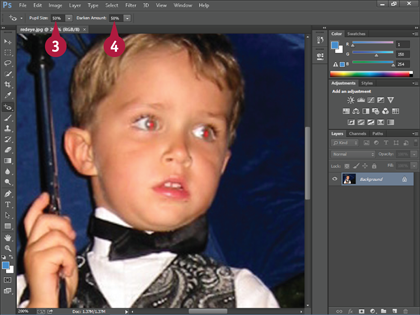
![]() Type a value from 1% to 100% for Pupil Size to determine the size of the area affected.
Type a value from 1% to 100% for Pupil Size to determine the size of the area affected.
![]() Type a value from 1% to 100% for Darken Amount to determine the darkness of the applied color.
Type a value from 1% to 100% for Darken Amount to determine the darkness of the applied color.

![]() Click the center of a pupil.
Click the center of a pupil.
Photoshop replaces the red pixels with a dark gray hue.

![]() Click the other eye.
Click the other eye.
Photoshop fixes the other eye.
Tips
What are alternatives to the Red Eye tool?
You can use the Color Replacement tool to fix red eye. First, select the red eye with the Elliptical Marquee tool (![]() ). Select a dark gray hue as your foreground color and then apply the foreground color over the eye with the Color Replacement tool (
). Select a dark gray hue as your foreground color and then apply the foreground color over the eye with the Color Replacement tool (![]() ). This can also help you fix the blue- and green-eye phenomena that can occur with animals.
). This can also help you fix the blue- and green-eye phenomena that can occur with animals.
What can cause problems for the Red Eye tool?
If your subject has a reddish skin tone in the photo, the Red Eye tool may apply color to more than just the eyes. To avoid this, you can first select the eyes with the Elliptical Marquee tool (![]() ). Then, the Red Eye tool leaves the rest of the image alone when you apply it. See Chapter 4 for more.
). Then, the Red Eye tool leaves the rest of the image alone when you apply it. See Chapter 4 for more.