
9
Developing Terraform Code Efficiently
Terraform’s popularity and open source licensing model have spawned a very active ecosystem. Many open source and commercial tools and resources are available that extend its functionality and capabilities. An excellent resource is the curated list of Terraform resources at https://github.com/shuaibiyy/awesome-terraform. This chapter highlights four of the most common and practical tools to help you write and develop Terraform code more efficiently.
In this chapter, we cover the following topics:
- Visual Studio Code (VS Code) Terraform Extension
- tflint
- Checkov
- Terragrunt
Technical requirements
In this chapter, you need to install each of the tools discussed. We provide references on how to do so. The code for this chapter is at https://github.com/PacktPublishing/Terraform-for-Google-Cloud-Essential-Guide/tree/main/chap09.
VS Code Terraform Extension
Note
The code for this section is in the chap09/vscode directory in the GitHub repo of this book. However, in this section, you do not have to actually run Terraform.
VS Code is one of the most popular source code editors, and for a good reason. Managed and maintained by Microsoft, VS Code is open source and includes many features such as syntax highlighting and intelligent auto-completion. VS Code is extensible. At the time of writing this book, there are over 40,000 extensions available that add to the development workflow. One of them is the HashiCorp Terraform extension, which is managed and maintained by HashiCorp. If you already have VS Code on your local system, installing the HashiCorp Terraform extension is easy. Simply go to Visual Studio marketplace at https://marketplace.visualstudio.com/items?itemName=HashiCorp.terraform and hit the Install button.
Once installed, the extension is automatically activated in any folder or workspace that contains Terraform code. In this section, we will highlight the main features of the extension. One of the primary objectives of the Terraform extension is to keep you close to the code – that is, rather than exiting the editor to perform actions such as validation, formatting, or looking up definitions and declarations, the extension lets you perform those actions inside the editor, saving you time.
We are reusing the code from the Writing flexible modules section of Chapter 4, Writing Reusable Code Using Modules, to demonstrate some of the features.
Syntax highlighting and validation
Let’s go ahead and open the main.tf and ./modules/main.tf files, which we have slightly modified. We will see two features immediately. The first one is syntax highlighting. Terraform language constructs, such as modules, strings, and dynamic blocks, are color-coded for quick identification, making the code easier to read.
Second, the extension provides syntax validation. You may notice the unclosed configuration block in main.tf under the Problems tab (Ctrl + Shift + M). Syntax validation provides validation similar to terraform validate but without running the command explicitly. Go ahead and close the block by adding the missing } symbol, and the problem will disappear. Similarly, you can format the code without leaving the editor using the Ctrl + Shitft + I key combination. These features keep you close to the code, as you do not have to leave the editor:
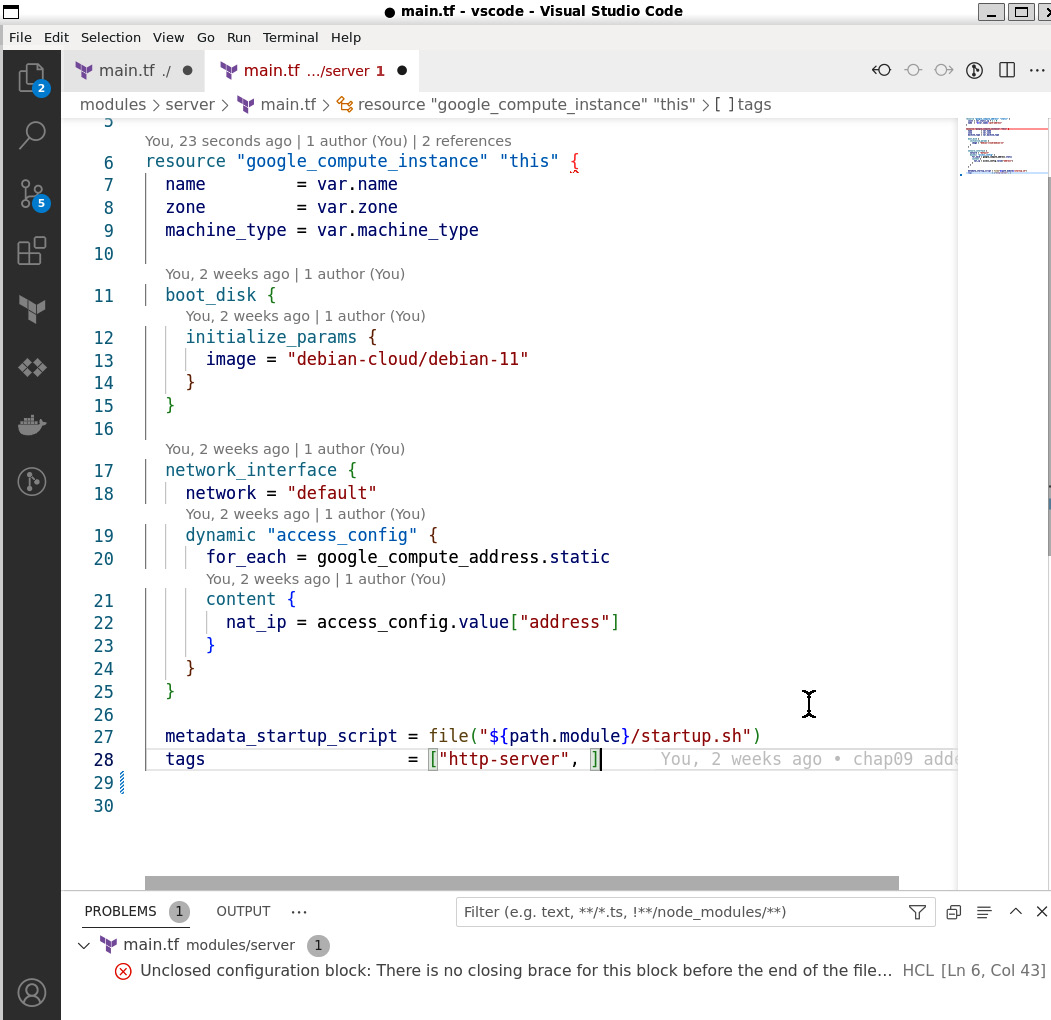
Figure 9.1 – Syntax highlighting and validation
Let’s go to the Terminal tab and run terraform init to initialize Terraform in the current directory. While strictly not required, initializing Terraform will align with the provider version.
Intelligent auto-completion
Once we have initialized Terraform, we can see the true power of the Terraform extension. Let’s start typing to declare a new resource – for example, resource "google_compute_instance". As you type, the editor autocompletes your code – that is, the editor automatically provides the possible options for the text you have typed so far. As you provide more text, the choices narrow down to fewer options:
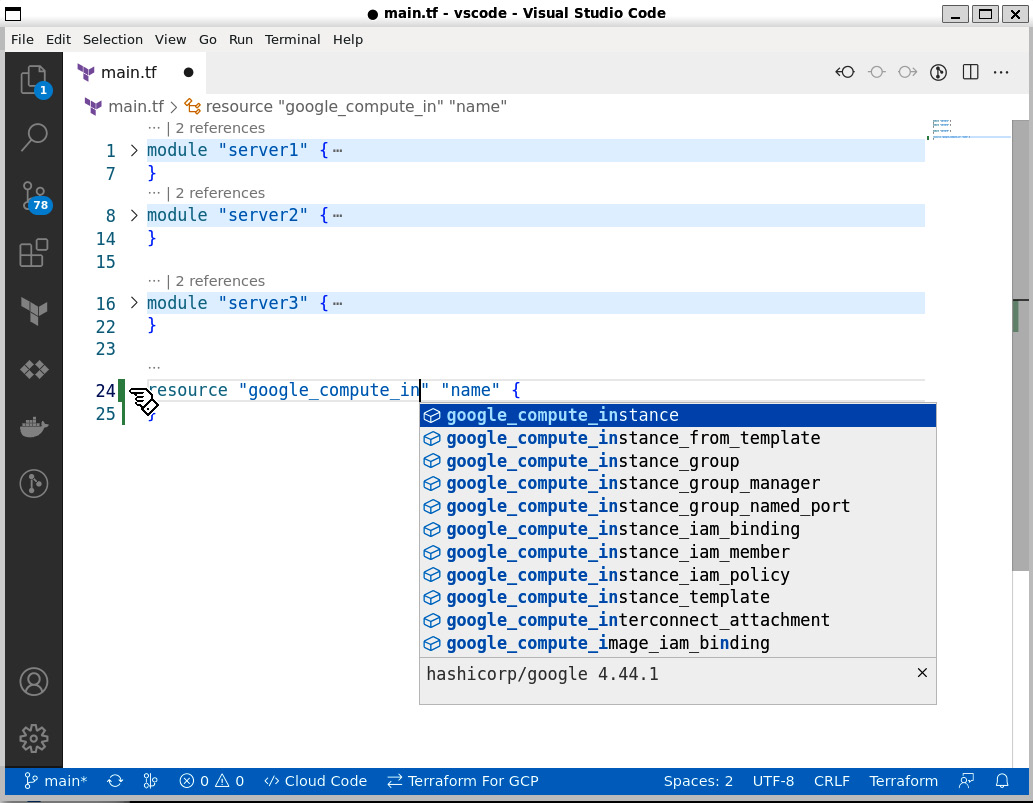
Figure 9.2 – Intelligent autocompletion
Staying with our example of google_compute_resource, once you decide from the list of options, the extension automatically fills in the required fields for that resource. Not only that but also if you hover the cursor over that block, the extension provides additional details for that block.
Note
For this feature, you must enable Terraform | Experimental Features: Prefill Required Fields.

Figure 9.3 – Prefilling the required fields
Consistent in keeping you close to the code, the extension also provides easy code navigation.
Code navigation
To demonstrate this feature, let’s open up the main.tf file and hover the cursor on var.zone on line 4. First, the extension tells us that this variable is of the string type. Right-clicking (or Ctrl + Click on Mac) brings up the context menu. This allows us to quickly go to the variable definition or see all the locations where the variable is referenced:

Figure 9.4 – Code navigation
This feature is useful when working with modules, and we want to investigate the code of the module. Let’s bring the cursor to the value of the source definition of the module, for example, in line 2, and hit F12 (go to Definition). We can peek at the definition, which gives us a view of the first few lines of the module code without switching over to the module file.
The VS Code Terraform extension is an excellent tool that increases productivity, and if you haven’t done so, we highly recommend installing and using it.
tflint
In the Unix world, a linter is a static code analysis tool to detect minor errors. Initially created for the C programming language, many different lint programs have been developed, including for Terraform. Previously, we showed the terraform validate command, which validates your configuration, including the syntax and verification of reusable modules. This command is excellent for finding common syntax errors such as missing brackets or unclosed quotation marks. tflint (https://github.com/terraform-linters/tflint) serves a similar function but detects possible errors, such as invalid instance types, and provides more information, such as any unused declaration, deprecated syntax, and violation of best practices. Therefore, tflint not only finds errors but also helps keep the code cleaner and easier to manage.
tflint consists of a single executable and extensible plugins. To install tflint on your machine, follow the instructions at https://github.com/terraform-linters/tflint#installation for your operating system. There is a default plugin for Terraform and plugins for different service providers, including Google Cloud.
To use the Google Cloud plugin, we define the plugins we want to use in a file called .tflint.hcl shown as follows:
chap09/tflint/.tflint.hcl
plugin "google" {
    enabled = true
    version = "0.21.0"
    source  = "github.com/terraform-linters/tflint-ruleset-google"
}
plugin "terraform" {
  enabled = true
  preset  = "all"
}
After you have installed tflint and defined the plugins to be used, we need to initialize tflint. Once initialized, we can execute tflint to run it in the current directory:
$ tflint --init
$ tflint
We have included an example to show the type of errors and warnings that tflint reports. In this case, tflint reports the following:
- An error, as x2-micro is an invalid machine type
- A warning that the output, which is defined in main.tf, should be moved to output.tf to follow the best practices
- A warning that the static_ip variable is declared but not used
- A notice that the machine_type variable does not have a description
You can disable rules that you don’t want tflint to report by setting the enabled flag to false in the .tflint.hcl file shown as follows:
chap09/tflint/.tflint.hcl
rule "terraform_documented_variables" {
  enabled = false
}
As you can see, tflint is a nice utility that helps you improve your workflow and write more consistent code. Hence, it is often used as one step in the CI/CD pipeline as we will show in the next chapter.
Checkov
Checkov is a static code analysis tool that checks for potential security and compliance issues. Its flexible design allows it to work with not only Terraform but also different kinds of IaC tools, including Docker and Helm. Checkov is implemented in Python and, similarly to tflint, uses rules called policies to check for potential security violations. As of the time of writing, over 150 Google Cloud-specific policies have been defined (https://github.com/bridgecrewio/checkov/blob/master/docs/5.Policy%20Index/terraform.md).
You can extend the predefined policies by creating custom policies using Python or YAML (https://www.checkov.io/3.Custom%20Policies/Custom%20Policies%20Overview.html).
Checkov is a complex tool with a multitude of options and extensions. Thus, we will only cover the basic functionality so you can decide whether to investigate it further.
As Checkov is implemented in Python, Python and PIP must be installed on your local system. You can find the installation instructions at https://www.checkov.io/2.Basics/Installing%20Checkov.html.
Once Checkov is installed, running it is straightforward:
$ checkov –-directory .
We can see that the output provides a lot of information. It starts with the files scanned; the version information; and the number of passed, failed, and skipped checks. It then lists an entry for each checked rule. For each failed rule, Checkov lists the location in the file that violated the policy:
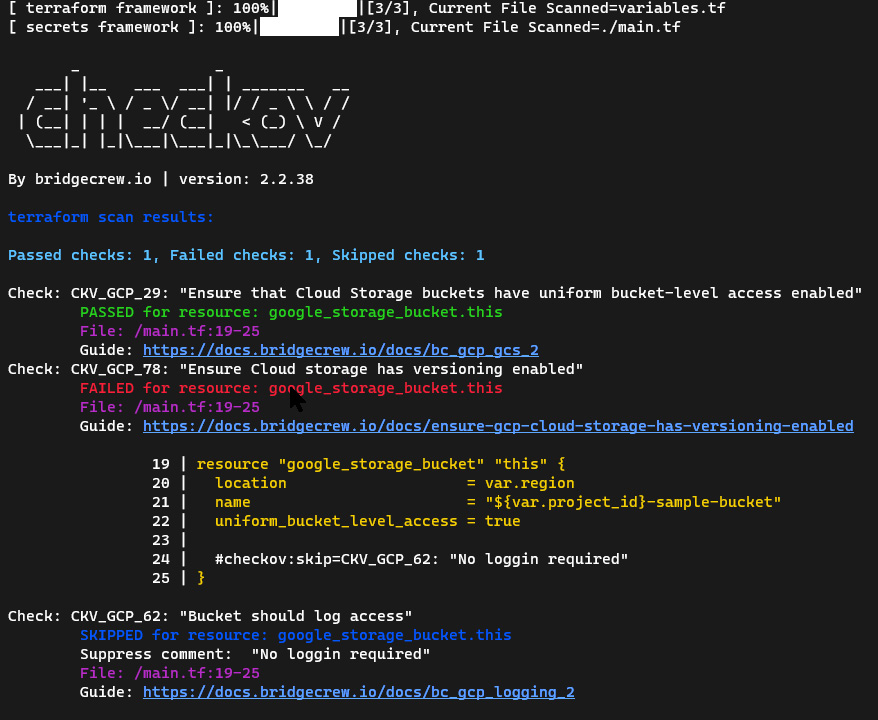
Figure 9.5 – Checkov output
The output for Checkov tends to be verbose and can quickly get overwhelming. We can use the --quiet and --compact flags to shorten the output. When the --quiet flag is set, Checkov only displays failed checks whereas the --compact flag does not display the code block.
Furthermore, there are times when we explicitly do not want to enforce certain rules. Checkov provides two mechanisms to skip rules. First, we can insert comments into the Terraform code to skip a rule and display an appropriate comment, such as #checkov:skip=CKV_GCP_62: "No logging required".
Alternatively, we can specify the rules to skip using the --skip-check flag. Using the comment and the appropriate flag, the output now becomes more manageable:
$ checkov --directory . --skip-check CKV_GCP_78
--quiet --compact
terraform scan results:
Passed checks: 1, Failed checks: 0, Skipped checks: 1
In summary, tflint and Checkov are static code tools that you can incorporate into your workflow to make your Terraform code more maintainable and more secure.
Terragrunt
As you develop larger deployments, your Terraform code becomes more complex. You will also start to have teams working on the same deployment simultaneously. As discussed in previous chapters, it is advisable to break larger Terraform deployments into more manageable parts, each residing in its own subdirectory and each having its own state file. Unfortunately, that creates overhead, and you find yourself repeating yourself. For example, each subdirectory has its own provider.tf and backend.tf files. As we have already experienced, we cannot use interpolation in the backend.tf file and we need to edit each backend.tf file explicitly. Furthermore, we need to run Terraform in each subdirectory independently.
This is where Terragrunt comes into the picture. Terragrunt is defined as a thin wrapper to keep your Terraform code DRY – as in, in line with the don’t repeat yourself (DRY) principle. Terragrunt achieves this by preparing each subdirectory, for example, by writing backend.tf files and then calling Terraform recursively. Thus, rather than individually preparing files in each subdirectory and then calling Terraform multiple times, we define Terragrunt configuration files and then call Terragrunt once in the root directory. Terragrunt performs all the necessary actions recursively, hence removing the need to repeat yourself.
The key features of Terragrunt are to define the backend and provider configurations once and to call Terraform with common CLI arguments recursively.
Let’s see how to use Terragrunt in practice. To demonstrate the use, we will simulate a three-tier deployment similar to the one from Chapter 6, Deploying a Traditional Three Tier Architecture. We have a root directory with three subdirectories, foundation, db, and main. To speed things up, we will not provision any resources and will simply output values to demonstrate the flow.
Previously, we had to edit backend.tf explicitly to specify the bucket, and we also had to duplicate the provider.tf file. Furthermore, we then had to run Terraform in each subdirectory. While this overhead is manageable for this deployment, you can see how it may become cumbersome for more complex implementations and if deployed in multiple environments. With Terragrunt, we can reduce this overhead by creating several configuration files and deploying everything with a single command with no additional editing.
As before, the objective of this section is to give you a brief overview of the main features rather than a detailed description so you can decide whether Terragrunt suits your workflow.
To install Terragrunt, follow the instructions at https://terragrunt.gruntwork.io/docs/getting-started/install/ for your operating system.
As Terraform, Terragrunt uses configuration files written in the HCL language, so we are familiar with the syntax. The configuration files are named terragrunt.hcl by default. We generally place one configuration file in the root directory for global directives and additional ones in each subdirectory. The terragrunt.hcl file in each subdirectory references (includes) the configuration files in the parent directories and adds some additional commands. Therefore, a typical directory structure using Terragrunt looks like the following:
├── db
│   ├── backend.tf
│   ├── main.tf
│   ├── output.tf
│   ├── provider.tf
│   ├── terragrunt.hcl
│   └── variables.tf
├── foundation
│   ├── backend.tf
│   ├── main.tf
│   ├── output.tf
│   ├── provider.tf
│   ├── terragrunt.hcl
│   └── variables.tf
├── main
│   ├── backend.tf
│   ├── main.tf
│   ├── output.tf
│   ├── provider.tf
│   ├── terragrunt.hcl
│   └── variables.tf
└── terragrunt.hcl
As mentioned, Terragrunt configuration files are written in the HCL syntax, so we start by defining some local variables used throughout the configuration file. To pass a variable value to Terragrunt, we can use an environment variable. This is especially useful to pass the Google project ID so that we don’t have to define it or edit it in any file explicitly.
One of the most useful features of Terragrunt is to define the remote_state dynamically. As you have seen, a common practice is to store the same subdirectory structure for the remote state. Terragrunt provides several built-in functions that return paths relating to the directory structure. Therefore, we can define the remote state file generically for each subdirectory, shown as follows:
locals {
  project_id = get_env("GOOGLE_CLOUD_PROJECT")
  prefix     = "chap09/terragrunt"
}
remote_state {
  backend = "gcs"
  generate = {
    path      = "backend.tf"
    if_exists = "overwrite_terragrunt"
  }
  config = {
    bucket = "${local.project_id}-tf-state"
    prefix = "${local.prefix}/${path_relative_to_include()}/terraform.tfstate"
  }
}
When we run Terragrunt, it dynamically generates a backend.tf file in the local subdirectory. First, it retrieves the value of the environment variable GOOGLE_CLOUD_PROJECT and assigns it to the local variable project_id. It then writes the remote_state block using the appropriate values for the bucket and prefix attribute. The prefix attribute will be chap09/terragrunt/db for the DB subdirectory and chap09/terragrunt/main for the main subdirectory.
The next block dynamically generates the provider.tf file, so that we do not have to repeat ourselves. The last block in the root terragrunt.hcl file defines the input variables to be passed to Terraform – that is, it serves the same purpose as the terraform.tfvars file, but again, we don’t have to write the same file in each subdirectory:
generate "provider" {
  path      = "provider.tf"
  if_exists = "overwrite_terragrunt"
  contents  = <<EOF
provider "google" {
  project = local.project_id
  region  = var.region
  zone    = var.zone
}
EOF
}
# Indicate the input values to use for the variables of the module.
inputs = {
  project_id = local.project_id
  region     = "us-west1"
  zone       = "us-west1-a"
}
Now that we have defined the configuration files in the root and the subdirectories, we can run Terragrunt recursively using the terragrunt run-all command:
$ terragrunt run-all init
The preceding command writes the provider.tf and backend.tf files in each subdirectory, and then runs terraform init in each subdirectory to initialize Terraform.
Note
Ensure that your GOOGLE_CLOUD_PROJECT environment variable is set, and if not, set it using the following command:
GOOGLE_CLOUD_PROJECT=`gcloud info --format="value(config.project)"`
You may notice that Terragrunt has created two new files in each subdirectory: provider.tf and backend.tf. Looking into each backend.tf file, you see that the appropriate values for the bucket and prefix are filled in automatically.
Now, we can run Terraform recursively by calling terragrunt run-all apply. However, there is one more thing we need to do. By default, Terragrunt runs Terraform in parallel. In our case, this causes an error, as the different layers depend on each other. Remember that the foundation layer enables several APIs that the db layer requires, and the main layer requires the database to be in place. Thus, we need to instruct Terragrunt to run Terraform in sequence rather than in parallel. We do this by defining a dependency in the Terragrunt declaration file in each subdirectory:
chap09/terragrunt/db/terragrunt.hcl
include "root" {
  path = find_in_parent_folders()
}
dependencies {
  paths = ["../foundation"]
}
Therefore the Terragrunt configuration file in the database subdirectory contains two blocks. The include block references terragrunt.hcl of the root directory, and the dependencies block declares that Terraform can only be called in this directory after the foundation layer is complete.
With this in place, we can now run Terragrunt in the root directory using the following commands. Please note that terragrunt apply automatically adds an -auto-approve flag, so it is better to run the plan step explicitly:
$ terragrunt run-all plan
$ terragrunt run-all apply
Here, you can see how Terragrunt can help you to keep your Terraform code DRY. Previously, we had to edit several files each time we moved to a new project and then had to call Terraform multiple times. With Terragrunt, we can spare this work by defining the appropriate Terragrunt configuration files. However, please note that Terragrunt is not a panacea, and as with all other tools, we should apply it appropriately when it suits our workflow.
Summary
In this chapter, we introduced four commonly used tools in this chapter that can help you improve your Terraform workflow. We started with VSCode Terraform extension, which provides several intelligent capabilities to develop Terraform code more efficiently. We then showed two static code analysis tools. tflint helps you to catch specific errors before running Terraform, and it helps you to make your code more consistent. Checkov improves security by ensuring your Terraform conforms to a set of predefined and custom security policies. Lastly, Terragrunt can improve your efficiency by removing repetitive tasks.
These four tools only scratch the surface of the Terraform ecosystem. There are many more tools available, and more are developed every day. In our next and final chapter, we will see how to integrate Terraform into several Google Cloud services.