
Modern computer applications are built with graphical user interfaces in mind. The user interacts with the application using windows, icons, menus, and a mouse pointer rather than console-based I/O.
To create a graphical user interface using Python, you’ll need to use Tkinter (Tk interface). This module is bundled with standard distributions of Python for all platforms.
Creating a Window
The first two numbers, in this case “800x600,” set the window size . Set this to the desired window size in pixels. This could be 1280x720, 1920x1080, and so on.
The second two numbers, in this case “50+20,” set the initial position of the window on the screen using x and y coordinates.

A module depicts how to create a window. The window size is given as 800 by 600, and its left indention position is 50, and the top at 20.
Let’s take a look at a program. Open window.py. Here, we’ve created a window. You can do this using the Tk() function and assign it to a window object.

A window has a code for creating a window that includes its initial size, position, and title. An untitled and blank window is also included.
We’ve sized the window, so that is 640 pixels wide by 480 pixels high. We’ve also positioned the window 500 pixels across from the top left by 20 pixels down. You can do this using the .geometry() method . This is the initial size and position of the window on screen.
We’ve also added a window title. You can do this using the .title() method . This helps to identify your app.
This is an infinite loop used to run the application and is called an event loop. The .mainloop() method waits for an event such as a keypress or mouse click events from the window system and dispatches them to the application widgets (frames, buttons, menus, etc.).
Adding Widgets
Widgets are standard items for building a graphical user interface using Tkinter.
Menus
Let’s add a menu . You can create a menu bar using the Menu() function. Assign it to an object (e.g., menubar) and attach it to your main window.

A window has the menu bar indicated on top. Below are the file menu and menu commands.
Let’s take a look at a program. Open the file menu.py. Here, we’ve written the program as described earlier.
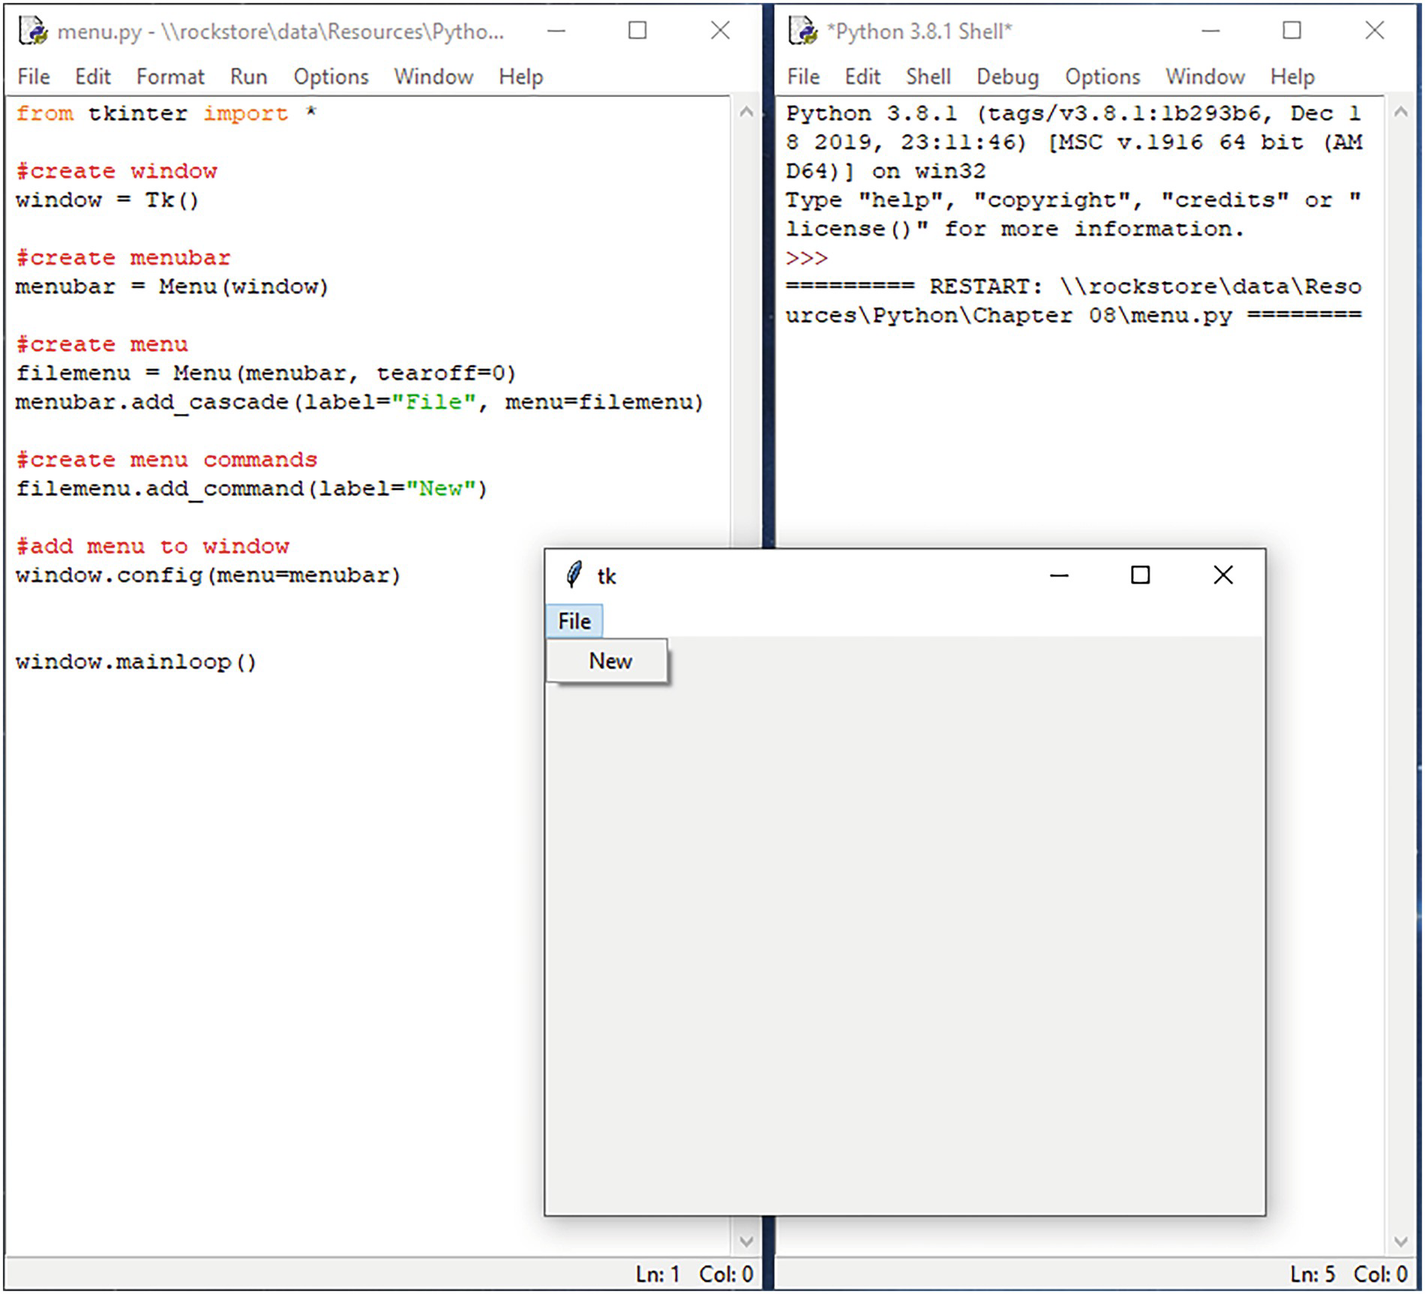
A window has a program for creating a window, menu bar, menu, menu commands, and adding a menu. A window pop-up has a file given on a menu bar.
The Canvas
The canvas is used to draw and create graphics and layouts. This is where you place your graphics, text, buttons, and other widgets to create your interface.
Use parent-window to attach the canvas to your window. Use height and width to size your canvas.
Use bg to set the background color. Open colorchart.py and run the program. This will create the color chart shown here.

A window depicts a color chart. The palette includes the color names and their corresponding numbers.
Select the name of the color from the chart to use in the bg parameter .
The first two numbers are the x and y coordinates on the canvas. The second two numbers are the length and width.

A canvas has a yellow rectangle on its upper left-hand side.
You can also draw a polygon.

A two-line code for creating a triangle includes three sets of numbers corresponding to the three lines to be drawn.
In this example , we’re creating a triangle. A triangle has three sides, so we need to draw three lines. The first two numbers indicate the start point of the first line; the second two numbers indicate the end point of the first line, and so on. Let’s take a look.

A canvas has measurement bars on the top and left. A triangle on it has an apex with starting points 100, 150, and legs at 57, 255, and 143, 255.
Images
You can add images to your canvas. Have a look at images.py. To load the image, use the PhotoImage() function.

A window has a code on the left panel for adding images to a canvas. On the right panel is a canvas with an image of a rocket ship on it.
To paste the image on your canvas, use the .create_image() method.
Buttons
You can add command buttons to your canvas. To do this, use the Button() function.
Use window to specify the name of the window the button is to go on.
Use command to specify the function you want to call to handle what the button does. You can call existing functions or define your own functions to do this.
Message Boxes
You can create different types of message boxes: an info box, a warning box, an error box, and a box that asks for a yes/no response.

Four examples of message boxes and their corresponding icons. The first 3 have the ok button, and the fourth has the yes and no buttons.
Let’s have a look at messagebox.py.

A window has a code on the left for processing yes and no responses. On the right are two message boxes indicating the highlighted yes and ok buttons.
Text Field
Let’s add these to the program. Have a look at textfield.py. Here, we’ve added a text field to the canvas under the command button.

A window has a code on the left panel. On the right is a canvas with a text field, a click me button and a text message box with an ok button.
We’ve also added code in the dialog() function to get the data from the text field and display it in a message box.
The dialog() f unction is called when the “Click Me” button is clicked.
Run the program and see what it does.
Listbox
Let’s take a look at a program. Open listbox.py.

A window has a code for creating a list box. On the right is a canvas with a list box, a click me button, and a message box with an ok button selected.
Checkbox
Let’s take a look at a program. Open checkbox.py.

A window has a code for getting the value when a checkbox is clicked and for creating and adding checkboxes to a window.
When you run the program , you can select any of the checkboxes. When you click the button, the function reads which checkbox is selected and returns the value.

A canvas has the variables red, green, and blue, where the checkbox beside green is ticked, a click me button and a message box for green.
Labels
Label Frame
The LabelFrame is used to group related widgets, such as checkboxes, radio buttons, or text fields.
Let’s take a look at a program. Open labelframe.py.

A window has a code for creating a label frame-group. On the right panel is a text label titled contact details, and a text field for name.
Here, we’ve created a text label and a text field inside the labelframe group (group1).
Interface Design
Now that we know how to create a window, menus, and add different types of widgets, we’ll take a look at how to lay them out in the window to create a usable interface.
You can do this using the grid layout manager. Let’s take a look at an example. Open the file gridlayout.py.
Use the .grid() method to place the widgets in the window according to the grid layout. Use row and column parameters to specify which cell in the grid to place the widget. Use the padx and pady parameters to add some spacing around your widgets in the grid.

A window has a code where some lines are boxed with arrows pointed at widgets on a grid on the right. The grid has two columns and two rows.
Here, we’ve placed a text label in row 1, column 1. There is a text field in row 1, column 2. We’ve placed a command button in row 2, column 2.
When you run the program, you’ll see the result as shown here:

A grid layout has two columns and two rows. On the top row is a text field titled enter name, and below is an ok button.
Let’s design a simple interface for a unit converter app. To design this interface, we’ll divide the window up into three rows and five columns.

A window has five columns and three rows, which contains a geometrical image with labels on the right.
Let’s take a look at the program. Open the file converter.py. Here, we’re adding the widgets to the grid using the .grid() method .

A code for adding widgets to a grid. It includes adding an image, label, combo box, text field, and creating a label, and a button, among others.
We’ve used the padx and pady parameters to space out the widgets in the grid layout.
That’s the interface sorted. As it stands, the program won’t do anything if you click the button or enter a number into the text field.
We need to write a function to take care of this and call it when the button is clicked.
Declare the function in the usual way. We’ll call this one convert() .
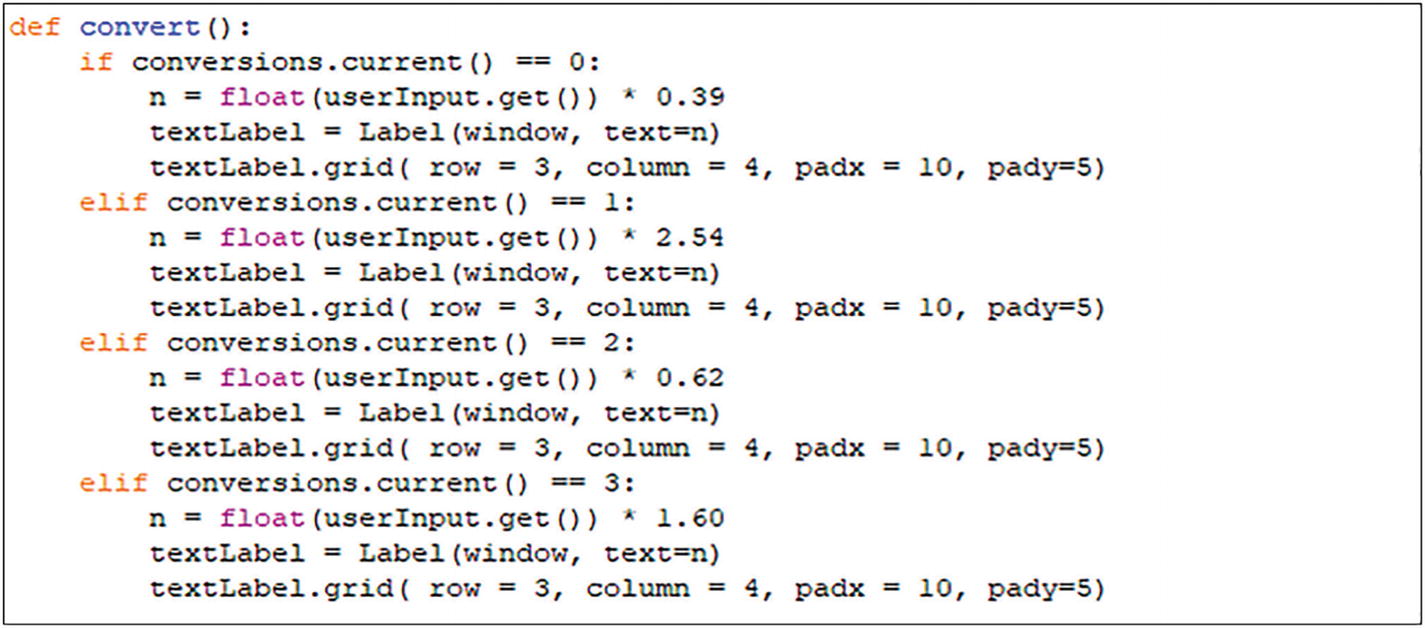
A 17-line code for an outcome or result when a button is clicked or an entry is made in a text field on an interface.
Perform the calculation and return the result to the blank text label in row 3, column 4, of the grid.
Now, when you run the program , you’ll get a nicely laid out interface.

A unit converter window has a logo on the left. On the right is a text field labeled convert, a dropdown menu, an entry box, and an ok button.
Summary
To create a graphical user interface using Python, you’ll need to use Tkinter (Tk interface).
Widgets are standard items for building a graphical user interface using Tkinter.
The canvas is used to draw and create graphics and layouts. This is where you place your graphics, text, buttons, and other widgets to create your interface.