
On your first day at a new job, somebody takes the time to show you around the office. They show you the restrooms and the coffee-maker and tell you the security code. It’s important to know your way around your workplace, and that’s why we want to start by introducing you to the graphical interface of InCopy, so you’ll feel at home.
Whether you’re more familiar with Adobe’s professional design applications, Microsoft Word, or a traditional newspaper text-editing system, this chapter will get you up and running with InCopy quickly. InCopy is truly a professional writing and editing tool, and each interface element and menu item is designed for a very specific purpose. That means if you skip these first few chapters and just start using InCopy as if it were Microsoft Word or a generic text editor, you’ll be missing out on a ton of great features that were designed to make your life as a writer or editor so much easier. Let’s take a look!
Starting on the left side of the screen you’ll notice a small toolbar displaying five tools (Figure 1.1). The Type and Note tools are the first two because you’ll use these most often for typing and editing text and creating notes. These first two tools are usable in all three view modes (Galley, Story, and Layout).
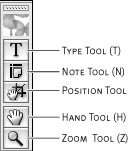
The bottom three tools can only be used in Layout view. The Position tool is used for positioning and cropping images that are in assigned image frames (see Chapter 6 for more information about working with images in an InCopy document).
The last two tools are the Hand tool and the Zoom tool. Click and drag with the Hand tool to move the document within the viewable area and click with the Zoom tool to zoom into the Layout view. To zoom out hold the Option/Alt key and click with the Zoom tool.
Tip
Double-click the Hand tool to fit the entire spread in the window or double-click the Zoom tool to view the spread at 100%. These shortcuts are the same for InDesign CS2.
The default position of the Tools toolbar is a single column on the far left edge of the screen, but it can be customized in many ways. For example, if you would rather display the tools across the top of the screen, grab the gripper area at the top of the Tools toolbar and drag it near the top of the screen.
If you’re familiar with some of Adobe’s other professional graphic design applications such as Photoshop and Illustrator, you might prefer the familiar two-column floating toolbar. If so, grab the toolbar by the gripper area and drag it away from the edge of your screen. Now you can position the floating toolbar anywhere you please.
InCopy has two other toolbars that give you instant feedback and control over different aspects of the writing and editing workflow.
The default location of this handy toolbar is along the top of the screen, beneath the menu commands; it may remind you of the similar toolbar in Word. For users who don’t want to use the menu commands or aren’t inclined to memorize keyboard shortcuts, this helpful toolbar includes shortcuts to several of the most frequently used commands:
 Creates a new InCopy story with default settings.
 Invokes an Open dialog box where you can choose a file to open (see Chapter 2).
 Saves the current document.
 Prints the current document.
 Opens a Find/Change dialog for the current window (see Chapter 4).
 Opens a Check Spelling dialog (see Chapter 4).
 Reveals and hides invisible characters such as spaces, paragraph breaks, and tab characters.
By default, the Track Changes toolbar (Figure 1.2) is parked next to the Command Bar and offers some of the most important InCopy features in an editing workflow. The tools in this toolbar allow you to view, accept, or reject edits. To learn about making text edits and tracking changes in an editorial workflow, see Chapter 5.
Rather than explain all the features of each one now, we’ll simply point out that the InCopy palettes are listed alphabetically in the Window menu. The only exception to this is Type & Tables, which lists a submenu of all the palettes related to those features, including Character Styles, Paragraph Styles, and Tabs. We’ll give a more complete explanation of specific palettes in the context of the overall workflow—to quickly learn more about a particular one, look it up in the index.
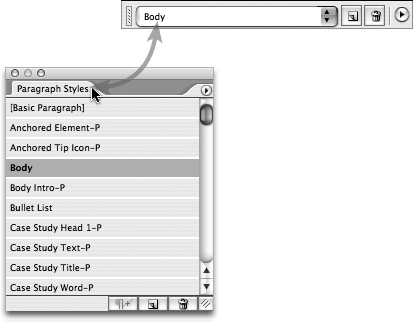
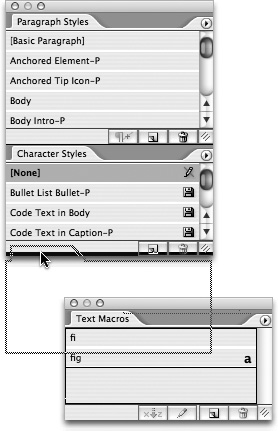
Before going any farther into managing your palettes and toolbars, we want to introduce you to a slick trick found only in InCopy. A few toolbars work only as toolbars, and some palettes work only as palettes, but the remaining palettes (Change Info, Copyfit Info, Swatches, Character, Character Styles, Paragraph, Paragraph Styles, and Swatches) lead an intriguing double life. They can behave and look just like a typical floating palette, but if you drag the palette tab (the part with the text label) to the top or bottom of your screen, the palette morphs into a horizontal toolbar (Figure 1.3).
Some InCopy users will be familiar with the palettes of Adobe applications, whereas other folks are making the switch from a word-processing application such as Microsoft Word, with its horizontal toolbars. The hybrid palette/toolbars mean that no matter what other software you might be familiar with, InCopy can be customized to behave the way you prefer.
It’s pretty cool that you can customize how the InCopy interface works, but it gets more interesting when you discover that most of the toolbars can be customized to show only the features you actually use. Click the palette menu button ![]() in any toolbar to see a Customize command plus a few available options particular to that set of tools. Choose Customize and you can enable the options you want to see all the time and disable the ones you don’t use (Figure 1.4). This is an easy way to minimize screen clutter and maximize your efficiency as you work in InCopy.
in any toolbar to see a Customize command plus a few available options particular to that set of tools. Choose Customize and you can enable the options you want to see all the time and disable the ones you don’t use (Figure 1.4). This is an easy way to minimize screen clutter and maximize your efficiency as you work in InCopy.

Adobe applications are famous for their floating palettes, and InCopy is no exception. InCopy has 23 default palettes and toolbars, so organizing and managing palettes is important to working efficiently. In addition to accessing palettes from the Window menu or by using the corresponding keyboard shortcuts, you can use the many helpful user interface features that InCopy shares with its sister product, InDesign. Let’s start with palette stashing, the ability to hide floating palettes vertically along the left or right edge of your screen as a way to minimize screen clutter and maximize the viewable size of your document windows (Figure 1.5). The default installation of InCopy includes five palettes on the right side of the screen. To stash or reveal these palettes, just click on the palette tab. To hide or reveal all the stashed palettes at the same time, Option/Alt-click the palette tab.
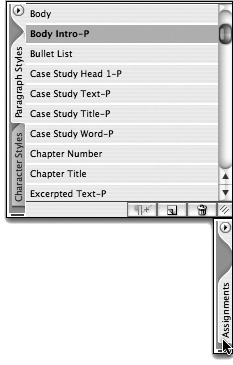
If you open a new palette and want to stash it for frequent use, just click on the palette tab and drag the tab to the left or right edge of your screen. You can even stash groups of palettes by holding down the Option/Alt key as you drag the palette tab of any of the palettes in the group. Stashing palettes is a nice way to save screen real estate, but Macintosh users shouldn’t stash InCopy palettes on the same screen edge as the OS X Dock. Position the Dock at the bottom of the screen or on the opposite edge from the stashed palettes, or you’ll drive yourself insane with an electronic version of Whack-a-Mole.
Tip
You cannot stash palettes at the top or bottom of the screen, but you can convert many palettes to toolbars by dragging them near other toolbars.
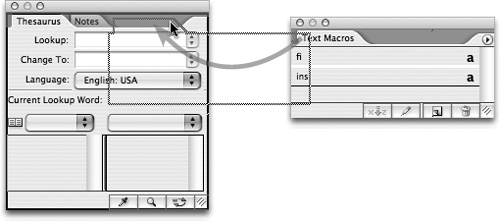
In addition to stashing palettes on the edges of your screen, you can also group multiple palettes together. For example, drag a palette tab near the top of another open palette and release the mouse button (Figure 1.6). Now you have multiple palettes open, but they consume the space of a single palette. Although you can group any number of palettes together, eventually you will no longer be able to read their palette tab text labels. Group palettes that belong together logically or according to your workflow. To ungroup palettes click on a palette tab and drag it outside the perimeter of the palette.
One last way to organize your palettes is to dock them together top to bottom. Drag one palette tab over the bottom of another open palette. When a thick black line appears on the target palette, release the mouse button, and the two palettes will be stuck together (Figure 1.7). When you move the top palette all the others docked below it move together. You can even dock and group multiple palettes together into one tall “super” palette. Then you don’t need to select, move, hide, or stash a bunch of separate palettes. Instead, group and dock the palettes you use most frequently and manage just one item.
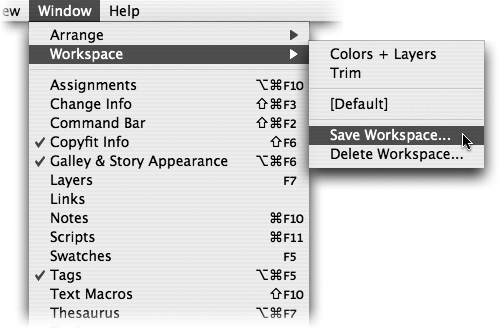
Once you position, group, dock, and stash your palettes and toolbars just how you like them, you can save the custom arrangement as a workspace. To save a custom palette arrangement, choose Window > Workspace > Save Workspace (Figure 1.8). Give the workspace a recognizable name and click OK. At different times you might use InCopy in different ways, so you can save multiple workspaces for different tasks or different users. To access a saved workspace, just choose Window > Workspace > [WorkspaceName]. Assigning custom keyboard shortcuts to your favorite workspaces makes it easy to quickly switch between the different palette configurations (see “Customizing Keyboard Shortcuts” later in this chapter). As you become more comfortable with workspaces and find new ways to use them, you might adjust an existing workspace. Instead of deleting and recreating the workspace, you can simply arrange your palettes and save with the same name. When InCopy asks you if you want to replace the existing workspace with the same name, just click OK.
If you decide not to create your own workspaces but just want that factory-fresh feeling, choose Window > Workspace > [Default] to set things back to the original configuration. The Default workspace is a good place to start new users on learning the software.
We think workspaces are really cool, but if you experiment a lot you might end up with a bunch that you don’t actually use. This isn’t technically a problem, but it might drive you crazy. To clean house, choose Window > Workspace > Delete Workspace, select the unwanted workspace from the pull-down menu, and click Delete.
After you’ve spent time customizing and saving your workspaces, it’s a good idea to make a backup of your custom workspaces for safe-keeping. Each custom workspace is saved on your hard drive as a tiny XML settings file; a saved workspace called “StylingSetup” will appear as a file called StylingSetup.xml. Macintosh users can find these workspace settings files in username/Library/Preferences/Adobe InCopy/Version 4.0/Workspaces, and Windows users will find them in Documents and Settings/Username/Application Data/InCopy/InCopy 4.0/Workspaces. You can back these files up, copy them to another computer, or share them with coworkers.
InCopy documents can be viewed in three ways: Galley (Command/Control-G), Story (Command/Control-Option/Alt-G), and Layout (Command/Control-L). You switch views by clicking the corresponding tabs at the top left of the document window or selecting the commands from the View menu. But why are there three different ways to view a simple text file? Well, if all that mattered were letters, words, and punctuation, then a simple text editor would suffice. But InCopy documents usually end up as part of an InDesign layout and will have to fit a specific space and coexist with other text and images, and the different views give you different ways of previewing how the layout will look.
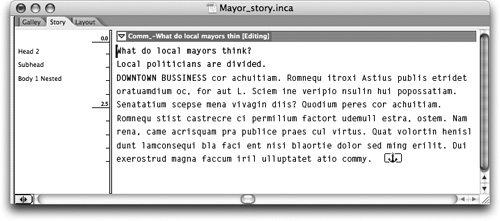
Story view, the middle tab, is the simplest view of your document (Figure 1.9). Story view shows your text with no regard for how line breaks, frame breaks, page breaks, or image wraps will end up looking. It’s just a basic text flow that shows only paragraph breaks and that wraps lines at the width of the document window. When you’re writing a first draft or you have no constraints on the length of your text, you probably want to write in Story view.
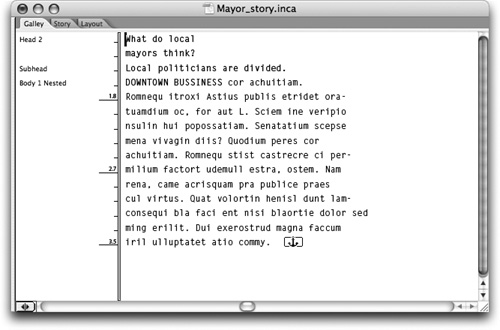
Galley view, the leftmost tab, displays your text with an increased level of detail. Unlike Story view, Galley view shows you accurate line breaks, column breaks, frame breaks, and page breaks. It even shows line breaks that indicate where your text wraps around an image or another text frame in the InDesign layout (Figure 1.10). This is really helpful—instead of “writing blind,” you actually know how your writing will fit in relation to the rest of the layout. One great feature of both Galley and Story views is accurate copyfit information. If your InCopy document was exported from an InDesign layout or is a stand-alone document with a specified depth value (see Chapter 2), then these views warn you if you are over or under the designated copyfit area. Chapter 8 offers a thorough explanation of how copyfitting works in InCopy.
The third way to view your InCopy document is in Layout view, which shows your writing in the context of the InDesign layout or InCopy template. Layout view shows text with accurate formatting applied instead of the plain text you see in the Galley and Story Views. If your InCopy document is exported from InDesign, you can also see the complete page layout, including images, text wrap, guides, grids, rulers, and spreads (Figure 1.11). Because InDesign and InCopy share the same underlying architecture, you can rest assured that what the writer sees in Layout view is exactly what the designer will see in InDesign. Once you’ve enjoyed the experience of writing to fit in InCopy, composing in Word will feel like writing in the dark (ages).

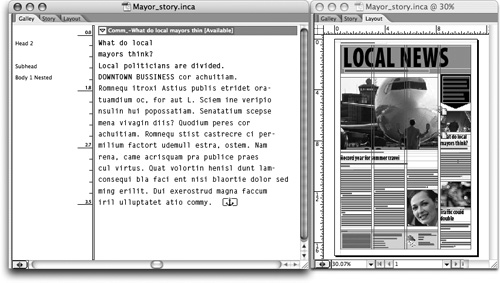
If you enjoy the luxury of using multiple monitors or have a really large display, you can take advantage of InCopy’s ability to display multiple views of a document simultaneously. To create another view of a document, choose Window > Arrange > New Window and then choose Window > Arrange > Tile so you can see both views at the same time (Figure 1.12). Now you can do some really interesting things, such as view the same document in one window in Story view and the other in Layout view. This way you can write or edit in one view and see live layout updates in the other. You can also drag and drop text from one window to another if you need to rearrange large portions of text.
Most InCopy users deal with long text documents that they need to navigate quickly and easily. In Galley and Story views you can scroll up and down with the scrollbar or with the scroll wheel on a scrolling mouse. If you prefer to keep your hands on the keyboard, you can scroll through the open document with the Page Up and Page Down keys.
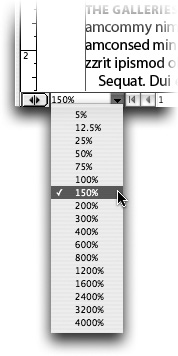
Layout view offers a lot more navigation options because it shows the layout instead of just the text. The View menu holds commands for zooming in and out and fitting the current page, spread, or pasteboard to the window boundaries. To view the document at 100%, choose View > Actual Size or press Command/Control-1. You can also select the Zoom tool ![]() in the Tools palette and click in the document window. To zoom out hold the Option/Alt key when you click. You can also alter the zoom by selecting a zoom value from the pull-down menu in the bottom-left corner of the document window or by typing a zoom value in the number field (Figure 1.13). To move the document around in the window, you can use the scroll bars or select the Hand tool in the Tools palette and pan the document in any direction.
in the Tools palette and click in the document window. To zoom out hold the Option/Alt key when you click. You can also alter the zoom by selecting a zoom value from the pull-down menu in the bottom-left corner of the document window or by typing a zoom value in the number field (Figure 1.13). To move the document around in the window, you can use the scroll bars or select the Hand tool in the Tools palette and pan the document in any direction.
Next to the zoom options at the bottom of the document window (in Layout view) are a few page navigation icons that make document navigation easy. With one click you can navigate to the first page, previous page, next page, or the last page in the document. To jump to a specific page just choose the page number from the pulldown menu (Figure 1.14). If you have a really long document, press Command/Control-J to focus on the page number field and enter the page number you want to access, press Return/Enter, and InCopy will instantly take you to that page.

The last document navigation technique we want to show is position markers, introduced in InCopy CS2. When editing a long document, you may want to mark a specific place in the text to which you can quickly return. Put the cursor where you want the marker to go, choose Edit > Position Marker > Insert Position Marker (or press Shift-Command/Control-[), and a small pink placeholder is inserted at the current cursor location (Figure 1.15).

After the position marker has been inserted, you can, from anywhere else in the file, choose Edit > Position Marker > Go To Marker (or press Shift-Command/Control-]), and InCopy jumps back to the marker location. You can place only one position marker per document, but you can move it by choosing Edit > Position Marker > Replace Marker (or by pressing Shift-Command/Control-[). If you rely on the position marker frequently, you should do yourself a favor and use keyboard shortcuts—we’d go nuts if we had to use the menu commands every time, but the keyboard shortcuts make it a breeze.
With multiple writers and editors contributing to this book, it’s become apparent that we all think differently. These differences are really obvious when you compare how each of us has configured our Galley & Story Appearance settings. Considering how much time you’ll spend staring at text on your screen, it’s a good thing that InCopy gives you lots of ways to customize your editing environment.
The Galley & Story Appearance toolbar, in the bottom-left corner of the screen, includes five tools for customizing the appearance of text in Galley and Story views (Figure 1.16). Although it may seem obvious, remember that these options affect only Galley and Story views. In Layout view, text formatting is controlled by the character and paragraph formatting in the document, and the layout is determined by the corresponding InDesign layout or the document settings in InCopy.
On the far left of the toolbar is the display font menu. In Galley or Story view, you can choose a font that’s optimized for on-screen reading, though it may not be the same font used in the InDesign layout or printed output. Although you can conceivably pick any font you want, remember that it should be easy to read, and its character set must be able to display any advanced characters that appear in the copy. For example, Adam, who has extensive background in Web design, really likes to use the Monaco typeface for editing text on screen, but if the text demands more advanced characters that aren’t available in Monaco, he needs to choose a font that is more complete. Letter Gothic is the default selection and a good choice for most purposes. The next two toolbar options let you customize the font size and the spacing in Galley and Story views without affecting Layout view or the InDesign document.
The fourth toolbar option allows you to show line numbers in the left column of the document window, but only in Galley view (Figure 1.17). Because Story view is only a text editing environment and doesn’t calculate page-composition data such as column width, text wrap, and page breaks, it has no need to display line numbers. The last option controls the display of paragraph styles (see Chapter 3) in the left column of the document window. We find the visibility of paragraph styles to be very helpful, and since turning them off doesn’t save any space, we recommend leaving this option turned on.

The ability to control options such as font and line spacing is helpful, but some of the coolest options are found in the application preferences. Choose InCopy > Preferences > Galley & Story Display (Mac) or Edit > Preferences > Galley & Story Display (Windows) to access a few advanced controls (Figure 1.18). If most of your work involves writing and editing text, then you know how hard it is on your eyes to stare at black text on a white background all day. To lighten your visual load, you can adjust the colors of the text and background for a more pleasing work environment. Choose Amber Monochrome or Terminal from the Theme pull-down menu and you’ll probably chuckle at the retro effect, but your tired eyes will thank you.

Among these preferences is the option to change the appearance of the cursor to one of four different styles (Figure 1.19). You can even make it blink, blink, blink. Although these options might seem minor, anyone who spends a lot of time working with type will appreciate the variety that InCopy offers.

When working with an InCopy assignment file (see Chapter 8) or InDesign document that contains multiple stories, you can view and and edit more than one story at once. In Galley or Story view, each available story is listed under a story separation bar (Figure 1.20). Each separation bar displays an expand and collapse button ![]() on the left and the story title so you can distinguish the different stories.
on the left and the story title so you can distinguish the different stories.
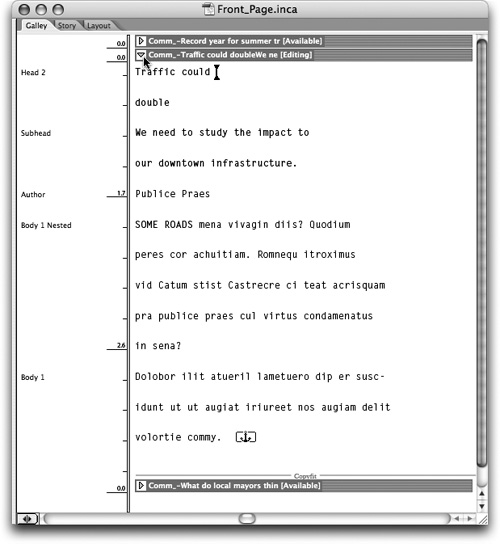
You can expand and collapse individual stories with the button in the story separation bar or choose View > Expand/Collapse Story. The View menu also offers commands for expanding or collapsing all stories. To view just the current story, Option/Alt-click the expand/collapse button in its separation bar, and all the other stories are collapsed.
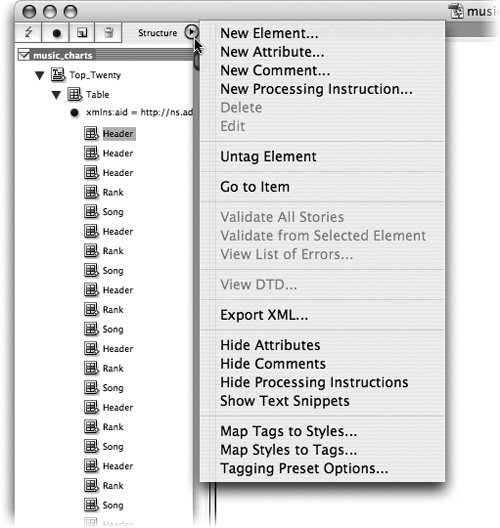
You may be wondering about that tiny widget ![]() in the bottom-left corner of the document window. Well, if you click that it reveals the Structure pane (Figure 1.21) on the left side of the document. We’re not going to launch into a complete explanation of XML in this chapter, but if you’re using XML in your workflow this pane is where you create tags, validate your file, and export XML. To learn more about working with XML in InCopy, check out Chapter 7.
in the bottom-left corner of the document window. Well, if you click that it reveals the Structure pane (Figure 1.21) on the left side of the document. We’re not going to launch into a complete explanation of XML in this chapter, but if you’re using XML in your workflow this pane is where you create tags, validate your file, and export XML. To learn more about working with XML in InCopy, check out Chapter 7.
If you want to see images with the text in Layout view while you write and edit, you need to know about adjusting display performance to achieve optimal speed and quality with the software. Note that images will appear only in Layout view and only when you open the complete InDesign layout or an InCopy assignment that isn’t limited to placeholder frames. (See Chapter 6 to learn more about working with images in InCopy.)
Tip
You can’t see images in Galley and Story views, so the Display Performance settings have no effect on those views.
The default setting, called Typical Display, displays the graphics in your document pretty well. However, if you’re only looking at how your text interacts with the placement of images and not the actual content of the graphics, then choose View > Display Performance > Fast Display. This shows the image frames as gray boxes (Figure 1.22) and also eliminates the anti-aliasing in the text. This bare-bones viewing mode allows you to quickly pan and scroll through documents because it limits the amount of information rendered on the screen. When you’re ready to see your document in more detail, just choose View > Display Performance > Typical Display.

Tip
If you decide to view all your documents with the Fast Display view setting, you can designate Fast as the Default View option in the the Display Performance pane of the application preferences.
The third display performance setting is High Quality Display. This setting renders all raster images, vector graphics, and transparency at the highest possible quality. However, your document takes much longer to zoom, pan, and scroll due to the complexity of visual information that InCopy has to render. The more images and transparency in your layout, the slower the document displays in High Quality Display. This setting is best used for a quick preview of your layout; the performance hit makes it impractical to work in this mode all the time.
Tip
The Display Performance settings affect only how the document is previewed in InCopy and do not affect the final printed output in any way.
Although we want to be realistic about the trade-offs of the High Quality Display setting, there’s an interesting compromise that can be achieved by using Display Performance settings options for individual objects. If you select a single image and choose one of the options under Object > Display Performance, the setting affects only the selected object. This is handy when you need to see a detail in an image that might not be clear with the Typical Display setting. For example, when writing a caption for a photograph, you can turn on High Quality Display for the image, write the caption based on the details of the photograph, and then revert the view settings for that image by choosing Object > Display Performance > Use View Setting.
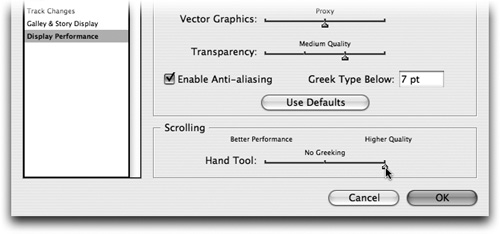
If you’re not happy with the three default Display Performance settings, you can customize them in the Display Performance pane of the application preferences. Choose an option in the Adjust View Settings menu and adjust the controls for raster images, vector graphics, and transparency. To speed up display in any of the settings, you can increase the value for Greek Type Below; this setting means that in Layout view, InCopy displays text smaller than a specific point size as a dimmed gray bar instead of actual text. As you zoom into the Layout view the text will become legible. You can also choose to turn on or off anti-aliasing of text.
Tip
If you want to preserve the object-level view settings for images when you close a document, check Preserve Object-level Display Settings in the Display Performance pane of the application preferences. If you don’t enable this option, all object-level settings are reset every time you reopen a document.
One more way to optimize InCopy performance is to control the scrolling behavior in Layout view. In the Display Performance pane of the preferences, look at the Scrolling section; the default setting is High Quality (Figure 1.23). This setting does indeed give you the best quality view when you scroll or pan your InCopy document, but it is also the slowest option. If you want to speed things up a little, choose Better Performance, which renders images and text as grey areas. The middle option, No Greeking, greeks only images.
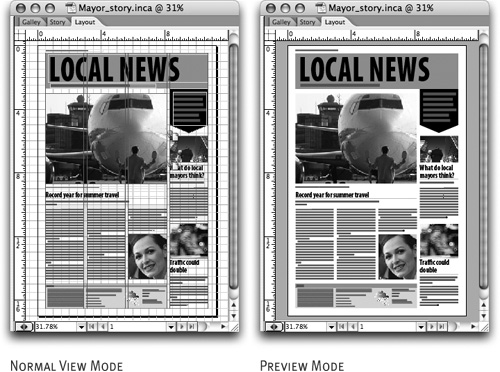
When you’re writing or editing in InCopy, you’ll probably be more focused on the text than the layout, but once you’ve finished writing you’ll want to preview the layout before you submit your work. Enable Layout view by clicking the Layout tab and then choose View > Screen Mode > Preview. Preview mode shows you the layout without any of the guides, grids, baseline grids, frame edges or invisible characters that you normally see (Figure 1.24). By temporarily removing all the visual extras, you get a pristine view of the layout to help you make any last-minute decisions about copyfitting, text wrapping, and paragraph breaks. When you’re done previewing the document, choose View > Screen Mode > Normal to revert to the normal mode.
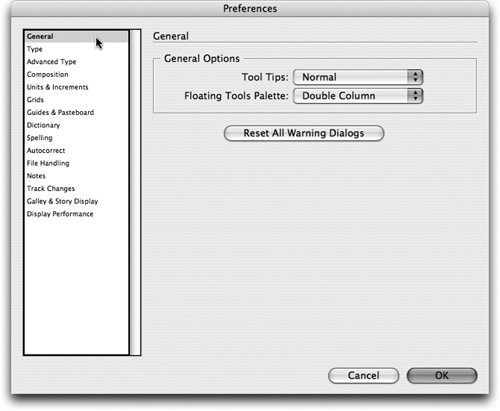
Customize the application preferences by choosing any of the options under InCopy > Preferences (Mac) or Edit > Preferences (Windows). Choose any option in the submenu to open different panes in the same dialog; you can access the other categories as needed (Figure 1.25). To change a preference, select from the category list on the left, adjust the settings in the pane, and click OK. Most of the preferences are self explanatory; we cover more complicated or especially interesting options in later, appropriate chapters. The InCopy Help files are also a good source of details on preferences (see “Accessing the Help Files,” later in this chapter).
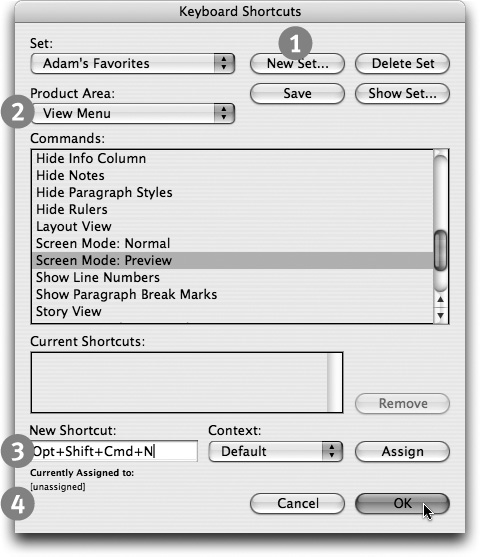
We’ve covered customizing toolbars, palettes, and workspaces, but did you know that you can change InCopy’s keyboard shortcuts as well? That’s right, complete control is at your very fingertips. Choose Edit > Keyboard Shortcuts to open the Keyboard Shortcuts dialog (Figure 1.26). The Set pop-up menu offers two sets: Default and Shortcuts for Microsoft Word. To create your own set of shortcuts, follow these steps:
Click New Set, give your set a name, and click OK.
From the Product Area menu, choose the menu or area you want to modify and select the specific command from the Commands list.
Click in the New Shortcut field, press the keys that make up the new shortcut, and then click Assign and OK.
InCopy lets you know if an existing shortcut uses the same keys; you can either try a new key combination or click Assign to override the existing shortcut.
You can use your new shortcuts on multiple computers or share them with coworkers by copying the shortcuts file from Adobe InCopy CS2/Presets/InCopy Shortcut Sets/[ShortcutSetName] and installing it in the same location in another copy of InCopy.
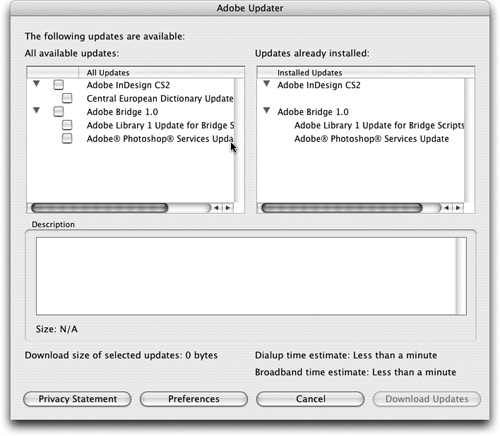
One of the greatest accomplishments of the InDesign and InCopy engineering teams is the modularity of the software, which makes it easy to customize and improve. From a practical viewpoint, this makes it easier for Adobe to release fixes and improvements in a timely manner. To check for the latest free updates to InCopy, choose Help > Updates to launch the Adobe Updater software. Adobe Updater compares your installed copy of InCopy with the latest updates on Adobe’s servers and downloads and installs them automatically for you (Figure 1.27).

For those who manage multiple computers, Adobe Updater keeps a history of all the updates that have been installed. This is a great way to make sure everybody is using the latest version. Just look on the right side of the window for a complete summary of installed updates (Figure 1.28).
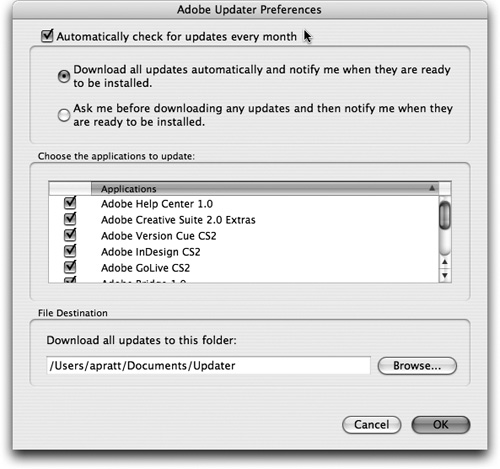
You can also have Adobe Updater automatically check for new updates once a month. Just click the Preferences button and make sure the automatic option is enabled (Figure 1.29).
Tip
There may occasionally be a product update that requires a login or isn’t distributed through Adobe Updater. Visit www.adobe.com/support/downloads for a complete list of downloadable updates.
Although we’ve tried throughout this book to introduce the features and explain the workflow of InCopy, you may stumble upon something that we haven’t covered. In this case (unlikely, we hope), you can consult the Adobe Help Center, a cool new application that offers a centralized location for help files for any CS2 application you have installed. Choose Help > InCopy Help to launch the Help Center (Figure 1.30).
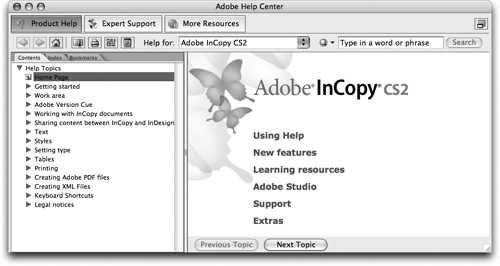
You can browse the contents, navigate an alphabetical index, or type in a specific phrase and click the Search button. When you find helpful information that you might want to refer to again, click the Bookmark icon ![]() and give the bookmark a memorable name. The link to the information will be saved under the Bookmarks tab on the left side of the Help Center. If the information helps you so much you want to commit it to paper, click the Print icon
and give the bookmark a memorable name. The link to the information will be saved under the Bookmarks tab on the left side of the Help Center. If the information helps you so much you want to commit it to paper, click the Print icon ![]() at the top of the Help Center window.
at the top of the Help Center window.
Now that we’ve given you a tour of the InCopy interface, and you can find your way around the place, it’s time to really get started. In the next chapter you’ll learn how to create new InCopy documents, open existing files, and save document presets.