
Writing is not easy. Regardless of whether you use quill and ink, pen and paper, a typewriter, or a word processor, the process of getting your ideas together, organized and on paper is challenging, if not daunting. Compound that effort with the back and forth of editing and revising, fact-checking, and even simply styling the page, and it becomes real work.
That’s why we’ve abandoned the quill and ink, opting to write this book in InCopy CS2. Thus far you’ve seen a number of advantages to using InCopy, but much of the composition many of us do in this day and age is more about automation and less about actual writing. We’ve already seen some of these features, such as applying styles or customizing keyboard shortcuts.
In this chapter, we focus on tools for streamlining and automating the process of writing so you can concentrate more on the words and less on the process.
Mike’s office, where he does most of his work, currently has about a dozen dictionaries on the shelf. He rarely needs them any longer. (Mostly, he now pulls them out to settle arcane language arguments over the dinner table.) That’s because InCopy CS2 comes with 35 different dictionaries, encompassing multiple languages and including a USA Medical dictionary and a USA Legal dictionary.
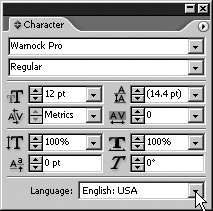
Open the Character Palette (Window > Type & Tables > Character) and at the bottom of the palette you’ll find a pull-down menu listing the dictionary you’re currently using (Figure 4.1). If you don’t see it, click on the palette menu and choose Customize (Figure 4.2). At the bottom of the list of Customize Character Controls, you’ll find an option called Language (Figure 4.3). Put a check mark in the box next to Language to enable the Language pull-down at the bottom of the Character palette. Click OK and you’re all set.


Tip
If the language is not displayed in the Character palette when you save a workspace, it will not be shown when you invoke that workspace. Also, the Default InCopy workspace does not show the language in the Character palette.
As is the case for most preferences in Adobe products, setting the language from the Character palette without any document open will make this the default language for InCopy CS2. Now, as you work, InCopy CS2 will assume that the language you’ve chosen at the bottom of the Character palette is the language you want to use for purposes of spelling (see “Using Spell Check,” later in this chapter), repeated words, capitalization, and hyphenation. For most readers of this book, that will be English, but InCopy CS2 comes with five flavors of English dictionaries, including USA Legal and USA Medical, so there is a decent chance that you might need to invoke something other than English: USA. That doesn’t mean you’re stuck in one particular language, though. As you work, you can change languages by changing the language in the pull-down menu before typing a word or phrase in the new language, or you can highlight any words you like and change the language pull-down at that point. The result will be that InCopy, when spell checking, will read your language assignment and check the appropriate dictionary.
As we mentioned, InCopy CS2 is installed with 35 different language dictionaries, most of which are for non-English languages. Believe it or not, that may not be enough for you. If you write specialized material, you will find that other words such as technical terms, proper nouns, and topic-specific jargon are not included in any of the 35 dictionaries.
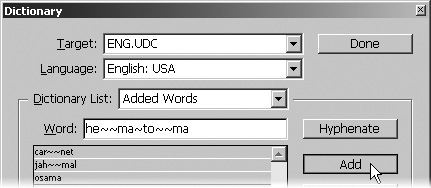
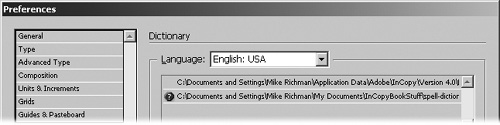
You can go about the tried-and-true method of clicking the Add button as you’re running a spell check to add words to your user dictionary. A user dictionary is the dictionary InCopy refers to for spelling and hyphenation. If you already have a few special words in mind, choose Edit > Spelling > Dictionary to open the Dictionary dialog (Figure 4.4). The Target pull-down, atop the box, allows you to add the words to a specific dictionary. If you are working on a stand-alone document, not linked to an InDesign layout, you can add words to your user dictionary, denoted by the .udc extension. The second pull-down, Language, tells you the language associated with the assigned user dictionary. Just type a word into the Word field and click on the Add button, on the right. (You can tell InCopy how to hyphenate your added word. See “Controlling Hyphenation for New Dictionary Words,” later in the chapter.) The third pull-down in the box lets you look at a dictionary for a list of words you’ve added, complete with hyphenation settings, or words you’ve set to ignore. (Don’t ignore the section on Ignore — see “Using Spell Check,” later in this chapter.)
If you have many unique, industry-specific words, you might find the need to create an additional dictionary (or more than one!) that includes vocabulary specific to your topic. For this book, for example, words like spell check, pull-down, toolbar, .incx, OpenType, and Quick Apply are not in InCopy’s English: USA dictionary. We had a significant list of terms we knew we’d be using, so we created our own dictionary.
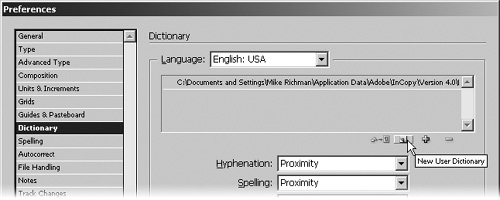
Open InCopy’s Dictionary Preferences file, which Windows users will find under Edit > Preferences > Dictionary and Mac users will discover at InCopy > Preferences > Dictionary (Figure 4.5). Click on the New User Dictionary button ![]() , give your new dictionary a name, and save it.
, give your new dictionary a name, and save it.
Add words to your newly created dictionary from InCopy’s Dictionary dialog (Edit > Spelling > Dictionary). Be sure to select the appropriate user dictionary from the target pull-down at the top of the dialog (Figure 4.6). Here you have a choice of adding words one by one, as we discussed earlier in this chapter, or, if you have a long list of words, clicking the Import button on the right to make InCopy import any .txt file into your new user dictionary. This is referred to as importing a word list. The words in your word list can be separated by commas, spaces, or paragraph markers. If your original .txt file’s contents have tildes in them, then InCopy will use them if hyphenating your custom dictionary words (see “Controlling Hyphenation for New Dictionary Words,” later in the chapter). You can import as many different .txt files into a user dictionary as you want. InCopy CS2 is smart enough that it will not import duplicate words. If, however, you have the same word set to hyphenate two different ways in two different sources, InCopy will honor the hyphenation settings in the most recently imported .txt file. In the Import dialog, InCopy offers you the option of appending the new word list to the current list or replacing the old list with the new one.

As you would expect, the way to share word lists with others is to export a word list. In the same Dictionary dialog, (Edit > Spelling > Dictionary), select the user dictionary with the list of words you want to share and then click Export and save it where you want. That exported .txt file is a word list that can be tweaked, if necessary, and then passed along to others who can, in turn, import it (see “Modifying User Dictionaries,” earlier in this chapter).
Remove words from an InCopy user dictionary by choosing Edit > Spelling > Dictionary, select the user dictionary you want from the pull-down target list, and choose Added Words from the Dictionary List pull-down. You’ll be given a list of all the words in that user dictionary. Highlight a word and click on the Remove button on the right. It will no longer be part of that dictionary file. Unfortunately, the only way to simultaneously remove more than one word from a dictionary is to delete the entire dictionary.
In InCopy CS2, you can now simultaneously use multiple user dictionaries. Adding word lists to your existing user dictionary can be a helpful way of making sure InCopy spell checks against the unique, industry-specific words you need. Dividing up those unique words into multiple user dictionaries can speed up the spell check process. If you write technical documents for your company, you might use both a dictionary of industry-specific terms as well as a dictionary of the internal jargon at your company. When writing documents for internal use, you could invoke both dictionaries. When writing for external distribution, you might disconnect from the internal jargon dictionary so that InCopy does not waste time spell checking against that list.
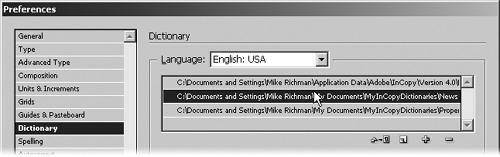
To add a user dictionary, click InCopy > Preferences > Dictionary on a Mac (Edit > Preferences > Dictionary on Windows) to open the InCopy Dictionary Preferences file. Click on the Add User Dictionary button (Figure 4.7) and navigate to the user dictionary (.udc file) you want to add. Select the dictionary, click Open, and your added user dictionary will appear in the list of dictionaries in the Dictionary Preferences dialog.

When InCopy CS2 needs to check your text against a dictionary, either for puposes of spelling or hyphenation, it checks the dictionaries in the order in which they are listed in the Dictionary window of InCopy’s Preferences file (Figure 4.8). If you have tremendous volumes of words in your dictionaries, the order of your dictionaries can speed up the process. Reordering the dictionaries is simply a matter of dragging a dictionary up or down the stack of dictionaries in the Preferences list.
If you’re checking documents against irrelevant dictionaries, you’re slowing InCopy down. Removing a dictionary is simply the opposite of adding one. In InCopy’s Dictionary Preferences, click on the dictionary you want to remove and then click the Remove User Dictionary button ![]() . This process tells InCopy CS2 not to check documents against the dictionary you’ve removed.
. This process tells InCopy CS2 not to check documents against the dictionary you’ve removed.
Tip
InCopy CS2 does allow you to delete the default dictionary from this list. The location of the default dictionary is Users/Username/Library/Preferences/InCopy/Version 4.0/Dictionaries/Proximity (Mac) or Program Files/Adobe/AdobeInCopyCS2/Plug-ins/Dictionaries/Proximity (Windows). You can either manually add it back into your list or reset your preferences (see Chapter 2). If you reset your preferences, you’ll have to relink all your custom user dictionaries.
User dictionaries can be located anywhere, but InCopy must be able to find them. That means that if a dictionary is moved or renamed, InCopy can’t find the dictionary and therefore can’t use it. InCopy warns you in two places when the link to a dictionary is broken. Because user dictionaries are part of InCopy’s preferences file, when you restart the application, if InCopy cannot find one of the dictionaries that was in its list, it will display a dialog to that effect (Figure 4.9). InCopy will also warn you in Dictionary Preferences (Figure 4.10) by displaying a stop sign icon to the left of any dictionary to

which the link is broken. The stop sign means that InCopy can no longer “see” the dictionary at the path where it previously found it. The solution is to click on the Relink User Dictionary button ![]() . This will open a dialog enabling you to navigate to the current location of the user dictionary, but do this and link to a dictionary with a different name and — voila! — you’ve added yet another dictionary to your list, rather than relinked the broken link. No “the filename is different” warning. And you still have to fix the broken link.
. This will open a dialog enabling you to navigate to the current location of the user dictionary, but do this and link to a dictionary with a different name and — voila! — you’ve added yet another dictionary to your list, rather than relinked the broken link. No “the filename is different” warning. And you still have to fix the broken link.
It makes sense that everyone in your shop or workgroup should be using the same dictionaries. Ideally, in a networked or workgroup environment, everyone is using the exact same dictionaries, rather than copies distributed to each user. In this way, there is one master dictionary that holds all the changes, and any modifications to it are uniform. In the workgroup environment, the first user to load the dictionary has the ability to modify it, but for all others the file is locked, as indicated by a lock symbol to the left of the dictionary name in InCopy’s Dictionary Preferences (Figure 4.11). A common approach in environments where the dictionary rests on a server is to set its permissions as read-only at the operating system level. Any modifications to the dictionary are then centrally made by an administrative user, typically your company’s Systems Administrator.
As you would expect from a text-editing tool, InCopy includes a powerful spell check. It becomes even more powerful when you master its settings to take you beyond just repairing misspellings.
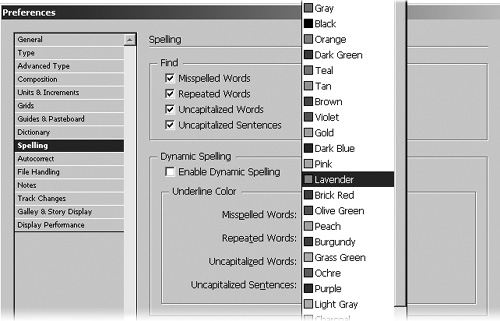
InCopy CS2 allows you to control which spelling errors it will detect. These settings are in the top half of InCopy’s spelling preferences, which are found at InCopy > Preferences > Spelling on Mac (Figure 4.12) and Edit > Preferences > Spelling on Windows. By default, all four options are checked, meaning that InCopy will look for misspelled words, repeated words, uncapitalized words, and uncapitalized sentences. You may want InCopy to check only for misspelled words. In that case, deselect the other three options and you’ll never have to hear about uncapitalized sentences again — at least not from InCopy.

Tip
These settings affect both InCopy’s standard spell check as well as dynamic spelling (see “Understanding Dynamic Spelling” later in this chapter).
If you understand how InCopy CS2 invokes language dictionaries for spell checking, then the basic process of running a spell check in InCopy CS2 is going to be quite familiar. You can either highlight a selection or run a spell check beginning at your current cursor position. Choose Edit > Spelling > Check Spelling (or press Command/Control-I) to open InCopy CS2’s Check Spelling dialog (Figure 4.13). You’re probably already familiar with most of these options from other word-processing programs, but we’re going to point out a few that make InCopy CS2 unique. First, InCopy shares the same dictionaries with InDesign. That means that if you successfully spell check a story in InCopy, then InDesign will also be happy with the spelling. Possibly more importantly, the shared dictionaries mean shared hyphenation settings, so that the two programs can agree on hyphenation, line counts, and copyfit information; InCopy and InDesign will agree on when and where to break a word.
The bottom half of the dialog box is where the meat of the settings is. You can tell InCopy to spell check to the end of the current story, the entire current story, the current document (meaning multiple stories in the InDesign document you may have open), or all documents you currently have open.
Tip
Although InCopy CS2 will spell check multiple stories in an InDesign document that you have open, it will only let you change spelling in stories you have checked out, so be certain to check out a story before you run a spell check on it.
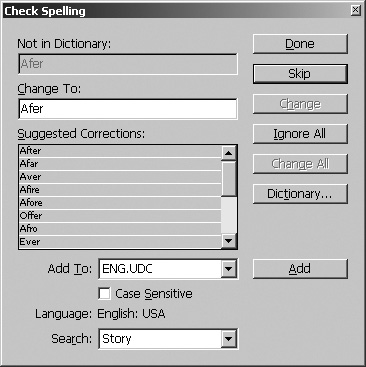
Suppose you wrote the sentence, “At trial, Jamal brought up the hematoma during voir dire.” If you’ve been writing away with InCopy set to English: USA as you type in this sentence and then run InCopy CS2’s spell check, InCopy will stop on the words Jamal, hematoma, and voir. It stopped on Jamal because it’s a proper name, and InCopy does not recognize it. If this is a word you’d like to add to your dictionary, use the Add button to add “Jamal” to your dictionary. Note the pull-down to the left of the button that says Add To. If you’re using user dictionaries, you’ll have several dictionaries to choose from, but initially you can add it to the standard English dictionary.
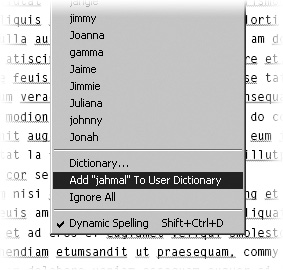
What if you don’t know whether the spelling of his name is Jamal or Jahmal? You won’t want to add that to a dictionary, but you do have two reasonable alternatives. You can either Skip or Ignore All. If you skip a word, InCopy will still flag its next appearance in the text or flag it the next time you check the spelling of the same sentence. That may well serve your purposes. The alternative is a very powerful one called Ignore All, but it might not do what you think. Ignore All tells InCopy to both ignore every other instance of the word as you spell check this document and adds it to your user dictionary’s list of words to ignore. InCopy will then ignore it in every document, neither flagging it as misspelled nor approving it as correctly spelled. To look at the current list of words you’ve set to ignore, head on over to Edit > Spelling > Dictionary and choose Ignored Words from the Dictionary List pull-down (Figure 4.14). When you relaunch InCopy CS2, your Ignored Words list is automatically cleared out, and Jamal will once again be flagged as a misspelling in any document.

Tip
Using an OpenType font’s ligatures in your InCopy CS2 document? The good news is that using the ligature will not cause InCopy to flag the word as misspelled. You can have your cake and eat it, too!
The word hematoma[1] is, of course, a medical term. It’s not in InCopy’s English: USA dictionary, but it is in the English: USA Medical one. Highlight hematoma, change the language in the Character Palette to English: USA Medical. Now, when InCopy spell checks hematoma in this document, it will change, on the fly, to the English: USA Medical dictionary, locate the word, and then switch back to English: USA and continue. That is, until it gets to voir dire. Voir dire[2] is not in InCopy’s English: USA dictionary either, so you should highlight it and assign it to English: USA Legal. Now if you spell check the sentence anew, InCopy CS2 will start with the English: USA dictionary, including the newly added Jamal, switch to the English: USA Medical dictionary for hematoma, back to English: USA for the word during, and then to English: USA Legal when it arrives at voir dire. Not only that, it’ll happen in a fraction of the time it took to describe the process. Don’t be fooled by the Language field at the bottom of the dialog box. Although it’s a good thing to keep an eye on, the only time you should really pay close attention is when InCopy stops on a word, just to make certain that it’s using the appropriate dictionary. You can change the language assignment of a word as you’re spell checking by clicking on the Language pull-down in the Character palette. No need to close the Check Spelling dialog.
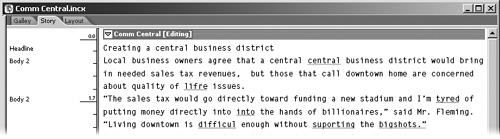
You have the ability to control whether InCopy will spell check the notes you’ve put into your documents as well. In the next chapter, we cover notes in detail. Suffice it to say, notes are a great way to communicate with your collaborators on a project or even make notes to yourself while writing. We realize that if you’re just making notes to yourself, the equivalent of a sticky note, you might not worry about spelling. If, on the other hand, your note is something that you want to run by the legal department that may be converted into live text, it’s probably best that you spell check the notes as well. The default setting for InCopy is that the notes are spell checked when you’re using the Galley or Story view (Figure 4.15). If you prefer to turn this off, head on over to Preferences > Notes and deselect Include Note Content When Checking Spelling.

The alternative to the Add button in the Check Spelling dialog is the Dictionary button. Click Dictionary and you’ll have a bit more control over how words get added to dictionaries. Jamal is a two-syllable word. When you add it to the dictionary, you should tell InCopy where it should be hyphenated, when necessary. You accomplish this by typing a tilde (~) into the word between the first “a” and the “m.” If you have a polysyllabic word, such as hematoma, you could enter a tilde after each syllable:
he~ma~to~ma
And you prioritize the hyphenation for InDesign by inserting multiple tildes thusly:
he~~~ma~to~~ma
A single tilde is the first choice for where to hyphenate this word, two tildes indicate second choice, and three tildes indicate third choice. Insert your tilde(s) into your word in the Word field of the Dictionary dialog and click Add.
Whiz! Bang! Pow! That’s the feeling of InCopy’s dynamic spelling. It’s dynamic, after all, just like the Dynamic Duo.
Dynamic spelling means InCopy helps you spell on the fly rather waiting for you to initiate a spell check. It’s not on by default, but there are two locations to turn it on: Either go to Edit > Spelling > Dynamic Spelling or go to InCopy > Preferences > Spelling on Mac (Edit > Preference > Spelling on Windows) and check the box marked Enable Dynamic Spelling. They both accomplish the same thing, so you only need to use one. With the default dynamic spelling preferences enabled, InCopy references any active dictionaries (see the previous section) and then underlines misspelled words, repeated words, uncapitalized words, and uncapitalized sentences in all three document views (Figure 4.16).
It’s in the dynamic spelling preferences at the bottom half of the Spelling Preferences dialog that you can change the underline color bringing each of these issues to your attention. You might want to change these either to fit in with the color scheme you’ve chosen for your Galley and Story display or to differentiate among different kinds of spelling issues, given that green is the default color for three different sorts of issues (Figure 4.17).
Once you’ve enabled dynamic spelling, if you’re already in the midst of writing a long document, it might take a moment for InCopy to catch up with you. If you’ve turned it on before you began writing, it should have no problem keeping up with you dynamically.
Any misspelled word that dynamic spelling underlines can be fixed most expediently by Control-clicking or right-clicking it. That action will open one of InCopy’s context-sensitive menus, and because you’re already familiar with InCopy’s spell check and dictionary functions, most of this will seem obvious. If your word is underlined because dynamic spelling believes it to be misspelled, the menu offers you a number of options based on InCopy’s best guess as to what the word is supposed to be (Figure 4.18). Now all you have to do is select the appropriate spelling from the list — POW! — it’s corrected. Of course, InCopy is not always correct, and sometimes the word in your document is correct (probably because it’s some sort of technical term or jargon), and you wish you’d already added it to your user dictionary. Down at the bottom of the pull-down menu is Add [the word] To User Dictionary (Figure 4.18). Just choose that command and — BOOM! — it’s part of the dictionary. If you prefer to open up the Dictionary dialog from here, just select that option from the contextual menu enabled by dynamic spelling and — ZAP! — it’s right there. From the contextual menu, you also have the same option to Ignore All (which we discussed earlier in this chapter). Last but not least, yet another way to turn dynamic spelling off is by selecting it from the bottom of the contextual menu. It’s a toggle. If you select it, the check mark goes away, as do all the underlines, and you’ll need to dive back into preferences — SPLASH! — to turn it back on.
Want dynamic spelling to fix other things? If dynamic spelling flags a word as needing capitalization, then Control-clicking or right-clicking on that word will offer up the option to Capitalize [the word] as well as the alternative of adding it to the dictionary, just in case the word is, say, e. e. cummings. Similarly, if you’ve neglected to capitalize the first word in a sentence, InCopy will underline that word as well. Unfortunately, InCopy simply assumes that every word following a period should be capitalized. As we all know, that’s not always the case, as in:
Mr. Charles’ references to love, infatuation, etc. punctuated many of his hit records.
Even adding “etc.” to your user dictionary will not resolve this particular issue.
Control-click or right-click on a word that has been underlined because it’s repeated, and InCopy offers the option of deleting the redundant word. But only one. Meaning if you’re quoting Paul McCartney lyrics and you enter a series of yeah yeah yeah yeah, as Sir Paul is wont to do, InCopy will underline the last three as repeated words, even if you needed three of the four. And you’re only able, via the contextual menu, to remove the yeah’s one at a time.
Mike has no problems spelling. On the other hand, not a week goes by that he doesn’t mutter to himself, “My job would be so much easier if I knew how to type.” Autocorrect and text macros, its sister functions, have made his job much easier than in the days when he (sorta) learned how to type on an IBM Selectric with a jumbo bottle of correction fluid at the ready. Whether you don’t spell well or don’t type well, Autocorrect can be a lifesaver.
If you’re not familiar with the concept of Autocorrect, InCopy uses it to look over your shoulder as you type, and if it sees you type a word it knows to be misspelled, it corrects it immediately, without any involvement on your part. A word like danceing is corrected to dancing immediately. The list InCopy uses to make its Autocorrect corrections is in the Preferences dialog under Autocorrect (Figure 4.19).
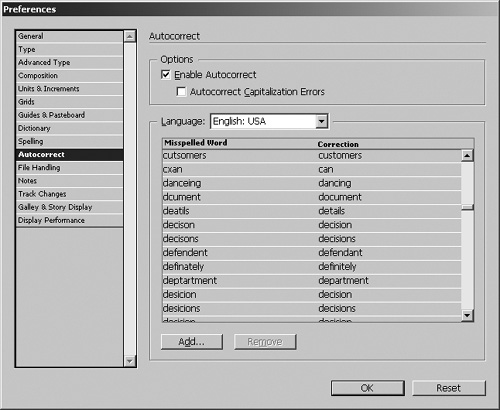
In the left column you’ll find a given misspelled word paired in the right column with its corrected counterpart. InCopy comes with an extensive list, but feel free to add your own words that you misspell or mis-type regularly. They’re in alphabetical order, so you can scroll through to see if words you regularly have problems with are already in the list. If not, feel free to click the Add button at the bottom of the dialog box and fill in a misspelling paired up with its correction to add it to your list. Even better, if you add a word to your misspelled list that already exists, InCopy will automatically overwrite the previous pairing. No need to remove a word only to retype it.
For XML-savvy users, InCopy’s Autocorrect list is an XML list, and, just to keep you on your toes, there are two of them. The first list is located inside Applications/Adobe InCopy CS2/Presets/Autocorrect. That’s the default Autocorrect list that’s installed with InCopy. If you use the Autocorrect preferences’ Add button to add your own word pairs, those words end up in Users/username/Library/Preferences/Adobe InCopy/Version 4.0/AutoCorrect on a Mac and Documents and Settings/Username/Application Data/Adobe/InCopy/Version 4.0/Autocorrect on Windows. Either way, it’s an XML file, and if you want to open it in an XML editor, you can add in as many pairings as your heart desires. You can also copy either one from one user to another, now that you know where it belongs, and that way keep everyone in your shop consistent.
Tip
Two things about the InCopy CS2 Autocorrect preferences XML file: First, the feature is dependent on the file in the Presets folder. Don’t expect to live with only the Preferences file because you’ll need them both. Second, if you use the keyboard shortcut to delete InCopy’s preferences (see Chapter 2), the Autocorrect preferences do not get reset.
Autocorrect might seem like a great way to let InCopy speed up your typing for you. Suppose you go to InCopy’s Autocorrect preference file and add PM for Prime Minister into your Autocorrect settings. Now every time you’re writing about a Prime Minister, you can type PM, and InCopy’s Autocorrect will immediately replace your two letters with Prime Minister. A great idea, but InCopy’s Autocorrect is always thinking in the lowercase. InCopy’s Autocorrect assumes that anything you’ve typed in uppercase is a proper noun or an exception of some sort. That means that the next time you type PM in caps, nothing will happen. Worse still, when you put in the time of Prime Minister Blair’s press conference as 3:30 pm, InCopy has no idea that your intentions are otherwise, and will replace pm with Prime Minister. But fear not: the workaround and savvier solution all around is to create text macros.
Autocorrect is a great way to let InCopy fix your spelling and typos, but text macros can take it to the next level. If you’ve never experienced text macros in other word-processing programs, you’ve been missing out. In short, a text macro can take a complex series of keystrokes combined with formatting and allow you to boil it down to just a few keystrokes. If you find yourself repeatedly typing involved chunks of text that need to be formatted or assigned to styles, a text macro can save you time and energy. For example, typing President George W. Bush repeatedly is both difficult and time-consuming. What if you could reduce it to just two or three keystrokes?
Creating text macros is easy. We recommend that you type the actual macro text you want to use onto the page (in our case, President George W. Bush) and apply any formatting you want, either with paragraph or character styles, or by manually formatting the text, and then select your text. Open the Text Macros palette (Window > Text Macros) (Figure 4.20). Either click the New Macro button at the bottom of the palette or from the Text Macros palette menu choose New Macro and behold the New Macro dialog (Figure 4.21).


Tip
If you use the New Macro option without typing, formatting, and selecting the text in your document first, the text macro field of the New Macro dialog will not remember text attributes, even if you check the box in the dialog.
Atop the box, you’ll create a macro code. A macro code is the name of the text macro you create. Type a macro code, and InCopy will replace the code with actual text. In our example, InCopy will replace the letters GWB with George W. Bush. First, type GWB in the Macro Code field and then type George W. Bush in the Macro Text field.
Tip
One of the good things about text macros is that the macro codes are case sensitive. GWB can be the macro code for George W. Bush, but you might have another macro code gwb, which will generate George Washington Bridge. Nifty, eh?
Check the Remember Text Attributes option if you want specific formatting to be applied to the text every time you type the macro code. Formatting might mean that you’ve applied paragraph or character styles or you’ve manually formatted the macro text, such as changing a type style to bold. If you do opt to “remember text attributes,” the Text Macros palette will display an a to the right of the listing for that text macro (see Figure 4.20).
Last but not least, you can assign a macro key shortcut at the bottom of the dialog. This is ideal for invoking a text macro with a specific keyboard shortcut rather than a set of keystrokes you might want to reserve for actual use. Continuing with the PM example, earlier in this section, if you type in a macro code of PM, which will type the copy Prime Minister, you can assign a macro key shortcut of Command-Shift-F12, so that if you type in PM, it will remain PM, but if you press Command-Shift-F12, InCopy will type in Prime Minister without causing you grief when typing 12:38pm. Click OK and note that the macro code is now listed in your Text Macros palette.
Another way to prevent the keystroke PM from automatically expanding to Prime Minister Tony Blair is to head over to the palette menu of the Text Macros palette and uncheck Automatically Swap Macro Text. The default setting is on (Figure 4.22), but if you turn it off, only the macro key shortcut will generate your text macro.
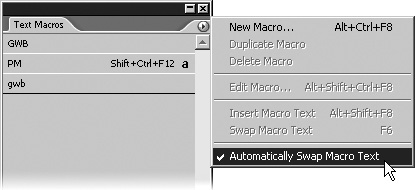
Using a text macro is easy. If you assigned your text macro a macro code — and left the Automatically Swap Macro Text option checked at the bottom of the Text Macros palette menu (Figure 4.22) — then type the macro code into your document and the macro text will immediately replace your macro code. You could also type in the macro key shortcut, and that will invoke your macro text.
At the bottom of the Text Macros palette (see Figure 4.20) are buttons that do the same things as some of the options in the Text Macros palette menu. From left to right:
Insert Macro Text will do exactly that. Click on one of the text macros in the Text Macros palette and click this button. InCopy will insert your macro text at the insertion point in the document.
Edit Macro allows you to modify the attributes, such as text, formatting, and macro keys for a selected text macro.
Delete Macro deletes the text macro currently selected in the Text Macro palette. (If you do this, InCopy will open a dialog warning you that this action cannot be undone. Just say OK to make the deletion.)
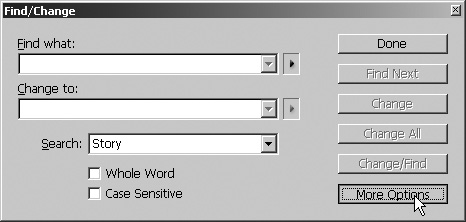
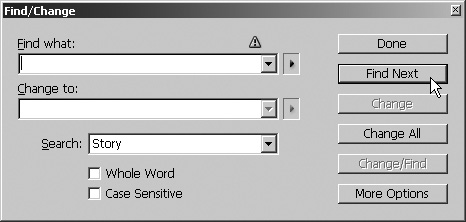
Choose Edit > Find/Change (Command/Control-F) to open the Find/Change dialog (Figure 4.23). At face value, it looks like Find/Change in any other word-processing program, and in some ways it is. But InCopy CS2 has added some subtle but important features that make this a much more writer-friendly tool than those found in other programs.

The first step is to define the search criteria. In the top field of the dialog box, type the word (or words) you want to find in your document. If you’re doing a find in order to locate a word in a document with no intention of changing anything, leave the Change to field blank. If your intention is to not just find but change as well, fill in the Change to field with the replacement word or words you’d like to use. By default, InCopy will search from the point of your cursor until it either finds the next instance of your word or has searched your entire story, whichever comes first. If it finds your word, it stops and highlights it in the document window. By definition, spelling counts here. If you want capitalization to count as well, check the Case Sensitive box at the bottom. If you want to search only for words, rather than parts of words, check the box before it Whole Word box, which means searching for cup will not stop at occupy or occupation.
InCopy searches the current story by default, but you can use the Search pull-down menu either to expand the scope of your search to the current document or all the documents you have open, or confine the search to the end of the story or even limit it to just the active text selection.
Once you’ve defined the parameters, the options on the right are pretty self-explanatory:
Find Next finds the next instance of whatever text is in the Find field.
Change swaps out the found text and puts in the contents of the Change to field.
Change all makes a wholesale replacement of all instances of what’s in the Find field with what’s in the Change to field.
Change/Find will swap out the found text, put in the contents of the Change to field, and move to the next instance of what’s in the Find field.
In order to replace the text you are trying to find, fill in the next field Change to, and InCopy will be poised to replace occupation with insurgency (Figure 4.24).

The Find/Change command has an expansive list of special characters you can use. The flyout menu to the right of the Find field will search for such things as tab spaces, hairlines, bullet characters, and many other items a writer or editor may need to find. The identical list appears in the flyout menu of the Change to field for the same reason (Figure 4.25). Maybe you’re in the midst of editing someone else’s article about neuroses, and they have put a non-breaking hyphen into every instance of obsessive-compulsive. To correct that mistake you can type obsessive into the Find field, select Nonbreaking Hyphen from the flyout menu, and then type compulsive after that.

If your inner Scotty says you need more power, click on the More Options button on the lower right and, behold, you can boldly Find/Change to, specifying very detailed formatting (Figure 4.26). Nearly any styling functionality of InCopy, from a character style to a discretionary ligature, can become a criterion for either the Find or Change to component of your search. You can use these in tandem with text (find Record Deficit with a paragraph style of Headline) or with no text components at all (find any copy with an indent setting of Away from spine). If you set up either the Find or the Change to sections with formatting and then opt back to Fewer Options without removing those formatting choices, then InCopy will remind you, via a yield symbol, that formatting exists for one or the other, or both (Figure 4.27).
Although there are numerous dictionaries in Mike’s office, there’s only one thesaurus, dog-eared from years of use. Fortunately, InCopy CS2 has reduced his reliance on Roget.
InCopy CS2’s thesaurus is a palette (Figure 4.28), meaning you start by going to Window > Thesaurus to open it. Type the word you intend to replace in the Lookup field. Alternatively, you can highlight a word in your document and click on the Load Word icon at the bottom of the palette ![]() , or you can highlight the word and use the keyboard shortcut Command/Control-Shift-5 to accomplish the same thing. Once it’s loaded, the next step is to look up the word, which can be accomplished by clicking on the Lookup Word button at the bottom of the palette
, or you can highlight the word and use the keyboard shortcut Command/Control-Shift-5 to accomplish the same thing. Once it’s loaded, the next step is to look up the word, which can be accomplished by clicking on the Lookup Word button at the bottom of the palette ![]() , or invoking the keyboard shortcut Command/Control-Shift-6. Finally, the Change Word button
, or invoking the keyboard shortcut Command/Control-Shift-6. Finally, the Change Word button ![]() or Command/Control-Shift-7 will either replace the highlighted word in the text with the word in the Change To field of the Thesaurus palette, or insert the word in the Change To field wherever the cursor is in the text. Double-clicking one of the suggested words also replaces the selection on the page.
or Command/Control-Shift-7 will either replace the highlighted word in the text with the word in the Change To field of the Thesaurus palette, or insert the word in the Change To field wherever the cursor is in the text. Double-clicking one of the suggested words also replaces the selection on the page.
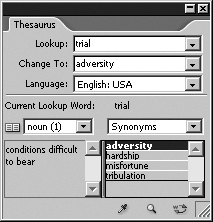
Sadly, Mike’s dog-eared Roget is monolingual. C’est la vie. InCopy CS2’s thesaurus is not. It’ll help you work in any of the dictionaries included with your copy of InCopy.
As soon InCopy finds your word in its thesaurus, it gives you a definition in the lower-left corner of the palette. Still, like any good thesaurus, InCopy doesn’t know whether the word you’re looking up is intended for use as a noun, adjective, or a verb. If multiple options exist, it will offer them. For instance, looking up detail in InCopy’s thesaurus will lead to a list of synonyms, two sets if it’s used as a noun, one if it’s used as a verb (Figure 4.29).
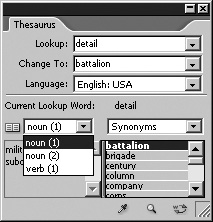
The pull-down on the left of the palette allows you to choose among nouns, verbs, or adjectives as appropriate. The first noun definition of the word detail is military subdivisions, which offers up such synonyms as battalion, brigade, corps and unit. The pull-down on the right then lets you determine whether you want synonym, antonym, or something else. For instance, InCopy will also suggest the option of “See Also” when it finds a word that is abstractly related but neither a synonym nor an antonym. In our example, you can use the right hand pull-down to opt for a near synonym for detail, for which InCopy suggests subdivision. Changing to the verb list of synonyms, the definition morphs into to give a detailed account while offering just a synonym and an antonym.
Tip
The selection of noun or verb then controls whether InCopy’s thesaurus offers synonyms, antonyms, or other alternatives.
Once you’ve decided on whether you need a noun, verb, adjective, or adverb and chosen a synonym, antonym, or something else, you’ll be given InCopy’s suggestions in the lower-right corner of the palette. Choose the one you want and either click the Change Word button ![]() , or use the Command/Control-Shift-7 keyboard shortcut to pop it into your text.
, or use the Command/Control-Shift-7 keyboard shortcut to pop it into your text.
Just as we promised, master the text-automation pieces of InCopy CS2 and you’ll be able to concentrate on words rather than word processing. Now that you have the automation under your belt, turn the page, and we’ll help you tackle keeping track of all of the edits you (and others) are making.