This chapter discusses various topics in advanced add-on development. We conclude the chapter with an in-depth look at some of Blender’s most popular add-ons.
Topics include developing in Blender’s filesystem, developing outside Blender’s Text Editor, organizing your add-on as a traditional Python module, advanced panel organization, data storage best practices, and submitting your add-on to Blender.
Developing in Blender’s Filesystem
Up to this point, we have developed scripts and add-ons in the Blender Text Editor. We have dealt with the cumbersome task of adjusting our add-ons to work both in the Text Editor and independently as add-ons. Ultimately, manually modifying code to take it from development to deployment is an unsafe practice. We want to be certain that our code in development works exactly the same as it does in deployment.
For the development environment to mimic the deployment environment, we must develop directly in Blender’s filesystem. When we refer to Blender’s filesystem, we refer to the non-static application files in Blender’s root directory.
First, navigate to your Blender installation. For 64-bit Blender 2.78c on Linux, it is called blender-2.78c-linux-glibc219-x86_64. The name varies across operating systems, so we will call this directory blender-2.78c throughout our discussion. The add-ons directory is located as blender-2.78c/2.78/scripts/addons. In this folder, we see all of our currently installed add-ons, including those that came with the Blender distribution. Some of the add-ons are single scripts, some are single-level directories, and others are complex multi-level directories.
Any valid add-on placed in this directory will appear in the Blender User Preferences. So, if we build a valid add-on from scratch, we can activate it in the User Preferences without ever opening Blender’s Text Editor. We have touched on the requirements for an add-on in Chapter 5, but we have not discussed add-ons as multi-level directories. See Listing 7-1 for ASCII filetrees of various types of add-ons.
Listing 7-1. Filetrees of Various Types of Add-Ons
### Single Scripts ###### e.g. Node Wrangler ###node_wrangler.py### Single-level or Flat Directories ###### e.g. Mesh Inset ###mesh_inset/|-- geom.py|-- __init__.py|-- model.py|-- offset.py'-- triquad.py### Multi-level Directories ###### e.g. Rigify ###rigify|-- CREDITS|-- generate.py|-- __init__.py|-- metarig_menu.py|-- metarigs| |-- human.py| |-- __init__.py| '-- pitchipoy_human.py|-- README|-- rig_lists.py|-- rigs| |-- basic| | |-- copy_chain.py| | |-- copy.py| | '-- __init__.py| |-- biped| | |-- arm| | | |-- deform.py| | | |-- fk.py| | | |-- ik.py| | | '--__init__.py| | |-- __init__.py| | |-- leg| | | |-- deform.py| | | |-- fk.py| | | |-- ik.py| | | '--__init__.py| | '-- limb_common.py| |-- finger.py| |-- __init__.py| |-- misc| | |-- delta.py| | '--__init__.py| |-- neck_short.py| |-- palm.py| |-- pitchipoy| | |-- __init__.py| | |-- limbs| | | |-- arm.py| | | |-- __init__.py| | | |-- leg.py| | | |-- limb_utils.py| | | |-- paw.py| | | |-- super_arm.py| | | |-- super_front_paw.py| | | |-- super_leg.py| | | |-- super_limb.py| | | |-- super_rear_paw.py| | | '-- ui.py| | |-- simple_tentacle.py| | |-- super_copy.py| | |-- super_face.py| | |-- super_finger.py| | |-- super_palm.py| | |-- super_torso_turbo.py| | |-- super_widgets.py| | '-- tentacle.py| '-- spine.py|-- rig_ui_pitchipoy_template.py|-- rig_ui_template.py|-- ui.py'-- utils.py
As we see in Listing 7-1, it is possible to build add-ons with the structure of traditional Python modules as well as single scripts and flat directories. The solution that is best for an add-on depends not so much on the size of the codebase, but on the complexity of its functions. Rigify is a great example of an add-on that necessitates multiple directories. The add-on is intended to rig (or prepare to animate) many different types of meshes. The filetree shows custom modules for legs, arms, tentacles, paws, and more, each organized into a submodule, like biped or limbs, for organization.
Creating an Add-on in the Filesystem
For this exercise, we need a text editor other than Blender’s. Readers are encouraged to open their favorite IDE or text editor and create a new project. Create a directory called sandbox/ directly in Blender’s add-on folder as blender-2.78c/2.78/scripts/addons/sandbox/. From there, create a file called __init__.py with the contents of Listing 7-2.
Listing 7-2. Minimal Init File for In-Filesystem Add-On
bl_info = {"name": "Add-on Sandbox","author": "Chris Conlan","version": (1, 0, 0),"blender": (2, 78, 0),"location": "View3D","description": "Within-filesystem Add-on Development Sandbox","category": "Development",}def register():passdef unregister():pass# Not required and will not be called,# but good for consistencyif __name__ == '__main__':register()
Save this file, then open Blender and navigate to Header Menu ➤ File ➤ User Preferences ➤ Add-ons and filter by “Development” to see our add-on, Sandbox. The result should appear as in Figure 7-1. Click the checkbox to activate our add-on, then check the terminal for errors. No news is good news, as we should see our blank add-on instantiate without errors.

Figure 7-1. Activating our sandbox
After clicking the checkbox, look in blender-2.78c/2.78/scripts/addons/sandbox/. We see a folder called __pycache__, and the following filetree:
sandbox|-- __init__.py'-- __pycache__'--__init__.cpython-35.pyc
The __pycache__ folder is where Python stores the compiled .py files as .pyc files. Given the way Blender registers add-ons, the *.pyc files in the __pycache__ directories represent the in-memory version of the add-on. When we click the checkbox in User Preferences, Blender makes sure that the Python source files on disk (e.g., sandbox/__init__.py) have not changed. If they have changed, Python will re-compile the related __pycache__ directories and Blender will load the compiled Python into memory. Thus, while they are not strictly the same data, the compiled Python represents the current in-memory version of the add-on. This is why we can edit the Python source without affecting the add-on in real time.
Note
This is not the case if Python fails to compile a .py file or Blender fails to reload an add-on. In this case, the add-on cannot be successfully turned on, so the in-memory version will be blank or inactive.
Using F8 to Reload Add-Ons
Now that we are editing the source of our add-on in the Blender filesystem, we can recompile the add-on to update the in-memory version. The F8 key will reload all of the active add-ons by calling unregister(), recompiling the .pyc files if necessary, then calling register() on the compiled .pyc files. Simply press F8 to reload all of the active add-ons, not just the one we may be working on. This is excellent for complex projects, especially those that depend on operators and function calls from other add-ons. In general, editing add-ons with this method is a best practice.
When we press F8, we should see terminal output from the unregister() call of the old in-memory add-on, then the register() function of our new in-memory add-on. If the add-on has been updated, Blender will recompile after running unregister() on the old add-on. If the add-on has not been updated and therefore does not require recompilation, Blender will still run the unregister() function.
Here is the console output for such an operation. Note that the final lines with gc.collect() are calls to a Python garbage collector.
### F8 after updating on disk... ###### Other modules and add-ons...reloading addon: sandbox 1491112473.307823 1491116213.6005275 /blender-2.78c/2.78/scripts/addons/sandbox/__init__.pymodule changed on disk: /blender-2.78c/2.78/scripts/addons/sandbox/__init__.py reloading...Hello from Sandbox Registration!gc.collect() -> 19302### F8 without updating on disk... ###Hello from Sandbox Unregistration!### Other modules and add-ons...Hello from Sandbox Registration!gc.collect() -> 19302
Important Takeaway
It may seem counterintuitive, but the best practice for developing Blender add-ons is to avoid the Blender Text Editor altogether. This introduces some logistic issues concerning external text editors and IDEs, which we discuss next.
Managing Imports
Looking back to Chapter 5, Listing 5-5, the XYZ-Select add-on showed an example add-on that required modification to move from the Blender Text Editor to an add-on. Listing 7-3 shows the proper way to manage imports when editing in-filesystem. Say, for example, we had ut.py sitting adjacent to __init__.py in a flat directory. We would import it as shown in Listing 7-3.
Listing 7-3. Managing Imports While Editing In-Filesystem
if "bpy" in locals():# Runs if add-ons are being reloaded with F8import importlibimportlib.reload(ut)print('Reloaded ut.py')else:# Runs first time add-on is loadedfrom . import utprint('Imported ut.py')# bpy should be imported after this block of codeimport bpy
IDEs for In-Filesystem Development
Developing in the filesystem fundamentally changes the way we develop Blender Python scripts and add-ons, because it removes much of the accessibility and modularity we previously enjoyed in the Blender Interactive Console and Text Editor. Nonetheless, in-filesystem is the best way to develop published add-ons, and we will adjust our tools to help us with this endeavor.
Tools and features we desire in an IDE for Blender Python:
Tab-completion or auto-complete, as typically accessed in the Interactive Console with Ctrl+Space
Not creating error marks or red squiggly lines when working with bpy, bmesh, bgl, etc.
Python code highlighting, possibly Blender-specific code highlighting, which we discuss in a few classes of options later
Lightweight (Notepad++, Gedit, and Vim)
Lightweight text editors are good for simple add-ons and scripts. In general, they have the following characteristics:
Support syntax highlighting for Python
Will not create error tags and red squiggly lines for Blender modules
Do not support project management and directory browsing
Do not have tab-completion built-in
Midweight (Sublime Text, Atom, and Spyder)
Midweight editors are a good default for programmers who do not want to spend too long configuring their IDEs. Generally, they are the same as lightweight IDEs but with project management tools. They have the following characteristics:
Support syntax highlighting for Python
Generally will not create error tags and red squiggly lines for Blender modules
Have project management and directory browsing built-in
Generally do not have tab-completion for Python built-in
Do not have tab-completion for Blender Python built-in
Heavyweight (Eclipse PyDev, PyCharm, and NetBeans)
Heavyweight editors are good for programmers who are already used to them. They may require some configuration to work nicely with Blender Python add-ons. The option to configure is not always available. They have the following characteristics:
Support syntax highlighting for Python
Generally create error tags and red squiggly lines for Blender modules
Have project management and directory browsing built-in
Have tab-completion for Python built-in
Do not have tab-completion for Blender Python built-in
Can be configured to work cleanly with Blender Python
Eclipse PyDev is popular among the developer community, and developers often ask how to configure it to work with Blender Python. Eclipse in particular is very naggy about creating error markers on Blender Python module calls. Various attempts have been made to create configuration files for it, but they are not being actively maintained.
Compiling Blender as a Python Module
So far, the best catch-all solution (for all heavyweight IDEs) to lack of tab-completion is to compile Blender as a Python module. When compiled as a Python module, IDEs can descend submodules of bpy and the like to suggest corrections and enable tab-completion. We do not detail this solution here, as it is not guaranteed to work across different operating systems. Linux users interested in this solution are encouraged to research it.
Compiling Blender as a module can open up more opportunities for low-level control of your development process. Users who are able to compile Blender as a module are encouraged to check out the Sybren Stüvel’s remote debugger add-on for PyCharm at his Blender add-on GitHub repo ( https://github.com/sybrenstuvel/random-blender-addons ). His add-on gives low-level debugging control to developers right inside PyCharm.
Summary
In the author’s opinion, midweight IDEs are the best solution for Blender Python development for users who have no particular loyalty to an IDE. Many developers struggle to integrate Blender Python with heavyweight IDEs. It is not difficult to settle for a midweight IDE and refer to the Interactive Console and official documentation for API tips.
Best Practices for External Data
We shift gears here to analyze a handful of popular add-ons and critique how they handle external data. We discuss how to best deliver external data by drawing on examples from the Blender Python developer community.
In Chapter 4, we discussed the various ways in which a 3D mesh can be defined. Most notable in our discussion was the extensibility and brevity of the .obj file format in transmitting mesh, normal, and texture data between different software.
Blender Python add-ons often depend on predefined data. For example, BlenderAid’s Asset Flinger allows users to easily spawn in assets from a predefined list into the scene. We discuss ways in which Asset Flinger and other add-ons get data into Blender.
Using File Interchange Formats
The Asset Flinger add-on imports meshes into Blender via .obj files. If we sift through the assets/ directory of the add-on, we see a few dozen .obj files and screenshots of them. Using interchange formats like .obj is a good way to get external data into Blender Python, because it is modular and standard to 3D artists.
This add-on allows users to extend it by adding their own .obj files. Using interchange formats is the best practice for building extensible add-ons with clear Python code. The function in Listing 7-4 is all that is required to import a .obj file into a Blender scene.
Listing 7-4. Importing OBJ Files into a Scene
bpy.ops.import_scene.obj(filepath=myAbsoluteFilepath)As we will see, other methods of importing data can clutter your Python code and make it difficult for other developers to collaborate on it.
Using Hardcoded Python Variables
As we discussed in Chapter 4, a 3D mesh requires a minimum set of information to specify it completely, regardless of which file format is used. Some developers have used this knowledge hardcode meshes into as Python variables in their code.
Antonio Vazquez’s (antonioya) Archimesh add-on allows users to create and edit architectural meshes such as walls, windows, and doors, with a custom user interface. Instead of saving these doors and windows externally in a file interchange format, he has hardcoded these meshes in Python as lists of tuples. See the Archimesh GitHub Repo at https://github.com/Antonioya/blender/blob/master/archimesh/src/ for examples of this. The tail end of many of the Python files in this repo contain hardcoded lists of tuples of vertex and face data represented by floats and integers.
This design choice is not without its motivations or consequences. In order to create rooms with arbitrary numbers of walls and windows with arbitrary numbers of panes, these Python variables are duplicated, subsetted, and transformed many times in a complex fashion. As a consequence, these objects cannot be easily substituted for one another. They are specifically designed to work with the algorithms laid out in the add-on.
The core API calls here are to bpy.data.meshes.new() and my_mesh_object.from_pydata(). The add-on creates a blank mesh, manipulates a great deal of Python data to form the object, then instantiates the mesh using the from_pydata() function on the mesh. See Listing 7-5 for a minimal example of how this add-on operates. The bottom section of Listing 7-5 shows an alternate method using bpy.ops.object.add().
Listing 7-5. Creating Meshes with from_pydata()
# Adapted from Antonio Vazquez’s Archimeshimport bpy# Clear scenebpy.ops.object.mode_set(mode='OBJECT')bpy.ops.object.select_all(action='SELECT')bpy.ops.object.delete()# Manipulate Python lists of vertex and face data...# Sample here creates a triangular pyramidmyvertex = [(0.0, 0.0, 0.0), (1.0, 0.0, 0.0), (0.0, 1.0, 0.0), (0.0, 0.0, 1.0)]myfaces = [(1, 2, 3), (1, 2, 4), (1, 3, 4), (2, 3, 4)]############################################################### Option #1 - bpy.ops.object.add()bpy.ops.object.add(type = 'MESH')mainobject = bpy.context.objectmainmesh = mainobject.datamainmesh.name = 'WindowMesh'mainobject.name = 'WindowObject'# Write the Python data to the mesh and update itmainmesh.from_pydata(myvertex, [], myfaces)mainmesh.update(calc_edges = True)############################################################### WARNING: Known to cause crashes and segmentation faults in# certain operating systems. Linux builds are safe.# Option #2 - bpy.data.meshes.new()mainmesh = bpy.data.meshes.new("WindowMesh")mainobject = bpy.data.objects.new("WindowObject", mainmesh)# Link the object to the scene, activate it, and select itbpy.context.scene.objects.link(mainobject)bpy.context.scene.objects.active = mainobjectmainobject.select = True# Write the Python data to the mesh and update itmainmesh.from_pydata(myvertex, [], myfaces)mainmesh.update(calc_edges = True)##############################################################
Reading through the Archimesh source code, we can see how a simple example as in Listing 7-5 can evolve into something capable of procedurally generating architectural models. Hardcoding large amounts of data may not be the most Pythonic approach to procedural generation, but it is put to good use in Archimesh. The argument can be made that the hardcoding is unnecessary and the data could be easily stored in external files, while still allowing for the use of from_pydata().
Algorithmic Manipulation of Primitives
The final method bringing mesh data into Blender is algorithmic manipulation of primitives . Primitives, in this case, refer to objects in 3D Viewport Header ➤ Add by default. It is possible, for example, to algorithmically call Edit Mode operations on a plane to turn them into a detailed model of a window. By continually subdividing, translating, and extruding a plane, we can arrive at a complex model of a window. When we do this, the algorithm becomes the descriptor of the mesh, and it can be modified to create different variations of the mesh.
When we code algorithmic processes to create meshes, they are almost naturally modular. For example, if we created an algorithm to build a fence with 20 posts with width of 6 inches, it would naturally extend to an algorithm that builds fences with n posts with width w.
See Listing 7-6 for an example of an algorithmically generated maze. We can adjust maze_size, maze_height, fp, and buf to alter the way the maze is built. There are many points in the script that we can customize to further alter the way the maze is generated. Such is the nature of procedural generation. Parameterization comes naturally. See Figure 7-2 for an example of the output. Note that this requires the ut.py module available at http://blender.chrisconlan.com/ut.py .

Figure 7-2. Randomly generated maze
Listing 7-6. Algorithmic Manipulation of a Plane, Random Maze
import bpyimport utimport random# Clear scene, must be in object modebpy.ops.object.select_all(action='SELECT')bpy.ops.object.delete()# size of mazemaze_size = 20# height of mazemaze_height = 1.0# Create NxN planebpy.ops.mesh.primitive_plane_add(radius = maze_size/ 2, location=(0, 0, 0.1))# Subdivide and deselect meshbpy.ops.object.mode_set(mode='EDIT'))bpy.ops.mesh.subdivide(number_cuts=maze_size - 1)bpy.ops.mesh.select_all(action='DESELECT')# Set starting pointv = [-maze_size / 2, -maze_size / 2]# Stop iterating if point strays buf away from planebuf = 5b = [-maze_size / 2 - buf, maze_size / 2 + buf]# Probability of point moving forwardfp = 0.6while b[0] <= v[0] <= b[1] and b[0] <= v[1] <= b[1]:# Select square in front of vut.act.select_by_loc(lbound=(v[0] - 0.5, v[1] - 0.5, 0),ubound=(v[0] + 1.5, v[1] + 1.5, 1),select_mode='FACE', coords='GLOBAL',additive=True)# Returns 0 or 1ind = random.randint(0, 1)# Returns -1 or 1 with probability 1 - fp or fpdir = (int(random.random() > 1 - fp) * 2) - 1# Adjusts pointv[ind] += dirbpy.ops.mesh.select_all(action='INVERT')bpy.ops.mesh.extrude_region_move(TRANSFORM_OT_translate={"value": (0, 0, maze_height),"constraint_axis": (False, False, True)})bpy.ops.object.mode_set(mode = 'OBJECT')
Listing 7-6 uses randomness and algorithmic manipulation to generate an object. It should also be noted that algorithmic manipulation is often used to generate deterministic objects.
Summary
As a matter of best practice, it is the author’s opinion that hardcoding Python variables should be avoided in favor of the other two methods: external interchange files and algorithmic manipulation. Hardcoding should be avoided mainly because external interchange files are a superior replacement for it. All of the benefits of hardcoding can be realized by reading the interchange file and holding its data within Python variables.
As a matter of practicality, it is the author’s opinion that external interchange files should be used in place of algorithmic manipulation where substantial parameterization is not required. Virtually any object can be obtained with either method, but algorithmic manipulation can become unduly complicated (without benefit) in cases where parameterization is a second thought. For example, if we desire a very detailed window (1000+ vertices) and the only thing we want to parameterize is its size, algorithmically generating this window would be a poor use of development time. The preferred method here would be loading in the window from an external interchange file and resizing it using Blender’s tools.
Conversely, it is easy to recognize when external interchange files will not suffice. If the original goal of the add-on is to parameterize a mesh, it is almost always best to opt for algorithmic manipulation.
Advanced Panel Creation
We conclude this chapter with a discussion of advanced panel creation . The bpy.types.Panel class has a handful of useful class methods for organizing buttons on a panel. For this discussion, we use our add-on template from Chapter 5. The version used for this discussion can be downloaded at http://blender.chrisconlan.com/addon_template.py .
To explain advanced panel customization, we use the properties and operator registered already in the template. In other words, we focus purely on the draw() function of the SimplePanel class.
Panel Organization
We have already discussed how operator() and prop() can be called to add buttons and type-specific GUI elements to the canvas, respectively. With what we have introduced thus far, readers are only able to create vertically stacked lists of buttons and properties in their panels. Listing 7-7 shows how to use organizational functions to customize panels. See Figure 7-3 for the result.

Figure 7-3. Experimenting with panel functions
Listing 7-7. Organizing Panels
# Simple button in Tools panelclass SimplePanel(bpy.types.Panel)bl_space_type = "VIEW_3D"bl_region_type = "TOOLS"bl_category = "Simple Addon"bl_label = "Call Simple Operator"def draw(self, context):# Store reference to context.scenescn = context.scene# Store reference to self.layoutlay = self.layout# Create boxbox = lay.box()box.operator("object.simple_operator", text="Print #1") box.prop(scn, 'encouraging_message')# Create another boxbox = lay.box()# Create a row within itrow = box.row()# We can jam a few things on the same rowrow.operator("object.simple_operator", text="Print #2")row.prop(scn, 'encouraging_message')# Create yet another boxbox = lay.box()# Create a row just for a labelrow = box.row()row.label('There is a split row below me!')# Create a split row within itrow = box.row()splitrow = row.split(percentage=0.2)# Store references to each column of the split rowleft_col = splitrow.column()right_col = splitrow.column()left_col.operator("object.simple_operator", text="Print #3")right_col.prop(scn, 'encouraging_message')# Throw a separator in for white space...lay.separator()# We can create columns within rows...row = lay.row()col = row.column()col.prop(scn, 'my_int_prop')col.prop(scn, 'my_int_prop')col.prop(scn, 'my_int_prop')col = row.column()col.prop(scn, 'my_float_prop')col.label("I'm in the middle of a column")col.prop(scn, 'my_float_prop')# Throw a few separators in...lay.separator()lay.separator()lay.separator()# Same as above but with boxes...row = lay.row()box = row.box()box.prop(scn, 'my_int_prop') box.label("I'm in the box, bottom left.") box = row.box()box.prop(scn, 'my_bool_prop') box.operator("object.simple_operator", text="Print #4")
The core organizational functions of the bpy.types.Panel are box(), row(), column(), separator(), and label(). Each of these five functions can be nested within box(), row(), or column() for more granular organization. Overall, this is a very intuitive GUI development toolkit. It enables easy construction of aesthetically pleasing GUIs.
Note
Blender’s GUI is built with these same tools. If you’re interested in how to replicate a GUI element, right-click on it and select Edit Source to see the bpy.types.Panel class declaration for it.
Panel Icons
Looking around the Blender GUI, we notice many different icons positioned to the left of buttons. There are over 550 icons built into Blender, all of which we can use next to our own buttons. Buttons are represented by character strings that we will pass to the prop() function via the icon= argument. At the time of writing, the most comprehensive reference to the available icons is the Icons add-on that comes packaged with Blender. After activating it, press Ctrl+F in the Blender Text Editor to see the properties panel, where it will be located at the bottom. Listing 7-8 shows how we draw icons in the panel next to our operators. See Figure 7-4 for the result.
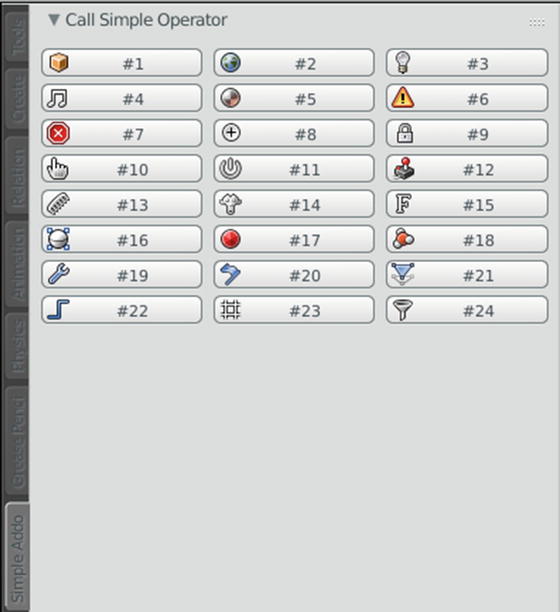
Figure 7-4. Experimenting with panel icons
Listing 7-8. Panel Icons
class SimplePanel(bpy.types.Panel):bl_space_type = "VIEW_3D"bl_region_type = "TOOLS"bl_category = "Simple Addon"bl_label = "Call Simple Operator"def draw(self, context):# Store reference to context.scenescn = context.scene# Store reference to self.layoutlay = self.layout# Create a row within itrow = lay.row()row.operator("object.simple_operator", text="#1", icon='OBJECT_DATA')row.operator("object.simple_operator", text="#2", icon='WORLD_DATA')row.operator("object.simple_operator", text="#3", icon='LAMP_DATA')row = lay.row()row.operator("object.simple_operator", text="#4", icon='SOUND')row.operator("object.simple_operator", text="#5", icon='MATERIAL')row.operator("object.simple_operator", text="#6", icon='ERROR')row = lay.row()row.operator("object.simple_operator", text="#7", icon='CANCEL')row.operator("object.simple_operator", text="#8", icon='PLUS')row.operator("object.simple_operator", text="#9", icon='LOCKED')row = lay.row()row.operator("object.simple_operator", text="#10", icon='HAND')row.operator("object.simple_operator", text="#11", icon='QUIT')row.operator("object.simple_operator", text="#12", icon='GAME')row = lay.row()row.operator("object.simple_operator", text="#13", icon='PARTICLEMODE')row.operator("object.simple_operator", text="#14", icon='MESH_MONKEY')row.operator("object.simple_operator", text="#15", icon='FONT_DATA')row = lay.row()row.operator("object.simple_operator", text="#16", icon='SURFACE_NSPHERE')row.operator("object.simple_operator", text="#17", icon='COLOR_RED')row.operator("object.simple_operator", text="#18", icon='FORCE_LENNARDJONES')row = lay.row()row.operator("object.simple_operator", text="#19", icon='MODIFIER')row.operator("object.simple_operator", text="#20", icon='MOD_SOFT')row.operator("object.simple_operator", text="#21", icon='MOD_DISPLACE')row = lay.row()row.operator("object.simple_operator", text="#22", icon='IPO_CONSTANT')row.operator("object.simple_operator", text="#23", icon='GRID')row.operator("object.simple_operator", text="#24", icon='FILTER')
Conclusion
Thus concludes our discussion of advanced add-ons. This guide is by no means comprehensive, as there are many places and possibilities to explore when it comes to add-on development. It is important to remember that the Blender GUI itself is built on the Python classes we have been discussing, so every functionality we see can be replicated.
The background knowledge on add-on organization in this chapter should allow readers to more easily understand the source code of other developers. Blender is an open source platform that encourages users to share code and learn from each other. Readers are encouraged to copy and modify work from other developers, then share their work for others to learn from.
The next chapter concludes this text with a treatment of texturing and rendering.