
“Write a famous saying and your name will live forever.’”
Anonymous
There are Three Types of Temporary Tables
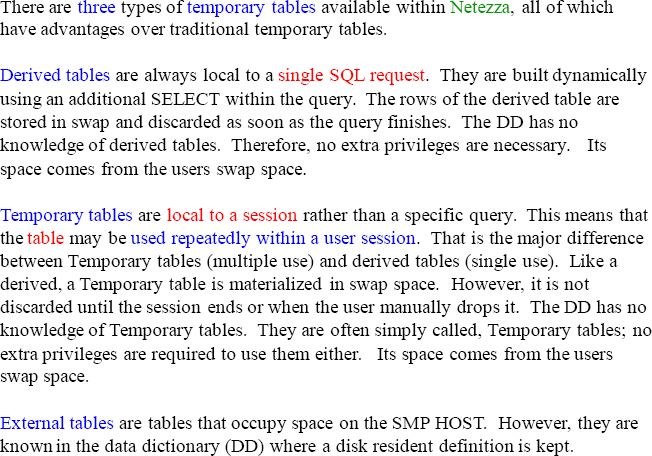
This slide shows and describes the three types of Netezza temporary tables.
The Same Derived Query shown Three Different Ways
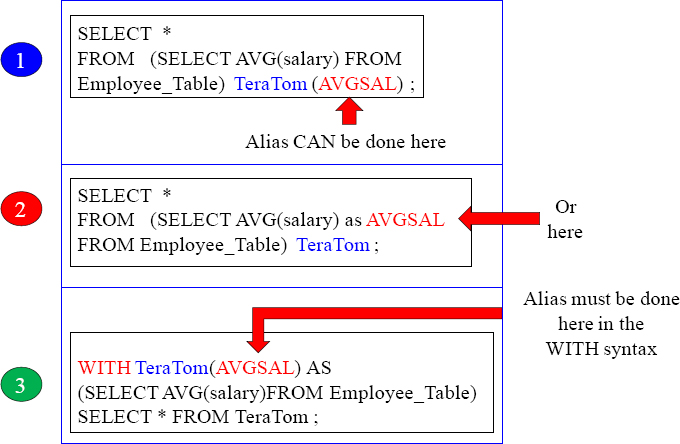
All three examples above are the same query but with a different derived style. The Derived table name must always be named.
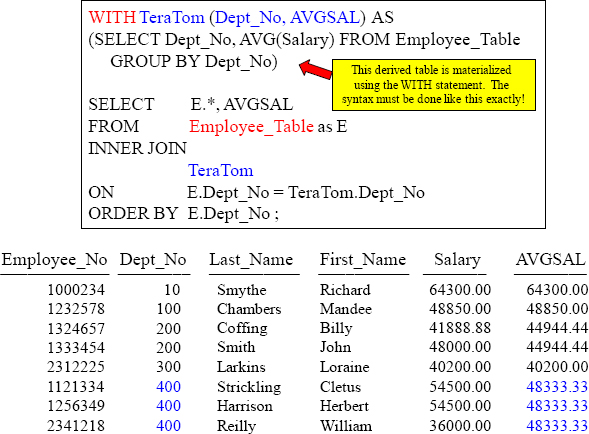
Most Derived Tables Are Used To Join To Other Tables
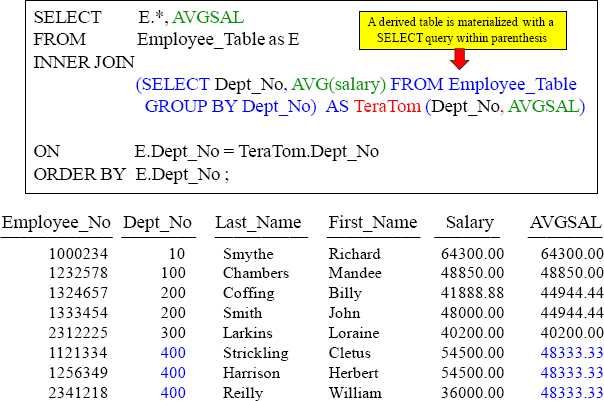
The above example shows how derived tables are usually used. They are great for combining aggregates with detail data. Above, our derived table TeraTom held the averages for each Dept_No, and we then joined TeraTom to our Employee_Table.
Our Join Example With A Different Column Aliasing Style
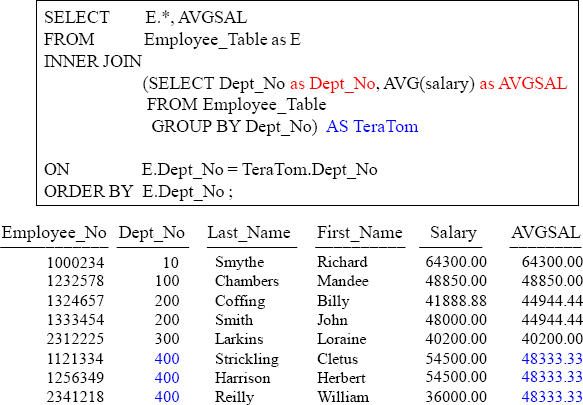
We have named the columns in our TeraTom derived table right inside the derived query. This is exactly the same query we ran before.
Our Join Example With The WITH Syntax
The WITH syntax is nice because you build the derived table right away.
Syntax For Creating A Temporary Table
The syntax to create a Temporary table follows and is the same as a real table except for the use of the TEMPORARY adjective:

Temporary tables have two characteristics in common with derived tables. They are materialized in swap and are unknown in the DD. However, unlike a derived table, a Temporary table may be used in more than one SQL statement throughout the life of a session. This feature allows other follow-up queries to utilize the same rows in the temporary table without requiring them to be established again. This ability to use the rows multiple times is their biggest advantage over derived tables.
If a temporary table is created using the same name as an existing persistent table, the original table rows are not available to a SELECT. Instead, the rows from the temporary table are returned until the temporary table is dropped. A Temporary table may be dropped manually at any time when it is no longer needed. If it is not dropped manually, it will be dropped automatically at the end of the user session.
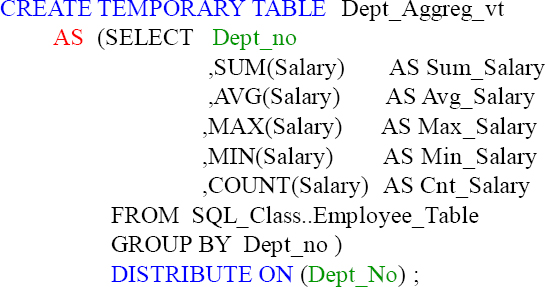
Creating and Populating a Temporary Table
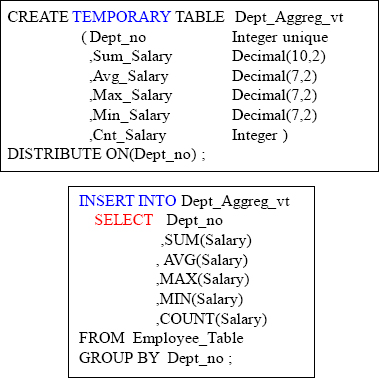
The above depicts exactly how you create and populate a Temporary table. Once you create and populate the temporary table, it will be available for the entire user session. That means the table can be used repeatedly until the user logs off. Nobody else can see or utilize the table except the user who created the table. The system only allows the user in the current session to use the table. Remember, you create the Temporary table, and then you populate it with an Insert/Select statement.
The above shows a Temporary table CREATE, INSERT/SELECT, and actual query of the temporary table.
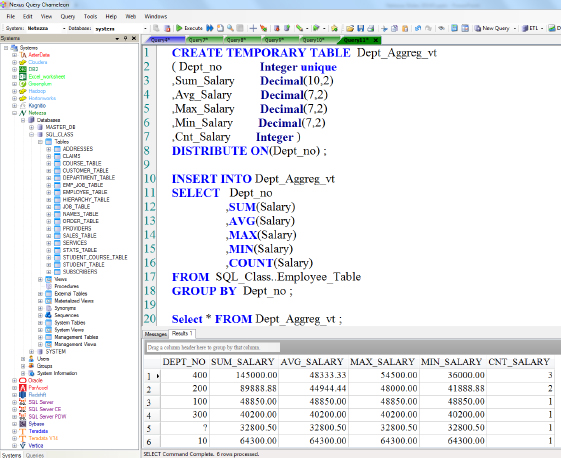
A Temporary Table Can Be Used Again and Again
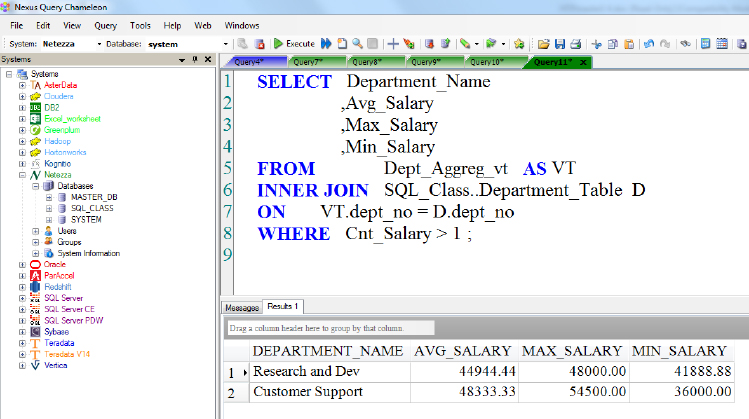
A Temporary table can be used as many times as you like (within the user session). In the above example, we are joining our Temporary table (called Dept_Aggreg_vt) to our Department_Table.
Alternative CREATE TEMPORARY TABLE Option
In a previous chapter, the CREATE TABLE AS SELECT was introduced. This is called a CTAS table. This same technique can be used for a temporary table:
You can CREATE and populate a Temporary Table by using the CTAS technique (CREATE TABLE AS). Again, the table will be around until the end of the session (or the user drops it). The only disadvantage to using this technique is the issue of not being able to put constraints like NOT NULL or UNIQUE on a column, but it is so very quick.
A CTAS Temp Table to Improve Zone Map Selectivity
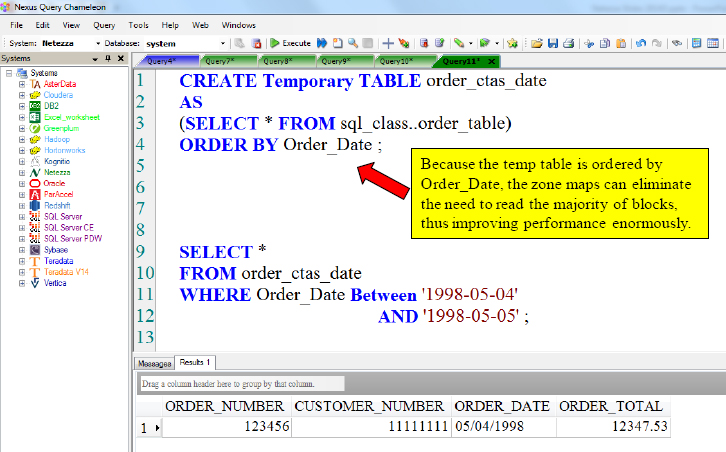
Now we’re cooking! We just sorted the data on our CTAS table. The Zone Maps are perfect for those who are querying the order_ctas_date table.
Creating a Temp Table as a Cluster Based Table (CBT)
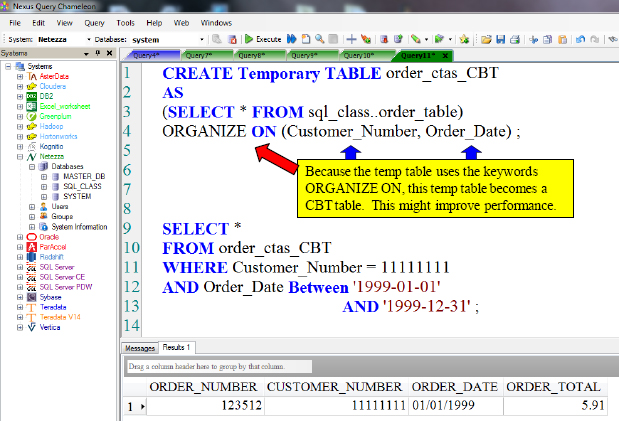
It is the ORGANIZE ON clause that builds the CTAS table as a CBT. You can specify up to four columns you want to ORGANIZE ON, but the max is often three. This might or might not help in the queries, but worth proofing.
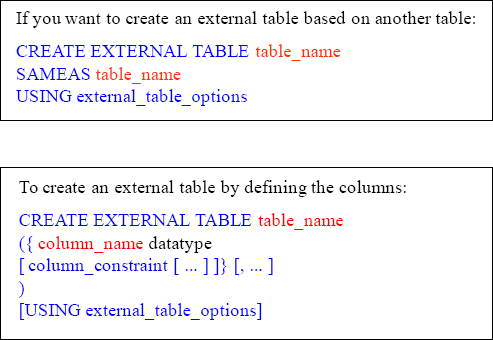
An External Table allows Netezza to treat an external file as a database table. An external table has a definition, but the data exists outside the Netezza database. External tables can be used to access files which are stored on the Netezza host server or, in the case of a remote external table, Netezza can treat a file on a client system as an external table. After you have created the external table definition, you can use INSERT INTO statements to load data from the external file into a database table or SELECT FROM statements to actually query the external table.
External Tables Data Loading Formats
“If you don’t know where you’re going, any road will take you there.”
– Lewis Carroll
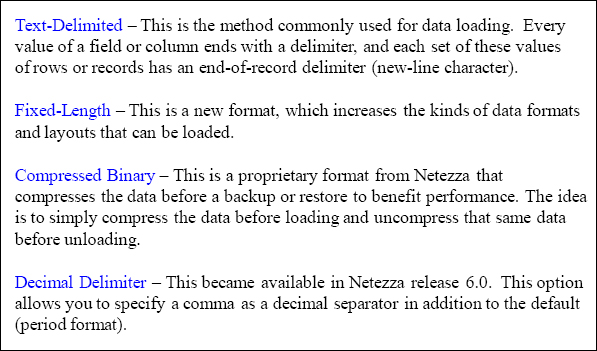
Netezza provides many options for formatting the data load both to and from external tables. Since data comes in different forms, Netezza provides different ways of configuring the load. External tables and nzload are also a way to perform Backup and Restore and to transfer data between systems
“Don’t count the days, make the days count.”
– Mohammed Ali

The brilliance of external tables is that the entire ETL process can be designed with simple SQL. Since an SQL-based ETL process can be performed from any SQL client, it avoids the requirement of creating specialized ETL tools. Being able to check the results of a load is also important, and that is why Netezza always provides two log files with each load. For loads, if there are errors processing a row or column then the error is logged in detail in an nzlog file, and bad rows are logged in an nzbad file. These files help user to identify bad rows in the external data file and correct them for reloading. Depending on the load options of the external table in use, each bad row would either cause the row to be skipped or the entire load to be aborted. All of these options are dependent on how you setup the load script.
The brilliance of external tables is that the entire ETL process can be designed with simple SQL. Since an SQL-based ETL process can be performed from any SQL client, it avoids the requirement of creating specialized ETL tools. Being able to check the results of a load is also important, and that is why Netezza always provides two log files with each load. For loads, if there are errors processing a row or column then the error is logged in detail in an nzlog file, and bad rows are logged in an nzbad file. These files help user to identify bad rows in the external data file and correct them for reloading. Depending on the load options of the external table in use, each bad row would either cause the row to be skipped, or the entire load to be aborted. All of these options are dependent on how you setup the load script.
Exporting Data Off of Netezza into an External Table
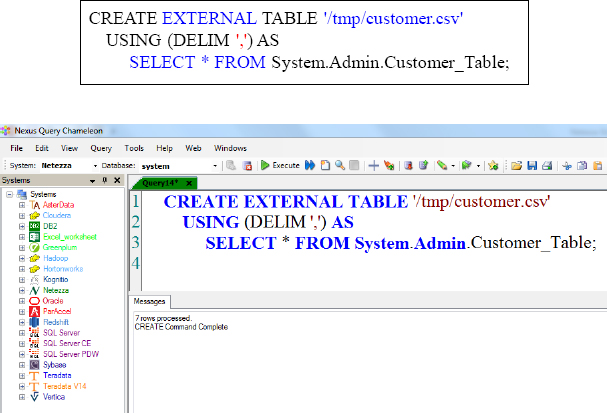
Here is your first live example of creating an external table and exporting data off of the Netezza database.
Importing Data Into Netezza Using an External Table

We have just imported seven rows from our external table to an empty table on Netezza called Cust_Table_Empty. We then used the Nexus to query the table, and as you can see, we have seven rows.

The problem here is that we have exported the data off of Netezza into an external table using a delimiter of ‘,’ (comma) and we tried to import data into our Netezza table using the same external table, but we used a delimiter of ‘|’ (pipe). Describing the correct way an external file is delimited is very important. Consistency is the key.