
Chapter 12 – Creating Databases and Users and Managing Them
“As I would not be a slave, so I would not be a master.”
Abraham Lincoln
Creating and Dropping a Netezza Database
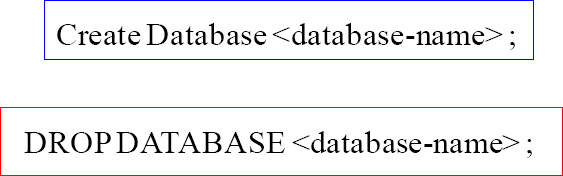
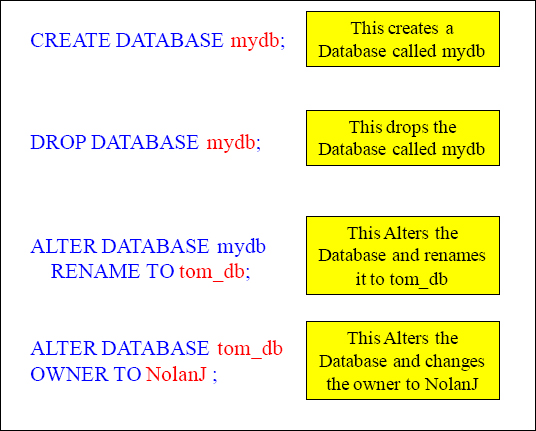
Within the NPS, a database is a storage location for database objects (tables and views). An administrator can use Data Definition Language (DDL) to establish a database by using a CREATE DATABASE command. A database has segment space automatically allocated to it on disk. This segment space establishes the maximum amount of disk space for storing user data rows in any table located in the database.
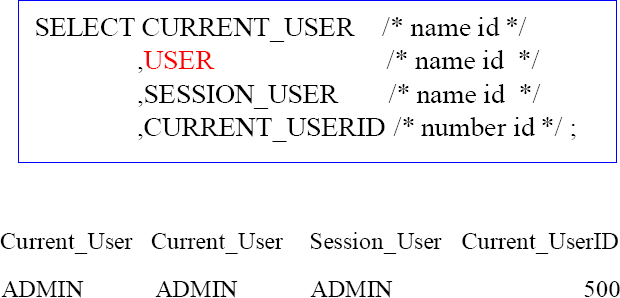
How to Determine the Database you are in?

To determine the database in which the user is currently residing, use the above. As you can see, the current catalog is SQL_Class, and the current Database ID is 238416.

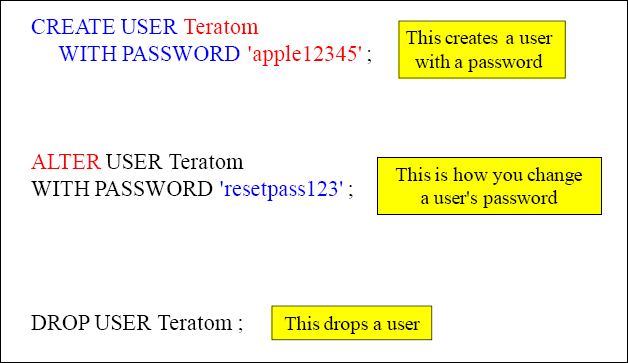
Within the NPS, a user is a database object able to connect to the system. Therefore, to authenticate the user, a password must be established. The password and other attributes are established at the same time that the CREATE USER statement is executed.

USERS and DATABASES are peer level objects within the NPS system, so granting access to Databases is a simple matter of granting the user access privileges.
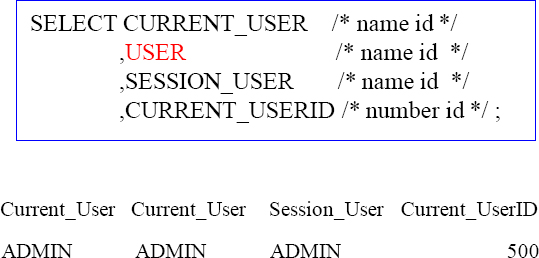
Reserved Words to find out about a User
Above are reserved words to find information out about a user.
Using Limit to bring back a Sample
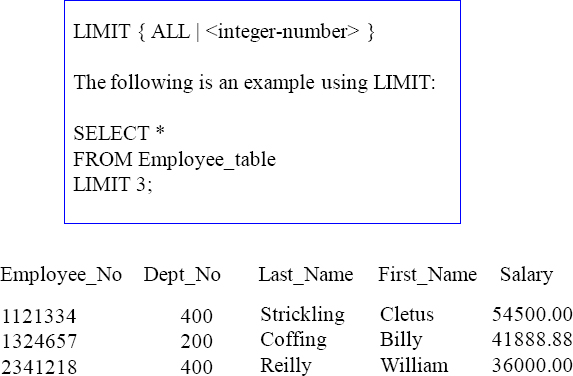
NPS offers a unique capability in its SQL to limit the number of rows returned from the SPU data. It is a LIMIT clause and is normally added at end of a valid SELECT statement with the above example and syntax.
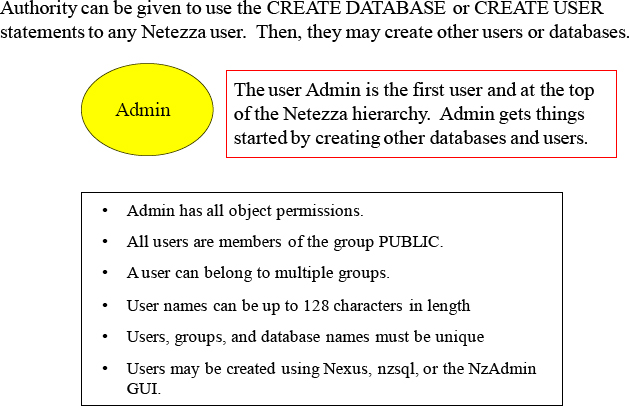
Not everyone can create a database or a user. The first user in a Netezza system is user Admin, and it is Admin who starts the process of creating other database and users. Admin has the power to grant other users this Create capability, and those who are granted “Create Database with GRANT option” or “Create User with GRANT option” can grant this Create right to others as well.
Starts with a Linux User, a Database User and A Database
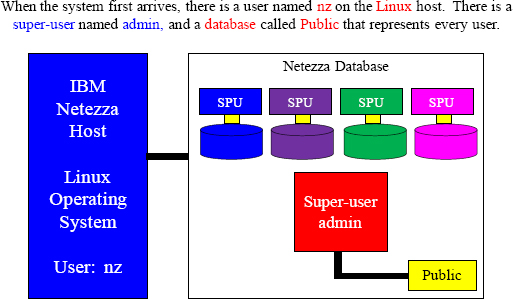
The Linux user is named nz, and the default password when the system first arrives is nz. The Netezza software runs as the nz user, and you can access the system using a command shell or remote access software as the nz user. The super-user for the Netezza database is named admin. The default password when the system first arrives is password. The admin user has full access to all system functions and objects at all times. The Netezza hierarchy begins to be built when admin begins creating user databases and additional database user groups and accounts. A preconfigured database group named public is always present. All Netezza database users are automatically placed in the group public and therefore inherit all of its privileges. The group public has default access privileges to selected system views such as lists of available databases, tables, and views. You cannot delete the group public or the super-user admin.
Creating and Managing A Database
If you do not have the privileges required to create a database, the system displays an error message. Above are some basics to get you started.
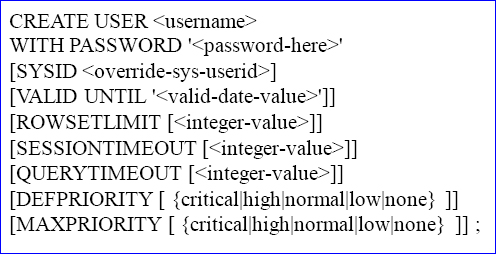
Users may be created using Nexus, nzsql, or the NzAdmin GUI. You must be an administrator or have the appropriate Object Permissions, to create, alter, or drop users. By default, when a user is first created, they have access only to system views that allow them to retrieve a list of user database objects within the system. Permissions must be granted to the user or group the user is assigned to. Users names can be up to 128 characters in length and are stored in the database as uppercase.
Within the NPS, a user is a database object able to connect to the system. Therefore, to authenticate the user, a password must be established. The password and other attributes are established at the same time that the CREATE USER statement is executed.
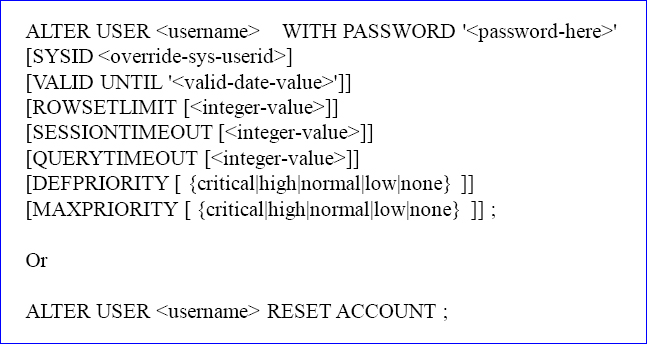
Forcing a Password Change for a User

Once Netezza authentication determines that a user’s password has expired, it creates a special session (called a restricted session) for the user. A restricted user session only allows the user to change their password and that is all. After the user changes the password in their restricted session, the user transitions to a regular session where they have full access to all SQL commands.
Reserved Words to find out about a User
Above are reserved words to find information out about a user.
USERS and DATABASES are peer level objects within the NPS system, so granting access to Databases is a simple matter of granting the user access privileges.
How to Determine the Database you are in?
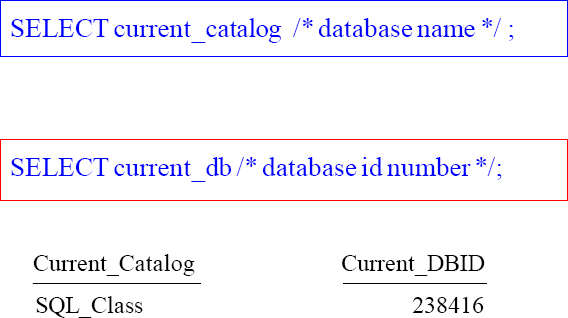
To determine the database in which the user is currently residing, use the above. As you can see, the current catalog is SQL_Class and the current Database ID is 238416.
Fully Qualifying a Database, Schema, and Table
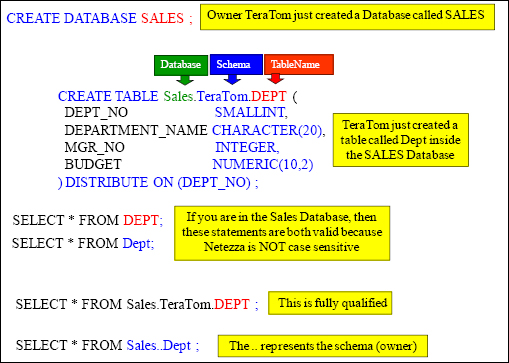
To refer to objects in other databases on the Netezza system, you must use three-level naming, which consists of the database (also referred to as catalog name), the schema (which is the name of the database owner), and the object (table, view or synonym). The last example (Sales..Dept) is a convenient way of specifying a fully qualified object name. The system supplies the schema name by internally inserting the current schema name.
Options for Handling Invalid Schema Names
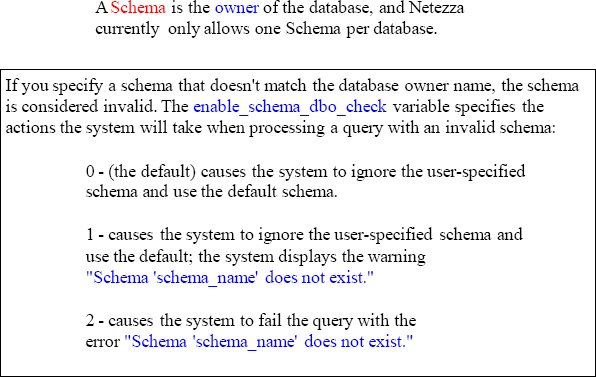
A Schema is the owner of the database, and Netezza currently only allows one Schema per database. You can set the enable_schema_dbo_check variable in the postgresql.conf file, or you can change the behavior on a session level using the using the SET enable_schema_dbo_check = value SQL command.
An Example of Setting enable_schema_dbo_check

A Schema is the owner of the database, and Netezza currently only allows one Schema per database. You can set the enable_schema_dbo_check variable in the postgresql.conf file, or you can change the behavior on a session level using the using the SET enable_schema_dbo_check = value SQL command.
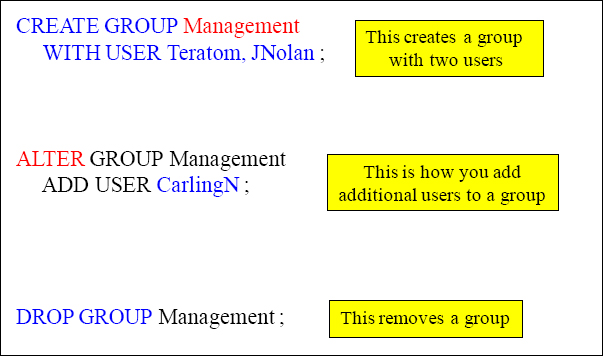
You must be an administrator, or have the appropriate Object Permissions, to create, alter, or drop groups. Utilize the CREATE GROUP command to create new groups and add users. Remember, a user must already exist to be added to a group. Use ALTER GROUP to add a new user to the group, change group limits, drop a user from a group, change the group owner, or to rename the group. Use DROP GROUP to remove a group.
Two Types of Permissions – Object and Admin
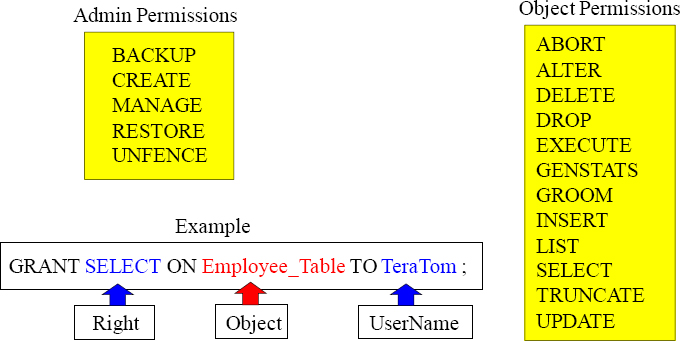
There are two types of permissions, and they are administrator permissions and object permissions. Administrator permissions control creation of objects and system administration. Object permissions control access to specific database objects.

Above is a list of the Netezza maximums.
Admin permissions are not connected to a specific object or object class but define the privilege to execute administrative tasks in the system. Some of these permissions are global (system wide) and do not apply to any particular database. These include the rights to create, alter, or drop databases, users, and groups. It also contains permissions to manage the system and its hardware. Netezza does a great job with security that allow users and groups to do certain things and to restrict others.

Object permissions are related to a specific object or object class and give a user or group the right to do something with the specified object. They can be global to all databases or local to a specific database. They contain the ability to create, alter, or drop tables, views, stored procedures, etc. They contain data manipulation tasks like SELECT, INSERT, UPDATE, or TRUNCATE. Object permissions are about permissions to do certain things on objects.
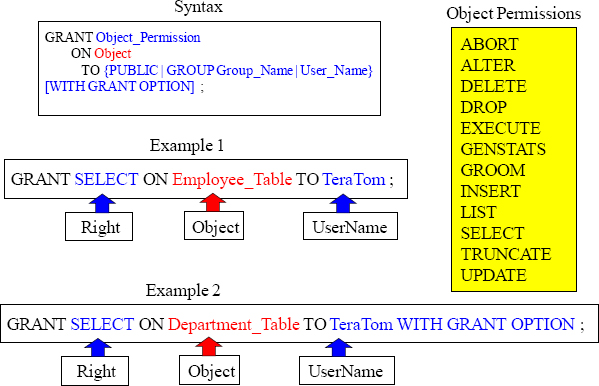
Above, you can see two examples (example 1 and example 2). Both examples are giving TeraTom the right to SELECT from a table, but example 2 uses the WITH GRANT OPTION keywords. This means that TeraTom can also grant SELECT on Department_Table to other users.

TeraTom now has Admin Permissions to perform backups, and TeraTom can grant others this privilege because of the WITH GRANT OPTION keywords. You can use the GRANT command to give specific admin permissions to one or more users or groups of users.

Above are three examples for you to use as guidelines. If you grant to public, then everyone has access. If you use the keyword ALL, then all rights are allowed. You can also list the individual rights. If you do not use the WITH GRANT OPTION keyword, then you can’t pass the right on to someone else.

Above are some examples of accessing data from another database. The .. represents the default schema (database owner).
Creating and Managing Synonyms
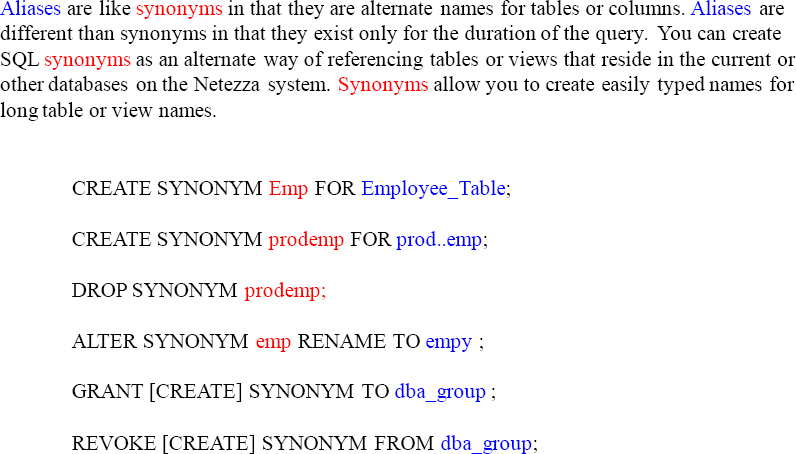
Above are some examples of creating and managing synonyms.
Creating a Table With Comments
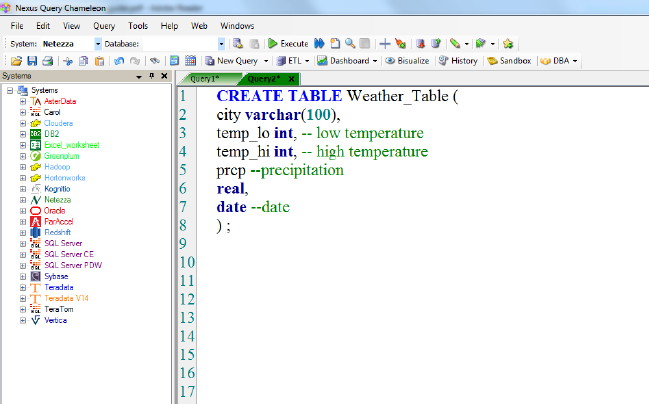
You can use white space (that is, spaces, tabs, and new lines) within SQL commands. Netezza creates a Comment (Two dashes (“--”) introduce comments). The system ignores whatever follows a comment up to the end of that line. Notice how the column prcp has a comment, and then on the next line, has the data type. This is allowed.

To populate a table, you can use the INSERT command. The INSERT command adds new rows to an existing table. You can insert using column positions, column names, or by inserting rows from one table to another.