
Chapter 6. Back Up Important Data

Disasters happen: It’s a fact of life. And while you can’t prevent disasters, unexpected as they are, it’s important to do your best to prepare for them. In the case of your computer, that means backing up your data. Regularly. And preferably in more than one place.
Fortunately, there are a variety of good options to make sure that you’ve got copies of all of your data, for both your Mac and your iOS devices, so that if—when—disaster does strike, you can be back on your feet in no time.
Back Up an iOS Device to iCloud
The best kind of backup is the kind that you don’t have to think about, and that’s where iCloud Backup comes in. It ensures that your iOS device backs up its data to Apple’s servers at least once a day, as long as you’re signed in to your iCloud account and you have the system turned on. The device attempts to back itself up when it’s plugged into power, on a Wi-Fi network, and locked.
Your iOS device should prompt you to enable iCloud Backup when you first set it up, but if you’re not sure (or you had it turned off but want to enable it), go to Settings > iCloud > Backup, and flip the switch to the On position (6.1). That pane also reports when your device last backed itself up, and provides an option to manually start a backup by tapping Back Up Now.

Managing Space
The tricky aspect of backing up to iCloud is that, by default, your iCloud account comes with only 5 GB of space. That may be enough to back up your key data, but when you start adding photos and videos into the mix, it gets filled pretty quickly—especially if you own more than one iOS device. You can pay an additional $1 a month to upgrade to 25 GB of iCloud backup space, or an additional $4 a month to bump that up to 200 GB. (You can also pay $10 a month for 500 GB and $20 a month for 1 TB of storage.)
If you’d prefer not to spend the extra cash, you can also take a fine-toothed comb to the data that you’re actually backing up. In Settings > iCloud, tap Storage and then Manage Storage to get a closer look at what you’re storing (6.2).

6.2 iCloud storage allocation on iOS
This pane is broken into two sections, the first of which shows backups for all your devices, and the second of which shows you details about documents and data stored in iCloud on an app-by-app basis. The first item in the Backups list should be your current device—tap that to see what information from your device is being backed up.
Under your device, the Backup Options section reveals how much data is being backed up for each app (6.3, on the next page). You can also choose to disable backups for any particular app to save space. Keep in mind that it isn’t the space taken up by the app itself, but rather by the data that you have stored in the app (such as video clips and assets in iMovie). It might be as little as a few kilobytes of settings, or as much as several megabytes (or gigabytes) of data.

Remember, if you do disable backups for a particular app, the data that you have for that app will no longer be stored in iCloud. So, think carefully before disabling them, to make sure that either you don’t really need that data or it’s backed up somewhere else.
Restoring from Backup
If you’re lucky, the only time you might have to restore an iOS device from iCloud Backup is when you get a new device. Fortunately, it’s almost as easy as backing up in the first place.
When you launch a fresh phone (or if you’ve erased your device for troubleshooting purposes using Erase All Content and Settings under Settings > General > Reset), you’re asked if you want to restore from a backup. Choose iCloud Backup to view a list of devices backed up on iCloud, and the date and time of the most recent backup. Select that backup and you’re on your way: The iOS device restarts when it’s ready to go.
![]() Note
Note
Although iCloud Backup restores your settings, it may not restore all of your passwords, for security reasons. Make sure that you’ve stored those safely elsewhere, or enable iCloud Keychain (see Chapter 4) to restore them. Alternatively, making encrypted backups to iTunes (see below) will also restore your passwords.
Note that, as mentioned, your apps themselves aren’t backed up by this process. Once your phone has been restored, your iOS device automatically re-downloads your apps from the iTunes Store whenever your device is on a Wi-Fi network.
Back Up an iOS Device to iTunes
If you’d rather not back up your iOS device to the cloud, or you want the security of knowing that you’ve got it backed up in multiple places, you can also make backups to iTunes, via either Wi-Fi, if you’ve set up iTunes Wi-Fi Sync, or a USB cable. (You can do this even if you don’t regularly sync your iOS device to iTunes.)
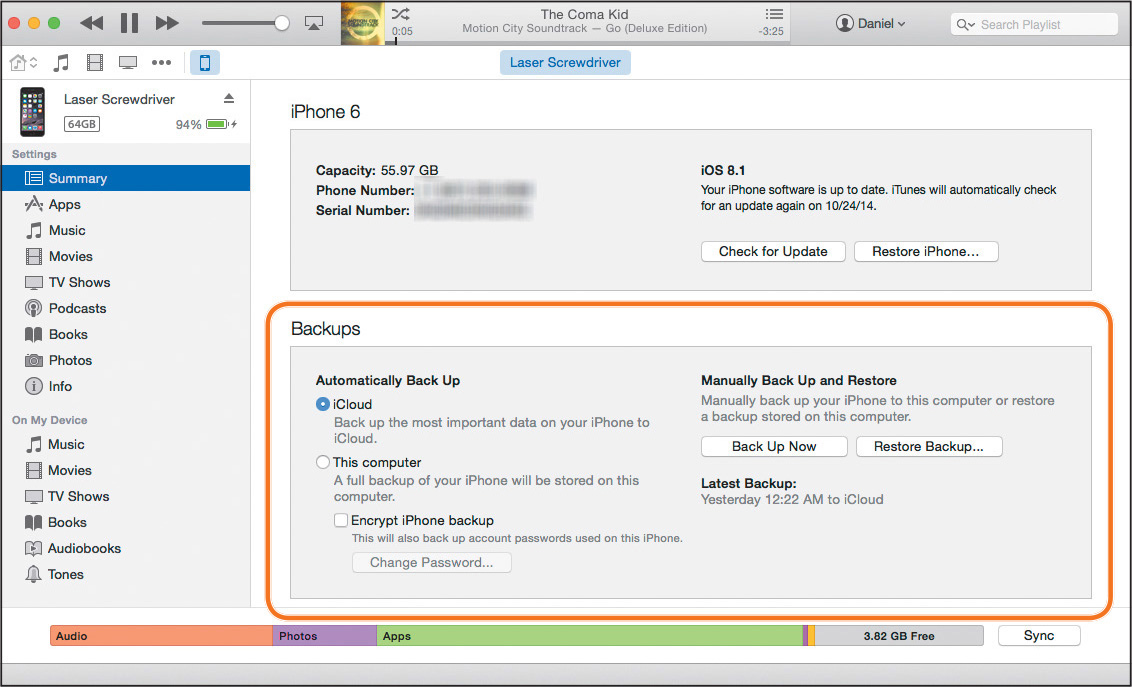
With your iOS device connected to your Mac, select your device in the toolbar and go to the Backup section (6.4). If you’d like to encrypt your backup, which will preserve all your account passwords, click the Encrypt iPhone Backups checkbox, and then create and verify a password. Click Back Up when you’re ready, and then wait while iTunes creates the backup.
This process is similar to iCloud Backup, with one major exception: If you have media synced via iTunes—including iOS apps—those are additionally backed up. That way, when you restore from the backup, all of that information will make its way across to your iOS device, without having to be re-downloaded via Wi-Fi.
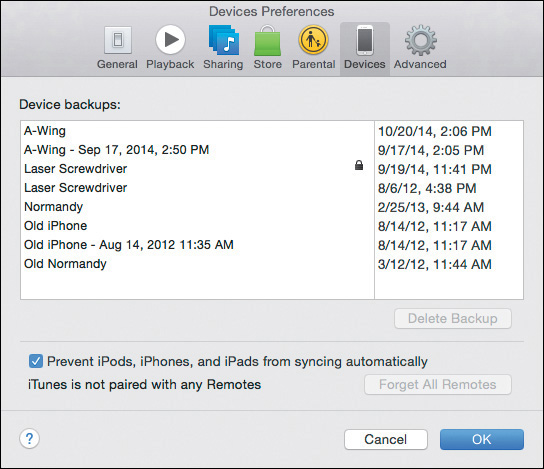
To view which backups are on your Mac, go to iTunes > Preferences and click Devices; you’ll see a list of devices and when they were last backed up (6.5). You can delete individual backups—it’s a good way to free up space on a drive—but always make sure you keep a current one.
Restore from iTunes
Whether you have an erased or fresh device or simply want to restore an older backup onto your iPhone, an iTunes backup is the fastest option.
1. Plug in your device via the USB cable, and click the device icon in the toolbar.
2. If you’re restoring a currently working iOS device from backup, skip to step 3. If your device is erased or just out of the box, click the Restore iPhone button to load your most recent backup. That restores the current version of iOS.
3. Choose Restore Backup. If you have more than one backup available, iTunes asks which you’d like to restore from. Your iOS device restarts and begins the restore process.
Back Up a Mac to Time Machine
Backing up your computer used to be a pain, requiring either specialized third-party software or burning DVD after DVD (or CD after CD if you want to go way back, or Zip disk after Zip disk if you really want to dust off those little gray brain cells), and then cataloging those discs so you knew what was where.
But those were in the days before Apple added Time Machine to OS X. The automated backup system greatly simplifies the whole process, and tries to make it much easier not only to set it and forget it, but also to restore files when you need to—even files you’ve recently deleted.
Back Up Using Time Machine
OS X should prompt you to set up Time Machine when you first configure your Mac, but if you declined or haven’t yet activated it, it’s easy to do. All you need is a disk on which to back up your data: An external hard drive will do, as will a network drive hooked up to another Mac or a Time Capsule. Fire up System Preferences and click the Time Machine button to open its pane (6.6).
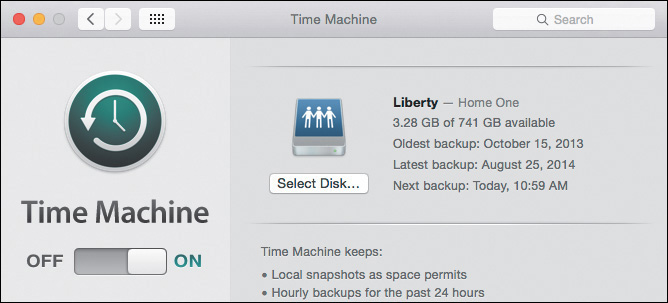
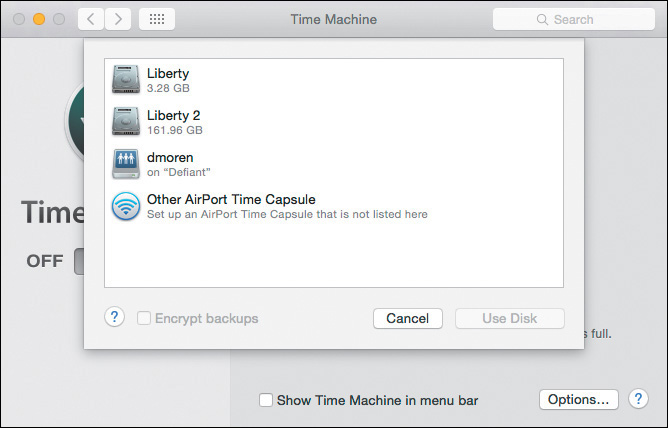
As you might guess, enable the system by flipping the big Time Machine switch to On, at which point your Mac prompts you to specify a backup volume from the disks that it can see; you also have the option to set up a Time Capsule if you have one (6.7). If you’re worried about someone snooping in your backups, you can also choose to encrypt them if the disk you’re selecting supports it.
Once you’ve chosen the disk you want to use, Time Machine begins your initial backup, which will probably take some time. From there, it backs up your data every hour. You can also force Time Machine to manually start a backup either by clicking Back Up Now from the Time Machine preference pane or, if you’ve enabled Time Machine’s menu bar icon, by clicking the menu bar icon (6.8).

Manage Backups
For the most part, Time Machine backups are self-managing, meaning you shouldn’t have to do anything—that’s the whole point! The system automatically keeps the last 24 hours of hourly backups, the last month of daily backups, and weekly backups for every month. On a laptop, Time Machine also keeps local snapshots as space allows, letting you recover files even if you’re away from your backup disk. If your backup disk begins running out of space, Time Machine prunes the oldest ones first.
One thing you can do if you’re concerned about backup space, though, is to exclude certain items from your Time Machine backup. For example, if you use the Dropbox cloud storage service, which instantly syncs and backs up its data, you might decide that it doesn’t also need to be backed up to Time Machine (although redundancy is a wonderful thing).
To exclude any volume, folder, or file from your Time Machine backup, follow these steps.
1. In the Time Machine pane in System Preferences, click the Options button (6.9).

2. In the sheet that appears, you’ll see a list of the items you’ve told it not to include in backups. To add to the list, click the Add (+) button and navigate to and select the folder, file, or volume.
3. If you’ve changed your mind and decided that an item you previously excluded should be backed up after all, select it from the list and click the Remove (–) button.
4. When you’ve finished, click Save. Time Machine makes the changes to update your backups accordingly.
If you’re concerned about Time Machine cleaning off your old backups, click the checkbox in the Options sheet labeled Notify After Old Backups Are Deleted.
Restore Files
When the unthinkable happens and you lose some data, that’s when you turn to Time Machine.
1. Launch Time Machine from the Dock or the Applications folder, or by going to the Time Machine icon in the menu bar and choosing Enter Time Machine.
If you don’t have a Finder window open, Time Machine opens one—otherwise it uses the window you’re currently looking at. You’re presented with a row of copies of the window you’re viewing, stretching back into infinity, each representing a single backup (6.10). On the right side of the screen, a timeline documents all of your past backups, and a pair of arrows lets you page through them.
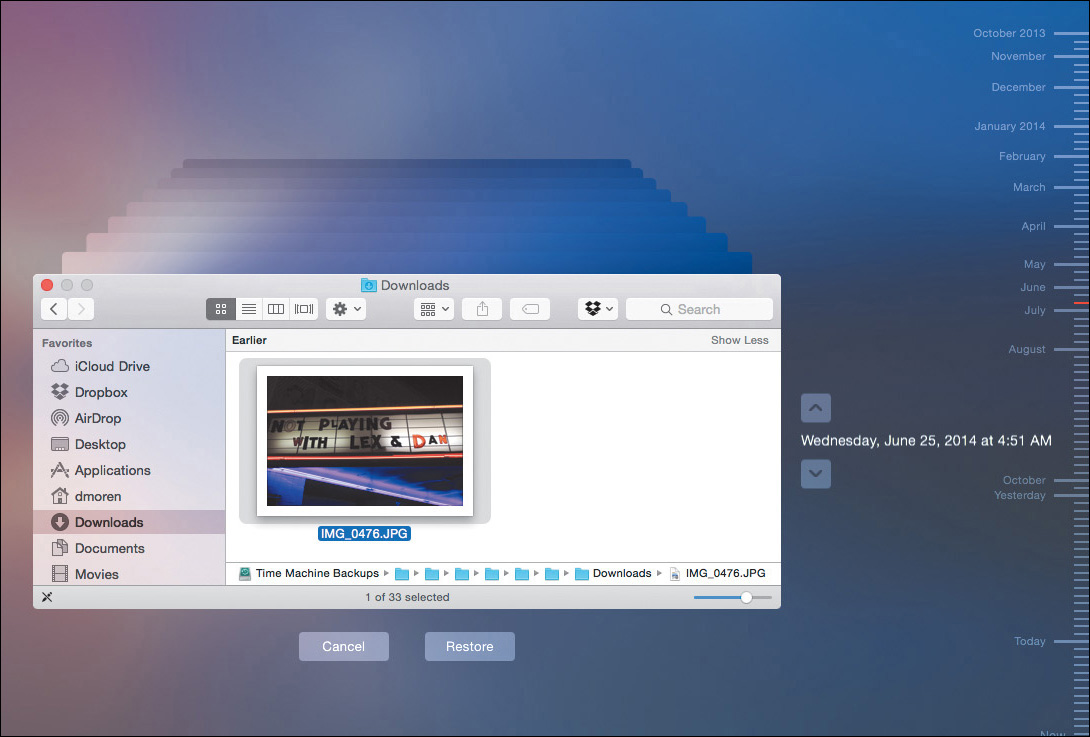
2. Locate the file or folder you wish to restore, using any of several options. Click the back arrow to be taken to the last time the contents of the folder you’re viewing changed. If you know the exact date of the backup you’re looking for, you can also mouse over the timeline on the right-hand side of the screen; as you do, specific dates will pop out. When you find the right one, click it and you’ll be shown the folder for that date.
The Finder window you use in Time Machine is more or less fully functional, letting you switch views or navigate through your hard drive. You can move up and down in the folder hierarchy, select items from the sidebar, use the Search field, and more. In fact, you can even use Quick Look to view a file’s contents while in Time Machine, playing back video and audio if appropriate.
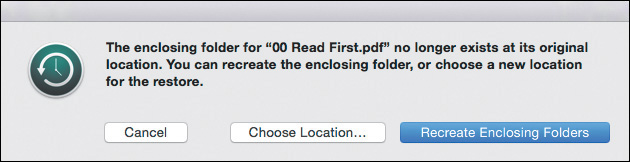
3. When you locate the files or folder you want to restore, select them in the Finder window and click the Restore button. You’re zipped back to the present, and the files or folders you restored are copied back to their original position. If you try to restore a file whose enclosing folder has been since deleted, Time Machine prompts you to either place the file in a new location or re-create the enclosing folders (6.11).
Time Machine also works in certain apps, such as Contacts and Mail. If you made a change to a contact record or your mailbox that you want to undo, launch the appropriate app, choose Enter Time Machine from the menu bar icon, and search the same parade of backups for that app in the place of the Finder; just as before, flip back in time and restore an older version.
Restore Your Mac from Time Machine
Should the time come when you need to restore your entire backup from Time Machine—or want to migrate a new Mac from an older one—rest assured that the process isn’t terribly difficult. It is time-consuming, though, which is why we recommend that you also have a bootable backup (discussed next).
If you’re restoring a Mac from Time Machine, you want to boot up in either Recovery Mode or Internet Recovery mode: Restart your Mac by pressing Command-R or Command-Option-R, respectively. (The only difference between the two modes is that Recovery uses a local partition created by OS X, whereas Internet Recovery requires a network connection to boot remotely; Internet Recovery is best used as a fallback if the Recovery partition has been erased or is otherwise damaged.)
Once you’ve booted into Recovery mode, you’ll have the option to restore your entire disk from your Time Machine backup (assuming, of course, that your backup drive is currently connected to your Mac or available on your network). Choose the date and time of the backup you want to use, and OS X does the heavy lifting of restoring all your files. When it’s done, your Mac should reboot, and you should be able to pick up right where your backup left off.
Make Bootable Mac Backups
Time Machine is fine and dandy, but when it comes to backups, redundancy is your friend. And if you suffer a hard disk crash, you want to get up and running right now, without waiting for a lengthy restore process. One additional option to enhance your backup strategy is to create a bootable duplicate of your system using an app such as Shirt Pocket’s SuperDuper (shirt-pocket.com). (Other applications perform similarly, such as Bombich Software’s Carbon Copy Cloner; www.bombich.com.)
What sets an app like this apart from Time Machine is that it makes an exact clone of your hard drive that you can use to start up and power your computer. If disaster strikes, you can plug in your backup and start your Mac up from it, getting back to work immediately. Later, at your leisure, you can then clone your backup back to your Mac’s drive. It also gives you another copy of your data.
Create a SuperDuper Backup
To use SuperDuper, all you need is an external drive large enough to contain your Mac’s startup drive. Connect the drive and launch the application.
1. Using its simple dropdown menus, select the source of the copy—generally your Mac’s startup drive—and then the destination (the drive you just connected) (6.12).

2. Choose the method of backing up from the Using dropdown menu. Backup – All Files copies all files on the disk to create a bootable clone; Backup – User Files simply backs up just the files in your user directory.
3. Click the Copy Now button to start. You may need to also enter an administrator’s password.
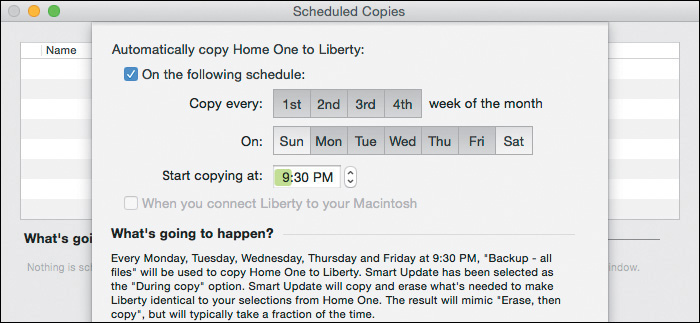
SuperDuper can make and restore backups even without a license, but the $27.95 full version unlocks some really handy features, including the ability to schedule backups. For example, you could make a clone of your startup drive every day at 3 a.m. when you’re—hopefully—sound asleep in bed (6.13). That way you never have to worry about your backup being up to date.
The full version also offers Smart Update, a feature that backs up only those files that have changed since your last backup to that drive. The backup occurs much faster, since fewer files have to be transferred.
![]() Note
Note
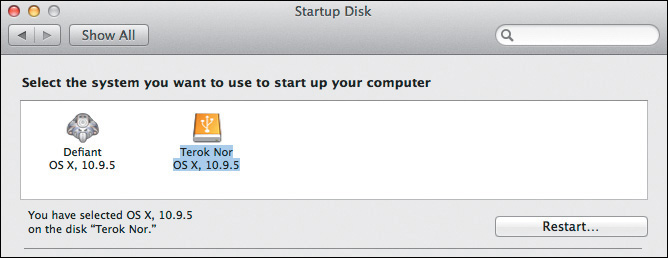
Even if you do have an automated backup system, one very important step is verifying your backups. If the backup drive goes bad, you don’t want to wait to find out when you try to restore it. At least once a month (and possibly more frequently), try starting up your Mac from the Super Duper clone: Go to the Startup Disk preference pane, choose your backup drive, and then click the Restart button (6.14).
Should you need to restore from your SuperDuper clone, the process works much the same as backing up, just in reverse.
1. Boot your Mac from the clone by using the Startup Disk pane; or, if you can’t get your Mac to boot at all, hold the Option key when starting up and select your backup drive.
2. Once the system has booted, launch SuperDuper.
3. Choose your backup drive as the source and your Mac’s drive as the destination.
4. Choose the Restore – All Files option from the Using dropdown menu.
5. Click the Copy Now button.
Power users will find a lot of other useful options in SuperDuper, including the ability to run scripts before or after copies, edit the backup scripts themselves, and more.
Offsite Backups
You’ve got a Time Machine backup. Good. You’re running daily clones to SuperDuper. Great! But, as you may expect, your backup strategy isn’t complete yet.
What do both your Time Machine backup and your SuperDuper clone have in common? They’re likely both in your home. Which means they’re both susceptible to disasters like a hurricane, flood, or fire. To truly ensure that your data is always safe, you need an offsite backup.
Disk Swapping
“Offsite backup” may sound like something network administrators talk about in their spare time, but it can be as simple (and cheap) as making a SuperDuper clone once a week or month that you then leave at the office or at a friend or family member’s house. Even better is to set up an exchange with a friend or family member, where you hold onto their backup disk and they hold onto yours. You can also store offsite backups in a safe-deposit box or other secure location.
That approach is great if you’re diligent about it, but real life has a way of intervening, and some of us simply prefer not to have to think about it. Fortunately, with the wide proliferation of fast Internet, there are lots of great options for automatically backing up your Mac (or Macs) over a network to a remote server.
![]() Note
Note
Ideally, you have all the components in this chapter set up as a complete backup system. A Time Machine backup records incremental changes in your data; a bootable backup provides a way to get back on your feet quickly; an offsite backup protects against local disaster; and iOS backups keep the data on your devices safe. It sounds extensive, we know, but having multiple backups is so worth it when faced with losing, say, every digital photo you’ve captured during the last several years.
CrashPlan
Several services allow you to back up all your files to a company’s servers. CrashPlan (www.crashplan.com) is among the ones that we really like, because it provides a number of ways to handle remote backups and can accommodate multiple Macs with ease. Other popular options include Backblaze (www.backblaze.com) and Carbonite (www.carbonite.com).
One of CrashPlan’s most basic options, which is available for free, is to set up a deal with a family member or friend, like the aforementioned suggestions about storing drives remotely. But instead of having to physically meet and exchange backup drives, you can both install the CrashPlan app on your computers and back up your files across the Internet to the other’s computer (or even to a drive that you leave at their house, assuming it’s available to a computer on which CrashPlan is installed). And because CrashPlan can be throttled to use only a small amount of bandwidth and even do its backing up during off hours, it won’t tax your network connections.
But you can also use CrashPlan to back up all your files to the company’s servers, where they’re stored safely and with secure encryption. This method requires a subscription to CrashPlan+, which starts at $4 a month for a four-year subscription covering a single computer. But, if you’ve got a bunch of computers in your household, you can also opt for a subscription that covers between two and ten computers—which ought to account for a pretty solid chunk of your family unit—that starts at $9 a month for a four-year subscription. (The monthly price does go up if you choose a shorter-term subscription.)
Set up CrashPlan
To set up CrashPlan, download and install the app from the company’s Web site, then fire it up. Create a user account (or log in to an existing account), after which you can choose what backup method—or methods—you want to use (6.15). Aside from backing up to a friend’s computer or CrashPlan’s servers, you can also have your files copied to another computer you own or to a specific folder somewhere—both of which are available in the free version of CrashPlan.

If you’re backing up over the network, be aware that the initial backup may take a pretty long time—we’re talking hours, days, perhaps even weeks, depending on how much data you’re backing up. CrashPlan throttles its traffic so it doesn’t overwhelm your network connection, which means that it backs up pretty slowly. You can tweak how much CPU and bandwidth it uses, both when you’re at the computer and when the computer is idle, in the app’s Settings section (6.16, on the next page).
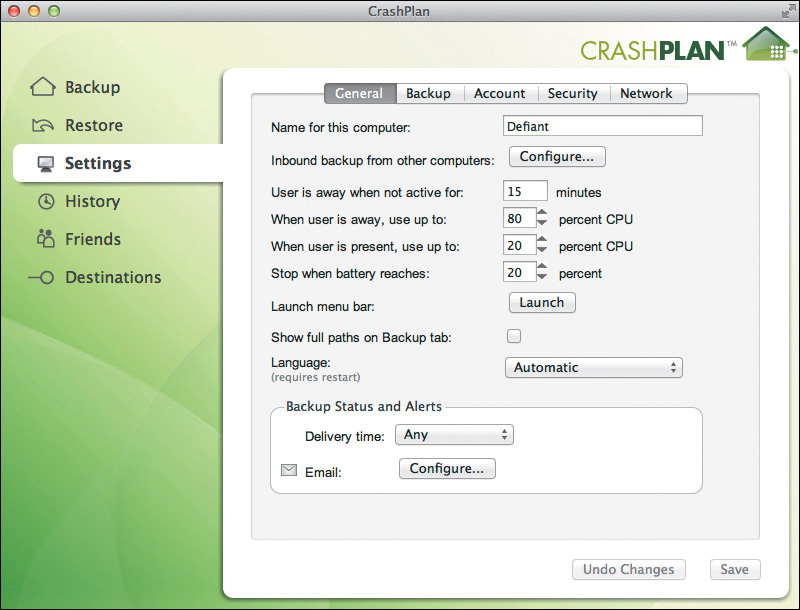
6.16 Control how much of the Mac’s CPU is used for backups.
If you’ve got a lot of data—300 GB or more—you can kickstart the process by using CrashPlan’s optional Seeded Backup service. The company sends you a drive that you can fill with your data and then send back to it; then you only have to make incremental backups. You’ll need to be a subscriber to take advantage of it.
The great part about CrashPlan and similar services is that once you set them up, you can more or less forget about them until you need them. They’ll take care of all the hassle of automatically backing up your files and verifying them. CrashPlan also lets you quickly and easily restore specific files from your backups, à la Time Machine (6.17). And if you migrate to a new computer, you can use the Adopt option to migrate your existing backup to your replacement machine.

6.17 Restoring from a CrashPlan backup
Dropbox
If you’re less concerned with backing up your entire computer online than simply ensuring that your most important files stay secure and safe, consider turning to a service like Dropbox. While many individuals and organizations take advantage of the cloud-storage service to keep their files in sync across multiple computers, it can also be a handy way to maintain backups.
When you install Dropbox, it creates a special folder in the home directory of your Mac, called, appropriately, Dropbox (6.18, on the next page). Any files in this folder are automatically synced to other computers you own that are also logged in to Dropbox, but the files are also stored on Dropbox’s own servers, where you can access them via a Web interface.
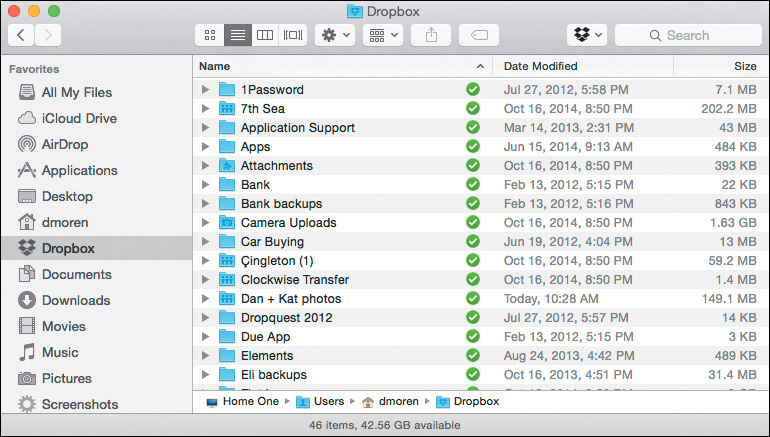
6.18 Dropbox folder in the Finder
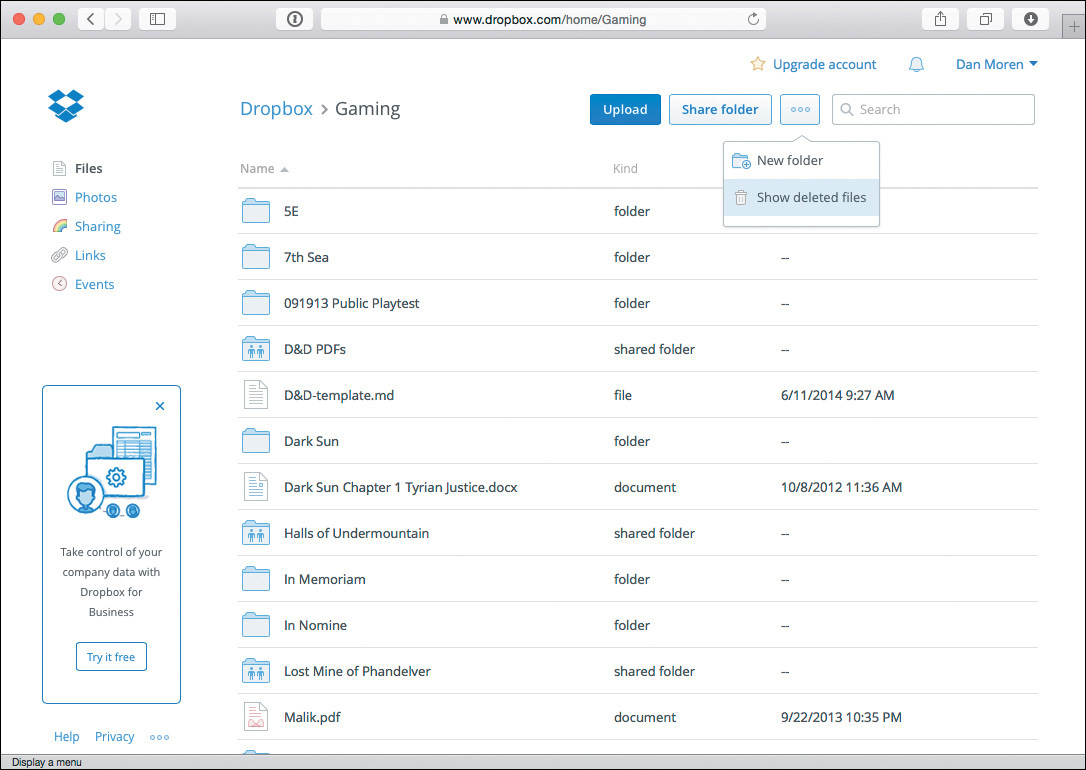
Though Dropbox is primarily concerned with keeping your files in sync across multiple machines, it also maintains a history of files you stored. Via the Web interface, you can view files that have been deleted and undelete any that were erased by mistake (6.19).
Dropbox also stores multiple versions of files: when you’re in the Web interface, Control-click any file and select Previous Versions and you’ll see a full history of all the changes made to that file, along with timestamps, file sizes, and more (6.20). Clicking any of the previous versions lets you preview that version of the file; you can restore that version by selecting it and then clicking Restore at the bottom.

Because of the way Dropbox works, it’s not really sufficient for backing up your entire computer, but if you just want to avoid accidentally deleting some files (or make sure that your work is available wherever you go), it’s a pretty good solution. You can sign up for a free account that gets you 2GB of storage, but a paid option can jump that up to 1TB—enough to store pretty much all of your critical files.