In the previous chapter, we set things up to be able to start building a Masonite application. We installed Python, a database, and the craft command-line utility.
In this chapter, we’re going to learn about the process of connecting browser URLs to the application code that handles each request. We’ll learn about the different types of requests Masonite can interpret, and we’ll start to build functionality for our example application.
“How Does Masonite Handle Requests?”
- 1.
Your browser connects the address you type in (like www.apress.com) with an IP address. IP addresses come in two forms: IPv4 and IPv6. Both of these are types of addresses that are meant to connect different machines together, but are not easy for humans to deal with.
Things called Domain Name Servers (or DNS for short) have lookup tables which take in the human-readable domain names and give out the IPv4 or IPv6 address back to the browser.
- 2.
The browser makes a request to the server, at the end of the IPv4 or IPv6 address (and usually at port 80 or port 443). After DNS resolution, a request to www.apress.com will result in the browser sending a request to 151.101.172.250:443 (the address might be different when you try it, since servers can change their IP addresses).
- 3.
The server then has a chance to interpret the request and respond accordingly. Most of the time, the response will be a textual body (which can contain HTML) and some headers describing the server and response body.
It’s the third step where Masonite takes over. Masonite applications listen on port 80 and port 443, unless otherwise configured, and are given the HTTP request to interpret.
HTTP means Hypertext Transfer Protocol, and it describes the format in which requests are made and responses are sent. There’s a huge amount of detail I’m glossing over, because it’s largely unimportant to what we’re learning about Masonite. If you’d like to see the full specification, you can find it at https://tools.ietf.org/html/rfc2616.
Masonite takes in an HTTP request, performs some initial formatting on it, and passes that request to a route handler. In order for us to respond to specific requests, we need to create route handlers and the accompanying controllers.
Creating Controllers and Routes
This code can be found at https://github.com/assertchris/friday-server/tree/chapter-2.
In Masonite, we think of routes as the first point of entry into the application, but before we can create new routes, we have to create new controllers.
This is from app/http/controllers/HomeController.py.
Controllers are ordinary Python classes. What makes them powerful is that they are created and called using a dependency injection container. We’ll dive deeply into what that means, in Chapter 3.
For now, all you need to know is that the Request and View objects you see, there, will automatically be provided. We don’t need to create new instances of this controller, and feed it with those objects, in order for it to function.
Most of the controller code is documentation. For the sake of brevity, we’re going to omit as much of this kind of documentation as possible. You’ll see it in your files (and it’ll still be in ours), but we won’t be repeating it in code listings.
This is from routes/web.py.
Older versions of Masonite require a -r flag to make the server restart every time it sees a file change. If your updates aren't showing in the browser, make sure the server is reloading every time a file changes, by checking in the console. If you're not seeing any activity, there, you may need this flag.
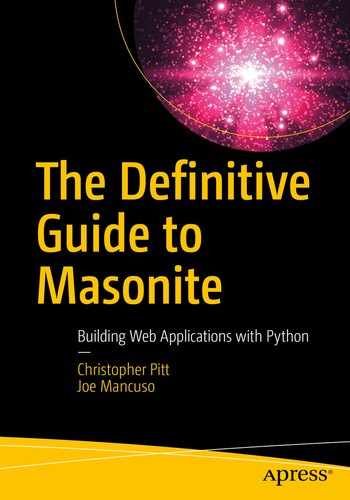
Oops! An error
This is from app/http/controllers/HomeController.py.
Our route tells Masonite to use the show method, but the show method just passes. For routes to work, they need to return something. The error message tells us this, albeit in a roundabout way: “Responses cannot be of type: None.”

Returning a string from show
Success! This may not seem like much, but it’s the first step toward building a functional application.
- 1.
We opened a browser to http://127.0.0.1:8000/home. The browser created an HTTP request and sent it to that address.
- 2.
The Masonite server, started with craft serve -r and listening on port 80, received the HTTP request.
- 3.
The Masonite server looked for a route matching /home, with the GET request method. It found a match and looked at which controller and method to use.
- 4.
The Masonite server fetched the prevailing Request and View objects, instantiated the controller, and sent those objects to the controller and show methods.
- 5.
We told the controller to return a string, for that type of request, which it did. That string was formatted as an HTTP response and sent back to the browser.
- 6.
The browser displayed the HTTP response.
Every route you create will be connected with a method in a controller, or directly to a response file. You’ll need to follow this process often, so it’s important that you get the hang of it now.
This is just an ordinary GET route, but there are many different kinds of routes and variations we can use.
Creating Different Kinds of Routes
We’ve kinda glossed over this, but HTTP requests can have different aspects that separate them. We’ve already seen what GET requests look like – the kind that happen when you type and address into your browser.
Different Methods
POST – These kinds of requests usually happen when you submit a form in your browser. They are used to signify that the object(s) being conveyed on should be created on the server.
PATCH, PUT – These kinds of requests usually don’t happen in the browser, but they have special meaning and operate similarly to POST requests. They are used to signify that the object(s) being conveyed on should be partially changed or overwritten, respectively.
DELETE – These kinds of requests also don’t usually happen in the browser, but they operate similarly to GET requests. They are used to signify that the object(s) being conveyed should be removed from the server.
HEAD – These kinds of requests do happen in the browser, but they are more about the metadata of the object(s) being conveyed than they are about the object(s) themselves. HEAD requests are ways to inspect the object(s) in question and whether the browser has permission to operate on them.
Using these request methods, requests to the same path (like /room) can mean different things. A GET request can mean that the browser, or person using it, wants to see information about a specific room.
A POST, PATCH, or PUT request may indicate that the user wants to make or change a room, specifying attributes to create or change it with.
A DELETE request may indicate the user wants the room removed from the system.
Different Parameters
Routes (and requests) can also have different kinds of parameters. The first, and easiest to think about, is the kind of parameter that is part of the URL.
You know when you see blog posts, with URLs like https://assertchris.io/post/2019-02-11-making-a-development-app..? That last part of the URL is a parameter, which could be hard coded or could be dynamic, depending on the application.
This is from routes/web.py.
This is from app/http/controllers/HomeController.py.
The __init__ method (or the constructor) accepts a Request object, which we can access inside the show method. We can call the param method, to get the named URL parameter, which we defined in the route.
This is from app/http/controllers/HomeController.py.
This works, as before, because controller methods are called after their dependencies have been resolved from the dependency injection container.
If you’re using a dependency in a single method, you should probably just accept that parameter in the same method. If you’re reusing it multiple times, it’s a bit quicker to accept the dependency in the constructor.
This is from routes/web.py.
This is from app/http/controllers/HomeController.py.
We can access query string parameters using the input method, on the Request object. Wanna know the best part about this code? If we want to respond to POST, PATCH, or PUT requests, we don’t need to change any of this controller code.
This is from routes/web.py.
This is from app/http/middlware/CsrfMiddleware.py.
We’re going to be learning about middleware in Chapter 8 and CSRF protection in Chapter 4. For now, it’s enough to know that POST requests are usually prevented when they come from outside the application.
- 1.
Go to www.getpostman.com and download and install the app. You’ll need to create a free account when you open the app, unless you’ve used Postman before.
- 2.
Change the method dropdown from Get to Post and enter the URL httsp:// 127.0.0.1:8000/home.
- 3.
Change the data tab from Params to Body and enter name (key) = chris (value).
- 4.Click Send.
 Figure 2-3
Sending POST requests to the server
If either the GET or POST request gives you an error, along the lines of “can only concatenate str (not “bool”) to str,” it’s probably because you’re providing neither the route param nor the query string/post body name.
Route Groups
This is from routes/web.py.
If we use RouteGroup instead of Match or Get, we can define common path and name prefixes. This saves a lot of typing and makes it easier to see routes that have something in common.
There are a few more advanced aspects of RouteGroup, but they are best left for the chapters where they are properly explained. Look out for middleware in Chapter 8 and domains (deploying) in Chapter 13.
Exploring Request and Response
While we’re in the controller, let’s look at the Request and Response classes in a bit more detail. We’ve already used a couple Request methods, but there are more to see.
This returns a dictionary of input. For HEAD, GET, and DELETE methods, this probably means query string values. For POST, PATCH, and PUT methods, this probably means request body data.
The latter methods can send their body data as URL-encoded values, or even as JSON data.
I say this “probably means” because the latter methods may also have query string values. While this is allowed in most settings, it’s contrary to the HTTP specification. When you’re designing your application to use the latter methods, you should try to steer clear of mixing query strings and body data.
These methods limit the returned dictionary items and exclude the specified dictionary items, respectively.
request.has() returns True or False, depending on whether or not the specified key is defined. You could, for instance, alter the behavior of the route method, based on the presence of certain bits of data. Perhaps you want to update a user’s account details, if you detect data specific to that. Or, perhaps you need to reset their password, if you find relevant data in their form submission. Up to you.
Reading and Writing Cookies
One of the ways we remember a user, and store data relevant to their session, is by setting cookies. These can be set and read in the browser, so it’s important to realize that the Masonite defaults protect against this.
This code also demonstrates how to set the expiry of cookies. By default, they will expire the moment the user closes their browser, so any long-lived or persistent data must have this value set.
If you set Encrypt to False, then you need to set Decrypt to False. Otherwise the Decrypt argument may be omitted. If Masonite tries to decrypt a cookie, but fails, then it will delete that cookie. This is a security precaution against cookie tampering.
Sending Other Kinds of Responses
It’s this kind of magic that makes me enjoy Masonite so! There’s something similar happening when we return plain strings, but this is the first time we’re digging deep enough to know that is what’s happening.
This is one of the main reasons I recommend you always name your routes. If you later want to change the path to the route, all the code that references a named route will continue to function unmodified. It’s also often quicker using a named route than it is reconstructing or hard coding the URL you need.
Creating Views
The final kind of response I want to talk about is the kind that involves HTML. If we’re interested in building a rich UI, plain strings just aren’t going to cut it. We need a way to construct more complex templates, so we can show dynamic and styled interface elements.
This is from resources/templates/layout.html.
This is from resources/templates/home.html.
Notice how little this template has to repeat, since we’re extending the layout.html template. This path is relative to the templates folder. Blocks defined in “outer” templates can be overridden by “inner” templates. This means we can define default content, which “inner” templates can replace with more specific content.
Masonite views use a superset of the Jinja2 template syntax, which can be found at http://jinja.pocoo.org/docs. One important difference is that Masonite templates can use @extends syntax in place of {%extends ...%} syntax.
There are a couple things we need to change, in the controller, to use these templates. Firstly, we’re using dynamic data, in the form of {{ name }}. This data needs to be passed into the view. Secondly, we need to specify which view template to load.
This is from app/http/controllers/HomeController.py.
We pass the name data, to the view, by defining a dictionary of dynamic data.
There’s a lot more to learn about the Jinja2 syntax and how Masonite extends it. We’ll explore it more as we build our example application.
Starting the Example Application
Before we begin, I want to stress that the example application is entirely optional to your learning. Each chapter’s example code can be found on GitHub, so you don’t have to retype anything.
That said, we highly recommend that you at least follow along with the development of the example application. We believe you’ll find it easier to remember what you learn if you see it built into something real. More so if you build something real yourself.
This code can be found at https://github.com/assertchris/friday-server/tree/between-chapters-2-and-3.
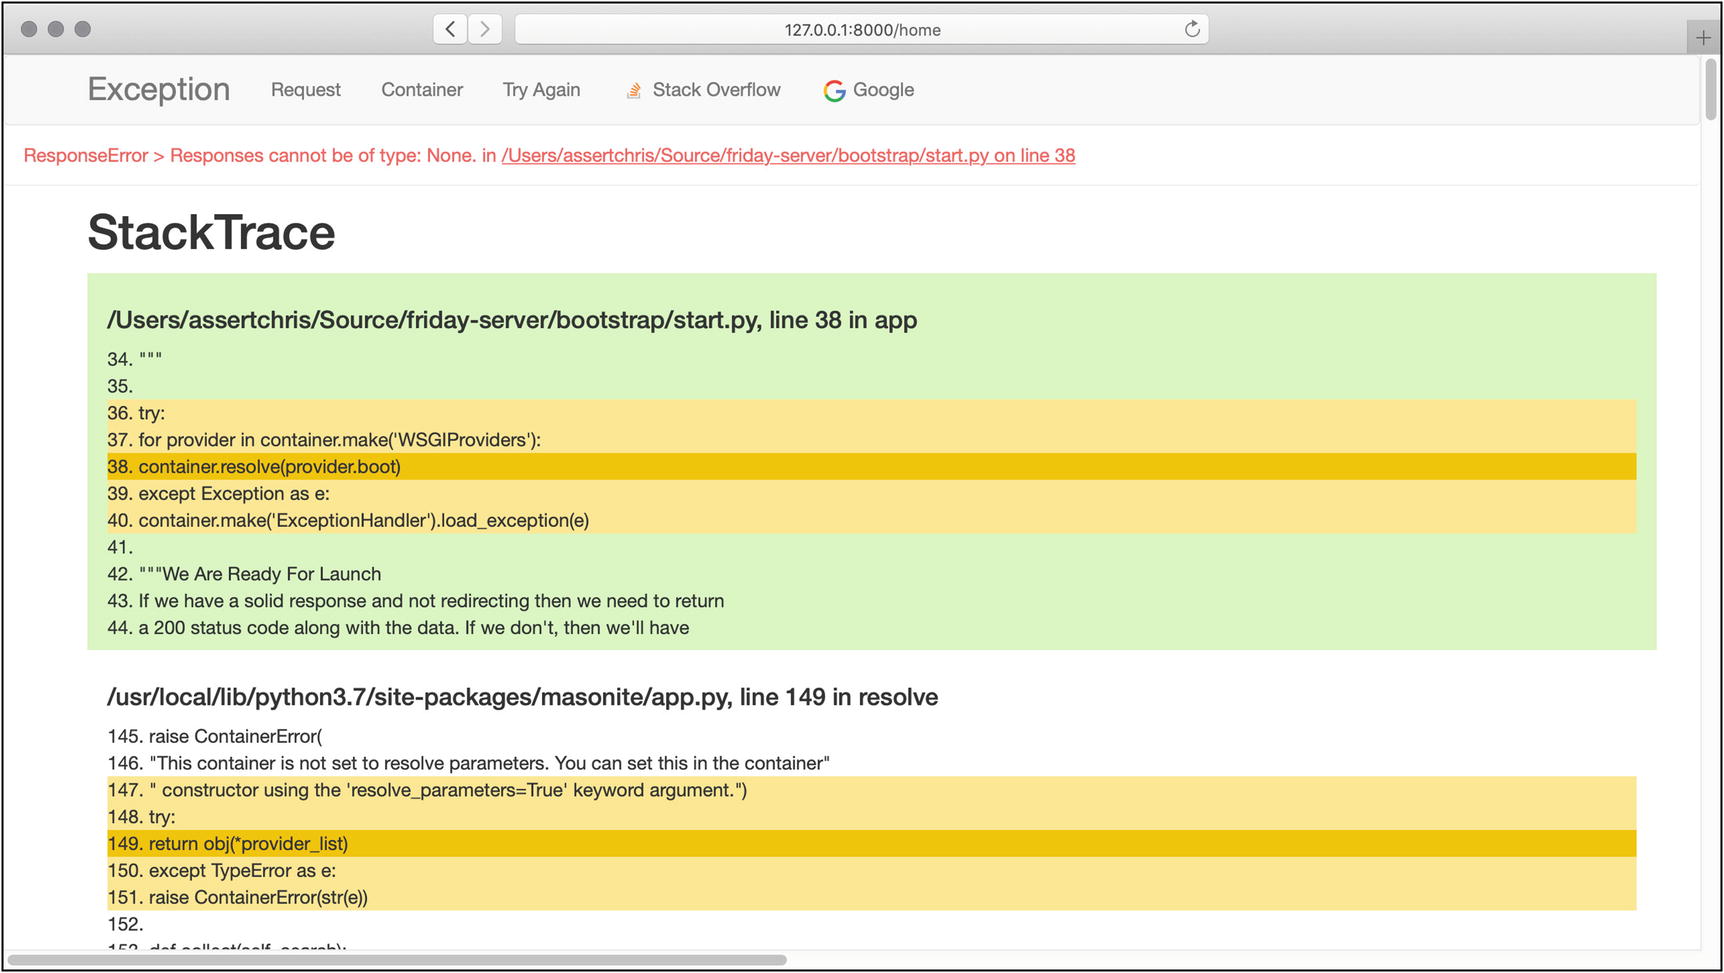
I listen to many podcasts, so I’d like Friday (my personal assistant and home automation software) to organize and play podcasts on demand. Friday will begin her life as a glorified podcast app.
This is from app/http/controllers/PodcastController.py.
This is from resources/templates/podcasts/search.html.
This is from routes/web.py.
This adds two new files and one new folder. You can commit the files to Git, but I recommend adding the folder (which is node_modules) to your .gitignore file. You can always recreate it by running npm install.
This is from resources/templates/layout.html.
This is from storage/static/sass/style.scss.
This will only work if we’ve installed the Sass library, using pip install libsass or pip3 install libsass. You may, also, not see changes just by refreshing the page. If you aren’t seeing changes, restart the server and clear your browser cache.
I don’t want to go into too much detail about Tailwind, except to say that it is a utility-based CSS framework. That means styles are applied by giving elements classes (inline), or extracting classes in the way we’ve done with these h1 and input selectors.
This is from resources/templates/layout.html.
Podcast search form and results
Summary
In this chapter, we learned about controllers, routing, and views. We created multiple entry points into our application, accepted multiple request methods, and responded with simple and complex responses.
We also began work on our personal assistant application, got Sass up and running, and started applying styles to custom markup.
In the next chapter, we’re going to learn about some of the more advanced tools Masonite provides, beginning with the dependency injection container.