In previous chapters, we learned a bit about some of the patterns Masonite uses to organize an application. We learned about binding and resolving from the container. We also saw how managers, drivers, and factories are used to create a highly customizable system.
In this chapter, we’re going to dive back into the practical aspects of building an application, using these new techniques and tools.
“How Do I Store Data?”
There are many ways to send data, to a web application, using a browser. There are the obvious ways, such as when we enter a web site address into the browser’s address bar. We’re telling the browser where we want to go, and that request ends up at the web application’s doorstep.
In Chapter 2, we saw the many ways in which we can make requests to a Masonite application. What I’m more interested in, for the purposes of this chapter, are some of the other ways we can send and receive data.
Have you heard the term “Ajax” before? It’s a name that began as an acronym for a particular set of technologies (Asynchronous JavaScript And XML), but has become a term to describe many kinds of partial page loading.
In essence, Ajax is when the GET or POST requests we usually send happen quietly behind the scenes, usually to persist some state or reload part of the page with new content.
Then there’s web sockets. These are an evolution of the HTTP requests we’ve seen thus far. Instead of full or partial requests for new content, web sockets are a continuous open connection, through which the server can push new content to the browser.
There are more ways, but these help to illustrate a problem I want us to solve. When we’re building web applications, we need to be able to send data along these channels. We also need to validate that the data is in order, before doing something with it. Typically, form data is stored, but it could also be sent to other services, which will expect certain things in certain formats.
So, in this chapter, we’re going to work out how to create forms and how to post their data securely to the server. We’ll explore the options we have for ensuring the data is properly formatted and doesn’t try to do malicious things on the server.
Building Secure Forms
This code can be found at https://github.com/assertchris/friday-server/tree/chapter-5.
What we have, so far
This is from resources/templates/podcasts/search.html.
Since we’re making the list of podcasts dynamic, we’ve created a PodcastController method to return that list. It’s returning an empty array, for now, but we’ll expand it over time.
That array is passed to the podcasts/search.html template , by supplying a dictionary to view.render. Then, in the template, we replace the preview static content with a bit of dynamic code. We check to see if there are any podcasts, failing which we render some helpful text.
If there are podcasts, we loop over them. There are loads of things going on here, so we’re going to spend some time looking at what this template is doing and what templates can do in general. Buckle up!
Template Conditionals
Masonite templates are a superset of Jinja2 templates. That means, anything you can do in an ordinary Jinja2 template you can do in Masonite. Masonite includes some extra goodies, like the alternate block syntax.
- 1.
If statements
These are the simplest checks we can do, inside a template. They take a variable or expression which doesn’t need to be a Boolean. The value of the variable or expression is interpreted as either True or False. If True, the nested block will be displayed.
When we say @if podcasts|length > 0, we’re saying “if the number of podcasts is greater than zero, show the next nested level of content.” We can also define an @else block and multiple @elif blocks.
I personally don’t like the idea of using @elif blocks, as they tend to make templates messy very quickly. It’s far clearer to define multiple templates and to do as much conditional logic as is practical inside the controller.
- 2.
Loop statements
These help us to render a block of content/markup for each item in a list. In our example application, we may use them to render a list of podcasts, as we’re doing in the preceding example.
Notice the difference between @endfor and @endif. These help the compiler to know which kind of conditional block is being closed, so it’s important to use the appropriate closing block. It’s something that takes getting used to, especially since Python doesn’t have block terminators like this.
- 3.
Include statements
These are useful for including other templates into the current one. We could, for instance, put the block we render for each podcast into another template and include it inside the loop.
The included template has access to all the variables defined in the template which includes it. We don’t need to “pass them down” or anything. We can just start using them straight away.
- 4.
Extend/block statements
These are great for extending an existing layout, as we learned about in Chapter 3. We’re going to learn more about blocks, as we add more JavaScript to our application.
You can see more details in the official documentation: Views - Masonite Documentation.
Template Filters
- 1.
value|‘default’
When we get around to showing podcast details, we’ll see this filter used more. It says, “if the value is not false, show it. Otherwise, show the value 'default'.” It’s great for filling the gaps where there is no content to show.
- 2.
items|first
This filter shows the first item from a list of items. It’s useful if you have a list of things, but you only want to show the first. Of course, you could always pull the first item out the list, in the controller, and only send that to the view.
- 3.
‘hello %s’|format(name)
This filter works like the Python string interpolation method. It’s useful if you want to use a template string inside the template, and you have access to variables you want to replace placeholders with.
- 4.
items|join(‘ , ’)
This filter helps to combine a list of items into a single string, using another string to go between each item. If the list is only one item long, the “join” string won’t be added at all.
- 5.
items|last
Similar to first but it returns the last item.
- 6.
items|length
This filter returns the length of a list of items. It’s essential for pagination and summarizing list contents in search results.
- 7.
items|map(attribute=‘value’) or items|map(‘lower’)|join(‘ , ’)
map is an extremely powerful filter. With it, we can pluck attributes out of each object in a list or provide another filter to be applied for each item in a list. Then it can even be combined, by extracting an attribute and then applying another filter to each extracted value.
- 8.
items|random
Returns a random item from a longer list of items.
- 9.
value|reverse
Reverses n object (like a string), or returns an iterator that traverses the items in a list in reverse.
- 10.
items|sort or items|sort(attribute=‘name’,reverse=True)
This filter sorts a list of items. If the items are strings, just using |sort should be enough, though you might also want to change the reverse parameter to make it sort descending. If the items are dictionaries, you can select which attribute to sort by.
- 11.
value|trim
Trims the whitespace before and after a string.
There are quite a few filters not covered in this list. I think some of them are simple but not as useful, while others are a bit more in-depth that I’d like us to go at this point. If you’re searching for a filter you don’t see here, check out the Jinja2 filter documentation: https://jinja.palletsprojects.com/en/2.10.x/templates/#list-of-builtin-filters.
CSRF Protection
One thing I want to mention, before we look at how to use this form on the back end, is the {{ csrf_field }} field. CSRF (or Cross-Site Request Forgery ) is a security concern that arises when you start to use forms on your site.
Web applications, which require users to log in to perform sensitive operations, might store some of those credentials in the browser. That way, when you navigate from page to page (or when you return to the site after a while), you are still logged in.
The problem with this is that malicious folks can forge a request from you to the web application that requires authentication. Imagine you are logged in to Facebook, in your browser. While you’re browsing an unrelated site, that site uses an Ajax request to navigate your browser to the Facebook URL that causes your account to follow theirs.
That can’t happen because Facebook is using a thing called CSRF protection. It adds a special token to the page from which your account could naturally follow another account. Then, when your browser initiates the request to follow another account, Facebook compares the token it has remembered for you with the token the HTTP request passed along.
If they match, your browser must have proceeded through a natural path to initiate the follow operation.
I don’t want to dwell too much on the details of this, except to say that Masonite provides a simple mechanism to use the same security Facebook uses. {{ csrf_field }} creates a hidden field, which holds this CSRF token. If your forms don’t use {{ csrf_field }}, you probably won’t be able to submit their contents to another Masonite URL, by default.
To a lesser degree, CSRF protection also makes it harder for automation scripts (or bots) to use your web application. They have to do double the number of requests and adapt to changes in the markup of the page where they find the initial token.
CSRF can affect web applications that perform destructive or sensitive operations through HTTP GET requests. It’s just that good applications seldom perform these kinds of operations through GET requests, because that goes against the original design of the HTTP specification. You should do the same.
This is from app/http/middleware/CsrfMiddleware.py.
A really good example of this is that services like PayPal and Stripe will, at our request, send us details about payments made by our customers. We’re not going to be using them, for our home automation, but you’re likely to encounter something similar the more you build.
Services like these need a way to send us HTTP POST requests, without jumping through the CSRF hoop. They’re not first going to open a form in a browser and find the CSRF token.
The trick is being specific about which endpoints are allowed to bypass the built-in protection and making sure they are bulletproof.
What happens when people call these endpoints with a valid user session in the browser? What about when they call the endpoints with malicious data? What about when the endpoint is hammered by bots?
These are the questions you should ask, before allowing an endpoint to bypass the protection.
Validating Form Data
Once the form is submitted, we need to check that the data it provides is valid. You could do this in the same controller action you used to display the search page, but I suggest you split these actions up a bit.
This is from app/http/controllers/PodcastController.py.
- 1.
We type hint the Request and Validator parameters to our search action. Masonite’s container, which we learned about in Chapter 3, reflects over the parameters to see which objects it should inject into the function call.
- 2.
We use the validate method , of the Request class, with a list of validations we want to perform. The Validator class provides different rule-generating methods we can use to define what valid data looks like.
- 3.
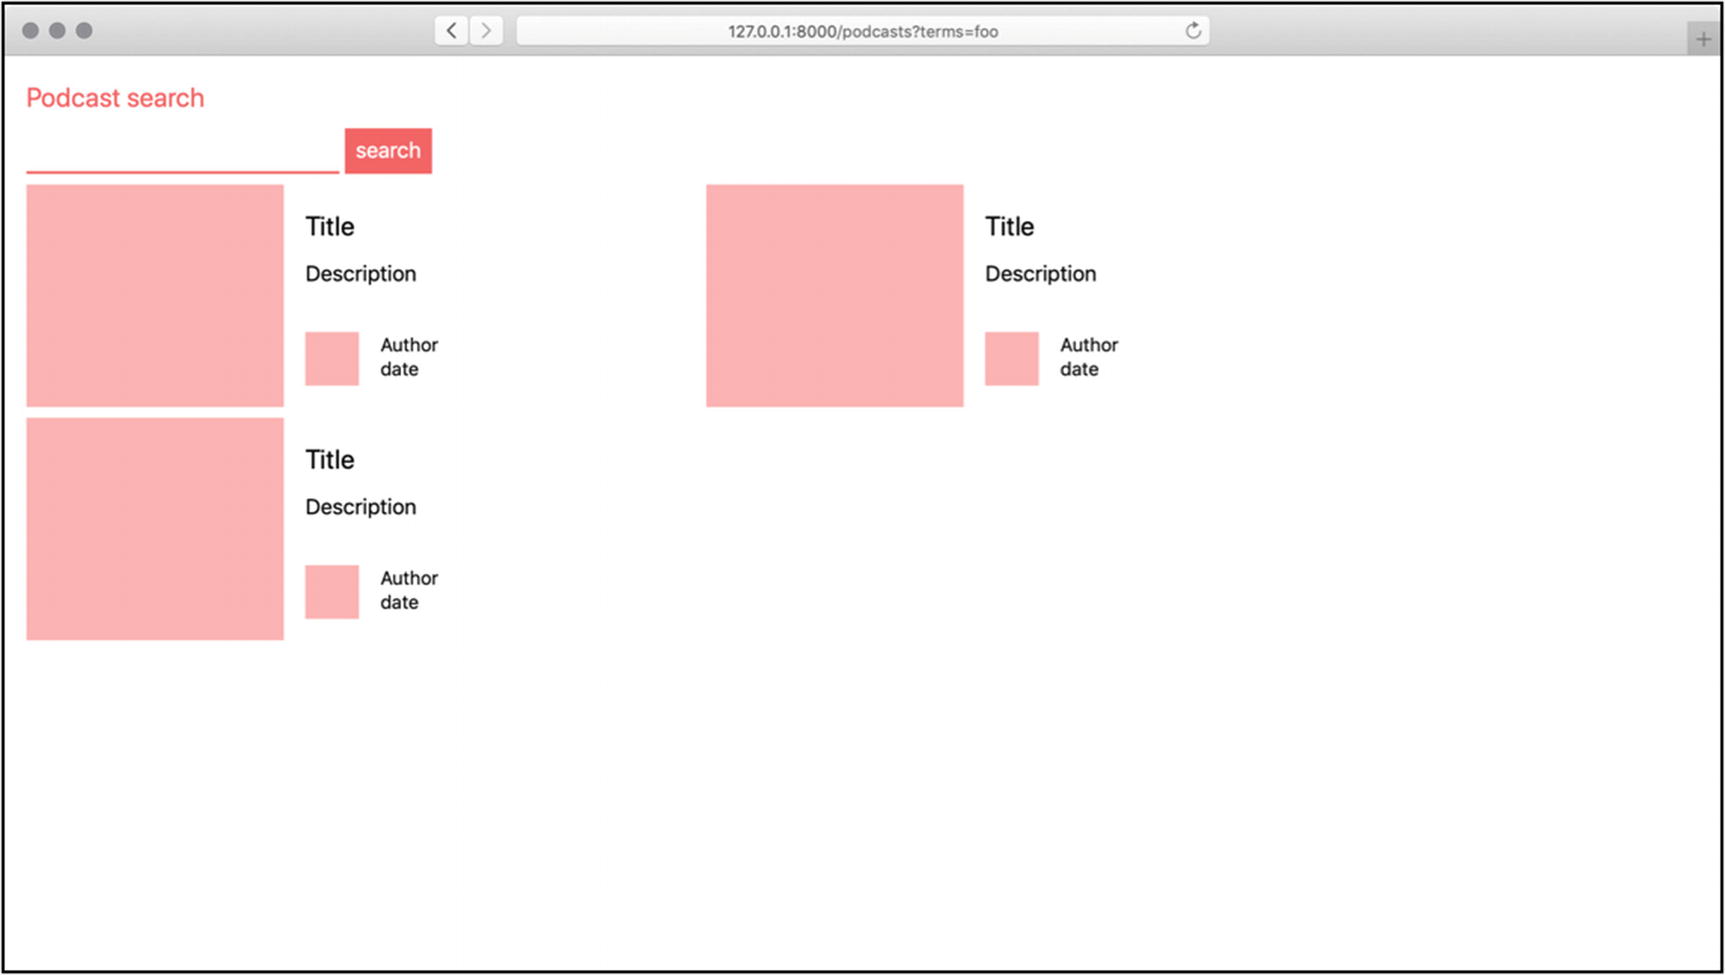
If there are errors, we find a reasonable way to notify the user of these errors. Flashing them to the session, which we learned about in Chapter 2, allows us to remember them temporarily. Then, after the redirect, we can display them for the user.
This is from resources/templates/podcasts/search.html.
If there are validation errors, we want to be able to show them in the search template. Here, we have access to a session() function , which is a shortcut to the same request.session object we see in the controller.
If the session has an errors value, we show an enumeration of the fields it contains errors for. In a simple array, @for item in items will return values we can put directly into markup. For dictionaries, it becomes @for key in items. Each key is the name of a field with failed validation.
We then dereference those errors (where each field name, or key, has an array of error messages) and join them with the join filter we just learned about.
There are many built-in validation methods. So many, in fact, that I’d prefer we uncover them as we progress through the book instead of all at once. If you can’t wait, head over to the official documentation to learn more: https://docs.masoniteproject.com/advanced/validation.
Rendering error messages in a template
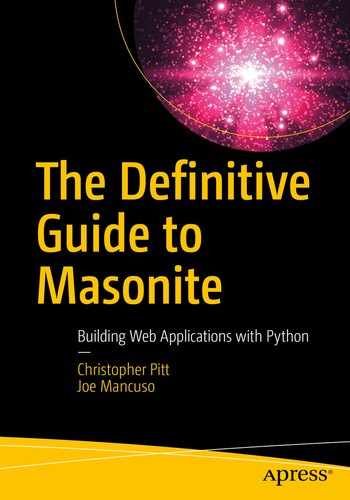
Fetching Remote Data
Now that we’re getting and validating search terms, it’s time to fetch a list of matching podcasts. We’ll tap into iTunes to find new podcasts and parse their data.
In Chapter 3, we learned about creating service providers. Let’s recap what we learned.
This is from config/providers.py.
This is from app/providers/RssParserProvider.py.
This is from app/helpers/RssParser.py.
This is from app/providers/HttpClientProvider.py.
This is from config/providers.py.
This is from app/providers/init.py.
This is from app/helpers/HttpClient.py.
Resolving Dependencies from the Container
This is from app/http/controllers/PodcastController.py.
We’ve added an init__ method, which resolves HttpClient and RssParser out of the container.
This isn’t the only way to resolve these dependencies, and the alternatives definitely deserve some consideration. We’ll circle back to them before too long.
This is from app/http/controllers/PodcastController.py.
This is from resources/templates/podcasts/_podcast.html.

Finding new podcasts, in an app we built!
Summary
We covered a lot of things in this chapter. There’s also a lot of things we could add. Consider it a challenge to find out more information, about each podcast, and fill out the _podcast.html template a bit more.
Aside from learning all about forms and templates, we also got a chance to further cement what we learned about the IoC container and how to add our own services to it.
In the next chapter, we’re going to explore how to persist this kind of data to a database, and all that entails.