
![]()
Sharding
Whether you’re building the next Facebook or just a simple database application, you will probably need to scale your app up at some point if it’s successful. If you don’t want to be continually replacing your hardware (or you begin approaching the limits of what you can do on just one piece of hardware), then you will want to use a technique that allows you to add capacity incrementally to your system, as you need it. Sharding is a technique that allows you to spread your data across multiple machines, yet does so in a way that mimics an app hitting a single database.
Ideally suited for cloud-based computing platforms, sharding as implemented by MongoDB is perfect for dynamic, load-sensitive automatic scaling, where you ramp up your capacity as you need it and turn it down when you don’t (within reason).
This chapter will walk you through implementing sharding in MongoDB and will look at some of the advanced functionality provided within MongoDB’s sharding implementation, such as tag sharding and hashed shard keys.
Exploring the Need for Sharding
When the World Wide Web was just getting under way (1994), the number of sites, users, and the amount of information available online was low. The Web consisted of a few thousand sites and a population of only tens or perhaps hundreds of thousands of users predominantly centered on the academic and research communities. In those early days, data tended to be simple: hand-maintained HTML documents connected together by hyperlinks. The original design objective of the protocols that make up the Web was to provide a means of creating navigable references to documents stored on different servers around the Internet.
Even a current big brand name such as Yahoo! had only a small presence on the Web then compared to its offerings today. The original product around which the company was formed in 1994, the Yahoo! directory, was little more than a network of hand-edited links to popular sites. These links were maintained by a small but enthusiastic band of people called surfers. Each page in the Yahoo! directory was a simple HTML document stored in a tree of filesystem directories and maintained using a simple text editor.
But as the size of the net started to explode—and the number of sites and visitors started its near-vertical climb upward—the sheer volume of resources available forced the early Web pioneers to move away from simple documents to more complex dynamic page generation from separate datastores.
Search engines started to spider the Web and pull together databases of links that today number in the hundreds of billions of links and tens of billions of stored pages.
These developments prompted the movement to datasets managed and maintained by evolving content management systems that were stored mainly in databases for easier access.
At the same time, new kinds of services evolved that stored more than just documents and link sets. For example, audio, video, events, and all kinds of other data started to make their way into these huge datastores. This process is often described as the “industrialization of data”—and in many ways it shares parallels with the industrial revolution, centered on manufacturing during the 19th century.
Eventually, every successful company on the Web faces the problem of how to access the data stored in these mammoth databases. They find that there are only so many queries per second that can be handled with a single database server, and network interfaces and disk drives can only transfer so many megabytes per second to and from the Web servers. Companies that provide web-based services can quickly find themselves exceeding the performance of a single server, network, or drive array. In such cases, they are compelled to divide and distribute their massive collections of data. The usual solution is to partition these mammoth chunks of data into smaller pieces that can be managed more reliably and quickly. At the same time, these companies need to maintain the ability to perform operations across the entire breadth of the data held in their large clusters of machines.
Replication, which you learned about in some detail in Chapter 11, can be an effective tool for overcoming some of these scaling issues, enabling you to create multiple identical copies of your data in multiple servers. This enables you (in the correct circumstances) to spread out your server load across more machines.
Before long, however, you run headlong into another problem, where the individual tables or collections that make up your dataset grow so large that their size exceeds the capacity of a single database system to manage them effectively. For example, Facebook has let it be known that it receives over 350 million photos per day! And the site has been operating for more than 15 years.
Over a year that’s 127.8 billion photos, and that amount of data in one table is not feasible. So Facebook, like many companies before them, looked at ways of distributing that set of records across a large number of database servers. The solution adopted by Facebook serves as one of the better-documented (and publicized) implementations of sharding in the real world.
Partitioning Horizontal and Vertical Data
Data partitioning is the mechanism of splitting data across multiple independent data stores. Those data stores can be coresident (on the same system) or remote (on separate systems). The motivation for coresident partitioning is to reduce the size of individual indexes and reduce the amount of I/O (input/output) that is needed to update records. The motivation for remote partitioning is to increase the bandwidth of access to data by having more RAM in which to store data, by avoiding disk access, or by having more network interfaces and disk I/O channels available.
Partitioning Data Vertically
In the traditional view of databases, data are stored in rows and columns. Vertical partitioning consists of breaking up a record on column boundaries and storing the parts in separate tables or collections. It can be argued that a relational database design that uses joined tables with a one-to-one relationship is a form of coresident vertical data partitioning.
MongoDB, however, does not lend itself to this form of partitioning, because the structure of its records (documents) does not fit the nice and tidy row-and-column model. Therefore, there are few opportunities to cleanly separate a row based on its column boundaries. MongoDB also promotes the use of embedded documents, and it does not directly support the ability to join associated collections together on the server (this can be done in your application).
Partitioning Data Horizontally
Horizontal partitioning is currently the only partitioning strategy when using MongoDB, and sharding is the common term for a popular form of horizontal partitioning. Sharding allows you to split a collection across multiple servers to improve performance in a collection that contains a large number of documents.
A simple example of sharding occurs when a collection of user records is divided across a set of servers, so that all the records for people with last names that begin with the letters A–G are on one server, H–M are on another, and so on. The rule that splits the data is known as the shard key.
In simple terms, sharding allows you to treat the cloud of shards as through it were a single logical database, and an application does not need to be aware that the data are distributed across multiple machines. Traditional sharding implementations require applications to be actively involved in determining which server a particular document is stored on in order to route requests properly. Traditionally, there is a library bound to the application, and this library is responsible for storing and querying data in sharded datasets.
MongoDB has a unique method for sharding, where a mongos routing process manages the splitting of the data and the routing of requests to the required shard server. If a query requires data from multiple shards, then the mongos will manage the process of merging the data obtained from each shard back into a single cursor.
This feature, more than any other, is what earns MongoDB its stripes as a cloud- or web-oriented database.
Analyzing a Simple Sharding Scenario
Let’s assume you want to implement a simple sharding solution for a fictitious Gaelic social network. Figure 12-1 shows a simplified representation of how this application could be sharded.
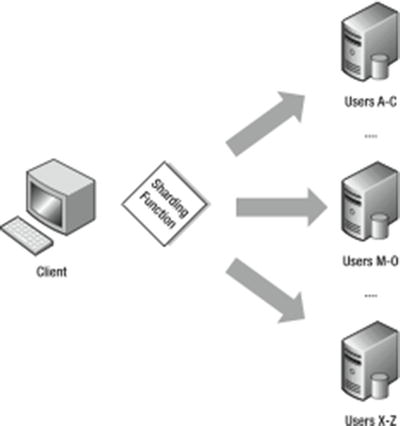
Figure 12-1. Simple sharding of a user collection
There are a number of problems with this simplified view of this application. Let’s look at the most obvious ones.
First, if your Gaelic network is targeted at the Irish and Scottish communities around the world, then the database will have a large number of names that start with Mac and Mc (MacDonald, McDougal, and so on) for the Scottish population and O’ (O’Reilly, O’Conner, and so on) for the Irish population. Thus, using the simple sharding key based on the first letter of the last name will place an undue number of user records on the shard that supports the letter range “M–O.” Similarly, the shard that supports the letter range “X–Z” will perform very little work at all.
An important characteristic of a sharding system is that it must ensure that the data are spread evenly across the available set of shard servers. This prevents hotspots that can limit horizontal scaling performance. Let’s call this Requirement 1: The ability to distribute data evenly across all shards.
Another thing to keep in mind is that when you split your dataset across multiple servers, you both increase and decrease your dataset’s vulnerability to hardware failure. That is, you decrease the chance that a single server failure will make all of your data unavailable, but you increase the number of servers and the likelihood that one will fail. Again, an important characteristic of a reliable sharding system is that—like a RAID system commonly used with disk drives—it stores each piece of data on more than one server, and it can tolerate individual shard servers becoming unavailable. Let’s call this Requirement 2: The ability to store shard data in a fault-tolerant fashion.
Finally, you want to make sure that you can add or remove servers from the set of shards without having to back up and restore the data in order to redistribute them across a smaller or larger set of shards. Further, you need to be able to do this without causing any down time on the cluster. Let’s call this Requirement 3: The ability to add or remove shards while the system is running.
The upcoming sections will cover how to address these requirements.
Implementing Sharding with MongoDB
MongoDB uses a proxy mechanism to support sharding (see Figure 12-2); the provided mongos daemon acts as a controller for multiple mongod-based shard servers. Your application attaches to the mongos process as though it were a single MongoDB database server; thereafter, your application sends all of its commands (such as updates, queries, and deletes) to that mongos process.
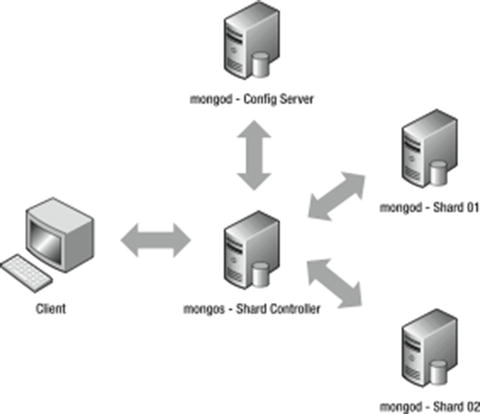
Figure 12-2. A simple sharding setup without redundancy
The mongos process is responsible for managing which MongoDB server is sent the commands from your application, and this daemon will reissue queries that cross multiple shards to multiple servers and aggregate the results together.
MongoDB implements sharding at the collection level, not the database level. In many systems, only one or two collections may grow to the point where sharding is required. Thus, sharding should be used judiciously; you don’t want to impose the overhead of managing the distribution of data for smaller collections if you don’t need to.
Let’s return to the fictitious Gaelic social network example. In this application, the user collection contains details about its users and their profiles. This collection is likely to grow to the point where it needs to be sharded. However, other collections, such as events, countries, and states, are unlikely to ever become so large that sharding would provide any benefit.
The sharding system uses the shard key to map data into chunks, which are logical contiguous ranges of document keys. Each chunk identifies a number of documents with a particular continuous range of sharding key values; these values enable the mongos controller to quickly find a chunk that contains a document it needs to work on. MongoDB’s sharding system then stores this chunk on an available shard store; the config servers keep track of which chunk is stored on which shard server. This is an important feature of the implementation because it allows you to add and remove shards from a cluster without having to back up and restore the data.
When you add a new shard to the cluster, the system will migrate a number of chunks across the new set of servers in order to distribute them evenly. Similarly, when you remove a shard, the sharding controller will drain the chunks out of the shard being taken offline and redistribute them to the remaining shard servers.
A sharding setup for MongoDB also needs a place to store the configuration of its shards, as well as a place to store information about each shard server in the cluster. To support this, a MongoDB server called a config server is required; this server instance is a mongod server running in a special role. As explained earlier, the config servers also act as directories that allow the location of each chunk to be determined. Historically you could have either one (development) or three (production) config servers in your cluster. With the release of MongoDB 3.2, this has changed, and you can now use either the older three config server configuration or a config replica set. At the time of writing, it is still 100% possible to have a single config server (we will do that below), but this does not provide any redundancy in case of failures and only works when running with a replica set of one. As such it is always recommended to run with a minimum of three config servers.
At first glance, it appears that implementing a solution that relies on sharding requires a lot of servers! However, you can co-host multiple instances of each of the different services required to create a sharding setup on a relatively small number of physical servers (similar to what you saw in Chapter 11’s coverage of replication), but you will need to implement strict resource management to avoid having MongoDB processes compete with each other for things like RAM. Figure 12-3 shows a fully redundant sharding system that uses replica sets for the shard storage and the config servers, as well as a set of mongos to manage the cluster. It also shows how those services can be condensed to run on just three physical servers.
Carefully placing the shard storage instances so that they are correctly distributed among the physical servers enables you to ensure that your system can tolerate the failure of one or more servers in your cluster. This mirrors the approach used by RAID disk controllers to distribute data across multiple drives in stripes, enabling RAID configurations to recover from a failed drive.
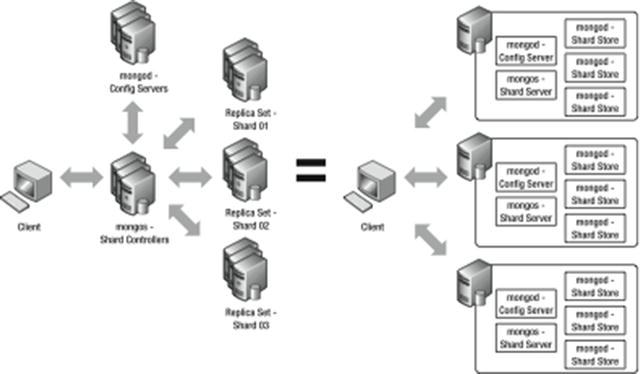
Figure 12-3. A redundant sharding configuration
Setting Up a Sharding Configuration
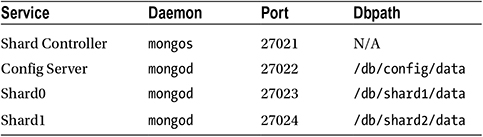
To use sharding effectively, it’s important that you understand how it works. The next example will walk you through setting up a test configuration on a single machine. You will configure this example like the simple sharding system shown in Figure 12-2, with three differences: this example will keep things simple by using only two shards, these shards will be single mongods rather than full replica sets, and there will only be a single config server. Finally, you will learn how to create a sharded collection and a simple PHP test program that demonstrates how to use this collection. Finally, please be aware that the following examples are based on MongoDB 3.2 as this is the current best practice from MongoDB; as such, anyone running a pre-3.2 version of MongoDB should aim to set up three nonreplica set config instances now.
In this test configuration, you will use the services listed in Table 12-1.
Table 12-1. Server Instances in the Test Configuration
Let’s begin by setting up the configuration server. Now when working through this example, let’s pretend we are setting up our small business called TextAndARandomNumber.com, this system will be where you store your text and random numbers.
Start setting up a config server by opening a new terminal window and typing the following code:
$ mkdir -p /db/config/data
$ mongod --port 27022 --dbpath /db/config/data --configsvr --replSet config
Be sure to leave your terminal window open once you have the config server up and running, or feel free to add the -–fork and –-logpath options to your commands. Note that we have provided this member with a replica set name of “config”. This is needed to create a one member replica set which can be used to fulfill the requirement of a replica set for a config server. Given that this is a replica set, you will need to initialize it first, so go ahead and connect to the member and run rs.initate() just as you did in Chapter 11:
$ mongo --port 27022
> rs.initiate()
Next, you need to set up the shard controller (mongos). To do so, open a new terminal window and type the following:
$ mongos --configdb config/<hostname>:27022 --port 27021 --chunkSize 1
This brings up the shard controller, which should announce that it’s listening on port 27021. If you look at the terminal window for the config server, you should see that the shard server has connected to its config server and registered itself with it.
In this example, you set the chunk size to its smallest possible size, 1MB. This is not a practical value for real-world systems, because it means that the chunk storage is smaller than the maximum size of a document (16MB). However, this is just a demonstration, and the small chunk size allows you to create a lot of chunks to exercise the sharding setup without also having to load a lot of data. By default, chunkSize is set to 64MB unless otherwise specified.
Finally, you’re ready to bring up the two shard servers. To do so, you will need two fresh terminal windows, one for each server. Type the following into one window to bring up the first server:
$ mkdir -p /db/shard0/data
$ mongod --port 27023 --dbpath /db/shard0/data
And type the following into the second window to bring up the second server:
$ mkdir -p /db/shard1/data
$ mongod --port 27024 --dbpath /db/shard1/data
You now have your servers up and running. Next, you need to tell the sharding system where the shard servers are located. To do this, you need to connect to your shard controller (mongos) using your server’s hostname. You could use localhost, but that limits the scalability of your cluster to this machine alone. You should replace the <hostname> tags with your own hostname when running the examples that follow. It’s important to remember that, even though mongos is not a full MongoDB instance, it appears to be a full instance to your application. Therefore, you can just use the mongo command shell to attach to the shard controller and add your two shards, as shown here:
$ mongo <hostname>:27021
> sh.addShard("<hostname>:27023")
{ "shardAdded" : "shard0000", "ok" : 1 }
> sh.addShard( "<hostname>:27024")
{ "shardAdded" : "shard0001", "ok" : 1 }
Your two shard servers are now activated; next, you need to check the shards using the listshards command:
> db.printShardingStatus();
--- Sharding Status ---
  sharding version: {
    "_id" : 1,
    "minCompatibleVersion" : 5,
    "currentVersion" : 6,
    "clusterId" : ObjectId("5607a9598662c6937d3c2a0d")
}
  shards:
    {  "_id" : "shard0000",  "host" : "norman:27023" }
    {  "_id" : "shard0001",  "host" : "norman:27024" }
  active mongoses:
    "3.1.9-pre-" : 1
  balancer:
    Currently enabled:  yes
    Currently running:  no
    Failed balancer rounds in last 5 attempts:  0
    Migration Results for the last 24 hours:
        No recent migrations
  databases:
You now have a working sharded environment, but no sharded data; next, you will create a new database called testdb, and then activate a collection called testcollection inside this database. You will shard this collection, so you will give this collection an entry called testkey that you will use as the sharding function
> sh.enableSharding("testdb")
{ "ok" : 1 }
> sh.shardCollection("testdb.testcollection", {testkey : 1})
{ "collectionsharded" : "testdb.testcollection", "ok" : 1 }
Thus far, you have created a sharded cluster with two shard storage servers. You have also created a database on it with a sharded collection. A server without any data in it is of no use to anybody, so it’s time to get some data into this collection, so you can see how the shards are distributed.
To do this, you will use a small PHP program to load the sharded collection with some data. The data you will load consists of a single field called testkey. This field contains a random number and a second field with a fixed chunk of text inside it (the purpose of this second field is to make sure you can create a reasonable number of chunks to shard). This collection serves as the main data table for a fictitious website called TextAndARandomNumber.com. The following code creates a PHP program that inserts data into your sharded server:
<?php
// Open a database connection to the mongos daemon
$mongo = new MongoClient("localhost:27021");
// Select the test database
$db = $mongo->selectDB(’testdb’);
// Select the TestIndex collection
$collection = $db->testcollection;

for($i=0; $i < 100000 ; $i++){
        $data=array();
        $data[’testkey’] = rand(1,100000);
        $data[’testtext’] = "Because of the nature of MongoDB, many of the more "
                            . "traditional functions that a DB Administrator "
                            . "would perform are not required.  Creating new databases, "
                            . "collections and new fields on the server are no longer necessary, "
                            . "as MongoDB will create these elements on-the-fly as you access them."
                            . "Therefore, for the vast majority of cases managing databases and "
                            . "schemas is not required.";
        $collection->insert($data);
}
This small program will connect to the shard controller (mongos) and insert 100,000 records with random testkeys and some testtext to pad out the documents. As mentioned previously, this sample text causes these documents to occupy a sufficient number of chunks to make using the sharding mechanism feasible.
The following command runs the test program:
$php testshard.php
Once the program has finished running, you can connect to the mongos instance with the command shell and verify that the data have been stored:
$mongo localhost:27021
>use testdb
>db.testcollection.count()
100000
At this point, you can see that your server has stored 100,000 records. Now you need to connect to each shard and see how many items have been stored in testdb.testcollection for each shard.
![]() Note The count output in a sharded cluster can vary assuming your system is being balanced or you are adding or removing documents. To avoid this problem, you should use the aggregate $group operator. For more details on this limitation, see the following MongoDB documentation https://docs.mongodb.org/manual/reference/method/db.collection.count/#sharded-clusters.
Note The count output in a sharded cluster can vary assuming your system is being balanced or you are adding or removing documents. To avoid this problem, you should use the aggregate $group operator. For more details on this limitation, see the following MongoDB documentation https://docs.mongodb.org/manual/reference/method/db.collection.count/#sharded-clusters.
The following code enables you to connect to the first shard and see how many records are stored in it from the testcollection collection:
$mongo localhost:27023
>use testdb
>db.testcollection.count()
48875
And this code enables you to connect to the second shard and see how many records are stored in it from the testcollection collection:
$mongo localhost:27024
>use testdb
>db.testcollection.count()
51125
![]() Note You may see different values for the number of documents in each shard, depending on when exactly you look at the individual shards. The mongos instance may initially place all the chunks on one shard, but over time it will rebalance the shard set to evenly distribute data among all the shards by moving chunks around. Thus, the number of records stored in a given shard may change from moment to moment. This satisfies “Requirement 1: The ability to distribute data evenly across all shards.”
Note You may see different values for the number of documents in each shard, depending on when exactly you look at the individual shards. The mongos instance may initially place all the chunks on one shard, but over time it will rebalance the shard set to evenly distribute data among all the shards by moving chunks around. Thus, the number of records stored in a given shard may change from moment to moment. This satisfies “Requirement 1: The ability to distribute data evenly across all shards.”
Adding a New Shard to the Cluster
Let’s assume business is really jumping at TextAndARandomNumber.com. To keep up with the demand, you decide to add a new shard server to the cluster to spread out the load a little more.
Adding a new shard is easy; all it requires is that you repeat the steps described previously. Begin by creating the new shard storage server and place it on port 27025, so it does not clash with your existing servers:
$ mkdir -p /db/shard2/data
$ mongod --port 27025 --dbpath /db/shard2/data
Next, you need to add the new shard server to the cluster. You do this by logging in to the sharding controller (mongos) and then using the admin command addshard:
$mongo localhost:27021
>sh.addShard("<hostname>:27025")
{ "shardAdded" : "shard0002", "ok" : 1 }
At this point, you can run the listshards command to verify that the shard has been added to the cluster. Doing so reveals that a new shard server (shard2) is now present in the shards array:
> db.printShardingStatus();
--- Sharding Status ---
  sharding version: {
    "_id" : 1,
    "minCompatibleVersion" : 5,
    "currentVersion" : 6,
    "clusterId" : ObjectId("5607a9598662c6937d3c2a0d")
}
  shards:
    {  "_id" : "shard0000",  "host" : "norman:27023" }
    {  "_id" : "shard0001",  "host" : "norman:27024" }
    {  "_id" : "shard0002",  "host" : "norman:27025" }
  active mongoses:
    "3.1.9-pre-" : 1
  balancer:
    Currently enabled:  yes
    Currently running:  no
    Failed balancer rounds in last 5 attempts:  0
    Migration Results for the last 24 hours:
        No recent migrations
  databases:
    {  "_id" : "testdb",  "primary" : "shard0000",  "partitioned" : true }
        testdb.testcollection
            shard key: { "testkey" : 1 }
            unique: false
            balancing: true
            chunks:
                shard0000    1
            { "testkey" : { "$minKey" : 1 } } -->> { "testkey" : { "$maxKey" : 1 } } on : shard0000 Timestamp(1, 0)
If you log in to the new shard storage server you have created on port 27025 and look at testcollection, you will see something interesting:
$mongo localhost:27025
> use testdb
switched to db testdb
> show collections
system.indexes
testcollection
> db.testcollection.count()
4657
> db.testcollection.count()
4758
> db.testcollection.count()
6268
This shows that the number of items in the testcollection on your new shard2 storage server is slowly going up. What you are seeing is proof that the sharding system is rebalancing the data across the expanded cluster. Over time, the sharding system will migrate chunks from the shard0 and shard1 storage servers to create an even distribution of data across the three servers that make up the cluster. This process is automatic, and it will happen even if there are no new data being inserted into the testcollection collection. In this case, the mongos shard controller is moving chunks to the new server and then registering them with the config server.
Removing a Shard from the Cluster
It was great while it lasted, but now assume that TextAndARandomNumber.com was a flash in the pan and its sizzle has fizzled. After a few weeks of frenzied activity, the site’s traffic started to fall off, so you had to start to look for ways to cut your running costs—in other words, that new shard server had to go!
In the next example, you will remove the shard server you added previously. To initiate this process, log in to the shard controller (mongos) and issue the removeShard command:
$ mongo localhost:27021
> use admin
switched to db admin
> db.runCommand({removeShard : "<hostname>:27025"})
{
    "msg" : "draining started successfully",
    "state" : "started",
    "shard" : "shard0002",
    "note" : "you need to drop or movePrimary these databases",
    "dbsToMove" : [ ],
    "ok" : 1
}
The removeShard command responds with a message indicating that the removal process has started. It also indicates that mongos has begun relocating the chunks on the target shard server to the other shard servers in the cluster. This process is known as draining the shard. This also lists any potential databases, which cannot be moved off the shard as part of the draining. These are listed in the "dbsToMove" array.
You can check the progress of the draining process by reissuing the removeShard command. The response will tell you how many chunks and databases still need to be drained from the shard:
> db.runCommand({removeShard : ""<hostname>:27025"})
{
    "msg" : "draining ongoing",
    "state" : "ongoing",
    "remaining" : {
        "chunks" : NumberLong( 12 ),
        "dbs" : NumberLong( 0 )
    },
    "ok" : 1
}
Finally, the removeShard process will terminate, and you will get a message indicating that the removal process is complete:
> db.runCommand({removeShard : "localhost:27025"})
{
    "msg" : "removeshard completed successfully",
    "state" : "completed",
    "shard" : "shard0002",
    "ok" : 1
}
To verify that the removeShard command was successful, you can run listshards to confirm that the desired shard server has been removed from the cluster. For example, the following output shows that the shard2 server that you created previously is no longer listed in the shards array:
>db.runCommand({listshards:1})
{
    "shards" : [
        {
            "_id" : "shard0000",
            "host" : "<hostname>:27023"
        },
        {
            "_id" : "shard0001",
            "host" : "<hostname>:27024"
        }
    ],
    "ok" : 1
}
At this point, you can terminate the Shard2 mongod process and delete its storage files because its data have been migrated back to the other servers.
![]() Note The ability to add and remove shards to and from your cluster without having to take it offline is a critical component of MongoDB’s ability to support highly scalable, highly available, large-capacity datastores. This satisfies the final requirement: “Requirement 3: The ability to add or remove shards while the system is running.”
Note The ability to add and remove shards to and from your cluster without having to take it offline is a critical component of MongoDB’s ability to support highly scalable, highly available, large-capacity datastores. This satisfies the final requirement: “Requirement 3: The ability to add or remove shards while the system is running.”
Determining How You’re Connected
Your application can be connected either to a standard database server (mongod) or to a shard controller (mongos). For all but a few use cases, the database server and shard controller look and behave exactly the same way. However, sometimes it may be important to determine what type of system you are connected to.
MongoDB provides the isdbgrid command, which you can use to interrogate the connected data system. The following snippet shows how to use this command, as well as what its output looks like:
$mongo
>use testdb
>db.runCommand({ isdbgrid : 1});
{ "isdbgrid" : 1, "hostname" : "<hostname>", "ok" : 1 }
The response includes the isdbgrid:1 field, which tells you that you are connected to a mongos. A response of isdbgrid:0 would indicate that you are connected to a mongod.
Listing the Status of a Sharded Cluster
MongoDB also includes a command for dumping the status of a sharding cluster: printShardingStatus().
This command can give you a lot of insight into the internals of the sharding system. The following snippet shows how to invoke the printShardingStatus() command but strips out some of the output returned to make it easier to read
 $mongo localhost:27021
>sh.status();
--- Sharding Status ---
  sharding version: {
    "_id" : 1,
    "minCompatibleVersion" : 5,
    "currentVersion" : 6,
    "clusterId" : ObjectId("5607a9598662c6937d3c2a0d")
}
  shards:
    {  "_id" : "shard0000",  "host" : "norman:27023" }
    {  "_id" : "shard0001",  "host" : "norman:27024" }
  active mongoses:
    "3.1.9-pre-" : 1
  balancer:
    Currently enabled:  yes
    Currently running:  no
    Failed balancer rounds in last 5 attempts:  0
    Migration Results for the last 24 hours:
        No recent migrations
  databases:
    {  "_id" : "testdb",  "primary" : "shard0000",  "partitioned" : true }
        testdb.testcollection
            shard key: { "testkey" : 1 }
            unique: false
            balancing: true
                chunks:
                    shard0000     2
                    shard0001     3
               { "testkey" : { "$minKey" : 1 } } -->> { "testkey" : 0 } on : shard0000 Timestamp(4, 0)
               { "testkey" : 0 } -->> { "testkey" : 14860 } on : shard0000 Timestamp(3, 1)
               { "testkey" : 14860 } -->> { "testkey" : 45477 } on : shard0001 Timestamp(4, 1)
               { "testkey" : 45477 } -->> { "testkey" : 76041 } on : shard0001 Timestamp(3, 4)
               { "testkey" : 76041 } -->> { "testkey" : { "$maxKey" : 1 } } on : shard0001 Timestamp(3, 5)
This output lists the shard servers, the configuration of each sharded database/collection, and up to 20 chunks in each sharded collection. Because you used a small chunkSize value to simulate a larger sharding setup, this report lists a lot of chunks. An important piece of information that can be obtained from this listing is the range of shard keys associated with each chunk. The output also shows which shard server the specific chunks are stored on. You can use the output returned by this command as the basis for a tool to analyze the distribution of a shard server’s keys and chunks. For example, you might use these data to determine whether there is any “clumping” of data in the dataset.
![]() ProTip Use db.printShardingStatus(true) to display all chunk information for large sharded collections.
ProTip Use db.printShardingStatus(true) to display all chunk information for large sharded collections.
Using Replica Sets to Implement Shards
The examples you have seen so far rely on a single mongod instance to implement each shard. In Chapter 11, you learned how to create replica sets, which are clusters of mongod instances working together to provide redundant and fail-safe storage.
When adding shards to the sharded cluster, you can provide the name of a replica set and the address of a member of that replica set, and that shard will be instanced on each of the replica set members. Mongos will track which instance is the current primary server for the replica set; it will also make sure that all shard writes are made to the correct instance.
Combining sharding and replica sets enables you to create high-performance, highly reliable clusters that can tolerate multimachine failure. It also enables you to maximize the performance and availability of inexpensive, commodity-class hardware.
![]() Note The ability to use replica sets as a storage mechanism for shards satisfies “Requirement 2: The ability to store shard data in a fault-tolerant fashion.”
Note The ability to use replica sets as a storage mechanism for shards satisfies “Requirement 2: The ability to store shard data in a fault-tolerant fashion.”
The Balancer
We’ve previously discussed how MongoDB can automatically keep your workload distributed among all the shards in your cluster. While you may think that this is done via some form of patented MongoDB Magic, that’s not the case. Your mongos process has an element within it called the balancer, which moves the logical chunks of data around within your cluster to ensure they are evenly distributed among all your shards. The balancer speaks to the shards and tells them to migrate data from one shard to another. You can see the distribution of chunks within the sh.status() output in the following example. You can see that my data are partitioned with two chunks on shard0000 and three on shard0001:
{  "_id" : "testdb",  "partitioned" : true,  "primary" : "shard0000" }
     testdb.testcollection
          shard key: { "testkey" : 1 }
          chunks:
               shard0000     2
               shard0001     3
While the balancer does all this work automatically on your behalf, you do have some say in when it operates. You can stop and start the balancer on demand and set a window in which it can operate. To stop the balancer, you connect to the mongos and issue the sh.stopBalancer() command:
> sh.stopBalancer();
Waiting for active hosts...
Waiting for the balancer lock...
Waiting again for active hosts after balancer is off...
As you can see, the balancer is now off; the command has set the balancer state to off and waited and confirmed that the balancer has completed any migrations that were running. To start the balancer is the same process; you run the sh.startBalancer() command:
> sh.startBalancer();
Now, both of these commands can take a few moments to complete and return, as they both wait to confirm that the balancer is up and actually moving. If you are having trouble or wish to confirm the state for yourself manually, you can perform the following checks. First, you can check what the balancer flag is set to. This is the document that acts as the on/off switch for the balancer and it is located in the config database:
> use config
switched to db config
db.settings.find({_id:"balancer"})
{ "_id" : "balancer", "stopped" : true }
Now you can see that the document here with an _id value of balancer is set to stopped : true, which means that the balancer is not running (stopped). This, however, does not mean that there aren’t already migrations running; to confirm that, you need to check out the “balancer lock.”
The balancer lock exists to ensure that only one balancer can perform balancing actions at a given time. You can find the balancer lock with the following command:
> use config
switched to db config
> db.locks.find({_id:"balancer"});
{
        "_id" : "balancer",
        "state" : 0,
        "ts" : ObjectId("5607adec8662c6937d3c2b06"),
        "who" : "norman:27021:1443342681:297529878:Balancer",
        "process" : "norman:27021:1443342681:297529878",
        "when" : ISODate("2015-09-27T08:50:52.936Z"),
        "why" : "doing balance round"
}
You can see that this is a significantly more complex document than the settings document. The most important things, however, are the state entry, which says whether the lock is taken, with 0 meaning “free” or “not taken” and anything else meaning “in use.” You should also pay attention to the timestamp, which says when the lock was taken out. Compare the “free” lock just shown with the “taken” lock next, which shows the balancer was active:
> db.locks.find({_id:"balancer"});
{
        "_id" : "balancer",
        "state" : 2,
        "ts" : ObjectId("5607adec8662c6937d3c2b06"),
        "who" : "norman:27021:1443342681:297529878:Balancer",
        "process" : "norman:27021:1443342681:297529878",
        "when" : ISODate("2015-09-27T08:50:52.936Z"),
        "why" : "doing balance round"
}
Now you know how to start and stop the balancer and how to check what the balancer is doing at a given point. You will also want to be able to set a time window when the balancer will be active. As an example, let’s set the balancer to run between 8 PM and 6 AM, which lets it run overnight when the cluster is (hypothetically) less active. To do this, you update the balancer settings document from before, as it controls whether the balancer is running. The exchange looks like this:
> use config
switched to db config
>db.settings.update({_id:"balancer"}, { $set : { activeWindow : { start : "20:00", stop : "6:00" } } } )
And that will do it; your balancer document will now have an activeWindow that will start it at 8 PM and stop it at 6 AM. You should now be able to start and stop the balancer, confirm its state and when it was last running, and finally set a time window in which the balancer is active.
![]() Warning Make sure all your config servers are in the same time zone and have their clocks synchronized with a tool like NTP. The balancer requires accurate local times to function correctly.
Warning Make sure all your config servers are in the same time zone and have their clocks synchronized with a tool like NTP. The balancer requires accurate local times to function correctly.
Earlier we discussed how important it is to pick the correct shard key. If you pick the wrong shard key, you can cause all kinds of performance problems. Take, for example, sharding on _id, which is an ever-increasing value. Each insert you make will be sent to the shard in your set that currently holds the highest _id value. As each new insert is the “largest” value that has been inserted, you will always be inserting data to the same place. This means you will have one “hot” shard in your cluster that is receiving all inserts and has all documents being migrated from it to the other shards—not very efficient.
To help people solve this problem, MongoDB 2.4 introduced a new feature—hashed shard keys! A hashed shard key will create a hash using the MD5 algorithm for each of the values on a given field and then use these hashes to perform the chunking and sharding operations. This allows you to take an increasing value such as an _id field and generate a hash for each given _id value, which will give randomness to values. Adding this level of randomness should normally allow you to distribute writes evenly to all shards. The cost, however, is that you’ll have random reads as well, which can be a performance penalty if you wish to perform operations over a range of documents. For this reason, hashed sharding may be inefficient when compared with a user-selected shard key under certain workloads.
![]() Note Because of the way hashing is implemented, there are some limitations when you shard on floating-point (decimal) numbers, which mean that values such as 2.3, 2.4, and 2.9 will become the same hashed value.
Note Because of the way hashing is implemented, there are some limitations when you shard on floating-point (decimal) numbers, which mean that values such as 2.3, 2.4, and 2.9 will become the same hashed value.
So, to create a hashed shard, you simply run the shardCollection and create a "hashed" index:
sh.shardCollection( "testdb.testhashed", { _id: "hashed" } )
And that’s it! You have now created a hashed shard key, which will hash the incoming _id values in order to distribute your data in a more “random” nature. Now, with all this in mind, some of you may be wondering why you wouldn’t always use a hashed shard key.
Good question; and the answer is that sharding is just one of “those” dark arts. The optimum shard key is one that allows your writes to be distributed well over a number of shards, so that the writes are effectively parallel. It is also a key that allows you to group so that reads go to only one or a limited number of shards, and it must allow you to make more effective use of the indexes held on the individual shards. All of those factors will be determined by your use case, what you are storing, and how you are retrieving it.
Sometimes, under certain circumstances it makes sense to say “I wish I could have all of that data on this shard.” This is where MongoDB’s tag sharding can shine. You can set up tags so that given values of your shard key are directed at specific shards within your cluster! The first step in this process is to work out what you want to achieve with your tag setup. In the next example, you will work through a simple set up where you want to have the data distributed based on geography, with one location in the United States and another in the European Union.
The first step in this process is to add some new tags to the existing shards. You do this with the sh.addShardTag function, simply adding the name of the shard and a tag you wish to give it. In the example, I have made shard0000 the US shard and shard0001 the EU shard:
> sh.addShardTag("shard0000","US");
> sh.addShardTag("shard0001","EU");
Now, in order to view these changes, you can run the sh.status() command and review the output:
> sh.status();
--- Sharding Status ---
  sharding version: {
    "_id" : 1,
    "minCompatibleVersion" : 5,
    "currentVersion" : 6,
    "clusterId" : ObjectId("5607a9598662c6937d3c2a0d")
}
  shards:
    {  "_id" : "shard0000",  "host" : "norman:27023",  "tags" : [ "US" ] }
    {  "_id" : "shard0001",  "host" : "norman:27024",  "tags" : [ "EU" ] }
...
As you can see, the shards now have the US and EU tags against their names, but these alone will do nothing; you need to tell the mongos to route data for the given collection to those shards based on some rules. This is where the tricky part comes in; you need to configure the sharding setup so that mongos can perform the rule evaluations against any given document in order to distribute them to the correct shard, based on the tags you just set up. In addition to this, you still want to maintain the same distribution logic as before. If you recall from the earlier discussion of how chunks are split, you can see that for the most part you just need to have this breakdown by region occur “before” the breakdown by current shard key of “testkey.”
The solution here is to add to the shard key an extra value that represents the region the data belong in and have this as the first (left most) element of the shard key. So, now you need to shard a new collection in order to get these tags added:
> sh.shardCollection("testdb.testtagsharding", {region:1, testkey:1})
{ "collectionsharded" : "testdb.testtagsharding", "ok" : 1 }
![]() Note While the tag portion of a key does not need to be the first element, it is almost always best that it is; that way, chunks are split primarily by tag, making distribution easier.
Note While the tag portion of a key does not need to be the first element, it is almost always best that it is; that way, chunks are split primarily by tag, making distribution easier.
At this point you have your tags set up, you have your shard key, which will break the chunks up into nice regional pieces, and now all you need is the rules! To add these you use the sh.addTagRange command. This command takes the namespace of the collection, along with minimum and maximum range values, and the tag to which those data should be sent. MongoDB’s tag ranges are minimum inclusive and maximum exclusive. Thus if you want anything that has a value of EU to be sent to the tag EU, you need to have a range from EU to EV. And for value of US you want a range from US to UT. This gives us the following commands:
> sh.addTagRange("testdb.testtagsharding", {region:"EU"}, {region:"EV"}, "EU")
> sh.addTagRange("testdb.testtagsharding", {region:"US"}, {region:"UT"}, "US")
From now on, any documents that match these criteria will be sent to those shards. So let’s introduce a few documents in order to test things. I’ve written a short loop to introduce 10,000 documents that match the shard key into the cluster:
for(i=0;i<10000;i++){db.getSiblingDB("testdb").testtagsharding.insert({region:"EU",testkey:i})}
Now run sh.status() and you can see the shard chunking breakdown:
testdb.testtagsharding
    shard key: { "region" : 1, "testkey" : 1 }
    unique: false
    balancing: true
    chunks:
        shard0000    2
        shard0001    3
    { "region" : { "$minKey" : 1 }, "testkey" : { "$minKey" : 1 } } -->> { "region" : "EU", "testkey" : { "$minKey" : 1 } } on : shard0000 Timestamp(4, 1)
    { "region" : "EU", "testkey" : { "$minKey" : 1 } } -->> { "region" : "EU", "testkey" : 1 } on : shard0001 Timestamp(2, 0)
    { "region" : "EU", "testkey" : 1 } -->> { "region" : "EU", "testkey" : 19 } on : shard0001 Timestamp(3, 0)
    { "region" : "EU", "testkey" : 19 } -->> { "region" : "US", "testkey" : { "$minKey" : 1 } } on : shard0001 Timestamp(4, 0)
    { "region" : "US", "testkey" : { "$minKey" : 1 } } -->> { "region" : { "$maxKey" : 1 }, "testkey" : { "$maxKey" : 1 } } on : shard0000 Timestamp(1, 7)
     tag: EU  { "region" : "EU" } -->> { "region" : "EV" }
     tag: US  { "region" : "US" } -->> { "region" : "UT" }
From this you can see the breakdown of which chunks are where: there are three chunks on the EU shard and two on the US shard. If you go onto each of the individual shard servers, you will find that all of the 10,000 documents you inserted are on only one shard. You may have noticed the following message in your log file:
Sun Jun 30 12:11:16.549 [Balancer] chunk { _id: "testdb.testtagsharding-region_"EU"testkey_MinKey", lastmod: Timestamp 1000|2, lastmodEpoch: ObjectId(’51cf7c240a2cd2040f766e38’), ns: "testdb.testtagsharding", min: { region: "EU", testkey: MinKey }, max: { region: MaxKey, testkey: MaxKey }, shard: "shard0000" } is not on a shard with the right tag: EU
Sun Jun 30 12:11:16.549 [Balancer]  going to move to: shard0001
This message appears because you have set up the tag ranges to work only on the EU and US values. You can rework them slightly, given what you now know, to cover all tag ranges. Let’s remove those tag ranges and add new ranges; you can remove the old documents with the following commands:
> use config
> db.tags.remove({ns:"testdb.testtagsharding"});
Now you can add the tags back, but this time you can run from minKey to US and from US to maxKey, just like the chunk ranges in the previous example! To do this, use the special MinKey and MaxKey operators, which represent the least and the greatest possible values, respectively, for the shard key range:
> sh.addTagRange("testdb.testtagsharding", {region:MinKey}, {region:"US"}, "EU")
> sh.addTagRange("testdb.testtagsharding", {region:"US"}, {region:MaxKey}, "US")
Now if you run sh.status() again, you can see the ranges; this time, things look to be running slightly different:
testdb.testtagsharding
shard key: { "region" : 1, "testkey" : 1 }
unique: false
balancing: true
chunks:
        shard0000       1
        shard0001       4
{ "region" : { "$minKey" : 1 }, "testkey" : { "$minKey" : 1 } } -->> { "region" : "EU", "testkey" : { "$minKey" : 1 } } on : shard0001 Timestamp(5, 0)
{ "region" : "EU", "testkey" : { "$minKey" : 1 } } -->> { "region" : "EU", "testkey" : 1 } on : shard0001 Timestamp(2, 0)
{ "region" : "EU", "testkey" : 1 } -->> { "region" : "EU", "testkey" : 19 } on : shard0001 Timestamp(3, 0)
{ "region" : "EU", "testkey" : 19 } -->> { "region" : "US", "testkey" : { "$minKey" : 1 } } on : shard0001 Timestamp(4, 0)
{ "region" : "US", "testkey" : { "$minKey" : 1 } } -->> { "region" : { "$maxKey" : 1 }, "testkey" : { "$maxKey" : 1 } } on : shard0000 Timestamp(5, 1)
tag: EU  { "region" : { "$minKey" : 1 } } -->> { "region" : "US" }
tag: US  { "region" : "US" } -->> { "region" : { "$maxKey" : 1 } }
The data are now better distributed, and the ranges involved cover the whole range of shard keys from the minimum value to the maximum value. If you further insert entries into the collection, these data will be correctly routed to the desired shards. No mess and no fuss.
This section applies only to MongoDB 3.2, as it covers the current best practice of using replica sets as config servers. If you are using an older version of MongoDB or are not using config server replica sets, you should look to start with three config servers. As mentioned earlier in this chapter, having more than one config server is basically a necessity in a production environment. Adding extra config servers means that you have additional redundancy in the event that one of your config instances crashes or becomes corrupted. Adding extra config instances is the same as adding new members to a replica set, just as we covered in Chapter 11. First, you start the instances:
mkdir -p /db/config2/data
$ mongod --port 27026 --dbpath /db/config2/data --configsvr --replSet config
mkdir -p /db/config3/data
$ mongod --port 27027 --dbpath /db/config3/data --configsvr --replSet config
Then, once started, you connect back to the first config server instance and add the two new members:
$ mongo
> rs.add(“<hostname>:27026”)
> rs.add(“<hostname>:27027”)
And that’s it! With these extra config members, you can now ensure redundancy in your config database.
Summary
In this chapter we explained how sharding enables you to scale your datastores to handle extremely large datasets. It also enables you to grow the cluster to match the growth in your system. MongoDB provides a simple automatic sharding configuration that works well for most requirements. Even though this process is automated, you can still fine tune its characteristics to support your specific needs. Sharding is one of the key features of MongoDB that sets it apart from other data-storage technologies. After reading this chapter, you should understand how to shard your data over a number of MongoDB instances, manage and maintain a sharded cluster, and how to take advantage of tag sharding and hashed shard keys.
We hope this book has helped you see the many ways that MongoDB is designed to help you cope with the rigorous demands of modern web-based applications as opposed to using more traditional database tools. Topics you have learned about in this book include the following:
- How to install and configure MongoDB on a variety of platforms.
- How to access MongoDB from various development languages.
- How to connect with the community surrounding the product, including how to obtain help and advice.
- How to design and build applications that take advantage of MongoDB’s unique strengths.
- How to optimize, administer, and troubleshoot MongoDB-based datastores.
- How to create scalable fault-tolerant installations that span multiple servers.
You are strongly encouraged to explore the many samples and examples provided in this book. Other PHP examples can be found in the PHP MongoDB driver documentation located at www.php.net/manual/en/book.mongo.php. MongoDB is an extremely approachable tool, and its ease of installation and operation encourage experimentation. So don’t hold back: crank it up and start playing with it! And remarkably soon you, too, will begin to appreciate all the possibilities that this intriguing product opens up for your applications.