
![]()
Database Administration
In this chapter, we will walk you through some of the basic administrative operations you can perform on a MongoDB server. We will also show how to automate some of those activities, such as backing up your server.
Because MongoDB is a nonrelational database system, many of the more traditional functions that a database administrator would perform are not required. For example, it’s not necessary to create new databases, collections, or fields on the server, because MongoDB will create these elements on the fly as you access them. Therefore, in the vast majority of cases you don’t need to manage databases and schemas.
This freedom from having to predefine everything, however, can result in the unintended creation of elements, such as extraneous collections and fields in documents. Administrators and developers will occasionally need to clear out unused data elements from databases, particularly during the development phase of a project, when change is often rapid. They may have to try many approaches before finally settling on a solution and cleaning up the databases. MongoDB’s ease of use encourages this explorative mode of development; however, it can also result in clutter in your datastores because the amount of effort required to create data structures has fallen almost to nothing.
A contributing factor to this clutter, and one of the more significant differences between MongoDB and SQL databases, is that all object and element names in MongoDB are case sensitive on all platforms. Thus, the foo and Foo collection names refer to two completely different collections. Therefore, you need to be careful with your database and collection naming to avoid accidentally creating multiple databases that differ only in the case of the name. (There is, however, one exception to this, as of MongoDB 2.4: you can no longer create databases whose names differ only in case, as doing so will generate an error.)
The different versions of these databases will fill up your disk, and they can create a lot of confusion for developers and end users of the system by allowing them to connect to incomplete or unintended sets of data.
In this chapter, you will learn how to perform all of the following tasks:
- Back up and restore your MongoDB system.
- Use the supplied MongoDB shell (invoked with the mongo command) to perform common tasks.
- Control access to your server with authentication.
- Monitor your database instances.
Before diving into those tasks, however, we’ll begin by looking at the tools used to carry out many of them.
An administrator needs tools suitable for performing the day-to-day tasks of keeping the server running smoothly. There are some very good tools available in the MongoDB package, as well as an evolving collection of useful third-party tools. The following sections cover some of the most important tools available, as well as how to use them.
mongo, the MongoDB Console
The main tool you will use as an administrator is mongo, the MongoDB console tool. mongo is a command-line console utility based on JavaScript. It is similar to many of the query tools supplied with mainstream relational databases. However, mongo has one unique trick up its sleeve: it can run programs written in JavaScript that interact directly with the MongoDB database.
This console allows you to script all of your interactions with MongoDB in JavaScript and then store those scripts in .js files to run as needed. In fact, many of the built-in commands in the mongo console are themselves written in JavaScript.
You can place any commands you would type into the MongoDB shell in a file with a .js extension and run them by simply adding the file name to the command line when starting up the shell or using the load() function from within the shell. The shell will execute the contents of the file and then exit. This is useful for running lists of repetitive commands.
In this chapter we will use the mongo console to demonstrate many of the administrative tasks you can perform on a MongoDB server, and because it is distributed with the MongoDB server, we can guarantee it will be there.
Using Third-Party Administration Tools
Several third-party administration (admin) tools are available for MongoDB. MongoDB, Inc. maintains a page on the MongoDB website that lists currently available third-party tools. You can find this list at http://docs.mongodb.org/ecosystem/tools/administration-interfaces/.
Many of these tools are web based and similar in principle to phpMyAdmin for MySQL, but some are also full-fledged desktop user interfaces. There is also a great reference with a huge catalog of MongoDB-related tools at http://mongodb-tools.com/.
Backing Up the MongoDB Server
The first skill a new MongoDB administrator should learn is how to back up and restore a MongoDB server. Arming yourself with this knowledge will make you feel more comfortable with exploring some of the more advanced administrative functions, because you know that your precious data are stored away safely somewhere.
Creating a Backup 101
Let’s begin by performing a simple back up and then restoring it. Along the way, you will make sure the backup is intact, and you will look at some practical examples that illustrate how the backup and restoration features work. Once you have a solid understanding of how to use these features, you will be able to move on to explore the more advanced administrative features of MongoDB.
In this simple backup example, we will assume the following:
- Your MongoDB server is running on the same machine you are currently logged into.
- You have enough disk space for dump files that could be, at most, the same size as your database.
- Your backup will be made in your home directory. This means you won’t have to deal with any issues related to permissions.
The MongoDB backup utility is called mongodump; this utility is supplied as part of the standard distribution. The following example performs a simple back up of the running MongoDB server to a designated disk directory:
$> cd ~
$> mkdir testmongobackup
$> cd testmongobackup
$> mongodump
When mongodump is running, you should see it output something that looks like the following:
$ mongodump
connected to: 127.0.0.1
Tue May 21 20:52:58.639 all dbs
Tue May 21 20:52:58.640 DATABASE: blog      to      dump/blog
Tue May 21 20:52:58.640      blog.system.indexes to dump/blog/system.indexes.bson
Tue May 21 20:52:58.641            4 objects
Tue May 21 20:52:58.641      blog.system.profile to dump/blog/system.profile.bson
Tue May 21 20:52:58.645            3688 objects
Tue May 21 20:52:58.645      Metadata for blog.system.profile to dump/blog/system.profile.metadata.json
Tue May 21 20:52:58.645      blog.authors to dump/blog/authors.bson
Tue May 21 20:52:58.646            1 objects
Tue May 21 20:52:58.646      Metadata for blog.authors to dump/blog/authors.metadata.json
Tue May 21 20:52:58.646      blog.posts to dump/blog/posts.bson
Tue May 21 20:52:58.686            29997 objects
Tue May 21 20:52:58.709      Metadata for blog.posts to dump/blog/posts.metadata.json
Tue May 21 20:52:58.710      blog.tagcloud to dump/blog/tagcloud.bson
Tue May 21 20:52:58.710            1 objects
Tue May 21 20:52:58.710      Metadata for blog.tagcloud to dump/blog/tagcloud.metadata.json
If your output doesn’t look very similar to this, you should double check that your environment matches up with the assumptions stated previously.
If you do see the correct output, then your database has been backed up to the testmongobackup/dump directory. The following snippet restores your database to its state at the time you performed the back up:
$> cd ~/testmongobackup
$> mongorestore --drop
connected to: 127.0.0.1
Tue May 21 20:53:46.337 dump/blog/authors.bson
Tue May 21 20:53:46.337      going into namespace [blog.authors]
Tue May 21 20:53:46.337       dropping
1 objects found
Tue May 21 20:53:46.338      Creating index: { key: { _id: 1 }, ns: "blog.authors", name: "_id_" }
Tue May 21 20:53:46.339 dump/blog/posts.bson
Tue May 21 20:53:46.339      going into namespace [blog.posts]
Tue May 21 20:53:46.339       dropping
29997 objects found
Tue May 21 20:53:47.284      Creating index: { key: { _id: 1 }, ns: "blog.posts", name: "_id_" }
Tue May 21 20:53:47.375     Creating index: { key: { Tags: 1 }, ns: "blog.posts", name: "Tags_1" }
Tue May 21 20:53:47.804 dump/blog/system.profile.bson
Tue May 21 20:53:47.804       skipping
Tue May 21 20:53:47.804 dump/blog/tagcloud.bson
Tue May 21 20:53:47.804      going into namespace [blog.tagcloud]
Tue May 21 20:53:47.804       dropping
1 objects found
Tue May 21 20:53:47.821      Creating index: { key: { _id: 1 }, ns: "blog.tagcloud", name: "_id_" }
The --drop option tells the mongorestore utility to discard each collection in the database before restoring it. Consequently, the backed-up data replaces the data currently in the database. If you were to choose not to use the --drop option, the restored data would be appended to the end of each collection, which would result in duplicated items.
Let’s examine what happened in this example more closely.
By default, the mongodump utility connects to the local database using the default port and pulls out all of the data associated with each database and collection and stores them in a predefined folder structure.
The default folder structure created by mongodump takes this form:
./dump/[databasename]/[collectionname].bson
The database system used in the example consists of a single database called blog. The blog database contains three collections: authors, posts, and tagcloud.
The mongodump saves the data it retrieves from the database server in .bson files, which is just a copy of the internal BSON format that MongoDB uses internally to store documents. You can also see the indexes on each collection being restored in the preceding example. The MongoDB server maintains indexes, and it records index definitions for each collection, which are stored in the metadata.json files. It is these metadata files that allow you to rebuild the indexes when restoring from a backup.
Once you have dumped the database, you can archive and store the folder on any online or offline media, such as CD, USB drive, tape, or S3 format.
![]() Note The mongodump utility does not empty the contents of the output directory before it writes the backup files to it. If you have existing contents in this directory, they won’t be removed unless they match the name of a file (collectionname.bson) that mongodump has been instructed to back up. This is good if you want to add multiple collection dumps to the same dump directory; however, it could cause problems if you use the same dump directory each time you back up data but don’t clear it out. For example, assume you have a database that you back up regularly, and at some point you decide to delete a collection from this database. Unless you either clear out the directory where you are performing your backup or manually remove the file associated with the deleted collection, the next time you restore the data, the deleted collection will reappear. Unless you want to overlay data in your backups, you should make sure you clear out the destination directory before you use mongodump.
Note The mongodump utility does not empty the contents of the output directory before it writes the backup files to it. If you have existing contents in this directory, they won’t be removed unless they match the name of a file (collectionname.bson) that mongodump has been instructed to back up. This is good if you want to add multiple collection dumps to the same dump directory; however, it could cause problems if you use the same dump directory each time you back up data but don’t clear it out. For example, assume you have a database that you back up regularly, and at some point you decide to delete a collection from this database. Unless you either clear out the directory where you are performing your backup or manually remove the file associated with the deleted collection, the next time you restore the data, the deleted collection will reappear. Unless you want to overlay data in your backups, you should make sure you clear out the destination directory before you use mongodump.
Backing Up a Single Database
When you have multiple applications running on the same server, you may find yourself wanting to back up each database individually, rather than all at once, as in the preceding example.
With mongodump, you can do this by adding the -d database_name option to the command line. This causes mongodump to create the ./dump folder; however, this folder will contain only the backup files for a single database.
Backing Up a Single Collection
Imagine you have a blog site where the contents of the authors collection do not change much. Instead, the rapidly changing content of the blog site is contained in the posts and tagcloud collections. You might back up the entire database only once a day but want to back up these two collections once per hour. Fortunately, you can do that easily with mongodump by using the -c option to specify the collection you wish to back up.
The mongodump utility does not clear its destination directories. This means that, for each collection you want to back up, you can call mongodump successively to add a given collection to your backup, as shown in the following example:
$mkdir ~/backuptemp
$cd ~/backuptemp
$mongodump -d blog -c posts
$mongodump -d blog -c tagcloud
...
    Commands to archive the dump folder ~/backuptemp away as a tar file
...
$ cd ~
$ rm -rf backuptemp
Digging Deeper into Backups
At this point, you know how to perform the rudimentary tasks of backing up and subsequently restoring your data. Now you’re ready to look at some of the powerful options that allow you to tailor MongoDB’s backup and restore functionality to suit your particular needs.
The mongodump utility includes the options shown in Figure 9-1, captured by running help in MongoDB 3.1.9.

Figure 9-1. The mongodump utility help display showing its options
Most of the options listed here are self-explanatory, with the following exceptions:
- -o [ --out ] arg: You use this option to specify the directory where you want the database dumps to be placed. By default, the mongodump utility creates a folder called /dump in the current directory and writes the dumps into that. You can use the -o/--out option to choose an alternative path to place the output dumps.
- --authenticationDatabase arg: Specifies the database that holds the user’s credentials. Mongodump will default to using the databases specified with –db without this option.
- --authenticationMechanism arg: Defaults to MongoDB’s Salted Challenge Response Authentication Mechanism (SCRAM)-SHA1 authentication mechanism. This command is used to switch to MongoDB Enterprise edition’s Kerberos authentication.
Restoring Individual Databases or Collections
You’ve just seen how the mongodump utility can back up a single database or collection; the mongorestore utility has the same flexibility. You can use mongorestore to restore an item if the dump directory it is restoring from has the backup files for the required collection or database in it; you don’t need to restore all the items present in the backup. If you wish, you can restore them individually.
Let’s begin by looking at the options available in mongorestore, as shown in Figure 9-2.
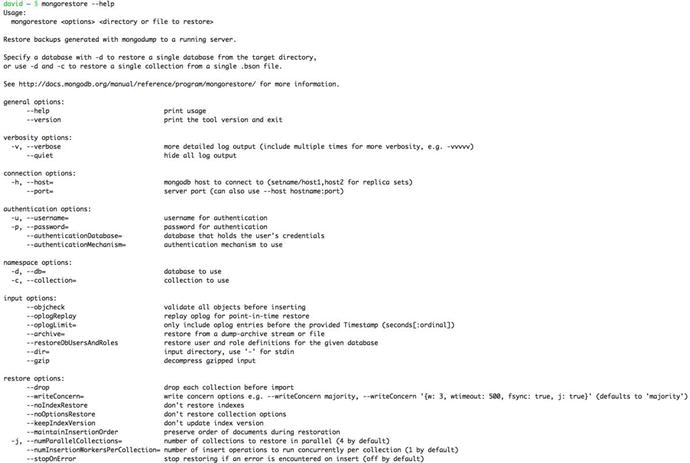
Figure 9-2. The mongorestore help display showing its options
You probably recognize most of these options from the discussion of mongodump; however, the following two options are worthy of special mention:
- --drop: This option instructs mongorestore to drop the existing collection before restoring it. This helps ensure that there are no duplicates. If this option is not used, the restored data are appended (inserted) into the target collection.
- --noobjcheck: This option instructs mongorestore to ignore the step of validating the object before inserting it into the destination collection.
Restoring a Single Database
You can use the mongorestore utility’s -d option to restore a single database. As before, don’t forget to use the --drop option if the database already exists in your MongoDB server:
$cd ~/testmongobackup
$mongorestore -d blog --drop
Restoring a Single Collection
You use similar syntax to restore a single collection to a database; the difference is that you also specify a collection name with the -c option, as shown in the following example:
$cd ~/testmongobackup
$mongorestore -d blog -c posts --drop
For small installations or developer setups, the simple act of running the mongodump utility and saving the results is a perfectly adequate method of performing ad hoc back ups. For example, a common practice on a Mac OS X workstation is to let Time Machine (the Mac backup utility) store the backups.
For any kind of production setup, you will want to back up the server automatically; regular back ups can help you prevent or recover from trouble if you encounter any problems. This holds true not only with your installation (for example, if you have corrupted databases), but also if your users inadvertently damage or destroy data.
Let’s look at some simple scripts you can use to automate your backups.
Using a Local Datastore
A simple backup script that creates archives in a specified directory will suffice if you have a large backup drive attached to your system or you can mount an external filesystem through NFS or SMB. The following backup script is easy to set up; simply edit the variables at the top of the script to match those of your local system:
#!/bin/bash
##########################################
# Edit these to define source and destinations

MONGO_DBS=""
BACKUP_TMP=~/tmp
BACKUP_DEST=~/backups
MONGODUMP_BIN=/usr/bin/mongodump
TAR_BIN=/usr/bin/tar

##########################################

BACKUPFILE_DATE=`date +%Y%m%d-%H%M`

# _do_store_archive <Database> <Dump_dir> <Dest_Dir> <Dest_file>

function _do_store_archive {
        mkdir -p $3
        cd $2
        tar -cvzf $3/$4 dump
}

# _do_backup <Database name>

function _do_backup {
        UNIQ_DIR="$BACKUP_TMP/$1"`date "+%s"`
        mkdir -p $UNIQ_DIR/dump
        echo "dumping Mongo Database $1"
        if [ "all" = "$1" ]; then
                $MONGODUMP_BIN -o $UNIQ_DIR/dump
        else
                $MONGODUMP_BIN -d $1 -o $UNIQ_DIR/dump
        fi
        KEY="database-$BACKUPFILE_DATE.tgz"
        echo "Archiving Mongo database to $BACKUP_DEST/$1/$KEY"
        DEST_DIR=$BACKUP_DEST/$1

        _do_store_archive  $1 $UNIQ_DIR $DEST_DIR $KEY

        rm -rf $UNIQ_DIR
}

# check to see if individual databases have been specified, otherwise backup the whole server
#  to "all"

if [ "" = "$MONGO_DBS"  ]; then
        MONGO_DB="all"
        _do_backup $MONGO_DB
else
        for MONGO_DB in $MONGO_DBS; do
                _do_backup $MONGO_DB
        done
fi
Table 9-1 lists the variables you have to change to make this simple backup script work with your system.
Table 9-1. The Variables Used in the Local Datastore Backup Script
|
Variable |
Description |
|---|---|
|
MONGO_DBS |
Leave this variable empty ("") to back up all databases on the local server. Or you can place a list of databases into it to back up selected databases ("db1 db2 db3"). |
|
BACKUP_TMP |
Set this variable to a temporary directory suitable for holding the dump files for the backup. After the archive has been created, the temporary data used in this directory are deleted. Be sure to choose a suitable directory that is relevant to using your script. For example, if you are using the script to create backups in your local account, use ~/tmp; if you are using it as a system cron job that runs under a system account, use /tmp.. On an Amazon EC2 instance, you should probably use /mnt/tmp, so that the folder is not created on the system root partition, which is quite small. |
|
BACKUP_DEST |
This variable holds the destination folder for the backups, and individual folders will be created below this folder. Again, place this directory at a point relevant to the way you use your backup script. |
|
MONGODUMP_BIN |
Because your backup script may be running under an account that does not have a full set of paths set up, it’s wise to use this variable to specify the full path to this binary. You can determine the appropriate path on your system by typing which mongodump into a terminal window. |
|
TAR_BIN |
You use this variable to set the full path for the tar binary; use which tar in a terminal window to determine this path. |
You can now use this script to back up your databases; doing so will create a set of archival backups in the specified BACKUP_DEST directory. The files created follow this naming format:
Database Name/database-YYYYMMDD-HHMM.tgz
For example, the following snippet shows the backup names for this chapter’s test database:
Backups:$ tree
.
|-- blog
|   |-- database-20150911-1144.tgz
|   `-- database-20150911-1145.tgz
`-- all
    |-- database-20150911-1210.tgz
    |-- database-20150911-1221.tgz
    |-- database-20150911-1222.tgz
    |-- database-20150911-1224.tgz
    `-- database-20150911-1233.tgz
Of course, you also need to install the script. If you want to run this script daily, just put it into /etc/cron.daily and restart the cron service to make it active. This approach will work on most Linux distributions, such as Ubuntu, Fedora, CentOS, and RedHat. If you want less frequent backups, just move the script to /etc/cron.weekly or /etc/cron.monthly. For more frequent backups, you can use /etc/cron.hourly.
Using a Remote (Cloud-Based) Datastore
The script described in the previous section has a separate function for creating and storing the archive. This makes it relatively easy to modify the script so that it uses an external datastore to store the backup archive. Table 9-2 provides a couple of examples, but many other mechanisms are possible.
Table 9-2. Remote (Cloud-Based) Backup Storage Options
|
Method |
Description |
|---|---|
|
rsync/ftp/tftp or scp to another server |
You can use rsync to move the archive to a backup storage machine. |
|
S3 storage |
This is a good place to put your backups if you run your system on EC2 because storage costs are low and Amazon makes redundant copies. |
We will examine the S3 method of storing your backup; however, the same principles apply to any of the other mechanisms.
This example uses the s3cmd utility (written in python) available from http://s3tools.org. On Ubuntu, you can install this script using the sudo apt-get install s3cmd command; on Mac OS X, this script is available from the MacPorts collection. On Fedora, CentOS, and RedHat, you can acquire the yum package from http://s3tools.org, and then install it using yum.
Once you have installed the package, run s3cmd –configure to set your Amazon S3 credentials. Note that you only need to supply two keys: AWS_ACCESS_KEY and AWS_SECRET_ACCESS_KEY. The s3cmd utility will create a config file that contains the information you need in this file: ~/.s3cfg.
Here are the changes you need to make for your backup script to work with S3:
# _do_store_archive <Database> <Dump_dir> <Dest_Dir> <Dest_file>

BACKUP_S3_CONFIG=~/.s3cfg
BACKUP_S3_BUCKET=somecompany.somebucket
S3CMD_BIN=/usr/bin/s3cmd

function _do_store_archive {
        UNIQ_FILE="aws"`date "+%s"`
        cd $2
        tar -cvzf $BACKUP_TMP/$UNIQ_FILE dump
        $S3CMD_BIN --config $BACKUP_S3_CONFIG put $BACKUP_TMP/$UNIQ_FILE
        s3://$BACKUP_S3_BUCKET/$1/$4
        rm -f $BACKUP_TMP/$UNIQ_FILE
}
Table 9-3 lists some variables that you need to configure to make this adapted script work.
Table 9-3. Configuring the Variables of Your Adapted Backup Script
|
Variable |
Description |
|---|---|
|
BACKUP_S3_CONFIG |
The path to the s3cmd configuration file that was created when you ran s3cmd –configure to save the details of your S3 account. |
|
BACKUP_S3_BUCKET |
The name of the bucket where you want the script to store backups. |
|
S3CMD_BIN |
The path to the s3cmd executable program, again use which s3cmd to find it on your system. |
Backing Up Large Databases
Creating effective backup solutions can become a problem when working with large database systems. Often the time taken to make a copy of the database is significant; it may even require hours to complete. During that time, you have to maintain the database in a consistent state, so the backup does not contain files that were copied at different points in time. The holy grail of a database backup system is a point-in-time snapshot, which can be done very quickly. The faster the snapshot can be done, the smaller the window of time during which the database server must be frozen.
Using a Hidden Secondary Server for Backups
One technique used to perform large back ups is to make the backup from a hidden secondary that can be frozen while the backup is taken. This secondary server is then restarted to catch up with the application after the backup is complete.
MongoDB makes it very simple to set up a hidden secondary and have it track the primary server using MongoDB’s replication mechanism. It’s also relatively easy to configure (see Chapter 11 for more details on how to set up a hidden secondary).
Creating Snapshots with a Journaling Filesystem
Many modern volume managers have the ability to create snapshots of the state of the drive at any particular point in time. Using a filesystem snapshot is one of the fastest and most efficient methods of creating a backup of your MongoDB instance. While setting up one of these systems is beyond the scope of this book, we can show you how to place the MongoDB server in a state where all of its data are in a consistent state on the disk. We also show you how to block writes so that further changes are not written to the disk, but are instead buffered in memory.
A snapshot allows you to read the drive exactly as it was when the snapshot was taken. A system’s volume or filesystem manager makes sure that any blocks of data on the disk that are changed after the snapshot is taken are not written back to the same place on the drive; this preserves all the data on the disk to be read. Generally, the procedure for using a snapshot goes something like this:
- Create a snapshot.
- Copy data from the snapshot or restore the snapshot to another volume, depending on your volume manager.
- Release the snapshot; doing so releases all preserved disk blocks that are no longer needed back into the free space chain on the drive.
- Back up the data from the copied data while the server is still running.
The great thing about the method just described is that reads against the data can continue unhindered while the snapshot is taken.
Some volume managers that have this capability include:
- Linux and the LVM volume management system
- Sun ZFS
- Amazon EBS volumes
- Windows Server using shadow copies
Most of those volume managers have the ability to perform a snapshot in a very short time—often just a few seconds—even on very large amounts of data. The volume managers don’t actually copy the data out at this point; instead, they effectively insert a bookmark onto the drive, so that you can read the drive in the state it existed at the point in time the snapshot was taken.
Once the backup system has read the drive from the snapshot, then the old blocks that have been subsequently changed can be released back to the drive’s free space chain (or whatever mechanism the filesystem uses to mark free space).
To make this an effective method of creating a backup, you must either have the MongoDB journal files existing on this same device or get MongoDB to flush all outstanding disk writes to the disk so you can take a snapshot. The feature that forces MongoDB to do this flushing is called fsync; the function that blocks further writes is called a lock. MongoDB has the ability to perform both operations at the same time, so that after the fsync, no further writes are done to the disk until the lock is released. By having the journal on the same device or performing an fsync and lock, you make the image of the database on the disk consistent and ensure that it stays consistent until you have completed the snapshot.
You use the following commands to make MongoDB enter the fsync and lock state:
$mongo
>use admin
>db.fsyncLock()
{
        "info" : "now locked against writes, use db.fsyncUnlock() to unlock",
        "seeAlso" : "http://dochub.mongodb.org/core/fsynccommand",
        "ok" : 1
}
You use these commands to check the current state of the lock:
$mongo
>use admin
>db.currentOp()
{
        "inprog" : [
                {
                        "desc" : "fsyncLockWorker",
                          ......
                }
        ],
        "fsyncLock" : true,
        "info" : "use db.fsyncUnlock() to terminate the fsync write/snapshot lock",
        "ok" : 1
}
The "fsyncLock": true status indicates that MongoDB’s fsync process, which is responsible for writing changes to the disk, is currently blocked from performing writes.
At this point, you can issue whatever commands are required to make your volume manager create the snapshot of the folders where MongoDB has its data files stored. Once the snapshot is completed, you can use the following commands to release the lock:
$mongo
>db.fsyncUnlock();
{ "ok" : 1, "info" : "unlock requested" }Note that there may be a small delay before the lock is released; however, you can use the db.currentOp() function to check the result.
When the lock is finally cleared, db.currentOp() will return the following:
$mongo
>use admin
>db.currentOp()
{
        "inprog" : [
                {
                        "desc" : "conn1",
                        "threadId" : "139861600200448",
                        "connectionId" : 1,
                        "client" : "127.0.0.1:46678",
                        "active" : true,
                        "opid" : 76,
                        "secs_running" : 0,
                        "microsecs_running" : NumberLong(24),
                        "op" : "command",
                        "ns" : "admin.$cmd",
                        "query" : {
                                "currentOp" : 1
                        },
                        "numYields" : 0,
                        "locks" : {

                        },
                        "waitingForLock" : false,
                        "lockStats" : {

                        }
                }
        ],
        "ok" : 1
}
The output here shows that our system has only one activity in progress—the currentOp() command that we just executed—and the fsync sections and other indicators that the system is locked are now cleared. Now that you have the snapshot bookmark inserted, you can use the utilities associated with your volume manager to copy the contents of the snapshot to a suitable place so you can store your backup. Don’t forget to release the snapshot once your backup is complete.
You can visit the following links for more information about snapshots:
- http://docs.mongodb.org/manual/tutorial/backup-databases-with-filesystem-snapshots/
- http://tldp.org/HOWTO/LVM-HOWTO/snapshots_backup.html
- http://docs.huihoo.com/opensolaris/solaris-zfs-administration-guide/html/ch06.html
- http://support.rightscale.com/09–Clouds/AWS/02-Amazon_EC2/EBS/Create_an_EBS_Snapshot
Disk Layout to Use with Volume Managers
Some volume managers can take a snapshot of subdirectories on a partition, but most can’t, so it is a good idea to mount the volume you are planning to store your MongoDB data on in a suitable place on your filesystem (for example, /mnt/mongodb) and use the server configuration options to place the data directories, the configuration file, and any other MongoDB-related files (for example, journal) solely on that mount.
This means that when you take a snapshot of the volume, you capture the complete state of the server, including its configuration. It may even be a good idea to place the binaries of the server distribution directly on that volume, so that your backup contains a completely coordinated set of components.
Importing Data into MongoDB
Sometimes, you need to load lots of bulk data into MongoDB for use as reference data. Such data might include ZIP code tables, IP geolocation tables, parts catalogs, and so on.
MongoDB includes a bulk “loader,” mongoimport, designed to import data directly into a particular collection on the server; this differs from mongorestore, which is designed to restore MongoDB binary from backups.
The mongoimport utility can load data from any of three file formats:
- CSV: In this file format, each line represents a document, and fields are separated by commas.
- TSV: This file format is similar to CSV; however, it uses a tab character as the delimiter. This format is popular because it does not require the escaping of any text characters other than those for new lines.
- JSON: This format contains one block of JSON per line that represents a document. Unlike the other formats, JSON can support documents with variable schemas. JSON is the default output format.
The use of this utility is fairly intuitive. For input, it takes a file in one of the three formats, a string or a file with a set of column header names (these form the element names in a MongoDB document), and several options that are used to control how the data are interpreted. Figure 9-3 shows how to use the mongoimport utility.

Figure 9-3. The mongoimport help display showing its options
The following options deserve more explanation:
- --headerline: Uses the first line of the file as the list of field names. Note that this applies only to CSV and TSV formats.
- --ignoreblanks: Does not import empty fields. If a field is empty, then a corresponding element will not be created in the document for that row; if you don’t invoke this option, then an empty element with the column name is created.
- --drop: Drops a collection and then re-creates it with data only from this import; otherwise, the data are appended to the collection.
- --numInsertionWorkers: The number of insertion workers to create for the insertion of your documents. Higher numbers can lead to more throughput at a cost of more resources.
- --jsonArray: Allows the import/export of data that has multiple MongoDB documents expressed within one JSON array.
You also have to specify the database name and the collection name when you use mongoimport to import data with the -d and -c options, as in the following example:
$mongoimport -d blog -c tagcloud --type csv --headerline < csvimportfile.csv
The mongoexport utility is similar to mongoimport, but mongoexport, as its name implies, creates export files from an existing MongoDB collection instead. This is one of the best ways to extract data from your MongoDB instance in a format that can be read by other databases or spreadsheet applications. Figure 9-4 shows how to use the mongoexport utility.
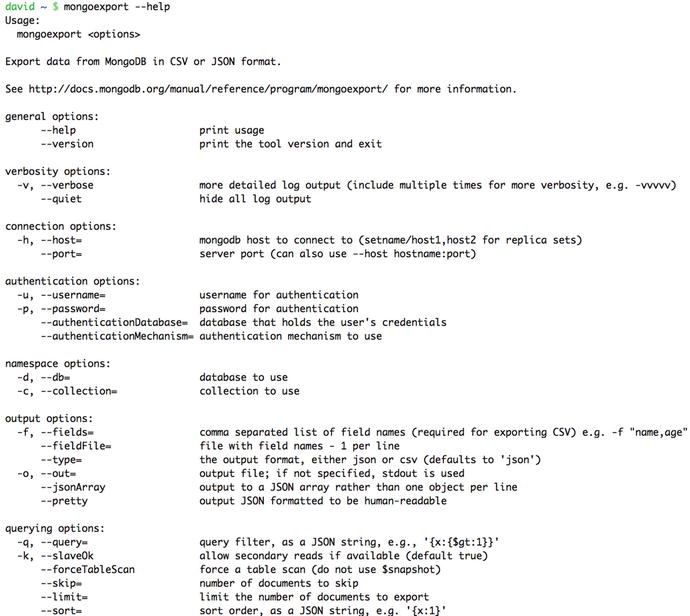
Figure 9-4. The mongoexport help display showing its options
Notable options from the mongoexport utility include the following:
- -q: Specifies the query used to locate the records to output. This query can be any JSON query string (but not a JavaScript query string, as this often doesn’t work as expected) that you might use with the db.collection.find() function to select a subset of records. If you don’t specify this option or you set it to {}, the mongoexport utility will output all records.
- -f: Lists the database element names to be exported.
The following example illustrates how to use the options for the mongoexport utility:
$mongoexport -d blog -c posts -q {} -f _id,Title,Message,Author --csv >blogposts.csv
connected to: 127.0.0.1
exported 1 records
Securing Your Data by Restricting Access to a MongoDB Server
In some cases, your applications may be dealing with sensitive data, such as user records in social networks or payment details in ecommerce applications. In many cases, there are rules mandating that you have to ensure restricted access to sensitive data in your database systems.
MongoDB supports a simple role-based authentication system that allows you to control who has access to each database and the level of access they are granted.
Most of the commands that change the configuration of data or make major alterations to its structure on a MongoDB server are restricted to running only inside the special admin database that is created automatically during each new MongoDB installation.
Before you can issue these commands, you have to switch to the admin database with the use admin command. Upcoming sections will note any command that is admin only, so you will always know when you need to be in the admin database before you can use it. This chapter assumes that you can select the database and authenticate against it, if necessary.
By default, MongoDB does not use any authentication methods. Anybody with access to the network connection can connect and issue commands to the server. However, you can add users to any database, and MongoDB can be configured to require both connection and console authentication to access the relevant database. This is the recommended mechanism for restricting access to admin functions.
Protecting Your Server with Authentication
MongoDB supports a role-based access control (RBAC) authentication model with predefined system roles and user-defined custom roles.
MongoDB supports individual access control records on each database; these records are stored in a special system.users collection. For normal users to have access to two databases (for example, db1 and db2), their credentials and rights must be added to both databases.
If you create individual logins and access rights for the same user on different databases, there is no synchronization between those records. In other words, changing a user password on one database does not change the password on any other database. Using these credentials in this manner, you can create one master user with a password. Then create users on other databases and specify that this user already exists on the master database and its credentials should be used for authentication.
There is also one final (and critical) exception to this rule: any users added to the special admin database will have the same access rights on all databases; you do not need to assign rights to such users individually.
![]() Note If you enable authentication before adding the admin users, you will only be able to access your database via localhost, meaning a connection made from the machine hosting the MongoDB instance. This is a security feature designed to allow administrators to create users after having enabled authentication.
Note If you enable authentication before adding the admin users, you will only be able to access your database via localhost, meaning a connection made from the machine hosting the MongoDB instance. This is a security feature designed to allow administrators to create users after having enabled authentication.
Adding an Admin User
Adding the admin user is as simple as changing to the admin database and using the createUser() function:
$mongo
> use admin
> db.createUser({user : "admin", pwd : "pass", roles: [ { role : "readWrite", db : "admin" }, { role:  "userAdminAnyDatabase", db : "admin" } ] })
Successfully added user: {
        "user" : "admin ",
        "roles" : [
                {
                        "role" : "readWrite",
                        "db" : "admin"
                },
                {
                        "role" : "userAdminAnyDatabase",
                        "db" : " admin"
                }
        ]
}
You only need to add a single admin user at this point; once that user is defined, you can use it to add other admin users to the admin database or normal users to any other database.
Now you need to alter your server’s configuration to enable authentication. You would do so by stopping your server and adding --auth to the startup parameters.
If you installed MongoDB with a packaged installer such as yum or aptitude, then typically you can edit /etc/mongodb.conf to enable auth=true. Next, you can use the following command to restart the server and enable authentication:
$sudo service mongodb restart
In addition to auth you can also use a keyfile, a file that contains a preshared key of some description, which is used to confirm communication between MongoDB nodes. To create a keyfile, just create a simple file with a phrase or string in it to be used. Then add the option keyfile=/path/to/keyfile just as you did with auth. You can even remove the old auth=true option, as running with keyfile implies auth.
Authenticating in the mongo Console
Before you can run restricted commands in the admin database, you will need to be authenticated as an admin user, as in the following example:
$mongo
> use admin
switched to db admin
>show collections
2015-09-06T20:36:51.834+1000 E QUERY    [thread1] Error: listCollections failed: {
        "ok" : 0,
        "errmsg" : "not authorized on admin to execute command { listCollections: 1.0, filter: {} }",
        "code" : 13
} :
_getErrorWithCode@src/mongo/shell/utils.js:23:13
DB.prototype._getCollectionInfosCommand@src/mongo/shell/db.js:741:1
DB.prototype.getCollectionInfos@src/mongo/shell/db.js:755:15
DB.prototype.getCollectionNames@src/mongo/shell/db.js:766:12
shellHelper.show@src/mongo/shell/utils.js:655:9
shellHelper@src/mongo/shell/utils.js:554:15
@(shellhelp2):1:1

>db.auth("admin", "pass");
1At this point, the mongo console will print either 1 (successful authentication) or 0 (a failed authentication):
1
>show collections
system.users
system.version
If your authentication was successful, you will be able to perform any operations available based on your user permissions.
If your authentication was unsuccessful, then you need to check whether your username/password is correct and whether the admin user has been correctly added to the admin database. Reset your server so it has no authentication, and then use the following command to list the contents of the system.users collection in the admin database:
$mongo
>use admin
> db.getUsers()
[
        {
                "_id" : "admin.admin",
                "user" : "admin",
                "db" : "admin",
                "roles" : [
                        {
                                "role" : "readWrite",
                                "db" : "admin"
                        },
                        {
                                "role" : "userAdminAnyDatabase",
                                "db" : "admin"
                        }
                ]
        }
]
![]() Note If you are using an admin credential to access databases other than admin, then you must first authenticate against the admin database. Otherwise, you will not be able to access any other databases in the system.
Note If you are using an admin credential to access databases other than admin, then you must first authenticate against the admin database. Otherwise, you will not be able to access any other databases in the system.
The mongo console shows the contents of the user collection, enabling you to see what the userid is, while the password is shown as a SCRAM-SHA1 hash of the original password you supplied:
$ mongo
> use blog
switched to db blog
> show collections
2015-09-06T20:55:13.928+1000 E QUERY    [thread1] Error: listCollections failed: {
        "ok" : 0,
        "errmsg" : "not authorized on blog to execute command { listCollections: 1.0, filter: {} }",
        "code" : 13
} :
_getErrorWithCode@src/mongo/shell/utils.js:23:13
DB.prototype._getCollectionInfosCommand@src/mongo/shell/db.js:741:1
DB.prototype.getCollectionInfos@src/mongo/shell/db.js:755:15
DB.prototype.getCollectionNames@src/mongo/shell/db.js:766:12
shellHelper.show@src/mongo/shell/utils.js:655:9
shellHelper@src/mongo/shell/utils.js:554:15
@(shellhelp2):1:1
> db.auth("admin","pass")Error: Authentication failed.
0
> use admin
switched to db admin> db.auth("admin","pass")
1> use blog
switched to db blog> show collections
system.users
authors
posts
tagcloud
MongoDB User Roles
Currently, MongoDB supports the following roles that users can have within its permissions framework:
- read: Allows the user to read from the given database.
- readWrite: Grants the user read and write access to the given database.
- dbAdmin: Allows the user to perform administrative functions within the given database such as creating or removing indexes, viewing statistics, or accessing the system.profile collection.
- userAdmin: Allows the user to write to the system.users collection. With this permission you can create, delete, and administer the users for this database.
- dbOwner: A combination of the readWrite dbAdmin and userAdmin roles.
- clusterManager: Available only within the admin database.Management function on the cluster as a whole, without access to the data functionality.
- clusterMonitor: Available only within the admin database. Access to statistics and commands that gather statistics.
- hostManager: Available only within the admin database. Grants the ability to manage and monitor host level services.
- clusterAdmin: Available only within the admin database. Confers full administrative access to all sharding and replica set–related functions. Also combines clusterManager, clusterMonitor, and hostManager.
- backup: Available only within the admin database. Confers the minimum needed access to back up the entire system.
- restore: Available only within the admin database. Confers the minimum needed access to restore the entire system from backup.
- readAnyDatabase: Available only within the admin database. Grants the read permission on all databases.
- readWriteAnyDatabase: Available only within the admin database. Grants the readWrite permission on all databases.
- userAdminAnyDatabase: Available only within the admin database. Grants the userAdmin permission on all databases.
- dbAdminAnyDatabase: Available only within the admin database. Grants the dbAdmin permission on all databases.
Changing a User’s Credentials
It’s easy to change a user’s access rights or password. You do this by executing the updateUser() function, which causes MongoDB to update the existing user record. Technically, you can use any normal data-manipulation command to change a user’s record in system.users for a given collection; however, only the updateUser() function can create the password field. The update user function takes the username for a given user and then takes a document that defines replacements for any number of fields for the existing user. So let’s say we define an initial foo user as below:
$mongo
>use admin
switched to db admin
>db.auth("admin", "pass")
1
>use blog
switched to db blog>db.createUser({user : "foo", pwd : "foo" , roles: [ { role : "read", db : "blog" } ] } )
Now let’s say we want to grant this foo user the dbAdmin role instead of the read role. We would issue the following commands:
$mongo
>use admin
switched to db admin> db.auth("admin", "pass")
1>use blog
switched to db blog>db.updateUser( "foo", { roles: [ { role : "dbAdmin", db : "blog" } ] })
> db.getUsers()
[
        {
                "_id" : "bar.foo",
                "user" : "foo",
                "db" : "bar",
                "roles" : [
                        {
                                "role" : "dbAdmin",
                                "db" : "blog"
                        }
                ]
        }
]
Fantastic! We have now made the foo user a dbAdmin, but in the process foo has lost the original read role. To add it back we would need to update the user again with a roles document containing both the read role and the dbAdmin role.
Adding a Read-Only User
The createUser() function includes an additional parameter that allows you to create a user who has just read-only permissions. The MongoDB client will throw an exception if a process authenticated as the newly created user attempts to do anything that would result in a change to the contents of the database. The following example gives a user access to the database for status monitoring or reporting purposes:
$mongo
>use admin
switched to db admin>db.auth("admin", "pass")
1>use blog
switched to db blog>db.createUser({user : "shadycharacter", pwd : "shadypassword" , roles: [ { role : "read", db : "blog" } ] } )
Deleting a User
To remove a user from a database, simply use the normal remove() function for a collection. The following example removes the user just added; note that you have to authenticate against the admin database before you can remove the user:
$mongo
>use admin
switched to db admin> db.auth("admin","pass")
1>use blog
switched to db blog>db.removeUser("shadycharacter")
Using Authenticated Connections in a PHP Application
In Chapter 4, you learned how to create a connection with PHP to a MongoDB server. Once you have enabled authentication on your server, PHP applications will also have to supply credentials before they can execute commands against the server. The following simple example shows how to open an authenticated connection to a database:
<?php

// Establish the database connection
$connection = new MongoClient();
$db = $connection->selectDB("admin");
$result = $db->authenticate("admin", "pass");
if(!$result[’ok’]){
    // Your Error handling here
    die("Authentication Error: {$result[’errmsg’]}");
}

// Your code here

// Close the database connection
$connection->close();

?>
Managing Servers
As an administrator, you must ensure the smooth and reliable running of your MongoDB servers.
You will periodically have to tune the servers to achieve maximum performance or reconfigure them to better match the environment you are operating in. To that end, you need to familiarize yourself with a number of procedures that enable you to manage and control your servers.
Starting a Server
Most modern Linux distributions now include a set of /etc/init.d scripts that are used to manage services. If you installed your MongoDB server using one of the distribution packages from the MongoDB site (see Chapter 2 for more information on these packages), the init.d scripts for managing your server will already be installed.
You can use the service command on Ubuntu, Fedora, CentOS, and RedHat to start, stop, and restart your server, as shown in the following examples:
$sudo service mongodb start
mongodb start/running, process 3474$sudo service mongodb stop
mongodb stop/waiting$sudo service mongodb restart
mongodb start/running, process 3474If you don’t have an initialization script available, you can start the MongoDB server manually by opening a terminal window and then typing the following:
$ mongod
2015-10-09T11:29:34.110+1100 I -        [initandlisten] Detected data files in /data/db created by the ’wiredTiger’ storage engine, so setting the active storage engine to ’wiredTiger’.
2015-10-09T11:29:34.111+1100 I STORAGE  [initandlisten] wiredtiger_open config: create,cache_size=9G,session_max=20000,eviction=(threads_max=4),config_base=false,statistics=(fast),log=(enabled=true,archive=true,path=journal,compressor=snappy),file_manager=(close_idle_time=100000),checkpoint=(wait=60,log_size=2GB),statistics_log=(wait=0),
2015-10-09T11:29:34.903+1100 I CONTROL  [initandlisten] MongoDB starting : pid=1512 port=27017 dbpath=/data/db 64-bit host=voxl
2015-10-09T11:29:34.903+1100 I CONTROL  [initandlisten]
2015-10-09T11:29:34.903+1100 I CONTROL  [initandlisten] ** NOTE: This is a development version (3.1.9-pre-) of MongoDB.
2015-10-09T11:29:34.903+1100 I CONTROL  [initandlisten] **       Not recommended for production.
2015-10-09T11:29:34.903+1100 I CONTROL  [initandlisten]
2015-10-09T11:29:34.903+1100 I CONTROL  [initandlisten]
2015-10-09T11:29:34.903+1100 I CONTROL  [initandlisten] ** WARNING: soft rlimits too low. Number of files is 256, should be at least 1000
2015-10-09T11:29:34.903+1100 I CONTROL  [initandlisten] db version v3.1.9-pre-
2015-10-09T11:29:34.903+1100 I CONTROL  [initandlisten] git version: 411e9810075556fb196278a669fab0f19ea901ce
2015-10-09T11:29:34.903+1100 I CONTROL  [initandlisten] allocator: system
2015-10-09T11:29:34.903+1100 I CONTROL  [initandlisten] modules: none
2015-10-09T11:29:34.903+1100 I CONTROL  [initandlisten] build environment:
2015-10-09T11:29:34.903+1100 I CONTROL  [initandlisten]     distarch: x86_64
2015-10-09T11:29:34.903+1100 I CONTROL  [initandlisten]     target_arch: x86_64
2015-10-09T11:29:34.903+1100 I CONTROL  [initandlisten] options: {}
2015-10-09T11:29:34.909+1100 I FTDC     [initandlisten] Starting full-time diagnostic data capture with directory ’/data/db/diagnostic.data’
2015-10-09T11:29:34.910+1100 I NETWORK  [initandlisten] waiting for connections on port 27017
The server will show all connections being made, as well as other information you can use to monitor how the server is working.
To terminate the server in manual mode, just type ^C; this causes the server to shut down cleanly.
If you don’t supply a configuration file, then MongoDB will start up with a default database path of /data/db and bind to all network IPs using the default ports of 27017 (mongodb) as in the following example:
$ mkdir -p /data/db
$ mongod
mongod --help for help and startup options
...
2015-10-09T11:29:34.910+1100 I NETWORK  [initandlisten] waiting for connections on port 27017
^C
2015-10-09T11:30:25.753+1100 I CONTROL  [signalProcessingThread] got signal 2 (Interrupt: 2), will terminate after current cmd ends...
2015-10-09T11:30:25.903+1100 I CONTROL  [signalProcessingThread] dbexit:  rc: 0 Reconfiguring a Server
MongoDB supplies three main methods for configuring the server. First, you can use command-line options in conjunction with the mongod server daemon. Second, you can do so by loading a configuration file. And third, you can change most of these settings using the setParameter command. For example, you can change the logLevel back to the default of 0 with the following command:
> db.adminCommand( {setParameter:1, logLevel:0 } )
Most of the prepackaged MongoDB installers use the latter method, using a file that is normally stored in /etc/mongodb.conf on Unix/Linux systems.
You can change the configuration of your server by editing this file and restarting your server. The contents of this file look like this:
# mongodb.conf
storage:
  dbPath: /var/lib/mongodb
  journal:
    enabled: true
# where to write logging data.
systemLog:
  destination: file
  logAppend: true
  path: /var/log/mongodb/mongod.log
You enable an option by removing the # code from the front of the option and setting its value as you require it, as any line starting with # is considered to be a “comment” and is thus ignored.
Placing any of the following option values in the configuration file is the same as specifying --<optionname> <optionvalue> on the command line when starting up MongoDB:
- dbpath: Indicates where MongoDB will store your data; you should make sure it is on a fast storage volume that is large enough to support your database size.
- logpath: Indicates the file that MongoDB will store its logs in. The standard place to put this is /var/logs/mongodb/mongodb.log; you need to use logrotate to rotate this log file and prevent it from filling up your server’s drive.
- logappend: Setting this option to false causes the log file to be cleared each time MongoDB is started up. Setting this option to true causes all log entries to be appended to the end of any existing log file.
- auth: Enables or disables the authentication mode on MongoDB server; see the discussion earlier in this chapter for more information on authentication.
- rest: Enables or disables the rest interface to MongoDB. You must enable this interface if you want to use the links from the web-based status display to show additional information, but this is not advised for production servers, as all of this information should be available via the MongoDB shell.
Getting the Server’s Version
You can use the db.version() function to get the version information for a server. This information is useful for determining whether upgrades are required or when reporting an issue to a support forum. The following snippet shows how to use this command:
$mongo
> use admin
switched to db admin> db.version()
3.1.8-pre-Getting the Server’s Status
MongoDB provides a simple method for determining the status of a server.
![]() Note Remember that your user will need permissions to run these commands if you are using auth.
Note Remember that your user will need permissions to run these commands if you are using auth.
The following example shows the information returned, including such things as server uptime, the maximum number of connections, and so on:
$mongo
> db.serverStatus()
{
     "host" : "Pixl.local",
     "version" : "2.5.1-pre-",
     "process" : "mongod",
     "pid" : 3737,
     "uptime" : 44,
     "uptimeMillis" : NumberLong(43035),
     "uptimeEstimate" : 39,
     "localTime" : ISODate("2013-05-25T12:38:34.015Z"),
     "asserts" : {
          "regular" : 0,
          "warning" : 0,
          "msg" : 0,
          "user" : 1,
          "rollovers" : 0
     },
     "connections" : {
          "current" : 1,
          "available" : 2047,
          "totalCreated" : NumberLong(1)
     },
     "cursors" : {
          "totalOpen" : 0,
          "clientCursors_size" : 0,
          "timedOut" : 0
     },
     "globalLock" : {
          "totalTime" : NumberLong(43035000),
          "lockTime" : NumberLong(48184),
          "currentQueue" : {
               "total" : 0,
               "readers" : 0,
               "writers" : 0
          },
     },
     "locks" : {
          "admin" : {
               "timeLockedMicros" : {
                    "r" : NumberLong(54),
                    "w" : NumberLong(0)
               },
               "timeAcquiringMicros" : {
                    "r" : NumberLong(2190),
                    "w" : NumberLong(0)
               }
          },
          "local" : {
               "timeLockedMicros" : {
                    "r" : NumberLong(45),
                    "w" : NumberLong(6)
               },
               "timeAcquiringMicros" : {
                    "r" : NumberLong(7),
                    "w" : NumberLong(1)
               }
          },
          ...
     },
     "network" : {
          "bytesIn" : 437,
          "bytesOut" : 6850,
          "numRequests" : 7
     },
     "opcounters" : {
          "insert" : 1,
          "query" : 6,
          "update" : 0,
          "delete" : 0,
          "getmore" : 0,
          "command" : 7
     },
"storageEngine" : {
                "name" : "wiredTiger",
                "supportsCommittedReads" : true
        },
        "wiredTiger" : {
...
     "mem" : {
          "bits" : 64,
          "resident" : 37,
          "virtual" : 3109,
          "supported" : true,
          "mapped" : 320,
          "mappedWithJournal" : 640
     },
          "ttl" : {
               "deletedDocuments" : NumberLong(0),
               "passes" : NumberLong(0)
          }
     },
     "ok" : 1
}
As you can see, serverStatus outputs quite a lot of details and the above is the truncated version! You can find the two most important sections of the information returned by this function in the opcounters and asserts sections.
The opcounters section shows the number of operations of each type that have been performed against the database server. You should have a good idea about what constitutes a normal balance for these counters for your particular application. If these counters start to move out of the normal ratio, it may be an early warning that your application has a problem.
For example, the profile illustrated has an extremely high ratio of inserts to reads. This could be normal for a logging application; however, for a blogging application, it could indicate that either a spambot was hitting your “comments” section or a URL pattern that caused writes to the database was being repeatedly crawled by a search engine spider. In this case, it would be time to either put a captcha on your comments form or to block the particular URL pattern in your robots.tx file.
The asserts section shows the number of server and client exceptions or warnings that have been thrown. If such exceptions or warnings start to rise rapidly, then it’s time to take a good look through your server’s log files to see whether a problem is developing. A high number of asserts may also indicate a problem with the data in the database, and you should review your MongoDB instance’s log file to confirm the nature of these asserts and if they indicate normal “user asserts,” which represent things like duplicate key violations or more pressing issues.
If you have installed your MongoDB server from a package, you can use the operating system’s service management scripts to shut down the server. For example, Ubuntu, Fedora, CentOS, and RedHat let you shut down the server by issuing the following command:
$sudo service mongod stop
Or depending on what Init system your OS uses:
$sudo systemctl stop mongod
You can also shut down the server from the mongo console:
$mongo
>use admin
>db.shutdownServer()
You can use the Posix process management commands to terminate a server, or you can use the SIG_TERM(-15) or SIG_INT(-2) signal to shut down the server.
If—and only if—the server fails to respond to those two methods, you can use the following command:
$sudo killall -15 mongod
![]() Warning You must not use the SIG_KILL(-9) signal to terminate a server, because this could result in a corrupted database, and you will probably have to repair the server.
Warning You must not use the SIG_KILL(-9) signal to terminate a server, because this could result in a corrupted database, and you will probably have to repair the server.
It might be that you have a particularly active server with a lot of write activity, and you have reconfigured the server so it has a large sync delay. If that’s the case, then the server may not respond immediately to a termination request, because it is writing out all the in-memory changes to the disk. A little patience goes a long way here.
Using MongoDB Log Files
By default, MongoDB writes its entire log output to stdout; however, you can use the logpath option described previously to redirect the log output to a file instead.
You can use the contents of the log file to spot problems such as excessive connections from individual machines and other error messages that may indicate problems with your application logic or data.
Probably the most valuable thing you can do with MongoDB logs is to rotate them regularly to keep the log file at a sensible size. You can tell MongoDB to rotate your logs with the following command:
$ mongo
> db.adminCommand({logRotate:1})
This command will tell MongoDB to start writing to a new log file and rename the existing file with a timestamp of when it was rotated. These older files can then be deleted safely. It is also possible to instruct MongoDB to rotate logs without connecting to your instance as follows with the SIGUSR1 signal:
kill -SIGUSR1 `pidof mongod`
Validating and Repairing Your Data
It is possible that your data will be left in a damaged or incomplete state if your server unexpectedly reboots or your MongoDB server crashes for any reason.
Here are some indications that your data have been compromised:
- Your database server refuses to start, stating that the data files are corrupted.
- You start seeing asserts in your server log files or a high assert count when using the db.serverStatus() command.
- You get strange or unexpected results from queries.
- The record counts on collections don’t match up with your expectations.
Any of these signs may indicate problems with your application or, more worrisome, corruption or inconsistency in your data.
Fortunately, MongoDB ships with tools to assist you in repairing or recovering your database server. Nevertheless, you might still suffer the loss of some data, so please remember the golden rule of making sure you have either a good backup of your data or a replica set deployment to allow you to recover from whatever disaster befalls you.
Repairing a Server
Before you initiate the server repair process, you must be aware that running the repair command is a costly operation that can take significant time, and it requires up to twice the space taken by your MongoDB data files as all your data are cloned out to new files and fully re-created—this is effectively a rebuild of all your data files. This is one of the best arguments for using replica sets: you don’t have to fully stop your replica set from servicing your clients if you have to take one machine offline to repair it.
To initiate the repair process, just use the manual server startup process (as described previously in this chapter). However, this time you need to add the --repair option to the end of the command, as in the following example:
$ mongod --dbpath /data/db --repair
![]() Note It is normal for the server to exit after running the mongod utility with the --repair option; to bring it back online, just start it up again without specifying the --repair option.
Note It is normal for the server to exit after running the mongod utility with the --repair option; to bring it back online, just start it up again without specifying the --repair option.
Once the repair process finishes, you should be able to start up the server as usual, and then restore any missing data from your backups.
If you’re trying to repair a large database, you may find that your drive runs out of disk space because MongoDB may need to make a temporary copy of the database files on the same drive as the data (see the .../$tmp_repairDatabase_0/.. directory in the preceding example).
To overcome this potential issue, the MongoDB repair utility supports an additional command-line parameter called --repairpath. You can use this parameter to specify a drive with enough space to hold the temporary files it creates during the rebuild process, as in the following example:
$ mongod -f /etc/mongodb.conf --repair --repairpath /mnt/bigdrive/tempdir
Validating a Single Collection
Occasionally, you may suspect there is a problem with the data on a running server. In this case, you can use a handful of tools that ship with MongoDB to help you determine whether the server in question is corrupted or damaged.
You can use the validate option to validate the contents of a collection in a database. The next example shows how to run the validate option against a collection with one million records in it:
$mongo
> use blog
switched to db blog>db.posts.ensureIndex({Author:1})
> db.posts.validate()
{
     "ns" : "blog.posts",
     "nrecords" : 29997,
     "nIndexes" : 2,
     "keysPerIndex" : {
          "blog.posts.$_id_" : 29997,
          "blog.posts.$Author_1" : 29997
     },
     "valid" : true,
     "errors" : [ ],
     "warning" : "Some checks omitted for speed. use {full:true} option to do more thorough scan.",
     "ok" : 1
}
By default, the validate option checks both the data files and the indexes, and it provides some statistics about the collection when it completes. The option will tell you if there are any problems with either the data files or the indexes, but it will not examine every document for correctness. If examining every document is what you want, then you can run (as suggested in the output) validate with the {full: true} option, which is invoked by adding the true argument to the function call, as shown here: db.posts.validate(true).
You can also use the validate option if you have a very large database and you want only to validate the indexes. There is no shell helper command for this in the current version (2.6.0). But that isn’t an impediment, as you can readily accomplish this index validation using the runCommand option:
$mongo
>use blog
>db.runCommand({validate:"posts", scandata:false})
In this case, the server does not scan the data files; instead, it merely reports the information stored about the collection.
Repairing Collection Validation Faults
If running validation on your collections turns up an error, which would be noted in the errors section of the validate document, you have several options for repairing the data. Again, it’s impossible to overstress the importance of having good backups. Before jumping straight into restoring your backup, you should look into the MongoDB instance’s logs to see if there is any additional information about the nature of the error; if so, this should inform the next steps you take.
Repairing a Collection’s Indexes
If the validation process shows that the indexes are damaged, use the reIndex() function to reindex the affected collection (which will include foreground indexing that will block your access to the system). In the example that follows, you use the reIndex() function to reindex the blog’s posts collection to which you added the author index previously:
$mongo
>use blog
> db.posts.reIndex()
{
     "nIndexesWas" : 2,
     "nIndexes" : 2,
     "indexes" : [
          {
               "key" : {
                    "_id" : 1
               },
               "ns" : "blog.posts",
               "name" : "_id_"
          },
          {
               "key" : {
                    "Author" : 1
               },
               "ns" : "blog.posts",
               "name" : "Author_1"
          }
     ],
     "ok" : 1
}
The MongoDB server will drop all the current indexes on the collection and rebuild them; however, if you use the database repair option, it will also run the reIndex() function on all the collections in the database.
Repairing a Collection’s Data Files
The best—and most dangerous—way to repair all of the data files in a database is to use either the server’s --repair option or the db.repairDatabase() command in the shell. The latter repairs all the collection files in an individual database, and then reindexes all of the defined indexes. However, repairDatabase() is not a suitable function to run on a live server, because it will block any requests to the data while the data files are being rebuilt. This results in blocking all reads and writes while the database repair completes. The following snippet shows the syntax for using the repairDatabase() function:
$mongo
>use blog
>db.repairDatabase()
{ "ok" : 1 }![]() Warning MongoDB’s repair is a brute-force option. It attempts to repair and rebuild your data structures and indexes. It does this by attempting to read and then rebuild the entire data structure from disk. If possible, you should attempt to recover from backup; repairDatabase() should only be used as a last resort.
Warning MongoDB’s repair is a brute-force option. It attempts to repair and rebuild your data structures and indexes. It does this by attempting to read and then rebuild the entire data structure from disk. If possible, you should attempt to recover from backup; repairDatabase() should only be used as a last resort.
Compacting a Collection’s Data Files
Because of the way MongoDB allocates data files internally, you can run into what’s colloquially known as “Swiss cheese,” meaning that small empty sections of data storage space are left in the on-disk data structure. This can be a problem as it means there are large sections of your data files being unused. While a repair to rebuild your entire data structure may help, there can be other unintended consequences. The compact command that follows will defragment and restructure the data structure for a given collection within the existing data files, this will recover disk space using the default WiredTiger storage engine, but not for the old MMAPv1 storage engine:
$mongo
>use blog
>db.runCommand({compact:"posts"})
{ "ok" : 1 }Upgrading MongoDB
Occasionally, new versions of MongoDB require you to upgrade the format of the database files. The team at MongoDB, Inc. is aware of the impact (including the resulting downtime) caused by running an upgrade on a running production service; however, there are times when the need to support heavily demanded new features requires that an upgrade take place.
![]() Warning It is essential that you make a complete backup of your data before attempting any upgrade process. In addition to this, you should always review the release notes, which are available at http://docs.mongodb.org/manual/release-notes/.
Warning It is essential that you make a complete backup of your data before attempting any upgrade process. In addition to this, you should always review the release notes, which are available at http://docs.mongodb.org/manual/release-notes/.
MongoDB’s developers try to anticipate every possible problem that will present itself during an upgrade; nevertheless, you must take steps to protect yourself as well. Upgrades will typically rewrite every piece of data in your system in a new format, which means that even the slightest problem with the process can have disastrous consequences.
The following list walks you through the proper steps required to upgrade a database server:
- Back up your data and make sure that the backup is viable. If possible, restore the backup to another server and verify that it’s okay.
- Stop your application or divert it to another server.
- Stop your MongoDB server.
- Upgrade the code of your MongoDB server to the desired version.
- Use the shell to perform initial sanity checks on the data.
- If anything looks suspicious, use the validation tools to check the data.
- Re-enable your application when you are satisfied that everything looks okay.
- Test your application carefully before reopening the service or diverting traffic back to this server.
Rolling Upgrade of MongoDB
One of the great features of having a replica set is that it can be used to perform a rolling upgrade. This is a method designed to minimize the potential downtime and impacts involved with large changes like this. In addition to following the process outlined below, you should always make a backup and be testing in your nonproduction environment. Once you have performed due diligence to ensure that your system is recoverable, you can follow this process:
- Stop and perform an upgrade for each secondary one at a time.
- Run the rs.stepDown() command on the primary. One of the upgraded secondaries will step into place as the primary.
- Upgrade the primary.
Monitoring MongoDB
The MongoDB distribution contains a simple status-monitoring tool called mongostat. This tool is designed mainly to provide a simple overview of what is happening on your server (see Figure 9-5).

Figure 9-5. Monitoring the status of MongoDB with the mongostat utility
The statistics produced by this tool are not extensive, but they do provide a good overview of what is going on in your MongoDB installation. For example, this display lets you see how frequently database operations are being performed, the rate at which the index is hit, and how much time your application spends blocked as it waits for locks on the database to be released.
The main columns of interest are the first six columns, which show the rate at which the mongod server is handling certain operations (for example, insert or query). Other columns worth keeping an eye on when diagnosing problems with your installation include the following:
- q Queues (shown as “qr” for reads and “qw” for writes): Represents the number of operations queued up waiting for their turn to execute. As MongoDB allows one writer (inserts, updates, and deletes) and many readers (finds), this can lead to a situation where read queries are being blocked by poorly performing writes. Worse still, you can wind up in situations where you have a number of reads and writes blocked by one poorly performing write. Check to see which queries may be blocking the others from executing.
ROLLING YOUR OWN STAT MONITORING TOOL
Much of the information provided by mongostat is the same information that you can get from the db.serverStatus() call. It would not be a big task to create a service that uses this API to poll the server every few seconds and then places the results into a MongoDB collection.
The application of a few indexes, some carefully crafted queries, and a graphing package would enable you to use such a simple real-time monitor to produce historical logs.
There are also many third-party adapters available for MongoDB that let you use common open source or commercial monitoring systems, including tools such as Nagios, Ganglia, and Cacti. As mentioned previously, the MongoDB manual includes a page on its website that shares the latest information about monitoring interfaces available for MongoDB (for more information on this topic, see http://docs.mongodb.org/manual/administration/monitoring/).
Most of the statistical information discussed so far is also available via the MongoDB Cloud Manager Service (formerly known as MMS). Cloud Manager is a freemium monitoring service provided by MongoDB, Inc. It provides an agent you can install on a local machine. Once it is installed, you can add your servers via the MMS web page in order to instruct the agent to monitor them. Once monitoring has begun, you can then dive into specific hosts to see graphs of the performance statistics for that MongoDB instance. You can monitor everything from individual MongoDB instances to replica sets, right up to full sharded clusters, including config servers and MongoS. Cloud Manager also has facilities to view all the individual members of these groups or to view aggregated statistics for each. You can then configure alerts to be sent to you based on your particular performance requirements or if events occur within your MongoDB instances. You can sign up for Cloud Manager at cloud.mongodb.com, and we highly recommend you do so. There is nothing more powerful than being able to dive into exactly how each of your MongoDB nodes is performing (see Figure 9-6 for an example).

Figure 9-6. Viewing statistics via Cloud Manager
MongoDB Cloud Manager also provides the ability to automatically spin up and tear down MongoDB clusters, including spawning new hosts via AWS (with a credit card of course) for further MongoDB instances. The system has grown by leaps and bounds recently and is now a platform that you can use to create and manage all your MongoDB infrastructure.
Summary
Keeping your MongoDB installation running smoothly typically requires very little effort. In this chapter, you have seen how you can use the tools provided with the MongoDB distribution to manage and maintain your system, as well as to stay on top of any problems that may develop.
By working through this chapter you should now have the skills to back up, restore, upgrade, and monitor your MongoDB instance. You should be familiar with tools such as mongodump and mongorestore, know how to import and export data from only certain collections, and be familiar with a number of administrative commands that you can use to derive performance and usage statistics from your MongoDB instance.
Lastly, it must be stressed (and you’ve probably grasped this from everything that has been said) that the most important lesson to take away from this chapter is this: as the administrator of a database system, your first responsibility is to ensure that a reliable backup and restoration scheme for your data is available.
In the next chapter, we will look at methods for optimizing your system for improved performance and better utilization of system resources.