
37. HDR
![]()
HIGH DYNAMIC RANGE (HDR) is how we describe a scene with a wide range of brightness, often ranging from deep shadow to bright sun. Imagine a scene on a sunny day with sunshine illuminating part of the land, but in part of the image, a large shadow hides a portion of the scene in darkness. Capturing the entire image in one shot, with detail in all areas, would be impossible because the range of brightness is beyond the recording capability of modern sensors. You could try to capture everything in one image by setting an exposure exactly between the two extremes, or you could try to adjust the image in post-production, but this may not be enough to hold detail in both the highlights and shadows.
Recording a scene with intense highlights and deep shadows that keeps detailed information in all areas requires recording multiple images that each capture a different level of brightness. The resulting images are combined into a single HDR image.
To record an HDR image in the field, you’ll follow the same procedure described for bracketing. The idea is to take a series of images at different exposure levels. The number of images you take and the exposure difference between each shot will depend on the scene, how you will process the shot, how the final image will be used, and what your final vision for that photo is.
To start, you’ll need at least two images of different exposures. Most HDR photographers will shoot at least three, often five, and sometimes as many as nine images. The difference in exposure from one image to the next can vary according to your needs, but a 1-stop EV difference is quite common. A bracket series of three images taken one stop apart would cover a basic scene; five images one stop apart would cover a greater exposure range.
To do the job right, you should use a tripod so that all of your images are perfectly aligned. Some cameras offer a handheld option where the camera crops the image and automatically aligns the resulting images. This technique is less desirable because it changes the angle of view, reduces the resolution, and may introduce handheld blur into the image.
Always make sure there isn’t any subject movement. If there is anything moving, whether it’s people walking or flowers blowing in the wind, they will likely cause ghosting in the final image. For these reasons, HDR is not a viable solution in many situations.
Processing the images into a completed HDR image can be done several ways. Some cameras can shoot and process images right in the camera, albeit with limited control factors. For the greatest control, you’ll want to use one of the many image-processing programs available for processing HDR images. Results can vary from subtle brightening of shadows to fixing overcooked images that look like they came out of a CGI comic strip. The HDR look is a hot topic among photographers, but in the end it’s all a mater of taste.
For many photographers, HDR is an indispensable technique. Real estate photographers trying to capture a modern kitchen with beautiful amenities along with the view into the back yard now have an option to capture all of it in one image.
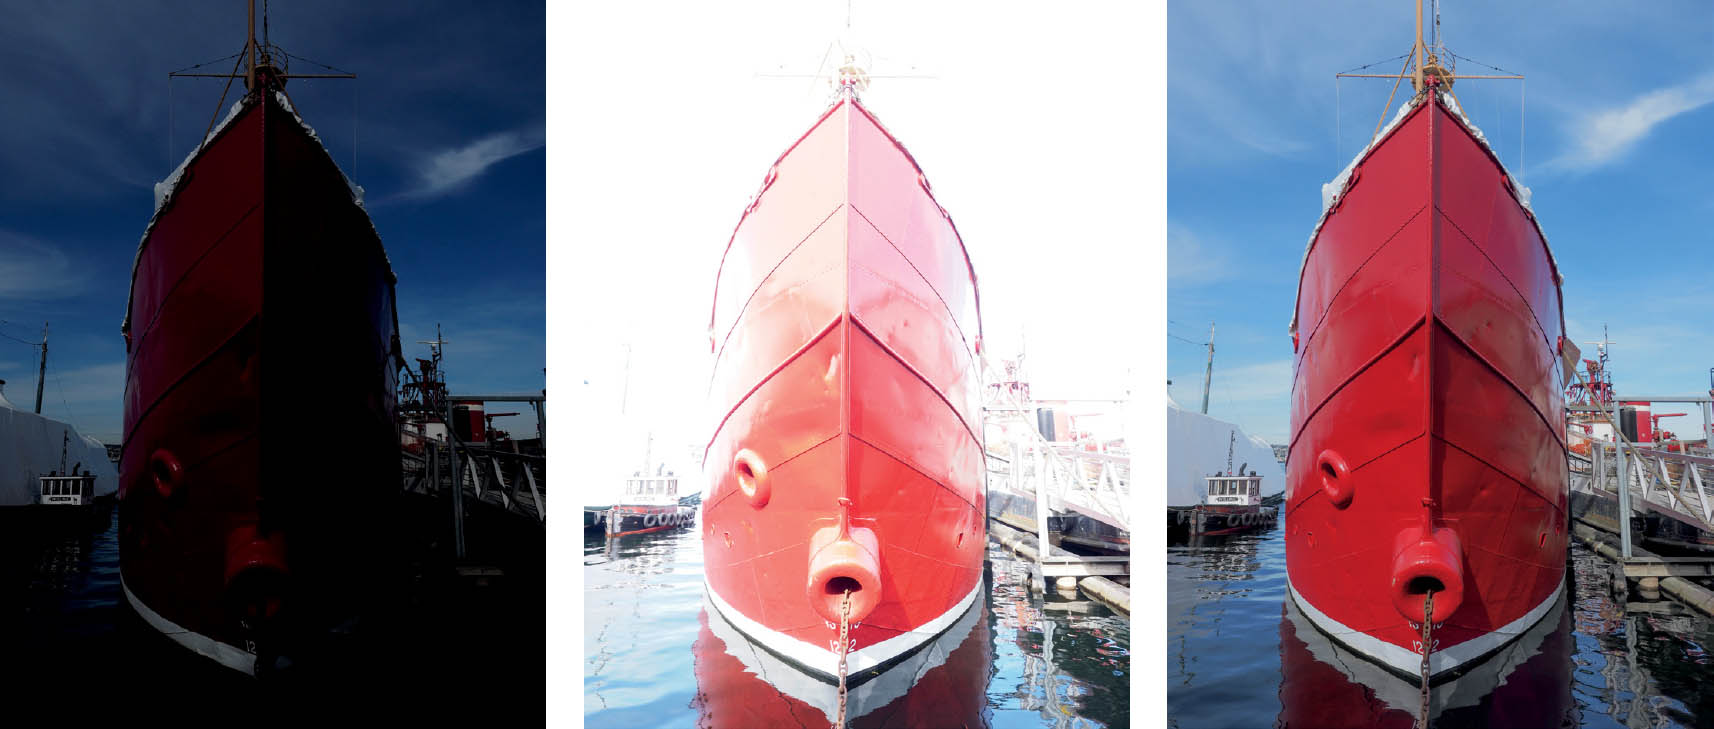
37.1 An HDR series of photos will cover the wide range of light exposure in a certain scene. In-camera or post-processing programs will then combine the images to create a blended image including the most detailed information from all the photos. This series shows how two images, one underexposed (left) and one overexposed (center), can be combined into the final HDR image, which maintains detail in the highlights and the shadows.
Underexposed image (left): 1/640 sec.; f/14; ISO 200; Olympus E-M1; Olympus 12–40mm f/2.8 ED PRO @12mm
Overexposed image (center): 1/60 sec.; f/5.6; ISO 200; Olympus E-M1; Olympus 12–40mm f/2.8 ED PRO @12mm