In the realm of Microsoft Access, the term "automation" has two meanings. First, it's used to describe the computerization of a process where Access self-regulates a procedure based on predetermined requirements you supply. It's also used to define the means of manipulating another application's objects with the use of Access Visual Basic for Applications (VBA). In the context of this book, the term automation involves the former.
Access provides you with two key methods of automating your analytical processes: macros and VBA. This chapter focuses on using macros to automate your processes and run batch analysis on your data. Why should you care? Well, leveraging macro functionality is not just a cool way to use Access, it offers the following advantages:
Higher productivity: Just because you have the skills to analyze data in Access doesn't mean you have the time. With automation, you can have Access carry out redundant analyses and recurring analytical processes, leaving you free to work on other tasks.
Quality control: Human beings make mistakes. The more you touch a set of analyses, the greater the chance there is for errors. Automation takes humans (you) out of the equation.
Reproducibility: There's an old quip among data analysts: "It's okay to produce the wrong answer, as long as you produce the same wrong answer consistently." Although you obviously don't want to produce a wrong answer, the point is you want to be able to reproduce the analysis you have established. If your answer changes from one analysis to the next, you'll find yourself wondering whether you've done something differently. Automating your analytical processes ensures that Access executes your analyses in the same way every time.
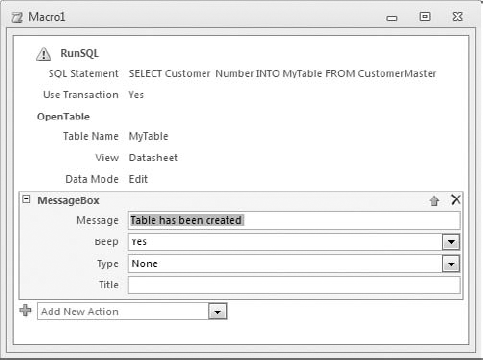
Access macros are very different from Excel macros. In Excel, macros are used as a way to record actions that can be played back when needed. Excel macros are analogous to programming a phone to dial a specific telephone number when you hit a special key. In Access, however, macros are used to execute a set of pre-programmed functions, much like a list of menu options on your TV that can be fired when selected. These pre-programmed functions are called actions. The idea behind building a macro in Access is to choose a set of actions you want the macro to carry out when it is executed. Figure 9-1 illustrates an Access macro that carries out three actions when run.

Figure 9.1. This macro runs a SQL statement that makes a new table, opens the new table, and throws up a message box.
Again, none of the actions shown in Figure 9-1 were recorded by the user. They are all actions that came pre-packaged for use in a macro.
Note
With the release of Access 2010, Microsoft decided to move away from the grid format traditionally found in previous versions of Access. To keep the content of this book substantive, the screenshots in this chapter have been limited to those taken from Access 2010.
This means that if you are using Access 2007 to go through the exercises in this chapter, you will notice some of the screenshots will not match what you see on your screen. That's OK. Although the interfaces are different, the basic mechanics and functionality of creating and using macros are the same between Access 2007 and 2010.
In short, you should still be able to follow along with the exercises in this chapter even if you are using Access 2007.
Before jumping into your first macro, it's important to understand the macro security features in Access.
Access 2010 comes with over 80 macro actions that you can use in your processes. However, the new security features in Access 2007 prevents 20 of those macro actions from running unless the Access database you are working with is trusted. The term trusted means that you have explicitly told Access that the macros within the database are of no threat and can be run freely.
For example, when you open the sample database for this book, you should see a security message (Figure 9-2) directly below the Ribbon. This message indicates that because this database is not "trusted," certain actions have been disabled.
This means that certain macro actions will not run at all. For instance, the macro illustrated here in Figure 9-3 contains two SetWarnings macro actions. These macro actions require that the database be trusted before running properly.
Note
In Figure 9-3, the two SetWarnings macro actions have a triangle icon next to them. These icons provide a convenient visual indicator, letting you know that the action will require a trusted database to run properly.
Attempting to run this macro in a database that is not trusted will result in a message similar to the one shown in Figure 9-4.
Tip
The following Access 2010 macro actions require a trusted database to run: CopyObject, DeleteObject, Echo, ImportExportData, ImportExportSpreadsheet, ImportExportText, ImportSharePointList, OpenSharePointList, OpenSharePointRecycleBin, OpenVisualBasicModule, PrintOut, QuitAccess, RenameObject, RunApplication, RunSavedImportExport, RunSQL, SaveObject, SendKeys, SetValue, SetWarnings, and ShowToolbar.
If you are running Access 2007, these macro actions require a trusted database to run: CopyDatabaseFile, CopyObject, DeleteObject, Echo, OpenDataAccessPage, OpenDiagram, OpenFunction, OpenModule, OpenStoredProcedure, OpenView, PrintOut, Quit, Rename, RunApp, RunCommand, RunSavedImportExport, RunSQL, Save, SendKeys, SetValue, SetWarnings, ShowToolbar, TransferDatabase, TransferSharePointList, TransferSpreadsheet, TransferSQLDatabase, and TransferText.
Note that although the RunCommand macro action does not, in and of itself, require a trusted database to run, many of its arguments do.
The easy fix for a disabled database is to manually enable the content. In Access 2010, you can do this by clicking the Enable button on the security message shown in Figure 9-2.
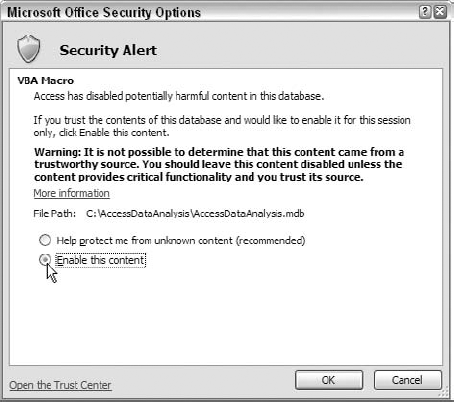
If you are using Access 2007, you can click the button on the warning messages shown in Figure 9-2. This activates the Microsoft Office Security Options dialog box. From here, simply select the option next to "Enable this content" as demonstrated in Figure 9-5.
Keep in mind that the Access 2007 quick fix needs to be repeated each time you open the database.
The best way to work around the security issues in Access 2007 on a long-term basis is to use the database in a trusted location, a directory deemed a safe zone where only trusted workbooks are placed. A trusted location allows you to work with a database with no security restrictions, as long as the database is in that location.
To set up a trusted location, follow these steps:
In Access 2010, select the File button. For Access 2007, select the Office icon in the upper left-hand corner of the application window.
Select the Options button.
Click the Trust Center button and select Trust Center Settings.
Select the Trusted Locations button.
Select Add New Location
Click Browse to specify the directory that will be considered a trusted location (such as your MyDocuments directory; or the Documents directory if you're using Windows Vista)
Once a trusted location is specified, all databases opened from that location are, by default, opened with macros enabled.
Note
In Access 2010, Microsoft has enhanced the security model to remember files that you've deemed trustworthy. That is to say, when you open an Access database and click the Enable button, Access remembers that you trusted the database. Each time you open the database after that, Access will automatically trust it.
Start by initializing a new macro. To do this, select the Create tab on the Ribbon and then click the Macro button. This will activate the Macro window shown in Figure 9-6.
The idea is to select an action in the Action drop-down box.
Tip
As mentioned previously in this chapter, Access, by default, hides any macro action that requires a trusted database to run properly. That is to say, these macro actions will not appear in the Action column drop-down boxes. Therefore, before you get started, click the Show All Actions button on the Design tab of the Ribbon. This ensures that all macro actions are displayed in the Action column drop-down boxes, even those that require a trusted database.
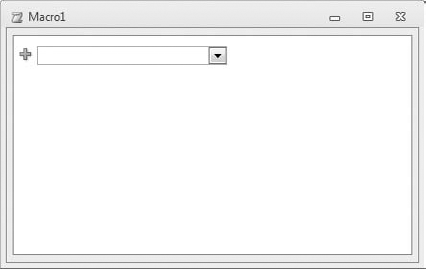
Figure 9.6. The Macro window is essentially a grid where each row defines a specified action to carry out.
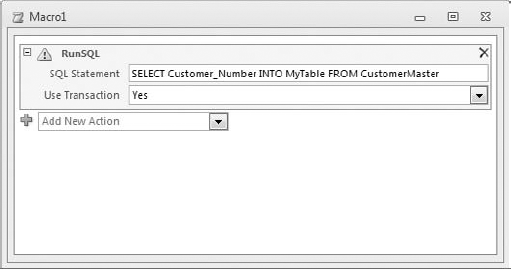
The first action you want to run is RunSQL, so select RunSQL from the Action dropdown box. Once you select your action, you will see some new input boxes. These new input boxes are called action arguments. Every action comes with a unique set of arguments that you can tailor to fit your needs. As you can see in Figure 9-7, the RunSQL action requires two arguments: SQL Statement and Use Transaction.
Click inside the SQL Statement input field and enter SELECT Customer_Number INTO MyTable FROM CustomerMaster. This action will run a make-table query in order to make a new table called MyTable.
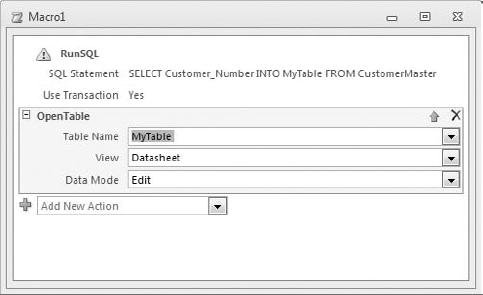
Add another action by selecting the OpenTable action from the Action dropdown box. Once the new OpenTable action has been added, enter MyTable in the Table Name input field, as shown in Figure 9-8. This action will open the MyTable table.
Note
Although there is no table called MyTable currently in the database, there will be once the RunSQL action runs. In the meantime, the macro doesn't care that there is no table called MyTable and will save with no problem. This illustrates the fact that, unlike VBA modules, macros don't compile to identify unrecognized objects or other errors.
Add another action by selecting the MessageBox action from the Action dropdown box. Once the new MessageBox action has been added, enter Table has been created in the Message input field, as shown in Figure 9-9. This action will activate a message box.
At this point, save and close your newly created macro. Access will prompt you to give your new macro a name. Once you name your macro, it will be saved in the Macros collection in your Database window. To run it, simply double-click it. If you built your macro correctly, it should paste 9,253 records into a new table called MyTable, and then open the table and throw up a message box that reads, "Table has been created."
Note
To edit any macro, you can simply right-click the macro and select Design View.
Trying to determine which macro actions benefit the automation of your data analysis can be overwhelming. A set of 18 macro actions, however, are ideal for automating your analytical processes. When trying to familiarize yourself with the macro actions that are available to you, the actions in this section should be first on your list.
The following macro actions manipulate forms, queries, reports, and tables:
CloseWindow:Closes a specified form, query, report, or table. This is useful when you want to ensure that a particular object is closed before running a process. In Access 2007, this action is calledClose.DeleteObject:Deletes a specified form, query, report, or table. This action comes in handy when you need to delete temporary tables that you created during an analytical process. Note that this macro action requires a trusted database to run properly.OpenQuery:Runs a specified query or, if indicated, opens the query in Design view. You typically use the action to string multipleOpenQueryactions together in order to run a series of queries, effectively running a batch analysis.OpenForm:Opens a specified form. You can use this action to open a form that supplies the values needed for your analytical process.OpenReportandOpenTable:These actions allow you to open a specified report and table, respectively. These are useful for presenting a final result after your batch analysis.
The following macro actions affect the Access environment:
QuitAccess:Closes the entire Access application. This action comes in handy when you are running a scheduled process and you want to close the application once the macro has finished executing. Note that in Access 2007, this action is calledQuit.SetWarnings:Forces an OK or Yes response to all system messages, effectively suppressing message pop-ups while a macro runs. Without theSetWarningsaction, you would have to be there to click Yes or OK on every confirmation message that popped up while your macro was running. Note that this macro action requires a trusted database to run properly.
The following macro actions control the execution of processes:
RunCode:Executes an existing VBA function. This action is ideal when you need to initialize a procedure that can only be accomplished with VBA, such as automating Excel.RunMacro:Executes another macro. You can use this action in a conditional macro where the resulting decision requires that another macro be executed.RunSQL:Executes a valid SQL string. Bear in mind that onlyInsert, Delete, Select...Into, orUpdatestatements are valid in the macro environment. This action comes in handy when you need to run action queries, but you don't want to inundate your database with superfluous query objects. Note that this macro action requires a trusted database to run properly.StopMacro:Stops the current macro. You can use this action in a conditional macro where the resulting decision indicates no further processing is needed.
The following macro actions export or output data:
PrintOut:Prints the active datasheet, form, or report. This action is ideal for ensuring that a hardcopy of analytical results are produced. Note that this macro action requires a trusted database to run properly.ExportWithFormatting:Outputs a table, query, form, or report to an external document. Output options include outputting to Excel, Word, HTML, or text. Note that this action is memory intensive and does not work well with very large datasets. In Access 2007, this action is calledOutputTo.ImportExportData:Exports and imports data to and from an external database. This action is ideal for backing up your database to an external location. You can even schedule nightly backups of your data using this macro action. Note that this macro action requires a trusted database to run properly. In previous versions of Access, this macro action was calledTransferDatabase.ImportExportSpreadsheet:Exports and imports data to and from external spreadsheets. This action comes in handy when you need to push large datasets to and from Excel files. Note that this macro actions require a trusted database to run properly. In Previous versions of Access, this macro action is calledTransferSpreadsheet.ImportExportText:Exports and imports data to and from external text files. This action is ideal for automating data pulls from text files. Note that this macro actions require a trusted database to run properly. In Previous versions of Access, this macro action is calledTransferText.EMailDatabaseObject:Outputs an object to an Excel, text, PDF, or HTML file, then attaches that file to an email message that can be sent to specified address with additional text. This action works with any 32 bit email program that conforms to Mail Application Programming Interface (MAPI) standards. In Access 2007, this action is calledSendObject.
An analytical process involves a series of queries that run in a logical order, giving you the needed set of analyses. A batch analysis is nothing more than automating the execution of one or more of your analytical processes. In this section, you learn how to set up and manage you own automated batch analysis.
Creating a batch analysis is as simple as defining which queries and actions you need run. This involves pointing your macro to specific objects. However, if your database is inundated with temporary queries and tables or queries that have no logical name or order, it becomes difficult to determine which object does what, let alone point a macro to the right set of objects. That being said, there are a few things you can do to ensure that you keep your database organized.
The long-standing guideline on using naming conventions in Access is that you preface each type of object in your database with a prefix describing that object. For example, an appropriate name for a query would be qryMonthlyRevenue, a table could be called tblCustomers, and a form could be named frmMain.
What you are about to read will be considered blasphemy in many Access circles, but the fact is that this is not always the best naming convention you can use.
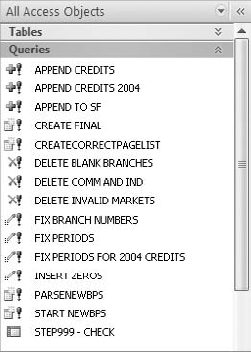
The database in Figure 9-10 is a good example. This database contains 15 queries that make up two separate analytical processes. As you can see, it's difficult to determine which query belongs to which process.
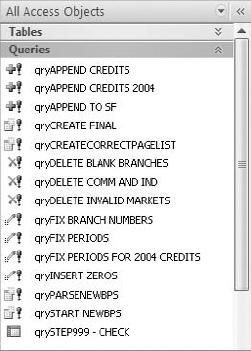
Adding "qry" to each query, as shown in Figure 9-11, doesn't help much in this situation.
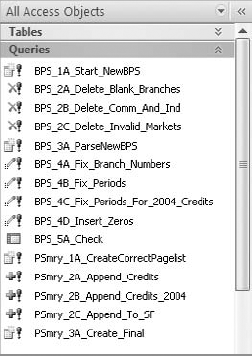
So, what do you do? In a database used primarily for data analysis, the best way to organize your queries is to take advantage of the fact that the default sort order is alphabetical. Preface your query names with text describing the analysis followed by a logical numbering system. For example, instead of AppendCredits, you could use PSmry_2A_AppendCredits. Figure 9-12 demonstrates this naming convention. Keep in mind that there is nothing special about the prefix "PSmry"; it is simply a description that allows for easy recognition of the analyses that have to do with creating the period summary.
Note
Note the use of the underscore in place of spaces. It's generally a good practice not to use spaces in your object names in order to avoid complications when writing SQL strings or using VBA code.
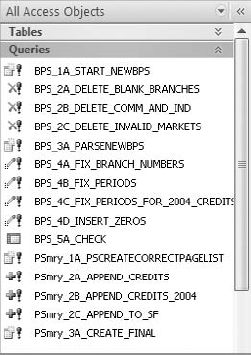
Figure 9.12. With this naming convention, you cannot only distinguish between the two analyses but can also see the correct order each query should be run.
You should also make your object names upper camel case, meaning that the first letter of each word is capitalized. This makes your object names easier to read. Figure 9-13 demonstrates this naming convention.
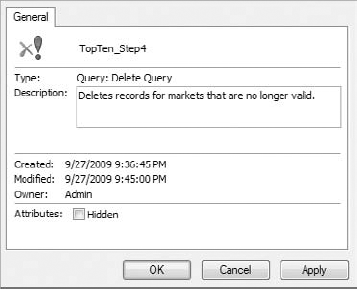
Each object has a Description property that you use to describe the object in detail. To adjust an object's description, right-click the object and select Object Properties. This activates a properties dialog box for that object, as shown in Figure 9-14. You can use up to 250 characters to describe the object.
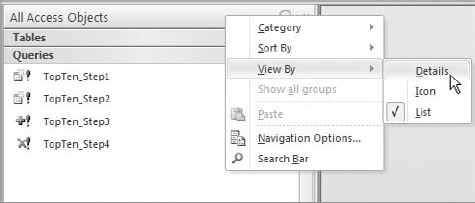
Now you can change your database view to show descriptions along with the names and other details of your Access objects. To do so, right click on the title bar of the navigation pane and select View By
This will show you a series of details to include the description you entered. Figure 9-16 shows a database in Details view.
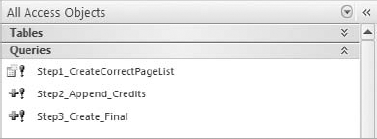
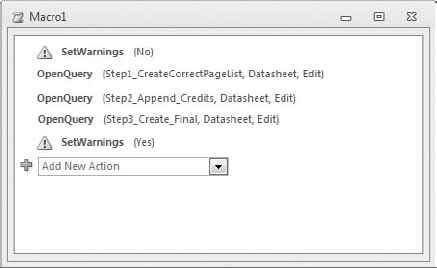
Setting up a basic batch analysis involves little more than creating a macro that executes a set of analytical processes in a logical order conducive to your analysis. For example, the database in Figure 9-17 is used to run three queries that work together to accomplish a set of analytics.
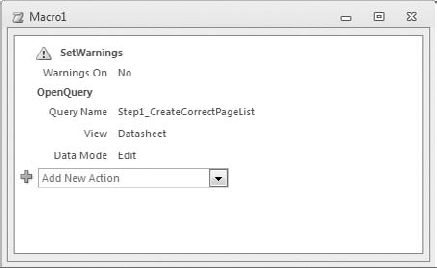
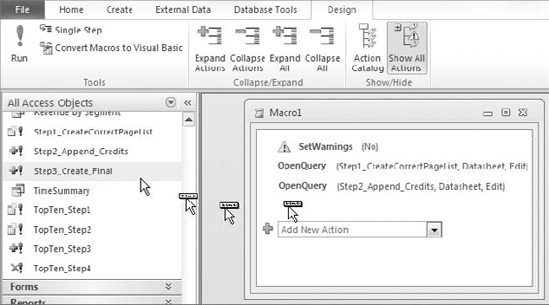
The macro being built in Figure 9-18 starts with a SetWarnings action to ensure that no system messages interrupt the process. From here, it's simply a question of adding the queries that need to be executed in order.
After all queries are added, a second SetWarnings action is called to reinstate system messages. The completed macro is shown in Figure 9-19.
Once this macro is saved, it can be run at any time to execute what can be called a "batch analysis."
Note
You may notice in Figure 9-19 that the arguments seem to be hidden. This is because the macro is in a collapsed state. This makes the macro easier to read. To collapse your macros, simply right-click any of the actions in the macro and select Collapse All.
Tip
If you need to create a macro with a large amount of queries, you can save time by simply dragging each query to the macro design interface (see Figure 9-20). This will automatically create an OpenQuery action for you, complete with all the needed arguments.
You can simulate decision-making functionality by building conditions into your macros. A condition is a logical expression evaluated in order to return a True or False answer. With conditions, you simulate an If...Then scenario or even an If...Then...Else scenario.
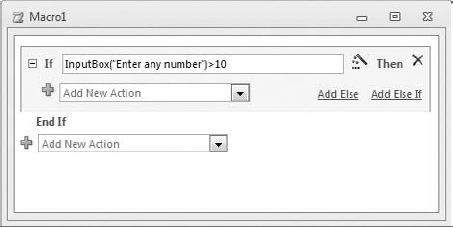
To demonstrate how to build a basic If...Then scenario, start a new macro and add the If macro action. Enter the following as the expression argument: InputBox("Enter any number")>10.
This expression activates an input box and asks you to enter a number. The number you enter is then evaluated to determine if it is greater than 10. If the number you enter is greater than 10, the expression will return a True answer, otherwise, it will return a False answer.
At this point, your macro should look similar to Figure 9-21.
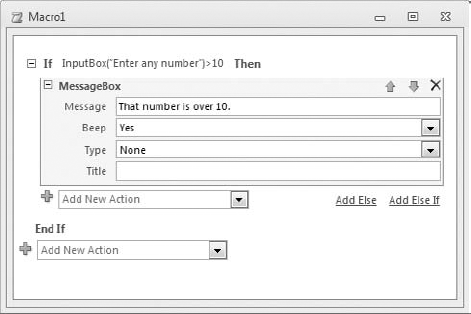
In Figure 9-21, you will notice an area between the If and End If where you can assign actions. Any action placed between the If and End If is executed when the conditional expression evaluates to true. Here, select the MessageBox action and enter a message similar to that shown in Figure 9-22.
Close the macro and save it as IfMacro. When you run the macro, you'll see the input box shown in Figure 9-23. If you enter a number less than or equal to 10, nothing happens. If you enter a number greater than 10, a message pops up telling you your number is greater than 10.
If you are using Access 2007, you will not have the If macro action available to you. In order to apply conditions to your macros in Access 2007, you need to activate the Condition column in your macro design interface.
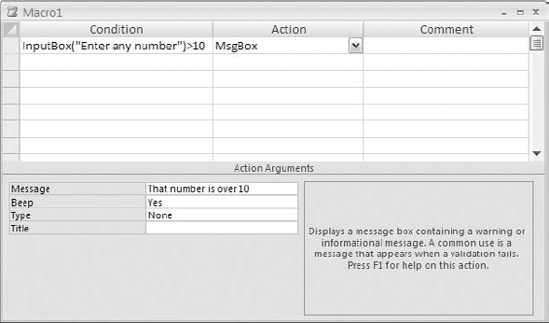
Go up to the Design tab on the application ribbon and click the Conditions button. At this point, your macro design interface will contain a new column called Condition. The idea is to enter your Condition next to the action you want fired if that condition evaluates to True. In Access 2007, the macro for this first exercise would look like Figure 9-24.
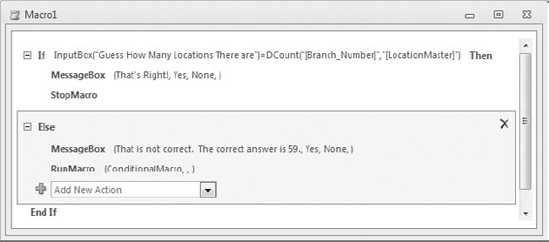
You can expand the scope of your conditions by adding If...Then...Else functionality. To demonstrate this, create a new macro and enter the following condition in a new If action: InputBox("Guess How Many Locations There are")=DCount("[Branch_Number]","[LocationMaster]"). With this condition, you are comparing the user's input to the number of records in the LocationMaster table. If the two are equal, the expression evaluates as True.
In the area between If and End If, Select the MessageBox action, and then select the StopMacro action. At this point, your Macro window should look similar to the one shown in Figure 9-25.
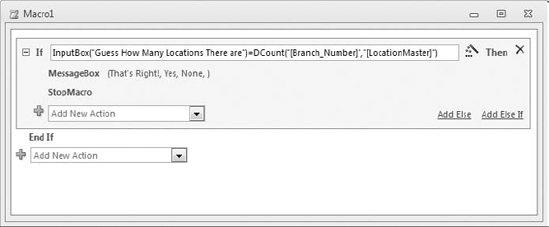
Figure 9.25. If the expression evaluates to true, this macro will fire a congratulatory message box, then stop.
Once you have your basic condition built, click the "Add Else" hyperlink shown in Figure 9-25. This activates a new section where you can specify what action to take if your condition evaluates to false.
In this case, select the MessageBox action, and enter "The Answer is 59" in the Message argument. On the line below that, select the RunMacro Action and enter ConditionalMacro as the Macro Name argument.
At this point, your Macro window should look similar to the one shown in Figure 9-26.
Make sure to save the macro and name it ConditionalMacro. Now take a moment to consider what will happen when you run this macro.
It will give you an input box where you will guess how many locations there are. It will then compare your answer to the real record count from the LocationMaster table. If your answer matches the actual record count, then the macro performs actions 2 and 3; else the macro skips to action 4. As you can see, this essentially gives you the
IF...THEN...ELSEeffect.If your macro goes to action 2, it means you got the answer right. A message box is thrown to tell you so.
The macro stops.
If your macro goes directly to step 4, it means it got the answer wrong. A message box is thrown to tell you the correct answer.
The macro is run again to give you another chance.
As explained earlier in this chapter (If...Then in Access 2007 Macros) conditional macros work differently in Access 2007. In Access 2007, conditional expressions are entered in the Conditions column. This allows you to build simple If...Then functionality into your macros.
You can expand simple decision-making functionality into a more complex If...Then...Else model by entering three periods (also called an "ellipsis") as a condition. Using an ellipsis in the Condition inputs tells the macro to execute the action on that line only if the condition in the preceding line is true.
The previous exercise can be completed in Access 2007 by building the macro shown in Figure 9-27.

Figure 9.27. In Access 2007, you use ellipses in the Condition inputs to invoke the If...Then...Else functionality.
Taking a closer look at Figure 9-27, you can see the second action in the macro is a message box with an ellipsis condition. This means that the second action will run only if the preceding condition evaluates to true. Since the third action in the macro also has the ellipsis condition, it too will be skipped if the preceding conditions are true.
In short, if the first condition evaluates to true, then the macro will run its course, else the macro will skip to action 4. This, in effect achieves the If...Then...Else functionality.
First, your trustworthy author has to confess that the phrase "looping with macros" is admittedly a tad misleading. Looping implies that the macro's actions are continuously being run in the same instance of execution. What is really happening is that the macro is being started repeatedly until a condition is met. However, the fact that you can simulate looping behavior through macros does open up some interesting possibilities for those of you who are not yet comfortable with VBA.
To demonstrate the concept of a looping macro, imagine that you have been asked to provide a list of the top ten customers for each market in the US. Because this will be a monthly exercise, you decide to use macros to automate the process. For this particular scenario, you will need four queries and two macros.
Tip
You can find a working version of the example illustrated here in the sample database for this book at www.wiley.com/go/excelanalystguide. Refer to the sample database if you run into problems.
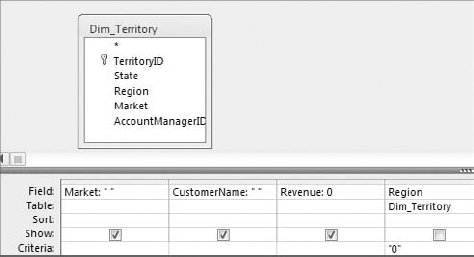
Create the make-table query shown in Figure 9-28. Name the table being created TopTenList. Running this query will create an empty table that will eventually contain the final results. Be sure to save this query as TopTen_Step1.
Note
Run the query you created in step 1 at least one time. You will need the table it creates for step 3.
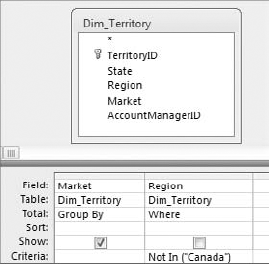
Create the make-table query shown in Figure 9-29. Name the table being created LoopList. Running this query will create a list of unique market names that will be used to loop through. Be sure to save this query as TopTen_Step2.
Note
Run the query you created in step 2 at least one time. You will need the table it creates for step 4.
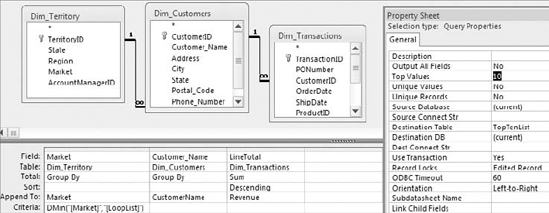
Create the append query shown in Figure 9-30. You will append it to the TopTenList table you created in step 1. Note that the Top Values property has been set to 10 in order to return only the top ten values. Also note the criteria under Market. This criteria ensures that only one market is included in the query: the one whose first letter is closest to the letter A. Be sure to save this query as TopTen_Step3.
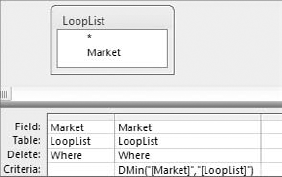
Create the delete query shown in Figure 9-31. Running this query deletes the market whose first letter is closest to the letter A from the LoopList. This ensures that the market can never again be used in the TopTen_Step3 query. If you ran this query 14 times, you would eventually run out of markets. Be sure to save this query as TopTen_Step4.
Start a new macro and add the following actions:
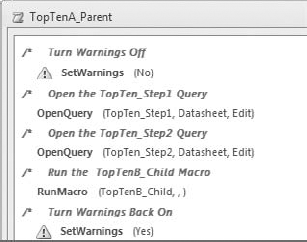
SetWarnings. Set the Warnings No argument to No.
OpenQuery. Set the Query Name argument to TopTen_Step1.
OpenQuery. Set the Query Name argument to TopTen_Step2.
RunMacro. Set the Macro Name argument to TopTenB_Child.
SetWarnings. Set the Warnings No argument to Yes.
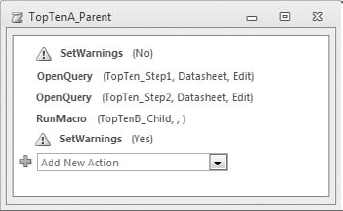
This macro will do the setup work, creating the tables necessary for the looping action. Once the tables are created, it calls the child macro, TopTenB_Child.
Be sure to save this query as TopTenA_Parent. At this point, your Macro window should look similar to the one shown in Figure 9-32.
Start a new macro and add an If action:
If: Set the Condition to DCount("[Market]","[LoopList]")>0. This condition specifies that the record count of the Looplist table must be greater than zero in order to continue with the actions that have the ellipsis condition.
Inside the If section, add the following actions:
SetWarnings: Give this action an ellipsis condition. Set the Warnings No argument to No.
OpenQuery: Give this action an ellipsis condition. Set the Query Name argument to TopTen_Step3.
OpenQuery: Give this action an ellipsis condition. Set the Query Name argument to TopTen_Step4.
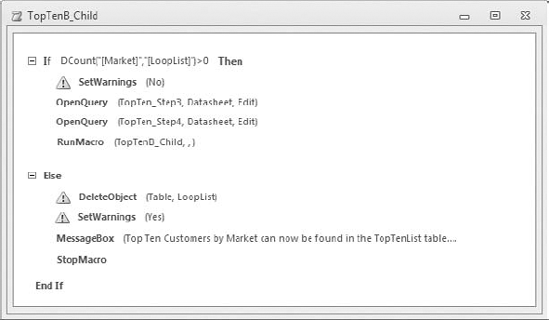
RunMacro: Give this action an ellipsis condition. Set the Macro Name argument to TopTenB_Child. This action starts the macro over. The idea is that this macro will repeatedly start over until the condition in the first line of the macro is false.
Click the "Add Else" hyperlink to add an Else section. Inside the Else section, add the following actions:
DeleteObject: This is the first action that runs when the condition in the first line of the macro is false. Set the ObjectType argument to Table and the Object Name argument to LoopList. This action deletes the LoopList table as it is no longer needed.
SetWarnings: Set the Warnings No argument to Yes.
MessageBox: Set the Message argument to "Top Ten Customers by Market can now be found in the TopTenList table."
StopMacro: This action is used as a clean sweep to ensure no rogue macro actions are still executing.
When you are done, your Macro window should look similar to the one shown in Figure 9-33. Be sure to save this query as TopTenB_Child.
There is nothing left to do but run the macro. Double-click the TopTenA_Parent macro to start the loop. After the macro is done, you will get a message telling you that you can find your results in the TopTenList table. Open the table to see the results.
You may be thinking that this is a lot of work. However, remember that you are not only performing some hefty analytics on 17 markets with a click of the mouse, but now that this process is built, you can run it whenever you need to.
Tip
Instead of using the OpenQuery action in your macro, which requires that you create a query object, you can use a SQL statement in a RunSQL action. This can help you cut back on the number of superfluous queries in your database.
Keep in mind that the SQL statements used in RunSQL actions cannot be more than 256 characters in length.
Although automating a process to run with a click of the mouse is impressive, the ultimate in automation is not even being there. How many times have you heard someone say, "Yeah, I just run a nightly routine" while you nod your head and pretend to know what that means. Meanwhile, you're trudging into work at 5:00 am to make sure you have the reports ready by eight. The good news is that there is an easy way to schedule your macros to run every night, every Monday, on the 15th of every month, or whenever you like.
Unfortunately, as of Office 2010, Access does not yet have an internal macro scheduler. Until the time it does, you can use the Windows Task Scheduler to schedule a macro to run at specific times. The question is, how do you tell Access which macro to run through a completely unrelated program (Windows Task Scheduler)? You have two options: use an AutoExec macro or use a command-line switch.
If you name a macro AutoExec, that macro will be run automatically when your database is opened. How does that help you? The idea is to create a macro that contains your batch analysis and save it as AutoExec. When the Windows Task Scheduler opens your database at 3:00 am, the AutoExec automatically executes your batch analysis.
To demonstrate this, create the macro shown in Figure 9-34. The MessageBox action with the Message argument set to read "A bunch of actions are executed" will represent a batch analysis. Using the QuitAccess action makes certain that the database closes once the macro completes execution. Save your newly created macro as AutoExec.
Tip
If you need to run multiple batch analyses, you can create a "master" macro that runs other macros, and then save it as AutoExec.
Once you save your macro as AutoExec, close the database to test it. When you open your database again, you should see the message box you entered into the AutoExec; then the database closes. Now you are ready to schedule your newly created macro with the Windows Task Scheduler.
Tip
How do you get back into your database? Simply hold down the Shift key while you open the database. This prevents the AutoExec macro from running.
You may be tempted to remove the QuitAccess action from your macro, but keep in mind that during a nightly routine, you want the database to close automatically. Removing the QuitAccess action will cause the database to stay open.
Remember that the QuitAccess action will only run if the database is trusted as per the new security features highlighted earlier in this chapter.
Every version of Windows comes with a built-in Task Scheduler. Although the steps for creating a scheduled task varies from version to version, the basic mechanics are the same. In this walkthrough, the Windows XP task scheduler is being used.
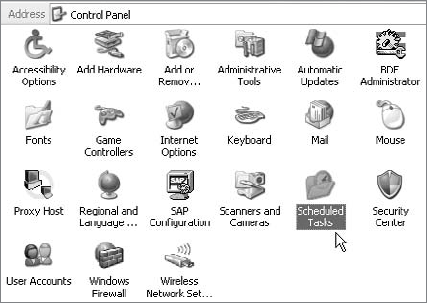
In the Windows Control Panel, find and double-click the icon for the Task Scheduler (Figure 9-35).
Tip
If you are having trouble finding the Task Scheduler in your version of Windows, you can use a Run command to find it. To do so, click Start in your Windows taskbar, and then click Run. This will open the Run dialog box. In the input box provided, enter "control schedtasks" (without the quotes) then press OK.
Another way to get to the Task Scheduler is to right-click My Computer and select the Manage option. This activates the Computer Mangement window where you will find the Task Scheduler.
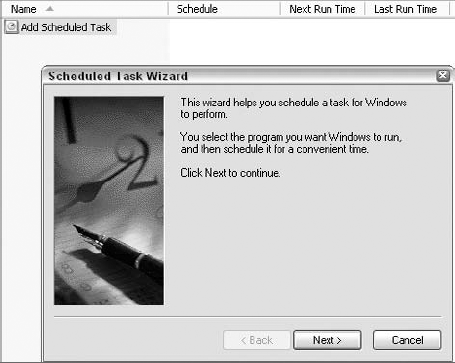
Once you are in the Scheduled Tasks folder, double-click the Add Scheduled Task icon to activate the Scheduled Task Wizard shown in Figure 9-36, and then click Next.
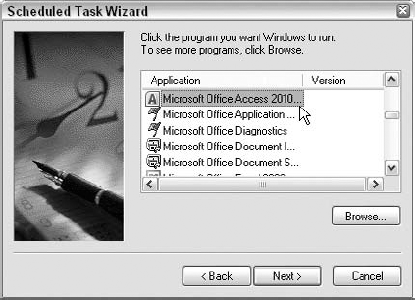
The next window, shown in Figure 9-37, asks you to select the program you would like to run. Select Microsoft Office Access 2010 from the program list, and then click the Next button.
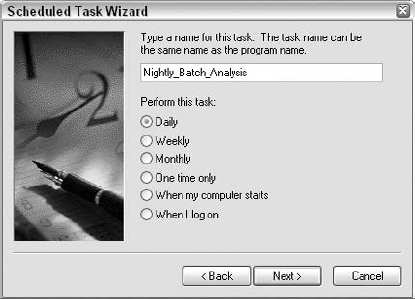
At this point, you will see the window shown in Figure 9-38, where you will name your scheduled task and specify when you want the task to be performed. In this example, the task will be performed daily.
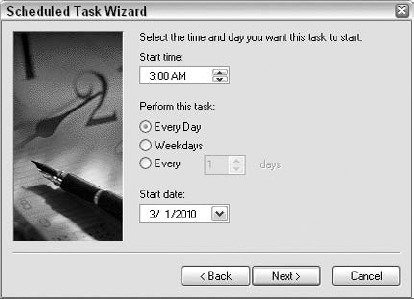
In the next window, you will set up the time and interval for the task. In the example illustrated in Figure 9-39, the task will be performed at 3:00 am every day, starting on March 1, 2010.
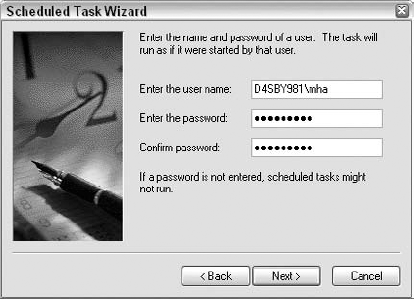
In the next window, shown in Figure 9-40, you will have to enter the user ID and password you use to log in. This is important, as the scheduled task will not run without it.
Warning
If you are using Windows XP, the Task Scheduler will not work without a password. Also, keep in mind that the Windows Task Scheduler does not keep track of expired or changed passwords. You will have to reconfigure your task if you change your password.
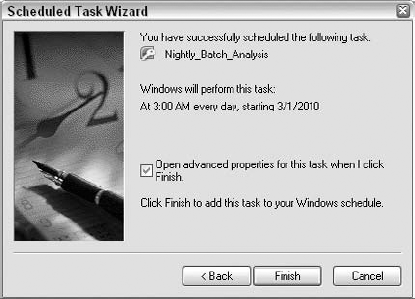
Once you get to Figure 9-41, you're almost done. Select the check box next to "Open advanced properties for this task when I click Finish."
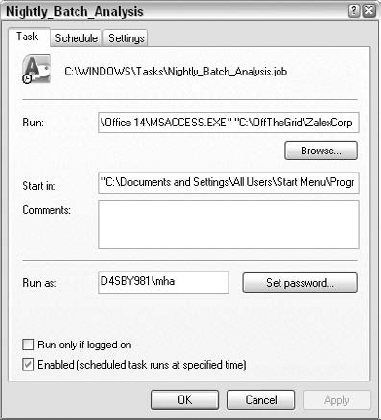
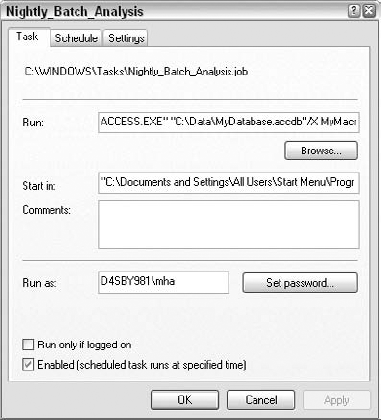
The last step is to click on the Browse button, shown in Figure 9-42, and point the Scheduler to the database that contains the AutoExec macro.
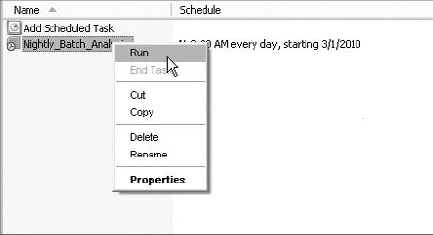
Now you can test the task to make sure it runs properly by right-clicking its name and selecting Run, as demonstrated in Figure 9-43.
Your task is now scheduled! One thing to keep in mind is that the PC on which the task is scheduled obviously must stay on. Also, based on your PC's configuration, you must be logged-in in order for the task to run. That is to say that if you log out, the task may not run. A workaround to this problem is to lock the workstation, which effectively keeps your user ID logged in without compromising security.
Command lines are nothing more than commands you can pass to your Access database to modify its startup process. In other words, you can tell Access to do something on startup. For example, the following command line tells the DB1 database to open exclusively and fire the STATS macro.
"C:Program FilesMicrosoft OfficeOfficemsaccess.exe""C:DataDB1.mdb"/Excl/X STATS
A command line is made up of three basic parts:
The path to the msaccess.exe:
"C:Program FilesMicrosoft OfficeOfficemsaccess.exe"
"C:DataDB1.mdb"/Excl/X STATS
The path of the affected database:
"C:Program FilesMicrosoft OfficeOfficemsaccess.exe"
"
C:DataDB1.mdb"/Excl/X STATSThe command-line switch(es) being used:
"C:Program FilesMicrosoft OfficeOfficemsaccess.exe"
"C:DataDB1.mdb"
/Excl/X STATS
In this example, the /Excl switch tells the database to open exclusively. The /X STATS switch tells the database to run the STATS macro upon opening.
Tip
Here's a quick list of the more useful command-line switches:
/exclopens the specified database exclusively./roopens the specified database as read-only./userstarts Access by using the specified user name./pwdstarts Access by using the specified password./profilestarts Access by using the options in the specified user profile./compactcompacts and repairs the specified database./X MacroNamestarts the specified database and runs the specified macro./wrkgrpstarts Access by using the specified workgroup information.
Microsoft recommends that you use an AutoExec macro in lieu of command-line switches. However, there are situations where a command line makes more sense. Consider the following when deciding which method to use to schedule your batch analysis:
AutoExec affects the startup of your database every time you open it. You already know that holding the Shift key while you open the database bypasses the AutoExec macro. However, working with a database where you constantly have to remember to hold down the Shift key can be quite annoying. In contrast, a command-line switch does not become part of the database. This means you can fire it whenever you like. If you regularly work in the same database used to run scheduled tasks, consider using command lines.
Each macro can have its own schedule. The problem with combining all your analytical processes into one AutoExec macro is that you run them all when you run AutoExec. If you want to schedule some your analyses to run on Monday while others run on Wednesday, you'll have to create another database with a separate AutoExec macro. Command-lines, on the other hand, allow you to have multiple macros run on different schedules without creating new databases. If you have multiple tasks that need to be scheduled at different time, consider using command lines.
To schedule a task using a command line, you would follow the steps you performed in the section "Using the Windows Task Scheduler" (shown in Figures 9-35 through 9-42). In the advanced properties dialog box shown in Figure 9-42, enter the following in the Run input box:
The path to msaccess.exe in quotes. In most cases, it will be "C:Program FilesMicrosoft OfficeOFFICExxmsaccess.exe," where xx is the version of Office.
A space.
The path to the database that contains the macro you want to run in quotes.
The command-line switch for running a macro (/X MacroName).
The following is an example of a valid command-line switch:
"C:Program FilesMicrosoft OfficeOFFICE14msaccess.exe""C:DataMyDatabase.mdb"/X MyMacro
As you can see in Figure 9-44, to use this command line, you would simply enter it into the Run input box.
Your task is now scheduled!
Tip
You can create a new shortcut on your desktop and use a command line as the target. This enables you to run a macro from a shortcut, compact and repair your database from a shortcut, and so forth.
Access macros are used to execute a set of pre-programmed functions called actions. The idea behind building a macro in Access is to choose a set of actions you want the macro to carry out when it is executed. There are over 80 macro actions in Access, each one performing a certain function. These functions range from manipulating Access objects to executing and outputting data analysis. Once you build a macro that automates your analytical processes, you can schedule it to run automatically by using the Windows Task Scheduler. Leveraging macro functionality allows you to automate many of your analytical processes, leading to higher productivity and a reduced chance of human error.

