Many Access users are not programmers, and it would be fair to say that most do not aspire to be programmers. In fact, most of you are just trying to survive the projects you are juggling now; who has the time to learn VBA?
If you are tempted to take a polite look at this chapter and then move on, you should definitely fight that urge. Why? Because leveraging VBA (Visual Basic for Applications) in your analytical processes can make your life easier in the long run. VBA can help you do things faster and more efficiently. In fact, just a few lines of code can save you hours of work, freeing you up to do other things, and increasing your productivity. Consider some of the advantages that VBA offers:
VBA can help you automate redundant analyses and recurring analytical processes, leaving you free to work on other tasks.
VBA allows you to process data without the need to create and maintain queries and macros.
With VBA, you can automate external programs such as Excel to expand the reporting capabilities.
With VBA, you can perform complex, multi-layered procedures that involve looping, record-level testing, and
If...Then...ElseIfstatements.You can tailor your own error-handling procedures using VBA, allowing you to anticipate and plan for process flow changes in the event of an error.
This chapter covers some fundamental concepts and techniques that will lay the groundwork for your own ideas about how to enhance your analytical processes with VBA.
Tip
True to its purpose, all the techniques in this chapter involve writing some basic code. In order to keep things focused on the data analysis aspect of these techniques, this chapter will not be spending much time explaining the VBA behind them. If you are new to VBA, you may want to refer to Appendix A, "Access VBA Fundamentals," which will give you a firm understanding of the basic concepts used in this chapter.
Note
Keep in mind that the new security features in Access may prevent you from running the procedures found in the sample file. You will need to enable the content in the database in order to use the VBA. Feel free to revisit Chapter 9 to find out how the new security features in Access work and how to enable the content of your database.
The developers at Microsoft have put in thousands of man-hours developing functions that are expansive enough to fit the needs of most users. In most cases, the functions available in Access more than satisfy user requirements. In fact, many users will never use a majority of the functions available, and will typically gravitate towards only those that fit their current needs.
On the other end of the spectrum, there are those users whose daily operations involve tasks not covered by the functions in Access. These tasks can involve a business-specific calculation or a complex expression that achieves a particular result. In most cases, these tasks are accomplished by building expressions. For example, suppose that your analysis routinely calls for the last day of the current week. Because no built-in function exists to help you determine the last day of the current week, you would use the following expression wherever you need this data:
Date() - WeekDay(Date()) + 7
The alternative to using such an expression is to build a custom function (sometimes referred to as a user-defined function). Custom functions are VBA procedures that expose your expressions to other objects in your database as a function, much like Access's built-in functions. This essentially means that instead of creating and using expressions in a query or form, you build your expressions into a VBA procedure, and then call it whenever you need it. Why bother with custom functions? Well, consider the following inherent advantages to converting your expressions into custom functions.
Expressions, in and of themselves, generally perform operations that are simple and linear in nature. They don't allow for complex operations that involve looping or
If...Then...Elselogic. Building a custom function will give you the flexibility to perform complex, multi-layered procedures that involve looping, record-level testing, andIf...Then...Elselogic.Expressions don't allow you to define explicitly what happens in the event of an error. Building a custom function in a VBA environment allows you to include error-handling procedures with your expressions, empowering you to anticipate and plan for process flow changes in the event of an error.
When you change the definition of an expression, you have to find and modify that expression in every place it is used. A custom function resides in one module; therefore, when there is a change in your expression or procedure, you have to update it in only one location.
There is an increased risk of error when you are forced to manually type expressions repeatedly. For example, the expression,
Date() - WeekDay(Date()) + 7contains syntax that could easily be keyed incorrectly or omitted. By using a custom function, you ensure that your expression is performed the same way every time, without the risk of a typing mistake.
For your first custom function, you will build a function that will return the last day of the current week.
Start a new module by clicking the Create tab on the ribbon and selecting Module as demonstrated in Figure 10-1.
Create a new function by entering the following code:
Function LastDayThisWeek()
Note
There is nothing special about the name
LastDayThisWeek. It's simply a descriptive name that coincides with the purpose of the function. When creating your own custom function, it's good practice to give your functions simple names that are descriptive and easy to remember.On the next line, assign the needed expression to the function, giving your custom function its utility.
LastDayThisWeek = Date - Weekday(Date) + 7
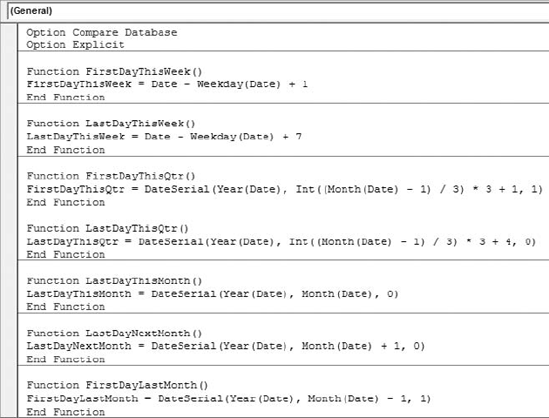
At this point, your module should look similar to the one shown in Figure 10-2.
Save the module and close it.
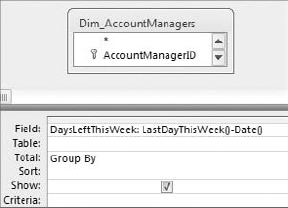
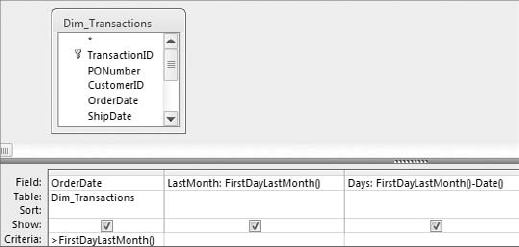
To test your newly created custom function, create the query you see in Figure 10-3 and run it. In this query, you first determine the last day of the current week by using your newly created function, and then you use that value to calculate how many days are left in the current week.
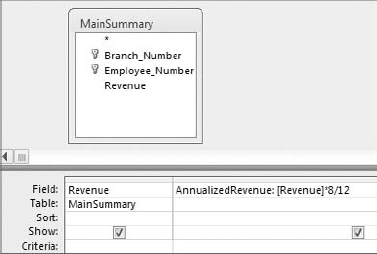
Sometimes the operation performed by your custom function requires arguments that cannot be supplied internally by Access. In these situations, you will need to create a custom function that accepts arguments. To illustrate this concept, look at the query in Figure 10-6.
In this query, the Revenue field is being annualized (that is, the revenue value of each row is being translated to an annual rate for comparative purposes). The nature of this operation requires three arguments: the value being annualized, the number of periods already completed, and the number periods that make up an entire year. As you can see in this query, the value being annualized is revenue, the number of periods completed is 8, and the number periods that make up a year is 12.
In order to convert this expression to a custom function, you have to allow the user to pass the required arguments. Walk through the following steps:
Go into the Visual Basic Editor by pressing Ctrl+Alt on the keyboard. From there, start a new module by selecting Insert

Create and name your new function by entering the following code:
Function Annualized()
Inside the parentheses, declare a variable and type for each argument that will be passed to the function.
Function Annualized(MyValue As Long, _
PeriodsCompleted As Integer, PeriodsinYear As Integer)
On the next line, assign the needed expression to the function, giving your custom function its utility. Instead of using hard-coded values, you will use the values passed to the declared variables.
Annualized = MyValue / PeriodsCompleted * PeriodsinYear
At this point, your module should look similar to the one shown in Figure 10-7.
To test your newly created Annualized function, create the query you see in Figure 10-8, and then run it. Note that you are using your newly created function in an Alias called "AnlzdRev."
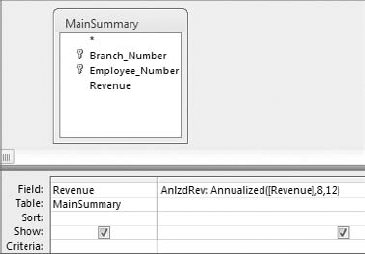
Figure 10.8. This query uses your newly created function to get the annualized revenue for each record.
Tip
You can hard-code selected arguments in your custom function to limit the number of arguments that need to be passed. For instance, the following code demonstrates how you can change the procedure for the Annualized function to hard-code the number of periods in a year:
Function Annualized(MyValue As Long, PeriodsCompleted As Integer)
Annualized = MyValue / PeriodsCompleted * 12
End Function
As you can see, the number of periods in a year has been hard-coded to 12, so when using this function, you have to pass only two arguments. For example:
Annualized([Revenue], 8)
An Access form is nothing more than a database object that can accept user input and display data using a collection of controls. Access forms are often thought of as part of the presentation layer of a database, primarily being used as the front-end of an application. While it is true that the primary purpose of forms is to act as an interface between Access and a user, this does not mean the user cannot be you (the designer of the database). In this section, you learn how Access forms can be leveraged on the back-end of a database as a data analysis tool that interacts with your analyses and further automates your analytical processes.
The idea behind passing data from a form to a query is that instead of using parameters in a query to collect the data for your analysis, you collect the data through a form. To get a firm understanding of the basics of passing parameters from a form to a query, perform the following steps:
Start by creating a new form. Go to the Create tab on the ribbon and click the Form Design button as demonstrated in Figure 10-12.
Go up to the Design tab and select the Text Box control as demonstrated in Figure 10-13; then click anywhere on your form. At this point, you should have a form with one text box control.
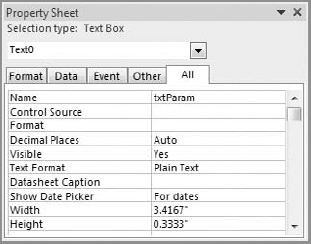
Right-click the text box and select Properties. Click the All tab, and then give the newly created text box a distinctive name by entering txtParam as the Name property, as shown in Figure 10-14.
Note
Each control on your form must have a valid name in the Name property. The Name property is a unique identifier that allows Access to reference a control in other parts of your database. Access automatically assigns generic names to newly created controls. However, you should always make it a point to give each of your controls you own descriptive name. This makes referencing and recognizing your controls much easier.
Go back to the Design tab and select the Command Button control, as shown in Figure 10-15, and click anywhere on your form. This will place a command button on your form.
Right-click the newly created command button and select Properties. Click the All tab, and adjust the Name property of your command button to read btnRunQuery. Then adjust the Caption property to read Run Query.
Next, while still in the command button's properties, click the Event tab and then select [Event Procedure] from the On Click event, as shown in Figure 10-16. Next, click the ellipsis button (the button next to the dropdown).
At this point, you should be inside the VBA editor, where you will enter a
DoCmdaction that will run the query called "Chapter10_ExampleA." Enter the following code, just as you see in Figure 10-17.DoCmd.OpenQuery "Chapter10_ExampleA", acViewNormal
The DoCmd.OpenQuery method enables you to execute any saved query from code. This method is perfect for simple automation processes such as this.
Once you are done, save your form as "frmMain" and close it.
It's time to test. Open the newly created frmMain form and click the Run Query button. If the query runs successfully, you have set up your form correctly. Now you can prepare your query to accept parameters from this form!
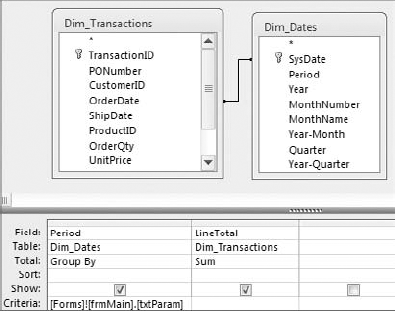
Open the "Chapter12_Example_A" query in Design view. Enter [Forms]![frmMain].[txtParam] as the criteria for the Period field, as shown in Figure 10-18.
Save and close the query.
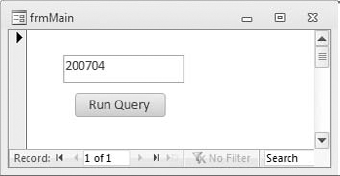
Now you can open the frmMain form and enter a parameter for your query through a form! Enter 200704 in the text box, as shown in Figure 10-19, and then run the query. This returns all revenues earned in the 200704system period.
Note
You will notice that if you leave the text box blank, your query will not return any results. This is the same issue you encounter using parameter queries. One way to get around this problem is to combine your expression with a wildcard so that if the text box is blank, all records will be returned. In this scenario, for instance, you would change your expression to read:
Like [Forms]![frmMain].[txtParam] & "*"
Access forms can help you enhance your automated processes using little more than a few controls and some light VBA coding. The idea is to turn your forms into something more than just a tool to pass parameters; you can create a robust central control point for your analysis.
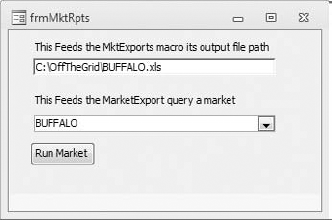
To help illustrate the power of incorporating Access forms into your analysis, open the frmMktRpts form in the sample database, shown in Figure 10-20. The purpose of this form is to control the execution of an analysis that involves creating market reports. The idea is to select a market, run the process that executes a query, and then sends the results to an Excel file in the C:OffTheGrid directory.
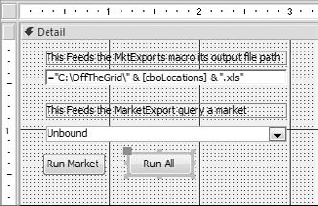
Open the form in Design view to see how this works. As you can see, there are three controls on this form.
The txtPath text box. The txtPath text box uses the market value from the combo box to construct a file path. This allows you to dynamically create a separate path for each market. This path is constructed by concatenating two strings and a control reference.
C:OffTheGrid. This is the first part of the file path, pointing to the OffTheGrid directory in the C drive.
[cboLocations]. This is the name of the combo box where you select your market. This becomes the file name.
.xls. This string finishes the path by assigning the file extension that identifies the file as an Excel file.
If you open the MktExports macro, shown in Figure 10-21, you will notice that the Output File path is referencing this text box. This allows the macro to avoid using a hard-coded file path.
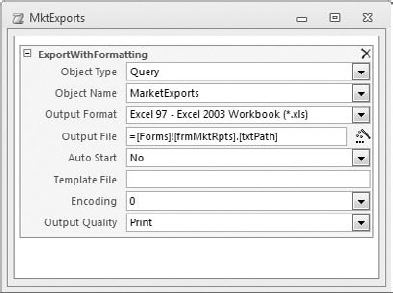
Figure 10.21. You will use the txtPath text box to dynamically feed your macro the Output File path for each market.
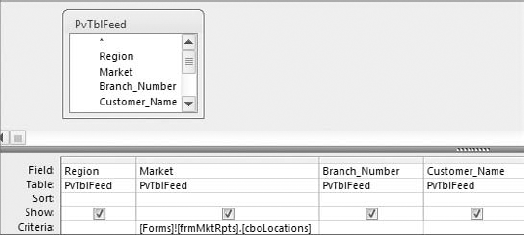
The cboLocations combo box. This combo box helps do two things. First, this combo box feeds the txtPath text box a market to use in the construction of a file path. Second, it feeds the MarketExports query its parameter. If you open the MarketExports query, shown in Figure 10-22, you will notice that filter criteria for the Market field is referencing this combo box. This allows the query to avoid using a hard-coded market.
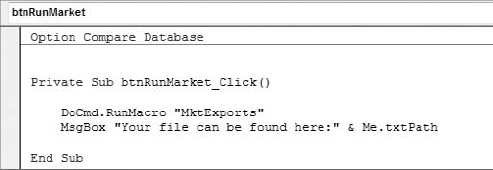
The btnRunMarket command button. Right-click this command button and then click Build Event. This will take you to the VBA editor shown in Figure 10-23. As you can see, this button simply runs the MktExports macro, and then throws up a message box announcing the location of your new file.
Now that you have a firm grasp of how this form works, you can enhance it even further. Instead of running one market at a time, wouldn't it be useful to run all markets at once? You can do this by using VBA to enumerate through all the markets in the combo box, running the MktExports as you go.
Open the frmMktRpts form and take a look at the combo box on the form. The entries, or rows, you see within the combo box are indexed—that is, each row has an index number starting from 0 and continuing to however many rows there are. For example, the first row is index number 0, the second row is index number 1, the third row is index number 2, and so on. The idea behind enumerating through a combo box is to capture one index at a time, and then change the value of the combo box to match the row value assigned to that index number.
Start by opening the frmMktRpts form in Design view and adding a second command button.
Adjust the Name property of your newly created command button to read btnRunAll, and then adjust the Caption property to read Run All.
At this point, your form should look similar to Figure 10-24.
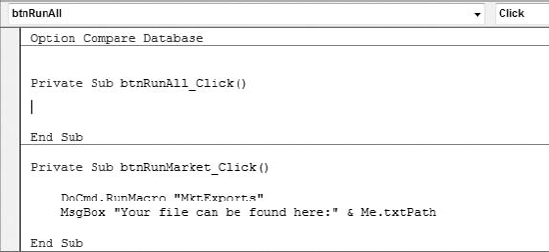
Right-click the button and select Build Event. Select Code Builder from the Choose Builder dialog box, and then click OK. This opens the VBA Editor. As you can see in Figure 10-25, this creates a separate subprocedure.
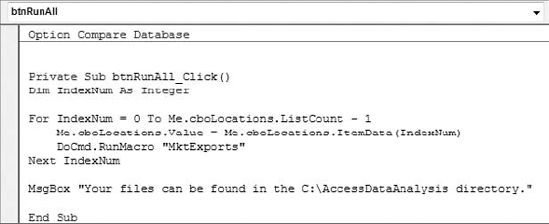
Start the code by declaring an integer variable called
IndexNum. This traps the index number of each entry of the combo box.Dim IndexNum As Integer
Initiate a
For...Nextloop with theIndexNumvariable. This line of code ensures that the procedure runs for each index number in the combo box.For IndexNum = 0 To Me.cboLocations.ListCount - 1
Note
Why subtract 1 from the combo box's list count? You must do this to adjust for the fact that index numbers of a combo box start at 0. If there are 10 rows in a combo box, the ListCount property starts counting at 1, returning a count of 10 rows. However, the index numbers in the same combo box range from 0 to 9. Subtracting 1 from the list count removes the extra number and corrects the discrepancy.
Set the value of the combo box equal to the value of the row assigned to the current index number. After the new value has been set, run the predefined macro.
Me.cboLocations.Value = Me.cboLocations.ItemData(IndexNum)
DoCmd.RunMacro "MktExports"
Repeat the process for the next index number. The message will alert you when the procedure has completed its execution.
Next IndexNum
MsgBox "Your files can be found in the C:OffTheGrid directory."
If you have done everything correctly, your procedure should look similar to Figure 10-26.
Save your form and test the newly created functionality by clicking the Run All button.
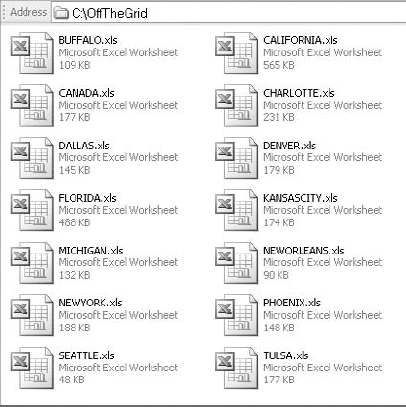
Once the procedure has completed running, look under the C:OffTheGrid directory to see all the Excel files that where created (see Figure 10-27).
Needless to say, this example is just one of the hundreds of ways you can enhance your analytical processes using forms. The flexibility and functionality you gain by using a few controls and a handful of code is simply incredible. Even simple techniques such as passing parameters from a form to a query can open the doors to a completely new set of analytical functionality.
One of the benefits of using VBA is that you can perform much of your data processing in the background without the use of queries and macros. This can be beneficial in several ways, including that it can:
Reduce the number of query objects in your database: Every analytical process has intermediate steps that serve as a means to an end. These steps typically involve action queries that massage and transform the data for the bigger analysis. Too many of these peripheral queries can inundate your database with query objects, making your analytical processes difficult to manage and change. Processing your data in the background using VBA can help you streamline your processes by reducing the number query objects in your database, making both the management and the maintenance of your analyses more practical.
Better organize your analytical processes: Have you ever seen a process that involves queries that link to forms that, in turn, link to macros that reference tables created by other queries, and so on? You will undoubtedly run into analyses that involve complicated processes, and there is nothing wrong with utilizing the tools Access provides. However, engineering overly elaborate systems that involve macros, queries, and forms can make your processes difficult to manage and maintain. Processing your data in the background using VBA can help you centralize your analysis into one procedure, organizing your tasks in a clearly defined set of instructions that are easy to locate, update, and manage.
Protect your processes in shared environments: Processing your data in the background using VBA can help you protect your analytical processes working in a shared database. Building your processes in VBA can reduce the risk of someone changing your queries or accidentally deleting objects.
Enhance your processes with VBA: The more you integrate your analytical processes into VBA, the more you can take advantage of its many benefits such as looping, record-level testing, and error handling.
Anyone who routinely works with Access knows that there are several different ways to accomplish any given task. Processing data using VBA is no different. Indeed, the beauty of VBA is that its flexibility allows you to perform literally any action in countless ways. That being said, it should be obvious that it's impossible to cover every possible way to process data using VBA. Therefore, you will focus on using RunSQL statements. This technique gives you some fundamental controls over your processes through VBA and allows you to move more of your analyses behind the scenes.
By this point, you already know that the query objects you are accustomed to using are simply visual representations of SQL statements. What you may not know is that you don't necessarily need to create a query object in order to process data. You can process data directly through a RunSQL statement. One of the ways to do this is to use the RunSQL method.
If you were designing a macro, you would find RunSQL in the list of macro actions. In technical terms, RunSQL is a method belonging to the DoCmd object. Those of you who have been paying attention probably noticed that up until now, you've used OpenQuery when working with a query in a macro environment, and Docmd.OpenQuery when working with a query through code. In this light, it's important to note the differences between the RunSQL method and OpenQuery method.
The
OpenQuerymethod executes a saved query, whereas theRunSQLmethod processes a SQL statement without the need for a saved query.The
RunSQLmethod only allows you to execute action queries (make-table, append, delete, and update), whereas theOpenQuerymethod enables the execution of any type of saved query; including select queries.The
OpenQuerymethod is ideal for use in a macro environment. TheRunSQLmethod, on the other hand, is better suited for dynamic back-end processes performed in VBA.
Note
Among other reasons, RunSQL is better suited for VBA because in a macro environment, the RunSQL action limits you to SQL statements that do not exceed 256 characters. This obviously restricts the functionality of RunSQL in the macro environment. However, there is no such limitation in the VBA environment.
Using RunSQL statements in your code is easy. You would simply place each RunSQL statement in your VBA procedure as needed. For instance, the following procedure runs four actions, demonstrating that you can process data without creating one query:
Updates the job code "PPL" to "PPL1"
Deletes the "PPL1" job code
Function Look_Ma_No_Queries()

DoCmd.RunSQL "SELECT [Job_Code]INTO [tblJobCodes]FROM
[Employee_Master] GROUP BY [Job_Code]"

DoCmd.RunSQL "INSERT INTO [tblJobCodes] ( [Job_Code] ) SELECT
'PPL' AS NewCode FROM [Employee_Master] GROUP BY 'PPL'"

DoCmd.RunSQL "UPDATE [tblJobCodes] SET [Job_Code] = 'PPL1'
WHERE [Job_Code]='PPL'"

DoCmd.RunSQL "DELETE * FROM [tblJobCodes] WHERE [Job_Code]='PPL1'"

End Function
Note
You will find this procedure in the sample database in the module called Using_RunSQL. Note that each RunSQL statement should be one line of code. You see the lines broken up here due to layout specifications.
Now that you have a firm understanding of what RunSQL statements can do, take a look at some of the advanced techniques that will help enhance your behind-the-scenes processing.
As you execute your RunSQL statements, you will notice that Access throws up the same warning messages you would get if you were to run the same actions with stored queries. You can use the SetWarnings method to suppress these messages just as you would in a macro. For example, the following code sets warnings to false, runs the RunSQL statement, and then sets warnings back to true.
DoCmd.SetWarnings False
DoCmd.RunSQL "DELETE * FROM [tblJobCodes] WHERE [Job_Code]='PPL1'"
DoCmd.SetWarnings True
One of the biggest challenges in working with the RunSQL method is managing and making sense of giant SQL statements. It's difficult to determine what is going on in your code when your RunSQL statement runs off the page with over 100 characters in its SQL string. One of the ways to make for easier reading is to pass your SQL statement as a variable. This section demonstrates how passing your SQL statement through a string variable enables you to break up your statement into pieces that are easier to read.
Start a procedure and declare a string variable called
MySQL.Function Passing_SQL_With_Strings() Dim MySQL As String
Start assigning the SQL statement to the
MySQLvariable. What you're looking for here is structure, a format that makes the SQL statement easy to read and manage within the VBA editor. The first line starts the string. Each subsequent line is concatenated to the previous line. By the last line, theMySQLvariable contains the entire SQL string.MySQL = "SELECT TOP 10 Market, Sum(Revenue) AS Rev INTO TopTenList " MySQL = MySQL & "FROM PvTblFeed " MySQL = MySQL & "GROUP BY PvTblFeed.Market, PvTblFeed.Customer_Name " MySQL = MySQL & "ORDER BY Sum(PvTblFeed.Revenue) DESC"
All that is left to do now is pass the
MySQLvariable to yourRunSQLstatement, as follows:DoCmd.RunSQL MySQL End Function
Note
Although there are other ways to concatenate this SQL string without the redundancy of typing "MySQL = MySQL &...", this method creates a visual block of code that unmistakably lets the person reviewing the code know that all this goes together.
Even when you are processing data behind the scenes, you can pass user-defined parameters from a form to create dynamic SQL statements. Here are some examples of how you would pass data from a form to your SQL statements:
In this example, you are passing textual criterion from a form. Note that the expression that points to the user-defined parameter on the form must be wrapped in quotes. In addition, because the data type you are passing is textual, the entire expression is wrapped in single quotes.
MySQL = "SELECT Market, Customer_Name, EffDate, TransCount "
MySQL = MySQL & "INTO MyResults "
MySQL = MySQL & "FROM MyTable "
MySQL = MySQL & "WHERE Market='" & [Forms]![frmMain].[cboMarket] & "'"
DoCmd.RunSQL MySQLIn this example, you are passing a numeric criterion from a form. Note that the expression that points to the user-defined parameter on the form must be wrapped in quotes.
MySQL = "SELECT Market, Customer_Name, EffDate, TransCount "
MySQL = MySQL & "INTO MyResults "
MySQL = MySQL & "FROM MyTable "
MySQL = MySQL & "WHERE TransCount =" & [Forms]![frmMain].[cboCount] & ""
DoCmd.RunSQL MySQL
In this example, you are passing date criterion from a form. Note that the expression that points to the user-defined parameter on the form must be wrapped in quotes. In addition, because the data type you are passing is a date, the entire expression is wrapped in a pound sign (#).
MySQL = "SELECT Market, Customer_Name, EffDate, TransCount "
MySQL = MySQL & "INTO MyResults "
MySQL = MySQL & "FROM MyTable "
MySQL = MySQL & "WHERE EffDate =#" & [Forms]![frmMain].[cboMarket] & "#"
DoCmd.RunSQL MySQL
Leveraging VBA (Visual Basic for Applications) in your analytical processes can help you automate redundant and recurring analyses, as well as process data without the need to create and maintain queries and macros. Although there are countless ways you can leverage VBA to improve your analytical process, in this chapter you covered three techniques: building custom functions, incorporating Access Forms in your analysis, and using Run SQL commands to run queries behind the scenes.
Custom functions are VBA procedures that expose your expressions to other objects in your database as a function, much like Access's built-in functions. This essentially means that instead of creating and using expressions in a query or form, you build your expressions into a VBA procedure, and then call it whenever you need it. The major advantages to building your own custom functions using VBA is that you have the flexibility to perform complex multi-layered procedures that involve looping, record-level testing, and If...Then...Else logical evaluations while ensuring that your expression is performed the same way every time, without the risk of a typing mistake.
Another way to use VBA to enhance analysis is to incorporate Access forms into your analytical processes. An Access form is nothing more than a database object that can accept user input and display data using a collection of controls. Access forms are often thought of as part of the presentation layer of a database, primarily being used as the front-end of an application. While it is true that the primary purpose of forms is to act as an interface between Access and a user, this does not mean the user cannot be you. Access forms can be leveraged on the back-end of a database as a data analysis tool that interacts with your analyses and further automates your analytical processes.
Finally, you can create and run RunSQL commands using VBA to process data behind the scenes, without the need for query objects or temporary tables. The advantages of using RunSQL commands are:
You can reduce the number of query objects in your database.
You can centralize your analysis into one procedure, organizing your tasks in a clearly defined set of instructions that are easy managed.
You can protect your processes in shared environments, reducing the risk of someone changing your queries or accidentally deleting objects.






![Set the On Click event to run an [Event Procedure], and then click the ellipsis button.](http://imgdetail.ebookreading.net/business/42/9780470567012/9780470567012__the-excel-analysts__9780470567012__figs__1016.png)

