
6. Editing with iMovie ’09
If you’re a Windows PC user, you’re welcome to skip this chapter. iMovie, part of Apple’s iLife suite, works only with Macs, so you’ll learn nothing helpful here. Windows Movie Maker is every bit as good as iMovie—better, probably—so just move along; nothing to see here. We’ll see you in Chapter 7. Bye!
Dum, dee, dum, dah, dum, dee...
Coast clear? Windows users gone? OK, now that it’s just us Mac users, let me assure you that I was lying through my teeth when I said Windows Movie Maker is a better movie editing application than iMovie. In fact, iMovie kicks Movie Maker’s patoot from here to eternity in terms of functionality and features. At the risk of sounding like an Apple fanboy, if you master iMovie, I guarantee that you’ll produce a far slicker video than you ever could with Movie Maker.
There have been several iterations of iMovie. With iMovie ’08, Apple essentially built a new video editing application from the ground up and slapped the iMovie name on it, even though the new app shared very little (code included) with the original iMovie. When Apple built this version of iMovie, it drastically changed the moviemaking metaphor, getting rid of the timeline and providing very little in the way of tracks. iMovie ’09 builds on the iMovie ’08 interface to become an even more capable movie editing application.
Given iMovie’s new approach to editing video, those who’ve used traditional movie editing applications in the past may find that wrapping their heads around iMovie ’09 takes a little time. Fear not—the whole point of this chapter is to assist in that head-wrapping. Grab your Flip, and let’s explore!
Plugging in Your Camera
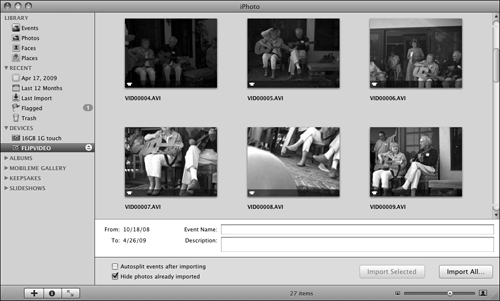
You’ve jacked your Flip camcorder into your Mac’s USB port, and what happens? That depends on the kind of Flip camcorder you have. If you plug in a Flip Mino, MinoHD, UltraSD, or UltraHD, and you have iLife ’09 installed on your Mac, both FlipShare and iPhoto will launch. Make iPhoto the frontmost application, and you’ll see the Flip camera listed under iPhoto’s Devices heading and all the clips on the camera displayed in the main area of the window. At this point, you’re welcome to import all the clips on the camera or just the ones you select (Figure 6.1).
Figure 6.1 Importing clips with iPhoto.
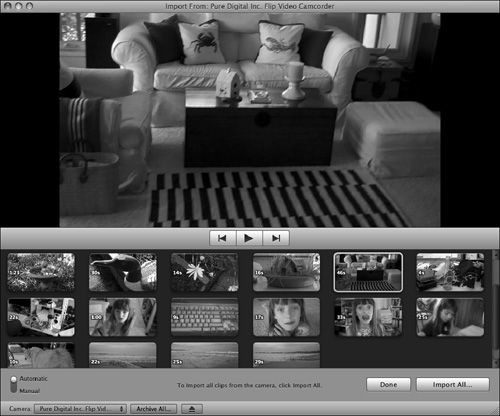
Ah, but launch iMovie ’09 and plug in a high-definition Flip camcorder (MinoHD or UltraHD), and an Import window appears, offering to import the camera’s clips—all the clips or just those you select—directly into iMovie (Figure 6.2).
Figure 6.2 Importing high-definition Flip clips with iMovie ’09.
Note
This feature works only with the high-definition Flips. iMovie doesn’t automatically recognize clips from the standard-definition Flip camcorders.
If you’re given the option to import clips into iMovie or iPhoto, which should you pick? Personally, I let iPhoto import the clips. It may sound like I’m bringing the clips into the wrong program, but it makes sense for this reason:
iMovie ’09 includes an Event Library pane. (I’ll tour iMovie’s interface soon and show you where this pane is.) Within that pane is an iPhoto Videos entry. When you click that entry, you can see and access every video file that you’ve imported into iPhoto. Because the only video clips I import into iPhoto come from my Flip camcorders, this method makes it very easy for me to find these clips and not mix them up with clips I may have imported from my DV or HD camcorder, which I file elsewhere in iMovie.
Also, I don’t always want to edit movies the minute I plug my Flip into my Mac. Rather, I just need a place to store them so I can erase them from the camera to free space. As iPhoto launches automatically and presents that Import All button, I find it convenient to take advantage of its offer to move the clips quickly from camera to computer.
Note
If you have iMovie open while you import new clips with iPhoto, iMovie won’t be aware of those new clips until you relaunch it. When you do, iMovie will notify you that it wants to index the iPhoto video clips and create thumbnail images for them. This process doesn’t take long, so let iMovie do it.
Touring the iMovie ’09 Interface
If you happened to glance at Chapter 5, you saw the reasonably spartan interface of Windows Movie Maker: a few panes and lots of white space. Launch iMovie ’09 for the first time, and you see something quite different: an imposing, largely dark-gray window with multiple panes that’s a bit of a jumble at first glance. In this section, I give you a long second glance at this window and help you make sense of its elements.
Pane management
Microsoft and Apple may have their differences in the way they approach design, but there are only so many ways you can present and edit video. Although iMovie and Movie Maker may look very different, they have some common elements because they have to. You need to be able to see a list of your clips, find a way to discover what kind of material each clip holds, preview your work, and assemble those clips into a finished movie. iMovie manages all these tasks in a series of panes (Figure 6.3).
Figure 6.3 The main interface elements of iMovie ’09.
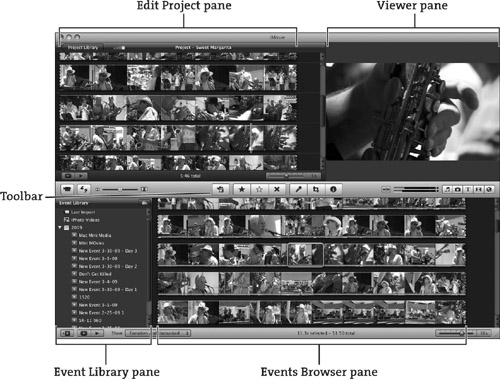
In the following sections, I look at these panes and the toolbar from the perspective of a workflow, starting with the list of clips and ending with project assembly.
Event Library pane
In the bottom-left section of the iMovie window, you see the Event Library pane, within which you’ll spy at least two entries: Last Import and iPhoto Videos. When you select Last Import, all the clips that you last imported within iMovie appear in the Events Browser pane to the right. (Nothing will appear if you haven’t imported any video yet.) If you select iPhoto Videos, any clips you’ve imported into iPhoto and indexed in iMovie appear in that same Events Browser pane.
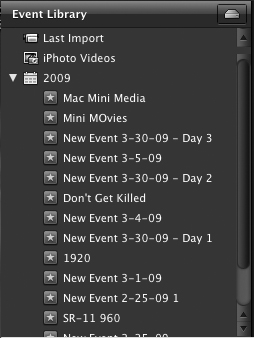
If you’ve imported video into iMovie, you’ll see year listings in the Event Library pane—2009, 2008, 2007, for example. Below the year heading is a list of clips that were imported during that year (Figure 6.4). (iMovie displays the year when the clips were imported—not shot. It cares only about when you imported the movies, so it ignores the Flip cameras’ date and time stamp.)
Figure 6.4 The Event Library pane.
Note
An event can contain more than one clip. If, for example, you’ve shot four clips with your Flip camcorder and then import them all at the same time—either with iPhoto or iMovie—they’ll be part of the same event. Again, iMovie cares about when the clips were imported, not shot.
If you Control-click (or right-click, if you have a multibutton mouse) any entry in the Event Library pane, you can choose different ways to organize your clips: Group Events by Disk, Group Events by Month, Most Recent Events at Top, and Show Separate Days in Events.
Events Browser pane
As I mention in the preceding section, when you select an event in the Event Library pane, all the clips that belong to that event appear in the Events Browser pane in the bottom-right section of the iMovie window (Figure 6.5).
Figure 6.5 The Events Browser pane.

This pane serves a couple of purposes:
• It provides a preview, in the form of thumbnail images, of what a clip contains.
• It’s where you choose clips (or portions of clips) that you’d like to add to your movie project.
Unlike Windows Movie Maker, iMovie shows far more than just single thumbnails in this pane. You see a series of thumbnails of scenes—like a film strip—within each clip. By default, these thumbnails are drawn from every 5 seconds of video. (You can adjust this setting by moving the slider just below the Events Browser pane so that you can see thumbnails for as little as every half-second of video to as much as every 30 seconds.)
But wait—as they say in the late-night-commercial biz—there’s more! Scoot your mouse pointer over the top of those thumbnails, and move it to the left or right. The video plays—backward or forward, depending on the direction in which you move the mouse—in the Viewer pane above, complete with sound. I don’t intend to spend the entire chapter repeating “Try that with Windows Movie Maker!”, but this is just one more example of how advanced iMovie is.
But wait again—there’s even more! Now that you’ve located a particular point in your clip, you can play the clip from that point simply by pressing the keyboard’s spacebar. (Alternatively, you can click the Play button at the bottom of the screen or play the video in full-screen mode by clicking the Play Full Screen button next to that Play button.) Should you want to select a portion of a clip, just click and drag over it. You could click at the beginning of that exciting car chase and drag until the local constabulary makes its appearance, for example.
Viewer pane
The Viewer pane, in the top-right quadrant of the iMovie window, is the big window where you preview clips and projects (Figure 6.6). Again, to play video in the Viewer pane, just position the mouse pointer over a clip and press the spacebar. The video will play in the Viewer pane from the point of your selection.

Edit Project pane
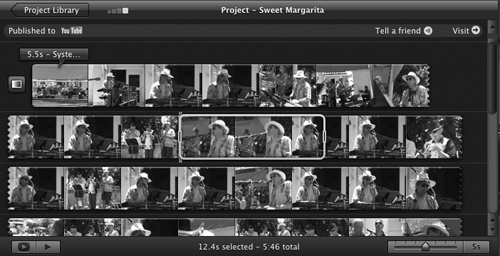
As its name implies, the Edit Project pane is where you piece together clips and add titles, transitions, effects, and audio to make your finished movie (Figure 6.7). Much like the Events Browser pane, the Edit Project pane lets you preview your video by clicking and dragging over any bit of video in the pane or by positioning the mouse pointer and pressing the spacebar. This pane also bears a slider for adjusting the frequency of thumbnail images, as well as Play and Play Full Screen buttons.
Figure 6.7 The Edit Project pane.
Project Library pane
The Project Library pane doesn’t appear by default, but you can produce it easily enough. Just choose Window > Show Project Library or click the Project Library button in the top-left corner of the Edit Project pane. Do either one of these things, and the Edit Project pane is replaced by the Project Library pane (Figure 6.8, on the next page), which lists all the projects you’ve created with iMovie. You can easily open a previous project by selecting its name in the list and then clicking the Edit Project button in the top-left corner of the iMovie window.
Figure 6.8 The Project Library pane.
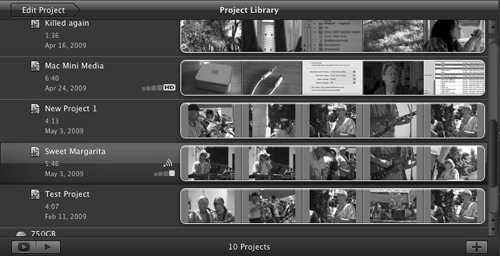
On the left side of this pane, you’ll see the name of your project, its length, and when you created it. On the right side are thumbnail images of your project. You can click inside a project to see the selection in the Viewer pane and drag to see a motion preview, but in this case, the motion preview doesn’t contain sound. To hear sound as well as see video, place your mouse pointer somewhere in the preview and press the spacebar to play from that location.
Tip
If you’d like to create a new project and just don’t have the strength to choose File > New Project, you can click the plus (+) button in the bottom-right corner of this pane to produce the New Project sheet.
Toolbar
Apple has a knack for planting its toolbars just about everywhere in its iLife applications except the tops of windows. iMovie is no exception. You’ll find that its toolbar divides the window right down the middle, horizontally (Figure 6.9).
Figure 6.9 iMovie ’09’s Toolbar elements.
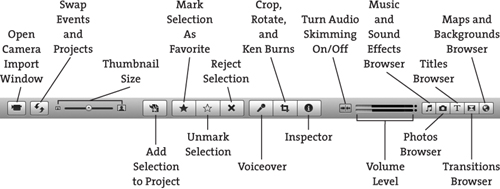
You access many of iMovie’s important features via this toolbar, so in the following sections, I break it down into its individual buttons.
Open Camera Import Window
If you have a compatible video camera attached to your Mac and want to import video from it, you click this button. In the case of the Flip camcorders, this button works only with the high-definition models: the MinoHD and UltraHD.
Within the import window, you can import every clip on the camera by clicking the Import All button, or you can flip the Automatic/Manual switch on the left side of the window to Manual and clear the check boxes next to the clips you don’t want to import. (Alternatively, you can click the Uncheck All button, check the boxes next to the clips you do want to import, and then click the Import Checked button that now appears.) When you’ve imported your clips, just click the Done button to dismiss the window.
Swap Events and Projects
If you’d prefer to have the Event Library and Events Browser pane at the top of the iMovie window and the Edit Project/Project Library panes at the bottom, just click this button and marvel at the swoopy effect that occurs as the two areas change positions.
Thumbnail Size
You use this slider to make the thumbnail images in the Events Browser pane larger or smaller.
Add Selection to Project
Normally, you add clips to a project by selecting them in the Events Browser pane and dragging them into the Edit Project pane, but you can use this button for the same task. Just select some video in the Edit Project pane and click this button. The selected portion of video is added to the end of the project as a separate clip.
Mark Selection As Favorite
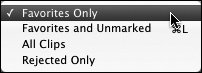
If there’s a bit of video that you’d like easy access to at a later time, select the video in the Events Browser pane and click the Mark Selection As Favorite button. When you do, a green bar appears across the selected video’s thumbnail view. You can find your favorites by choosing View > Favorites Only. (As an alternative, you can choose Favorites Only from the Show pop-up menu at the bottom of the window, as shown in Figure 6.10.) Your favorites are displayed in the Events Browser pane.
Figure 6.10 You can choose to view just your favorite clips.
Note
If you want to see all your favorites, regardless of which event they’re part of, select an event in the Event Library pane, press Command-A to select all the events, and then choose View > Favorites Only.
Unmark Selection
If you’ve determined that a clip marked as a favorite is now out of favor, you can remove its favorite status with this button. Just select that clip and click Unmark Selection.
Reject Selection
You can hide selections by marking them as rejected. This process works just like creating a favorite: Make your selection and then click this button. If you’d like to see rejected selections, choose View > Rejected Only, or choose Rejected Only from the Show pop-up menu at the bottom of the window. As with favorites, you can unreject a rejected selection by selecting it and then clicking the Unmark Selection button I just mentioned.
Voiceover
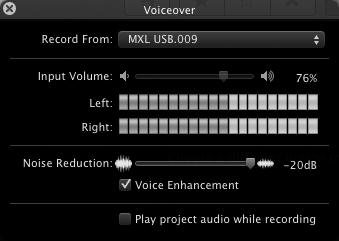
This button is the gateway to recording an audio narration track. Click it, and the Voiceover window appears (Figure 6.11, on the next page). Within this window, you choose the microphone source (a microphone built into your Mac, for example, or a mic plugged into the Mac’s audio input port), adjust and monitor the mic input levels (via a slider and meters, respectively), add noise reduction, enable voice enhancement (iMovie will save your narration with an equalization setting that helps make your voice stand out), and decide whether the Mac’s speakers will play back a video clip’s audio while you’re recording.
Figure 6.11 The Voiceover window.
Tip
As I mention in Chapter 5, unless you’re recording with headphones on to monitor your movie’s sound, it’s best to switch off the computer’s speakers when you’re recording a narration track so that you don’t also record the sound of the movie.
Crop, Rotate, and Ken Burns
iMovie has the power to crop and rotate video clips and to add a pan-and-scan effect to still images—an effect that Apple calls the Ken Burns effect, after the acclaimed documentary maker of the same name. As the Flip camcorders don’t take still images, I’ll skip Ken and concentrate on Crop and Rotate.
If you’d like to focus on a particular element within a clip, you can use the Crop feature to do that. Here’s how:
1. Make a selection in the Events Browser pane, and click the Crop, Rotate, and Ken Burns button.
In the Viewer pane, you’ll see a frame of the selection with a green-bordered rectangle imposed on it.
2. Click and drag one of the sides or corners of the rectangle so that it surrounds the area you want to focus on (Figure 6.12).
Figure 6.12 Cropping an iMovie clip.
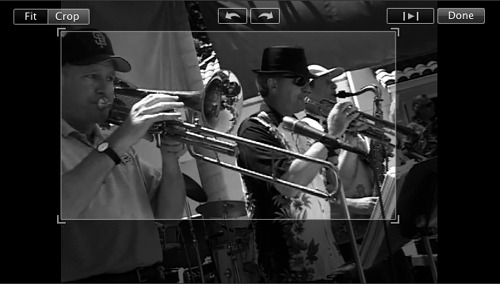
3. Click Done.
The image enlarges to fill the frame, showing everything within the rectangle and nothing outside it.
4. If you decide that you don’t like the crop, repeat Step 1 and then click the Fit button in the top-left corner of the Viewer pane.
iMovie removes the crop and restores the selection to its original appearance.
If you’ve held the Flip camera incorrectly—on its side or upside down—you can rotate the video that it took. Select the video you’d like to rotate; click the Crop, Rotate, and Ken Burns button; and then click either the left or right rotation arrow that appears at the top of the Viewer pane. The selection rotates 90 degrees for every click.
Inspector
The Inspector button leads you to the Inspector window, which lets you adjust a clip’s stabilization (make it less shaky), change its speed, and adjust video and audio settings. This Inspector window contains three tabs: Clip, Video, and Audio. The contents of the Clip tab change depending on whether you’ve made a selection in the Events Browser or Edit Project pane. The Video tab offers the same options regardless of where the selection resides. Finally, the Audio tab differs only slightly depending on the location of the selection. Here are the details:
• Clip (with Events Browser selection). Click the Clip tab, and you’ll see how long the selection is—39.9 seconds, for example. More interesting is the Analyze Entire Clip button that appears after the word Stabilization. iMovie ’09 includes a feature that can help stabilize your clips. This feature is amazingly cool, particularly if you’re using a Flip camcorder, because the Flips don’t have image stabilization of their own.
To make this feature work, just click Analyze Entire Clip. iMovie takes a while to analyze the clip (and by “a while,” I mean a long while, even on a really fast Mac). When it’s finished, you can add that clip to your project—and when you do, the video will be far smoother than it once was.
Note
Don’t expect miracles from image stabilization. If you’ve waved the camera around wildly, stabilization won’t do much for you. Also note that iMovie performs this magic by cropping the outside of the image. If you have important details on the edges of the frame, you’ll lose them.
• Clip (with Edit Project selection). Click the Clip tab when you’ve selected something in the Edit Project pane (Figure 6.13), and you see a Duration entry that tells you how long the selection is. A Source Duration entry indicates the length of the original clip from which the selection is taken. Below it is a Video Effect button. Click this button, and the window flips around to reveal 16 effects that you can apply to the clip simply by clicking them (Figure 6.14). (You can apply just one effect to a clip.)
Figure 6.13 The Inspector’s Clip tab lets you choose video effects, change the speed of the clip, and stabilize the video.

Figure 6.14 iMovie’s video effects.

Next is a Speed button that reads “Convert Entire Clip.” Click this button, and iMovie converts the clip to a form in which you can slow it down or speed it up. After that conversion, a Speed slider appears (refer to Figure 6.13). Drag the slider toward the turtle or the rabbit to adjust the speed of the clip; the range is 12.5 percent to 800 percent. Alternatively, you can enter the amount of time you’d like the clip to run in the Duration text box. If you’d like the clip to run for 10 seconds, for example, enter 10. If the clip was originally 15 seconds, it speeds up; if it was originally 5 seconds, it slows down. You can also make the clip run backward by enabling the Reverse option.
Finally, you can ask iMovie to analyze and stabilize the clip by checking the Smooth Clip Motion box at the bottom of the tab. After iMovie analyzes the clip, you’ll have the option to adjust the clip’s maximum zoom with a slider. Move the slider all the way to the right, and the image is more stable, but more of it is cropped. Move the slider farther to the left, and the motion gets bumpier, but you see more of what was originally in the frame.
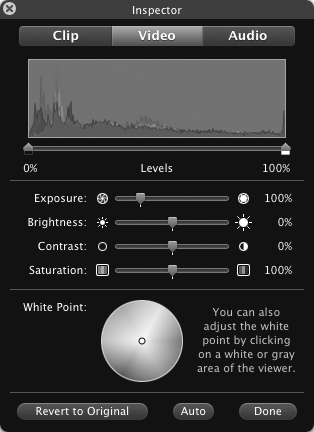
• Video. Click the Video tab (Figure 6.15) to see a histogram view of your selection. (A histogram is a graph that tells you how frequencies are distributed along the visible light spectrum. Peaks to the right indicate lots of white; peaks to the left indicate dark colors.) Within this tab, you can adjust exposure, brightness, contrast, and saturation via sliders that run from 0 percent to 100 percent. You can also click the Auto button, and iMovie will do its best to adjust these elements automatically for you. Alternatively, with this tab open, click a white or gray area of the clip, and iMovie will adjust the white balance. (Essentially, you’re telling iMovie, “This is white. Make the colors around it realistic based on my command, even though that white looks yellow or blue to you.”)
Figure 6.15 The Inspector’s Video tab.
• Audio. Finally, the Audio tab (Figure 6.16) is where you adjust the clip’s overall volume with a slider, enable ducking (a feature that automatically diminishes the audio of other tracks when the audio in this track plays), and fade in and fade out. Your fade choices are Automatic (a clip’s audio automatically starts quiet and gets louder, or vice versa) and Manual (you can determine how long the fade will last, in a range of 0 to 2 seconds).
Figure 6.16 The Inspector’s Audio tab.
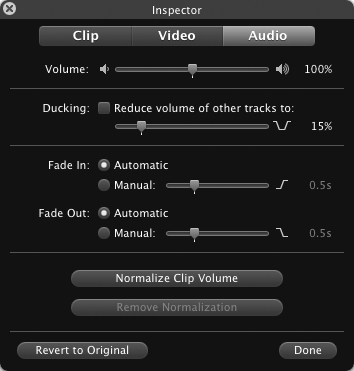
If you’ve made a selection in the Events Browser pane, you’ll see an active Normalize Clip Volume button. Click it, and the clip’s volume increases so that the loudest portion of the clip is raised to the point just below audio distortion. The rest of the clip’s audio is raised in relationship to that loudest bit.
Tip
Some people have a hard time visualizing normalization. Try this: Think of the shape of a mountain range, and imagine the peaks and valleys as loud and soft sounds. When you normalize audio, you don’t turn the valleys into peaks; you simply raise the entire range, in its current shape, so that the highest peak touches the top of the sky.
Turn Audio Skimming On/Off
I mentioned that when you skim through clips with your mouse, you hear audio, yes? Click this button to silence this skimmed audio.
Volume Level
This volume-level meter doesn’t behave like one. What I mean by that is that although it changes as you play a clip, reflecting louder and softer volumes, it can also tell you the volume at the location of the mouse pointer even when you’re not playing the clip. Just drag to any point in a clip, and you’ll see how loud the volume is at that point.
Music and Sound Effects Browser
Click this button, and you see evidence of the Mac’s Media Browser—a browser full of media elements that appears throughout the iLife and iWork applications. Specifically, you’ll see four entries by default: iMovie Sound Effects, iLife Sound Effects, GarageBand, and iTunes (Figure 6.17).
Figure 6.17 The Music and Sound Effects Browser.
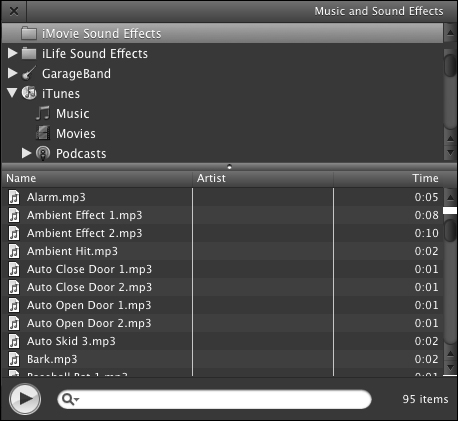
Select iMovie Sound Effects, and iMovie displays a list of 95 sound effects that you can add to your movie. Click iLife Sound Effects, and you get a mix of 418 sound effects and music tracks. (To help you tell one from another, click the triangle next to the iLife Sound Effects entry to view collections of sound filed by folder—Ambient, Jingles, and Textures, for example.) When you select GarageBand (Apple’s music-making application), you see the six canned background-music tracks included with the application as well as any GarageBand projects you’ve created. Finally, when you choose iTunes, you see the contents of your iTunes library.
You can add these tracks to your video as background music or sound effects. To do that, just select an audio track in this browser and, in the Edit Project pane, drag it to the location where you’d like it to play.
Note
You can add multiple audio tracks to a clip. The tracks just stack on top of one another and play simultaneously where they overlap.
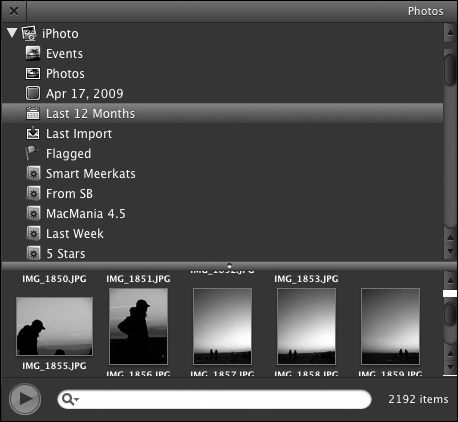
Photos Browser
An iMovie project can contain not only video, but still images as well. (Still images can be useful for placing a slideshow in the middle of a video or creating documentary projects.) To access all the photos in your iPhoto library quickly, just click this button. You’ll see listings for iPhoto’s Events, Photos, and the albums you’ve created (Figure 6.18). Select one of these items, and all the images within that group appear at the bottom of the Photos pane. To add an image, just select it and drag it into the Edit Project pane.
Figure 6.18 The Photos Browser.
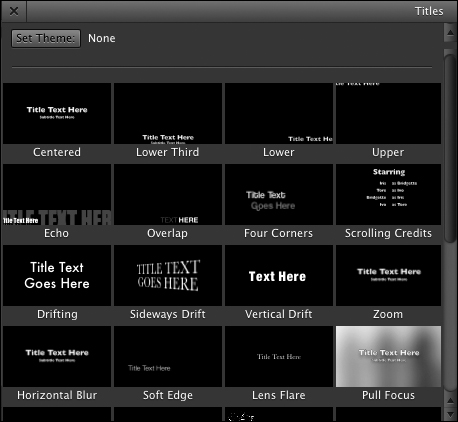
Titles Browser
This window is where you create titles for your movie (Figure 6.19). iMovie ’09 includes 32 title styles. Unlike Windows Movie Maker, which you have to tell what kind of title you’d like to create (one at the beginning of the movie over a background, one over a clip, or credits at the end, for example), iMovie is smart enough to do the right thing depending on where you drag the title.
Figure 6.19 The Titles Browser.
If you drag, say, the Boogie Lights title so that it’s the first thing that appears in your movie, a green bar appears in the Edit Project pane before the first clip to indicate where you’re putting the title. When you let go of the mouse button, a Choose Background window appears, offering 20 background styles. Click the style you’d like to use to select it and close the Choose Background window. In the Viewer pane, you see the words Title Text Here. Just click that text and enter the text you’d really like to use.
If you want a title that appears over a video clip with no background other than what’s playing in the clip, drag the title to where you want it to appear. iMovie will understand that you don’t want a background pattern because you’re dragging the title on top of the clip. The Viewer pane will display the video clip with the title field on top of it. Again, just click the example text and enter the title you want.
Tip
If you’re unsure what a particular title style will look like, place your mouse pointer on top of it in the Titles Browser. The title animation will play in the thumbnail.
After you’ve dragged a title into the Edit Project pane, you can change the font, color, text size, and alignment by clicking the Show Fonts button in the Viewer pane. You can also make title text bold, italic, or outlined.
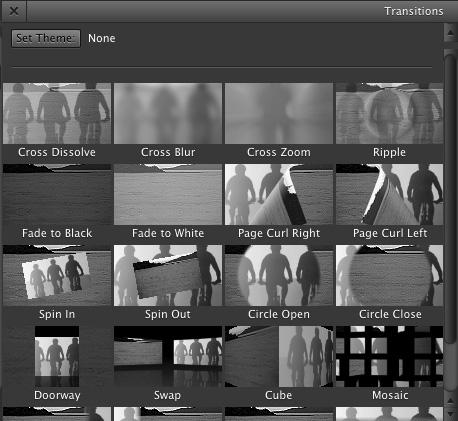
Transitions Browser
iMovie ’09 includes 20 transitions—everything from fades, dissolves, and wipes to page curls, doorways, and ripples (Figure 6.20). To add a transition, drag it from the browser to a place between two clips in the Edit Project pane. By default, transitions last half a second. You can change the duration by selecting the transition in the Edit Project pane; clicking the Inspector button in the toolbar; and, in the resulting Inspector window, entering a new value in the Duration text box.
Figure 6.20 The Transitions Browser.
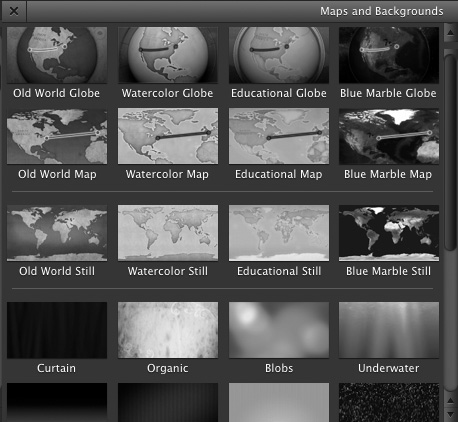
Maps and Backgrounds Browser
Suppose that you took your Flip camcorder on a round-the-world trip (you jet-setter, you), and in the travel movie that you’re making, you want to give your audience a good idea of where you were (other than shouting, “Oh! Oh! That’s Kalgoorlie! Or was it Coober Pedy?”). This browser will come in handy. Here’s what you can do:
1. Click the Maps and Backgrounds Browser button.
You’ll see 12 maps of the world (Figure 6.21).
Figure 6.21 The Maps and Backgrounds Browser.
2. Select a map and drag it into the Edit Project pane.
The map appears in the Viewer pane, and the Inspector window opens.
3. In the Inspector window, specify start and end locations (Kalgoorlie and Kefalonia, for example) by clicking the appropriate buttons and then choosing the location in the Choose Location window that appears.
iMovie creates an animation on the map that draws a line between the start and end locations. You probably won’t use this effect all that often, but it’s nice to have when you’re putting together a video record of your travels.
This browser also includes the same 20 background patterns that you see when you’re working with titles. Should you want to toss a background pattern into your project without a title, this browser is where you’ll find it.
Making a Movie
Now that you have an idea of where things are in iMovie ’09, you’re ready to make a couple of movies. Let iMovie lend a hand with the first one, and cobble the second one together from scratch.
Making a themed movie
Windows Movie Maker includes an AutoMovie feature that takes the clips you select and automatically stitches them together into a movie with titles, transitions, and effects. iMovie ’09 does the same kind of thing through the use of themes. To make a themed movie, just follow these steps:
1. Launch iMovie, create a project, and choose a theme.
In iMovie, choose File > New Project to open the New Project sheet. Then do the following:
• Enter a name for your movie in the Project Name text box.
• Choose an aspect ratio from the Aspect Ratio pop-up menu. Your choices are 16:9 (for an HD movie from your Flip MinoHD or UltraHD) and 4:3 (for a standard-definition movie from your Mino, original Ultra, or UltraSD).
• Select a theme other than None: Photo Album, Bulletin Board, Comic Book, Scrapbook, or Filmstrip (Figure 6.22).

Leave the Automatically Add Transitions and Titles option enabled, and click the Create button.
2. Import some video.
To do this, plug your Flip camcorder into your Mac. If you’ve plugged in a MinoHD or UltraHD, a sheet appears, indicating that iMovie is scanning the camera for clips. In the Import From window that appears, click the Import All button if you want to import everything on the camera, or flip the Automatic/Manual switch to Manual, check just those clips that you want to import, and click the Import Checked button.
If you’ve plugged in a Flip Mino or UltraSD, iPhoto will likely launch. In iPhoto, either click the Import All button to import all the clips on the camera, or select just the clips you want (by Command-clicking them) and clicking the Import Selected button. Quit iMovie and launch it again so that it indexes the movies you imported with iPhoto, thus making the clips available to you.
Tip
You can also import clips from a Flip camera manually. Within iMovie, choose File > Import > Movies. In the sheet that appears, follow this path: FLIPVIDEO/DCIM/100VIDEO. You’ll find the movies inside that 100VIDEO folder. Select the ones you want (again, by Command-clicking), and click the Import button.
3. Place the video in the Edit Project pane.
In the Event Library pane, select the event you imported your video into. In the Events Browser pane on the right, click and drag inside a video clip to select the portion of the video you want to use. A yellow highlight appears around the selection. Then either click that selection and drag it into the Edit Project pane to add it, or simply click the Add Selection to Project button in the toolbar.
4. Edit the title text.
The first clip automatically has a title added to it. Just click the brown title track that appears above the clip; then, in the Viewer pane, click the sample text and enter some text of your own (Figure 6.23). If you’d like to see how your title will look, just click the Play button in the Viewer pane. When you’re happy with your efforts, click the Done button in the Viewer pane.
Figure 6.23 Editing title text.

5. Fling other clips into the Edit Project pane.
Continue selecting and dragging clips into the Edit Project pane. iMovie automatically adds appropriate transitions between clips.
6. Edit the credits.
The last clip will have a title track with a credit style applied to it. As with the opening title, click the title track and edit the text in the Viewer pane. Click Done when you’re . . . well, done.
7. Tweak (if you like).
iMovie has done all the heavy lifting, and your movie is ready to export. (I cover exporting movies later in the chapter.) You’re welcome to make adjustments, if you want. You can select a clip in the Edit Project pane, click the Inspector button, and adjust the clip’s duration and video and audio settings. You can speed it up or slow it down, as well as apply stabilization to it. You’re also welcome to add effects and to replace the transitions that iMovie inserted automatically with your own choices.
Tip
Just because you chose a particular theme at the beginning of your project doesn’t mean that you’re stuck with it. You can change your project’s theme at any time by choosing File > Project Properties. In the sheet that appears, just choose a different theme, and click OK. iMovie will change the title and transitions to match the theme you selected.
Making a movie from scratch
Great as iMovie’s themes are, there are only five of them. When one of these themes doesn’t float your boat, or you’d simply like to create a completely personal project, pick the None theme and piece together the movie on your own, like so:
1. Create a new project.
Launch iMovie, and choose File > New Project. In the resulting New Project sheet, name the project, choose an aspect ratio, click the None theme, and click OK. Optionally, you can enable the Automatically Add option and choose one of 20 transitions from the pop-up menu.
Tip
As I mention in Chapter 5, be tasteful with your transitions. I’ve yet to meet a dissolve or fade transition that offended anyone. For me, those choices are safe ones. Constant spins, wipes, and circle transitions, on the other hand, will drive viewers up the wall (or out the door).
2. Import your video.
I tell you how to do this in the preceding section, “Making a themed movie.”
3. Place video clips in the Edit Project pane.
Yes, I tell you how to do that as well in “Making a themed movie.”
4. Add transitions.
Click the Transitions Browser button in the toolbar, choose a transition you like, and drag it between two adjacent clips.
5. Adjust transitions.
iMovie uses a default transition length of half a second, which is too short for some transitions. I like fades that run a little over a second, for example. If you’d like to adjust a transition, highlight it and click the Inspector button in the toolbar (or simply press the i key on your Mac’s keyboard). In the Inspector window that appears, enter a new value in the Duration text box, and click Done.
6. Add titles.
Click the Titles Browser button in the toolbar, select a title style you like, and drag that title just before the beginning of the first clip in the Edit Project pane. A green line should appear before that first clip, indicating where your title will appear when you let go of the mouse button. (If the clip instead turns blue, it means that the title will be overlaid on that clip.) Repeat for other titles.
7. Edit the title text.
If the title track isn’t highlighted, click it. In the Viewer pane, click inside the title field, and enter the title text. To change the title’s font, style, color, or alignment, click the Show Fonts button in the Viewer pane. Repeat for other titles. You can reposition tracks by dragging them to another place in your project. You can also shorten or lengthen them by dragging the left or right edge.
8. Add some music.
Click the Music and Sound Effects Browser button in the toolbar, select some music you like from your iTunes library, and drag it into position in the Edit Project pane. Wherever your mouse pointer sits when you let go of the mouse button is where the beginning of the audio track will appear. As with title tracks, you can drag audio tracks to other locations in the project.
9. Adjust the project’s volume.
If you have audio in more than one track—the audio you’ve recorded with your Flip camera plus a music track—you should balance the two so that the more important audio is up front. A quick way to do this so that the sound from the Flip’s video track is louder is to select the video clip, click the Inspector button, click the Audio tab in the window that appears, and enable the Ducking option (refer to Figure 6.16 earlier in this chapter). This option tells the music track to be quieter than the audio in the video track.
You can also edit the volume of tracks separately by adjusting the volume slider in the Audio tab for each track.
Exporting Your Movies
You’ve put your movie together, and thrilling though it may be to watch it on your computer within iMovie’s Viewer pane, confining your masterpiece to your computer makes it tough to share with your dearest and nearest. That’s why iMovie’s Share menu exists. It’s the means for exporting your movies and making them available to the world.
Apple tries to make this process as easy as possible by listing destinations in the first portion of this menu: iTunes, iDVD, YouTube, and MobileMe Gallery. If you’d like to have greater control of exactly how your movies are encoded and exported, you have that option too, thanks to the Export Using QuickTime command. I explore these commands in the following sections.
iTunes
At one time, Apple’s iTunes application was only for playing music on your Mac (and, later, on Windows PCs). Later, iTunes adopted the ability to play video. When it did, Apple made sure that you could easily export the movies you make in iMovie to iTunes. This command is the result of that work.
When you choose iTunes, a table in the sheet that appears offers four export sizes: Tiny, Mobile, Medium, and Large (Figure 6.24). The sheet also lists four devices: iPod, iPhone, Apple TV, and Computer. Below these devices are dots, indicating which video size works best (or at all) with a particular device. A Medium movie, for example, is playable on a traditional iPod, Apple TV, and computer but not on an iPhone or iPod touch, because the latter two devices don’t support this resolution.
Figure 6.24 Exporting a movie to iTunes.
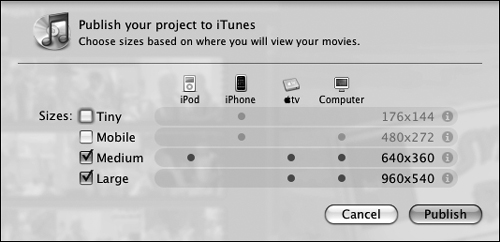
Near the end of each size row are the dimensions (in pixels) of the resulting movie. If you’re exporting a movie with a 4:3 aspect ratio (as you would with a movie shot on a Flip Ultra, UltraSD, or Mino), those numbers will be 176 × 144, 480 × 360, 640 × 480, and 720 × 540. Export a 16:9 movie shot from a Flip MinoHD or UltraHD, and you’ll see dimensions of 176 × 144, 480 × 272, 640 × 360, and 960 × 540.
At the very end of each size row is a small i character. Hover your mouse pointer over that character, and you’ll learn some important details about the resulting movie:
• The encoder used to compress it (H.264 is present for everything except the Tiny option, which uses 3GP, a codec often used to compress video for mobile phones)
• The frame rate (in frames per second)
• The data rate
• The estimated size of the movie after you export it
Looking at this information, you can make more informed decisions before exporting your movie—decisions such as “Do I really want to burn up a gigabyte of storage just for 10 minutes of the family hamster tirelessly running on his wheel?”
To export your movie and add it to iTunes’ movie collection, select the movie sizes you’d like to export. (Yes, you can select multiple sizes, and iMovie will export multiple copies using the different settings.) Then click the Publish button. iMovie will churn away for a while. How long “a while” is depends on the length of the movie and your Mac’s speed. Then, by default, iTunes launches automatically and starts playing the movie after the first version (if you chose multiple sizes) is encoded and created.
After your movies are in iTunes, you can play them within that application and sync them with compatible devices such as an iPod, iPhone, and Apple TV.
iDVD
I cover making DVDs in Chapter 4, so I won’t belabor this option here. All you need to know is that if you choose Share > iDVD, iMovie will prepare your project for iDVD, launch that application, and create a new iDVD project that plants the title of your movie on a new DVD project’s Menu screen (and the movie itself within the project). At this point, you can customize the DVD—change the theme and add other movies, for example—or you can just insert a blank recordable DVD and click the Burn button to record the project on the disc.
Note
Yes, iDVD is smart enough to create a project with the same aspect ratio as the movie you’ve exported. If you have a high-definition movie that you’ve shot with your MinoHD or UltraHD, your iDVD project will have an aspect ratio of 16:9.
Media Browser
Apple’s Media Browser is a repository for media files (movies, pictures, and audio files). It’s available in a variety of Apple applications, including most of the iLife and iWork applications. What this thing does is allow you to easily access and add your media files to projects created in compatible applications. You might open Apple’s presentation application, Keynote; expose the Media Browser; and drag a movie that you created with iMovie into a slide, for example.
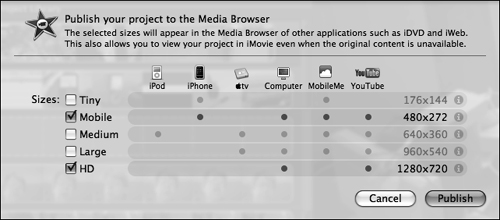
This option in iMovie’s Share menu lets you encode movies and place them in the Media Browser. The basic setup of its settings sheet (Figure 6.25) differs very little from the settings sheet for iTunes (refer to Figure 6.24). When you choose the Media Browser command, you see five sizes: Tiny, Mobile, Medium, Large, and HD (1280 × 720, which is 720p). You also see six destinations: the four from the iTunes sheet, plus MobileMe and YouTube. Again, select the sizes you want and click Publish. When iMovie finishes exporting the movies, they’ll be available within Media Browser.
Figure 6.25 Exporting a movie to Apple’s Media Browser.
Note
Exactly where are these movies stored? When you create an iMovie project, a project file is born within an iMovie Projects folder within the Movies folder inside your user folder (your user name/Movies/iMovieProject/name of iMovie project). If you hold down the Control key, click the project file, and choose Show Package Contents from the resulting menu, a new window opens that contains a variety of items. One of these items is a folder called Movies, in which you’ll find the movies iMovie created when you chose the Media Browser command.
YouTube
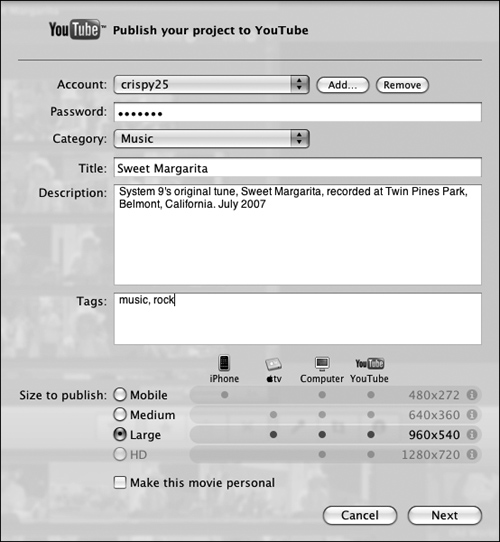
It’s fair to describe YouTube as today’s most popular video sharing service. Because it’s so popular, Apple tries to make it easy for you to create YouTube-compatible videos and upload them to this service. To do so, just follow these steps:
1. Choose Share > YouTube.
2. In the sheet that appears, add your YouTube account name by clicking the sheet’s Add button and then entering your password in the Password text box.
3. From the Category pop-up menu, choose the kind of movie you’re uploading (Science & Technology, Gaming, or Film & Animation, for example).
4. In the appropriate text boxes, enter the movie’s title, description, and tags (bits of information such as ducks, skateboard, or explosion that help YouTube sort your movies and users search for them).
5. At the bottom of the sheet, choose a size: Mobile, Medium, Large, or HD.
The HD option is grayed out if you’re working with a standard-definition movie. In that case, you can choose just a single size. (YouTube doesn’t want multiple versions of your movie, thank you very much.)
Figure 6.26 shows what your settings may look like at this point.
Figure 6.26 Exporting a movie to YouTube.
6. If you want, make your movie personal by checking the Make This Movie Personal check box at the bottom of the screen.
When this option is enabled, only those whom you’ve invited to see your movie can see it.
7. When you’re ready to proceed, click the Next button.
In the succeeding screen, you’ll be warned about not uploading copyrighted material.
8. Thus informed, click the Publish button.
iMovie will encode your movie at the requested setting and upload it to YouTube.
MobileMe Gallery
Apple offers a $99-per-annum Web-based service called MobileMe. With a MobileMe subscription, you get online storage, a customized e-mail address, a place to build a Web site with Apple’s iWeb application, synchronization between your Macs and Apple’s servers, and a location for uploading and displaying pictures and movies. That last item is the MobileMe Gallery, and the MobileMe Gallery command is iMovie’s tool for moving your movies to this location.
Note
This command works only if you have a MobileMe account.
Here’s how to use this command:
1. Choose MobileMe Gallery.
iMovie connects to the Internet and makes sure that the MobileMe account configured for your Mac is in good standing. When it confirms your account, iMovie displays a sheet that looks similar to the one you see after choosing Share > YouTube.
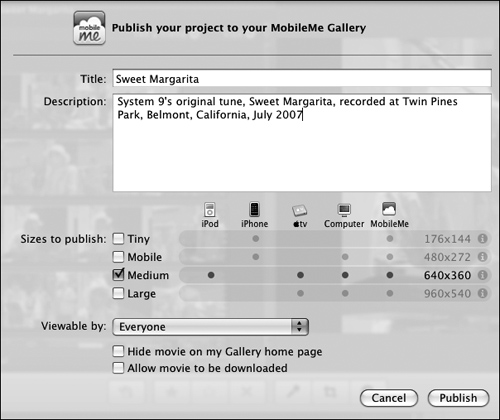
2. In the appropriate text boxes, enter the title of your movie and a description.
3. Choose a size: Tiny, Mobile, Medium, or Large (or multiple sizes).
4. From the Viewable pop-up menu, choose exactly who gets to view your movie: everyone, just you, or people who belong to specific groups that you’ve created.
You create these groups by choosing the Edit Names and Passwords command from the bottom of this menu, clicking the + button in the resulting window, and entering a name and password for the group in the text boxes that appear. Provide the group’s name and password to those people you want to participate in that group, along with a link to the movie. When your invitees arrive at the page via their Web browsers, they’ll be prompted for the group name and password. When they enter both successfully and click OK, they can watch your movie.
5. If you want to let people download your movie, enable the Allow Movie to Be Downloaded option.
Your settings may look something like Figure 6.27 at this point.
Figure 6.27 Exporting a movie to a MobileMe Gallery.
iMovie encodes your movie and uploads it to your MobileMe Gallery.
When the process is complete, a sheet appears, telling you that the movie has been published and is available at such and such a Web address—http://gallery.me.com/example/111111, for example. Within that sheet are Tell a Friend, View, and OK buttons.
Click Tell a Friend, and your Mac’s default e-mail client opens with an unaddressed message. The message body invites the recipient to check out this movie in your gallery and provides a link to that movie. Just address the message to your pals and send it along, and movie goodness is theirs.
If you choose Visit instead, your Web browser (Safari, by default) opens and whisks you to the Web page where you’ve stored your movie. If you’ve made the movie accessible only to a group, you’ll have to enter that group’s name and password to view the movie.
Export Movie
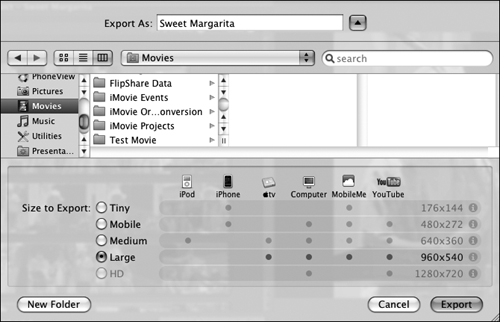
Maybe you don’t know what you want to do with your movie but would like to have a copy outside iMovie. No problem—that’s what the Export Movie command is for. Choose this command, and there’s the sheet again (Figure 6.28, on the next page). This time, enter a title in the Export As text box, and navigate to the location on your hard drive where you’d like to store the movie. Choose the size of the exported file—Tiny, Mobile, Medium, Large, or HD (you can choose only one size)—and click the Export button. iMovie encodes the movie at the setting and to the location you’ve chosen.
Figure 6.28 The results of iMovie ’09’s Export Movie command.
Export Using QuickTime
Up to this point, iMovie has taken a lot of the toil out of encoding and exporting your movies. It chooses the encoder (usually, H.264), frame rate, and bit rate. If you want complete control of how your movie is exported—if you want to choose and configure the encoder, for example—this option is the way to do that.
Personally, I love this option and use it quite often. I’ve spent a lot of time mucking with encoders and QuickTime, though, so I have a notion of how to squirrel around with these settings and produce a video worth watching. You may not.
You’re welcome to invoke this command and choose a setting from the Export pop-up menu in the resulting Save Exported File As window (Figure 6.29). Some of these settings—Movie to Apple TV, Movie to iPhone, and Movie to iPod—are not configurable and provide the same encoding settings you get in the Export Movie sheet, so don’t bother.
Figure 6.29 Choose Export Using QuickTime, and you have a lot of encoding options.

If you want to really dive in, try choosing something like Movie to QuickTime Movie from the Export pop-up menu, clicking the Options button in this window, and then clicking the Settings button in the Movie Settings window that appears. In the window that finally materializes, you’ll find a list of encoders in the Compression Type pop-up menu. Choose an encoder, and then you can play with frame rates, data rates, and quality settings.
Regrettably, given the size and mission of this small guide, I can’t provide greater detail. If you’d like to learn more, have a gander at Peachpit’s Apple Pro Training Series: QuickTime Pro Quick-Reference Guide.
Tip
iMovie ’09 is a rich enough application that I could easily write a book about it. Fortunately, Jeff Carlson saved me the trouble. His iMovie ’09 and iDVD for Mac OS X: Visual QuickStart Guide (also from Peachpit Press) is an outstanding guide to iMovie ’09. In it, you’ll learn more about the features I discuss in this chapter and discover iMovie ’09’s many advanced features.