Once you’ve built your new web site, you’ll want to put it somewhere people can see it and use it. However, waiting until the build is complete to do this is often too late—the way a web site is deployed can add additional constraints on how you build it. For example, if you’re building an app for horizontal scale, then you can’t store sessions in memory. If you’re handling files that are being uploaded from users, then the size of your hard drive can make a huge difference.
At the heart of the DevOps movement is the idea that developers no longer “throw something over the wall” to operations staff. In most organizations, this straw man was never fully accurate—there was always some sort of relationship between dev and ops, but DevOps is about bringing the two disciplines together to help ops teams provision better environments for the software to run in, and for developers to help understand the constraints of the environment they’re deploying to.
Another important concept to keep in mind is continuous delivery. Continuous delivery demands that teams release builds into production frequently and early in order to minimize waste and “shelf time,” and expands on the idea of continuous integration, which was discussed in an earlier chapter. Indeed, mature teams will release their earliest “hello world” first commits into production to prove their build and deployment pipelines work before moving on to product development. These teams can often stand up brand new environments from scratch within minutes to minimize any overheads and prove their automation systems.
Twelve Factor Apps
Heroku, an early “platform-as-a-service ” (PaaS) provider, codified a set of principles to simplify the process of running an application on a common platform. These “12 factors” are constraints placed on an app to give a consistent feel to the deployment and operation of an app, and to avoid common issues that can make running an app in production hard. The 12 factors have been criticized as being very Heroku-centric, but regardless of your deployment platform, they are relatively common, and you should consider each factor to see if it is appropriate for your application.
One Codebase Tracked in Version Control, with Many Deploys
When adhering to this factor, each service you deploy will have its own version control repository, which is where the code is deployed from. Regardless of which environment you deploy to, the code should come from the same place (and also the same branch). If your app requires multiple codebases to be copied to a server, then you should instead consider treating each codebase as a separate service or deal with them together, and if your app has different branches in different environments, it will be similar to having different repos. On the other hand, if you deploy the same repo several times for several services, then you should consider breaking out common functionality into shared libraries that you push into a dependency system, designating exactly one repository per service.
There is a popular technique that breaks this rule, called the “mono-repo.” In a mono-repo, all services and libraries in an organization come from the same repository. This is often used to avoid having many versions of a shared library at once, as changing some shared code will cause all other parts of the application to pick up those changes, allowing for large adjustments across multiple codebases at once to be configured. There are other advantages to a monorepo, including simplifying repository configuration management, and this highlights that the 12 factors are not always gospel, but rather practices to consider carefully.
Explicitly Declare and Isolate Dependencies
A service should be explicit about the dependencies it has and isolate those from any system dependencies. Languages such as JavaScript using tools like NPM are good at this, as they will install all dependencies locally into a folder called node_modules by default, which is separate from any system dependencies. For a dependency to get there, it must be specified in a package.json file.
Being explicit reduces the number of manual steps required to deploy your application, minimizing the risk of missteps, as most automated tools will ensure that your dependencies are installed alongside an app. Isolation means that you can have greater control over explicit versions than a system-level library can give you, thus avoiding any issues if a system-level library is also used by another tool and different versions are needed. Isolation gives another advantage when it comes to deployment, in that your app and its dependencies can be moved around as one unit (for example, as a single .tar.gz archive), making it easier to deploy.
Many languages have their own dependency systems that can provide both, such as Ruby’s Bundler, Python’s virtualenv, and other languages provide it commonly by default, such as a “fat JAR” in Java, which includes all the dependencies.
Sometimes it is useful to partially break this rule. For example, some programs, such as ImageMagick or curl, can be very complicated to package as a dependency, and it might make sense to instead use a system-installed version of it. If you do want to depend on a system-level dependency like this, you should still be explicit in specifying it. A common deployment pattern is to package your application alongside its isolated dependencies using a system packaging tool, which allows you to specify system-level dependencies in this way (this is discussed further later).
Store Configuration in the Environment
In following this factor, your application should read any necessary configuration values from environment variables, and not from a file on disk. The config for your app is anything that might feasibly change between deploys, or that you might want to change on short notice without having to change the code. Configuration of how you might use any frameworks or libraries in your app (for example, setting up routes in Express) is not the same as your application’s config, and it’s okay to hardcode that. The types of things you might want to have in your config include usernames, passwords, and hostnames of database servers, any other “secret,” or any per-environment variables, such as the address of the site (a developer environment will probably run at a different URL to your live site).
This rule is probably one of the most commonly broken. Although environment variables are a very common way to set config, often ops tools are set up instead to deal with config files, so your app can load config from a file in a well-known location. It is relatively easy to change, though. SystemD is becoming a common tool for running services at the system level, and is the default method of running service programs on many Linux distributions. It is relatively straightforward to set SystemD to load environment variables for a service from a config file, and other tools such as dotenv can be used to simulate this in other languages directly.
Another common way this rule is broken is by storing the config as settings files within your repo, and then having a single environment variable or switch that defines which environment you’re running in, and therefore which config file should be loaded. Although config values that indicate whether or not you’re running in a development mode are okay, this kind of high-level file is not, as it can make it very challenging to change the config on the fly without either editing the setting on the deployed instance or having to re-deploy the entire codebase. Not having your config checked into version control can also improve security, by not leaking any database passwords or API keys to anyone who has access to your codebase. The downside of this is that you now need an external config management system to manage this config, and ideally to have that version controlled to be able to roll back any config changes that might break things, as well as enabling auditing of any changes. Some teams do this by having a “config” repository that is more locked down than the main application repository, but this coordination of multiple repositories falls foul of the first factor.
Treat Backing Services as Attached Resources
A backing service is anything that your app communicates with over the network, such as a database or another API. Treating them as attached resources means you should assume that they’re some other service that’s distinct from your application and minimize any assumptions about where that service runs. Perhaps it’s a database running on the same VM in a dev environment, but in production it runs in a third party–hosted environment. Maybe during testing it gets replaced with a broken variant to simulate failures. The important thing is that your app shouldn’t care, and it should perform all communications over the network using the value determined in your config. Similarly, if you need to talk to two different APIs, each API should be configurable independently. Even if they are installed and running on the same hostname, they may be separated in future configurations.
Build, Release, Run
- 1.
Build. Convert your source code into something that can actually run. This could involve installing any dependencies, or converting any front-end SASS into the final CSS.
- 2.
Release. This phase gives us a distinct version number and ID for the build. It is common for configuration to be added here as well, so changing the configuration involves re-releasing the build (but not rebuilding it).
- 3.
Run. Put a release (build + config) in an environment (perhaps on physical servers, on cloud virtual machines, or in a container) so that it actually starts and does whatever it needs to do.
Completing these as three separate stages will simplify how you can reason about your running software. Ideally, each build corresponds to a tag in version control (or at least a commit ID), so you know exactly which version of your source is running at any one time, whereas if the lines get blurred and you have changed code directly in production (in the run phase), it’s then harder to see exactly what’s going on. It also makes releases and rollbacks easier, because to make a change you just need to place a new release into an environment, and to roll the release back, you take the previous release bundle.
Blurring the stages causes other problems. For example, if you install dependencies in your run stage, and then a third-party server containing your dependency is down or a dependency has changed, and you need to restart your service on a new server because the old one has crashed, you won’t be able to. Similarly, some frameworks allow you to build your source files on the fly, such as translating SCSS to CSS. This can create additional overheads, slowing down your application, and is more appropriate for a development environment. Prebuilding all of your assets up front allows for fast startup or restart times.
The only situation where you want to blur these lines is when running a dev environment locally, when you want to be able to make changes extremely quickly. Rebuilding your app, potentially only parts of it, while it is running in a dev environment allows you to quickly respond to changes. There is no reason to create a new release under these circumstances, as doing so adds no value and you would end up with a lot of releases very quickly. The lowest level at which a release should be created is in version control.
Execute the App as One (or More) Stateless Processes
This factor has several implications. First, your app should be started by invoking an executable that continues running (perhaps creating related worker processes when appropriate). Also, the app should not store any state locally, but always in an attached backing store. This might mean that any session data is stored in a database or caching layer like Memcached, or that any files go into a shared store like S3 rather than locally on disk. Having a file locally in memory or on disk while it is being processed is okay, but subsequent requests or other workers should not assume it is in memory.
This breaks down when it comes to PHP apps, and others that come from an old style of working known as CGI. In this style of working, your app consists of a series of scripts on disk that are executed in response to a request from a user, and then terminate. Other mechanisms such as mod_php or FastCGI speed this up by applying efficiencies, but it is essentially the same underlying principle. There’s nothing fundamentally wrong with breaking this factor in this case as long as you take into account the different deployment style of these apps, but you should ensure that your scripts are stateless. This is actually easier in some ways, as you cannot persist things in memory with this approach, but you should ensure that any technique you do use (such as sessions or storing files) uses an attached backing store, rather than, for example, writing to disk.
Of course, if your app is itself a database, this rule cannot be followed.
This rule is the single most important one in terms of allowing you to scale. If you don’t have anything stored in memory or locally, it will be easy to move your app to another server, or run it on many different servers behind a load balancer to provide a greater capacity. It also means you can restart your app, either during a deploy or to change a config value, in a way that minimizes impact on your users.
Export Services by Port Binding
This means that communication into your app should be over the network, and not locally with files or other mechanisms (such as UNIX sockets). This applies not only to your service, but to any services it depends on. Doing this allows you to split your application between multiple machines. Even if your initial deployment is doing something simple, like connecting to a database on the same machine, if you do so over a port you can move that database to a different machine as your app requires it.
This is another place where PHP and other CGI apps fall down. Instead of exposing their interfaces over a network, they expose themselves as files and let another tool (such as Apache) expose those over the network. The reason to use ports is to simplify your deployment to your app, rather than your app plus an additional server needed to run it. This also applies to Java “WAR” apps that run in an application server such as Tomcat, as opposed to standalone JARs that start their own network server.
Scale Out via the Process Model
This is similar to the stateless model approach. By having your app run as an individual executable process, you can scale by starting many processes (perhaps on other CPU cores in the same machine, or on other machines). By breaking down your wider application to a process type per service type (perhaps a queue worker separate from your web front end), each type of workload within your application can also be scaled independently.
Maximize Robustness with Fast Startup and Graceful Shutdown
Traditionally, the startup and shutdown types of an app were not considered important places to optimize, as these events occurred rarely. A twelve-factor app might be expected to do this more frequently, either as a result of scaling up or down, or to respond to issues such as another VM failing and needing to spin up a new one to replace it. It also enables you to deploy more frequently, in addition to benefitting your dev workflow.
By spending time on optimizing your startup time (so it takes no longer than a few seconds), you can make an individual process “disposable,” meaning it needs less care. If it starts misbehaving, it can simply by killed and replaced with a fresh instance.
Graceful shutdown means that when a process is asked to stop, then it should take a moment to finish any requests in progress (but not start any new ones) and close any database connections so it leaves no trace of itself, but also that when a deployment or config change happens, it minimizes the chance of any users noticing if they happened to be connected at that point of time. If your app takes a long time to process a request (perhaps it’s using web sockets or is a queue worker), then it should tell the client to either reconnect or place the request back on the queue for another process to pick it up.
Keep Development, Staging, and Production as Close as Possible
Minimizing the gap between all environments enables you to pre-empt environment-specific issues and increase your confidence in a deploy (and therefore do them more frequently with less of an overhead).
This might mean a large number of relatively small changes—for example, using the same database in all environments; some frameworks use a SQLite one in dev, but a hosted one for other environments. This can speed up initial setup, but can lead to subtle bugs due to different database implementations that waste more time in the long run. Instead, investing in automation to set up a dev environment that represents production (using VMs or containers) can minimize these issues. This is discussed in much more detail in the following section.
The original definition of the 12-factor app included three areas where it is important to keep environments as close as possible: time, personnel, and tools. Minimizing the time gap means reducing the time it takes between making a change and seeing it in production. For example, if you have a show-stopping bug that crops up in production, if the time since your last deploy is short, then the state of the dev environment should not have changed too much, and you should be able to reproduce and effectively fix that bug. This concept by itself is now known as “continuous delivery.” Minimizing the difference in personnel—between the people developing your app and the people running it—means that any knowledge these individuals have about those two activities is shared as much as possible. This has grown into the DevOps movement. The final gap to minimize is that of tooling. Using different tools, or even different versions or configurations of the same tools, in different environments lowers the confidence that something that has worked in a previous environment will work in the next, as it has not had a chance to prove itself. Of course, some differences are allowed—for example, a staging environment might run on slower instances for cost-saving purposes—but that difference should be flagged and controlled.
Treat Logs as Event Streams
Logs should be thought of as a time-oriented set of events that occur in your application. Logs are typically written to a log file on disk, but sometimes an external tool might want to aggregate logs from multiple servers, or collect them together centrally. Applications that try to take too much control over the logs can make this more difficult, so instead you should simply treat all log events as one thing, and write them to a single place. Quite often this place is just stdout, which can help in development as they show in the console, but also gives the power to tools like SystemD to log them centrally, or in other interesting ways.
It can be useful to output logs in a structured format, such as JSON, but logs should be readable by humans (for example, on a developer’s machine) as well as parsed by these external tools, so use caution. Logs should be timestamped and give enough information by themselves to be of use in diagnosing an issue or giving information on an error.
Run Admin and Management Tasks as One-Off Processes
It is important to get the code right for any admin or management tasks, even if it only runs once. As such, the code to run these tasks should be committed to your repository and stored alongside the code for the rest of your apps. This gives you confidence that when you need to run that task, you are running the right version of the task script in the right environment, since you are starting that process in the “run” phase of the app above. Other approaches (for example, having scripts that you run directly in a shell, or connecting to a database from a developer machine rather than the same environment as the code that is running) are open to error for the same reasons you’ve mitigated those issues in the other factors.
Developer Machines
For teams that aren’t quite there yet, and want to be, setting up dev environments is often the first step toward a DevOps world. It used to be common for developers to install dev environments on their actual machines, using tools like MAMP, but this can cause problems. If a developer has to run their code on Windows or OSX, then the code often has to be cross-platform, or running from different install paths, or have unidentified dependencies that happen to be installed on that machine.
Fortunately, the rise of virtualization has changed this. Developers can now install a virtual machine with the same OS as their code, which eliminates a whole class of issues immediately. VM management tools like Vagrant have taken that a step further, allowing for automated and repeatable configuration between development environments, which means that each developer can now set up exactly the same environment too, which can massively improve efficiency. I’ve worked on teams where getting a working environment was considered a “rite of passage,” and getting an instance of the product running in less than a day was considered a grand achievement! This is, frankly, unacceptable.
Vagrant is a fairly simple concept at its core—it creates virtual machines on your local machine from base images (e.g., a fresh, unconfigured Ubuntu or CentOS install, though for larger enterprises, this can be some other standard image), and then runs a script (or series of scripts) to provision it. It should be possible to configure a “Vagrantfile” that allows any new developer on your team to simply run vagrant up and have a fully running dev environment by the time the command has completed.
Beyond virtual machines is the concept of containerization, with Docker being a popular container management tool. Containers reduce the overheads of virtual machines by sharing some system resources such as the kernel, but otherwise are a similar principle to Vagrant, where a set of scripts is used to build it. Containers can get very complicated quite quickly if you have many moving parts, such as a database server. In a virtual machine, it is common to simply install these dependencies on the same virtual machine that is running your dev server, but with containers, a container per task is common, so a database container must also be running and then “orchestrated” so that your app container can access it. Container orchestration can be helpful in managing complex production environments, but this is beyond the scope of this book.
Production Environments
One question I hear from teams who are new to Vagrant is, “Can I now do run vagrant up into production?” but this is a misunderstanding of the role of Vagrant. Vagrant is very good at automating the process of local VM creation and running the scripts to provision that virtual machine, but lacks any fine-grained control of how that virtual machine is provisioned, deployed, or otherwise managed.
In an ideal world, it would be possible to use the same deployment scripts that you use to provision your local virtual machine as it is when it’s deployed into a production environment, but there are often subtle differences between these environments that mean the exact same scripts aren’t always suitable.
For example, in your local virtual machine, you may use shared folders to make the code available between your desktop and your virtual machine, enable features like hot-reloading, and run in a debug mode. For a deployed instance, you will probably not want to do any of these things, and your environment will probably be deploying your code either from a built package or a Git tag. However, there will probably be parts of your deployment process that you can reuse, and indeed you should! Appropriately used, containers can make this simpler, as you can run the exact same build of a container locally and in production.
Furthermore, you will often want more control over your infrastructure than Vagrant or containers alone can give you—for example, when setting up firewalls or SSH keys, and, for more complex deployments, things like auto-scaling groups, load balancers, and backups. However, the same rules still apply—you can use APIs to automate creating and provisioning these environments, and make them repeatable.
Most teams have multiple environments—their local developer environment (running on their machine); often several pre-production environments such as QA, UAT, or staging; and their production (user-facing) environment. In terms of how your app is deployed, once your code has left a developer’s machine, these should all be considered to be production environments. No environment should be seen as a special case, so you can avoid any issues that only appear in production; you have a high degree of confidence that it works. It also proves that your automation works. Of course, there will be some differences (different URLs, different machine sizes, or different firewall rules), and expressing these differences can be achieved by configuration values.
Similar to the way you can configure your application in various environments to behave differently, you can configure your infrastructure to do the same. Most infrastructure tools support the concept of “parameters” for your definitions. When using these parameters in your definition for things like “instance type” or “number of machines,” then you simply need to run the same code with a different configuration file—exactly the same as your app. As these templates and parameters are defined in code using automation tools, they can be versioned and managed exactly like any other code. It’s often worth actually versioning this code in the same repository and alongside your application code, which eases the deployment and roll back of infrastructure changes and code together, rather than having to figure out any dependencies between your infrastructure and your application logic and deploy them individually.
Moving Code into Production
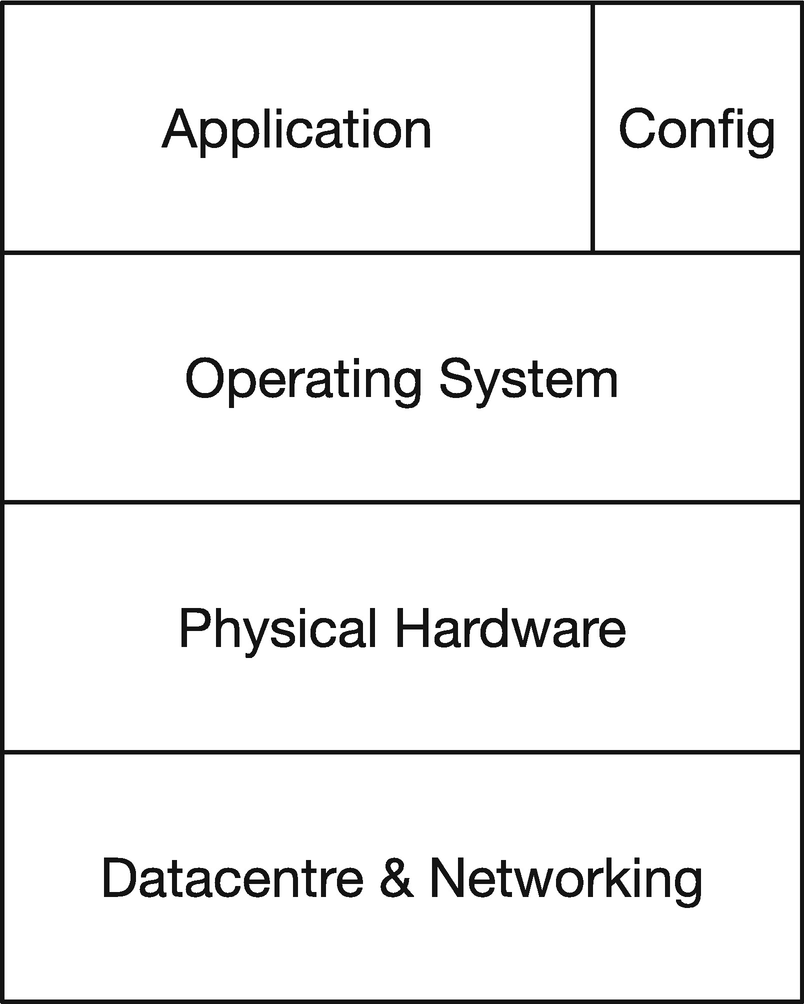
The layers of abstraction in a deployed web app
Let’s assume for a moment that you are working at a traditional IT organization, and your ops team is responsible for providing a configured server or VM on which you will deploy your app. The simplest way to do this might be to SSH in, use Git to check out your software onto the box, change a config file, etc. You may need to run gulp or npm install too, in order to get all of your dependencies on the box or build your assets. As you move to DevOps, it can be easy to automate this with a shell script or a job in your deployment pipeline to SSH in and run this, but this could present challenges. What happens if the versions of Node installed are subtly different, or some other minor configuration difference means that the static assets that get built are slightly different than the ones on the other environments? What happens if Composer, or Ruby Gems, or NPM is down when you try to install? This could delay a crucial bug fix being deployed.
One of the factors of the 12-factor application discussed above is that the build, deploy, and run phases of your application should be distinct. By applying this principle, you can simplify complex deployment processes by taking the build to another phase. As a developer, you should be deploying a package, rather than checking your app out from source control. For Java developers, deploying a JAR seems natural, but for other languages this is not necessarily the case.
It can be very powerful to bundle and deploy your application using the same type of packages as your OS: Debs on Ubuntu/Debian or RPMs on Red Hat/CentOS, etc. If you take this approach, you can manage your application just like any other package that gets installed. This can seem daunting to beginners, though; many OS package builders have developed over time to be very powerful, but complex, tools. Tools like fpm, which can be used to quickly build packages of certain types, are useful, but it is also worth coming to grips with how to build packages using native tools as well.
It can be just as valid to simply package your app in to .tar.gz files that are downloaded and unpacked onto the box you wish to deploy your apps to, but one advantage of using an RPM or deb is that you can specify dependencies and run post-install scripts. For example, you could include a systemd unit file in your RPM and then run systemctl enable my-application, which will cause your service to auto-start on boot and be managed by OS as part of the normal boot process. A common alternative is to use a tool like forever that manages long-running processes, but this tool does need to be linked to your boot process somehow, and keeping it simple by using the same tools the OS uses makes sense.
Specifying dependencies is very important too, and a 12-factor app should do this explicitly. RPMs and debs allow you to specify any dependencies as part of the package, and when installing the package, the installer will automatically bring in anything else it needs. It is important to separate these kinds of OS-level dependencies from any application-level dependencies. For example, in a Java application, the .jar will include any dependencies, and for languages like PHP, NodeJS, or Ruby, you can install the required dependencies in a folder alongside the code (e.g., a vendor folder for PHP with Composer, or node_modules for Node.JS), which you can bundle up as part of your package, and use the native tools for your language to manage those, rather than try and deal with them as OS-level dependencies. OS-level dependencies include things like the language runtimes themselves, so depending on nodejs (sometimes a specific version of it) in your RPM is good, in addition to any other libraries (like ImageMagick or libxml) that are normally installed using an OS-level package manager. You could also, in your package, include config files for Nginx or Apache, and then depend on them too, if you’re using those as a reverse proxy.
If executed correctly, all you should need to install your application onto a box is use your package manager to install it onto a fresh image. This is very straightforward, and very easy to automate. As you’re just installing code, rather than doing any building as part of the install process, it is likely that installing that RPM onto a different box (in a different environment) will work. These packages are usually built by a CI server upon successful passing of all tests, and then published into a package repository, ready for deployment.
If you are using containers, then the same principles apply. The main difference is in the tools you would use, and often instead of producing a package for your application, you instead create the container directly, and then treat that as your package.
Configuring Your Box
Although you can simplify deployment by building your application in a way that it can be easily installed, that isn’t the only thing you need to worry about. Installing a package means our code is installed, but doesn’t mean it is configured. There are also often other components that may need to be set up and configured, such as database servers.
It is common for there to be differences in configuration between environments, but these differences should be minimized. For example, enabling a higher level of logging on a test environment might be okay, but installing different versions of a database on your production environment to your QA environment is not. By standardizing environments and your approach to configuring them, you minimize any risk that could be caused by your production environment being different than your pre-release environments.
Fortunately, there are many tools here that can help. The simplest tool might be a shell script, which you run on an unconfigured box to set everything up the way you want, but there are much more powerful tools that can also be useful. Tools like Puppet, Chef, and Ansible work by defining what the state of a system should be, and then the tools run on that system to ensure that system is brought into that state. Rather than a set of instructions, you describe what you want the configuration of the system to be, and the tools then figure out the difference between the current state and the new one, and make changes to bring it up to date.
Often the first thing to configure will be the application itself. The principles of the 12-factor app encourage configuring your application by environment variables. Others prefer to provide a config.ini or JSON file containing the configuration settings. It is often the job of your automation tool to create these files, as the exact contents may depend on the machine and environment it is being deployed to. Regardless of how you choose to get the configuration into your app, you should inject the config values into your application, rather than hard-code them in. It is common to ship config files as part of your app, or to introduce code that performs based on the environment you are in, but it is preferable to instead keep the configuration separate from your app.
You may need some to configure some general tools that work alongside your application, but that relate to your infrastructure rather than specifically to your application. These may include things like log management (sending logs to a central aggregator) or a metrics collector for monitoring (see the In Production chapter for more details), and this type of configuration tool should also provision them.
Lower-level OS configuration matters here too. This includes things like firewall rules or configuring users who are allowed to SSH into a machine, and the common automation tools should make it easy for you to set these up too.
All of these things can and should be automated, and once you have automated them, you will have a high degree of confidence in your deploys, including the ability to spin up new environments for testing, as well as simplifying your deployment process, because you can just re-run the scripts for each environment to make a deployment.
SSH Bastions
An aside on SSH: it is generally considered good practice to hide individual machines from the open Internet. This can be done for the web by placing web servers behind a firewall or in a firewalled subnet that only allows connections from a load balancer or gateway on ports 80 and 443, but that means you can’t SSH into a box directly. There is a school of thought that says you should never SSH into a box, and your monitoring should be good enough to allow you to remotely diagnose issues, but for many, being able to SSH in remains a powerful diagnostic tool.
To get around these restrictions, you can use an SSH bastion (or jumpbox/jumphost). An SSH bastion is a specially secured machine that is only used for accepting incoming SSH connections. This machine should also be trusted in the firewall for SSH, so developers can first SSH into this machine, and then use it to SSH into an individual server as needed.
Infrastructure
In organizations that have not fully embraced the DevOps movement, infrastructure is traditionally configured by sysadmins, and then made available to developers to deploy their code. The “production” environment is often locked down further where the sysadmins also deploy the code.
As explained above, we can set up an individual server (or perhaps a fleet of servers) using automation tools, but with the advent of cloud computing, we can also automate the infrastructure that runs these servers. Historically, this may have involved installing physical servers and making physical network changes, but with virtualization and cloud technologies, all of these tasks are now hidden behind an API.
Infrastructure in this case can consist of computing resources in the form of virtual machines and network infrastructure (such as firewall rules), but also covers a number of components that may have previously been called “appliances” when deployed in one’s own data center. An appliance is typically a box you install and configure, as opposed to having to install software on existing machines. Most cloud providers will offer some common functionality, such as databases and load balancers, as appliances, sometimes providing a hosted version of software to avoid managing it yourself.
In the context of the cloud, infrastructure refers to the additional components that allow your application code to serve your users. At one end of the spectrum, this might be virtual machines (or even bare metal servers) where the hardware and host are managed by the cloud provider, but at the other end of the spectrum, so-called serverless options, where your code is executed as a function call rather than a long-running process, still require configuration of your serverless host. Although this may be enough to run an application, you will often want to deploy more components outside of your application, or set up firewalls and other security rules that sit around your compute ability and correspond to these appliances.
One of the more common pieces of infrastructure is a load balancer. By placing a load balancer in front of your application, you can either have multiple instances of your application running to spread the load and provide resilience, or to minimize downtime by spinning up a new version of your application in parallel to an existing instance and then just having the load balancer switch over which version it’s sending traffic to. Other bits of infrastructure, like nameservers for DNS hosting, are commonly needed too.
There are many other components of infrastructure that can be deployed. Services like AWS and GCP also allow you to provide API keys for their services as infrastructure, with appropriate permissions set on them, as well as configuration for their own monitoring tools to support your applications. These providers may also offer other APIs for features like single sign-on or machine learning tools, in addition to more generic utilities like load balancers. The most common types of these include forms of storage, such as object storage (for storing files) and databases, from relational databases to NoSQL or key-value stores. Other useful tools that are available as infrastructure components include message queues and caches, although you sometimes might choose to deploy these yourself on top of the compute layer rather than use a vendor-specific tool to avoid lock-in, or if the tool doesn’t quite meet your use case.
The final piece of infrastructure to consider is that of a content delivery network (CDN). CDNs are essentially a, HTTP caching layer that caches data closer to your users to minimize response time. A CDN is just a distribution mechanism. They do not by themselves allow you to actually serve any content. To use a CDN, you must configure an “origin” for it, which is where the content that the CDN serves comes from. The origin could be a simple object store for serving static files, or it could be the application itself. In either case, then cache headers in the HTTP response are used by the CDN to cache it, meaning future visits will not need to go all the way to the origin, but are instead served from the “edge” of the CDN where it is cached.
Those who practice DevOps are typically responsible for provisioning their own infrastructure, and there are two main approaches to doing this. The first has been called “platform-as-a-service” and the second “infrastructure-as-a-service.”
Although these terms are often associated with third-party companies like Heroku and Amazon Web Services, there is a concept known as “private cloud,” which at first might seem like an oxymoron, but can allow organizations to continue managing their own servers and physical infrastructure. A private cloud often simply provides APIs and tools on in-house infrastructure that offers similar functionality to what is available from third-party suppliers, but the main constraint is that these in-house tools sometimes seem immature in comparison, and lack some of the flexibility that external providers can bring.
PaaS is more like the traditional organizational model of having sysops run the servers and the developers perform deployments to them, although additional infrastructure components such as CDNs may or may not be a default part of this platform. An early pioneer here was Heroku. Infrastructure-as-a-service gives you the same control a traditional sysadmin or network engineer may have, except you don’t actually have to go to a data center to rack servers or maintain the physical infrastructure. You simply define what resources you want, and a configuration around them, and they are made available to you.
PaaS is often simpler than infrastructure-as-a-service, but in exchange for that simplicity comes a lack of flexibility, so some constraints exist, such as a lack of persistence or being limited to one OS. In PaaS, you still have to do some definition of your infrastructure, but this is generally at a very abstract level—perhaps simply a number and type of servers. Infrastructure-as-a-service (IaaS) offers a high level of control, at the cost of exposing the underlying complexity to you, which can be daunting for newcomers. It is common for organizations that use IaaS providers to provide tooling and a set of defaults around the service based on that organization’s preferences to make it feel more like a platform, rather than just raw resources. This “opinionated defaults” approach allows teams who need it to reach into the complexity and alter things, but for teams who are following the common practices of that organization, it can speed up the process and lower the barrier to entry by simplifying the setup. This latter approach can be very powerful and provide the best of both worlds.
In both cases, APIs and tools are available to manage how that deployment is set up, but manual alternatives are available too. For an effective DevOps team, automation must be in use, so using those tools and APIs to manage deployments is important. For example, Amazon Web Services provides CloudFormation, where a JSON template is used to list each Amazon resource you want, and any inter-dependencies/references between them (for example, you could define a database and a web server, and then set up a firewall rule to allow each other to access one just by referring to the other resource, rather than needing to know their IP address, and other information, which may only be available after the resource has been created, and may change between environments). Many other providers do not offer this kind of templating language, but rather APIs that allow you to manipulate resources directly. Fortunately, a tool called Terraform provides a CloudFormation-like experience, where you define the state you wish to have, but then wraps around the APIs of other providers to provision the needed resources, and maintains the infrastructure state itself.
At times, you will need to specify different aspects of your infrastructure, and most tools support some idea of parameterization, where you can specify some values of your infrastructure definition as a type of configuration. For example, you might decide to use cheaper/less powerful machines on a testing environment than in production, but want all other infrastructure to be defined in the same way. In such a scenario, you would use the same template for infrastructure on prod and test but use parameters to specify what spec of machine should be used.
Another reason to use parameterization is as part of your deployment process. For example, if you are deploying virtual machines, then the output of your build process is likely to be a virtual machine in a registry (on Amazon, this is an AMI) with an ID. Usually your infrastructure definition will contain the ID of the virtual machine to boot, so to deploy your app, you can change the parameter with the virtual machine ID that gets booted to your new one, and likewise if you need to roll back.
When it comes to developing apps, having a local environment, often on your dev machine, is an effective way to work, as we discussed earlier in this chapter. However, the flip side is that you may not be running on the same infrastructure as the production environment, but instead on something that mimics it. For example, your local code might not be served via a CDN, or your application might not sit behind a load balancer. These are reasonable trade-offs to make, but you should be aware of them. For more complicated apps—for example “big data,” or machine learning types—then it might make life simpler to run some of your infrastructure locally, with other parts running on environments that are provisioned in the same way as the production infrastructure for your app.
A desire for local development environments may result in developing code that’s relatively portable between infrastructures, which can be important to avoid vendor lock-in. It is common for your infrastructure provider nowadays to be a third party, but there is an important trade-off between leaning too heavily on their infrastructure-which can leave you open to the risk of the third party discontinuing a service you use or changing the pricing in a way that is unsustainable for you-or to ignore convenience to avoid lock-in, but then create a poorer version of that system.
Immutable Infrastructure
Immutable infrastructure means that once you’ve deployed your app, the infrastructure and the code and configuration that runs on it never changes. If you need to make a change, instead of trying to tweak a running part of the service, you instead delete the bit that’s changed and replace it with a new version with the updated configuration. This helps you avoid “fragile” infrastructure by fully describing the state of the infrastructure in code, rather than as a result of changes made over time. It also makes it straightforward to set up other environments that are identical, from the same infrastructure definition, to allow for testing.
This is sometimes referred to as the “phoenix deployment” pattern, as you regularly burn down your environments and then launch them again from scratch. By doing this frequently, you ensure that your app remains deployable from scratch, instead of accidentally building on top of something that was specified previously but then removed and has remained available because it wasn’t cleaned up. It is surprisingly easy to introduce bugs such that a program can no longer be installed cleanly, but only works because of something left over from a previous deploy (perhaps a log directory).
You may do this regularly in a test environment, but it is useful in a production context too. A pattern known as “blue-green” deployment means that you have two production environments, although only one at a time is actually serving production traffic. To use immutable infrastructure here, you tear down the environment that is not in use and then build it up from scratch. This can be combined with a “canary” rollout strategy, where you can then gradually point some traffic at this new environment to confirm it is working, and then switch over all traffic eventually. If the deployment fails, you can then switch traffic back to be served from the previous environment.
A 12-factor app, especially when it comes to the “stateless” factor, makes introducing immutable infrastructure straightforward. You can easily apply this pattern by having any state stored explicitly in attached services and not in your app. Even when your service is a database itself, it must still persist its data somewhere—ultimately, a disk. You can then treat this disk as an attached service and designate the rest of your infrastructure around your database as immutable.
Continuous Delivery & Continuous Deployment
Continuous delivery and continuous deployment are two distinct techniques that are often confused with one another. Continuous delivery is a set of engineering principles that aims to reduce the time an organization takes to make a change to software. Continuous deployment is a technique where every change is automatically deployed from development into live.
Continuous delivery is covered in the Planning chapter, but as a reminder, at the core of continuous delivery is the concept of a pipeline, through which a feature or change travels from inception to delivery. Each stage of the pipeline features automation of rote tasks to minimize the risk and cost of an item going through the pipeline. Towards the end of the pipeline, it’s common to want to deploy your code to live, and this is where continuous deployment and continuous delivery overlap. Sometimes you may want to have a manual gate in your pipeline—for example, you may have human sanity checks or usability tests before a final release—but many teams choose to automate the whole process, and this is where continuous deployment comes in.
Continuous deployment can seem risky, and takes significant discipline to fully realize, but having the technical capability to do so, even if you do not fully use it, is powerful and can help implement continuous delivery even if there is a manual check. Continuous deployment comes from fully automating a deployment, and manifests itself in a team having a single command to deploy the latest version of your application to an environment. This single command can be triggered by a developer or, more often, by some sort of hosted tool, such as a traditional CI server like Jenkins, or by a newer generation of CD servers like GoCD, which have workflows built around the pipeline metaphor instead of individual jobs, as CI servers tend to be.
There are other techniques you can use with continuous delivery, especially when using continuous deployment, to help manage this process. When building a feature, you may make multiple commits to the codebase that contribute to a working feature, but you may not want to reveal that feature immediately. For teams that do not apply pure continuous integration, this often means working on a feature branch until that feature is completed, and then merging it in. Continuous integration is predicated on the idea that merging is risky, and therefore advocates continually committing (“integrating”) to a single branch, at least daily, that all releases are then made from. Continuous delivery is predicated on the idea that releases are risky, so releasing often means you are forced to mitigate that risk in your process. For teams that practice continuous integration but not continuous delivery, often a release is only done after a feature is built and tested, so it is not prematurely released to an audience. This introduces a new risk: if there is a quick bug fix that needs to be made, or a higher priority change comes along, then a release with only that fix in it becomes hard to make, as the master branch will also contain the work-in-progress feature. You can work around this by branching and abandoning continuous integration temporarily, but that reintroduces the risks of merging that continuous integration aims to avoid.
Feature flags (or toggles) are a code-level mechanism to enable both continuous integration and continuous delivery. The simplest implementation of a feature flag is an if statement around some code that disables it based on an external config value. For example, if you’re building a new part of a web site, you may have a config file in your developer environment that sets a config value, and then use that config value when defining the routes for your application and exposing links to those new pages—for example, in a navigation bar. Exactly how a feature is enabled/disabled depends on how it is implemented, and there are more complicated ways to manage feature flags than just configuration files, but this is the core idea behind it. The feature flag should turn your code into dead code when it is disabled to minimize the impact of any bugs you may have introduced and reduce the QA overhead of regression checking when a flag is off.
Feature flags are useful too, if you are upgrading or replacing an existing feature. The simplest way to implement a feature flag is using an if/else to choose between two code paths, an existing one, or the new one.
Using feature flags can result in more complicated code due to the period of overlap of an old version of a feature and a new version, and requires discipline to clean up after completing a new feature. However, feature flags can allow you to better control the rollout of a new feature if needed, perhaps enabling it only for a subset of users or on a subset of servers to verify that the feature works in the production environment before rolling it out fully. Rolling back a feature with a feature flag, if issues are identified, does not mean actually having to revert code or deploy an older version of your application, but instead changing a config value, which still gives you the freedom to make other changes to your application unrelated to that feature. It can also feed into usability tests at scale, where the same mechanism that allows you to flag a feature could be used to serve different variants to your users to collect data for A/B testing.
Summary
The DevOps movement is an important part of modern software development, as it empowers a full stack development team to manage their software in production, minimizing communication overheads and, potentially, delivering changes faster. In order to achieve this, software has to be built that minimizes the friction of supporting it in a production environment.
One method used to do this is applying Heroku’s “12 factors,” which are concerns about how an application runs that allow it to be managed through multiple environments and easy to support.
The first step on many DevOps journeys is to automate the creation and management of local environments. Virtual machines are commonly used to do this, as they allow you to spin up an environment that’s close to the production environment, as well as give some degree of isolation between that and your running system. Once this is done, automating the process of moving code to a production or pre-production environment follows. Instead of deploying code from source on a server by hand, a single package should be built, and that package deployed onto the server. For all of these environments, tools can be used to deploy not only that package, but the configuration for it separately—this means you can quickly change the configuration of a running service without having to rebuild and redeploy the code.
As more and more teams move to cloud computing, they gain a self-service capability to manage the underlying infrastructure. This infrastructure can be defined using templates and managed alongside your code in version control, a technique known as infrastructure-as-code. More advanced techniques, including immutable infrastructure, can also be applied to your deployments, which can minimize their risk by replacing your infrastructure with the new version as it changes, rather than trying to upgrade it in place.
With this automation, more regular deployments can be made, each one with a smaller change. This deployment even involve work-in-progress code, which can be either inaccessible to the running app or enabled and disabled using config values known as feature flags.
Being able to make smaller, more regular deployments is a key factor in differentiating full stack teams in digital organizations from those in more traditional environments. This allows a much faster pace of change and minimizes the time it takes for changes to be made.