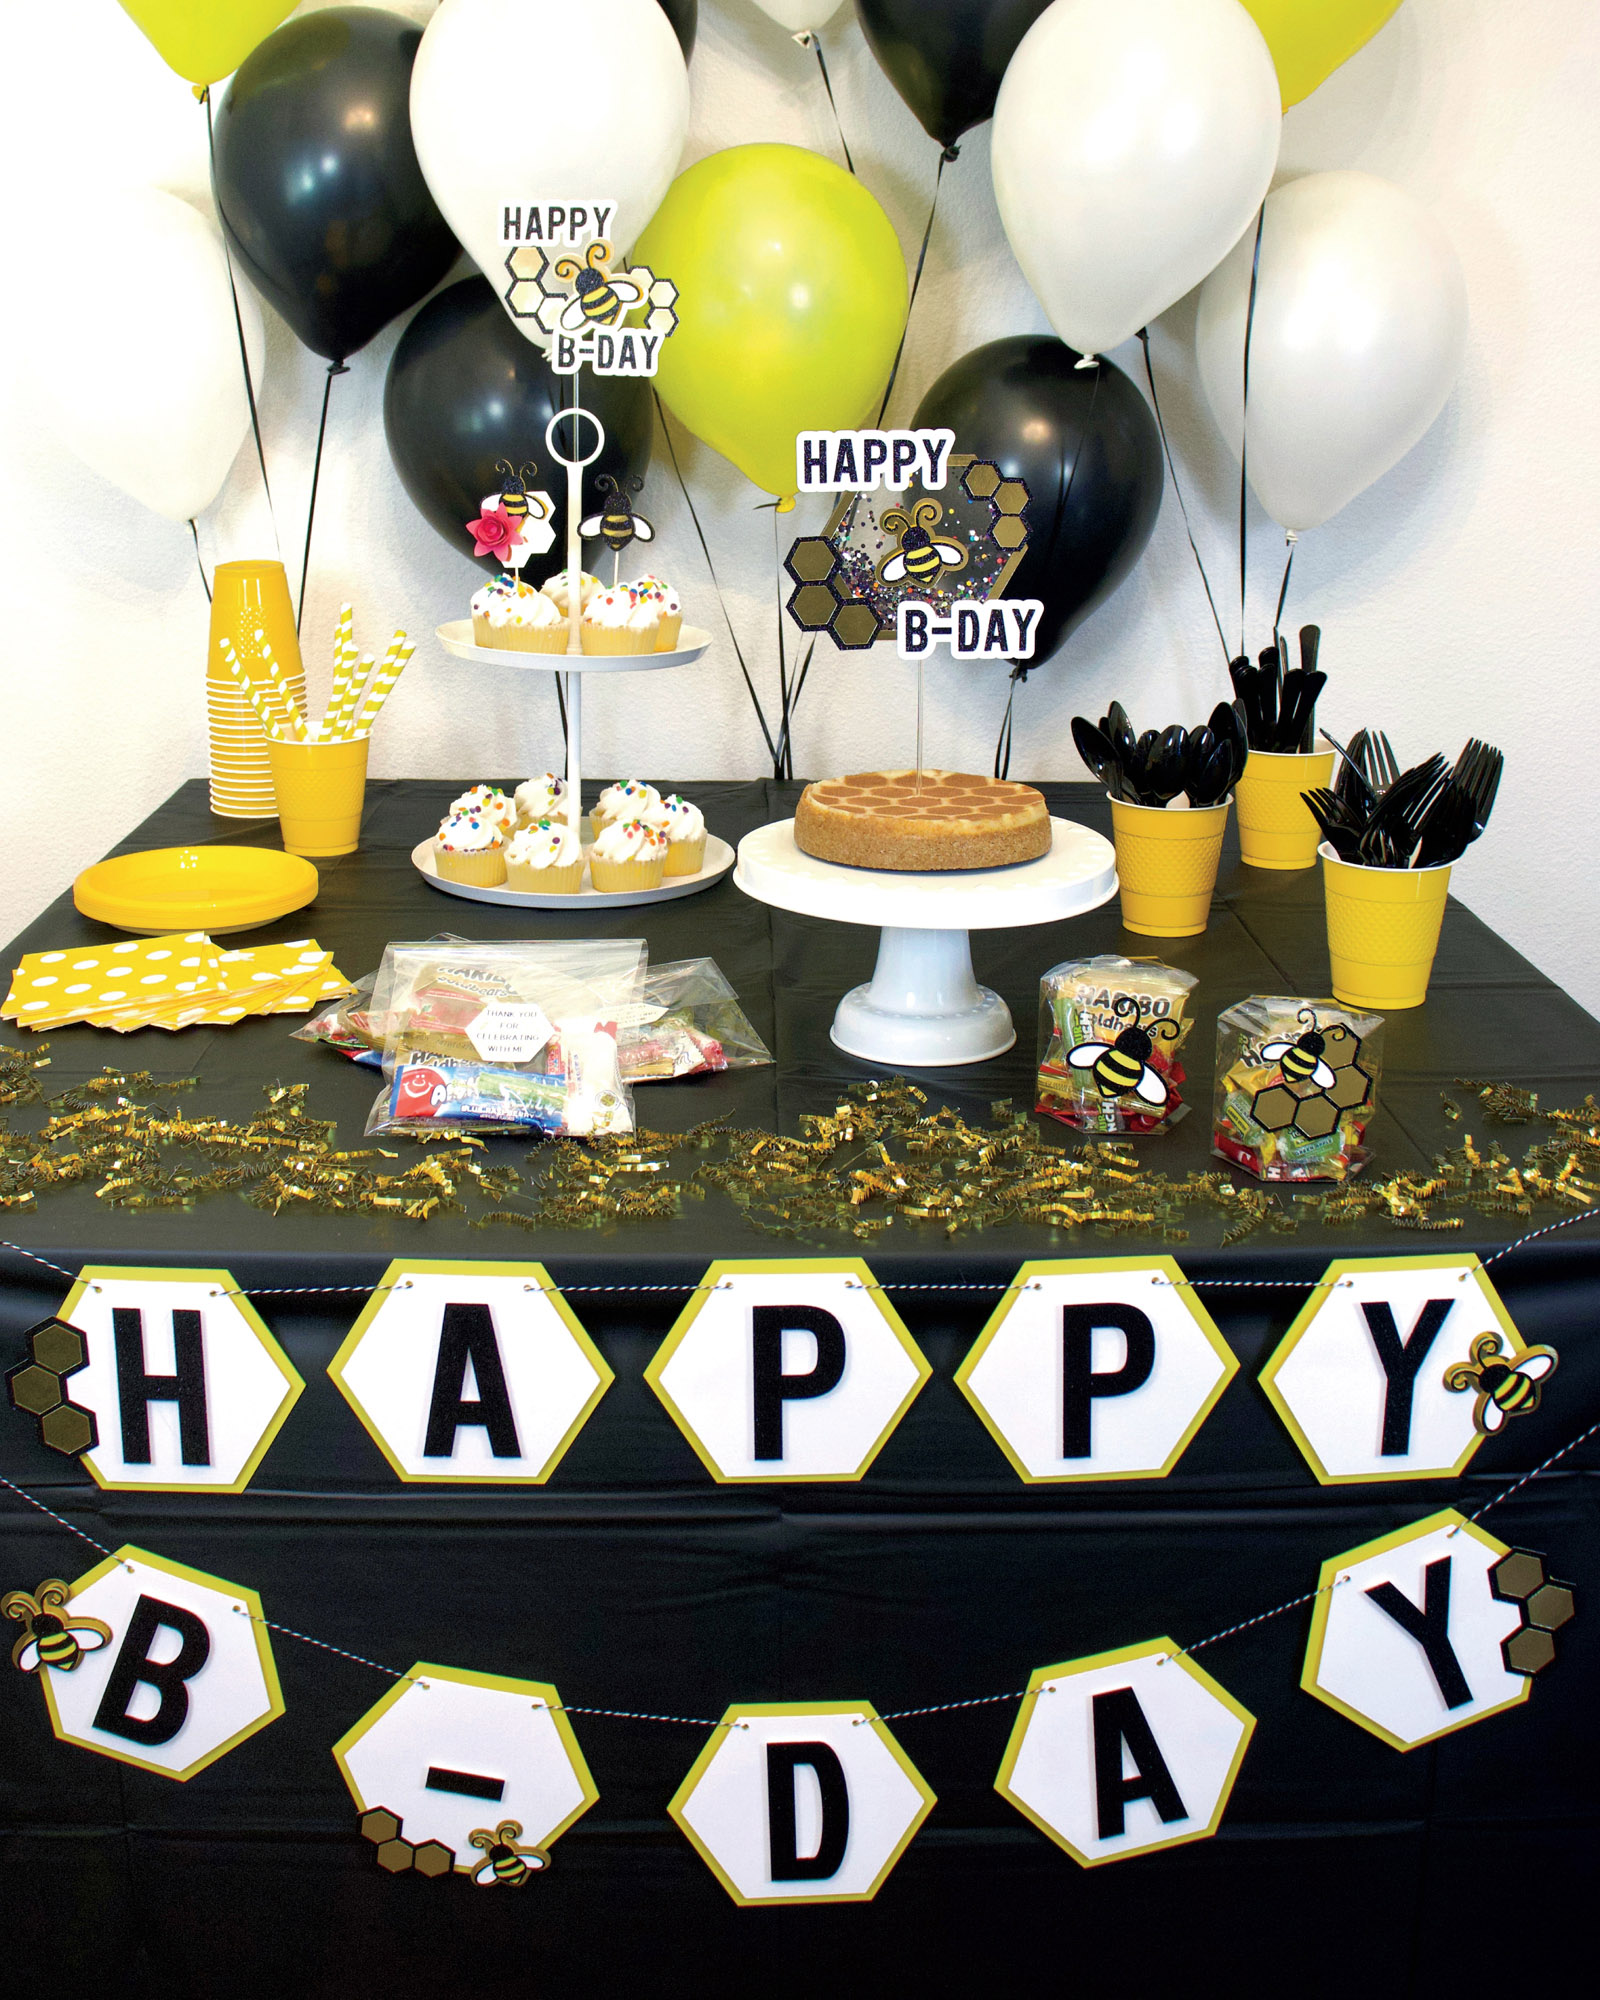
CHAPTER THREEDIY Gifting
Cards, gift tags, stamps, oh my! Make your special someone feel even more special when you create any of the items in this chapter for them. Go all out and make personalized wrapping paper, gift tags, a shaker or spinning card, and a matching envelope. Whether you create all these things, or just pick and choose, your sweet gesture is sure to be met with smiles and twinkly eyes. The craft projects to follow can easily be transformed to meet your party and holiday needs. Have fun and don’t be afraid to Make It Extra!
Foam Stamps
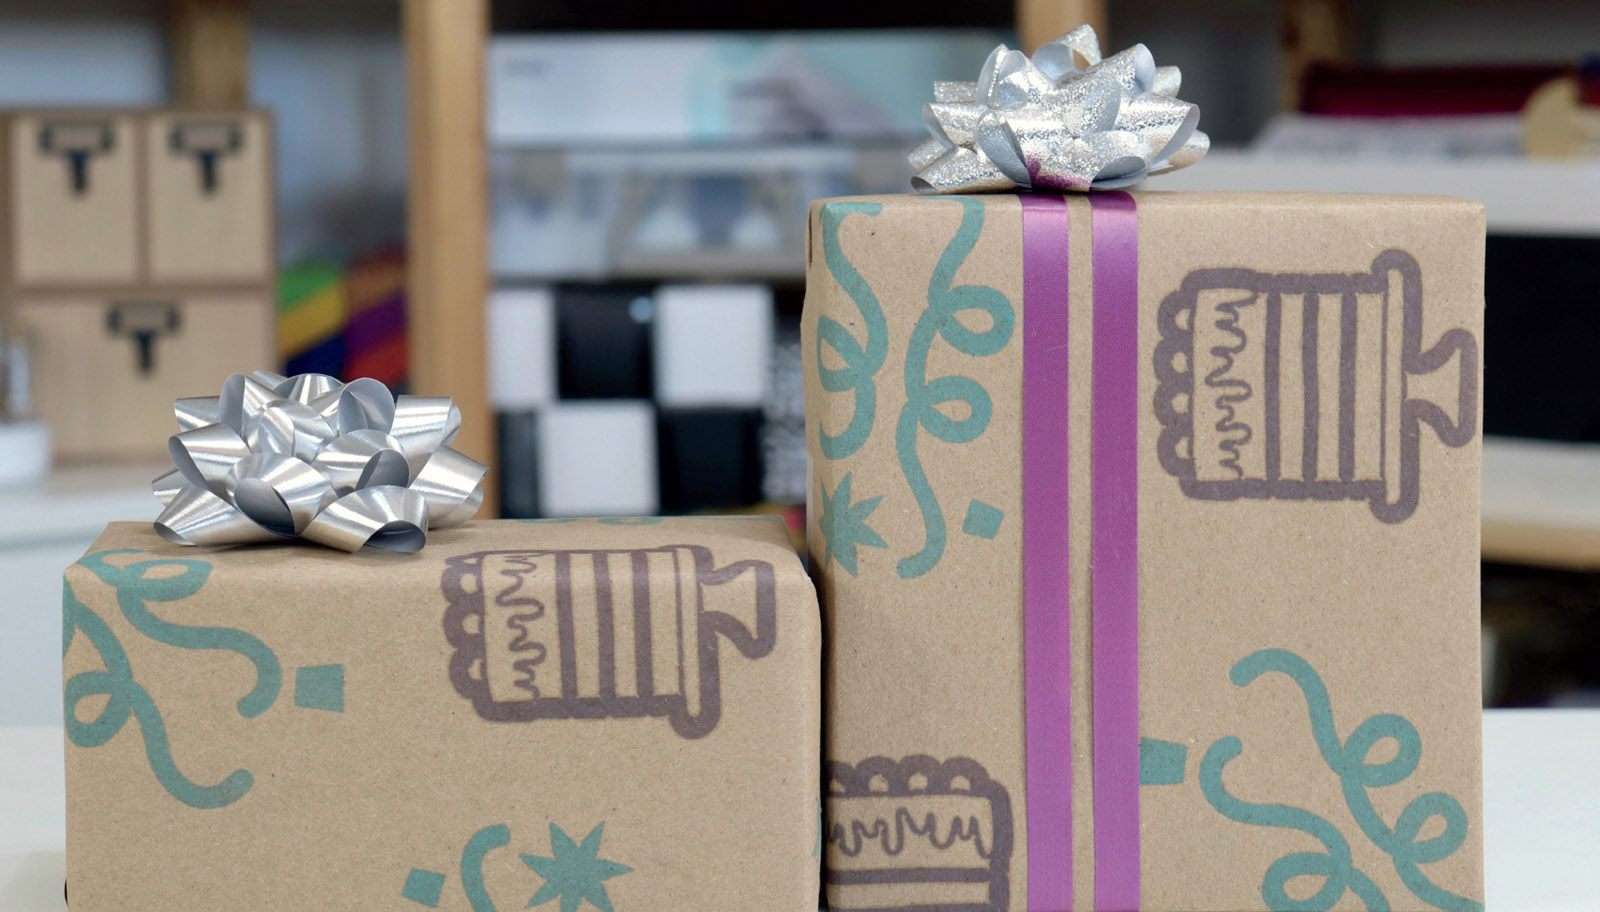
Did you know you can make your own stamps with your Cricut? You can, and it’s so fun! You can create custom stamps to use on cards, envelopes, or even to create your own gift wrap. So many possibilities!
Materials Needed
Craft foam (with adhesive backing for best results)
Wooden blocks (large and flat work best)
Tweezers
Glue/adhesive with fine tip applicator (optional)
Blank wrapping paper
Knife Blade for Maker machine (best results) or Deep-Point Blade for Explore Air 2 machine
Machine Compatibility
Maker or Explore series
Images Used
Streamers and Confetti #M3A179
Cake on Stand #M2841CC1E
DESIGN IT
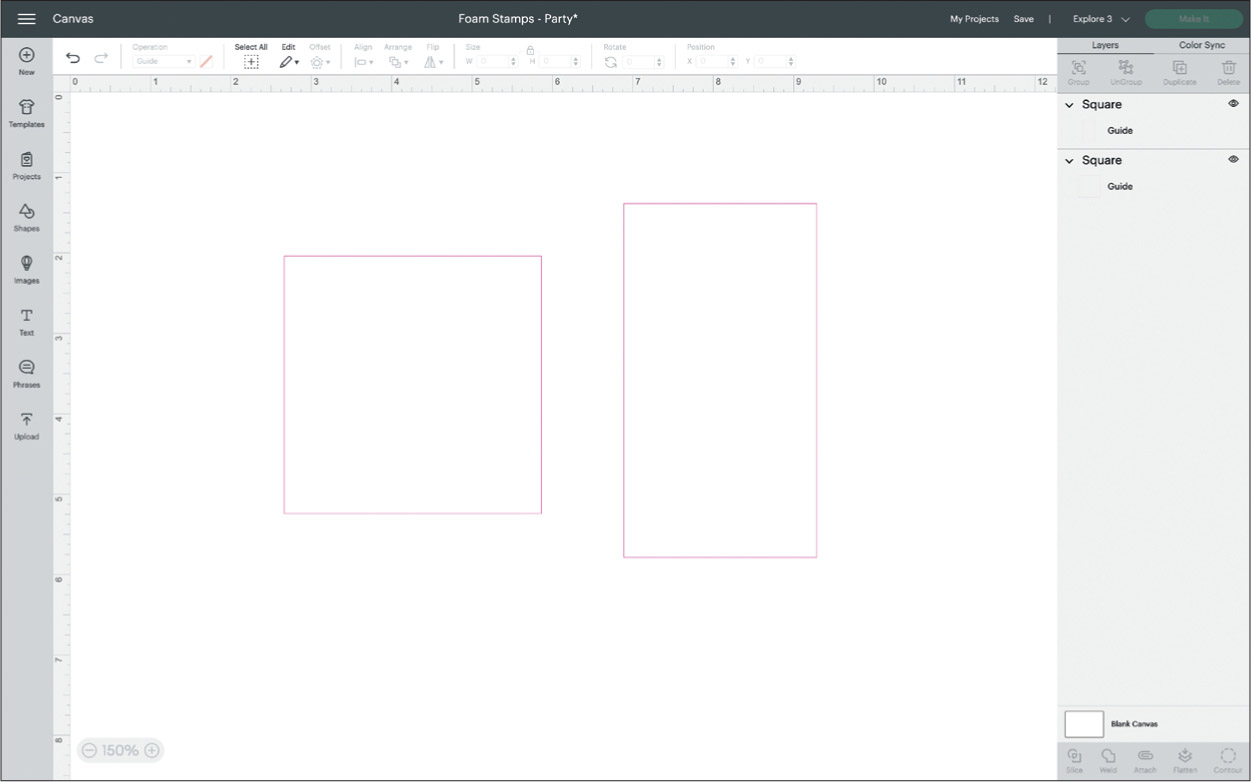
To make your stamps, first measure the surface of your wood block. On your canvas create a square/rectangle the size of your wood-block surface. Then turn those shapes into Guides from the Operation drop down menu.
Next, bring your images onto your canvas and size them to fit within your guide shapes. Your canvas may look something like the image here. Notice how the Streamers and Confetti image is outside my guideline just a bit. We’ll play with that part in a few steps.

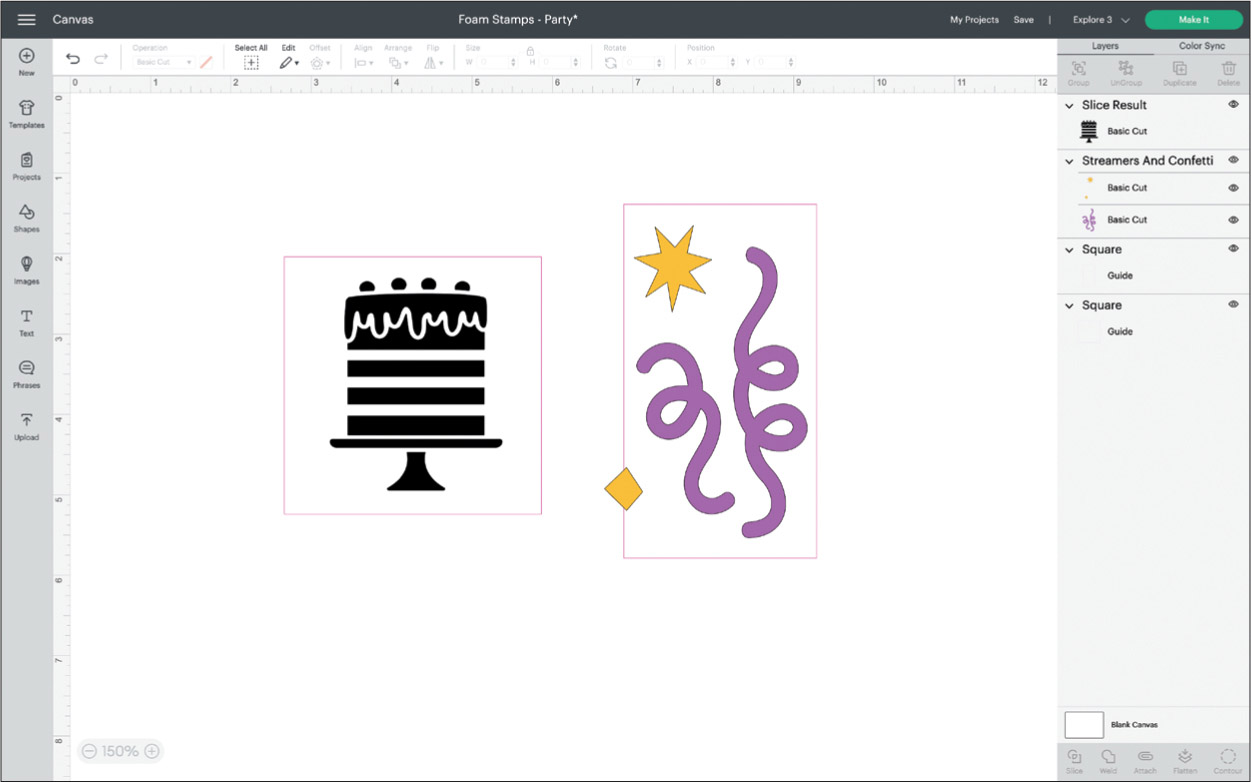
We’ll make these stamps two different ways. Let’s work with the Cake on Stand stamp first. Select the Cake on Stand image and create an offset. The image here has a 0.20” offset.

Duplicate the offset layer you just created. Then select one of the offset layers, and the Cake on Stand layer, and then Slice. Remove the initial image layer as well as one of the sliced offset layers, keeping only the sliced result and an offset layer, as shown here. These duplicated layers will make your stamps have a bit of depth on the wood blocks.
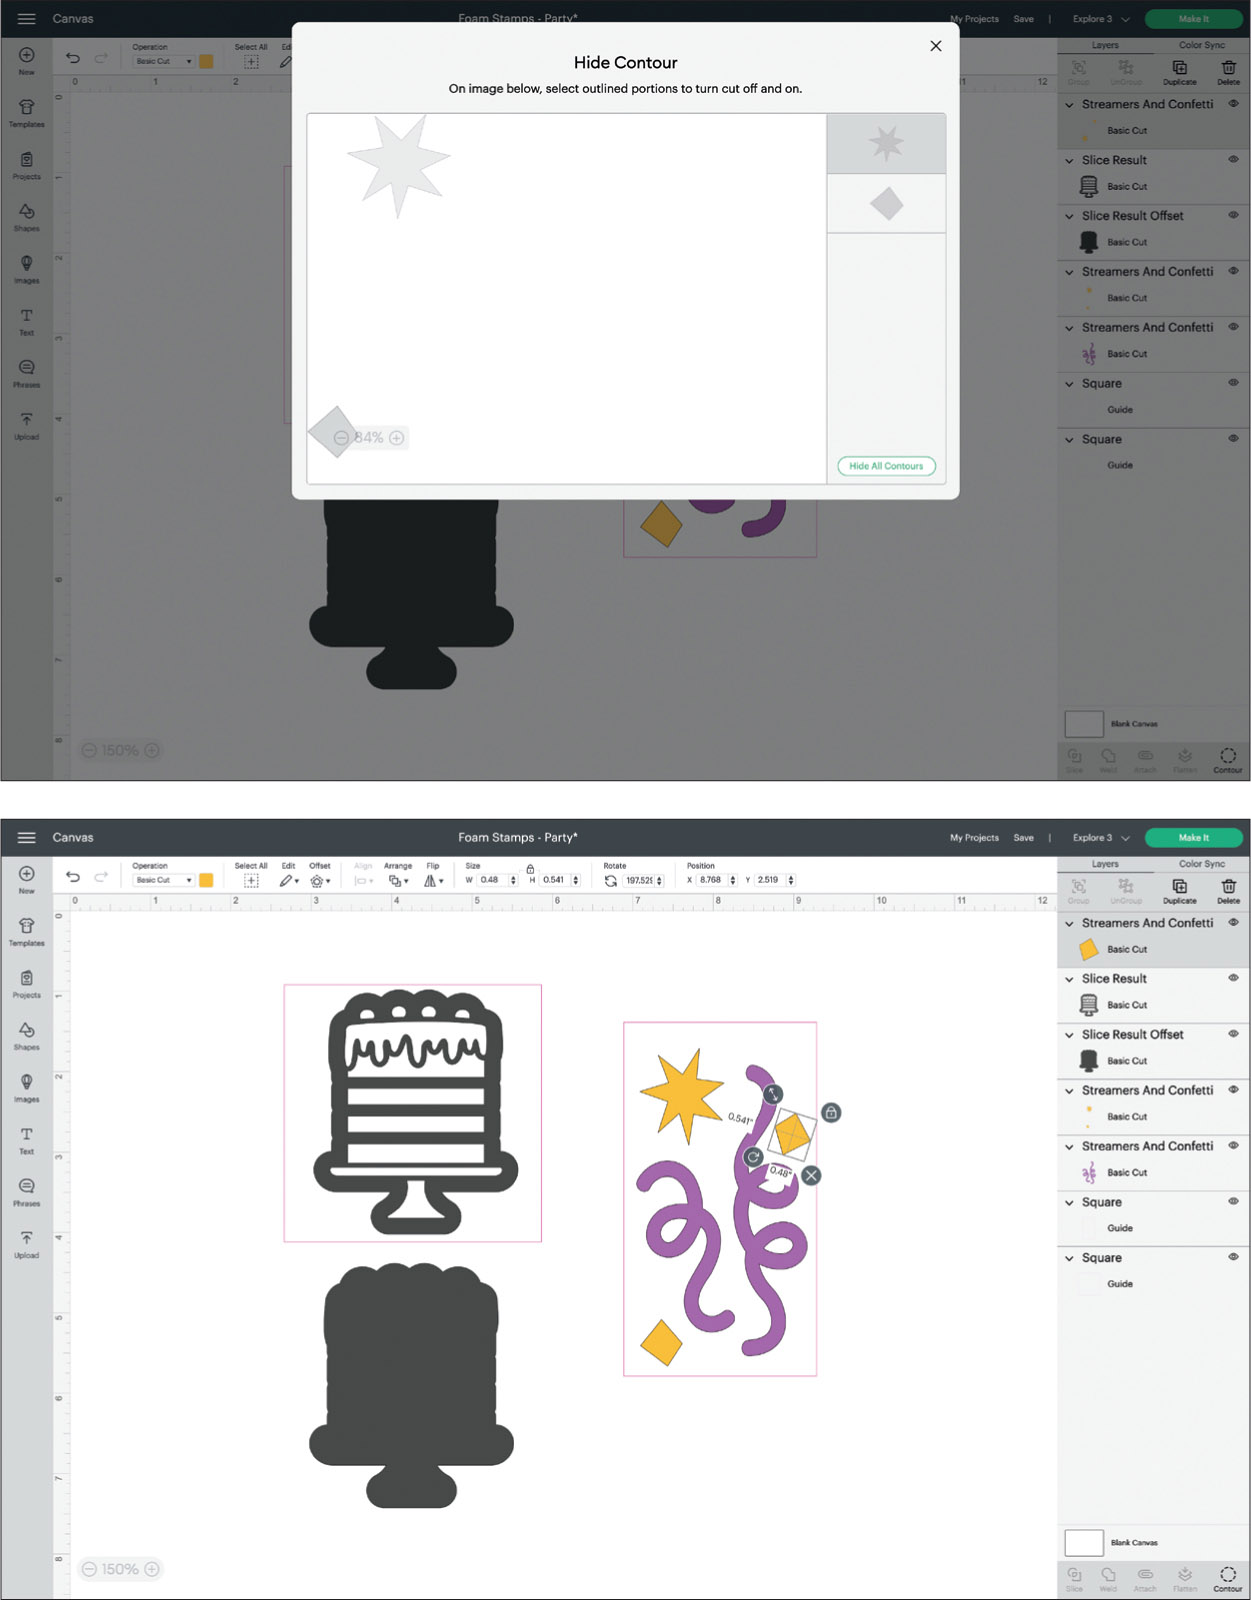
Let’s move over to the Streamers and Confetti stamp. You may notice that the image has two different layers. Ungroup this image and resize it so the image fills your Guide. Just for fun you can duplicate the confetti layer and use the Contour tool to remove the star shape as shown in the image on the left.
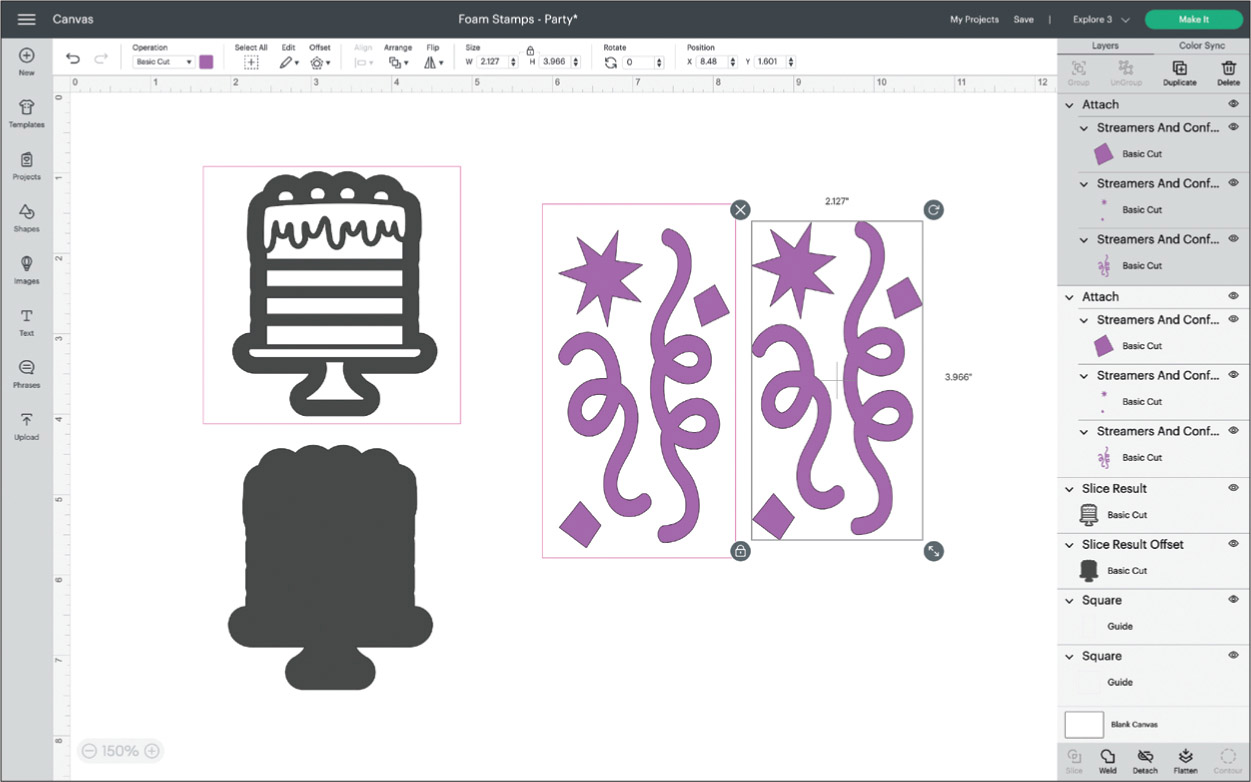
From here you can play with the arrangement of your images within your Guides, and then Attach and Duplicate the images for this stamp.

To increase the stability of this image, Contour the centers of the streamers out of the image, as shown here. Do this for only one of the layers, this will be your base during the assembly process.

Align all your layers so you have a good visualization of what they will look like assembled. To cut all the images from the same piece of craft foam, change the layers to the same color. The easiest way to do that is by using the Color Sync tool at the top of the layers panel. Simply drag and drop the images from the dark-gray box into the purple box. Isn’t that neat? Now all your layers are the same color.
Click on the green Make It button to send it to the mat.
MAKE IT

On the Make It screen you have the option to change your material size. The adhesive craft foam used in this project is 6” x 9”. The closest option to those measurements found in the drop-down menu is 5.8” x 8.3”, which is pretty close. You can also use this feature if you’re ever cutting other materials like 8.5” x 11” cardstock or copy paper.
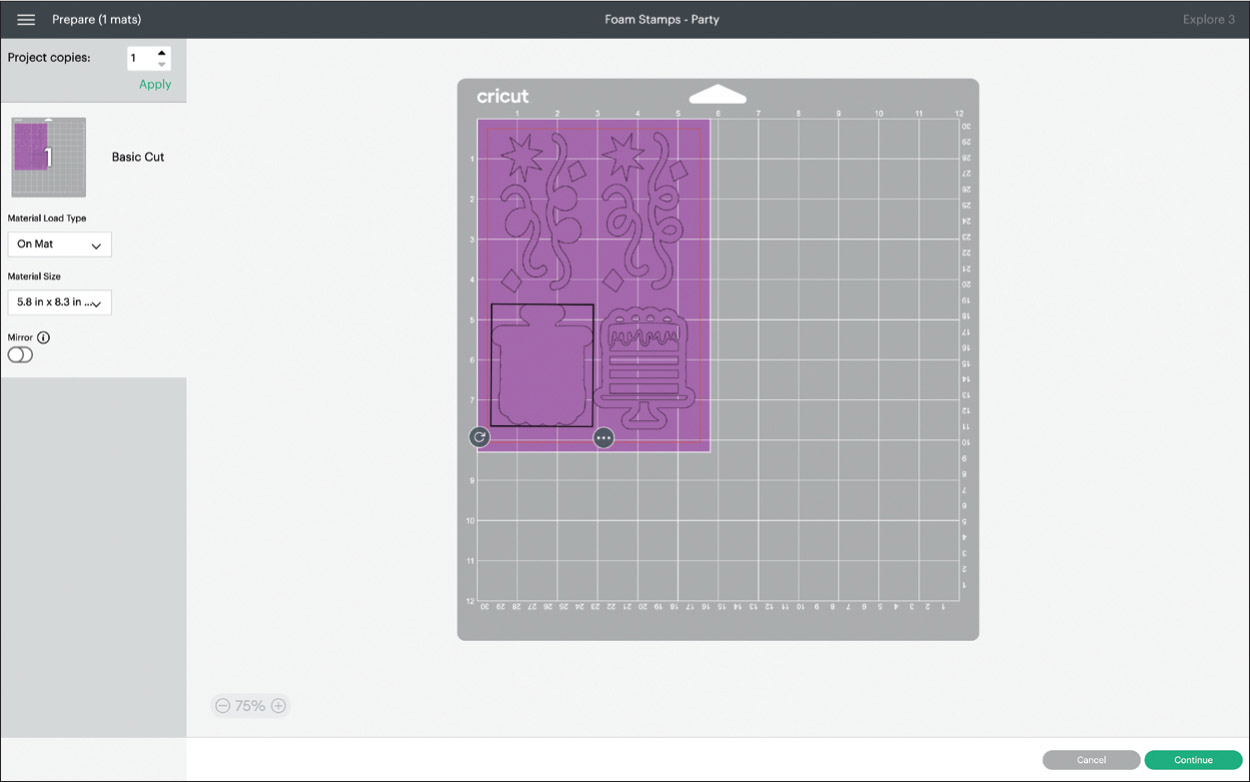
Arrange your images within the mat, making sure to leave room around the edges. You can even rotate your images to make the most out of the material you’re using.

Once you select Craft Foam from your list of materials, look for the option that says Edit Tools (right next to Load tools and material). This is where you’ll select Knife Blade if you’re using a Cricut Maker.

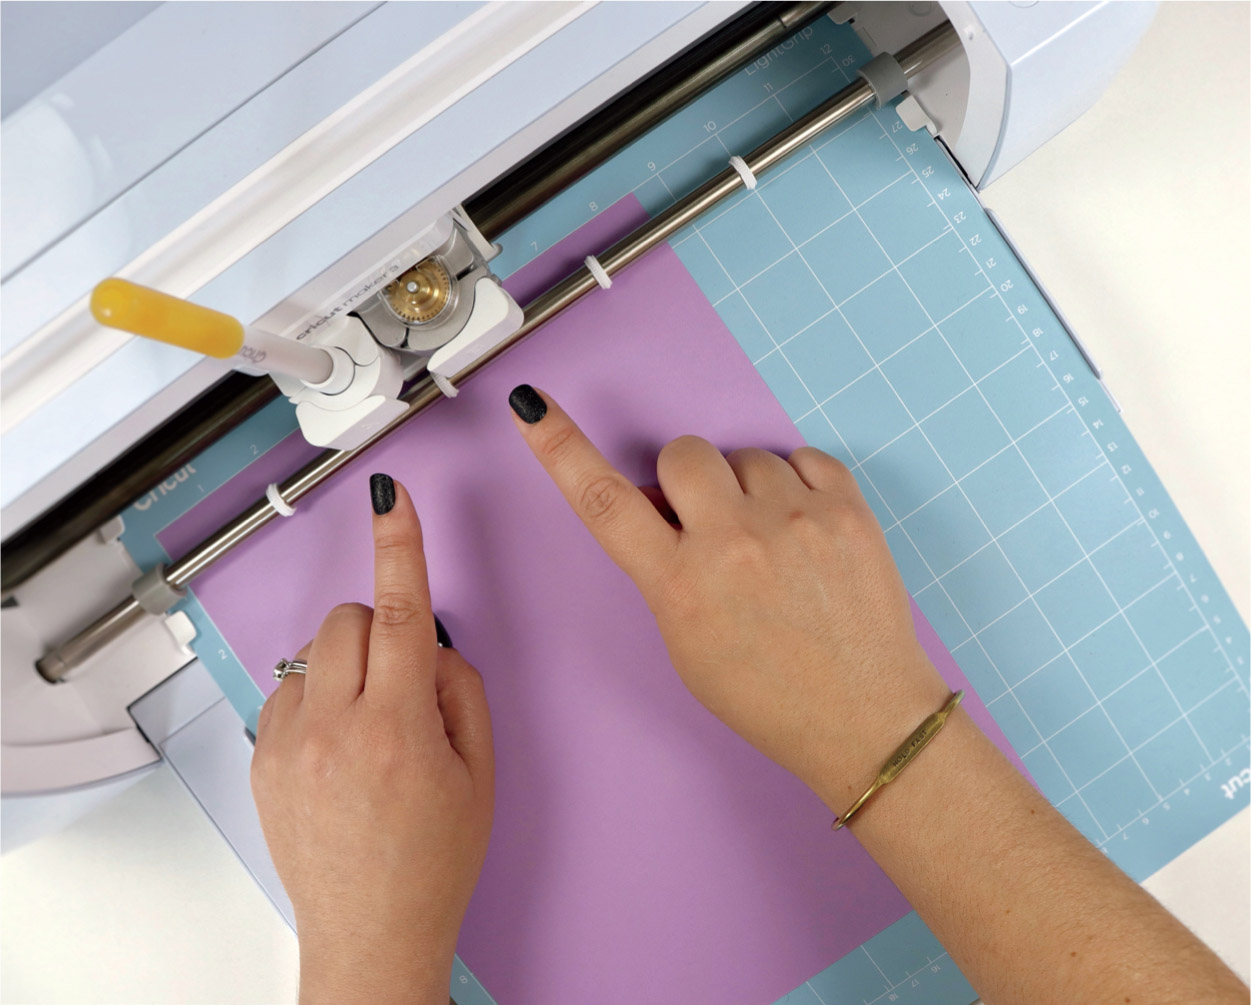
Before you load your mat, check that your star wheels are moved all the way to the right on the bar, like the photo here. Also, load your Knife Blade into your machine, or the Deep-Point Blade if you’re using an Explore machine.
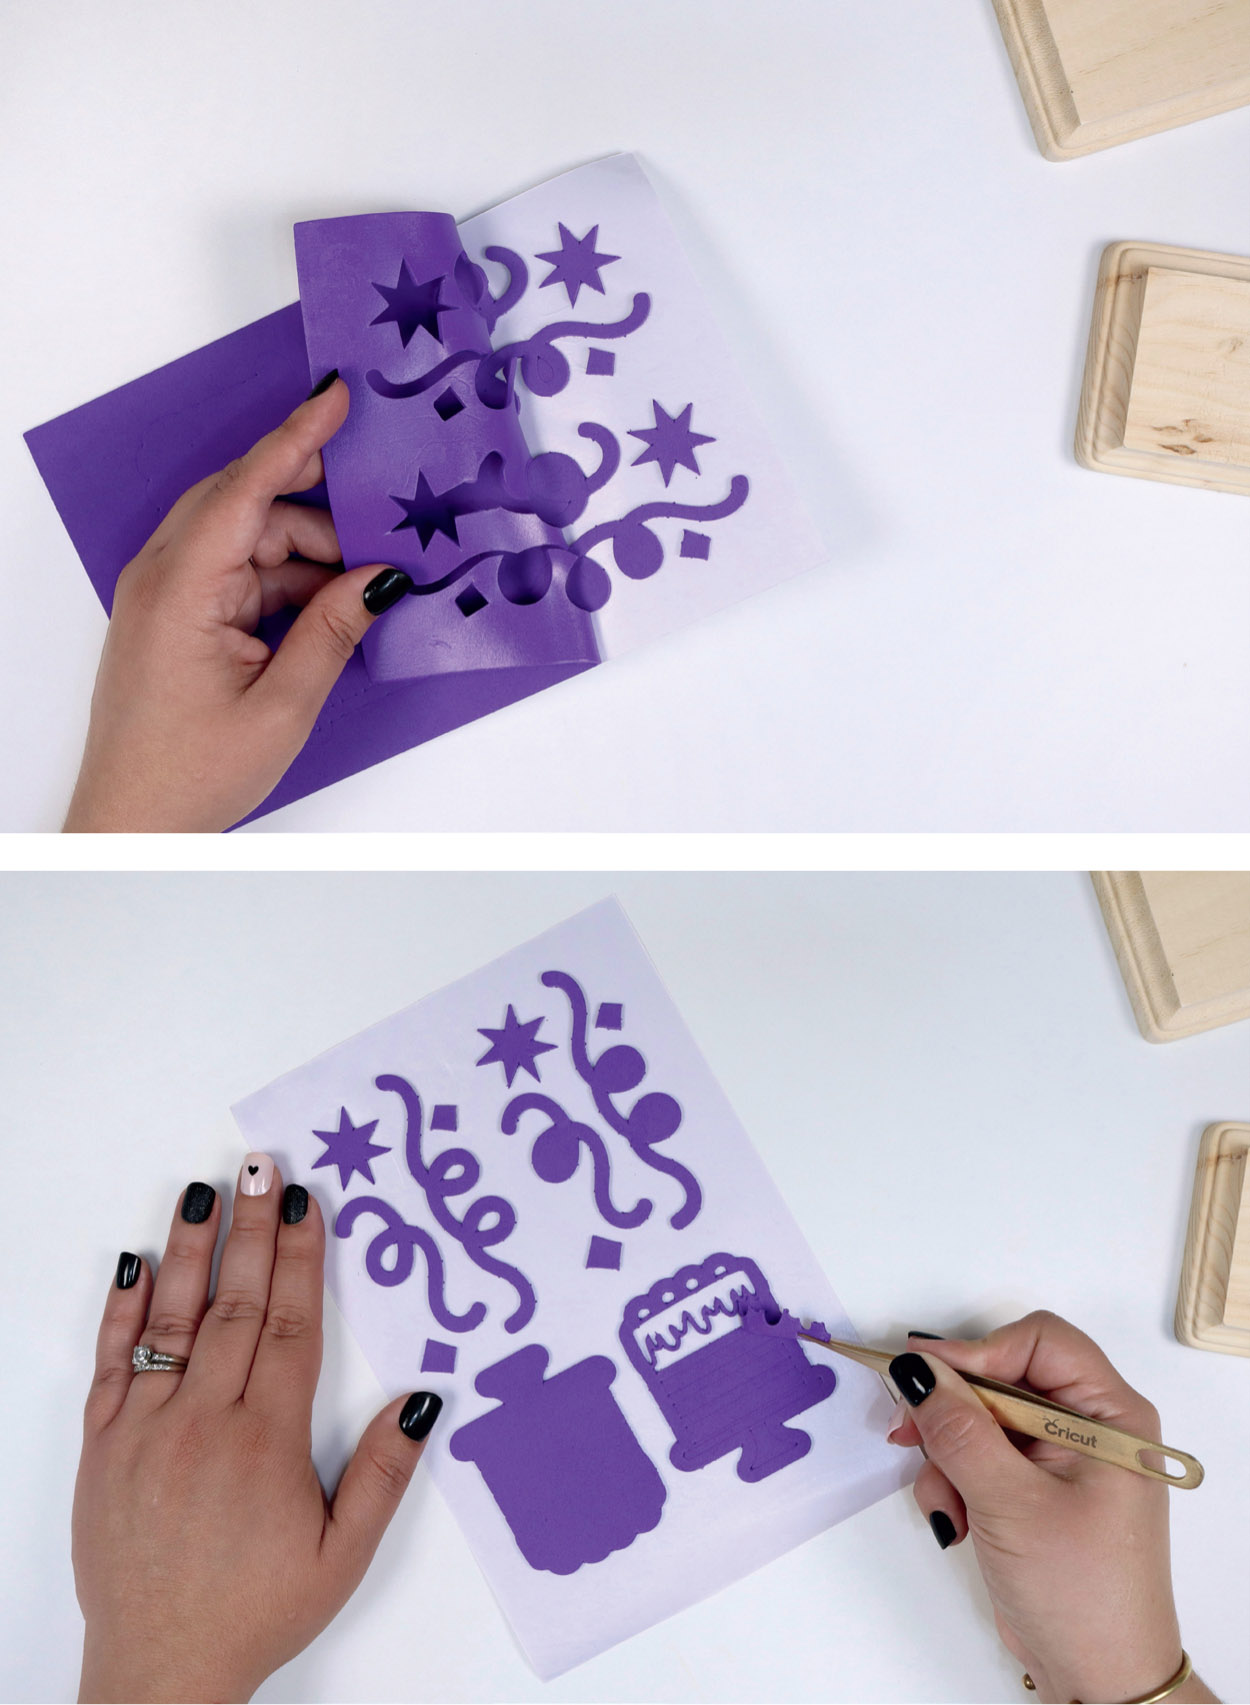
When your cuts are complete, remove the craft foam from your mat. If you’re using adhesive craft foam (suggested) keep the paper backing intact. Carefully weed away the negative space around your designs and also the inner details of the foam. Tweezers are a great tool for this.

Here’s where the adhesive craft foam comes in handy. Simply place the contoured images onto your wooden blocks. If you’re working with non-adhesive craft foam, use a fine-tipped glue applicator for these next few steps.
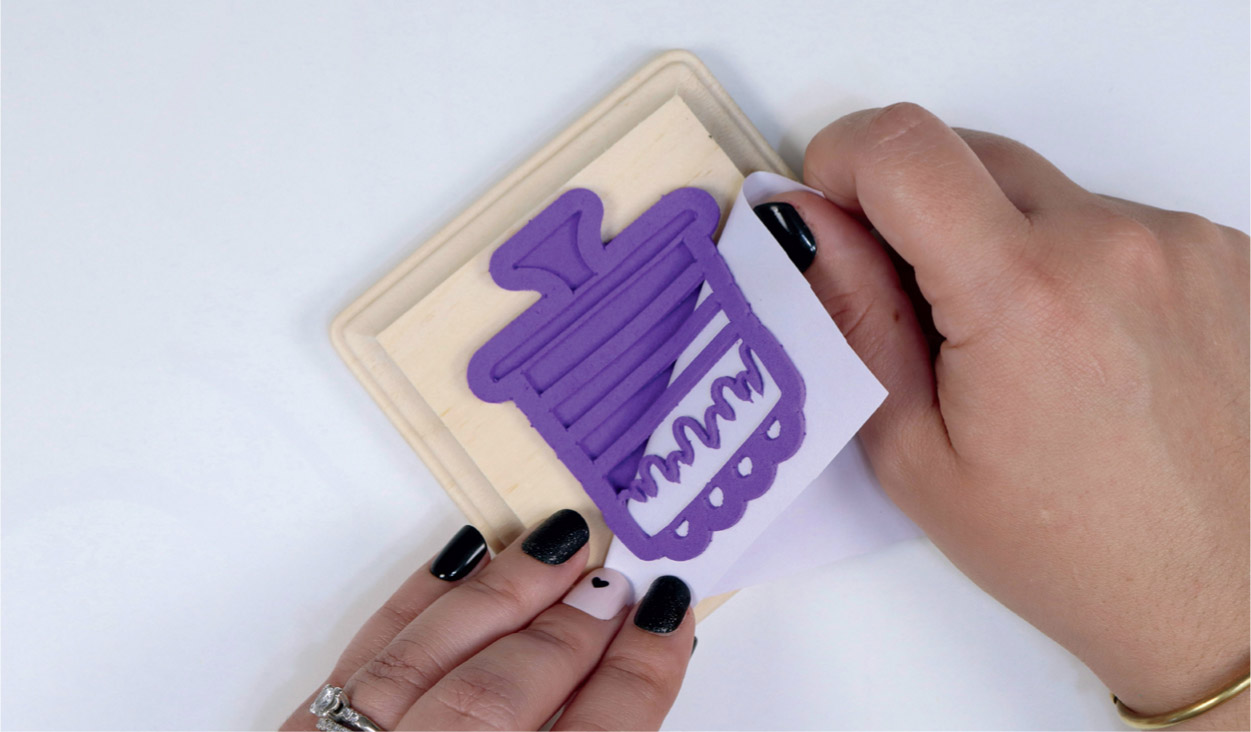
For the second layer, which has the details, you can either peel the whole design away from the foam backing or pull back a bit at a time while applying it.
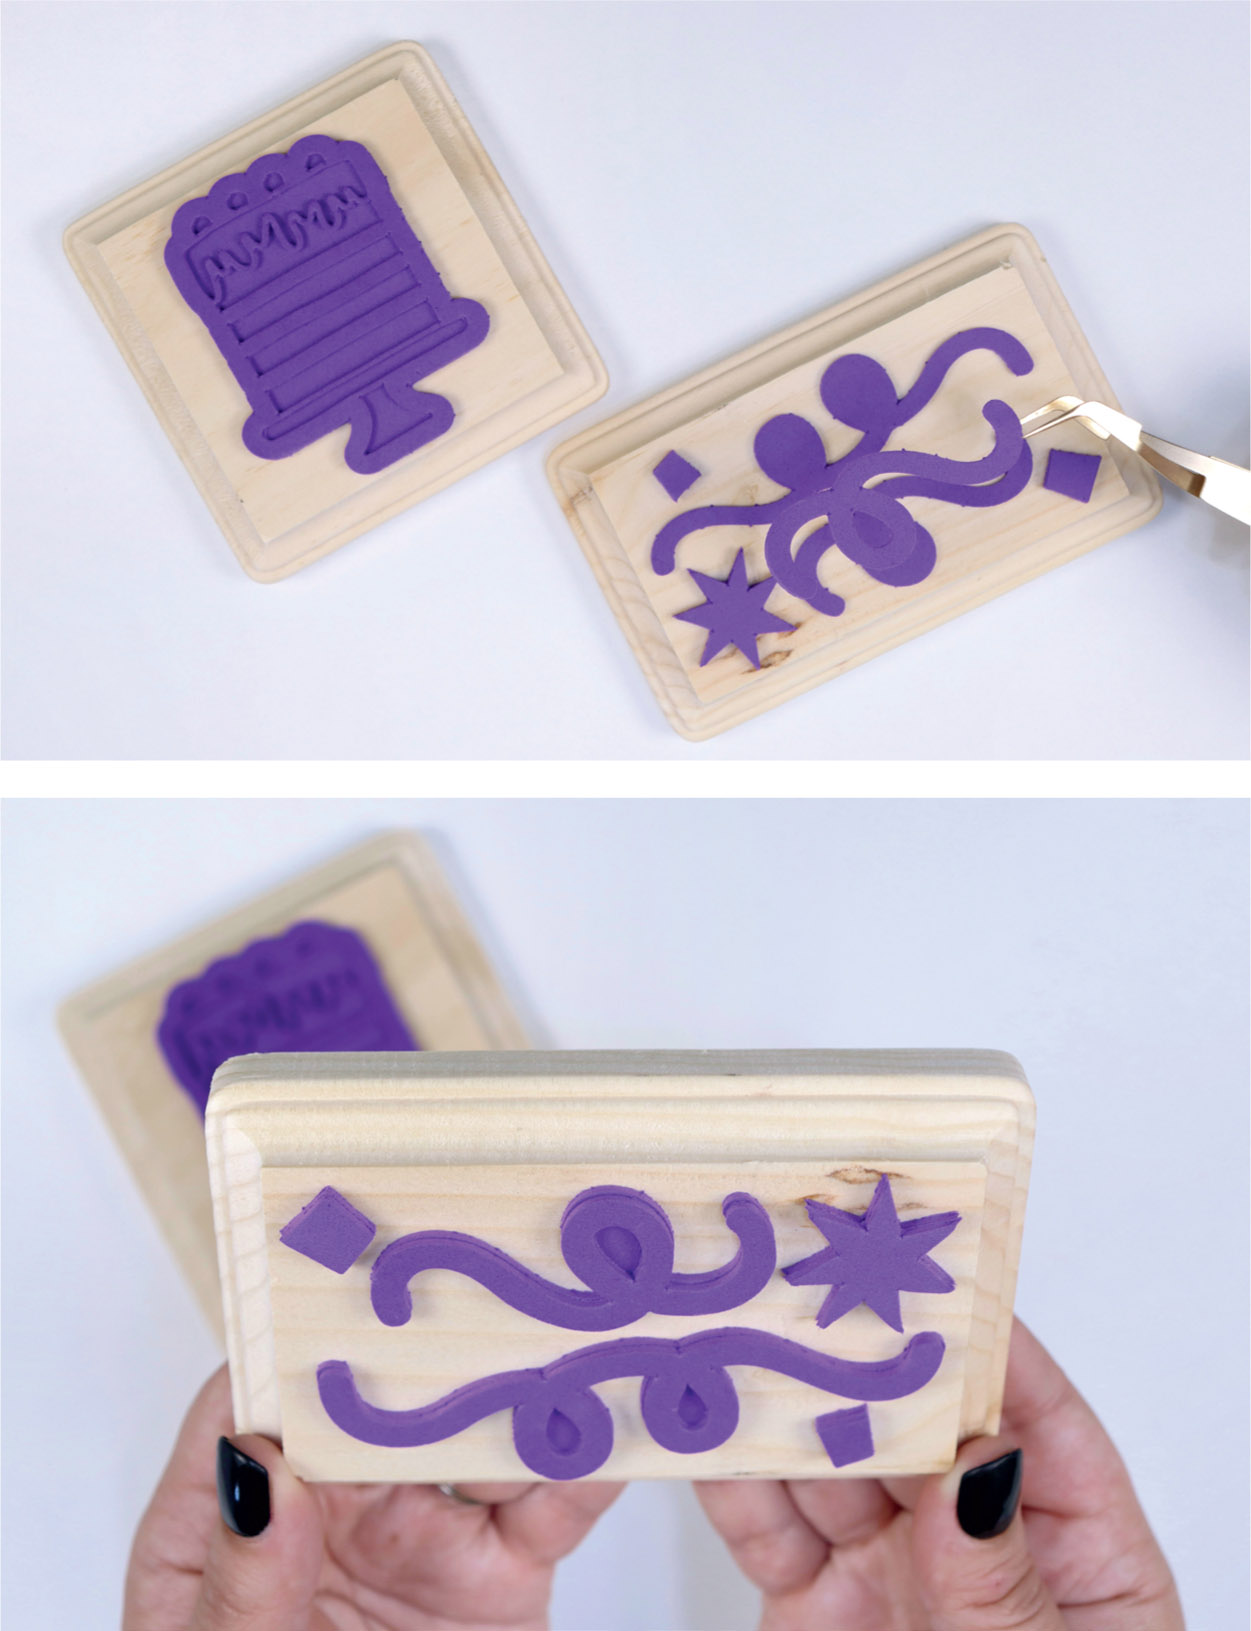
The streamers and confetti with the thinner foam cuts can be applied with tweezers. Place the contoured layer of foam down first, the one that doesn’t have any of the inner details. Carefully line up the layers when placing the second layer of foam.

Now that your stamps are complete, you can begin to roll out your plain wrapping paper, grab your stamp pads, and stamp away. If you used glue during the application process, make sure the glue is dry before you use your stamps.
MAKE IT EXTRA
Making custom stamps is already a bit extra, but think of all the things you could do with this idea. You can create teachers’ gifts or special stamps for each person’s gift wrap throughout the year for birthdays and holidays. Even a simple to-and-from stamp would add a special touch to any gift!

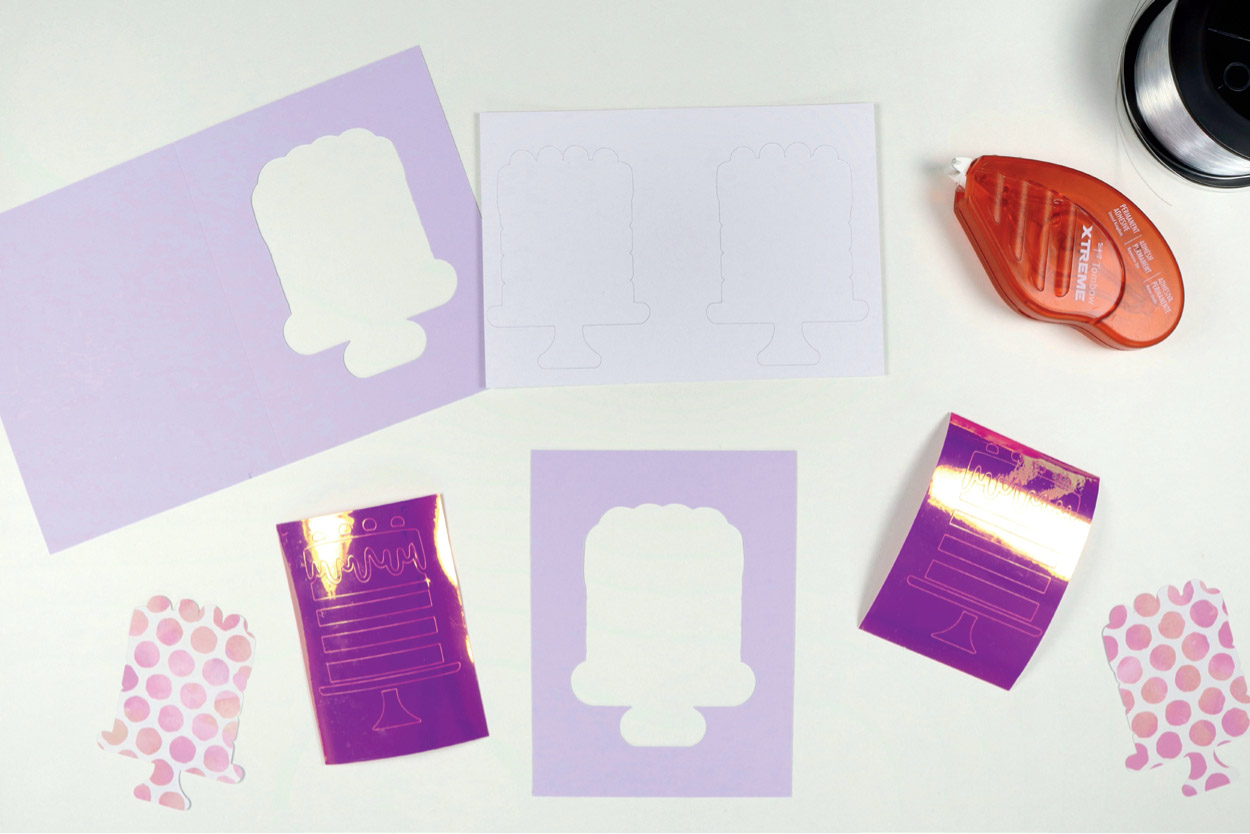
Foiled Gift Tags
A custom gift tag can be added to any gift, or perhaps you’ve already made the personalized gift wrap from this chapter and you’re looking for that perfect matching gift tag. These sparkly tags will give any gift that special, crafty, personalized touch. This is a great project to get comfortable with the Foil Transfer Tool, too!
Materials
Cardstock
Foil Transfer Tool
Foil Transfer Sheets
Washi or painter’s tape
Ribbon
Machine Compatibility
Any Cricut machine
Images Used
Rounded Gift Tag #M2AAB3E66
Cake on Stand #M2841CC1E
Oval #M2AAB3D97
DESIGN IT

Begin by bringing the images you’ll use onto your canvas.

Next, arrange your images and make sure to leave some room for text. Select all the layers and select Align > Center Horizontally to ensure everything is centered on your gift tag.
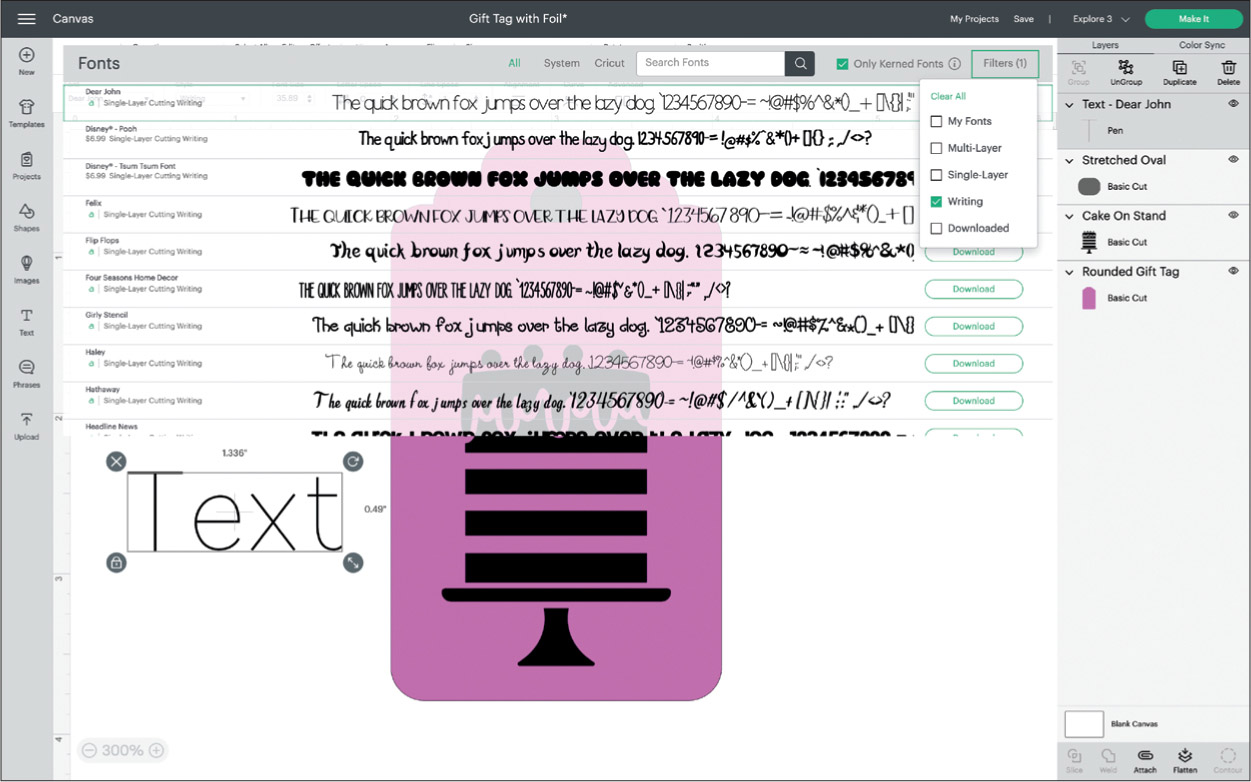
Now let’s add some text. Use the Filter option in the Text box and check the Writing box. This will provide you with all the options for the best font to use. Your Cricut machine writes by outlining the font, unless the font is labeled as a Writing font. Keep that in mind when selecting your font.
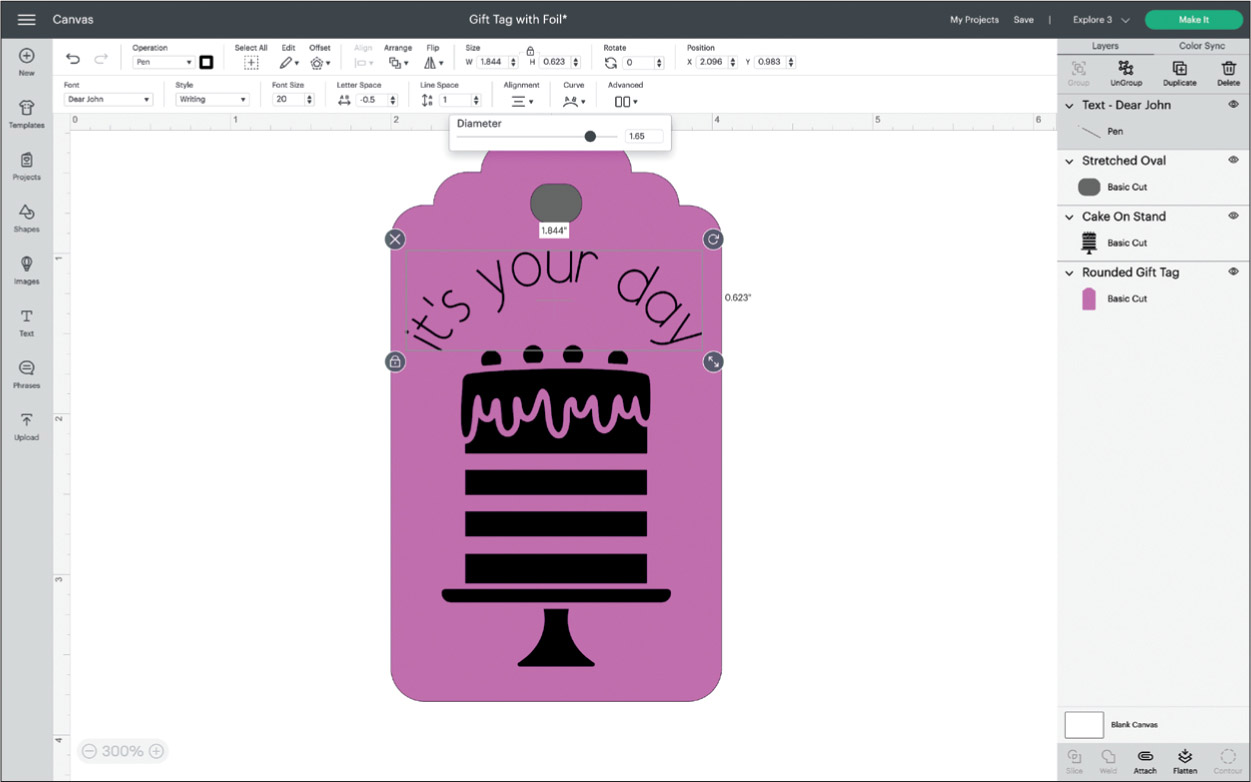
Size your text so it stretches across your gift tag with a small border on either side, then select the Curve text option. Play with what looks good to you. Using the Letter Spacing function can also help when adjusting your curved text.

When your text is the way you want it to be, change the Operation to Foil and choose your Tip option and color.

The final step before sending your project to the mat is to select everything, then Attach. Click the green Make It button.
MAKE IT

The Foil Transfer Tool process is a bit different than just cutting your material straightaway. You’ll need to start by laying the foil over your cardstock. Using the tape that comes with the Foil Transfer Sheets (washi or painters tape), make sure you tape all four edges of the foil down. Try and make the foil as smooth and secure as you can because if it’s not taped well, your foil will shift.
Before you start your machine, swap out your Fine-Point Blade for the Bold Foil Transfer Tip (the one with three lines). When this first process is complete, remove the foil but do not unload your mat yet. Just slide the foil out from underneath the carriage and set it to the side so you can make your gift tags extra (more on that in a bit). At this time swap out the Foil Transfer Tip for your Fine-Point Blade.
When the cutting process is complete, all you need to do is remove your gift tags from the mat and add your ribbon. Remember to flip the mat over and roll away the mat from your cardstock, which will prevent your cardstock from curling.
MAKE IT EXTRA

Grab that foil you put aside when you removed it from the cardstock and cut a piece slightly larger than your cut-out image. Using double-sided tape or fine-tipped glue, adhere the foil to the back of your gift tag. You will be able to see the trimmed foil piece from the other side, but you can easily cover it up with another gift tag to make a twosided tag, or just leave it. Now you have a foil peek-a-boo gift tag. So pretty!

Transport Shaker Card
Add a little fun and whimsy to your handmade cards: Make ‘em shake! In the Let’s Party chapter, you might have seen the sections on Shaker Cake Toppers and Cupcake Toppers. This would be a perfect pairing for those special decorations. Although this project is made with a cake design, you could create a shaker card with any image you like … as long as it’s got room to shake!
Materials Needed
Cardstock
Acetate
Glue
Glitter and/or shaker bits (beads/sequins)
Craft foam (with adhesive backing for best results)
Knife Blade for Maker machine (best results) or Deep-Point Blade for Explore Air 2 machine
Machine Compatibility
Maker or Explore series
Image Used
Cake on Stand #M2841CC1E
DESIGN IT
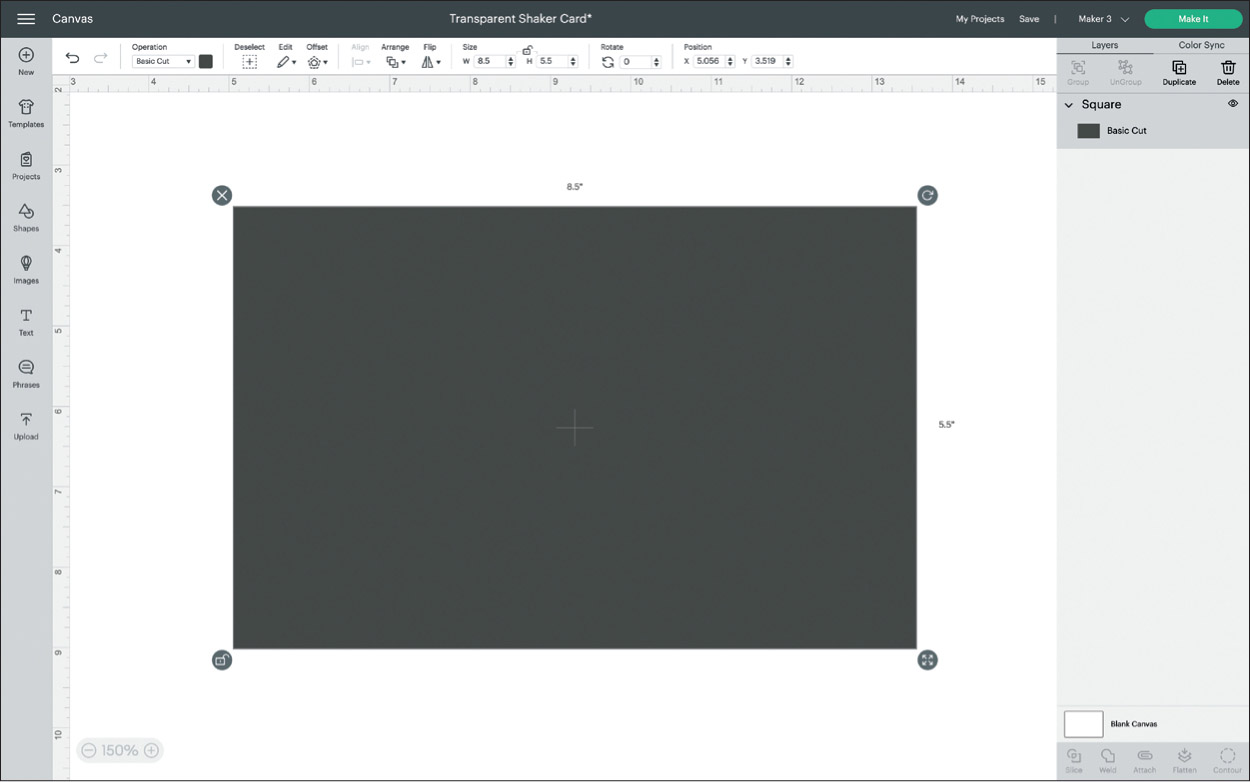
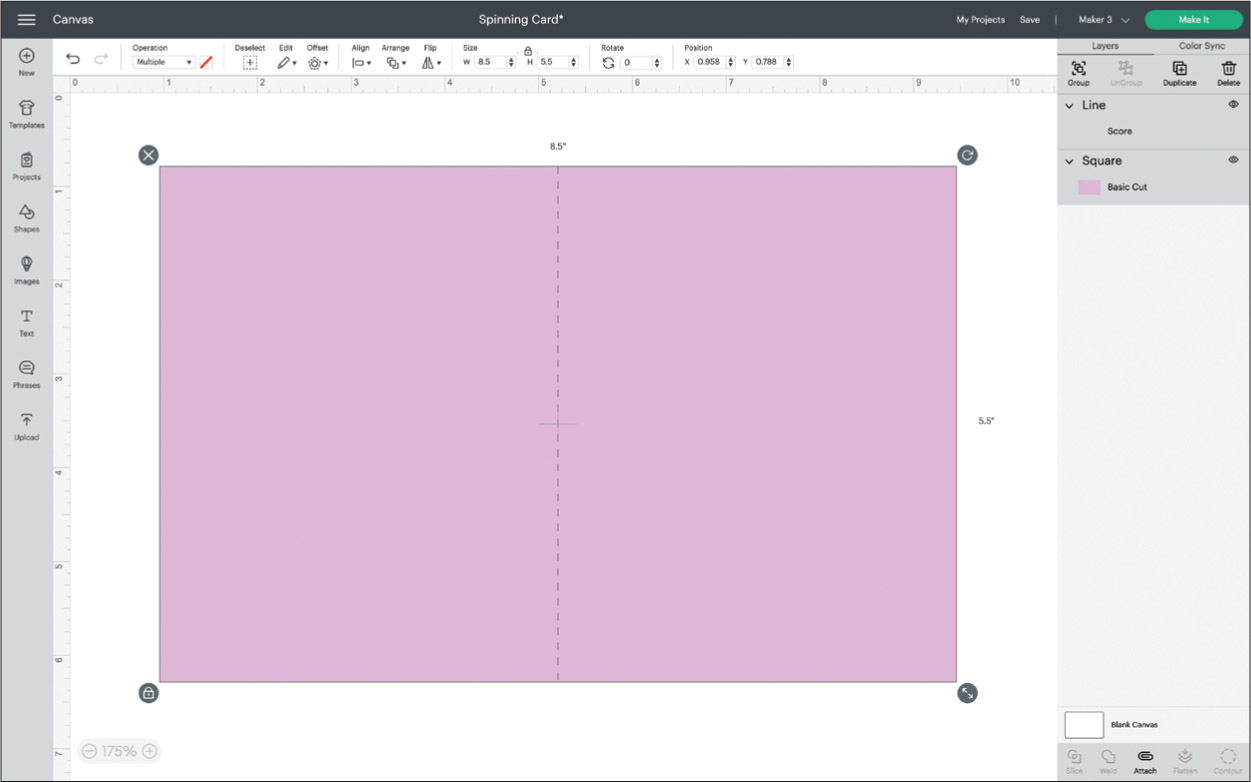
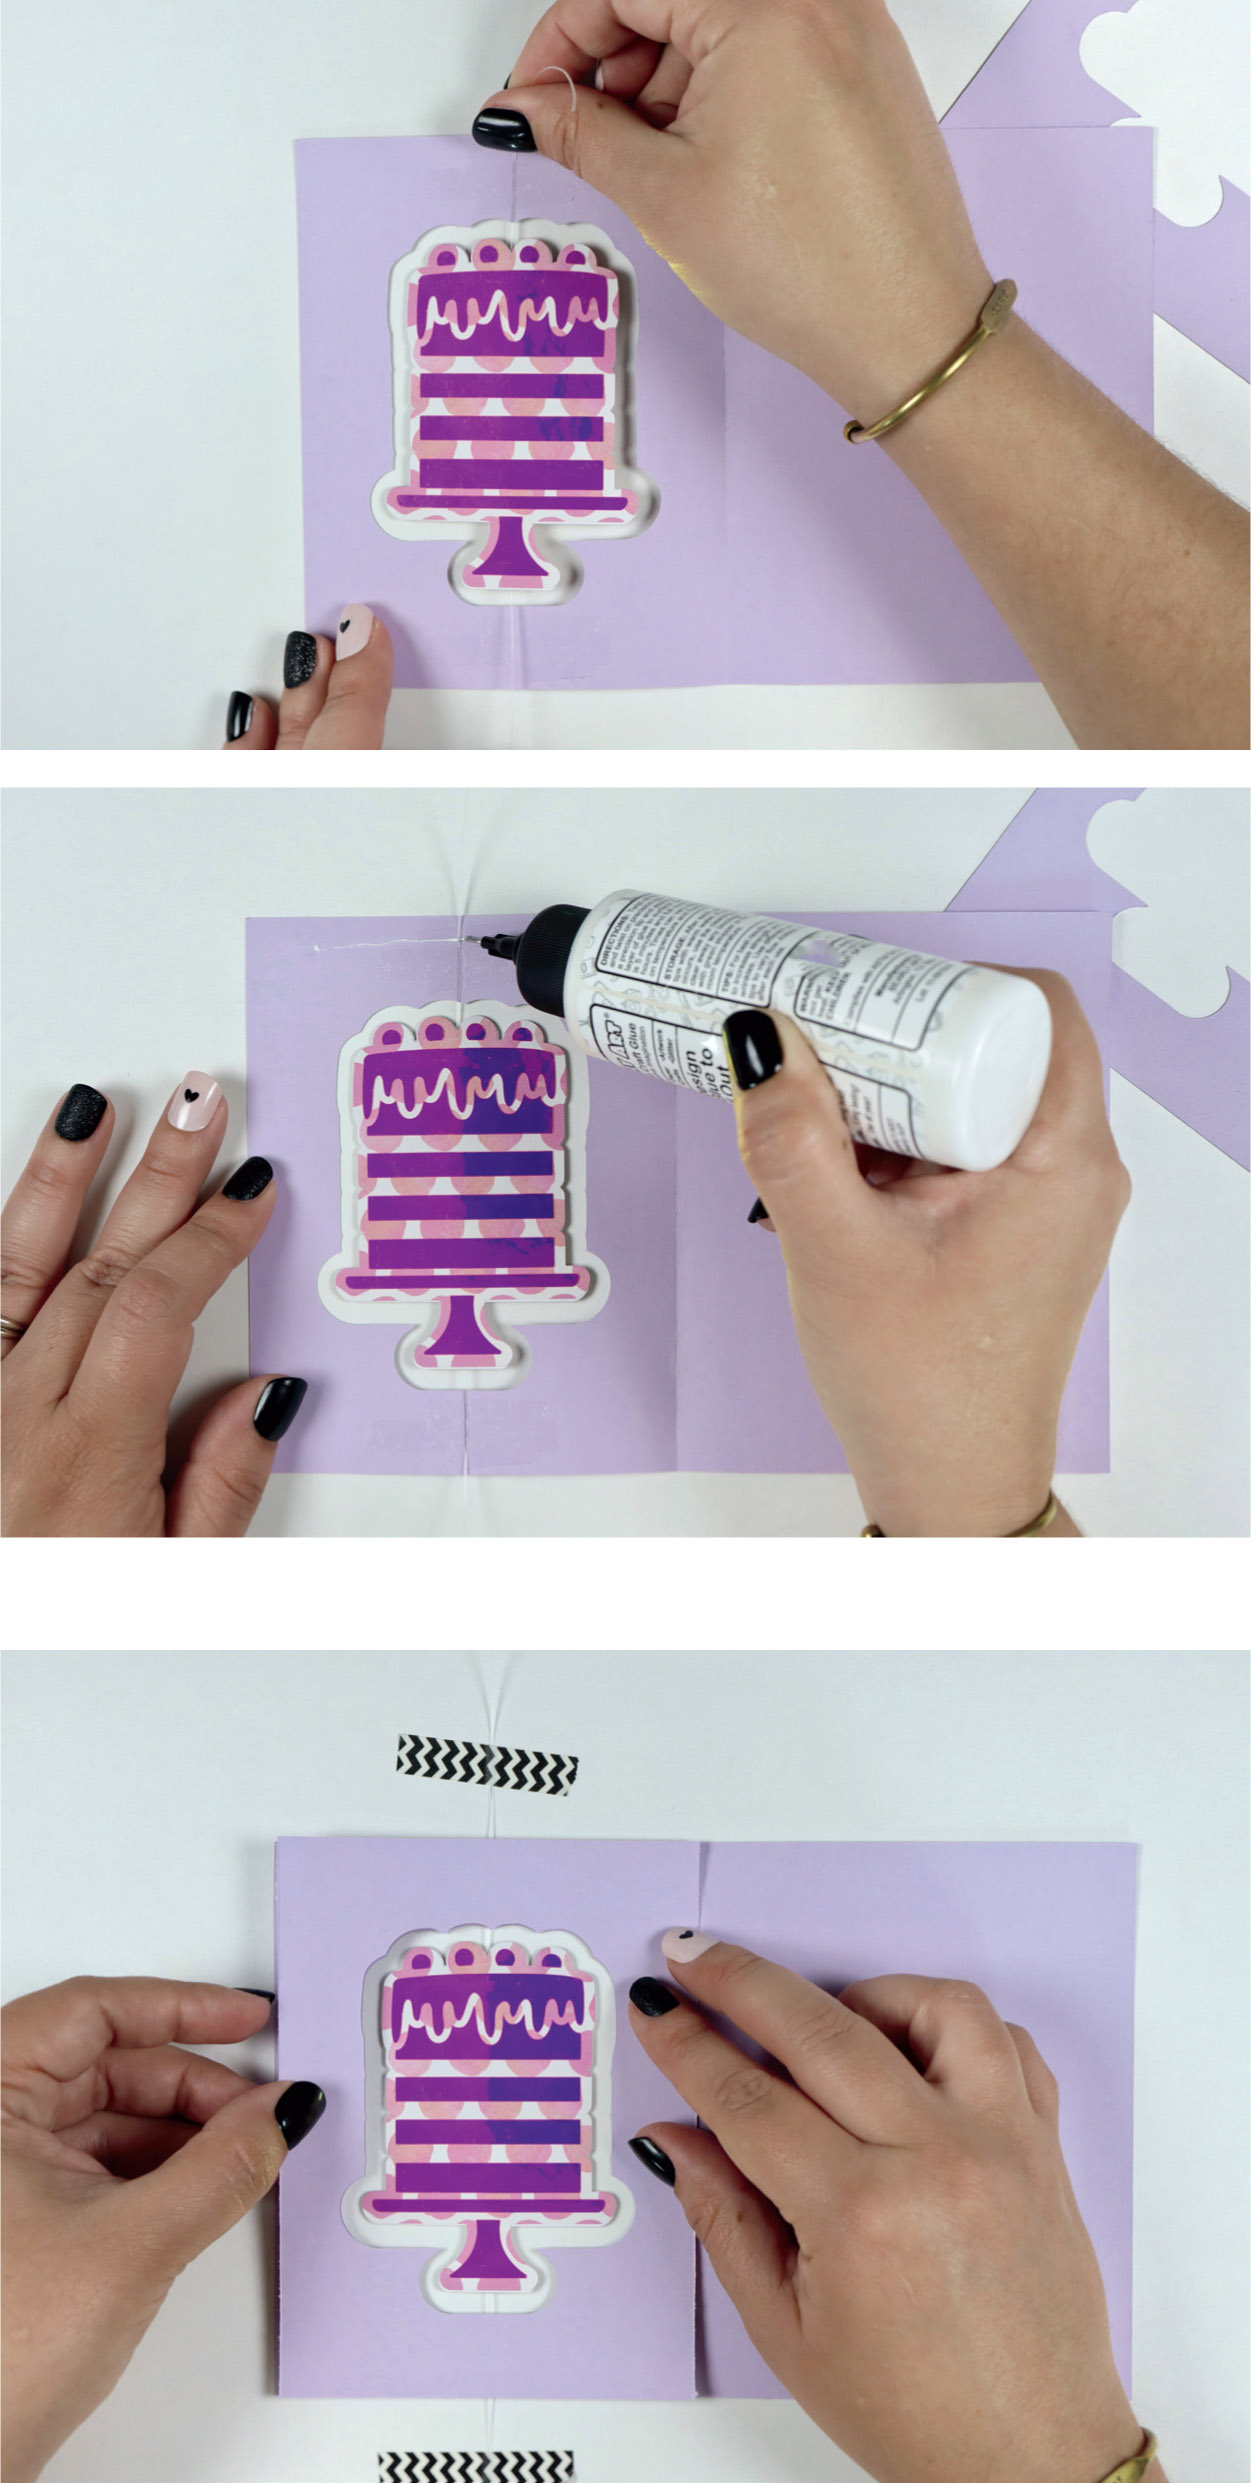
Start with a blank canvas and add your open card shape. The final card will be 4.25” x 5.5” so try to visualize an open card with the measurements 8.5” x 5.5”, as shown in the image here.

Next, add a score line to your canvas. You’ll find this when you open the Shapes tab; it’s the thin line (the first shape listed in the upper left). Once the line appears on your canvas, make sure that the Operation is set to Score. Also change the height of the score line to 5.5” and Align > Center to your full card shape. I also changed the color of the card here so you can clearly see the score line in the center.
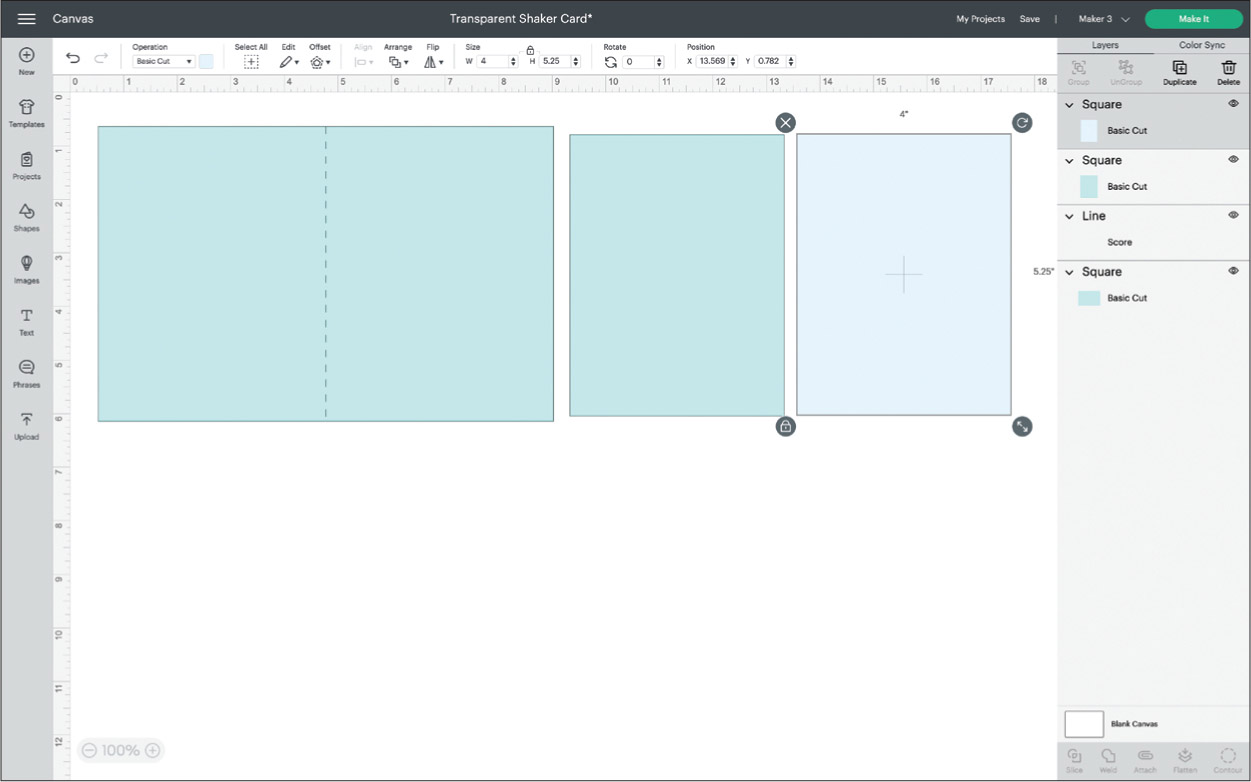
While you’re making rectangles, make one more that is 4” x 5.25” and then duplicate it. Change the colors of these layers: one to match the card and one to resemble the acetate backing layer.

Now let’s bring in the image for the shaker. This Cake on Stand image will make a fun and festive card. Bonus for matching all the other projects in this section! Add the image to your canvas and then size and center it, leaving a bit of room around each edge of the card, like the image here.

Next, make an Offset of the Cake on Stand image. I’d suggest an offset of at least 0.20”.

Now select your new offset layer and the original Cake on Stand image and Slice. Then delete the excess layers and you’ll be left with a canvas that resembles the image here. This new layer will be your foam layer. It may help to keep things organized if you change this layer color to the same color as the foam you will use.

Duplicate your foam layer two times to use for cardstock accent pieces. These will be used as fun cardstock that will cover any visible foam and/ or glue. Change the color of these layers to resemble the cardstock you’ve chosen as your accent. Also, Flip one of these layers. This reversed layer will be used to hide the back of your foam. You’ll find more details on how to create the shaker assembly in the “Make It” section here.
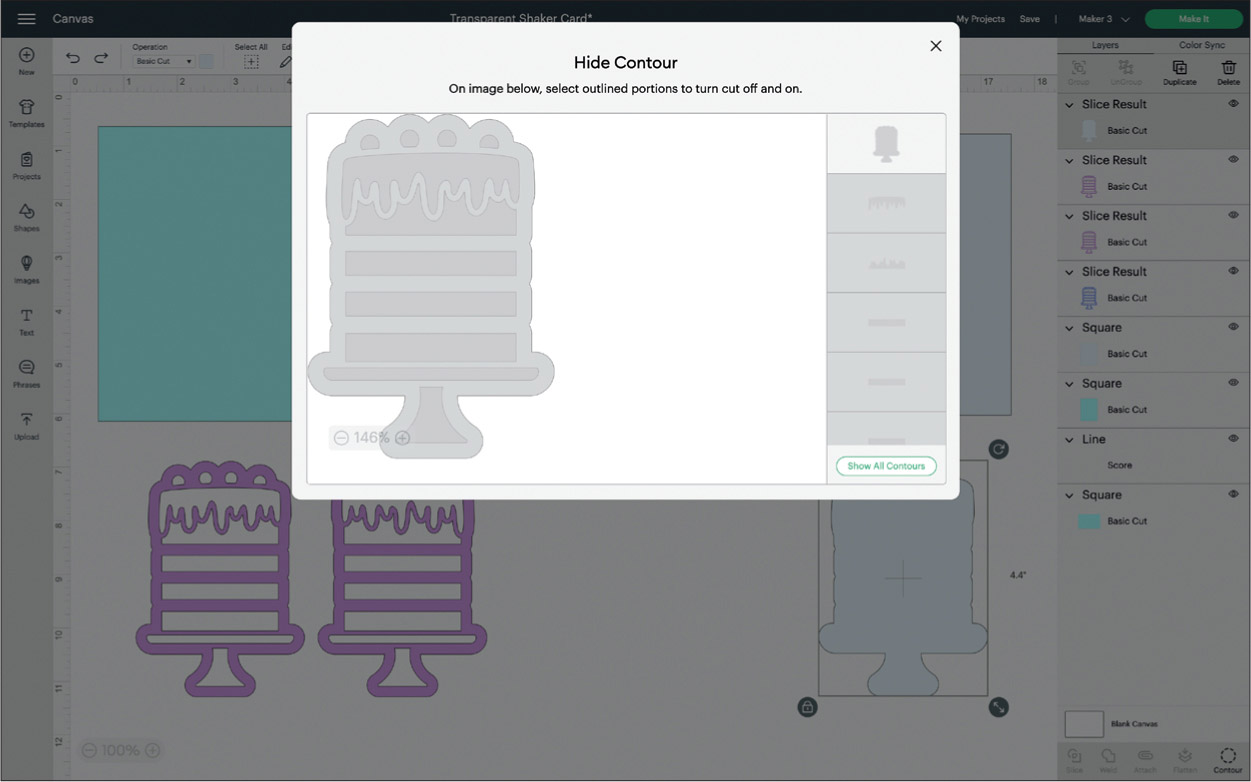
Alright, there are just a few more elements to make. Duplicate the sliced Cake on Stand image one more time to use for a second acetate layer. As is, this won’t keep any shaker pieces in, so we need to use the Contour tool and Hide All Contours, as shown here. After contouring this layer, change it to the same color you have your other acetate layer, shown here in light blue (behind the contour box). You might notice this looks the same as the initial offset layer, which could have just been duplicated, but I wanted to show you the image-editing steps within Design Space.

Now we need to turn this into a transparent card. To do this, bring the inner-card backing layer (same color as your card) and the acetate layer you just made and put them over the full card layer. Line up these elements to the foam layer that is already there. Select the acetate layer and inner-card backing layer and then Slice. You’ve just created new layers. You can get rid of these new layers in a minute but right now don’t move anything—keep everything where it is for the next step.
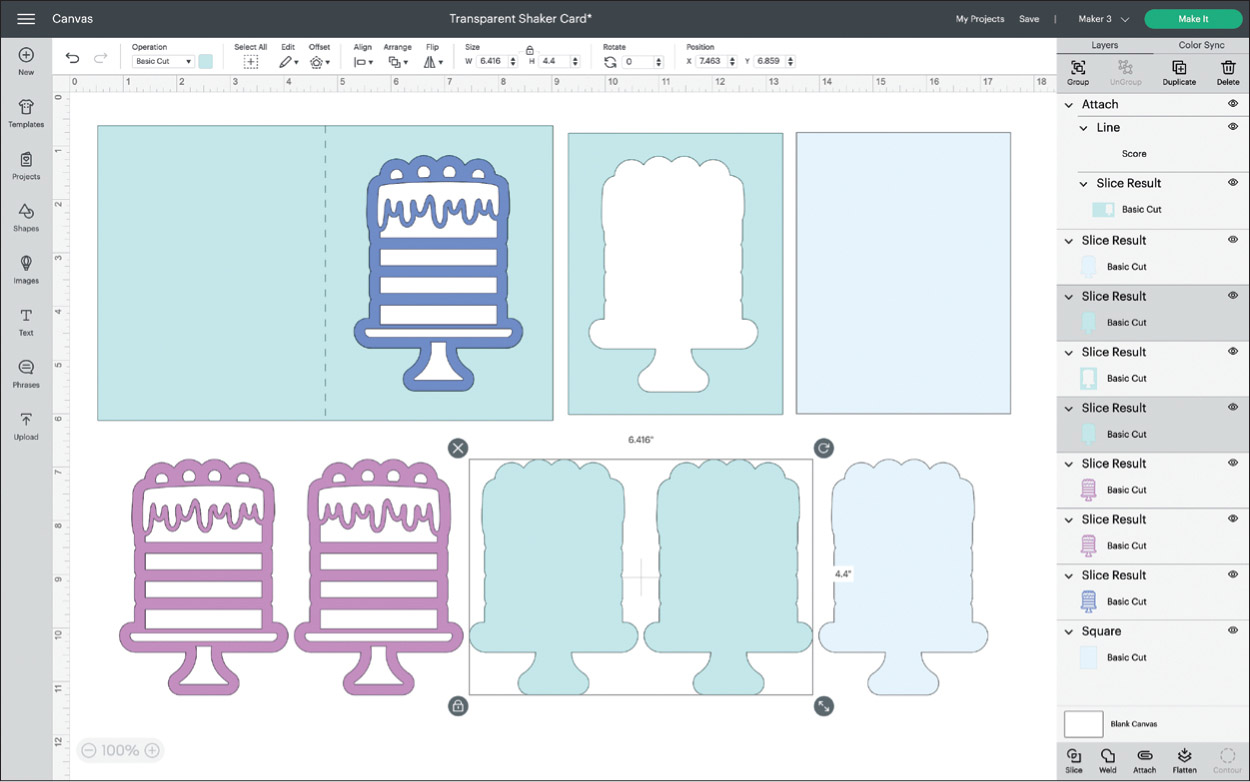
Next, select the full card layer and the acetate layer you just worked with and Slice. Notice that editing with these layers has pushed the score line to the back of the canvas. Select the score line and click Arrange, then Bring to Front. Then select the score line and the full card layer and Attach. Your Layers panel should look similar to the image here. I separated all the layers so you can easily see what should be there. See those two layers of cake selected in the bottom row (the same color as the cardstock)? Delete those two layers.

Before you send your project to the mat, make sure your Layers panel resembles the image here. Use this image as your guide for when you Make It. I hope it helps organize your layers during assembly. Now you are ready to click the green Make It button.
MAKE IT


Use a craft foam that has an adhesive backing, which makes for a much smoother process, rather than having to wait for wet glue to dry on both sides of the foam. It also helps to eliminate any of your shaker elements from adhering to excess glue. When cutting your craft foam, the Knife Blade in the Maker will give you the best results, though it is possible to cut using the Deep-Point Blade. Tweezers are a great tool for weeding foam.

Now that your layers have been cut and prepped, follow this order of assembly to create your shaker cake topper.
From the front of the card to the middle:
- »Accent cardstock
- »Acetate
- »Craft foam
- »Full card
- »Acetate backing
- »Inner-card backing
- »Inner-accent cardstock
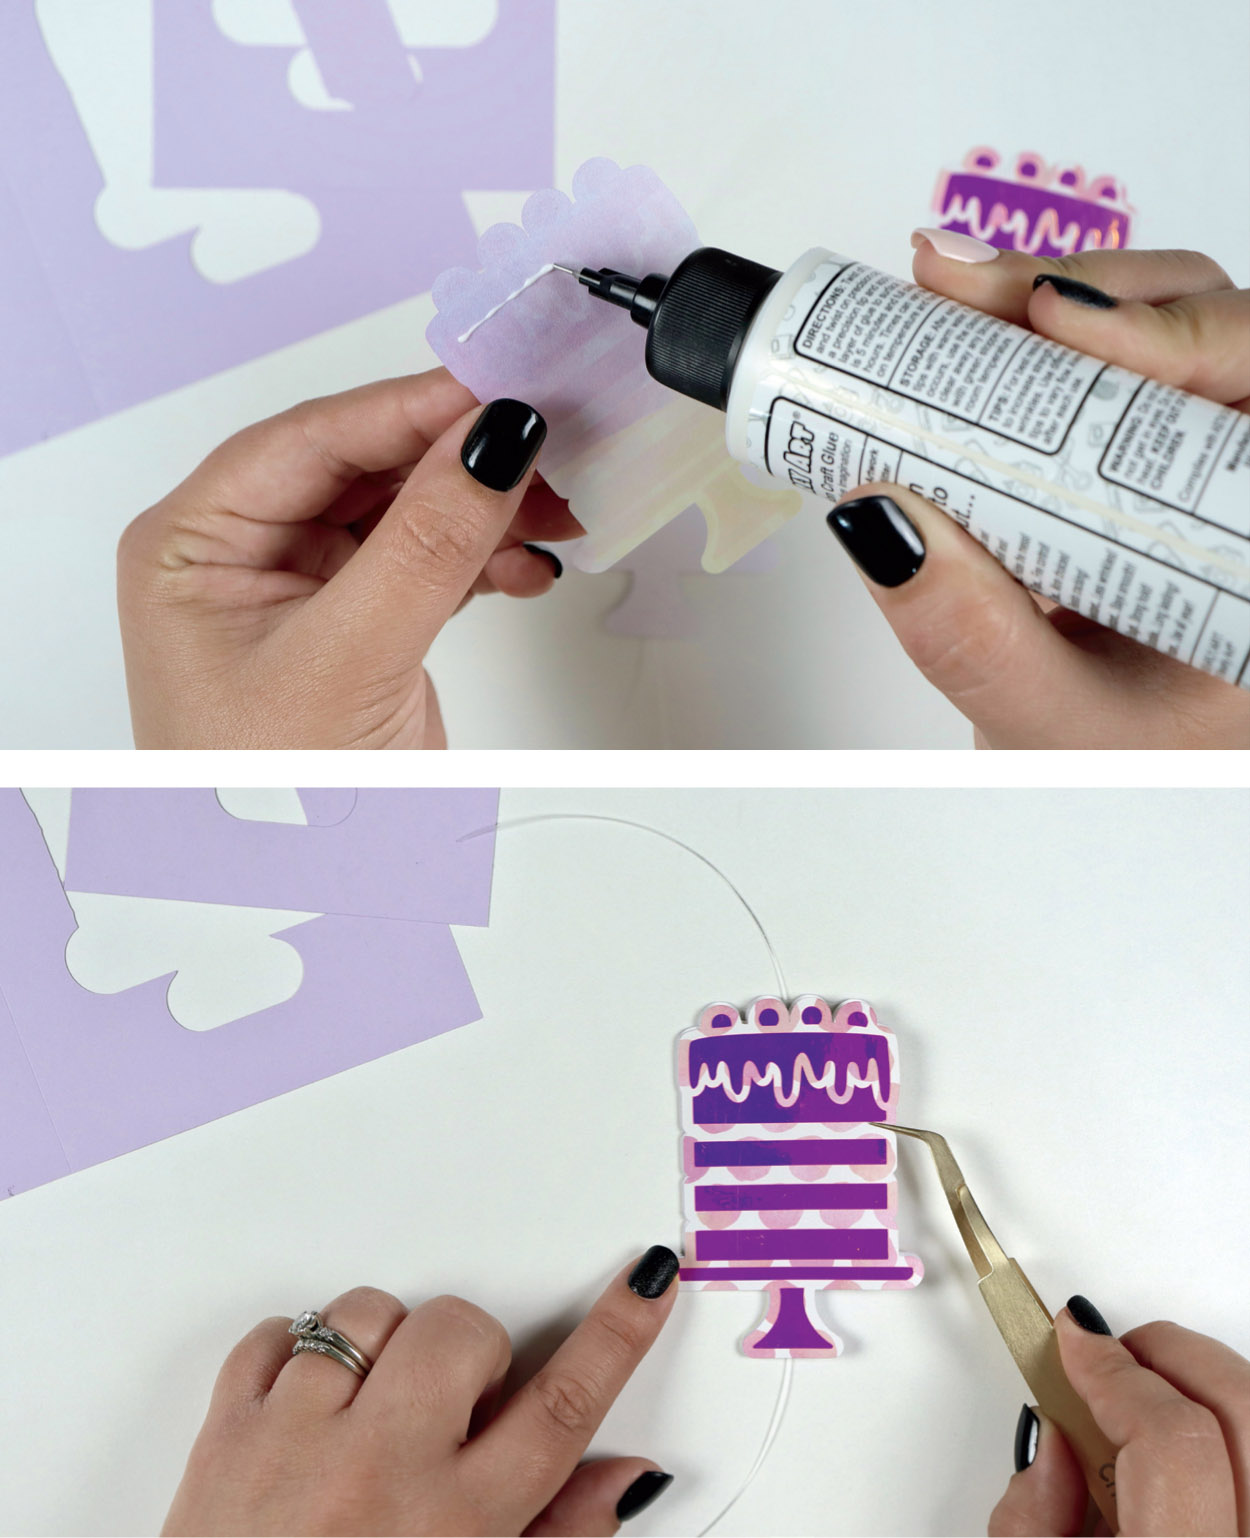
Start by adhering your foam layer and cake-shaped acetate. Adhesive craft foam makes this step very easy and mess-free. If you’re using glue, wait until your glue dries before moving on to the next steps.

Now comes the fun part of filling each little pocket with glitter and shaker bits. These cute little sprinkles made of polymer clay make a perfect addition to a cake shaker. You can put the same kind of shaker elements into each section or switch it up and add variety.
Carefully set your filled foam aside. Grab the inner-card backing and the acetate backing and glue these pieces together.

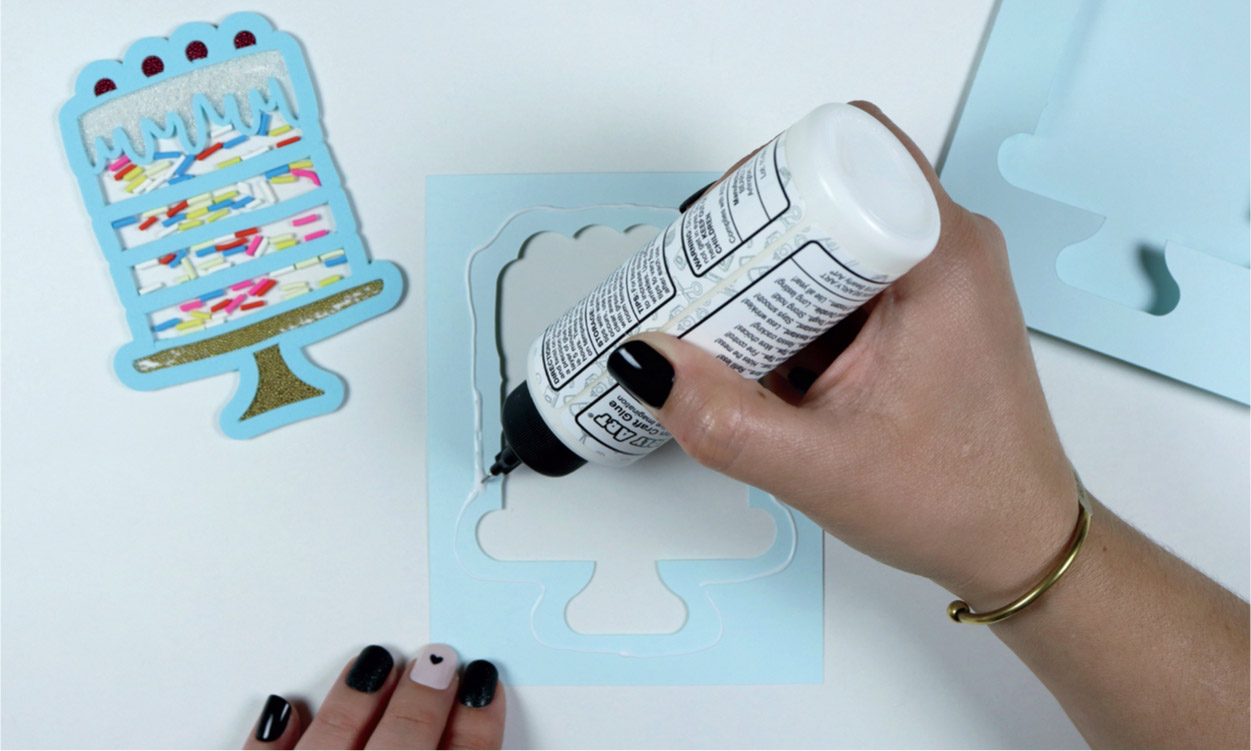
Back to the shaker. Apply a thin line of glue along the exposed foam. Taking the piece of acetate and cardstock from the previous step, acetate side facing down, carefully line up the edges of the foam with the cutout of the cardstock. This step is shown in the image to the left. Make sure there are no gaps in the glue, which will ensure your glitter and shaker bits don’t fall out once fully assembled. Set this aside to dry before moving on.

When the pieces you just glued are dry, grab the matching accent cardstock piece and glue it to the exposed foam. Line this up to where the edge of the cardstock meets the foam, as shown here.

We will now move on to the front of the card. Open your card and apply glue along the inside. Then nest the other assembled piece within the cutout of the card.

For the final step, apply the last piece of accent cardstock to the front of the card. Again, apply a thin bead of glue and line up your pieces to cover the foam.
When all the pieces have dried, shake it baby, shake it!
MAKE IT EXTRA
Admittedly, shaker cards are already a bit extra, but if you’d like to go even further, you can add more embellishments inside the shaker that are small enough and will shake and add excitement. You can also add extra layers for more dimension. If you’re looking for a matching envelope for your new shaker card, check the Envelope project (found later in this section). So cute!
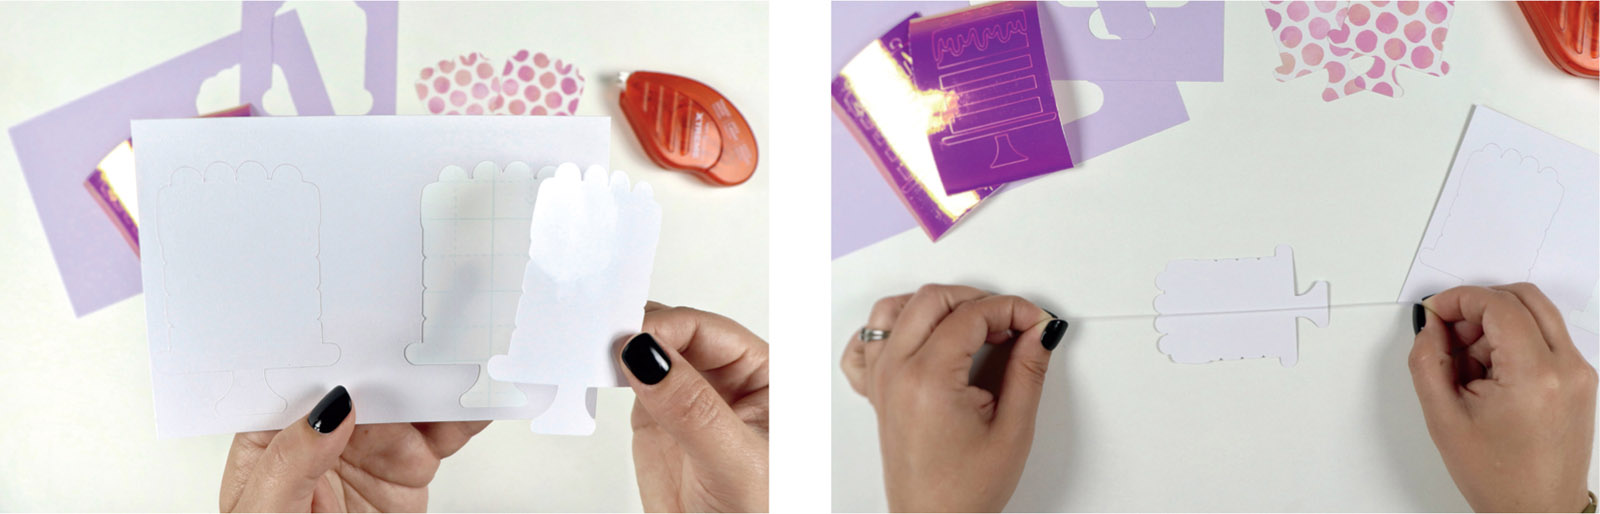
Spinning Card
This card has a bit of magic in it. Not only does the cake look like it’s levitating, but it can also spin! When gifting these cards, I recommend twisting the cake a few times before placing it inside an envelope. When the recipient opens the card, the cake will spin. So fun!
Materials Needed
Cardstock
Sticker cardstock (optional)
Fishing line
Holographic vinyl
Transfer tape
Scissors
Glue/adhesive
Weeding tool
Machine Compatibility
Any Cricut machine
Image Used
Cake on Stand #M2841CC1E
DESIGN IT

Start with a blank canvas and add your open card shape. The final (folded) card will be 4.25” x 5.5” so the open card will measure 8.5” x 5.5”, as shown in the image here.
Next, add a score line to your canvas. You’ll find this in the Design Panel, on the left, in the Shapes tab (it’s the line in the upper left). Once the line appears on your canvas, make sure that the Operation is set to Score. Also change the height of the score line to 5.5” and select Align > Center to your full card shape. I also changed the color of the card here so you can clearly see the score line in the center.
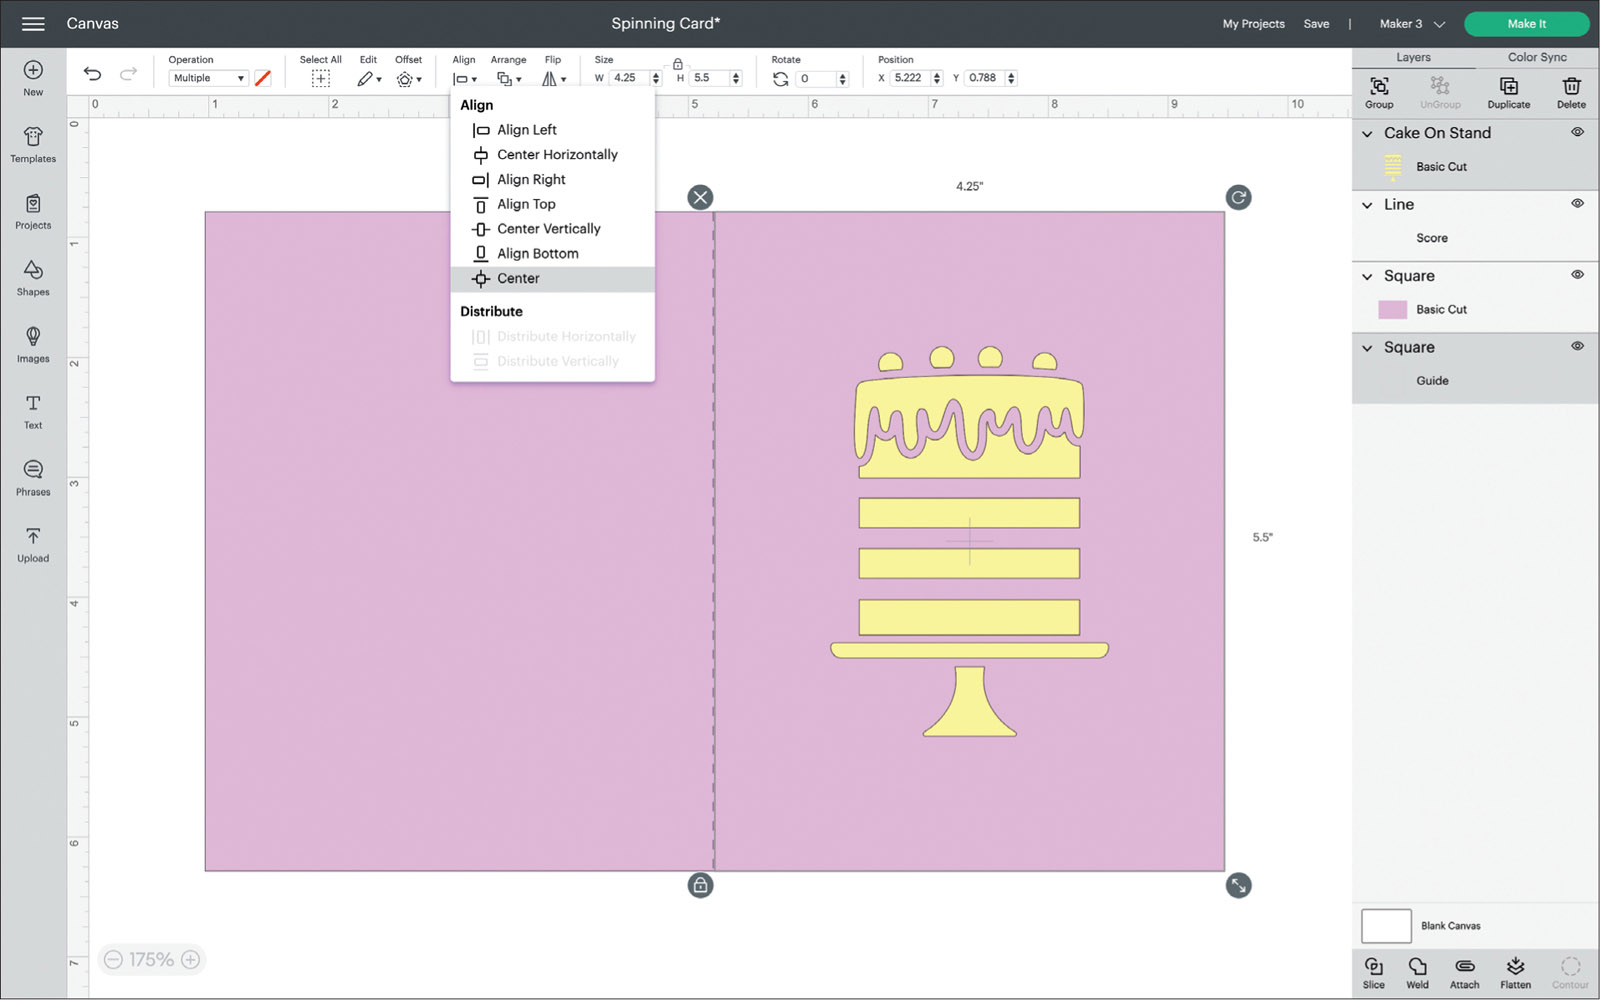
Now let’s bring in the image that will spin on this card. This cake image seems to be the theme of the chapter so let’s continue with it! Add the image to your canvas. Also, bring in a rectangle and size it to 4.25” x 5.5”, then change this layer’s operation to Guide. Align the guide to the right half of the card, which will make centering the cake image easier. You can send the guide layer to the back with the Arrange tool. Next, select the cake layer and the guide and then select Align > Center, making sure to leave a border to allow room for the offsets we will create in later steps.
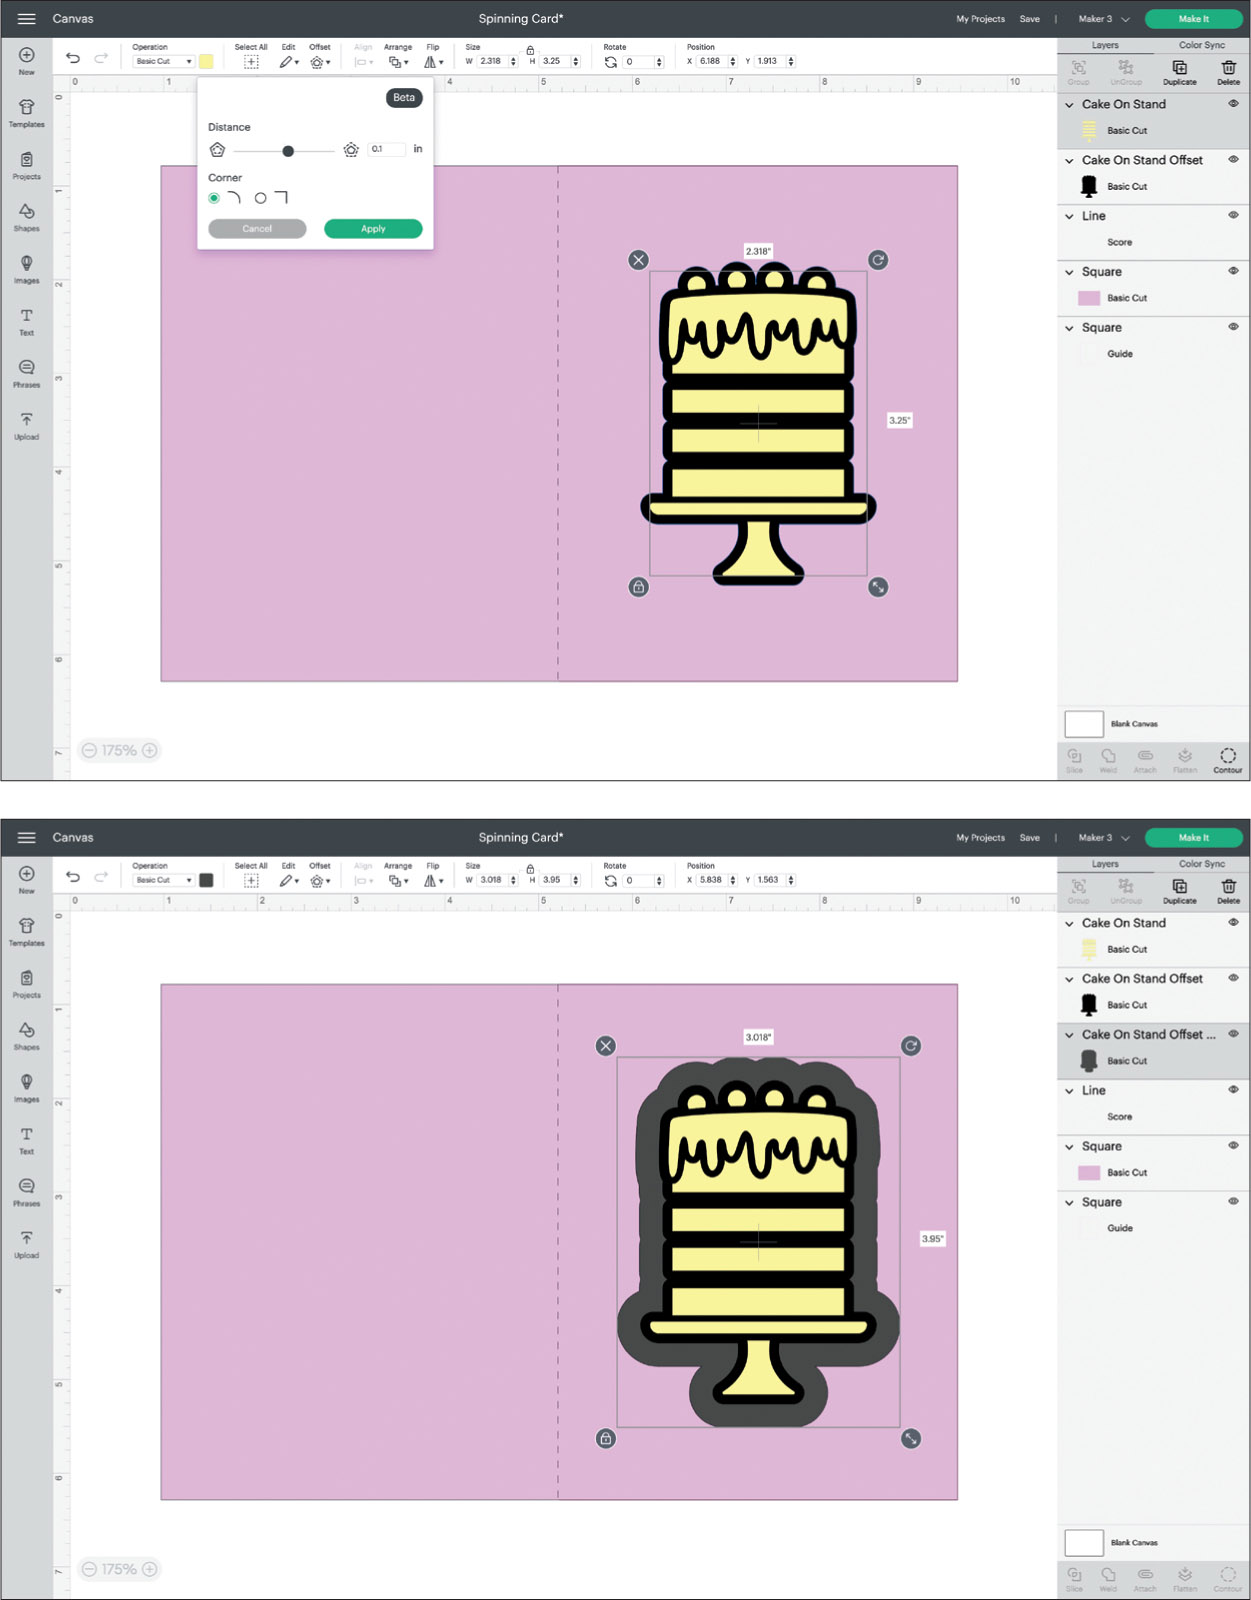
The next step is to create a narrow offset to the Cake on Stand image. An offset of 0.10” is good. With the offset layer now selected, add another offset. This time, make the offset a little larger: about 0.25” will work here. Your canvas should look similar to the images here.
You now have the basic shapes of this card. Next, you will create the additional layers to complete this spinning card.
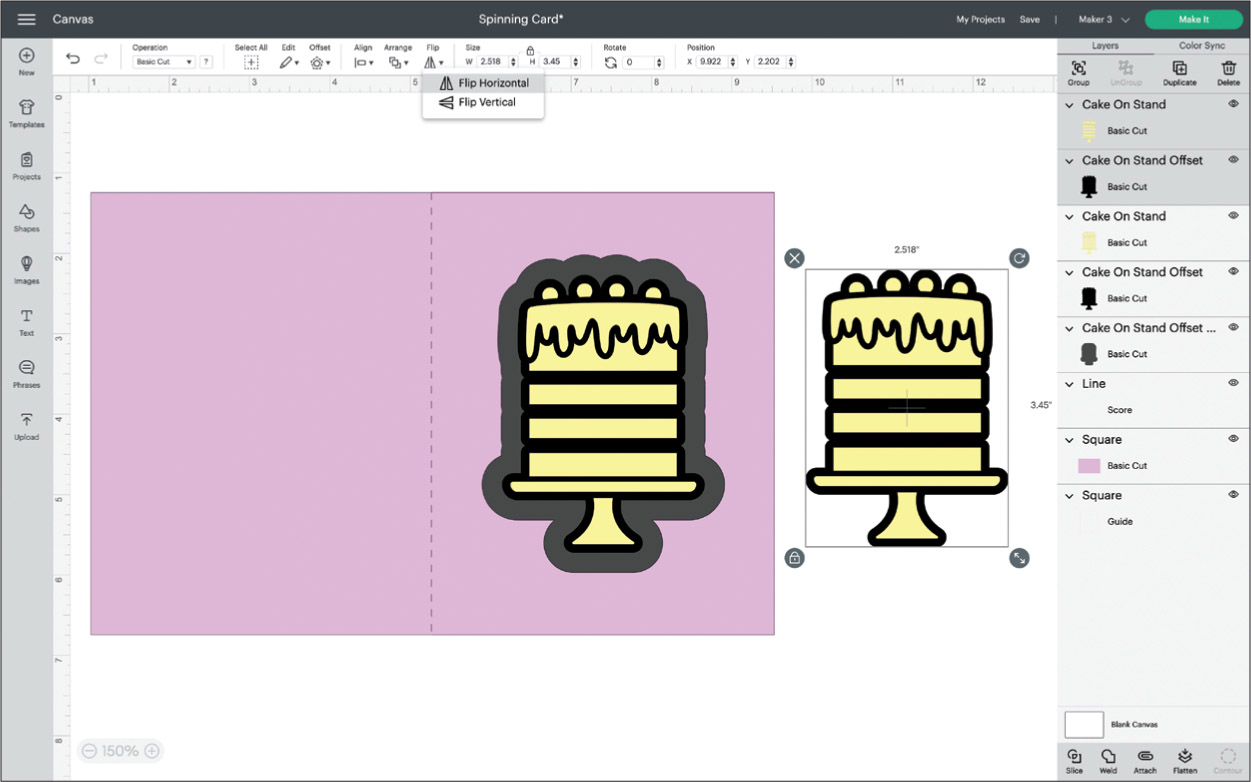
Select the original Cake on Stand layer and the smaller offset and then Duplicate them. Flip these two layers Horizontally, as shown here.

Add one more rectangle to the canvas, making this one 4” x 5.5”: just slightly narrower than the final card will be. This will be used on the inside of the card (more on that in the Make It section). Before you move on to the next step, Arrange this new rectangle to be under your cake layer and all the offsets. Your canvas should look similar to the image here.

Now this is where the magic happens! Select the largest offset layer and the narrower rectangle, then Slice. You can see in the image here that there are now three Sliced layers. Delete one of the cakeshaped layers.

Select the other freshly sliced cake layer (sounds yummy!), the largest rectangle, and the score line and Attach. This will move all these layers to the top of your canvas, so you will need to Arrange and Send Backward until your cake and offset layer are at the top again, like the image here.

You may have noticed in the Materials list, there is mention of an optional sticker cardstock, which will make the spinning image sturdier and makes it easier to add the fishing line. These layers can also be made out of normal cardstock. Let’s make these layers now by duplicating both of the smallest offset layers. Changing the layer colors will tell the machine that you’ll be using a different material. If you will make them out of normal cardstock, it’s best to keep all the cardstock layers the same color.
I’ve separated out all the layers in the image here and labeled them to make the assembly process clear for you. When all your elements are ready, click on the green Make It button and send your project to the mat.
MAKE IT
While your machine is cutting, stay close by because you’ll need to change the settings for the various materials. After everything is cut, you’ll start by assembling the spinning element, working from the inside out.
Grab your fishing line and your sticker cardstock or normal cardstock offset layers. Cut a piece of fishing line about 8” long—you just need it to be a bit longer than your whole card when it’s assembled. Lay the cardstock down sticky side up. If you are working with normal cardstock, apply a bead of glue down the center line. Now take the fishing line and lay it across the center, like the photo here.
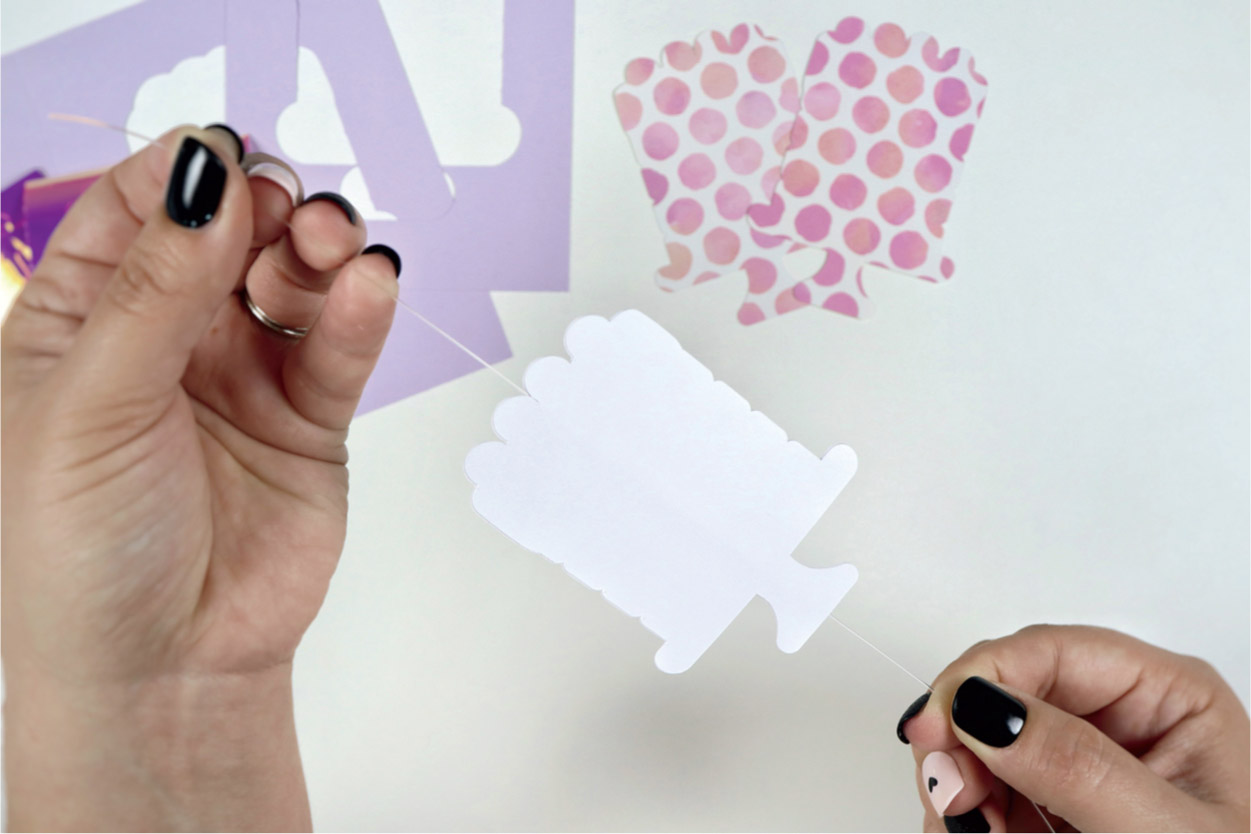
If you’re using glue, hold the fishing line tightly and keep it centered until the glue dries enough to secure the line. Next, add the other offset layer/sticker cardstock, making sure to line everything up.
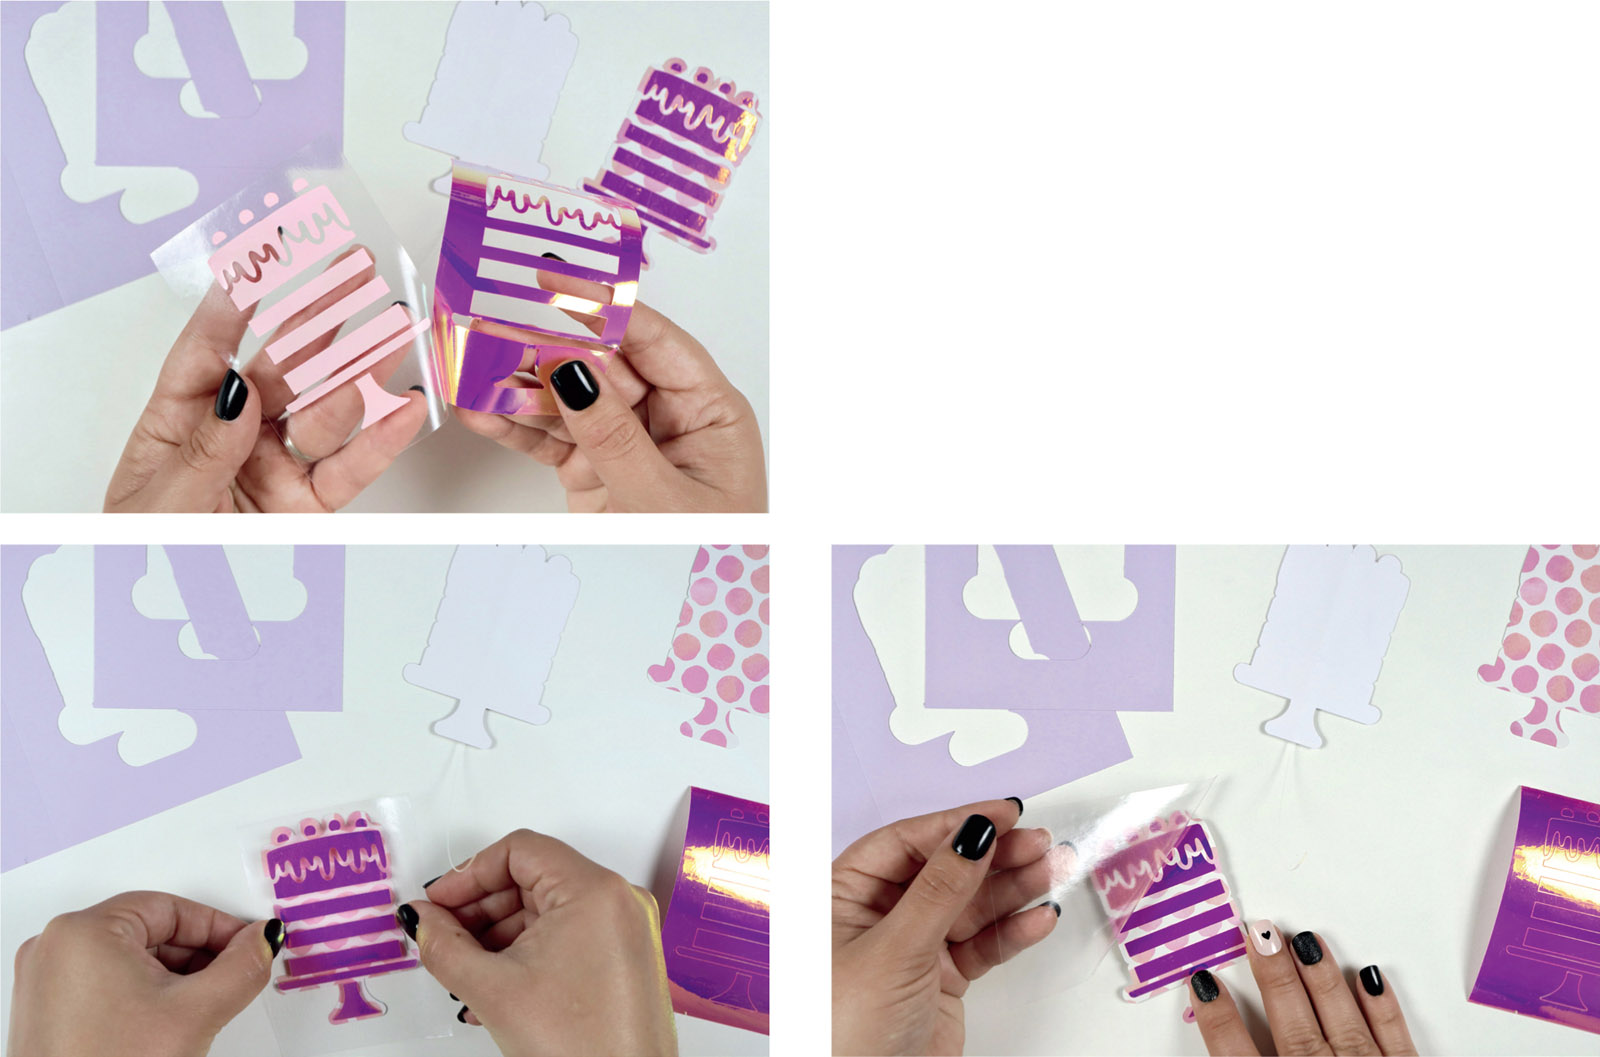
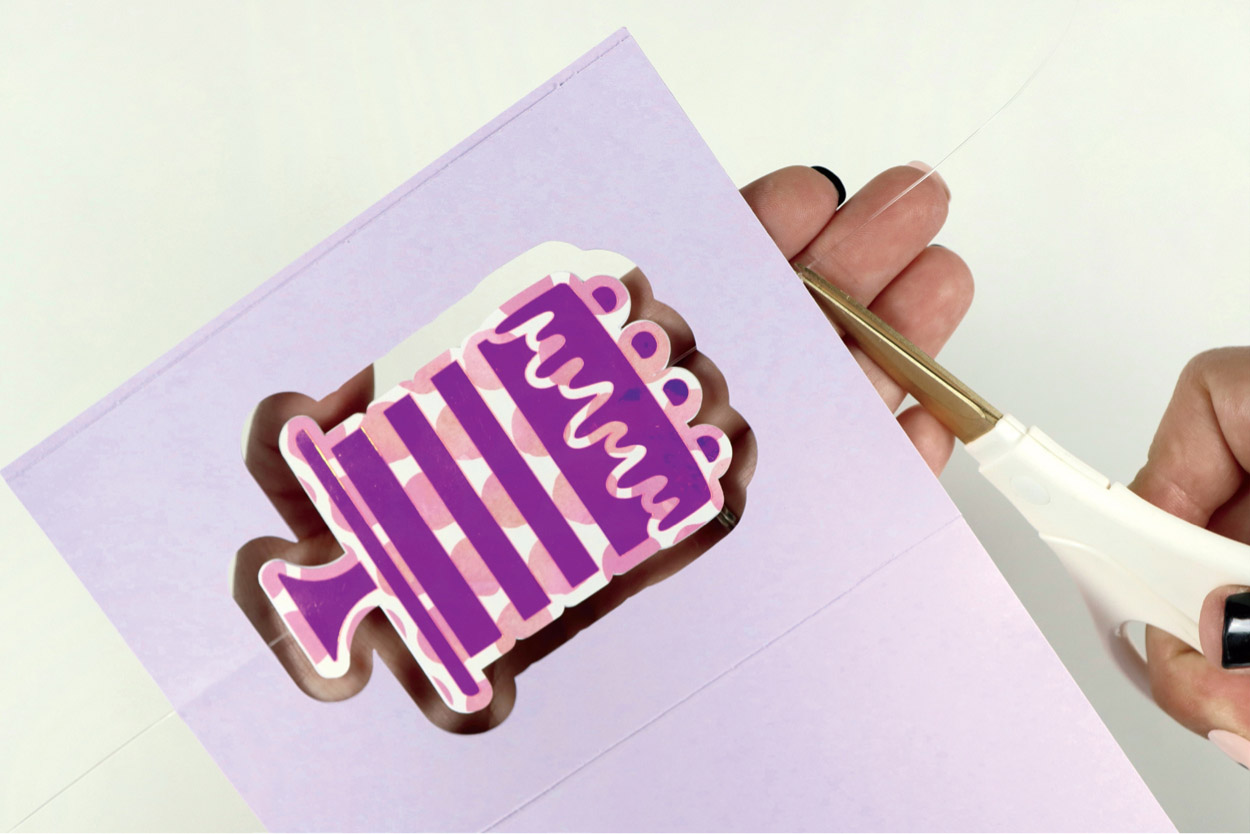
Set this spinning contraption aside and begin to weed your vinyl by removing the unwanted parts, leaving only your cake image. Using transfer tape, apply your vinyl to your accent cardstock, then peel away the transfer tape. Repeat this process for the other matching vinyl and cardstock layers.
Apply glue to the back sides of these layers and adhere them to the matching sides of the cardstock attached to the fishing line.
Using a quick tack adhesive or glue runner, apply a strip across the top and bottom of the inner side of the full card, as shown here.
Next, stretch the fishing line across the inside of the card, making sure to center it. Apply more adhesive across the top, bottom, and all edges of the inner side of the full card, then adhere the inner-card backing to hide the string.
Now for the final step. When all the glue is dry, trim the excess fishing line from the top and bottom of the card. Then, take it for a spin!
MAKE IT EXTRA
I hope this project has sparked all sorts of creative ideas for you! Although symmetrical images are the best when creating spinning cards, there are always workarounds. You could apply vinyl to a circle or square and have that be the spinning element. You could have multiple spinning elements on one card. The spinning piece can be vertical or horizontal. Truly, you could do so many things with a spinning card. I’d love to see what you create!
If you’re looking for an envelope for your fantastic spinning card, flip on over to the Envelope project in this chapter for directions on how you can make a custom envelope that matches this sweet spinning card!
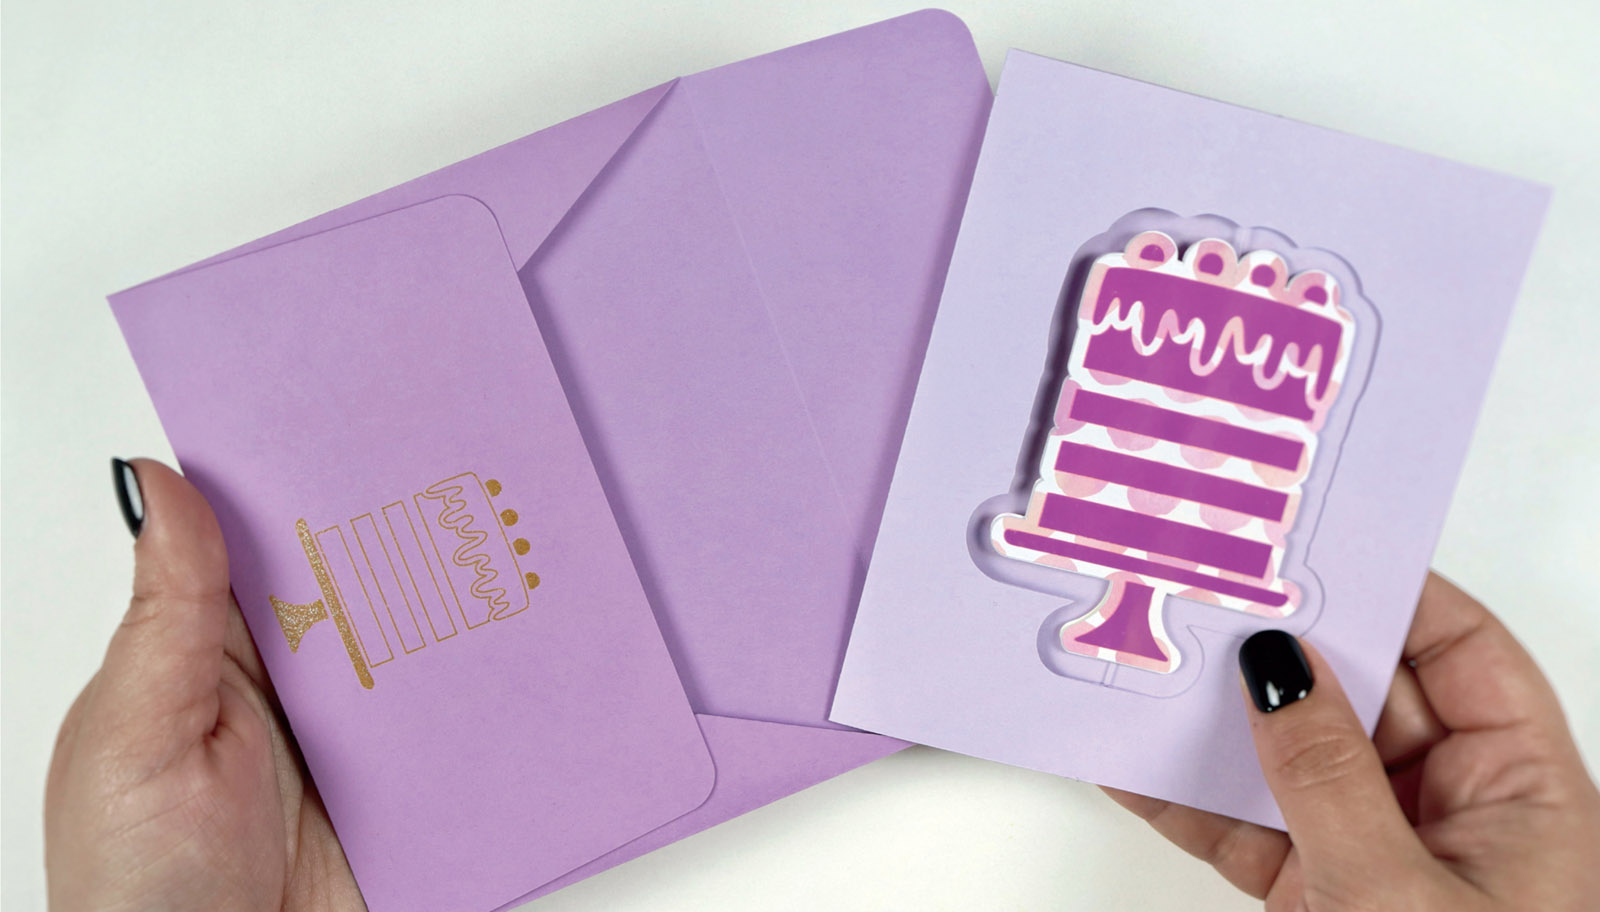
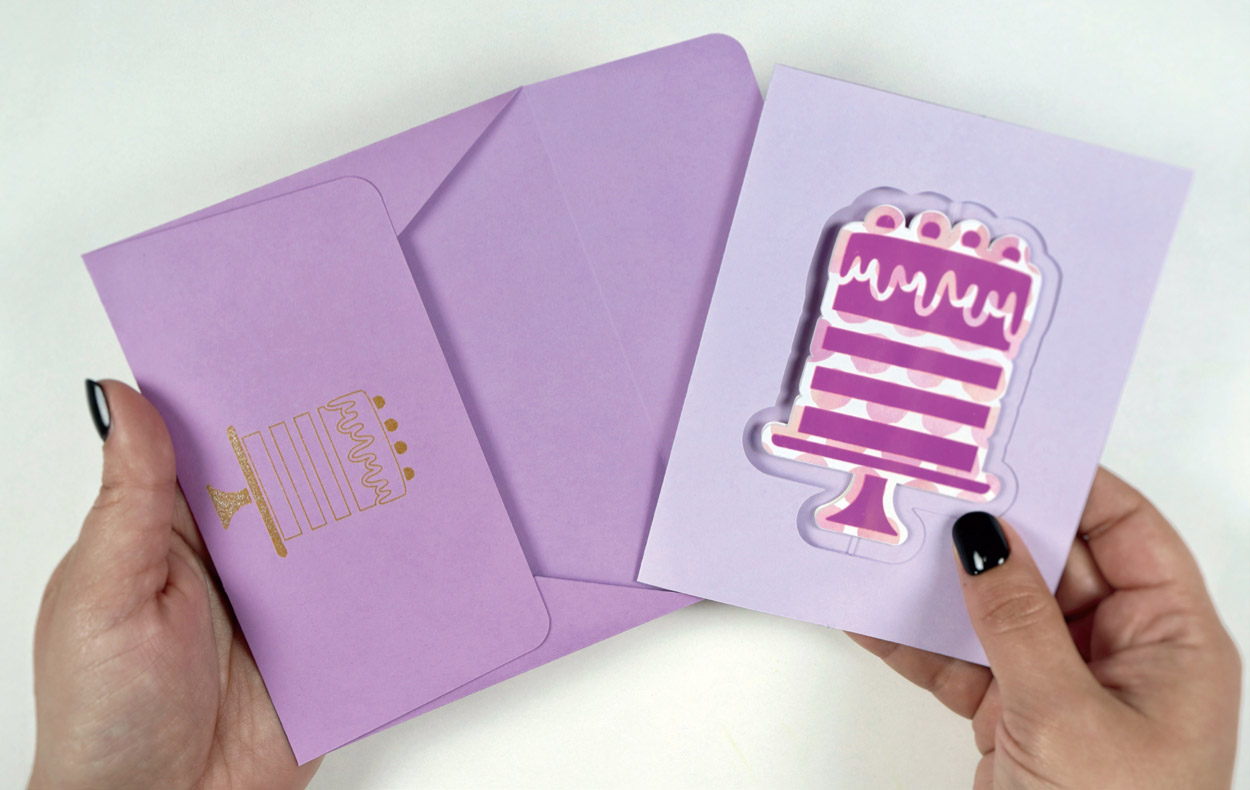
Envelope
The perfect addition to any handmade card is a handmade envelope! Your Cricut machine makes creating custom envelopes a quick and simple process. Of course, you can always add as many elements as you like. In this project we’ll use the writing feature of your Cricut machine, which makes addressing and embellishing your envelopes fun and easy.
Materials
Cardstock
Cricut pen
Scraper tool
Glue/adhesive
Machine Compatibility
Any Cricut machine
Images Used
Cake on Stand #M2841CC1E
Envelope #M4131B
DESIGN IT

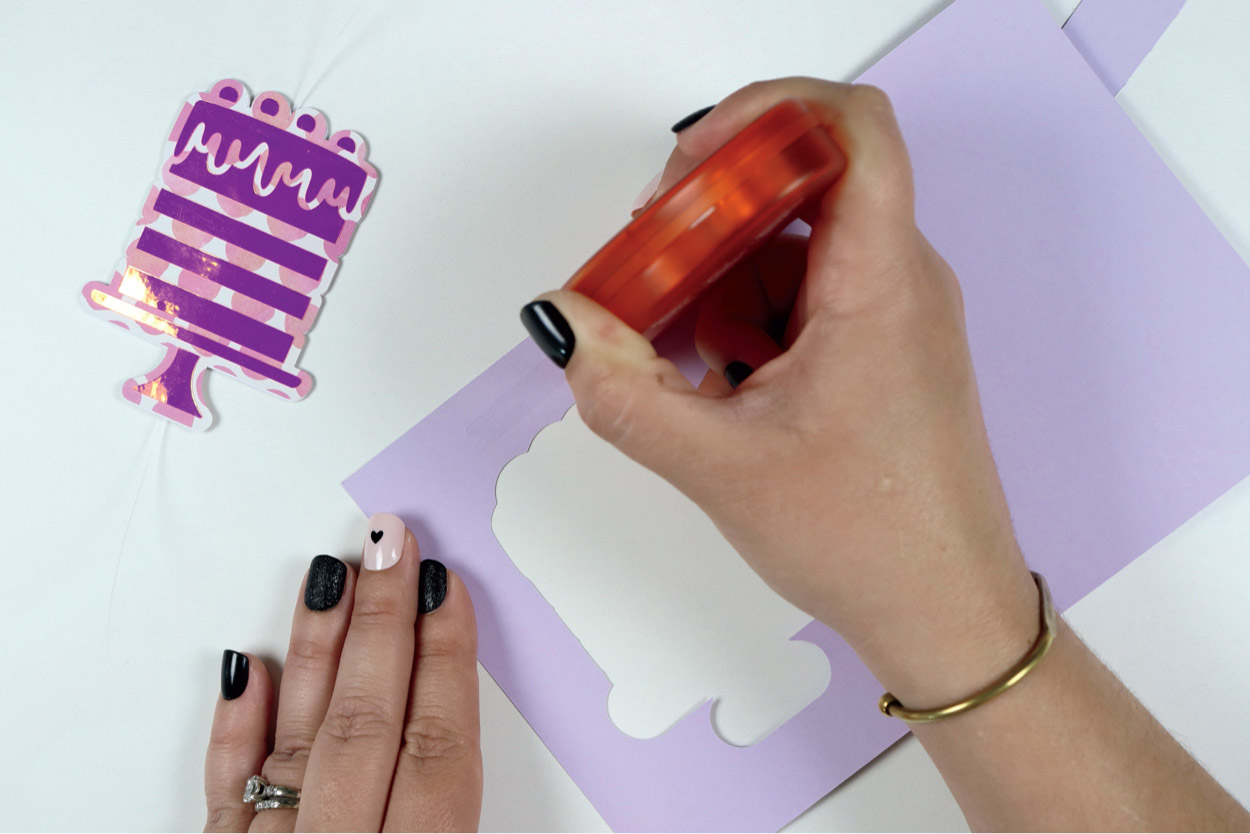
The first step is to add the Envelope image to your canvas. Cricut doesn’t automatically know what size card you’re working with, so you’ll need to resize the Envelope image, making sure to keep the envelope layers grouped as you resize. To size your envelope to match your card, add a square or rectangle shape to your canvas and resize it to the same size as your card. Change that layer into a Guide, from the Operation drop-down menu, like the image here.

Using the Guide, resize the envelope so the guide has a small border within the inner rectangle of the Envelope image. Your canvas should be similar to what is shown here.

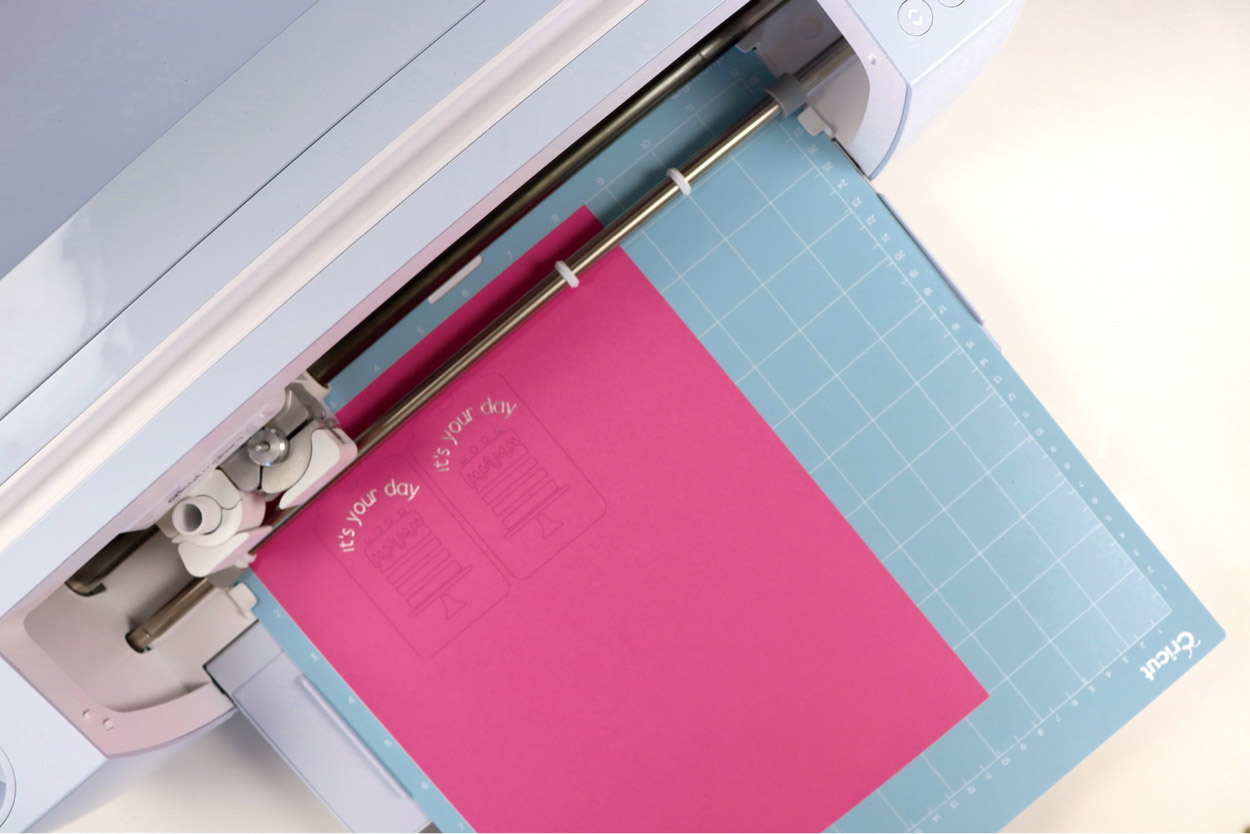
If you’d like to add text to your envelope, use the Filter option in the Text box and check the Writing box. This will give you all the options that will give you the best font results. Your Cricut machine writes by outlining the font unless the font is labeled as a Writing font. Keep that in mind when selecting your font.
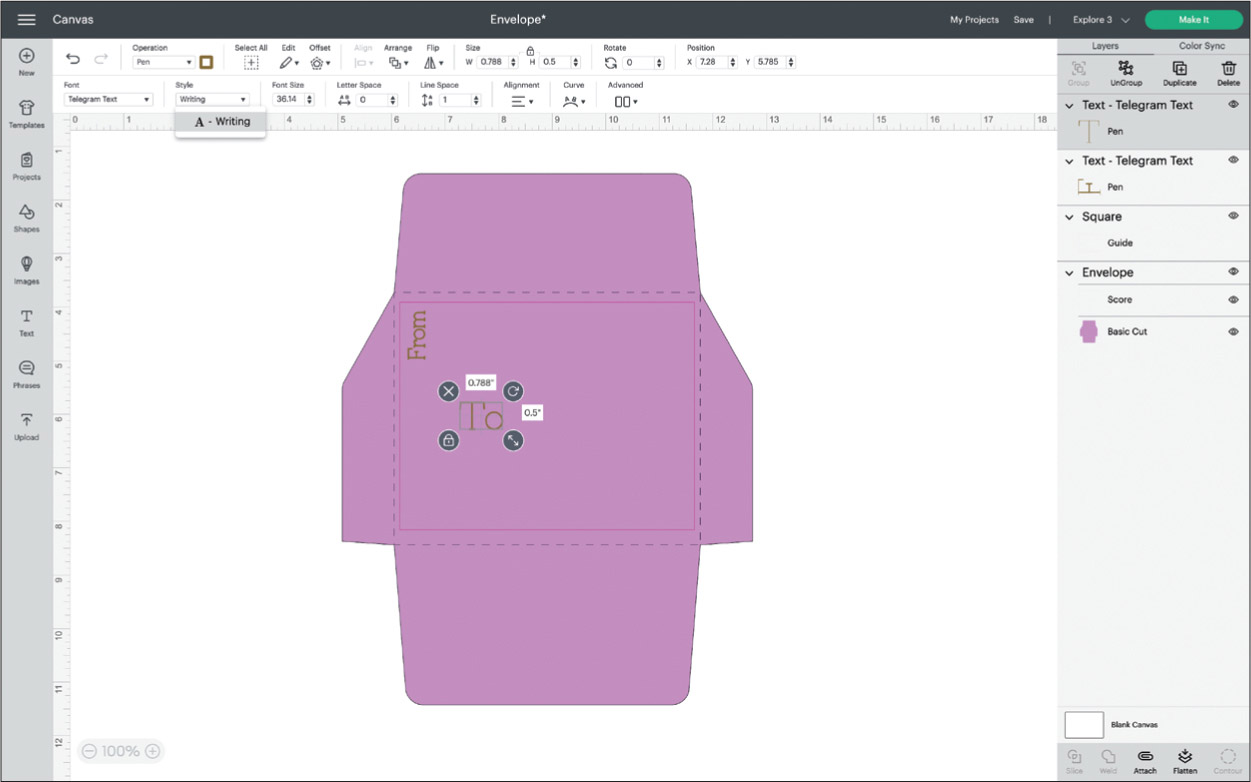
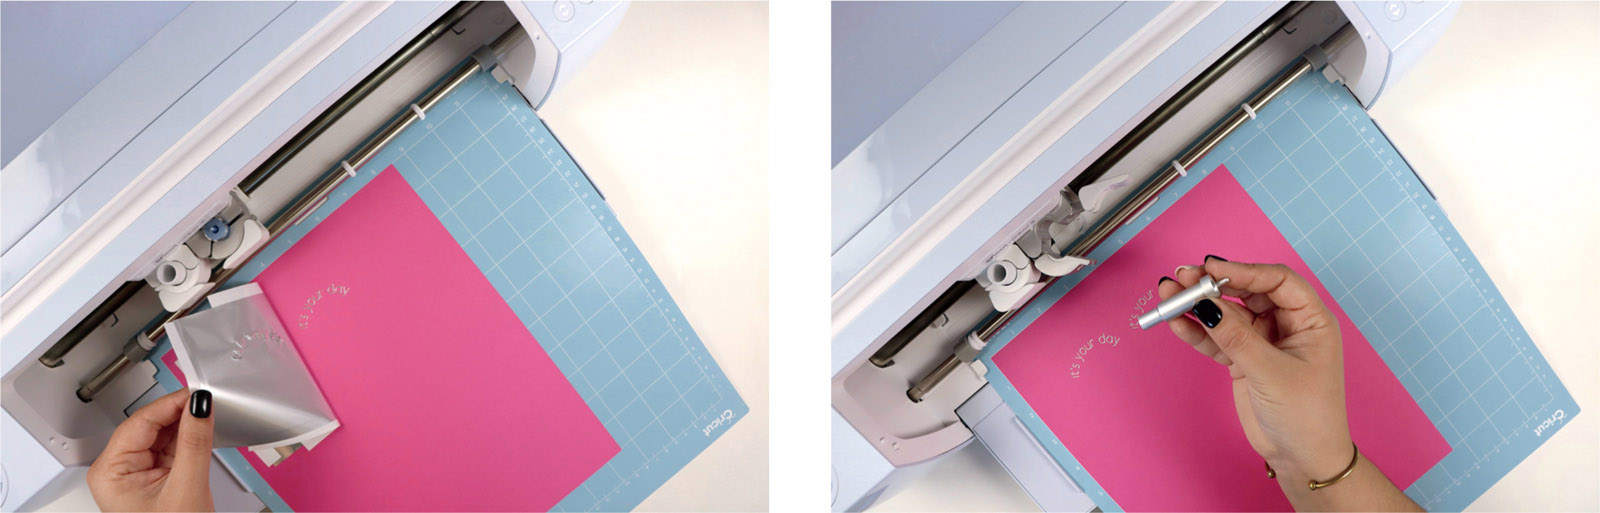
Size and rotate your text however you’d like it to be written on your envelope. Double-check that your text layers say Pen and choose your pen color.
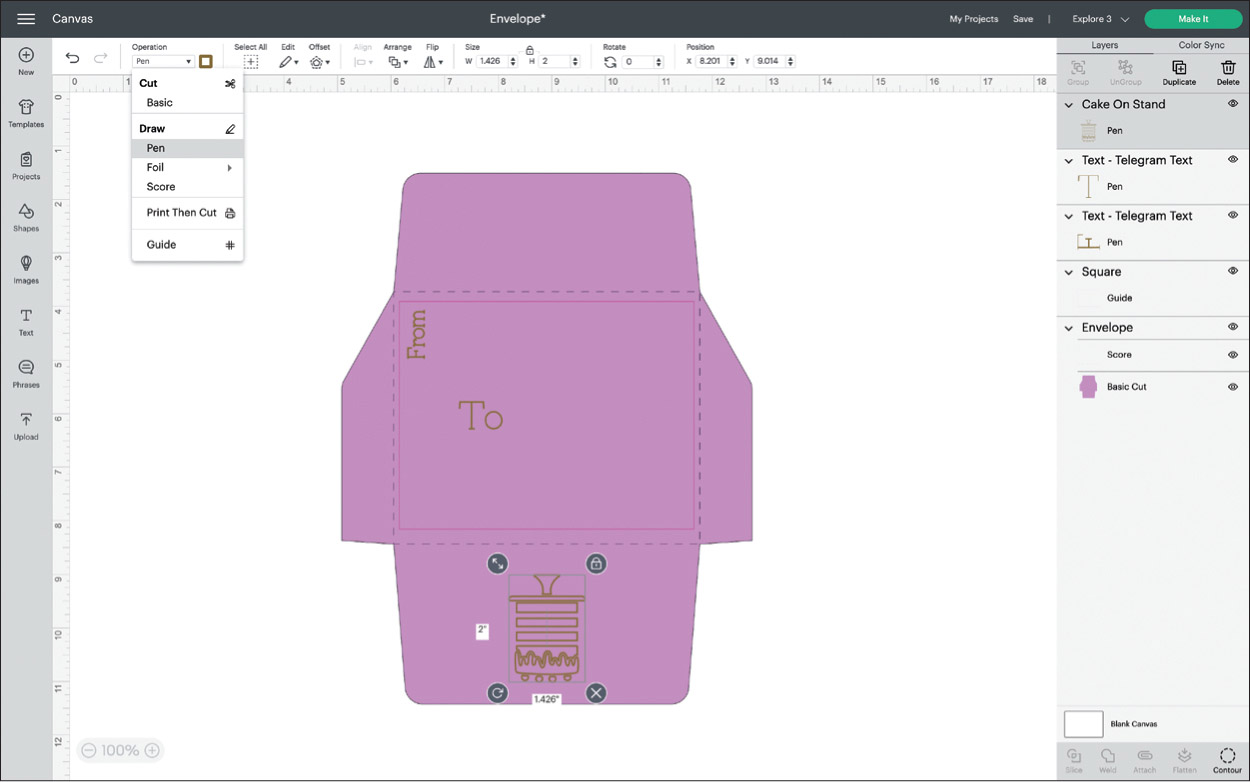
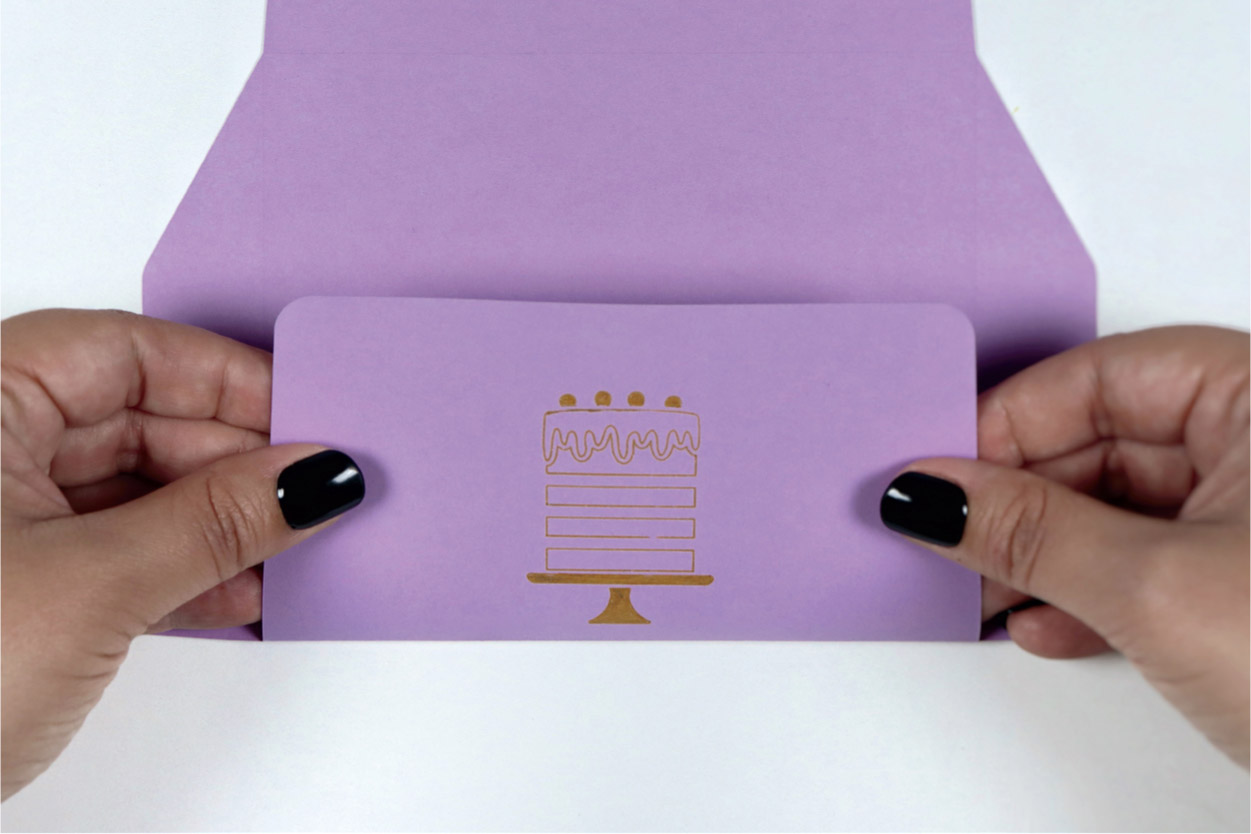
I will add this sweet little Cake on Stand image as a fun detail on the back of the envelope. Flip the image vertically and change the operation to Pen.

When all the layers are aligned and positioned the way you’d like them, select everything and Attach. Your final envelope should be similar to what you see here.

When you click on the green Make It button, your envelope should look just as it did on the canvas.
MAKE IT
Choose your pen color and follow the prompts from Cricut Design Space.
If you’re using a Cricut Maker, insert the pen into your machine on the left side of the carriage (A) and insert the Scoring Wheel on the right side (B).
If you’re using a Cricut Explore machine, Design Space will prompt you to use a Scoring Tool and your pen in the left side of the carriage (A), and the Fine-Point Blade on the right side (B).
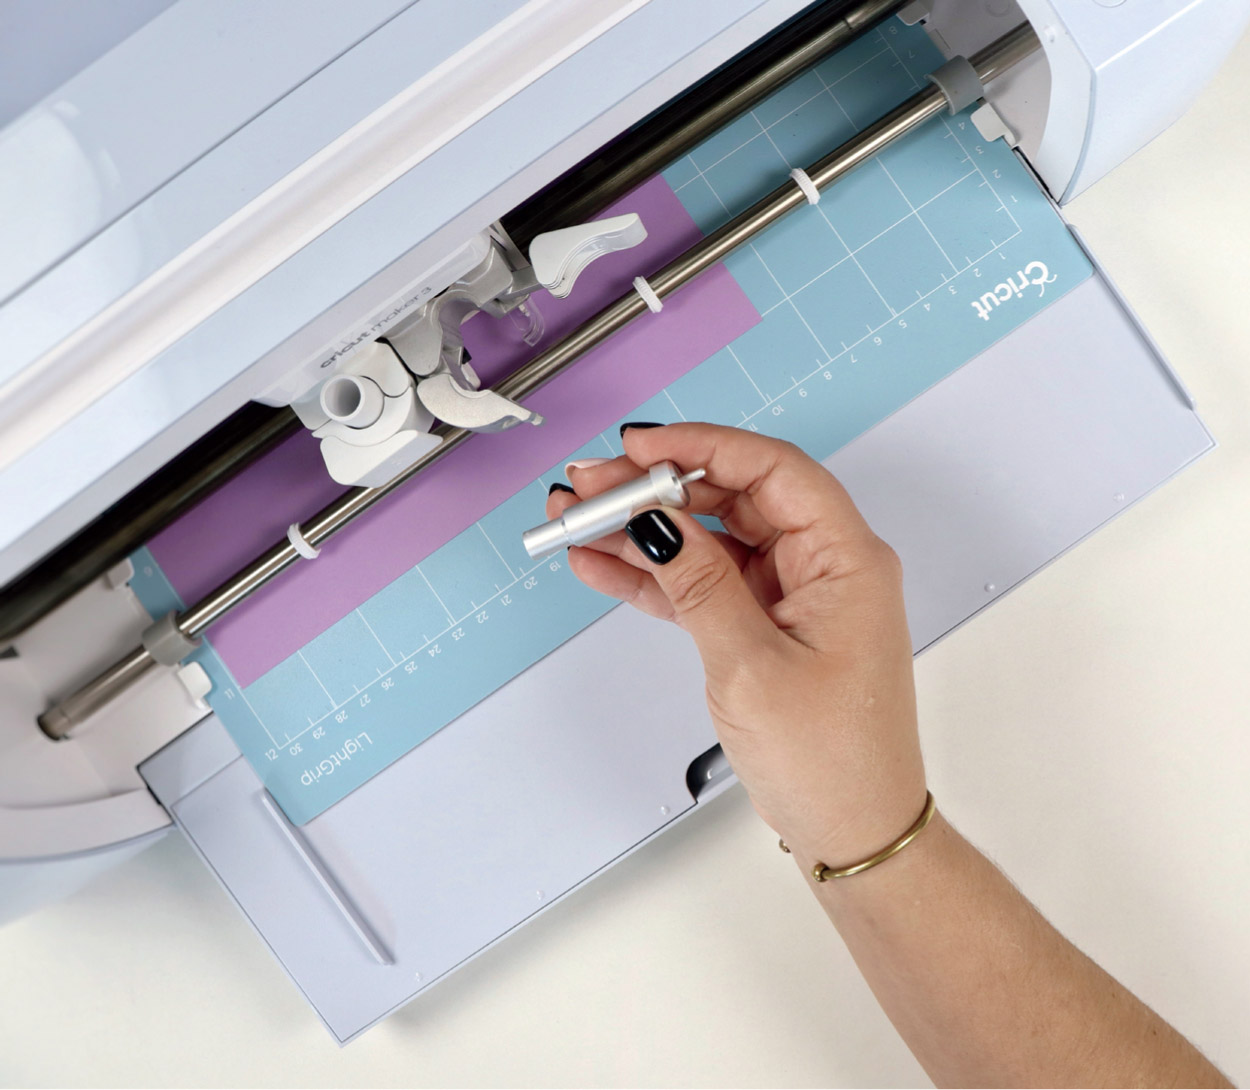
Following the prompts if using a Maker machine, when the writing and scoring is complete, swap out the Scoring Wheel for the Fine-Point Blade.

When your cuts are finished and your mat is unloaded, flip your mat over and roll it away from the cardstock, which will prevent the cardstock from curling.
Add any additional writing, coloring, or embellishments on your envelope and then fold along the score lines.

When gluing the sides, be aware of where the bottom flap ends. You don’t need to apply glue along the entire side.
MAKE IT EXTRA
You can create your custom envelopes in a variety of sizes, as long as it stays within the maximum cut dimensions. Remember, when cutting on a mat, your Cricut can cut a maximum of 11.5” wide and either 11.5” or 23.5” long, depending on your Cricut model and mat you’re using. To make your envelope extra, you can add more text, a complete address, more drawn images, or you can cut images or shapes in the envelope for a peek-a-boo design. Another fun way to match your envelope to your card is by adding an insert; this can be used for party or wedding invitations and be done with your favorite elegant or patterned cardstock. Of course, you could always add stickers, washi tape, and/or glitter to your envelope. You can never go wrong with glitter!