
Chapter 4
Section Editors: Arjun Ramamurthy
Introduction
Wikipedia notes that “Post-production includes all stages of production occurring after shooting or recording individual program segments.” Expanding on this understanding, this chapter will walk the reader through the processes that occur after initial (or principal) photography and on-set sound recording. We will examine motion picture and television together, detailing how content is brought or ingested, into the post-production process and how the content is finished, mastered, and versioned.
Physical production is typically limited to acquiring the sound and picture plus references for visual effects.
Post-Production encompasses everything that happens after that, all the way through to the finished product (Figure 4.1).
Traditionally, post-production includes creation of the dailies, editorial, visual effects, non-production sound (which includes design, effects, foley, music, dialogue re-recording, and mixing), color correction, and finishing of the content. In broad strokes, the middle area below is the focus of this chapter:

Figure 4.1 Simplified Generic Post-Production Overview (Movies and TV)

Figure 4.2 Post-Production within the Supply Chain
The careful management and curation of content is critical for all post-production processes, so that it can be edited, graded, scored, mixed, and prepared for the various distribution channels, which concludes with addressing localization issues such as dubbing and subtitling as well as handling regional edits based on localized concerns and formatting for platforms and devices. In addition to detailing the post-production workflow, this chapter will also introduce the reader to the different skills and job descriptions tasked with taking a raw product and turning it into the final dish – sticking with the traditional saying – “We will fix it in Post!”
Traditionally, the tasks during the post-production processes were clearly delineated with little cross over between the roles shown as different colored boxes in Figure 4.2. However, in today’s digital post-production “lab,” we often see that personnel typically work across traditional lines, and that the post-production process can now be described as an eclectic mix of storytelling, technology, and logistics management. With the introduction of more and more digital tools, from digital cameras, digital sound management processes right through to digital editing and image manipulation tools, it has become possible to operate post-production departments that range from simple, self-operated, laptop-based editing of sound and pictures that are often used for the end-to-end processing of simple television programs, all the way up to complex logistical operations that engage multiple facilities that would be used to post-produce a major motion picture or episodic television series. This has led to a rapid broadening of the list of skills and job descriptions required in current post-production areas.
Another way to understand post-production is to look at an overview of the key roles and skills of modern post-production. While the exact route through post depends on the complexity and budget of a program, one way to look at post-production workflows is to think about the skills needed. Some of the key areas to consider are (Table 4.1):
While each area detailed above has the requirement for a specific set of skills, all are closely related to the whole post process. On larger productions, each area often has a Producer or Supervisor whose role is to coordinate the workflow. On smaller productions a single person can often manage the end-to-end post process. In general, the organization chart then is similar to the one shown below:
| Area | Role/Task (where the key roles are based) |
|---|---|
Studio/production | Oversight of budget, schedule, crew and vendors, and broad vision for the show |
Dailies | The processing of camera footage after shoots or “dailies/rushes” to prepare for viewing and editing |
Editorial | Storytelling! Cutting and editing together what will become the final story, picture, and sound |
Visual effects (VFX) | The enhancement or creation of images that could not necessarily be realized on set |
Sound | The production and enhancement of the audio tracks including music and special audio effects |
DI/final post | All of the elements come together for the creation of final versions of the program or movie at the highest quality |

Figure 4.3 Post-Production Roles
Large and complex productions are usually arranged so that each department is organized under a supervisor and a producer. It is the role of the department Supervisor to deliver to the creative vision of the Director and the role of the department Producer to deliver within the budgetary and scheduling constraints imposed by the TV or movie Producer.
An area that clearly demonstrates each of these roles is Visual Effects (VFX), especially on large productions. The VFX Supervisor and the VFX Producer manage numerous VFX vendors that are tasked with delivering a variety of interrelated shots. The VFX Supervisor will regularly look at the images from a technical and creative aspect, while closely working with the VFX Producer to help determine and resolve issues that may affect the overall VFX budget and schedule. Additionally, these Supervisor and Producer responsibilities generally encompass managing numerous VFX vendors that are tasked with delivering a variety of shots. In turn, each VFX vendor also has an in-house VFX Producer and VFX Supervisor, who similarly mirror the organization of the production’s VFX Supervisor and Producer. Smaller productions, especially those that use one VFX vendor, often will use the VFX vendor’s in-house VFX Supervisor and VFX Producer to oversee the VFX process.
During complex post-production, the timing of each process is critical so no one area is held up due to a previous process overrunning or not delivering what is expected. It is the responsibility of the Post Producer or Supervisor to ensure each area or department delivers on time and that the groups are working together to the overall production timeline. The Post Producer or Supervisor’s role is to ensure the smooth on-time transfer of content between departments and to ensure that each department is operating as efficient as possible.
This is necessary not just to meet the deadlines for the delivery and transmission of TV programs or the launch and premiere dates for movies, but critically to ensure internal deadlines during the post process itself are met. For example, the delivery of proxies for viewing for a specific location or computer graphics (CG) delivery deadlines or music composition deadlines, etc. In a complex production, the list can be incredibly long involving many facilities, artists, and brute force processing – often referred to as “rendering” (which can become a byword for unexpected delays)!
It has to be remembered that the key process in post-production is not technical and can often cause reorganization processes. It is inevitable that there will be numerous edits and re-edits of the content as the Director focuses on the pacing and final timing of shots and performances. During this iterative process, the entire program will be shown to audiences as test screenings often known as “Friends and Family” or “Preview” screenings to judge whether the story line is playing out as intended. It is important to realize that the dialogue, music, effects, as well as visual effects and drama shots should be in a state that can be shown to the “preview” audience who may not understand that the preview is not the final product. It falls to the post-production Supervisor to coordinate all of these departments to meet each deadline.
At a high level, the post-production timeline and hand-off between departments can be visualized as Figure 4.3. As stated earlier, the reader should keep in mind that while these tasks have been delineated, for purposes of clarity today’s multifaceted tool sets permit a very small group of individuals on highly mobile laptops to execute most, if not all, aspects of the post-production pipeline. This has enabled faster delivery and also delivery to numerous additional channels and endpoints, as explained in succeeding chapters.

Figure 4.4 Overview of the Post-Production Workflow and Interactions between Groups
Figure 4.4 provides a generalized overview of the Post-production workflow for a typical motion picture. In step one (1), Dailies (see Dailies) are transferred to Editorial (see Editorial) which is the hub of the production. Editorial will go through multiple iterations until the cut becomes “locked” with the final timing of shots and performances. Often times, the editing is rearranged, or re-shoots are required, or additional photography is needed, repeating the production process again in order to capture missing or additional shots or performances needed to tell the story as desired by the creative team. This final locked cut is the version utilized through finishing.
While the Editorial team is revising their version, the Sound and Visual Effects teams access the production assets, and based on an initial shot compilation from Editorial begin to work their respective areas, as outlined in steps 2–4. As the Visual Effects and Sound teams generate temporary versions, these are sent back to editorial, so that they may be “cut-in” into the timeline to be viewed in continuity. This can go through multiple iterations with multiple versions being transferred back and forth, as denoted by the yellow arrows to Sound and the red arrows to Visual Effects. Simultaneously, the Editorial department (Step 6) is required to generate the “Preview” and other review versions to gauge audience responses and to revise the story in response to the feedback.
As the Post-production process proceeds, the Digital Intermediate team is brought (Step 7) on to start working with the production assets and develop the overall look of the movie. Once again, this is an iterative process, taking in intermediate versions of the cut from Editorial, as well as temporary visual effects and temporary audio. As each department converges towards the final versions, they are all compiled and coalesced into the final delivery.
At the same time the localization teams (Step 8), usually under the international group, are working on dubbing the feature into many different languages, developing subtitles for the different regions and possibly incorporating special regional or territorial material to meet cultural needs.
Post-Production in Detail
It is worth spending a bit of time looking in more detail at each of the post-production processes. Many of these processes apply to both movie and TV post-production although the scale may vary considerably; however, it is important to understand the background no matter if post is a single person self-operating or a major multi-company movie!
Preparation
The goal of post-production is to ensure consistent and accurate representation of the Director’s and Cinematographer’s creative intent, from Principal Photography and Dailies through Post-production and Delivery of the motion picture or TV program. As the final deliverable platforms continue to expand, it becomes more and more important to identify which technology options affect each part of the post-production process.
No matter how simple or complex the post-production process, planning is the key to success; and in order to achieve this process as smoothly as possible, planning before production begins is always time well spent. There are logistical considerations such as where departments such as Editorial or VFX will be located, where they will be sourcing their gear and who will supply support for the gear.
Do not forget that special consideration should be given to establishing clear and documented content security guidelines for all members of production before production begins. It’s very difficult to institute new controls and safeguards once production has begun – and sometimes too late if content has already been leaked, transferred via insecure public Internet or simply storyboards left in photocopiers!
Technical Preparation
Every department should know the exact requirements for each process and how they will receive and pass on material. There are numerous decisions that must be made; the wrong choices adversely impact the final deliverables. Here are a few of the technical requirement questions that should be asked and clearly documented before post-production planning starts:
Resolution
a What is the maximum final output resolution? – There may be several targeted at different outputs but the highest sets the bar.
b What is the working resolution for VFX? – It should be good enough for early Previews and viewings but is fast enough to work with during the Editorial processes.
c What Aspect Ratio will be used, and will it be protected? – Content has to be formatted for many displays from full blown cinema to mobile devices.
d What are the different camera acquisition resolution(s)? – Not all cameras are the same, especially if specialist or mini-cams are used.
e Is there a common DI resolution? – This is the target! Even for TV there may be a common mastering resolution.
f What cropping or padding of the image will be needed for visual effects and/or stereoscopic 3D? – Image stabilization or 3D image alignment zooms images; this can affect framing and quality if not known.
g Is there a standardized debayering toolset? – Vital for single sensor electronic cameras. Poor debayering can wreck quality!
Figure 4.5 illustrates a sample resolution diagram that would be generated for a feature production, calls out the different cameras used on the show, and the different acquisition resolutions, and how they flow through the post-production chain. It also shows the common color space (ARRI Wide Gamut) for the show.
Color Pipeline
Note: For TV workflows, the color pipeline is fairly standardized, however some of the questions below are extremely important to ask before Post-production can begin on a Motion Picture in order to determine the color pipeline and workflow.
h Who will be in charge of the “Look” for the dailies color and what display output is being targeted? Often, the DP sets the look, but others can as well. Typically, a Rec.709 display is used as the target display.
i Who is generating the Look-Up-Tables (LUTs) for the look? Are they the clearing house for the LUTs in the future (to give to VFX houses and marketing vendors)? LUTs are usually provided by the DI facility, but sometimes they are provided by the Dailies facility, the DIT, or DP.
k What is the “Working Space” for the dailies grade? Will it be the same for the final DI grade? This is typically either a camera proprietary working space or an ACES working space (Academy Color Encoding System).
l What is the creative “White Point”? Typical choices include D65 and D60.
n What is the bit depth and file format of the image files that will be used for VFX exchange and DI? Typical choices include 16-bit EXR, 16-bit DPX, or 10-bit DPX.
o What will be the target display for the final DI hero grade? How should VFX houses be viewing the shots? The typical choice for DI is a P3 D-Cinema projector, but VFX houses may view in either Rec.709 or P3, depending on their resources.
p Will a neutral or balance grade be needed for the VFX plates?
q What Color Spaces need to be supported for display of the content? It is important to know what color output standards are required such as Rec 709 for HDTV, DCI-P3 for theatrical, Rec 2100 for HDR …
Key Deliverables
r Standard Dynamic Range only? Requires a simpler workflow with fewer options. Images need no dynamic metadata but are limited in dynamic range.
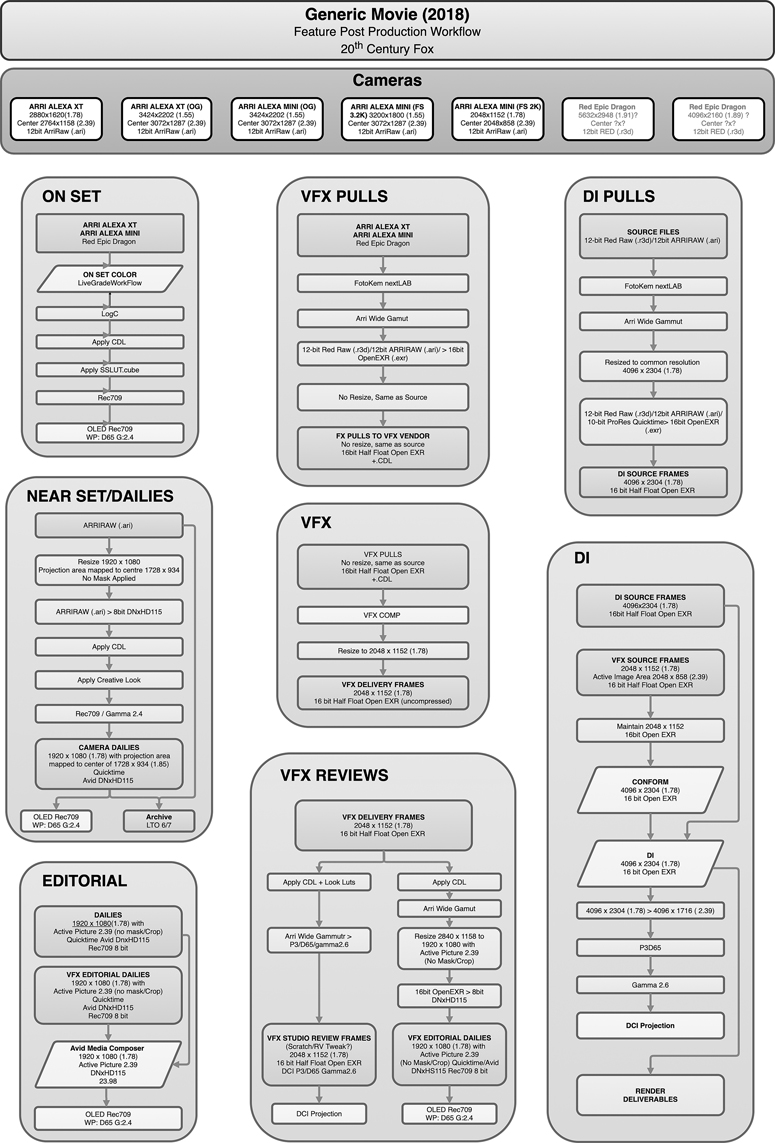
Figure 4.5 Sample Resolution Workflow from a Generic Title @ Twentieth Century Fox. Workflow Courtesy of Twentieth Century Fox
s Are High Dynamic Range versions needed? There are two primary production standards (see HDR section) but for HDR content, it is vital everyone knows the target brightness and the “reference white level” needed.
t Final Resolution for Theatrical.
u Final Resolution for Home Entertainment Deliverables?
v UHD for TV programs? UHD TV programs are not actually “4K,” it is 3840 pixels wide and 2160 pixels tall, so it’s very important to read the delivery document during planning. HDTV and SDTV deliveries are relatively easy!
Figure 4.6 shows the product of a “Deliverables” discussion for a production, highlighting the different versions, how they will be rendered, at what resolution, what the color space is and the delivery formats for each deliverable.
Audio
w Is the production going deliver in an immersive sound format, e.g., Dolby AtmosTM? It is very important to know the primary listening “environment.” This will impact mixing, QC, and Preview processing as well as the final finished output.
x Is the delivery a fixed channel-based option, e.g., Stereo, 5.1 or 7.1? Easier to understand during workflow planning as setup and listening environments are well documented.
y Are multiple audio options needed? This is the sound department’s nightmare. No one can satisfy every audio reproduction option, but during planning the target options must be documented.
z Is down-mix metadata required? This is very important for TV where only one audio option is sent. It is usual for the viewers’ TV to downmix 5.1 to stereo using the supplied metadata.
aa What plugins will be used within NLE and audio tool (e.g., ProTools®) and are they supported on all systems? What you don’t want is a holdup when the sound is not right after moving from one facility to another – even worse, no one will notice until the Director is at a Preview!
Editorial Considerations
bb What is the Codec and Bitrate for the Editorial processes? Too low and errors or issues with content may be missed – too high and processing takes too long.
cc Will playback be limited to stereo or will multichannel be needed? Not usually an issue but a minefield if Editorial requires it mid-post.
dd Is remote Editorial Review needed? If yes, then secure fast systems need to be in place that are easy enough for the recipient to use on location or some other method of remote review will need to be setup.
Archival Considerations
These will vary Studio by Studio, Broadcaster by Broadcaster and Production by Production but the key questions are:
ee Will the camera originals need to be archived?
ff Will LUTs and camera settings need archiving?
gg What level of audio archive is needed?
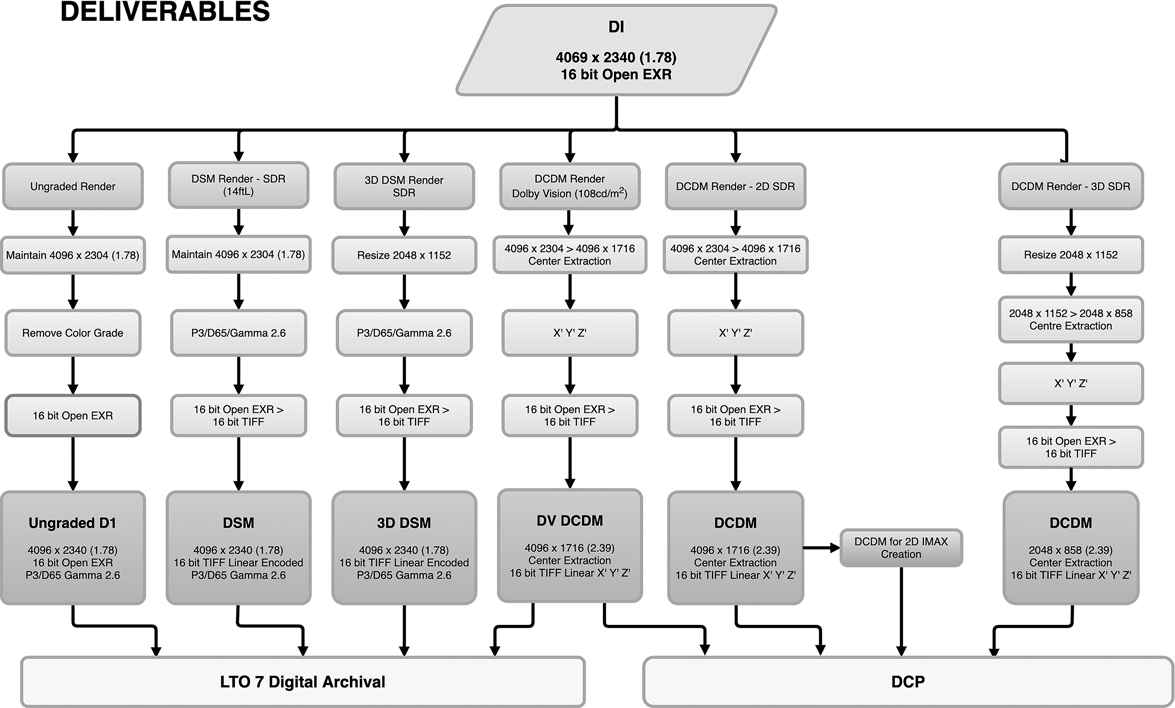
Figure 4.6 Deliverable on a “Sample” Feature Production Workflow Courtesy of Twentieth Century Fox
hh Components Archive
Finally, all of these considerations will inevitably be a balance between the post-production schedule, the post-production budget, and the final requirements from Editorial.
The post-production Supervisors and Producers will ultimately determine how the post-production budgets will be best used and will track the spend to make sure costs stay under control.
Post-Production Specific for TV
It is fair to say, TV content covers a vast range of program budgets! This means the post-production process can range from the director cutting sound and vision content on a laptop through international TV episodics that have post processes which are more complex than movies – usually due to the sheer number of episodes and overlapping seasons.
For many daytime or one-off programs, preparing an edit for delivering to television for traditional broadcast can be deceptively simple:
Cut the sound and vision content
Color correct
Add burned-in graphics or text (e.g., lower third names or end credits)
Mix the sound
Export the completed program
Simple as it seems, there is a very high chance the output will fail the broadcaster or distributor’s QC process or just be rejected even before QC!
As with all post-production, it is vital for anyone – from a self-operated editor to a post-production Supervisor on a large episodic – to read and know the broadcaster or distributor’s delivery guidelines. To be fair, these are not really guidelines but are more of an instruction set that must be followed to deliver a TV program for transmission or distribution.
The delivery guidelines which must be followed precisely should include information on:
What video format has the commissioner asked for? This could be UHD, HD, or even SD.
Which frame rates are acceptable? Remember fractional and interlace are often the only options for TV programs.
What codec does the broadcaster require? Get this wrong and the program won’t even get through to QC – automated “gateways” will simply bounce the file.
What is the audio channel layout? A program could get a long way through the chain before this is noticed – maybe even to transmission!
What is needed for the top and tail, line-up, slate, black, and silence, etc.? Nothing is worse than a season being rejected because the slate is incorrect!
What duration and commercial break parting is needed? As with the above, nothing is worse than a whole season being rejected because the commercial black is a second too short!
What audio volume or loudness standards are needed? This is not negotiable in many places. TV is regulated and non-compliant programs are rejected, or even worse, they are automatically “normalized” by the distribution path.
What metadata and “paperwork” (pdf or word) information must be sent with the program? This is used to confirm the program details. Remember a broadcaster will be receiving tens or even hundreds of programs a day. Whether metadata or paper, the details must be accurate and clear, or a program could just get lost.
Also, some TV content is commissioned for Over-the-Top (OTT) as well as traditional distribution. Sometimes, these are identical versions, in which case the same file is used but often the content layout is different (no commercial breaks or no teasers) which may mean additional material is needed.
The End Game!
The process and requirements can diverge dramatically, depending on the target platform(s) for the finished content (e.g., Cinema, TV, mobile, OTT, etc.) and all can have different and sometimes mutually exclusive requirements. It is very important that the overall post Supervisor has a solid grasp of the technical and editorial requirements for each version.
The following sections work through the post-production processes that might be required to deliver the final deliverable(s); however, one thing to remember is ALL of the facilities used during “the end game” must have correctly aligned equipment that follows industry standards, including and not limited to:
Dailies in More Depth
Once production starts on location or at the studio, the content (either on film or on digital camera files) is shot and will need to be viewed daily. As outlined earlier, these are known as “dailies” because usually they arrive at the end of each day’s shoot. The dailies process prepares the images, synchronizes the sound to the picture, and organizes the files for review by the production crew after each day’s shoot. In some regions such as the UK and Canada, dailies are usually referred to as “Rushes” or daily rushes, referring to the speed at which the film prints were originally developed back when film cameras were used.
Dailies give the Director and production crew an idea of how the filming and actors’ performances are progressing. If the Director sees any issues, he or she can organize retakes before the production changes location, or the talent is dismissed or “stood down.”
The dailies process can be carried out at a dailies facility or near-set by either the Digital Imaging Technician (DIT) or the crew from a dailies facility. The DIT is typically a camera department crew member who works in collaboration with the cinematographer on workflow, systemization, camera settings, signal integrity, and image manipulation to achieve the highest image quality and creative goals of cinematography.
If the production is shot on film, the dailies house will work with a lab to process the film and transfer it to files. This process typically involves the development of the negative film and then digitizing using a film scanner in high speed, and lower resolution – often referred to as a telecine. Once the film is developed and scanned, the raw camera images are treated the same as with digital camera footage (as described below) in order to create the dailies color, synchronize production audio, and back up the camera footage.
If the production is shot on digital camera, the DIT or dailies house will offload the camera files from the camera “mags” to their storage. Camera RAW formats have to go through a debayering process to convert the images to RGB in order to be processed for dailies, while compressed camera formats like Apple ProResTM maybe left as received, depending on the editorial/screening workflow, or the files can be transcoded to more compressed file formats for dailies viewing.
In addition to offloading the camera files and debayering, the DIT or dailies house is responsible for:
Checking the media contents for possible issues (duplicate time code or file names).
Collecting and backing up copies from of the original camera footage and audio recordings.
Provide checksum-verification of the copied data ensuring that copies are identical to the original footage.
Complete shot reports (scene/take information, filters used, comments, etc.) based on script notes.
For simple TV programs the Dailies process can be as simple as copying the camera card files to one or more (as a backup) hard drives followed by direct viewing on a laptop or even a hotel TV! It is also usual to wipe (delete the contents) the camera cards after copying so they are ready for re-use the following day. If this is the case, it is more than vital the copy is viewed end-to-end before the camera card is wiped (for obvious reasons). The same is true for motion pictures, although due to the size of the camera files, it usually takes longer than a day to return back the camera cards. Also, data verifications are also done before wiping the camera cards to make sure the integrity of the camera files is intact after the copy.
What is really important for any Dailies process is speed! The procedure is a tradeoff between getting the content in front of the director and the maximum quality that can be achieved at speed. For TV, this is why the process is typically repeated when shots have to be delivered to Visual Effects or in Digital Intermediate or when needed for other final finishing needs, such as trailers, etc. where full quality copies are essential. For motion pictures, camera footage is shot as RAW files which are debayered and transcoded into a certain bitrate of files for Editorial which are also used to screen high-quality dailies on a projector. The RAW files are also transcoded into even lower bitrate files to use on dailies systems for viewing on iPadsTM and computers. The bitrate of the editorial files and dailies system files is usually discussed before production starts so that everyone is on the same page.
As the speed of film and file processing have increased and the time needed for file copying and backup have dramatically decreased, some post-production houses now offer the choice of a single digital scan that can be used for the dailies process as well as the final digital intermediate process. This means the easy-to-damage film negatives are only touched once, and the post-production house maintains the digital scans for downstream use. But there may be trade-offs. For example, the original negative’s dynamic range may be reduced by only flashing the negative once, rather than twice to capture the entire dynamic range of the negative. The same is true of debayering digital camera images, where a simple and fast reconstruction process would be used for Dailies, while a more accurate and time-consuming process would be used for final, higher quality images. Typically, this choice, as many others in the post-production process, would be driven by the needs determined in the post-production preparation period where the end deliverables are clearly identified, and the budget constraints are imposed.
The dailies house will also load all production sound onto their storage in order to synchronize the sound to the image and will create the media files used by editorial and for all of the other dailies systems including projectors (in the case of theatrical feature workflows), television monitors, and mobile devices such as iPadsTM.
Still, the most effective and useful way to sync audio is a clapperboard. It not only pinpoints the sync point but also provides a visual marker with the audio identifier for the take and as a byproduct, alerts all on-set that sound and vision are recording. The clapperboard is labeled to identify the scene, shot, and take number for the camera. The numbers are also read aloud to label the audio recording. Once camera and sound are rolling, a camera assistant will close the clapper creating a visual and auditory reference point.
During the syncing process the dailies technician will look at the numbers on the slate board on the camera file (or on the digitized images of film) and then match the numbers with the verbal slate. Then, the technician looks for the frame where the clapper first closes and for the beep or clapping sound on the audio tape, adjusting one or the other until they happen simultaneously when played back. The operator is assisted in this with automated systems that permit automatic syncing of picture and audio using the synchronized timecode on the camera footage and the audio recording.
The dailies house is also responsible for the backup of all camera and sound files for safekeeping and disaster recovery, usually on LTO tapes.
The dailies company takes the reference looks set by the DIT and DP from set and creates a “dailies grade” or color for each of the shots for dailies viewing. The dailies color is meant to capture the color intent of the DP and Director and gives them a rough idea of what the shots could look like (otherwise, the original camera image might not represent exactly what the DP or Director intended). They may do simple (and sometimes complex) color correction to change the look of shots or to balance them within a scene.
Many productions will perform color correction based on the ASC CDL specification during dailies grading. This is a color decision list created by the American Society of Cinematographers. The ASC CDL allows for basic color correction information to be exchanged between different systems. The ASC CDL also enables color to be added as a separate step instead of rendering in the color, which gives more flexibility when more complex color timing happens later in the post process. The ASC CDLs can travel with the un-color-corrected camera files in order to create the dailies color non-destructively. However, for simplicity, the dailies company renders in the dailies color into the editorial and dailies viewing files so that CDLs do not have to be managed on these platforms.
To provide a specific example of a recent production where the DIT and crew acted as the dailies house, the following workflow was followed:
The production utilized the Alexa 65, and using Codex SXR drives the crew recorded full 12-bit 6.5K sensor data in ARRIRAW.
The 2TB capacity of each drive permitted approximately 43 minutes at 24fps.
The camera “mags,” in this case the Codex SXR Capture Drives, once ejected from the cameras, were taken to the DIT station for downloading using a Codex Vault.
At the DIT station, the DIT used Pomfort LiveGrade driving BlackMagic Design’s HDLink boxes.
The DIT applied a base 3D-LUT and performed a fine-tuning color grade using ASC CDLs.
The LUT used was designed by the Director of Photography (DP) and the DI colorist during post-production preparation.
The ASC CDL graded 1920×1080 4:2:2 signals were displayed for the DP on calibrated Sony 25” PVM OLED monitors in a light-controlled environment.
The data was then transferred to a mobile truck lab where a second Codex Vault unit took the 8TB Transfer Drives from set and transcoded the ARRIRAW files into 4K ProRes (as mezzanine files) for the fast creation of the editorial deliverables (DNX115) in FilmLight’s Daylight system.
These editorial deliverables incorporated the color grade information from set, and also generated the ARRIRAW archives.
Once the Director views the dailies, he or she will make particular note of the “circle takes” or “selects” which are usually the shot takes that were noted on-set as the takes that had better performances from the actors. The Director will confirm which selects are good for use in Editorial. These selects are noted for future reference by Editorial.
Editorial
Editorial is often thought of as one group that cuts together the story of the content, but actually several different functions occur which makes them the “hub” of everything in a production. In other words, nothing can function without Editorial! The “Editor” works with the raw footage transcoded by the dailies company, selecting shots and combines them into sequences which create a finished motion picture. However, supporting the “Editor” are the Picture Editorial, Sound Editorial, and VFX Editorial teams, with their supporting cast of assistant editors, coordinators, etc.
On its most fundamental level, film editing is the art, technique, and practice of assembling shots into a coherent sequence. The job of an editor is not simply to mechanically put pieces of a film together, cut off film slates, or edit dialogue scenes. A film editor must creatively work with the layers of images, story, dialogue, music, pacing, as well as the actors’ performances to effectively “re-imagine” and even rewrite the film to craft a cohesive whole. Editors play an instrumental role in the making of the content and story.
There are several editing stages, and the editor’s cut is the first. An editor’s cut (sometimes referred to as the “Assembly edit” or “Rough cut”) is normally the first pass. The film editor is involved through the pre-visualization and principal photography stages (aka Production) and in all likelihood is closely involved in reviewing dailies as production progresses. For the first pass the editor’s cut might simply be a collection of the shots that represent the selects, in script order, which presents the first bed that the editor will continue to refine as shooting continues.
When all live action footage has been captured, the director can then turn his or her full attention to collaborating with the editor and further refining the cut of the film. This is the time that is set aside where the film editor’s first cut is molded to fit the director’s vision. In the United States, under the rules of the Directors Guild of America, directors receive a minimum of ten weeks after completion of principal photography to prepare their first cut. While collaborating on what is referred to as the “director’s cut,” the director and the editor go over the entire movie in great detail. Scenes and shots are re-ordered, removed, shortened, and otherwise tweaked. Often it is discovered that there are plot holes, missing shots or even missing segments which might require that new scenes be filmed. Because of this time working closely and collaborating – a period that is normally far longer and more intricately detailed than the entire preceding film production – many directors and editors form a unique artistic bond.
One thing to consider when planning the Editorial section of the post-production workflow is the potential impact of getting stuck in “The EDL” or “Edit Decision Loop” (Figure 4.7).

Figure 4.7 The Editorial Process – Edit Decision Loop!
Once the TV program or movie enters the “EDL” there is a high risk it will never exit. This is where the Producer and Post-production Supervisor need to step in and provide all members of the creative team guidance with regard to schedule and budget.
Different Editorial Groups
There are several editorial groups working on content simultaneously during a production. These include Picture Editorial, Sound Editorial, and VFX Editorial. Each of these groups serves a specific function.
Picture Editorial is tasked with cutting together the story line of the content.
Sound Editorial specifically works to get all of the sound pieces together for the content. See Section on Sound Editorial below.
VFX Editorial puts together sequences that will be modified by a VFX house.
Picture and Sound Editorial are considered part of “Editorial” while VFX Editorial is part of the VFX team, but they all work together to get Picture Editorial assets to create the final version of the edit.
For a simple TV program, editorial is usually a small team consisting primarily of the Editor who brings in Sound (and VFX is needed) and possibly a color timer for a simple color grade.
For more complex productions, Picture Editorial consists of the Main Editor that edits the content and works closely with the Director to create the proper pacing of the content. The Main Editor usually has multiple assistant editors that help with organizing and ingesting the media as well as preparing the media in the editing system, exporting files from the edit and assisting the Main Editor as needed.
Sound Editorial and VFX Editorial also have similar structures and each group may have one or more coordinators to help with any other needs of the group like taking notes and scheduling sessions.
Marketing Editorial groups are not part of the production’s editorial team, but they often use the same or similar media as Editorial in order to cut teasers, trailers, or promotional spots.
There are multiple editing systems available for use by editors and most editors prefer using a specific system. Currently, many editors either use Avid® Media Composer or Adobe Premiere, but some editors use Apple Final Cut X (with some still on Final Cut Pro 7). Blackmagic Design’s Resolve is also starting to gain traction as an editing tool with editors.
As most productions want to work with specific editors, the system used on a show is usually dictated by the editor.
Typically, in the case of an Avid®-based editing system for a 24-frame production, Editorial is provided with MXF-wrapped files using the Avid® DNxHD 115 video codec and the audio files synced to the camera files in discrete day and shot (scene/take) order. These files are then imported in the editorial system as clips into bins and with the help of the AVID® ALE file, provide all of the relevant metadata information.
As VFX completes their work on various shots, editorial receives a copy of the revised shots and replaces the original shots.
As sound is mixed and created, editorial replaces their original scratch or production audio with the updated audio.
In the theatrical workflow, editorial results in a “Director’s Cut” first which is written into most director’s contracts. This is his/her first pass at the cut of the movie. The edit of the content usually gets whittled down from the Director’s Cut and goes through several iterations until it becomes “locked” with the final timing of shots and performances which is the basis for the version that is seen in the end.
It is not uncommon for editing to be rearranged so that re-shoots or additional photography can be done (and repeating the pre-editorial production process again) in order to capture shots or performances that maybe missing or in order to tell the story appropriately based upon the audience’s reaction to early versions of the movie. Once the cut is “locked,” the timing and order of the shots will not change, so sound and VFX can really begin finalizing their work.
For some TV productions, the final version of the edit is what will be used as the basis of delivery. In these cases, color correction (see Digital Intermediate section) will be done on the editorial files and masters will be created. Often TV programs simply export the final version to the delivery format required by the broadcaster or distributor. See QC and Delivery for more detail. For theatrical and some episodic content, editorial creates an edit decision list or EDL that will be used by Digital Intermediate or DI post-production house for the conform, color correction, and finishing of the content (see DI/Final Post section).
Visual Effects (VFX)
Many productions will use visual effects or VFX somewhere in the show, even if it is not a big budget movie. The VFX team works to either create images that could not be captured on camera or alter images that were captured on camera. This can range from things as simple as removing wrinkles from skin (also known as “vanity fixes”) and removing wires and cabling on actors to creating completely computer-generated imagery or CGI characters and objects or extending set pieces to completely fabricate the full image from scratch for an alien world including the backgrounds.
Although many people typically associate VFX with big action movies, VFX can also be used to alter images. For example, a show may have gotten a great incentive financially to shoot in the wintertime when all of the trees were bare, but the movie requires the outdoor scenes to be in the summertime, so a VFX company may be hired to add leaves on all of the trees. One other area where VFX has become almost ubiquitous is with period dramas. People living in picturesque villages, especially in the UK, are no longer prepared to have roof antenna and street lighting removed for a shoot!
As mentioned earlier, each of the areas within Post-production benefit greatly from early preparation. In the case of VFX, especially for a big budget movie, planning starts in the pre-production stages, and a core VFX crew is tasked with collecting necessary data during the case of production. In some cases, the production may shoot footage such as Background Plates, primarily for VFX needs. So, although the majority of work for VFX happens in post-production, VFX planning typically starts in the pre-production and production phase. This preliminary work helps to streamline the VFX process during post-production and brings home the fact that as production processes have changed so have the traditional areas of post, pre and physical production.
VFX in Pre-Production
During pre-production for higher budget productions, pre-visualization, or “pre-vis,” is created to help the filmmakers visualize the story with animations instead of only using storyboards. Pre-vis includes the conceptual artwork design done during pre-production, but incorporates the different camera moves, shot composition, and animations that would constitute the final shot. Once editorial begins, the production can use and update the pre-vis to post visualize (“post-vis”) the live action shot with temporary animations and temporary visual effects to fill in the story editing while the VFX is being finalized.
Shots that are “heavy” with VFX can take weeks or months to complete, so in order to allow Directors to see how a story will work in editorial, the post-vis process creates animatics to fill in the sequences until they can be replaced with the real VFX composite.
Additionally, pre-vis can also lead to Tech-vis, designed to aid in visualizing how certain scenes may be captured, how sets need to be constructed, and what the final visual effects process might entail. A typical tech-vis delivery would include animated Quicktime movies, usually in plain view, encompassing the movement of the camera, lens, frustum, and the camera’s visible path, along with the relevant dimensions and speeds. Ideally, these are tied together with the pre-vis shot, as a picture-in-picture, showing the pre-vis shot as approved, as well as the view through the tech-vis camera, which helps validate the tech-vis.
In pre-production, the VFX supervisor will determine whether blue-screen or green-screen will be used in the backgrounds on set, depending on what is planned for wardrobe and makeup for the actors. Also, wardrobe tests will be reviewed to determine whether issues may be found with fine detail in the clothing that might cause issues downstream. For digital CG characters, planning is required to figure out what should be shot in order to help the creation of the CG character in the VFX process. For the digital CG characters, reference materials are usually gathered so the VFX artists can see how real objects work (like animal movement).
VFX in Production
During production, tracking markers will be placed in the set to help the VFX vendors track the location and motion of actors and objects. Along with camera lens information and/or metadata, the tracking markers help VFX vendors reconstruct any motion to look like it was shot during production, with the same lens imperfections as what was used during shooting. VFX vendors will mimic the lens imperfections in their perfect CG renders in order to allow them to match what was originally shot.
Multiple witness cameras (video cameras) are used to shoot while the production camera(s) is (are) shooting. Witness cameras create three-dimensional data/depth to help with motion tracking of actors and objects which is used to help the VFX process in post with additional reference for more natural motion/perspective. After the set has been used for production (usually, later that day), the VFX team will capture High Dynamic Range Imaging or HDRI to help reference where the lighting sources were located during production. Facial scans will also be done during production to capture the actor’s facial features and movements to help with creation of digital doubles and CG.
One thing to remember is that any changes from the original planning with the VFX team can drastically alter the budget – usually upward! Therefore, changes in the production need to be communicated with the VFX team in order to minimize budget changes for the VFX processing.
The VFX editor and editorial team track all of the elements that will be used on VFX shots and have the important job of pre-compositing or “pre-comping” various elements of a VFX shot together.
They might choose a certain background and layer/composite in other elements like people, objects or other elements to create an early concept of what the shot will look like for the VFX supervisor and other filmmakers to review. Once the pre-comp is approved, the elements that are needed for the composite are determined by the VFX editor, created and then sent to the VFX vendor in a process called a “turn over.”
VFX in Post-Production
Moving forward to the post-production phase, the VFX editorial team will create the sequences and export EDL data. The EDL will contain metadata that references the original camera files, as well as the scene and take metadata. The company or department looking after the original camera files perform a “VFX Pull” – a process where original camera files are extracted and pulled together using the EDL data. This limits the VFX work to just the shots that are of interest to the VFX editorial team, and alternate shots and image sequences are not brought online, avoiding unnecessary or duplicated work.
The VFX house could work from the editorial files, but typically, they work off the highest resolution possible (like the camera files or uncompressed frames made from the camera files) if the workflow allows for it, as has been in the case of some recent theatrical and episodic productions.
Depending on the delivery specifications needed, the camera file is usually converted to a different file format in order to be used as a Plate to “turn over” to the VFX company (hence the term, VFX Turn Over where the plates are turned over to a VFX company so they can start their work). Camera RAW files or compressed camera files are also sometimes delivered as plates to the VFX company. This allows the VFX company to convert the image should their internal processing require a specific format or process in their pipeline.
However, if many different VFX companies do their own conversions using many different processes, there will almost certainly be discrepancies in the image quality between shots. Sharpness and dynamic range can be compromised making shots from different companies very difficult to match especially if the VFX shots have the same actors or easily identifiable landmarks. For this reason, it is important to establish clear guidelines on where the debayering will occur, and which tool (and version of the tool) will be used for debayering. In the case of some studios, baseline guidelines are provided for the production. If the content was shot on film, the film is scanned and files are created for the pulls.
The Plates are typically uncompressed 16-bit half float OpenEXR or 16-bit DPX frame sequences. Along with the plates, the VFX editor for the production will also provide corresponding information about the shots known as a count sheet which contains the length of the shot, camera report information, and other pertinent information from the VFX database about the shot as well as the pre-comp elements.
The VFX editor at the VFX vendor will receive the count sheet and pre-comp and will disseminate the information to various departments at the VFX vendor in order to get the work started. The VFX editor at the VFX vendor will compare the plates/scans with what was delivered in the pre-comp to check for errors and may create a pre-comp with the larger plates for the VFX artists to use as a starting point or for reference.
Sometimes the VFX supervisor will require the plates to have a neutral or balanced color grade before they are turned over to the VFX facility. More information about this can be found in the Digital Intermediation section under “Color Pre-timing and Reference Look.” The process of generating and compositing VFX is complex, but more information can be found in the Special Section 3: Visual Effects.
Sound
Sound or Audio post-production is an elaborate process with several key groups involved. Each group is a microcosm of the whole post-production process under an editorial supervisor who works to the production’s overall post-production supervisor.
The groups include dialogue, music, sound effects, foley, and mixing. In each sound group there are teams of specialists who work on specific areas. Although some of the sound work happens in parallel to the picture editing, much of the sound work happens once the edit of the content is “locked” where the timing and order of the shots does not change. The music team starts early by working with the composer and editorial to create the “sound mood” for the production. The editor(s) work to a combination of guide tracks and pre-mix sub masters as needed in order to ensure the cut and music complement each other.
Generally, waiting until picture lock prevents unnecessary effort on sound that might not be needed or has different requirements for the final edit.
Sound Editorial
The sound editorial Supervisor schedules the time to prepare the elements that make up what will be the final mix of the sound. Sound editorial usually breaks down into different element groups:
Each group is responsible for creating their part of the sound. When previews or early test screenings are needed, each team will quickly prepare some basic elements for something called a “temp dub” which is then mixed within a few days (typically three to four days). The temp dub is a temporary mix that is used to convey what is intended for the soundtrack, but is not the final mix of the content, and the temp dub is made before the picture is “locked.”
The next sections detail each of the groups that create the various elements.
Dialogue
The audio recorded during production can be used, but it often needs to be cleaned up to reduce or remove location background noise. The Production Dialogue Editor does this cleanup work using the cuts from the Picture Editor. If the production dialogue is too noisy or cannot be used, a process called Automated Dialogue Replacement (ADR) is used to replace the production dialogue.
Actors are brought into a special ADR recording studio to re-record their dialogue while watching a repeating loop of the image that will be used. The term “looping” is synonymous with ADR because the actor repeats the take until the new recording is synchronized to the lip movement and intent of the scene. The ADR Re-recorder does the recording of the dialogue while the ADR Editor edits the take to make it match even closer and to prepare it for the final mix.
Music
Like sound effects, the music can include pre-recorded songs or newly created music. A Music Supervisor oversees the pre-recorded music that is used in the edit of the content. This can include not only the main music in the soundtrack, but music that is in the background like on a radio or television. A Composer creates new music or score for the content which can usually set a certain mood or feeling during specific scenes. The Music Editor and Music Supervisor will go through a process called a “spotting session” where they will determine what sort of feeling or mood is needed during certain times of the edit. The spotting session information is given to the Composer so he or she knows what sort of incidental or transitional music is needed. Once the Composer creates and records the music, the Music Editor synchronizes all of the music to the edit of the content.
Music and Effects Tracks for TV
There is a lot of confusion around the meaning of Music & Effects (M&E) when applied to TV programs. Much of the confusion stems from the different interpretations and from the delivery requirement documents. M&E for TV is also genre dependent.
The first thing to establish is “what is actually needed.” Don’t assume just because one distributor or broadcaster has supplied a definition of M&E, that the definition can apply to all.
Two of the most common variants that come under the often-misused term M&E are:
Documentary M&E: The variation here is caused by programs with in-vision dialogue (i.e., interviews or presenter to camera) and programs with off-camera narration only.
Where there is in-vision dialogue, some distributors require the in-vision dialogue to remain but out of vision to be clean. This gets really confusing where dialogue either starts or ends in-vision but sections are off-camera. Some want the dialogue cut immediately, others want it cut at a sentence pause, and there are others who want it kept. The “rules” can be really complex, so the best advice is to ask for a written explanation, and then save as many stems as possible during the final audio mix so it is possible to rebuild if needed!
Drama M&E: Drama M&E can mean separate music and sync/effects mixed, or separate music with separate effects and a dirty dialogue track which is dialogue with any location spill, or it can mean a total footsteps track with separate music, separate effects, and a separate clean sync dialogue track OR any combination of the above. The same rule applies as given on Documentary M&E: if you are unclear, ask for a written explanation, and then, save as many stems as possible during the final audio mix so it is possible to rebuild if needed!
Other than the above, the mixing of a TV program differs very little from a movie – except for the vast difference of scale and time!
Sound Effects
The picture editor will often use temporary sound effects to fill “holes” in the soundtrack. These effects need to be replaced by the real or specially created sound effects. The Sound Designer on the show creates new sounds that are needed for the content that might not appear in real life. For example, perhaps there is a new object that does not really exist – what should it sound like? Or perhaps a new alien world has been created from CG – there are no associated sounds with the world, so the sound designer would create the sounds to go with the image to elicit a certain “feel” for the environment. Not all sound effects have to be designed; some sounds can be found in pre-recorded sound effects libraries. A Sound Effects Editor takes all pre-recorded and newly recorded sound effects and syncs them with the edit of the content.
Foley
This process is named after Jack Foley.
Depending on how noisy or clean the production audio was, common everyday sounds like footsteps, clothes rustling, and door creaks may need to be re-recorded. These sounds are re-created and recorded by a Foley Artist. A Foley Editor takes the new sounds and synchronizes them to the edit of the content.
Mixing
Once all of the dialogue, effects, and music are recorded and synchronized to the edit of the content, the Sound Mixer can start to adjust how each of these sound types interact with each other including volume and placement in the sound field or fields required.
Predubs
Before starting the final mix, a “predub” is done to the dialogue and sound effects. Predubbing prepares the dialogue and sound effects for the mix by grouping them into similar groups in order to reduce the number of tracks to make it easier for the mixer to use and organize. Also, during the predub, any production audio is cleaned up and any fixes that are needed are made during this time to prepare them for the final mix. The audio levels of each track are evened out during the predub stage as well. Predubs usually take a few days to complete.
Final Mix
After predubs are finished, the mixer starts to adjust how each of these sound elements interact with each other including volume and placement in the sound field.
For theatrical content, mixes typically take four to six weeks but the budget and schedule determine how much time is allotted for the mix. Music is usually brought in at this point by the sound editorial music team and mixed together with the dialogue and sound effects predubs.
During the Final Mix, separate dialogue, music, and effects mixes are created, comprising what are called, “stems.” The combining of the stems or composite becomes the final soundtrack of the content. Stems are kept separate, just in case fixes or adjustments are needed to each of the elements.
Depending on the type of combination, the sound field could be a simple mono or stereo mix, but the more common type is a surround sound mix like a 5.1, 7.1, or immersive mix. The sound mixer may have other mixers working with them to help run the multitude of tracks or elements of the sound. The mixer creates the final version of the soundtrack but will also create a soundtrack that only has music and effects (no dialogue) which can be used as a base for localized language tracks for different countries. Each mix is a different soundtrack. For theatrical content, most soundtracks are still done in reels as each reel is locked.
The director reviews the mix and notes any changes needed. The mixer will then work through the notes updating the mix. When everything is ready, a “sound check” is done so studio executives and production crew can review the soundtrack and determine whether any other fixes or creative changes need to be made.
When the final master mix is ready a last “print check” review happens in order to check for any technical issues. The term “print check” is a holdover from when film prints were checked for audio issues. The print check is really important because this version of the mix will be used to make all of the downstream masters – getting it wrong could lead to fixes being applied to many sub-master copies.
Soundtrack Versions
When the master version soundtrack is complete, all of the other versions can be created. Here is just an example of some of the versions that might be required.
Localized Dubbing
Localization is when a different language dialogue is created and mixed into each language’s localized master. There is an art associated with proper localized dubbing where not only does the translation of the original language need to keep the original intent of the dialogue, but the actual words used should have (as close as possible) the same mouth shapes and movements of the on-screen actors. Making the translated dialogue/dub look like the actors are actually speaking the localized language, keeps the audience less distracted and able to focus on the story.
In a similar process to ADR, actors who speak the localized language record the translation which is then mixed into a localized soundtrack by the mixer.
Descriptive Audio
Descriptive audio, also known as “Audio Description” in Europe and “Descriptive Video Service” by US broadcasters, is meant for those who are visually impaired. The Descriptive Audio track is a separate audio channel that usually includes a narrator who describes any action happening on-screen in-between dialogue from the original soundtrack. Creating a good Descriptive Audio track requires a lot of preparation in order to make sure that the narration paints an accurate picture in words and during the gaps in the action dialogue.
Nearfield Mix
For theatrical content, often a nearfield mix is created for distribution of the content to the home. Home theater systems are different from theatrical systems, so a special home theater or nearfield mix can be created in order to optimize the soundtrack for the home. Typically, the adjustments are done to the surround channels for nearfield mixes since the levels differ between theatrical systems and home systems. These mixes sometimes reduce the level of the surround channels (or rear groups of channels) by 3 dB. But the real test is listening in a “home” environment during QC (see QC section).
Audio Loudness for TV and the Home
Broadcasters are continually getting complaints that commercials and trailers are too loud while the programs are too quiet, even when traditional meters show they are within the levels that the broadcaster has asked for.
There are many documents that try to explain the issue and suggest remedies but the thing to remember is, TV loudness is regulated in many countries, meaning there is no “negotiation.” Programs either meet the local regulations or are “normalized” to meet them. Normalizing a finished mix will always be at best “OK” but usually is a disappointment and never meets the creative intent of the content creator.
To try and resolve the problem, new ways to measure audio levels have been developed. Two examples are:
Much of Europe uses the European Broadcasting Union’s EBU R128 recommendation. European broadcasters have unusually introduced this voluntarily which allows then to vary the requirements for special events; however, these variations are rare and should never be assumed until confirmed by the program’s commissioners.
In the United States, loudness control is mandated by the Commercial Advertisement Loudness Mitigation (CALM) Act, and non-compliance will fail QC and risks program rejection. The Standard used is ITU-R BS.1770.
The good news is there is very little difference between the two options which means, automated conversion between EBU R128 and ITU-R BS.1770 (in either direction) is usually acceptable, but there are always exceptions so never assume the conversion is OK until it’s reviewed with the best audio device on the market: “Ears.”
Digital Intermediate
For content that is intended to finish in a quality higher than what was used in editorial, the final step in the post-production chain is the Digital Intermediate or DI process. The DI process encompasses digitizing the captured motion picture data, aggregating and conforming the original image files with visual effects and data from other facilities, such as title houses, and then color grading the images for exhibition. The DI process also includes delivery of the master files and data from which downstream deliverables will be generated, the manufacture of exhibition elements, and the creation of final archive data for the DI master elements. A DI post-production facility provides several key features for finishing the content including conform, image fixes, color correction, aspect ratio changes and final render for distribution masters.
Conforming
Conforming is a process where the images from the locked edit are matched back to the high-resolution version of the images (camera files and final VFX comps). In order to perform the conform, the DI facility uses the final EDL from editorial since the EDL provides a mapping back to the original camera files and VFX comps. During the conform process, any transitions such as fades, dissolves, flipped images, and others that were done in editorial are performed on the high-resolution version. Back when film was edited, these sorts of transitions were called, “Optical Effects,” so even in today’s digital world, these transitions are still called “Opticals,” even though they are recreated in real time, digitally. The conform is the higher resolution version of the editorial media and becomes the base for the rest of the finishing.
Image Fixing
Now for the bad news! When the Conform is reviewed by the editor and director, they are seeing the images for the first time in their full glory… or not! Many times, once the filmmakers see the higher resolution version, image artifacts become more noticeable. Most DI facilities have the capability to make various fixes to the image including painting out digital hits from cameras, vanity fixes (where skin of actors and actresses are made blemish-free) and grain/noise management for scenes that had too much noise either due to underexposure of the image, excess film grain, or other issues.
As any fixes at this time in the process can be very expensive, delay premieres and even worse, miss publicized delivery deadlines, the Post Supervisor needs to consider the tradeoff between delay, cost, and processing cost. For TV workflows, higher quality editorial files allow issues to be seen and addressed early in post but use more storage when there is more material being used. Lower quality editorial files need less storage and are faster to process but the risk can include missing image errors that could delay delivery while they are being fixed.
Finishing
When the Conform has been signed off at the DI facility, the job of “finishing” can start. Finishing can be a simple color match plus burned-in text and credits for a low-cost TV program, or it can be a wide range of high-cost processes, high cost as the images are now full resolution masters.
Color Timing/Grading for TV Programs
For TV programs color timing, sometimes called “color correction” and in Europe often referred to as “grading,” is a stage between the Conform and the final edit to add graphics and text before export and localization edits.
The three most important parts of the color timing process are
The EBU technical document TECH 3320 outlines the requirements for displays used for TV production, and the ITU has possibly the most famous document on testing and viewing environments, ITU-R BT.500 “Methodology for the subjective assessment of the quality of television pictures.”
The display and the room setups are critical when color work is made. The initial color correction is done for a specific display type. For episodic content, the color correction is usually targeted for home television displays. There are three primary options for consumer TVs:
SDR HD TVs – these only reproduce ITU-R BT.709 images
SDR UHD TVs – these should additionally reproduce ITU-R BT.2020 images
HDR UHD TVs – these should additionally reproduce ITU-R BT.2100 images
Only “broadcast quality” Grade 1 TVs should be used for color correction. Grade 1 TVs or “monitors” can fully reproduce the images from the standard they are fed. This means that artifacts and errors are not masked by processing in the monitor and that they can be used as a measurement for the visual evaluation of image quality. One of the important factors is that Grade 1 monitors have good color stability (the colors will not drift during the day) and should reproduce images accurately based on the image standard being viewed.
The only exception might be a color matching process where one or two shots are being matched to others. Usually, this occurs when the original material is fully graded or has come from a Studio or outside broadcast truck when all cameras have been matched and new material is introduced during the edit that does not match. In these cases, the color-timed material can be used as a reference, and the new material is matched to this reference.
A full color session for TV programs usually takes between three to five times the program duration, assuming relatively well-matched cameras were used during the shoot. However, if the content comes from unmatched sources, archive, other programs, it can take up to ten times the program duration to achieve the creative intent of the production team.
If the TV program has only one delivery format, usually standard dynamic range (SDR) HD, then a single color session is all that is needed. If a high dynamic range (HDR) or an OTT platform (Netflix, iTunes, etc.) is needed, then you need to plan for two or more “passes.”
One thing to note: in most of Europe, if the master high dynamic range version is Hybrid Log-Gamma (HLG), then a single HDR pass is all that is needed. The backwards-compatible image capability of HLG allows a UHD SDR TV to display a reasonable representation while a simple 3D LUT can be used as part of a down-conversion to generate an SDR HD version. This is usually the workflow for live TV programs but can also be used for non-live content.
Color Timing/Grading for Motion Pictures
Color correction (or color timing or color grading) is where the bulk of the time and effort occurs for the DI facility. The conformed image is loaded into a color correction system and is controlled by a colorist, a person that helps translate the Director’s (and sometimes DP’s) vision for the content into the actual image. Color correction can be as simple as balancing a scene between two actors shot at different times to make it look like they were shot at the same time to changing the look of the shot completely. Colorists can change the color to elicit certain feelings during a particular scene. For example, if the filmmaker wants the scene to feel like a warm summer day, the colorist can add a bit of red or orange to “warm” up the image. If the filmmaker wants the content to feel cold and icy, the colorist can put a blue cast on the image to make it “feel cold.” If the scene was shot during the daytime, the colorist can change the image to make it look like the action is happening at night. Another example of what colorists do is when a production shot in color is turned into black and white by the colorist, but certain objects are left in color. The colorist has the ability to change the color on certain objects or people in order to create a certain look as requested by the filmmaker. This change is permitted through the use of “power windows” which allow an object or person to be isolated from the rest of the image and have color only affect what is within that window.
As a side note, the above process can also take place on the editorial files if a production is not required to deliver the content in any format higher than the editorial format, for example, for preview purposes. The color correction can use the dailies grade as the starting point or can start from scratch to get a completely different look than the dailies grade, depending on what the filmmaker desires.
In comparison to TV episodic content, theatrical content is a bit more complex because the initial color correction or “Hero Grade” is targeted for a theatrical projector (in DCI P3) and additional trim passes are done for other devices like home television displays. Both types of content can have additional complexity with the advent of high dynamic range (HDR) displays both in theatrical and home environments which usually requires additional “trim passes” for each different display technology. A Trim Pass is a separate color correction pass that is done to optimize the image for a specific display device and is based upon the hero grade.
For example, the hero grade would have the daytime scene turned into night optimized for a theatrical standard dynamic range (SDR) projector. The theatrical environment is very dark, with a large screen, but the projector only outputs a maximum of 48 cd/m2, so this hero grade would get a simpler grading pass or trim pass done to it to optimize it for the home television. The home environment is typically a brighter environment, with a smaller screen that has a much brighter maximum of 100 cd/m2, in the case of Standard Dynamic Range, and could be either 1,000 cd/m2 or 4,000 cd/m2 in the case of High Dynamic Range. The image is usually modified slightly to look good in this different environment and display. Otherwise, if you used the theatrical hero grade on a home display it would look dark and dull. Trim passes are also done to make the image look better and convey the proper artistic intent for other display formats including HDR theatrical, 3D stereo theatrical, HDR home, and 3D stereo home.
No one way of finishing a movie exists. For many theatrical features, below is a typical order of how the grades are completed:
Theatrical
Home
In parallel, IMAX, Eclair or other special theatrical distribution companies would receive files to create their 2D and 3D grades for their deliverables. Note that some productions start with the HDR theatrical (Dolby Vision) as their hero grade and then create the other trim passes. For some content, the hero grade for the home masters is an HDR home (Dolby Vision) grade that becomes the starting point for the other trim passes.
One of the most important tasks during the digital intermediate process is to maintain the color correction through editorial changes. The first set of digital intermediates were carried out on “cut-negative” shows. For these productions the editorial cut had been made and locked, essentially “cutting the final negative” and preparing it for the answer print stage. In this case, while the colorists had to make several creative choices, they were not hampered by shots being replaced/changed while they were setting the creative look. However, today the editorial process is often in process and rarely locked when the post-production schedule mandates that the digital intermediate process begin. It then becomes necessary for the DI colorist or color assist to work with a DI editor to ensure that color correction can proceed on a previously locked cut, and when a new version of the locked cut is released from Picture Editorial, the new shots are introduced into the timeline without losing the color correction that was already carried out on previous shots.
A new editorial cut could insert, move, shift, delete, or even shorten or lengthen existing shots in the time new shots are replaced into the timeline. It could also replace a shot in its entirety, e.g., in the case of an upgraded visual effect shot that replaces an earlier temporary placeholder. This can be a fairly cumbersome task, as simple color corrections such as global corrections can be easily copied over and shifted based on the changes in frame count. However, in the case where “power windows” and special tracking of objects is employed, it may be necessary to manually go into each new shot and adjust the tracking and power windows.
Color Pre-Timing and Reference Look
As mentioned in the Dailies section above, the DIT and DP will take the established reference looks and may do some simple (and occasionally complex) color correction to change the look of shots or to balance them within a scene. Part of the DI colorist’s job is to help establish the reference looks in a color-calibrated environment with the DP. These reference looks are often referred to as the color bible for the show, and from this bible, the DP has a set of looks for the common situations of daylight exterior, daylight interior, nighttime exterior, nighttime interior, and any special looks that he/she might be interested in maintaining. Part of the objective is to make the dailies process as smooth and streamlined as possible. Additionally, it also helps to convince the DIT and DP that small global modifications using the ASC CDL are sufficient to balance out shots. Without this confidence, the DIT and DP may employ higher orders of color correction, like power windows and secondaries which would then require the DI colorist to spend a lot of time undoing these corrections and balancing things out, to ensure a consistent pipeline across a production.
Another important aspect of the DI colorist’s work is to pre-time the visual effects plates as they are delivered to the VFX companies. Given the large percentage of VFX in current motion pictures, it is important that shots delivered to each VFX company are balanced, so that once composited with computer graphics imagery they can easily match one another. The DI Colorist/Color Assistant is responsible for balancing and or pre-timing each of the shots that are “pulled” for VFX work, so that there is a uniform look to each one. While this is an extra expense and extra step, it ensures that all shots are in close proximity to the final look, and when returned to the DI they will match closely.
Mastering and Versioning Preparation
The hero grade and the trim passes each have to be rendered out from the color correction system before being used as a master for distribution, but before that is done, Aspect Ratio conversions may be necessary for the Home Entertainment master.
The aspect ratio is determined by the width of the image divided by the height of the image. Theatrical content is usually shown in either scope (2.39) or flat (1.85) aspect ratio, while most home televisions have an aspect ratio of 16:9 (1.78). There is also a plethora of handheld devices with varying aspect ratios and many 4:3 (1.33) displays still exist.
For the home master, an Original Aspect Ratio (OAR) version is generated, i.e., a version that preserves the theatrical aspect ratio, and also a version that plays back properly on a 1.78 display.
There are actually two masters formatted for 1.78 displays. For the first generation, the entire OAR image is fitted horizontally with black bars at the top and bottom of the image. The second fills the screen horizontally and vertically which some viewers prefer. This means a decision must be made as to which section of the OAR is shown. The theatrical content goes through a process called “pan and scan” or “pan-scan” in order to create a 1.78 full frame image. The DI facility is equipped with the ability to basically take a 1.78 window and pan it around the 2.39 image in order to create a 1.78 master. Inevitably, image content will be cropped out, so changes are sometimes made to the cut in order to properly display an actor who is speaking.
Once the pan-scan and color passes are approved, the DI facility can render out the color and pan-scan versions according to the delivery specifications given by the content owner. The hero grade, the trim passes, and any aspect ratio changes are separate renders. These renders become the image portion of the masters for the various distributions like theatrical or home. The DI facility will also render out files for archive.
Figure 4.8 shows a simplified workflow for the DI where the source material, regardless of whether it was shot on film or digital, is brought into a color correction system. The original ASC CDLs from dailies could be added if desired, but the key is to show how the hero grade is created using Step 1 which targets a certain type of display output, in this case, the SDR theatrical projector. The grade is typically done through a look and output transform that limits the grade to the capabilities of the display device, again, in this case for a P3 theatrical projector. Once the hero grade is complete, it is rendered out, in this case, for a Digital Cinema Distribution Master or DCDM. Now, Step 2, the HDR theatrical projector grade, can be graded through a trim pass based upon the hero grade. This is accomplished by changing the output transform to something different that allows the grade to meet the capabilities of the HDR projector. Then, the color for the HDR projector grade is rendered out. The same process is repeated for Step 3, the home Rec.709 grade, and Step 4, the HDR home grade, and for each new version, the trim pass is done off of the hero grade. Once the project is complete, an archive is rendered out from the hero grade, but note that typically the rendered files do not include any looks or output transforms since those would limit the range of the image to the display device that was used for the hero grade.

Figure 4.8 This Diagram Highlights the DI Post-Production Image Workflow for Feature Post-Production
Mastering and Versioning
The DI facility or a mastering facility will take the image renders from DI and add any audio, captioning, and subtitling to create the final masters for distribution. Depending on the type of show, this is where the versioning nightmare begins! For theatrical workflows, masters are created for Digital Cinema and then for the home distributions. For Digital Cinema, the DI facility will render out either a Digital Cinema Distribution Master (DCDM) or compress directly to a Digital Cinema Package (DCP). If a DCDM is created first, a DCP is created from the DCDM. The DCP is a standardized format that is accepted by all Digital Cinema theaters (although there are countries that use a different format) and is essentially a lossy JPEG2000 compressed version of the movie, with all of the audio channels held within an MXF wrapper. The maximum bit rate of the JPEG2000 images is constrained to 250 Mb/s. More details on the DCP construction can be found in the Modern Digital Cinema Workflow section below.
The DCP format allows for flexible versioning which allows for the image and audio to be ordered and played back by a playlist called a Composition Playlist or CPL. The CPL references or “points” to the image, audio, and other files like captioning or subtitles which allows many versions to be created without having to have multiple instances of the image, audio, or other media files. More details on the CPL construction and uses can be found in the Modern Digital Cinema Workflow section below.
As described earlier in the workflow, many versions exist for Digital Cinema since there are many distributions. Several Hollywood Studios have reported that they have released more than 350 different versions of the same movie due to localized versions, different picture versions (2D, 3D at different light levels, Dolby Vision, IMAX, etc.), different audio configurations (5.1, 7.1, Theatrical ATMOS, DTS-X, Barco Auro, etc.), and different edits due to censorship in different countries. But this is just for theatrical! The home/ non-theatrical space has easily just as many different masters for a theatrical title due to similar situations with localized versions, different picture versions (2D, 3D, HDR), different audio configurations (2.0, 5.1, 7.1, Home ATMOS (which is different than a Theatrical ATMOS mix), DTS-X, etc.) and different edits to follow the censorship cuts in different countries. In addition, different resolutions (4K UHD, HD 1080, HD 720, etc.) increase the number of versions that need to be created.
For Home Entertainment and other downstream channels, rather than a DCP, an Interoperable Master Format (IMF) package or some other type of file-based master is created. As of 2018, many theatrical productions are created in uncompressed formats or IMF for archive or higher-level servicing while Apple ProRes QuickTime files or IMFs are created as smaller servicing files for distribution servicing.
Interoperable Master Format (IMF)
The Interoperable Master Format (IMF) is an internationally recognized SMPTE standard for the interchange of file-based, multi-version, finished audio-visual content. The IMF was loosely based upon the DCP standard but was meant to solve the versioning issue for home masters. IMF has the same basic structure as DCPs where a CPL references image, audio, and other files, allowing multiple versions to be created through a playlist. In addition to versioning, IMF supports the complex home ecosystem with different resolutions and frame rates within its architecture. Although IMF standards began to publish in 2012, as with any new standard, adoption took a while, and started gaining popularity in 2017.
IMF is not a format for day-to-day program production and post-production. The non-linear editing systems used during program production are storytelling tools that treat each video and audio element as discrete items whose relationship is set by the storyteller’s intent. IMF was originally designed to allow high-quality content to be exchanged between businesses. It requires tools that manipulate and understand finished components of a program and skills that are very different to those used in traditional post-production.
IMF is a workflow format that allows, or rather, enables all the additional elements of a TV program or movie to be “bundled” together in an open and flexible way.
A typical non-linear edit application (NLE) could make any version of a program from the master file, but they are not specifically designed to do so. IMF tools are ideally designed to organize finished content segments, or, as the IMF documentation describes them as “components” and compile the different elements into a finished version. More detail about how IMF can be used in post-production can be found on the SMPTE website (www.smpte.org).
Mastering and Versioning Applied to TV Documentary
There are many similarities in the mastering and finishing processes for movies and TV programs destined for an international market. It is worth looking at how processes are becoming more streamlined and use a number of automated processes.
Figure 4.9 gives an overview of a typical “high end” documentary – shot on a variety of cameras each using the best codec for the particular camera. Shooting ratio is typically 800:1 to 1,000:1 and all rushes are kept in their native format, for use by the production company of other programs or for potential “stock-shot” sale to other program makers. There are no particular “preferred” processes but the use of mezzanine compression during post-production is kept to a minimum, or if not possible, a camera “native” end-to-end codec might be used. A mix of common tools is normal and devices like FilmLight Baselight and SGO Mistika are common to cinema and TV post. However, some processes such as HDR to SDR conversion, HLG to PQ conversion, etc. are often totally automated and occur during the creation of the final format masters.
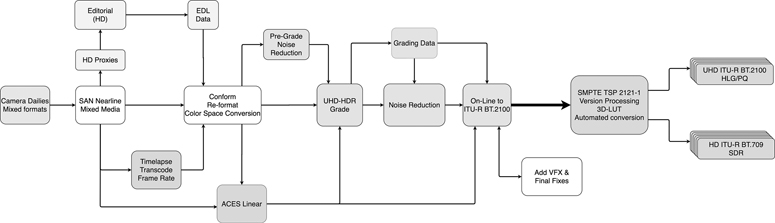
Figure 4.9 Television Post Workflow
Titling, Captions, Subtitles, and Alternate Takes
Title Sequences
The opening title sequence and end credits are typically created by a title facility. The studio or content producer usually has a legal team that vets all names and credits of people that worked on a particular production. These title sequences have to be created similar to VFX content and delivered to editorial and the finishing post-production facility. The length of each of these title sequences is determined by the content producer. Depending on the production, the title of the content may be localized in different countries and created in the same style as the original title.
Some broadcasters only allow “approved” job descriptions on programs they have commissioned (and paid for). Always check the broadcaster or distributor credit guidelines before final post.
Captioning and Subtitling
Once the edit is locked, translators can finalize the caption and subtitles for the content. Captioning is visual words on-screen that is usually meant for the hearing impaired and includes the dialogue, descriptions of sounds, music and who is speaking if the person is off screen. Subtitling can either include the same content as captioning or it can be a translation into another language. Subtitling is often a different translation from localized audio in the same language because the subtitle language does not have to account for mouth movements and can be a direct translation of the dialogue. Subtitling does have to take into account how many words can fit on the screen and still be human readable, so there are constraints that a subtitling facility uses when creating the subtitle. Both captioning and subtitling are usually delivered as certain types of file formats that are usable for downstream distribution.
Alternate Takes
The first question you should ask is “what are alternate takes?” and the second should be “what has to happen to the alternate takes I have been asked to process?”
Alternate Takes are quite simple technically. They are just different versions of a shot or clip of sound (or both) that replace a similar shot or clip in the program. The simplest form would be a shot with burned-in text (e.g., a contributor name) and the alternate take would be a clean version with no burn-in. But an Alternate Take can also be a unique location shot or VFX sequence. Also, there may be more than one! An example of this is in animation, where alternate versions of a sequence where background detail or text is changed for either language or cultural reasons.
When planning the Alternate Take options, it must be clear what exactly is meant. For example, do ALL of the shots with text need to be clean and to what level? This could mean graphics such as maps or story-line critical background text (as opposed to background text that just happens to be in shot) or it could be as simple as clean versions of that shots that can be used to replace “dirty” versions.
The same applies to sound; however, this may mean a new mix (see the Audio Mix section).
Quality Control (QC)
QC for Theatrical Delivery
Quality control for theatrical content must be done in a properly calibrated theater. The first QC is done off of what should be the final Original Version (OV) DCP. The OV contains one editorial version of the content and is usually the base for localized languages. However, there can be multiple versions of the content (for example, the English OV may have on-screen text burned in while an international OV may use textless image, expecting that D-Cinema subtitles will overlay over the textless image). Also, keep in mind that each version can have multiple audio and subtitle languages, as well as multiple audio configurations such as 7.1, 5.1, Dolby ATMOS, DTS-X, etc. Each of these variations must be reviewed for quality control! Starting with the OV DCP, each of the variations (audio configurations, captioning, language versions, etc.) are QC’d. Then, any other OVs are reviewed along with each of those variations.
The typical order for the review of the DCPs is as follows:
Apply any necessary fixes or updates, and QC updated DCPs
Once a particular OV is approved, the package is used as the source for versioning all DCPs for this particular picture & sound combination…and this process starts all over again when there is a new DCP version!
Checks are performed on image and sound at the same time. For 2D content, the review is usually done in a theater with a white screen. For 3D standard dynamic range content, the review is often done on a silver screen. Although the facility making the DCP will also QC the content to make sure there are no technical issues, the Studio will often have several people that are familiar with the content review the DCP to make sure there are no other issues, creative or technical with the sound or picture. Usually, this includes at least one crew member from Sound (mixer or sound editor) who is familiar with the mix and at least one crew member from Picture or DI (Director, DP, colorist, Editor, Assistant Editor, VFX Editor, etc.) familiar with the cut and one familiar with the color grade, as well as someone from the Studio who is overseeing the particular title.
QC is often the last opportunity to make fixes or changes before mass duplication starts and dozens (sometimes hundreds) of versions are made from the OV. Therefore, this is the time where filmmakers and crew members squeeze in last minute updates. While the intent of the QC process is to correct things that are “wrong,” many times it is also utilized as the last chance to make changes.
For some filmmakers the QC period is a good time to review the content in a new environment. For some people, they finally get to view the content on a much larger scale while others who are unfamiliar with the content are asked specifically to review the content with “fresh eyes.” These new factors sometimes offer a better opportunity to identify previously unseen or unheard issues. For example, an editor may have only seen their content on a 50-inch monitor in editorial, but once they see the 2K or 4K DCP projected onto a 50-foot screen, flaws are much easier to spot.
QC is done to identify, and hopefully fix any technical, production, or creative issues. Picture issues can include compression artifacts, duplicate frames, dropped frames, frame edges in picture, conform issues (wrong shot or VFX version), power window issues, bad or old color, 3D phasing, incorrect or misspelled credits, soft or fuzzy on-screen text, production issues (boom/production equipment or crew in frame), poor speed changes, incorrect placement or timing of on-screen text and subtitle or captioning issues.
Sound issues can include sync issues, misaligned reel breaks (resulting in a pop or snap), pops or crackles, incorrect channel routing, missing audio, incorrect sound mix balance issues, Narrative Audio Description issues (for visually impaired DCPs) and hearing impaired DCP issues (boosting of the center/dialogue channel). For dubbed versions, checks would include making sure the correct language is playing back in addition to the above issues. The different audio configurations must be reviewed on the correct type of system. For example, a 7.1 mix must be reviewed in a theater with the proper system to decode and playback 7.1.
Prior to the visual QCs, a data validation of the DCP is done to check the interoperability or proper playback across various devices, as well as confirming that the DCP has been mastered correctly. Additionally, the studio can request that the mastering facility review the DCP and confirm or reject based on its own technical specifications and requirements.
QC for Television
QC for most broadcasters usually consists of two distinct operations:
Compliance QC (CQC)
Content QC (QC)
Compliance QC for Television Delivery
A “compliance check” is to confirm the file is the correct codec and format. The compliance check, sometimes called “compliance QC” (CQC), is totally automated and checks the file formatting only – in other words, “will it play and is the metadata formatted correctly?”
Broadcasters usually have a delivery Portal or Gateway for content delivery and the CQC checks occur in the gateway. Files that are OK are passed to the next step while files that fail are “bounced” along with a technical report detailing the failure issues. In the UK the Digital Production Partnership (DPP) has a common CQC for all broadcasters. The details are published, and many automated QC vendors include the “UK DPP AS-11” CQC test. This allows post companies to pre-check file before sending.
Content QC
Assuming the program passes the CQC, it moves to the broadcaster’s QC department. Again, this is split into two processes:
Automated QC – AQC
Human QC
AQC carries out the checks that humans cannot or where humans use devices like video waveform monitors or audio level meters. Humans are expensive and QC areas even more expensive! Many QC checks that require meters and signal level monitors can be automated which means humans only need to QC sound and picture content and do not need to watch a program with technical errors.
AQC devices check for technical compliance with the video and audio standards the broadcaster has asked for and also the format of the file matches the requirements. Automated QC (AQC) devices usually work to QC Templates that are either supplied by the broadcaster or meet the house style of the post-production company. Many broadcasters and distributors are supporting the EBU QC site to define their QC Items and QC Templates.
Human QC is a visual and audio check by experienced craft personnel capable of assessing picture and sound quality, in an area where there is no distraction, controllable lighting, and reasonable soundproofing, on the final flattened transmission file. It is not acceptable to view any layered version of a program.
The viewing is carried out using a good quality broadcast video monitor Grade 2 or better with a minimum size of 24 inches, plus correctly positioned good-quality speakers.
A Grade 2 is similar to a Grade 1 but usually has wider (or looser) specification tolerances than a Grade 1. Grade 2 monitors are a cheaper than Grade 1 and are used where the tighter tolerances of a Grade 1 monitor (for example on accuracy of color reproduction and stability) or the additional features of a Grade 1 monitor are not needed.
Some facilities use “high end” consumer televisions fed via HDMI. There is something to be said for watching a program on the best version of the target display! If the following guidance is treated as a set of “minimum” requirements, then it is an acceptable procedure:
Minimum screen size 42”
Resolution*
Connections
Viewing distance, no more than 3H for HD and 1.5H for UHD with the viewing position directly in front of the screen preferably with the viewer’s eyes perpendicular to the display horizontally and vertically
External high-quality speakers properly positioned for stereo or surround sound monitoring – see Figure 4.10 for 5.1 but Report ITU-R BS.2159 gives suggestions and diagrams for optimal listening for other formats**
Reasonable sound dampening to minimize external interference and reflections
Regularly calibrated with broadcast monitor test signals (e.g., PLUGE, Testcard, etc.)
Controlled lighting to minimize screen reflection
*Resolution – it is always best to use a TV that is native to the target format, but higher resolution TVs can be used (3840×2160 to QC 1920×1080) IF and only IF engineering tests show no visible degradation due to the TV’s internal scaling.
**At the time of writing, one of the most popular Next Generation Audio (NGA) systems is Dolby Atmos – this adds height to the sound arena but only adds four additional speakers to a 5.1 setup as shown in Figure 4.10.

Figure 4.10 Speaker Configuration for Audio QC
Area for TV Immersive Audio QC
It is becoming increasingly common for TV to use more immersive audio formats such as DTS X and Dolby Atmos. When it comes to QC for these formats, there is no point in using a cinema style listening environment. The TV QC area has also to assume the audio and video will be QC’d together making the distance from the screen just as important as the position of the speakers.
There are two common types of room layouts:
Equidistant, where the distance to each speaker is approximately equal. This layout works well when a surround sound QC area (as per Figure 4.10) is adapted for immersive audio QC.
Orthogonal, where the room is usually longer than wide, more common for sound mixing where the mixer is toward the back half of the room. This layout can be used when the sound is QC’d in a sound mixing area.
Figure 4.11 gives the approximate speaker positions for an immersive audio QC area (including video QC). The height of the top speakers is usually about 2.5m from floor level and angled toward the operator’s position.
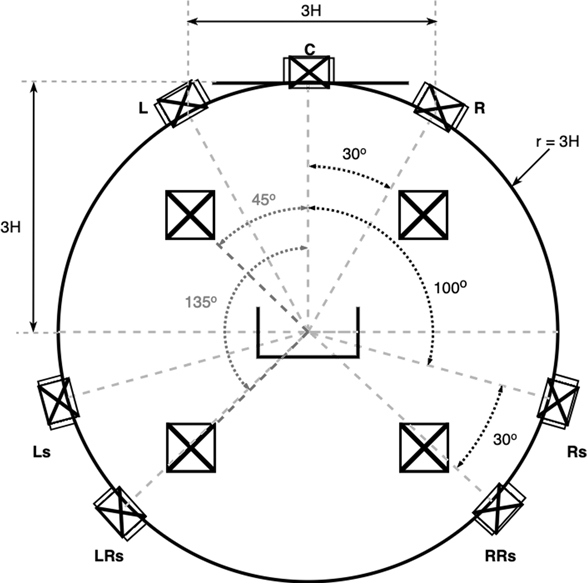
Figure 4.11 Speaker Configuration for Immersive Audio QC
QC Database of QC Items
The EBU has an open-source database for TV QC (AQC and CQC) which the UK’s DPP and many other broadcasters use to define their QC requirements. (http://ebu.io/qc)
Photosensitive Epilepsy (PSE)
Some countries require all programs to have a PSE test and report. This tests for flashing images and high detailed patterning. Details of the test can be found in ITU-R BT.1702. Many AQC devices have an option to carry out PSE tests but not all are approved for use in every country. In the United Kingdom, PSE tests are mandatory and approved devices are listed on the UK’s Digital Production Partnership website
Sound Audibility for Television
The quality of sound is an extremely import facet of the program, and poor quality can adversely affect the viewers’ audio-visual experience. Poor sound is usually blamed on:
Noisy location recordings
Mumbling actors
Inconsistent dialogue levels between and within programs
Quality of television speakers
Many TV viewers complain they have to adjust the volume during a program: this is often referred to as “volume surfing,” i.e. the scenario where viewers turn up the volume to be able to understand what’s being said but then have to turn the volume down when a loud section of the mix happens, usually music or fast action. Because the volume has been increased to understand the dialogue, the action sequences become too loud!
Audio mixers utilize devices that can help to ensure the final mix in within the local regulation or guidelines (Europe uses EBU R128 and the USA uses ITU-BT.1770). There are other variations used by other regulators or broadcasters, so it is very important to get the details as early as possible.
For the final mix, the music is normally taken down 4dB, and this has been shown to make an enormous difference to the audience and can usually be achieved without affecting the creative intention.
Additionally, a regular recommendation is to be aware of is how television sound is transmitted. Usually only the surround mix is sent to the home which means the TV or set-top box will do the down mix for those with stereo (usually TV speakers). If the mix doesn’t take account of this, the dialogue, which is fine in 5.1, can get swamped in stereo.
Some tools that might help assess a mix are available. In order of preference:
There are many Loudness tools now available as plug-ins to editing software as well as dedicated audio mixing tools.
As an example – take a look at the analysis evidence of two programs which both meet the European EBU R128 requirements on loudness, but the first example has good dialogue reproduction and the second caused Volume Surfing (Figures 4.12 and 4.13):
Archive
With all the creative input from the production, post-production, and creative teams, the final deliverable becomes an extremely valuable product. It is extremely important to archive it in a fashion that permits easy access, long-term reliability, and data protection. Additionally, based on specific studio guidelines, one or all of the below are archived:
a The Digital Source Master (DSM) is archived. This is the final version of the graded files from the DI process;
b The Ungraded DI files, the DI project, and all Viewing LUTs are archived;
c The Original Camera Negative (or RAW Camera Files) and production audio are archived;

Figure 4.12 Example Showing Good Dialogue Reproduction
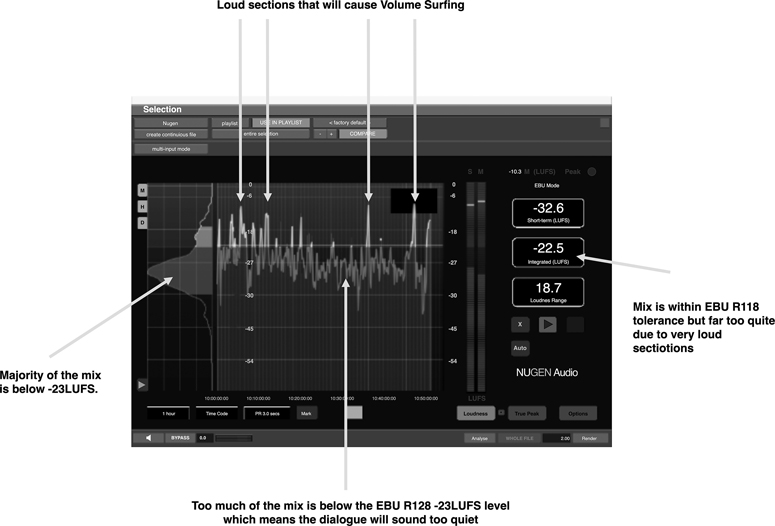
Figure 4.13 Example Showing Material That Leads to Volume Surfing
d The Visual Effects Models and Textures are archived;
e The Print Master as well as the Audio stems are archived;
f The Digital Cinema Package (DCP) is archived: This is the final “release” print of the motion picture; and
g The Interoperable Master Package (IMP – the file that represents the IMF) for the Home Master is archived.
The DSM represents the final creative intent, and in the case of multiple theatrical versions, each of the light levels as well as the SDR and HDR version are archived. The ungraded DI files, the DI project and the viewing LUTS represent all the files before creative adjustments were made for a specific display medium. Given the rapid advances in display and audio technology, this data set can be repurposed for the next generation audio-visual experience. The original camera negative and production audio were captured and backed up on-set and these are preserved in the archive, as are the Audio Print Master as well as the Audio stems. In certain cases, the DCDM from the HDR grade is also archived, as are the models, textures, and references generated during the VFX process.
Typically, these assets are received on LTO data tapes, and the archive sets each have a well-defined naming convention, along with Metadata requirements, and checksums for each TAR (tape archive) group to ensure that data validation schemes can be run across these data tapes. These data tapes are written in either the TAR or LTFS format and image files are normally written with the following guidelines:
Image files must be written to tape in sequential order as they appear in the film.
Sequences of files may be broken down into reels or sequences, as long as the correct sequencing information is maintained in the metadata and filename.
Image sequences are to be contiguous when written across multiple tar volumes.
Each file, sequence and/or reel on a given tape must be complete, with the following guidelines:
No frame file shall carry over to the next tape in the set,
No sequence or reel shall carry over to the next tape in the set,
If a full sequence cannot fit on one data tape, the sequence may span to the next tape in the tape set as long as any given tar volume does not span the tape set.
For a 3D title, left and right eye of the same reel may reside on the same data tape sets as long as the reel does not span across another data tape. If both left and right eye cannot fit on same data tape, they shall then be written to separate data tape per reel.
Use No Data File Compression.
Hardware, software, or proprietary data compression may not be applied when writing archival data tapes in order to ensure native drive capacity.
Approximately 100MB of the tape must be left data-free to guard against tape handling errors.
The end of each tape must contain an “end-of-data” file mark indicating the end of the recorded data.
A file mark must be written after each tar volume indicating the end of the “tarball.”
The Future of Post-Production
Across the entire media industry there is general move from large capital infrastructure operations to “on-demand” operational cost-based processes. As connectivity speeds rise so does the viability of cloud and diverse location collaborative post-production. This is already happening with audio post and is possible during editorial, where proxy files are small enough for real-time operations.
Currently, most of post-production processes (dailies encodes, editorial, etc.) are carried out in post companies data centers; this is known as on-premises or “on-prem” operations. This is because the high-quality image files are very large and speed is the imperative factor. However, some areas of post operations are able to exploit cloud-based and off-site operations. Rendering for VFX is starting to move into the cloud because of the spiky nature of the work – we all know sometimes there is a massive amount of rendering to be carried out and then sometimes there is very little. On-prem facilities would need to have peak capability ready to use 24/7, which translates into high investment in hardware that may have very low utilization.
Cloud services offer the ability to spin up more processing when needed and turn it off when not needed. Instead of investing in on-prem infrastructure that might sit dormant for most of the time in the anticipation that it will be required to support peak demand, paying for the cloud processing when you need it can be an efficient and cost-effective workflow.
Other parts of post-production are starting to look at the cloud. Transcoding for dailies and VFX plate pulls seem to make sense since you can spin up processing when needed, but the drawback is speed – for example when processing dailies, moving large camera RAW files into the cloud in the first place especially from remote locations is not viable because of access speeds: Network connectivity to the cloud from various locations can be limited or prohibitively expensive. Most productions do not have the budget for a super-fast connection to the cloud which means that large files like camera RAW files can take a long time to move into the cloud. Because productions need dailies files turned around quickly, waiting for your camera RAW files to move into the cloud before dailies processing is time-prohibitive right now.
Yet even now in News production, cameras are connecting to cloud services and uploading content as its shot. Many cameras can already produce viewing proxies simultaneously with the “masters” and this might well be the first step in long form production in the cloud. Mobile 4G can be used but 5G networks can be locally set up to allow local to cloud transfers during shooting time. Cloud processing could mean the program’s look can be preset, then accessed and used by all companies which will eliminate the differences that occur when multiple vendor processing occurs.
Once your source data is in the cloud, the possibilities for manipulating the files are endless. Many companies are creating Software as a Service (SaaS) that can be used on a pay as you go service to process files. Machine learning services can interrogate the images and audio and provide additional metadata such as image and sound recognition to your files and there are various transcoding and image processing services available.
The potential for better remote collaboration is a key tenant of working in the cloud. Many people are familiar with working on a document in the cloud with others such as a Google Doc or Microsoft 365 Word document, and these SaaS offerings are being joined by others such as DropBox, Box, etc.
These companies are looking into how very large files can be processed without the need for transfer, production-based backup, and built-in version control. It is also worth considering that the Cloud operators can manage vast processing power in an on-demand way, and many already offer real-time proxy streaming based on the recipients’ network speed. It would not be science fiction to suggest that soon an IMF CPL could be “dropped” into the production’s cloud space and a real-time proxy of the version stream back to a Director’s cell phone or a full quality version made available to a buyer with no need to transfer.
As has been demonstrated by the Audio community, especially in music composition and recording, there are amazing opportunities for collaboration with many people working on a project at the same time in real time. Now imagine that you have a set of image and/or audio files in the cloud and everyone can be editing or viewing the files in real-time at the same or different times. You would have true remote collaboration for the storytelling and for reviewing and approving the content.
Currently there is a problem that needs to be addressed, lag or as it’s known, “latency.” Vision switchers, editors, colorists, etc. expect – well demand – that when they press a button or adjust a setting, the change occurs on the next frame (mid frame changes are a bad idea!). For Cloud production to become viable for the end-to-end process, this latency issue must be resolved. It must be remembered that while Cloud processing can be much faster and much cheaper than on-prem, control signals and “return” suffer latency.
Even with current high bandwidth connections, the latency or delay in receiving the data over a network connection makes it difficult to work in real-time. With the image files in the cloud, the latency from the network connection would cause a delay in seeing the change. For cloud operations to become fully viable for all areas of post-production, post areas will need to invest in much higher connectivity for both local and cloud connection.
One other item to be aware of with production in the cloud is that companies that provide traditionally on-prem processes are aligning themselves with one of the multiple cloud providers. At some point, many of these services could become cloud agnostic, but because each cloud provider has different technical infrastructure, it makes sense for companies to work and hone their product or service to optimize for a specific cloud provider’s framework. For example, Avid® is currently working with Microsoft Azure for the implementation of their Media Composer editorial software in the cloud. This means that productions working in a different cloud might have to support multi-cloud usage and may have to move files from one cloud to another. As of the writing of this book, a new business model for the cloud providers will probably be needed in order to make production in the cloud cost-effective and a reality for content creators.
One other worthy note to include in the future of post-production is the use of game engines to provide real-time rendering for VFX, as opposed to the non-real time rendering that is used currently (aka start the render and get a cup of coffee/entire meal). Game engine companies have already demonstrated VFX quality rendering on short pieces, and their quality and usability will only improve in the future.
Bonus Content
Special Section 1: Color Pipeline
Each production needs to determine how color will be processed from camera through to the finishing process. Many productions have a few choices here including using a workflow specified by one of the camera manufacturers, working in a specific color space like Rec.709 or a standardized workflow like ACES (Academy Color Encoding System). It is important that the color workflows/pipelines be determined before production starts in order to prevent problems with color mismatches downstream. Testing the color workflow from camera through various areas like dailies/editorial, VFX, and DI using camera test footage before production starts helps to validate and test the color workflow and determine whether changes need to be made.
The color workflow/pipeline through finished content includes the following items:
Debayering of camera images into a format to be used as the source for the post-production process (if using camera RAW files)
ASC CDL values that adjust the image – can be per shot or sequence
Overall look of the content (more of a “film look” or a “higher contrast” look)
Viewing pipeline for VFX and DI (and which display device will be used for the hero grade)
Whether or not there is a neutral grade for the VFX work
The above items show a sample of where color can be modified in the workflow of post-production. However, color can be altered whenever a file is converted into another file or if the images are manipulated while viewing them on monitors that have not been calibrated to the proper standard. Since maintaining creative intent is such an important part of creating content, paying attention to the color pipeline is a requirement. Otherwise, you may hear complaints like, “That’s not what I shot!” or “That’s not my movie! That snow isn’t the right shade of white!”
Proprietary Color Workflows
Each camera manufacturer has their own proprietary color workflow that can be used by a production for their color pipeline. For example, if you shoot on ARRI cameras, a production can use the ARRI LogC workflow which converts the camera into an optimized color gamut that ARRI has specified for their camera images. Besides providing a special color working space, ARRI also provides transforms that can be used for different display devices, so if your hero grade is targeting a Rec.709 television, for example, you could use their transforms to view the color on a Rec.709 monitor. Once you establish a look for dailies, you would want to make sure that you communicate any looks and transforms as well as the target display device in any deliveries to VFX facilities to make sure they are viewing the images properly for dailies color. If you are targeting a Rec.709 finish, then the color management can be quite straight forward with the final DI/color correction. If the final color correction is targeting a different display device, for example, a Digital Cinema projector, you would need to use an ARRI transform for a Digital Cinema projector as your viewing transform for the hero grade.
Many dailies, color correction, and VFX systems understand the LogC workflow and can work with LogC images. However, Canon has their CanonLog workflow, Panasonic has their VLog workflow, Red has their RedLog workflow, and Sony has their SLog3 workflow. If you shoot with several types of cameras, it is possible to pick one of these camera workflows for all of the cameras, even though it sounds counter-intuitive to do so. Many filmmakers insist on having a certain look to their images and choose to work in one of these proprietary camera manufacturer–based color spaces. It should be noted that not all of these proprietary color spaces have been documented, so although they will work in the short term, there is no guarantee that these color spaces can be recreated in the future. From an archive standpoint where you may pull out your Digital Source Master 50 years from now, you would want to make sure that you can re-create any approved color or looks. One of the difficulties we face is if the proprietary camera transforms or working spaces are not available, you will not be able to get an exact match.
Besides the camera-specific workflow, there is also the issue of the look being proprietary to either the creator that made it or the post-production facility that made it. Back in the film days, certain post-production facilities prided themselves on the various ways that they would output film. Creatives would go to one post house over another because of the way that post house’s film-outs looked. Once Digital Intermediates became popular, post houses needed a way to emulate how these digital images were going to look on their film-outs, so they created Film Print Emulation (FPE) looks. The trouble was that these FPEs were quite proprietary to the post-production facility, and the post facility would not include this FPE with the DSM archive. This meant that when content owners restored their DSM, they could not get the exact approved look because the FPE was not supplied, and without it the images would not look right. You could also render in the FPE into the DSM, but then your image would be limited to what the FPE would allow. Although most productions do not output to film as their hero grade anymore, the post-production houses were used to not including any looks with the archive files, so many digital only productions still have this problem today. The post-production houses are now starting to include the looks/transforms, so always make sure to ask for them so that the looks can be added (virtually) in order to create the approved hero grade.
ACES
The Academy Color Encoding System version 1.0 was published in 2015 by the Academy of Motion Pictures Arts and Sciences (AMPAS) as a framework that can be used to place any camera image into a standardized container and color space. ACES is meant to help with color management from set through finishing and into the archive. Because it has been standardized through the Society of Motion Picture and Television Engineers (SMPTE), ACES provides a standard “language” to define color and looks that were used on a particular production. Where proprietary color spaces are not the best for archive purposes, ACES strives to be a standard way of defining color and looks for image archive. The ACES standards can be found in the SMPTE document suite of ST2065.
Through a series of transforms called input transforms, the camera files are converted into the ACES files, also known as ACES AP0 EXR files. Each camera manufacturer is responsible for making the input transforms according to the guidelines set by AMPAS. The ACES files can in turn have other transforms act upon them to change the look or optimize the output for different display devices. A look, for example, a more contrast-y look or a film look, can be stored in a transform called the Look Modification Transform or LMT.
There are different output transforms for each display device. The basic concept is to use the output transform that matches your hero grade, for example, the Theatrical standard dynamic version. Once the hero grade is complete, you can swap out the output transforms for a different display device, for example, a Dolby Vision projector, the Rec.709 HD display device, or an HDR television monitor, which will optimize the grade for that particular display device and can be used as a starting point for your trim passes for each new display device. The ACES framework allows for the color transformations to be broken up into components that can be added “virtually” over the ACES image so that the image never has any looks “baked” or rendered into the image. This concept of not baking anything into the image is important since many looks (including LMTs) have a tendency to limit the dynamic range of the image, locking it in to the display device’s capabilities at the time it was approved. Display devices are always improving, so if you were to “lock” in a specific look today, you would not be able to get more out of the image (Figure 4.14).

Figure 4.14 Basic ACES Workflow
ACES includes a few “working spaces” for specific usage in color correction systems and at VFX facilities. In color correction systems, there is a working space called ACEScct that allows colorists to have their controls on their color correction system to “feel” like they normally do. For VFX facilities, ACEScg provides a working space that is optimized for use with computer graphics. ACEScct and ACEScg are not meant to be rendered out and exchanged; instead they are meant to be only working spaces that are virtually created. A DI post-production facility and VFX facility would render out ACES AP0 files to exchange or use for archive.
There are two other components of the ACES framework that help with interchange and basic human usability. ACESclip is a sidecar metadata file that is used to describe the transforms used and the order that they appear. This file is helpful for archive and can serve as a record of what was done to the ACES files in order to re-create the approved look of the content. Looks are stored in a file format called a Look-Up Table or LUT, but because there was no way to interchange them between systems, ACES created the Common LUT Format (or CLF).
ACES also defines an entire workflow using film where film can be scanned into files that can be transformed into ACES and can also be recorded out to film from the ACES files. As of the writing of this book, the latest version of ACES is version 1.1, although many systems still use version 1.0.3 which does not include the newest output transforms for HDR. The ACES system is a work in progress and a current effort called ACESnext is working on improving the features and usability of ACES. AMPAS and SMPTE have defined a standardized Digital Source Master archive file through the use of an IMF (Interoperable Master Format) application that uses ACES image but includes synced audio and subtitles and other metadata. This format can be found as SMPTE ST 2067-50.
Special Section 2: High Dynamic Range
High Dynamic Range (HDR) refers to the contrast range of the displayed image. The most common mistake people make is that HDR is all about brighter images. HDR is more about darker images, where it enables the display of more detail and color in darker images areas plus incredibly bright highlights.
It should be mentioned that, at the time of writing, HDR is a nascent technology and experience is still growing. Any description of HDR in the workflow is a snapshot in time and the reader should consult regularly updated reports and standards from organizations such as the ITU and SMPTE.
In Theatrical exhibition, the Standard Dynamic Range (SDR) is normally 2000:1, or about ten stops. For SDR television in the home, with a nominal peak at 100 cd/m2, the dynamic range is about 128:1 or about seven stops.
In Theatrical Exhibition, there are now various projection systems such as IMAX, Éclair, and Dolby Cinema that offer different contrast ranges for the displayed image, and as they are greater than the standard Digital Cinema specification, they are regarded as High Dynamic Range systems.
For consumer televisions, there is a wide range of display technologies, such as organic light-emitting diode (OLED), Liquid Crystal Display (LCD backlit with Light emitting diode (LED)), and so on, and each of these display technologies have different capabilities and thus different dynamic range.
The good news is that the ITU Recommendation ITU-R BT.2100 defines only two HDR options for program production, Hybrid Log-Gamma (HLG) and Perceptual Quantization (PQ), and standardized under SMPTE standard ST-2084. This may seem confusing especially when documents refer to ITU-R BT.2020 color as well, so it’s worth a brief overview.
ITU-R BT.2100 has “cut and paste” color text (literally) from ITU-R BT.2020. This means:
if a UHD program is HDR, ITU-R BT.2100 is all that’s needed to describe Color and Dynamic Range; and
If a UHD program is SDR, ITU-R BT.2020 is all that’s needed to describe Color and Dynamic Range.
There is significant confusion in the industry currently over the different types of HDR, including what is actually meant by HDR. This should not affect post-production unless a proprietary distribution HDR format is used too early in the workflow.
Transfer Functions
In post-production, the basis of HDR is established by the Transfer Function. Recommendation ITU-R BT.2100 standardizes two HDR transfer functions: HLG and PQ (SMPTE ST 2084). The report ITU-R BT.2390 gives more background detail to both systems, and ITU-R BT.2408 gives operational guidelines. Additionally, SMPTE ST 2084 defines the optical transfer function for mastering reference display for the PQ HDR system, which is not needed for HLG.
Theatrical workflows tend to favor PQ workflows while TV favors the HLG workflow. The main difference between the two is that PQ is a “display referred” and provides a specific code-value to luminance correspondence, while HLG is “scene referred” and the images have the same relative and the actual display brightness is not relevant.
As long as everything has been captured in either a camera RAW format or RGB (4:4:4) then HDR post-production is the same as Standard Dynamic Range (SDR). Wherever possible, master HDR content using ACES or RGB 4:4:4; if this is not feasible, choose the mastering HDR format and stay with that format throughout post.
The good news is, ACES, RGB 4:4:4, HLG, and PQ do not need any form of metadata during post.
HDR Signals
It is important to keep in mind that since a larger range of the image will be displayed on an HDR display or projector, the bit depth of the camera image should be large enough to provide the desired dynamic range. For theatrical workflows 14-bit cameras are required, with the image bit depth based at a minimum of 16 bits. For TV broadcast workflows, the minimum is 10-bit but 12-bit is preferred if heavy post-production processing and color correction is needed. It is pointless to process HDR in 8-bit; it is simply not acceptable!
For Theatrical finishing, the HDR master is generated while viewing the material on an HDR projector. There are instances where a 42” Dolby Pulsar has been used as a starting point to generate the trims, but predominantly the colorist will begin the HDR grading process directly on the HDR projector for which the session has been allocated.
To preserve the look of the motion picture, typically the show’s look is transformed into the larger container of the HDR display, so that the colorist has a starting point to take advantage of the deeper blacks and brighter highlights.
For the Home Entertainment master, the colorist will normally color grade on an HDR display. Two common displays used in the mastering process are the 42” Dolby Pulsar and the Sony BVM X300. Based on production guidelines, the colorist will select the peak luminance point, and if using the Pulsar, this is set at 4,000 cd/m2, and if using the X300 it is 1,000 cd/m2. This does not mean that the content will be forced to either 4,000 or 1,000 cd/m2; it simply means the “container” permits this. In reality, the creative choices will determine how bright or dark the content actually will be.
HDR Displays
Probably the most important piece of the HDR process is the display used for color grading or final post. Monitoring HDR is not as straightforward as getting an HDR capable display and setting it to the right version! First the display needs to be set up and the room needs to have the right amount of illumination or the pictures will not look as intended when they are distributed.
A new display line up PLUGE signal has been developed by the ITU and a revised version of ITU-R BT.814 has an explanation of how to use the signal to set up the display brightness.
What is important to remember is the way a display should be set up. It is important to follow the guidelines in ITU-R BT.814 and adjust the controls in the correct order and in an area with lighting conditions.
When making graphics and adding text to HDR programs a new “white” level reference must be used. Adding text at 100% white level will make it far too bright with respect to the pictures so-called “Graphic White” must be used. Report ITU-R BT.2408 has tables with details of skin tones and graphics levels.
Brightness Jumps
Cuts between shots with very different brightness can be as uncomfortable as sudden transitions between quiet and very loud audio. Large brightness changes from dark to light can be used sparingly for effect but cutting from a very bright sequence to a very dark action will not work as expected! It is well known that the human eye takes time to adapt to the dark so if there is action or detail in a dark scene after a hard cut from a very bright scene no one will be able to see it. Adaption can take up to 30 minutes in extreme cases – just try reading print after coming in from bright sunshine to a dimly lit room! It is important to ensure that the brightness variations within HDR programs are limited and controlled to avoid viewer discomfort.
The ITU operational guidelines suggest, “night scenes will usually have an overall brightness at the lower end of the normal operating range, and sunny outdoor scenes will have an overall brightness at the upper end of the range.” It also points out that low light detail may be lost after a transition from a bright scene even if the transition is not uncomfortable, because it takes time for the eyes to adapt.
Line-up
Finally, a new television format will need a new set of color bars… ITU-R BT.2111 defines color bars for PQ Full and PQ Narrow Range and HLG Narrow.
The new signals have traditional HD colors as well as HDR colors.
This is an example of the new HLG color bars (Figure 4.15).
Conversion for Television Programs
Many television programs, especially documentaries use content from a wide variety of sources not under the control of the program maker or simply from archive content suppliers. The ITU Report ITU-BT.2408 “Operational practices in HDR television production” details some of the processes and practices HDR operations.

Cases to consider are:
Converting HDR content to an SDR signal range (i.e., Reducing the dynamic range of content).
Display-referred tone-mapping is used when the goal is to preserve the artistic intent of the original HDR ITU-R BT.2100 content when shown on an SDR ITU-R BT.709 or ITU-R BT.2020 display (UHD with no HDR). An example of which is the conversion of HDR graded content for distribution on an SDR service.
Scene-referred tone-mapping will change the appearance of the HDR content after conversion, but it is useful in live TV production where HDR cameras have been shaded using their SDR outputs. Scene-referred tone-mapping will produce a signal that is very similar to the SDR signal used for shading, and one that can be intermixed with other SDR cameras.
Placing SDR content in an HDR signal without changing its dynamic range.
Display-referred mapping is used when the goal is to preserve the original “look” seen on an SDR ITU-R BT.709 or ITU-R BT.2020 display, when the content is shown on an ITU-R BT.2100 HDR display. An example of which is the inclusion of SDR graphics in an HDR program, where color branding of the graphics must be maintained.
Scene-referred mapping will change the displayed “look” of content, but it is useful in live production where the goal is to match the colors and tones of a BT.2100 HDR camera. An example of which is the conversion of SDR graphics that are required to match in-vision signage.
Increasing the dynamic range of content by placing SDR content in an HDR signal with expanded luminance range, thereby providing a better match to native HDR content.
Display-referred inverse tone mapping is used when the goal is to preserve the artistic intent of SDR BT.709 or BT.2020 content, when the content is shown on a BT.2100 HDR display. An example of which is the conversion of graded SDR content for distribution on an HDR service.
Scene-referred inverse tone mapping will change the displayed “look” of content, but it is useful in live production where the goal is to match the colors and tones of a BT.2100 HDR camera. An example of which is the inclusion of specialist SDR cameras (e.g., slo-mo, spider cams, robo-cams) in a live HDR production.
Convert SDR content to HDR and then back to SDR or HDR content to SDR and then back to HDR. While such ability is very useful, it is advised to limit the number of such repeated conversions as much as possible, as some signal degradation is likely.
Many ask:
If you consider the end-to-end workflow of a program, it becomes clearer (Figure 4.16):

To ensure that image quality is not unduly compromised due to image processing, each step in the end-to-end chain should be mindful of processing that has already occurred or will occur later. The old engineer’s mantra “it’s ok leaving me” is not good enough if there is no consideration to the next step image processing.
Special Section 3: Visual Effects
Asset Creation
The VFX company has several steps in order to create their final approved VFX shots. The basic process for creation of something that did not exist before is to:
Create the object, character, or background
If needed, animate the character, or apply motion capture of the actors
Add textures to the object and look development
Set up the environment and light the scene
Composite the various elements together
Render the composite into a final form
Creation of the object, character, or background is dependent on what is needed. For example, a background could be a matte painting which is a painting of a background that needs to be composited into an existing shot. Because far away backgrounds typically do not need to move with foreground objects or actors, they can be 2D or flat in nature. However, in order to create foreground objects or characters that move around in a scene, steps must be taken to create the object or character so it can be seen from all sides and move around in a believable fashion.
In the case of 3D models and characters, it is necessary to develop the model/character from scratch, including geometry.
Model
To create a digital CG object or character, the first thing to create in the computer is a model using 3D software. The modeler sculpts the model as if it were made of clay, but the methodology and approach to creating the computer model differs significantly in the sense that models are usually made up by combining many polygon shapes to create the model. Models are mathematical representations of the object or character.
Rigging
If a model needs to move, it must be rigged. Rigging creates a skeletal structure or “bones” for the model. Rigging is a pretty technical process and requires knowledge of programming to create the proper rigs.
Texture
The surface of the model requires a realistic texture which is created by texture artists in 2D first. The 2D texture is then applied to the model in 3D graphics applications by mapping the 2D texture onto the 3D model to give the model more realism.
Animation and Performance Capture
Once a model is rigged, and a skeleton structure is developed, the model may be animated. For nuanced characters, the limbs, eyes, mouth, clothes, etc. of the model are moved by the animator. Another approach is to use performance capture systems to capture the motions of a real-life actor in the physical world and transfer them onto the digital model, wherein the joint structure of the real-life actor corresponds to the skeletal structure defined in the rig.
Motion capture has become a widely used technique because of its efficiency as well as high fidelity in being able to capture the nuances of specific actors. In feature film, often the performance capture is fine-tuned by animators to bring out specific nuances of the digital character.
Look Dev
Look development is where the photo-realism of the model happens. During look dev, the lighting of the object and shaders are balanced out to match what is in the actual scene. The lighting artists work to mimic any on-set lighting by placing CG light sources in the same locations and angles as what was used during production. Placing the lighting in the same location as what was used in the scene allows the CG asset to integrate into the original plate. Shaders are the instructions that describe how a surface should behave when light hits it and includes what color or “shade” it should be, whether it is reflective or has a matte finish and can even alter the texture somewhat by creating bumps and other surface textures.
Compositing
Compositing is where all of the various elements of the image are put together. Many times, compositors have the tough job of making sure everything looks right. They may clean up some of the rigging or fix blue screen lighting contamination. They help by doing technical checks and quality control of the image before delivery and play a large role in making sure color is balanced throughout the image.
Rendering
Once the 3D model is created and ready to be incorporated into the scene, the model must be rendered out in 2D to be added to the original plate. Rendering can be done in passes where separate parts are output to allow for better control in the scene.
World Building
World building refers to building an entire location in CG. Typically, this environment would seem to cover a large area from far away, but as you zoom in and get closer, there is enough detail through the location that you can “walk through” various areas of the location. You can think of world building as generating an entire town, for example where you can walk around the buildings and even possibly into each building.
Simulations / Particle Systems
Simulations are 3D computer models that are used to generate certain types of realistic looking effects that might randomly change with forces like wind or gravity. Many simulation models use particles to create the effect where each particle has its own properties like a certain mass, color, speed of travel, etc. Examples would be simulating how cloth moves in the wind, movement of water or buildings crumbling after an earthquake.
As the shots are being created at the VFX facility, they are continually reviewed, first by the VFX facility and then by the filmmakers from the production. The filmmakers will send back any notes for the VFX facility to work on. Upon approval, the VFX shots are delivered to Editorial (as editorial media), so that they may be cut into the current timeline and viewed in continuity.
As shots are finalized, the VFX facility sends the higher resolution file to the VFX team for final review and to the Digital Intermediate post-production facility for use in finishing. For VFX shots that do not use plates from the actual production, as in a fully CG shot, the process of review and approval is the same, and the VFX house would deliver fully rendered frames in the resolution needed for finishing as well as files for editorial to use.