Chapter 18. Reading Beyond Your NOOK
If you don’t have your NOOK handy, you can read items from your ebook library using the B&N NOOK Apps. B&N provides a version of the NOOK application for your PC, Mac, iPhone, iPad, iPod Touch, and Android device—even a NOOK Kids for iPad app.
Note
Technically, no Blackberry version of the NOOK App exists. The B&N eReader app, however, exists for the Blackberry. This is basically an older version of the NOOK App with significantly fewer features.
The experience the NOOK App provides varies depending on which device you use. On a PC, the experience similar to reading on your NOOK Color. On other devices, the experience is a bit more scaled-down.
You can download the NOOK App for your PC or another device by going to http://www.barnesandnoble.com/u/free-NOOK-apps/379002321/, clicking the appropriate NOOK App device link, and clicking the download link. (For the iPad, iPhone, or iPod Touch, you can search for Barnes & Noble NOOK in the App Store or in the iTunes Store.)
Tip
If you use a Blackberry or Android phone, B&N requires that you download the NOOK App from your device. For the Blackberry, you can do that by browsing to bn.com on your device and clicking the link to download the eReader app. For the Android version, search for NOOK in the Android Marketplace or scan the QR code on the Barnes & Noble Android NOOK App download web page.
Using the NOOK for PC App
When you launch NOOK App on your PC, you’ll be asked to sign in to your B&N account. Enter your username and password, and click Sign In if you already have an account on bn.com. If you don’t have an account, you can click Create an Account to create one.
Note
The Mac version of the NOOK App is essentially the same as the PC version.
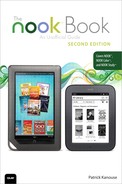
Browsing Your B&N Online Library with the NOOK for PC App
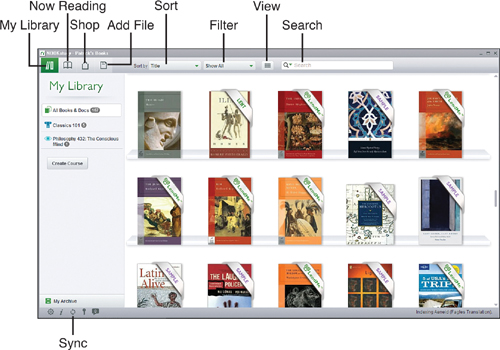
After you sign in to your account the NOOK for PC app checks in with My NOOK Library and synchronizes samples, last pages read, etc. You then see a series of buttons along the left side that mirror the buttons you see on your NOOK’s touchscreen when at the Home screen (see Figure 18.1). The only difference you notice is that the order of the Shop and Reading Now buttons is reversed on NOOK for PC app versus your NOOK.
Figure 18.1 The menu buttons in the NOOK for PC app mirror several of those on your NOOK.
By default, NOOK for PC app displays ebooks and subscription content. However, you can filter the view to show only ebooks, magazines, newspapers, and manually added content (what B&N calls “my stuff”) by clicking the appropriate option in the My Library menu.
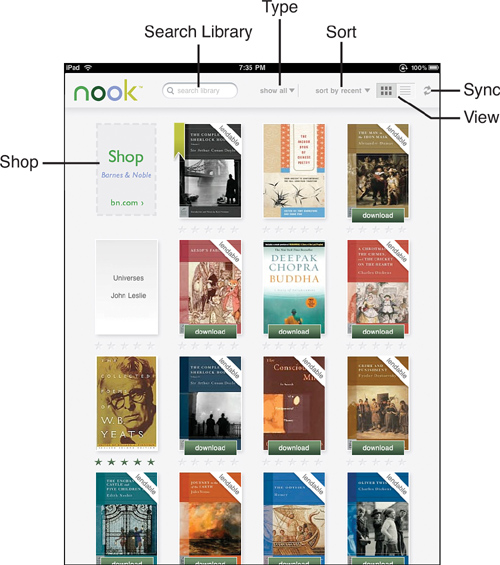
Along the top of the NOOK for PC app are buttons to manually refresh your library, control the views of your library, sort your library, and search your library, as shown in Figure 18.2.
Figure 18.2 Function buttons at the top of NOOK for PC app enable you to control how you view your library.

Clicking the Sync button synchronizes your B&N NOOK Library with the NOOK for PC app. Use this to synchronize your notes and page location.
Note
When the original NOOK and NOOK Apps were created, B&N had not yet created the mechanism to synchronize between devices. With the November NOOK software update and built into the NOOK Color and NOOK Apps, synchronization between these devices is now possible. No longer do you need to worry about finding your page or keeping notes across devices.
The View button (by default an image of six little boxes) controls how your ebook library appears in the NOOK for PC app. By default, the NOOK for PC app shows your library in list view. In this view, a small image of the cover of each item displays along with items such as the author, the last read date, and so on. You can switch to a grid or bookshelf view that shows only large images of each item’s cover by clicking View button, as shown in Figure 18.2. When you do, the View button changes to show three parallel lines.
When you select to show your items in list view, the Cover Size button enables you to control the size of the cover image that displays. (The button shows a small rectangle.) The smallest size is slightly smaller than the size displayed when in grid view, and the largest size is approximately twice the size of the covers shown in grid view.
Note
Most covers provided with ebooks and other content look terrible when you select the largest available size in list view because they’re not intended for display at such a large size.
You can sort your online library in the NOOK for PC app by clicking the Sort button, which defaults to Recent, but changes to Title and Author as you continue to click it.
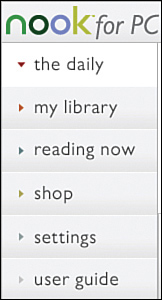
After you’ve owned your NOOK for a while, you’re likely to accumulate a large digital library of content. The NOOK for PC app enables you to easily find content as your NOOK library grows; you can search your library for content. When you click inside the Search Library box, you’re given a choice to search for a title, an author, a publisher, or all three, as shown in Figure 18.3. Select an option, enter your search text, and either click the magnifying glass or press Enter to search your library.
Figure 18.3 Searching your library using the NOOK for PC app.
Tip
Searches are filtered based on how your library is filtered. For example, if you’ve selected eMagazines from the My Library menu, searches show only magazines that match your search terms.
If you want to view all the items in your NOOK library instead of just those that match your search terms, click the X inside the Search Library box. Doing so clears your search term and shows all the items in your online library.
Viewing the Daily in the NOOK for PC App
Clicking the Daily menu button displays the Daily. Assuming you are connected to the Internet, it updates with the latest articles. Click Read Now to read the particular article, which appears in a small box. Clicking Close hides the article from view.
Shopping for ebooks in the NOOK for PC App
Clicking the Shop button opens up your web browser at BN.com. For more information about shopping for ebooks, see “Shopping on Your Computer” in Chapter 9, “Shopping and Visiting B&N on Your NOOK Color.”
Reading Items in the NOOK for PC App
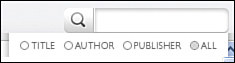
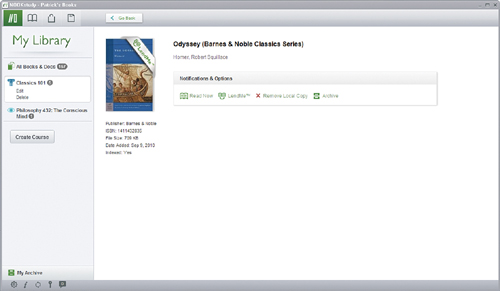
When you hover your mouse pointer over an item in My Library, the NOOK for PC app displays several options (see Figure 18.4):
• Read Now: Opens the item in the NOOK for PC app. If the item hasn’t been downloaded to your computer, the NOOK for PC app downloads it first and then opens it.
• LendMe: Displayed only for items you can lend to friends. When clicked, it opens a dialog box for entering the email address of a friend to whom you’d like to lend the item. See Chapter 4, “Lending and Borrowing Books with LendMe on Your NOOK Color,” for more details about the LendMe feature.
• Download: Displayed when the item hasn’t been downloaded to your computer. When clicked, the item is downloaded to your local computer and Download changes to Remove Local Copy.
• Remove Local Copy: Displayed when the item has been downloaded to your local computer. When clicked, the item is removed from your local computer. If you want to read it at a later time, you need to download it again.
• Move to Archive: Moves the item to your archive. Archived items appear in the Archive category in My Library.
• Unarchive: Displayed only for archived items. When clicked, the item is moved from the archive to your main digital library.
• Details: Displays the details for the item. Details typically consist of a larger image of the cover and a brief synopsis of the item.
Figure 18.4 Available options for when you hover over a cover.
Tip
Archiving or unarchiving an item in the NOOK for PC app on your PC also archives or unarchives the item on your NOOK, NOOK Color, and other apps (except the B&N Blackberry and Mac eReader apps).
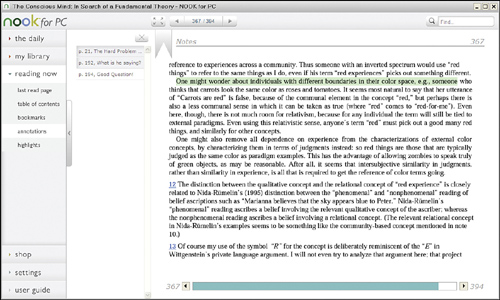
While you’re reading content, the NOOK for PC app displays the Reading Now menu. Using the Reading Now menu, you can easily navigate to the last page read, access the table of contents, and access bookmarks, annotations, and highlights for the item you’re reading.
For more information on using bookmarks, highlighting, and annotations, see Chapter 5, “Using Highlights, Bookmarks, and Annotations.”
Using Highlights, Notes, and Bookmarks in the NOOK for PC App
You can also use highlights in the NOOK for PC app. However, you cannot add highlights or notes to subscription content.
Adding Highlights and Notes
To add a highlight to an ebook in the NOOK for PC app, click your mouse on the starting point where you want your highlight. While holding the mouse button, drag your mouse to the ending point for the highlight. When you do this, the NOOK for PC app highlights the text and displays a pop-up menu (see Figure 18.5). To make the highlighted text an actual highlight, click Highlight Selection.
Figure 18.5 Adding a note in NOOK for PC app.
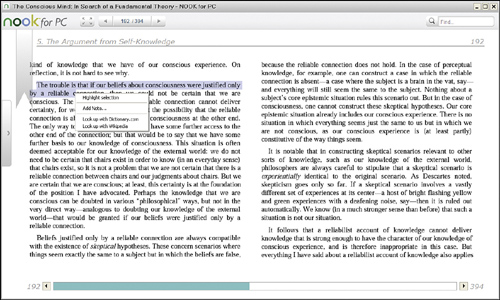
If you want to add a note, click Add Note from the pop-up menu. Type your note, and then click OK. If you want to add a note to text that is already defined as a highlight, highlight a portion of that text again. The pop-up menu offers a couple of extra options (see Figure 18.6). Click Add Note to add a new note to the existing highlight. Add the text for your note, and then click OK.
Figure 18.6 Editing an existing note or highlight.
Viewing Highlights and Notes
To view highlights, click Highlights under the Reading Now menu. Highlights that don’t have notes associated with them can be found by clicking Highlights. If a note is associated with the highlight, click Annotations in the Reading Now menu to see the note. You can quickly jump to any note or highlight by clicking the specific note or highlight (see Figure 18.7).
Figure 18.7 Jump to any highlight in a book.
Editing and Deleting Highlights and Notes
To edit a note associated with a highlight, highlight a portion of that text that comprises the note and click Edit Note. Enter the new text for the note, and click OK. To delete the note, select Remove Note; then click Yes when asked to confirm that you want to delete the note. Follow the same steps to remove a highlight that doesn’t have a note associated with it.
Using Bookmarks
To add a bookmark to a page in the NOOK for PC app, click the ribbon with pointed ends in the corner of the page. When you do, the ribbon drops down onto the page and your bookmark appears in the bookmark pane when you select Bookmarks from the Reading Now menu. To remove the bookmark, click the ribbon again.
You can easily navigate to a particular bookmark by clicking the bookmark in the bookmark pane (see Figure 18.8).
Figure 18.8 Jump to any bookmark in a book.
Importing Books into the NOOK for PC App
All books in your B&N online library are automatically added to the NOOK for PC app. If you want to read a book you purchased from another source, you can add it to the NOOK for PC app by clicking the My Library, clicking My Stuff menu, and then clicking the Add New Item button (see Figure 18.9).
Figure 18.9 Click this button to add non-B&N ebooks and content.
![]()
Note
You can only import eReader format (PDB files) and EPUB format ebooks along with PDFs into the NOOK for PC app.
If the book you are importing contains DRM, you will be asked for your name and credit card information when you attempt to read the book in the NOOK for PC app. You need to supply this information only the first time you read the book.
Configuring the NOOK for PC App Settings
Clicking the Settings menu lets you change the appearance of content in the NOOK for PC app and change your account settings.
To change the appearance of content, click Settings and then click Reading Preferences. From this screen, you can change the font size and margin spacing used in the NOOK for PC app. Clicking the font size adjusts the sample text size to give you an idea of how it will appear when reading an actual ebook. The Margins option is controlled by clicking and dragging the Indicator icon or clicking anywhere along the bar. Toward the right increases the amount of white space on either side of the text. Toward the left decreases the amount.
To change account settings, click Account Settings. You can sign in or sign out of your B&N account from this screen. You can also choose whether recent purchases are downloaded automatically. The other option you have is Autohide Navigation When Opening Reading Now. By default, this is selected, and what it means is that when you are reading an ebook, the Daily, My Library, and such, options on the left disappear. (You can get it back by clicking the left-facing arrow bar.) Otherwise, the menu is always available.
Using NOOK Apps on Your iPhone, iPod Touch, or Android Phone
The NOOK for PC application is a straightforward program. It’s similar to your NOOK, and is intuitive and easy to use. The NOOK for iPhone, iPad, iPod Touch, and Android (referred to as simply the NOOK App from now on) are different from the NOOK for PC app because of the devices, but each of them still offers an easy-to-use interface.
Note
As of this writing, B&N has disabled reading subscription content on the NOOK App. If you want to read content other than ebooks, you need to use either NOOK for PC app, NOOK Study app, or your NOOK.
Note
The focus of this section is on the iPhone app though the iPod Touch app is identical. The Android app is essentially identical in features and general interactivity, as well, though with the quirks of the Android phone navigation vis-à-vis the quirks of the iPhone navigation.
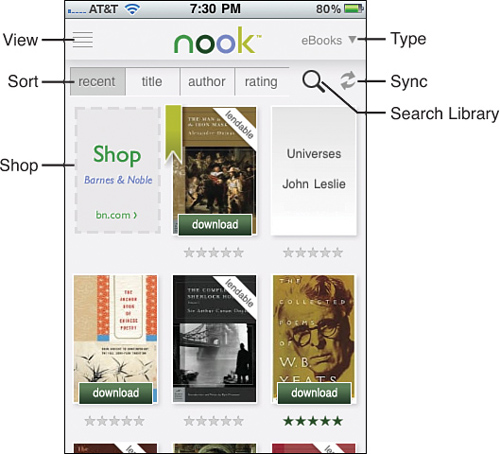
The NOOK App launches and syncs with your NOOK library. You have quite a few options on this small screen (see Figure 18.10):
• Shop for eBooks: Tapping this launches the Safari web browser and opens the NOOK Store.
• Sync: Tapping this synchronizes page location, notes, and so on with your NOOK Library.
• View: Tapping this switches between a list and grid view. (The default is grid view.) If you change to list view, the Shop for eBooks becomes a link at the top.
• Sort: Tapping these options sorts your list by the designated category.
• Type: Tapping this lets you see either your ebooks or archived ebooks. By default, your ebooks are sorted by most recent.
• Search Library: Tapping this allows you to search your library for a specific book.
Figure 18.10 Though small, the NOOK App interface has a lot of options.
Browsing My NOOK Library
Browsing your library is easy; just swipe up and down with your finger to scroll.
Caution
Don’t be surprised if while you scroll through your library, you accidentally tap the Download icon and download the book to your device.
To read an ebook, you first need to download it to your device. You can easily tell whether a book has been downloaded. If a Download button appears, you have not downloaded it to your device. Just tap the button to do so. After the ebook has been downloaded to your device, it opens so that you can begin reading.
Reading Books in the NOOK App
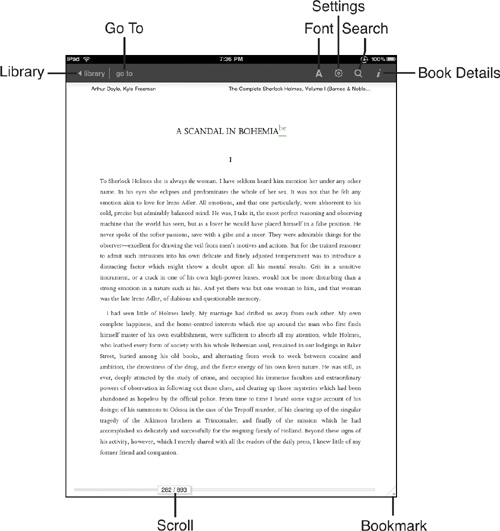
To read an ebook in the NOOK App, just tap the cover image to open it in reading mode. When there, to move to the next page, swipe your finger from right to left.
To move to the previous page, swipe your finger from left to right. The reading screen, however, offers more options than just reading (see Figure 18.11).
Figure 18.11 The NOOK App reading interface.
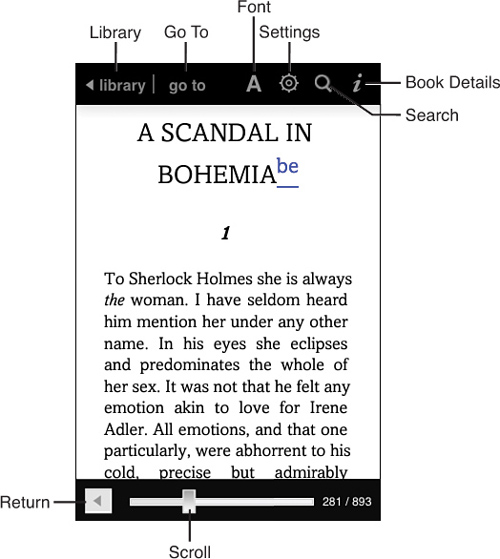
If you do not see the surrounding bars in the reading screen, just tap the page, and they will appear. Before discussing some of these options, take a quick tour:
• Library: Tapping this returns you to your NOOK library.
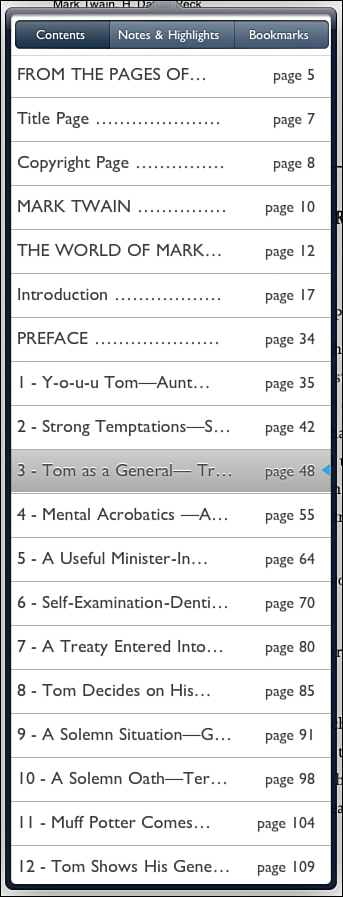
• Go To: Tapping this opens the table of contents with links to see your notes and annotations and bookmarks. You can scroll through any of these items and click the appropriate link to go quickly to that spot in the ebook.
• Return: This icon appears when you have tapped a footnote link (the blue link in Figure 18.11), going to the footnote. Tapping the Return button takes you back to the page you were originally on.
• Book Details: Tapping this brings up a page with many details related to the book.
• Search: Tapping this lets you search for specific text in this ebook.
• Settings: Tapping this lets you adjust the margin width and brightness.
• Font: Tapping this allows you to adjust the specific font, justification, colors, and font size.
Two of these screens deserve more attention: Book Details and Font. Now take a closer look at these.
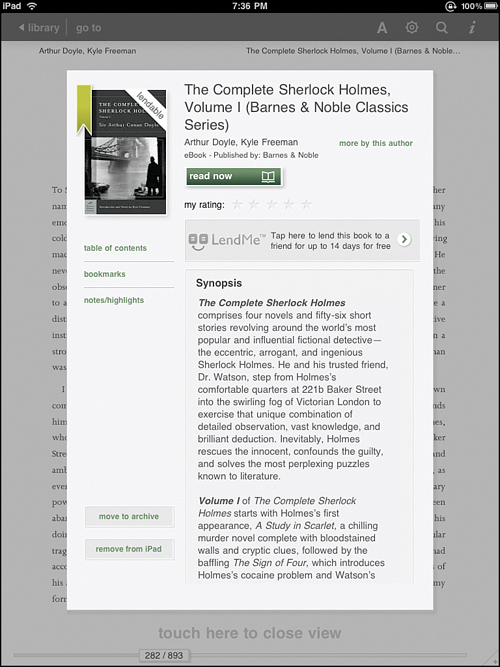
Using the Book Details Screen
After tapping Book Details, you see a screen like Figure 18.12.
Figure 18.12 The NOOK App’s Book Details screen.
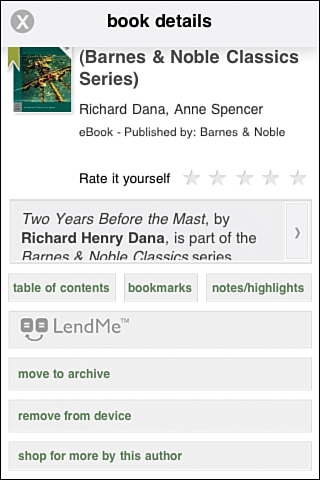
As you can see, you have several options here. Tapping the X returns you to the reading screen. You can rate the ebook by tapping a star. (Tap the third star, and the first three are marked.)
Note
If you give a star rating to an ebook, you cannot remove the star rating. You can only adjust it up or down.
In Figure 18.8, if you tap the right-pointing arrow next to the Two Years Before the Mast text, you are taken to a book synopsis. Clicking the X there returns you to the Book Details screen.
Tapping Table of Contents, Bookmarks, or Notes/Highlights quickly returns you to the reading screen and opens up the Go To page at the corresponding list of Contents, Notes, and so on. Clicking the X there returns you to the reading screen.
B&N has the unique LendMe feature for many NOOK Books. Whether you can lend NOOK Books is up to the publisher. To use this feature, just tap the LendMe icon. This takes you to another screen where you can type in the email address of the person to whom you want to lend the NOOK Book. (You can also tap the blue plus sign and select an email from your contacts.)
You can also type a message to the person. Click Send to send the offer to the person. After you’ve done this, you will notice in your library that the sash that once read Lendable now reads Lent. You can no longer read this book (until either the recipient turns down the offer, returns the ebook to you, or the lending time runs out).
You can also archive this book by pressing the Move to Archive icon. The Remove from Device option does just that. You can always download it again to your NOOK App by tapping Download.
Finally, you can click Shop for More by This Author to open a Safari browser window displaying other NOOK Books available from that author.
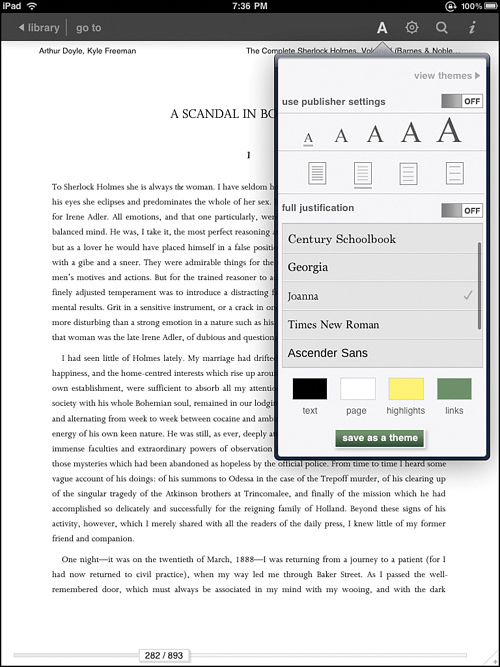
Adjusting Fonts
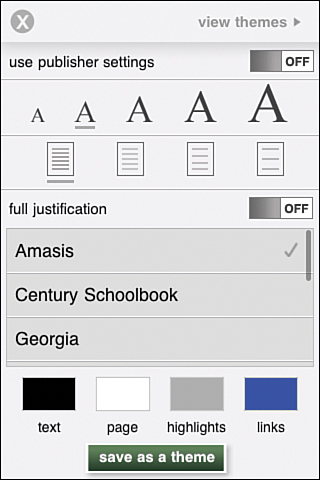
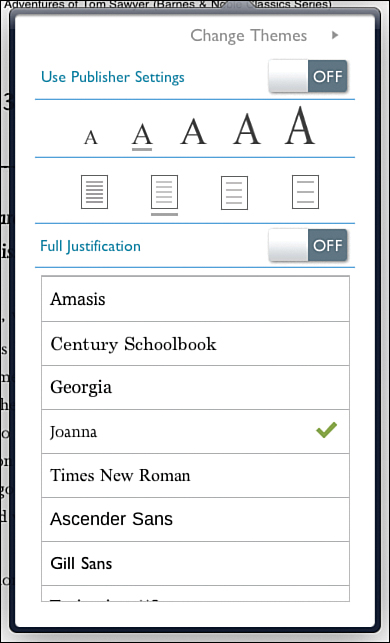
After tapping Fonts, you see a screen like Figure 18.13.
Figure 18.13 The NOOK App’s Fonts screen.
Again, a small screen that provides many options. The general purpose of this screen is to provide settings related to the reading experience in the NOOK App. Clicking the X closes this screen, returns you to the reading screen, and makes any changes that you have indicated.
We will come back to View Themes. You can choose Use Publisher Settings. In an ebook, the publisher often provides a series of defaults (font size, type of font, and so on). Changing this option to On sets the settings to those publisher default settings. You can change it to Off at any time you want.
Clicking the A icon adjusts the font size. The current font size has an underline beneath it.
The set of icons beneath the font size determine line spacing. Think of this like single space, double space, and so on. The current setting has a line beneath that icon.
The Full Justification setting is either On or Off (and is Off by default). I have yet to see any difference in the reading screen with this option On or Off.
Depending on what the publisher of this ebook allows, you can adjust the font. You can scroll through the available list. (A check mark appears to the right of the currently selected one.) You have options between serif and sans serif fonts. Serif is a technical term that refers to the “hanging structure” on a letter. In Figure 18.13, if you look at the A icons, notice the little base at the bottom of each leg of the A? That’s a serif. Sans (French for “without”) serif fonts lack these structures. In general, most people find reading serif fonts easier on the eyes. Unfortunately, the fonts in the Fonts screen don’t give you a preview, so you may need to experiment a bit to find the one you like best.
Note
Of the available font options Amasis, Century Schoolbook, Georgia, Joanna, and Times New Roman are serif fonts. Ascender Sans, Gill Sans, and Trebuchet MS are sans serif fonts.
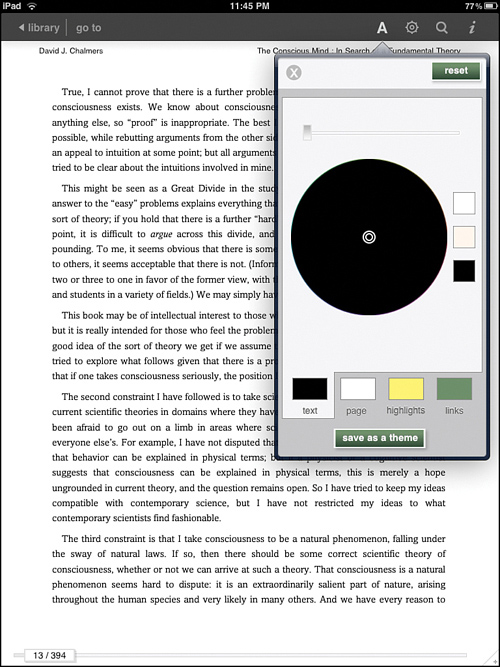
The bottom part of this screen gives you options for color related to the text, highlights, page, and links. Tap it and you end up in the reading screen color options screen. Figure 18.14 shows the basic screen for adjusting the color for all four of these items.
Figure 18.14 Altering the NOOK app’s color.

Basically, you have a lot of colors to choose from. Your first task is to select the particular part of the reading screen you want to change the color on: Text, Page, Highlights, or Links. The top part of the screen with the nonsense Latin “Lorem ipsum dolor...” reflects the alterations you make here. Thus, change the text to red, and the Lorem ipsum text changes to red.
The three squares next to the color wheel offer three quick ways of applying color. The black square adjusts whatever color you are changing to black. In other words, if you tap Links and then tap the black square next to the color wheel, the links appear in black. (In the Lorem ipsum text, the Quisque mi nisal link text changes from the default blue color to black.) The white square on top changes the color wheel from solid black to what you see in Figure 18.14. Tap an area of the wheel to choose that color for the item.
So what’s the middle tan square for? Tap it and it changes the selected item to a neutral color (works great for the page background). Tap Reset or the X icon to save your changes.
The world of colors for your ebook reading brings us to themes. On the Fonts screen there are two theme-related buttons: View Themes and Save as a Theme. Tap Save as a Theme and a screen appears prompting you to provide a name for the theme. (You can see the default themes: The Printed Page, Night Light, and so on.) Assuming you like the color set you have, give them a name, tap Done, and tap Save Theme. If you have a theme or you want to use one of the default themes, tap View Themes and tap the theme you want. A check mark appears next to the selected them. Tap the X icon to apply the theme. If you tap Edit, you can change the name of the themes (including the default ones).
Deleting a theme is as easy as tapping View Themes, tapping Edit, tapping the circle next to the theme you want to delete, and tapping Delete Selection.
Adding Notes and Highlights in the NOOK App
Adding Notes, Highlights, and Bookmarks in the NOOK App is as easy as using your finger to select the part of the ebook to which you want to add a note or highlight. Here’s how you do it:
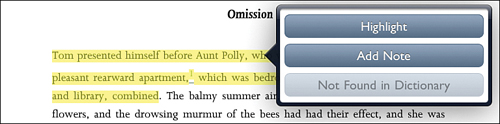
1. Using your finger, select the text you want to add a Note or Highlight to. The text will be highlighted according to the Font settings’ Highlight color. As soon as you lift your finger from the selection, the Notes & Highlights screen opens (see Figure 18.15).
Figure 18.15 The Note & Highlights screen.
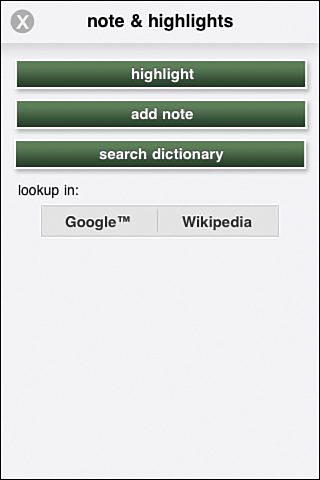
2. Tap Highlight to add the highlight and nothing else.
Tap Add Note to go to the Add Notes screen, where you can type in a note and tap Save.
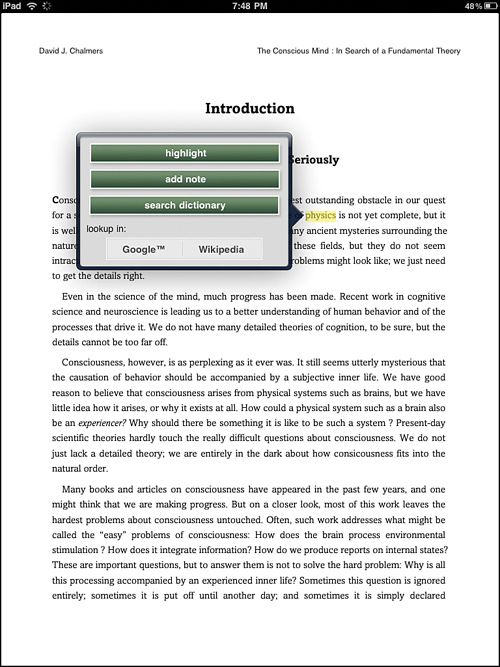
If you select a single word, the Search Dictionary is an available option. Tapping it brings up a dictionary entry for the word. Tapping See More Definitions Online opens a Safari browser at Dictionary.com. Tapping the X icon takes you back to the reading screen.
Tapping Google or Wikipedia opens a Safari browser with the text you selected entered as the search criteria.
3. The note and highlights are available for easy access using the Go To menu from the reading screen.
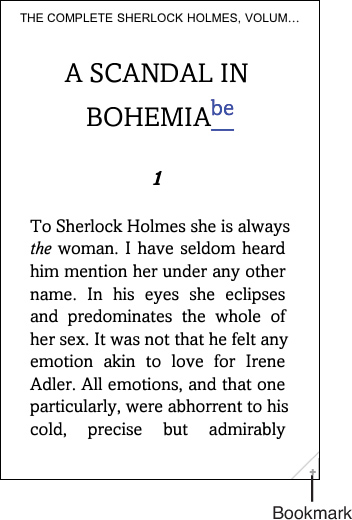
Although the NOOK App saves your location in reading, you may still want to add a bookmark. In the reading screen, but without the options bars, in the bottom-right corner, you see a plus sign (see Figure 18.16). Tap it to set a bookmark. Tap it again to remove the bookmark.
Figure 18.16 Tap the plus sign to set a bookmark.
Using the NOOK for iPad App
The NOOK for iPad app is a larger version of the NOOK for iPhone app adapted to the larger screen size of the iPad.
Note
As of this writing, you can read newspaper and some magazines from B&N has on the NOOK for iPad app. Make sure to check the available apps and devices you can read a particular magazine on at BN.com prior to purchasing. You will see what apps and devices you can read that magazine on at the magazine’s product page. However, even if you cannot read a magazine on the NOOK for iPad app, its cover will still appear in that library.
The NOOK App launches and syncs with your NOOK library. This default Home screen has many similarities to the NOOK for iPhone app, though adjusted for the more spacious real estate of the iPad (see Figure 18.17).
Figure 18.17 The NOOK App for iPad home page.
Now take a look at the options available on this screen:
• Shop for eBooks: Tapping this launches the Safari web browser and opens the B&N NOOK Store.
• Sync: Tapping this synchronizes page location, notes, and so on with your NOOK Library.
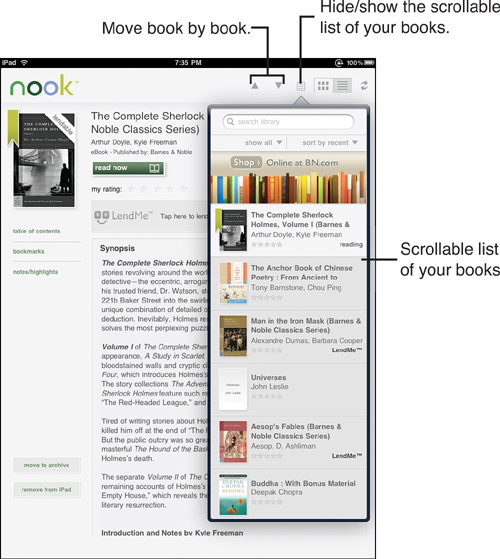
• View: Tapping one of the two options organizes this Home screen. The default is the grid view. You can switch to an individual book view by tapping the right button (the one with four lines)—see Figure 18.18. Switch back to grid view by tapping the left button (the one with six boxes). The individual book view offers a scrolling list of your library and detailed information about the current book, which is covered here in a bit.
Figure 18.18 Book-by-book view in the NOOK for iPad app.
• Sort: Tapping these options sorts your list by the designated category.
• Type: Tapping this lets you see either your ebooks or archived ebooks. By default, your ebooks are sorted by most recent.
• Search Library: Tapping this allows you to search your library for a specific book.
Browsing My NOOK Library
Browsing your library is easy; just swipe up and down with your finger to scroll.
To read an ebook, you first need to download it to your device. You can easily tell whether a book has been downloaded. If a Download button appears, you have not downloaded it. Just tap the button to do so. The ebook will be downloaded to your device. After the ebook has been downloaded, it will open to begin reading.
Reading Books in the NOOK for iPad App
To read an ebook in the NOOK App, just tap the cover image to open it in reading mode. When there, to move to the next page, swipe your finger from right to left. To move to the previous page, swipe your finger from left to right. The reading screen, however, offers more options than just reading (see Figure 18.19).
Figure 18.19 The NOOK for iPad app reading interface.
If you do not see the surrounding bars in the reading screen, just tap the page and they will appear. Before exploring some of these options, take a quick tour:
• Library: Tapping this returns you to your NOOK library.
• Go To: Tapping this opens the table of contents with links to see your notes and annotations and bookmarks. You can scroll through any of these items and click the appropriate link to go quickly to that spot in the ebook.
• Bookmark: Tapping this adds a bookmark to this page.
• Book Details: Tapping this brings up a page with many details related to the book.
• Search: Tapping this lets you search for specific text in this ebook.
• Settings: Tapping this lets you adjust the margin width and brightness.
• Font: Tapping this allows you to adjust the specific font, justification, colors, and font size.
Two of these screens deserve more attention: Book Details and Font. Now take a closer look at these.
Using the Book Details Screen
After tapping Book Details, you see a screen like Figure 18.20.
Figure 18.20 The NOOK App’s Book Details screen.
In the NOOK for iPad app, two versions of this screen exist. Figure 18.20 shows the screen as it appears by tapping the Book Details button from within the reading screen. If you are in individual book view at the Home screen, you see a slightly larger version of this same page. Also, if you press and hold a cover image in grid view, a similar Book Details screen appears (refer to Figure 18.20). All the functionality between the different versions of the Book Details screen is the same.
As you can see, you have several options here. Tapping an area outside of the Book Details screen returns you to the reading screen. You can rate the ebook by tapping a star. (Tap the third star, and the first three are marked.)
Note
If you give a star rating to an ebook, you cannot remove the star rating. You can only adjust it up or down.
Tapping Table of Contents, Bookmarks, or Notes/Highlights quickly returns you to the reading screen and opens the Go To page at the corresponding list of Contents, Notes, and so on. Tapping outside the Table of Contents, Bookmarks, or Notes/Highlights part of the screen, returns you to the reading screen.
B&N has the unique LendMe feature for many NOOK Books. Whether you can lend NOOK Books is up to the publisher. To use this feature, just tap the LendMe icon. This takes you to another screen where you can type in the email address of the person you want to lend the NOOK Book to. (You can also tap the blue plus sign and select an email from your contacts.)
You can also type a message to the person. Tap Send to send the offer to the person. After you do this, you can notice in your library that the sash that once read Lendable now reads Lent. You can no longer read this book (until either the recipient turns down the offer, returns the ebook to you, or the lending time runs out).
You can also archive this book by pressing the Move to Archive icon. The Remove from iPad option does just that. You can always download it again to your NOOK for iPad app by tapping Download.
Finally, you can click the More by This Author to open a Safari browser window displaying other NOOK Books available from that author.
Adjusting Fonts
After tapping Fonts, you see a screen like Figure 18.21. (The Fonts screen for newspapers and magazines has fewer options, though the ones there function the same.)
Figure 18.21 The NOOK for iPad app’s Fonts screen.
The general purpose of this screen is to provide settings related to the reading experience in the NOOK App. Tapping outside the Fonts screen closes it, returns you to the reading screen, and makes any changes that you have indicated.
Now back to View Themes. You can choose Use Publisher Settings. In an ebook, the publisher often provides a series of defaults (font size, type of font, and so on). Changing this option to On sets the settings to those publisher default settings. You can change it to Off at any time you want.
Tapping the A icon adjusts the font size. The current font size has an underline beneath it.
The set of icons beneath the font size determines line spacing. Think of this like single space, double space, and so on. The current setting has a line beneath that icon.
The Full Justification setting is either On or Off (and is Off by default). I have yet to see any difference in the reading screen with this option On or Off.
Depending on what the publisher of this ebook allows, you can adjust the font. You can scroll through the available list. (A check mark appears to the right of the currently selected one.) You have options between serif and sans serif fonts. What is this? Serif is a technical term that refers to the “hanging structure” on a letter. In Figure 18.21, if you look at the A icons, notice the little base at the bottom of each leg of the A? That’s a serif. Sans (French for “without”) serif fonts lack these structures. In general, most people find reading serif fonts easier on the eyes.
Of the available font options, Amasis, Century Schoolbook, Georgia, Joanna, and Times New Roman are serif fonts. Ascender Sans, Gill Sans, and Trebuchet MS are sans serif fonts.
The bottom part of this screen gives you options for color related to the text, highlights, page, and links. Tap it and you end up in the reading screen color options screen. Figure 18.22 shows the basic screen for adjusting the color for all four of these items.
Figure 18.22 Altering the NOOK for iPad app’s color.
Basically, you have a lot of colors to choose from. Your first task is to select the particular part of the reading screen you want to change the color on: Text, Page, Highlights, or Links.
The three squares next to the color wheel offer three quick ways to apply color. The black square adjusts whatever color you change to black. In other words, if you tap Links and then tap the black square next to the color wheel, the links appear in black. The white square on top changes the color wheel from solid black to a rainbow of colors. Tap an area of the wheel to choose that color for the item.
So what’s the middle tan square for? Tap it and it changes the selected item to a neutral color (works great for the page background). Tap Reset or the X icon to save your changes.
The world of colors for your ebook reading brings us to themes. On the Fonts screen there are two theme-related buttons: View Themes and Save as a Theme. Tap Save as a Theme, and a screen appears prompting you to provide a name for the theme. (You can see the default themes: The Printed Page, Night Light, and so on.) Assuming you like the color setup you have, give them a name, tap Done, and tap Save Theme. If you have a theme or you want to use one of the default themes, tap View Themes and tap the theme you want. A check mark appears next to the selected them. Tap the X icon to apply the theme. If you tap Edit, you can change the name of the themes (including the default ones).
Deleting a theme is as easy as tapping View Themes, tapping Edit, tapping the circle next to the theme you want to delete, and tapping Delete Selection.
Adding Notes and Highlights in the NOOK for iPad App
Adding Notes, Highlights, and Bookmarks in the NOOK for iPad app is as easy as using your finger to select the part of the ebook you want to add a note or whatever to. Here’s how you do it:
1. Using your finger, press and hold until you see the word your finger is on become highlighted; then select the text you want to add a Note or Highlight to. (If you just want that word, you can lift your finger.) The text will be highlighted according to the Font settings’ Highlight color. As soon as you lift your finger from the selection, the Note & Highlights screen opens (see Figure 18.23).
Figure 18.23 The Note & Highlights screen.
2. Tap Highlight to add the highlight and nothing else.
Tap Add Note to be taken to the Add Notes screen, where you can type in a note and tap Save Note.
If you selected a single word, the Search Dictionary is an available option. Tapping it brings up a dictionary entry for the word. Tapping See More Definitions Online opens a Safari browser at Dictionary.com. Tapping outside the definition screen takes you back to the reading screen.
Tapping Google or Wikipedia opens a Safari browser with the text you selected entered as the search criteria.
3. The note and highlights are available for easy access using the Go To menu from the reading screen.
Using NOOK Study Apps on PC and Mac
NOOK Study is an app for the laptop or desktop developed by Barnes & Noble for reading and marking textbooks while at the same time prepping for tests, papers, and so on. Although intended for students, the NOOK Study app is a useful, feature-rich program, especially for Mac users, because the B&N eReader app for Mac lacks many features. For example, the NOOK Study app for the Mac includes syncing with your online library and reading of books that, at the Barnes & Noble store, are noted as “not readable on the Mac or Blackberry apps.” For PC users, you do not need both apps, though having both doesn’t cause any problems.
Following are the feature highlights. (The NOOK Study app for both the PC and Mac are essentially identical, so the focus is on the PC version for the rest of this section.)
• Syncing with your online library.
• Viewing multiple books at once and dual-book view.
• Customizable courses, which is a fancy way to say, “You can organize your books into categories.”
• Enhanced note and lookup features.
These are covered while looking at the program.
Downloading, Installing, and Setting Up the NOOK Study App
To use this software, you need an Adobe Digital Editions (ADE) account. Go to adobe.com/products/digitaleditions/ to create one if you do not already have one.
You can find the NOOK Study app at barnesandnoble.com/nookstudy/download/index.asp. Download the appropriate version for your operating system. After the file has downloaded to your computer, double-click the file, and follow the instructions.
Note
On the Mac, you first need to unzip the file. Then double-click the setup file.
After NOOK Study has installed, start the program. When you first start it, you are asked to agree to the License Agreement. Click Agree. You are then asked to enter your B&N account information. (This is the same account you use to purchase books on BN.com.) You can also create an account by clicking Create Account. If you have an account, click I Have an Account, and enter the account information. Next, enter your Adobe ID and password. Finally, enter your school. That’s it! You are now ready to use NOOK Study.
Note
If you are not a student and just want to use NOOK Study (particularly for Mac users), enter a school near you. I, so far, have not been able to gauge any effect on how the school matters.
Navigating NOOK Study
When you open NOOK Study (see Figure 18.24), it syncs with your My NOOK Library, so if you were on page 400 of Moby-Dick on your NOOK for iPhone app, when you open Moby-Dick on NOOK Study, it opens at page 400.
Figure 18.24 The My Library screen.
Unlike the NOOK App for PC, there is no My Library, Shop, and such buttons. Instead, your library is shown. At the top of the screen, you have four buttons:
• Library: Clicking this takes you to your library.
• Now Reading: Clicking this takes you to the reading pane, where all ebooks you have open appear in tabs (much like the omnipresent browser tabs).
• Shop: Clicking this takes you to a link to purchase eTextbooks.
• Add File: Clicking this enables you to add PDFs and other ebooks.
These four buttons are always present and available.
Navigating NOOK Study’s My Library View
While at the My Library screen, choose to see all your books and documents. You can also choose a particular course, which filters your viewing list to just books in that course. If you haven’t yet done so, you can create a course. To create a course
1. Click Create Course. The Create a Course dialog box appears.
2. Give the course a name.
3. By default, for Course Icon, None is selected. Just click None or the drop-down arrow next to it to see a list of icons. Choose any that you like. (You’ll notice these are thematic according to probable types of courses: Law, Science, Economics, Classics, and so on.)
4. Click Yes, Create Course. The course name and icon are added below the All Books & Docs option.
5. You can now select books from your library and drag them to the course to add books to that course. Note, doing this does not remove them from the All Books & Docs view.
After you finish with the course or if you need to make changes at any point in time, this is easy to do:
1. Click the course name. When you do this, you see two options: Edit and Delete.
2. Click Delete to delete the course. NOOK Study asks you to confirm that you want to delete the course. You are not deleting the books from your library, just deleting that particular course.
3. Click Edit to edit the name or icon for the course. The Edit Course Details dialog box appears.
4. This dialog box functions exactly as the Create a Course dialog box. After you have made your changes, click Proceed. Clicking Cancel dismisses the dialog box without implementing your changes.
You have a few more options on this screen. You can choose to view your Archived Books & Docs. From here, you can unarchive books or documents.
The Sync button forces a sync with My NOOK Library, which means that the existing page you were reading is sent to your library. When you next open your NOOK for iPad app or NOOK Color, you will be taken to that same page.
For some book purchases, you will be given an access code. Open NOOK Study, and click Redeem. Enter the access code here to get your eTextbook.
Clicking Settings enables you to modify your account information or unregister this instance of NOOK Study, which has the effect of removing your Barnes & Noble library from visibility and use.
Notifications indicates if you have loan offers for your review.
In the view of your books, you see some features similar to the NOOK for PC app. You can choose to Sort your books by Title, Author, Last Read, Note Count, or Recently Added.
You can also choose what type of books and documents you are looking at in this view by choosing the Filter drop-down list. Your options here are Show All, eBooks, eTextbooks, eNewspapers, eMagazines, and My Stuff.
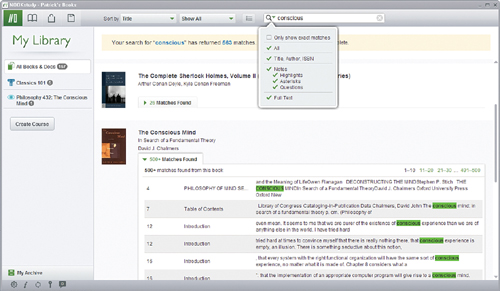
You use the Search box to search the entire contents of your NOOK Study library. If I type conscious, NOOK Study searches for that word in all titles, notes, and text (see Figure 18.25). If you click the down arrow in the Search box, you can filter the results. For example, if I turn off the checkmark next to Title, Author, ISBN, NOOK Study does not search those items. Clicking the Matches Found next to the title displays the results in detail where the search term was found in that particular book. Click the specific result to go to that page in the book.
Figure 18.25 NOOK Study searches not only the titles, but the notes you’ve added and the full text.
You can also choose to see your books in either grid or list view. In grid view, clicking the book cover opens the books for reading. If you have not downloaded the book yet, it will download first. If you hover your mouse over the cover, you can see a plus sign in the bottom-right corner of the cover. Clicking it gives you a variety of options depending on if you have downloaded the ebook or issue, added notes, etc. (see Figure 18.26). If you haven’t downloaded the book yet, you are also given an option to download the book.
Figure 18.26 Click the plus sign on the cover to see available options.
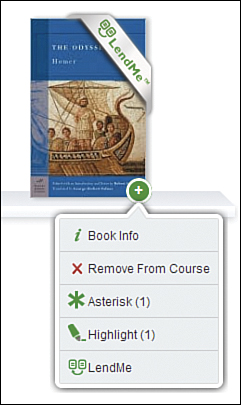
Book Info is straightforward (see Figure 18.27): It takes you to a page with some information about the book along with options to Read Now, Download, Remove the Local Copy, and Archive it (or unarchive it if you have archived it). Click Go Back to go back to My Library. If you have added notes to the ebook, when you click the plus sign, you see a list of links for the type of notes you have made. Clicking one of types of notes opens the ebook with the Notes view open, which is discussed in the section “Using the Highlights, Notes, and Look Up Features of NOOK Study.”
Figure 18.27 The Book Info screen.
In list view, clicking the cover image opens the book for reading. The Book Info link takes you to the Book Info page that is the same as what you get from the grid view. The notes links function the same as the notes links in the grid view.
Note
For subscription content, instead of Book Info, you see Subscription Info. That screen let’s you download, archive, and remove specific issues.
Reading Your Books in NOOK Study
Clicking the Now Reading button or a book cover takes you to the reading view (see Figure 18.28). Although initial impressions may be that this functions the same as the reading view in the NOOK App for PC, that impression will quickly disappear when you see the variety of options you have available.
Figure 18.28 The Reading Screen in NOOK Study.

First and foremost, you can have multiple books open at once and navigate between them by clicking the tabs. Beyond that you have a host of buttons and options to explore, so dive into those features:
Dual Book View
You can look at books side by side to compare. Say you wanted to compare the Latin and English versions of The Aeneid. Easy.
1. Open one of the books, and then click the Dual Book button. The Dual Book View screen appears (see Figure 18.29).
Figure 18.29 Select the other book to read in dual book view.
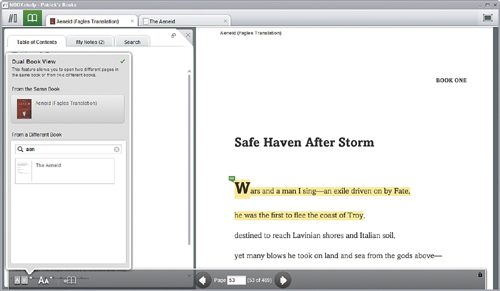
2. You can either click From the Same Book to view side-by-side contents of the same book. Or you can click From a Different Book.
3. Assuming the latter in the previous step, you can scroll through your books until you find the one you want to open or use the search field to narrow that list. Click the book you want to open side by side.
Note
The second book you want to open cannot already be open. If it is, close it first.
4. The second book opens and you get two reading screens, both with the same options (see Figure 18.30). The book that you are in (that is, the one where if you press the arrow key to turn the page, the page turns) has a large green arrow in the upper-left corner of that book’s reading screen.
Figure 18.30 Reading two books side by side.

When you finish looking at the books in Dual Book view, click the Dual Book View button. You can close the left one, the right one, or split into single books. This last option changes the screen to appear as if you had opened each book individually into tabs.
Font
Click the Font button to adjust the font and font size for the book.
Page Turning
You can click the page right or page left buttons to turn the page (or use the arrow keys on your keyboard). Or you can enter the page number text box and type a specific page number.
Lock
The tiny Padlock icon on the far bottom right enables visibility of the bottom pane. Clicking it locks it so that it is always visible. Unlocking it changes the behavior so that the bottom pane drops out of view when you move the mouse cursor. To see the bottom pane, just drop the mouse cursor down.
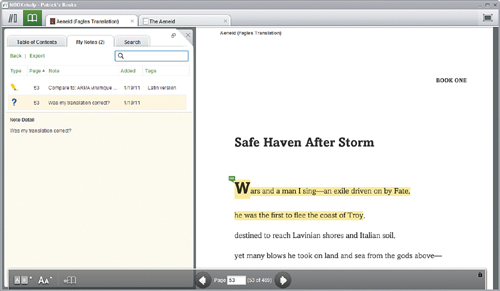
My Notes View
Click this to open a screen on the left side of the reading screen to see the notes for this ebook (see Figure 18.31). The notes and highlights are presented in tabular format. The Type column indicates the type of note (Highlight, Asterisk, or Question). The Page column provides the page number of the note.
Figure 18.31 Viewing notes while in the Reading screen.
Note
For more about entering notes and highlights and the associated options, see “Using the Highlights, Notes, and Look Up Features of NOOK Study.”
Tip
For the Type, Page, Added, and Tag columns, if you click the column header, you can sort the table based on that column’s information.
The Note column provides the text of the note. The Date Added column provides the date the note was added. The Tag column lists any associated tags you indicated in the note. Clicking the individual notes displays the note on the page and provides note details.
Clicking Back to Reading hides this notes screen. Click Export to export the notes out to a Word or text document. You can also search for specific content in the notes by entering search criteria.
Full Screen Mode
Click this to open the book to take up the entire screen. Press Esc to close full screen mode.
Find
Use this button to search for a word or phrase in the ebook.
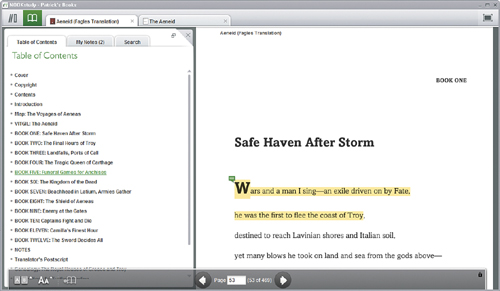
Table of Contents
Clicking this displays a table of contents for quick navigation to specific parts of the ebook (see Figure 18.32).
Figure 18.32 Navigating the table of contents while in the Reading screen.
Using the Highlights, Notes, and Look Up Features of NOOK Study
Adding notes and highlights to ebooks in NOOK Study is easy, and you have a variety of options. To add a highlight, follow these steps:
1. With the ebook open, select the text you want to highlight with the cursor. A pop-up menu appears (see Figure 18.33).
Figure 18.33 Text selection tools.
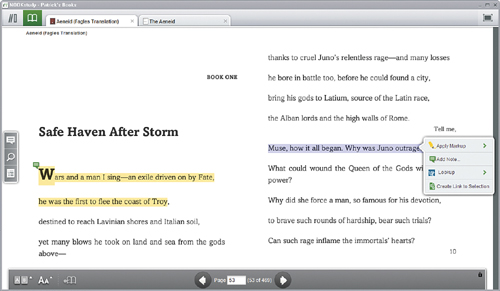
2. Click Apply Markup. You can choose Highlight, Asterisk, or Question from the menu. Other than using them for three different types of highlighting, the distinction is the icon used:
Highlight: No icon
Asterisk: Asterisk icon
Question: Question mark icon
To add a note, follow these steps:
1. With the ebook open, select the text you want to highlight with the cursor. A pop-up menu appears.
2. Click Add Note. The Add Note dialog box appears (see Figure 18.34).
Figure 18.34 The Add Note dialog box.
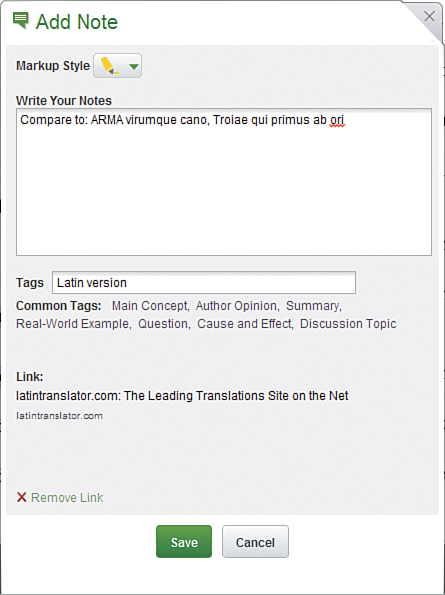
3. Set the Markup Style to Highlight, Asterisk, or Question.
4. Enter the text of your note.
5. Add tags if you want them.
Note
Tags can be useful for identifying notes with a similar type or theme. These can then come in handy if searching notes.
6. Add a hyperlink to outside research or articles. Click Add Link.
7. Click Save.
You can always edit the note by clicking the note in the reading screen.
NOOK Study also provides some look-up features. Just like creating a note, select the text you want to perform a search on at one of five websites:
• YouTube
• Wikipedia
• Wolfram Alpha
The final option you have after you select text is Create Link to Selection. You can paste the created link into a research paper for reference.
Zooming and Rotating Books
With eTextbooks (versus NOOK Books), you can rotate and zoom in and out (see Figures 18.35 and 18.36). Click the Rotate and Zoom buttons respectively. The Rotate button basically gives you the option to view the book in landscape or portrait mode.
Figure 18.35 The Rotation options.
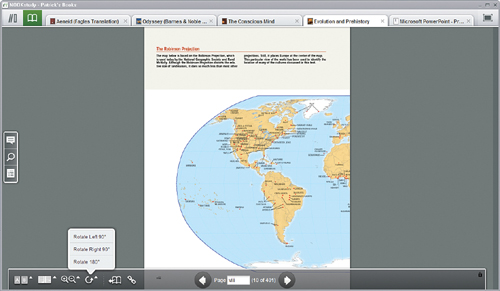
Figure 18.36 The Zoom options.
Using LendMe in NOOK Study
With NOOK Study, you can use B&N’s LendMe feature. You can access the LendMe options, assuming LendMe is available for that NOOK Book, either from the plus sign menu or the Book Info screen. Clicking LendMe in either location opens the LendMe dialog box (see Figure 18.37).
Figure 18.37 NOOK Study’s LendMe dialog box.
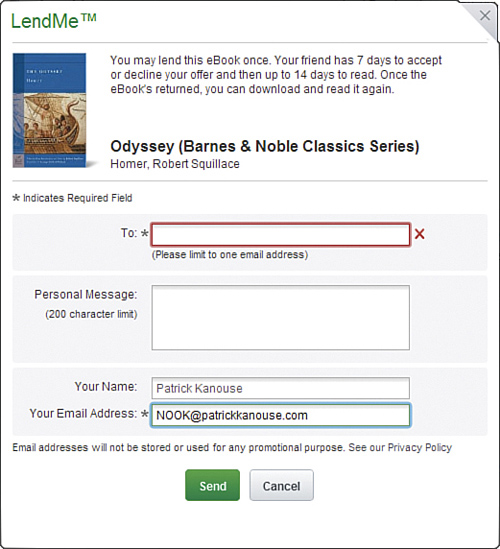
Enter the email address of the person you want to lend the NOOK Book to, enter a personal message if you want, and click Send.
The normal LendMe rules apply.
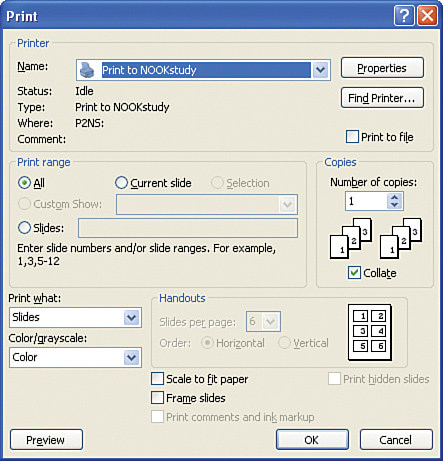
Using Print to NOOK Study
Have a PowerPoint or Word document you want to add to your NOOK Study library? If so, it’s easy. When you installed NOOK Study, it placed a print driver on your computer. So, if you are in PowerPoint or another program and you want to add that file to your NOOK Study library, choose File, Print. In your printer options, choose Print to NOOK Study (see Figure 18.38). (On the Mac, choose PDF down in the bottom left and click Print to NOOK Study from there.) Click Print. The file is automatically placed into your NOOK Study library.
Figure 18.38 Printing to NOOK Study in PowerPoint.
Shopping with NOOK Study
You can shop for eTextbooks within NOOK Study. Click the Shop button. If you know the ISBN, you can enter that or enter keywords. When you click Search now, your browser opens at BN.com with the search results already in place.
Adding Your Own Files to NOOK Study
If you have a PDF or ePub file you want to add to NOOK Study, click Add File, navigate to the file, and click Open. The file is added to your library and you can manipulate it like any other document.
Using the NOOK for Kids App for Your iPad
When the Barnes and Noble NOOK Color was released on November 19, 2010, one of its signature features was NOOK Kids Read to Me ebooks. These books featured a narration (and not a fake, mechanical-sounding one) if you wanted it. Moving from page to page, a child could hear the words read to them, and tapping the text would re-read that particular segment. Thumbnail views of each page mimicked the visual magazine representation. The downside of these books is that they were only available for the NOOK Color.
Fortunately, Barnes and Noble has recently released the NOOK for Kids app for iPad, which enables the same experience with NOOK Kids Read to Me ebooks whether you have a NOOK Color or an iPad.
Installing and Setting Up NOOK Kids for Your iPad
First, find the NOOK Kids app in iTunes, whether on your computer or on the iPad itself (in that case, use the App Store)—see Figure 18.39.
Figure 18.39 The NOOK Kids app in the iTunes store.

Once you have found the app, install it. If you downloaded it via iTunes, synch your iPad to load the app. With your iPad on, tap the NOOK Kids app icon.
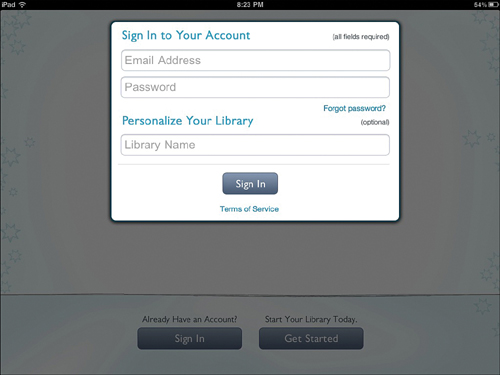
The first time you start the app, you will be asked to enter your Barnes & Noble account information and name the library (for example, Aidan’s Library)—see Figure 18.40.
Figure 18.40 Enter your account information to start.
You are ready to start browsing and reading NOOK Books.
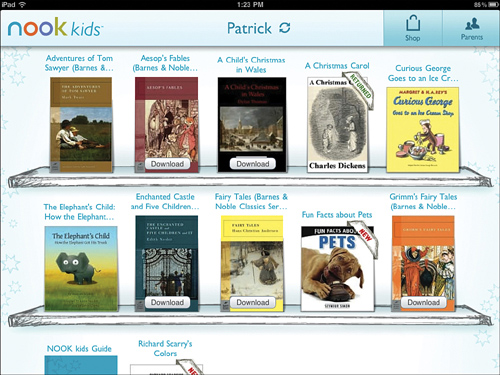
Browsing Your B&N Library
After you have installed the NOOK for Kids app and so long as you are connected via wi-fi or 3G, your B&N NOOK Books library will appear on the shelves (see Figure 18.41). Anything that is a NOOK Kids Read to Me ebook and NOOK Book for kids (that is, ones without the Read to Me feature but “traditional” like Curious George Goes to the Ice Cream Shop). You may also notice NOOK Books that don’t fit these categories directly: The Adventures of Tom Sawyer or Grimm’s Fairy Tales. I have been unable to discern why those appear but others do not. No matter, you will be able to control which titles you want to appear in the NOOK Kids app (see “Using the Shop and Parents Button,” later).
Figure 18.41 Browsing the library.
Note
Double-check on BN.com when you purchase kids books that it says Read to Me if you want the Read to Me feature.
To download the book to your iPad so that you can read it, tap the Download button. You can tap the red x button to stop the download if you like (see Figure 18.42).
Figure 18.42 Downloading a NOOK Book.
To scroll up and down in your library, just press the screen and while holding your finger to the screen drag your finger up or down.
If you tap the Refresh button, any new purchases will appear or archived items will disappear.
You have two other options here: Shop and Parents. We’ll cover these later in the “Using the Shop and Parents Button” section.
Reading a NOOK Kids ebook
To open a book, tap the book’s cover in the library. Essentially, there are two types of books that you are read in NOOK for Kids app: Your traditional young children’s book with a focus on images as well as text, and more straightforward texts, like The Adventures of Tom Sawyer. We’ll cover both here, but let’s focus first on the former.
Reading NOOK Books for Kids
These books, such as The Elephant’s Child: How the Elephant Got His Trunk, always open and are read in landscape view (i.e., wider rather than taller). Many of these books have the Read to Me feature available (these books are labeled as NOOK Kids Read to Me on BN.com).
When you open these types of books, you are presented with two options: Read by Myself and Read to Me (see Figure 18.43). If the book is not a NOOK Kids Read to Me book, then you only have the option Read by Myself. Read by Myself means just that: No audio reading of the book will happen.
Figure 18.43 The opening page for a NOOK Kids Read to Me ebook.
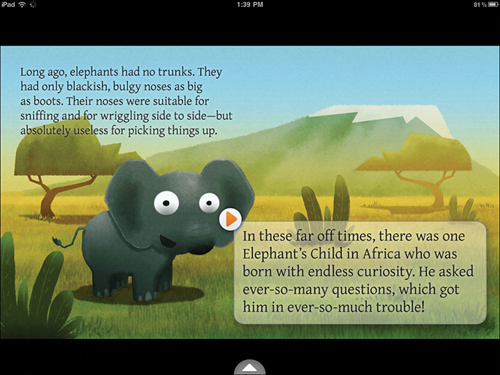
If you choose Read to Me, as you advance from page to page, you will hear a person reading the text to you. You can pause the text and you can replay the text. If you do not make a choice and flip to the first page of the book, the default is Read to Me.
The basics are this: To advance a page, swipe the screen from right to left. To go back to a previous page, swipe the screen from left to right. Double-tapping the text places the text in a balloon, and you have a play button at the corner of the text (see Figure 18.44). Tapping this play button reads that portion of the text. If the button has a square in it, tapping that pauses the reading. If you chose Read to Myself, you can double-tap the text and press the play button to have it read the recording to you.
Figure 18.44 You can replay specific portions of the text.
If the book is not a Read to Me book, if you double-tap the text, it is shown in a balloon without the play or pause button.
Using the Reading Options
As you read these books, you will notice a downward arrow button at the bottom of the page. If you tap this, a variety of reading options appears at the bottom of the page and thumbnails of the pages appear (see Figure 18.45).
Figure 18.45 Options available while reading.

• Library: Tap Library to go back to your B&N library.
• Play/Pause: Plays or pauses the reading for that page. If you chose Read to Myself, this option does not appear here (but you can double-tap the text and choose the play button to play the recording).
• Pages: Tap this to hide the thumbnails if they are visible or show them if they are hidden.
• Brightness: Adjust the brightness of the screen.
• Thumbnails: The current page you are on is marked with a blue outline. Press, hold, and drag the thumbnails back and forth to scroll through them. Tap a thumbnail to advance to that page. As you scroll, you will see a small light grey bar increase or decrease as you advance or retreat through the thumbnails. This is an indication of your overall location in the book.
Reading NOOK Books
These books, such as The Adventures of Tom Sawyer, open in either landscape or portrait mode. When there, to move to the next page, swipe your finger from right to left. To move to the previous page, swipe your finger from left to right. The reading screen, however, offers more options than just reading (see Figure 18.46).
Figure 18.46 Options when reading regular NOOK Books.
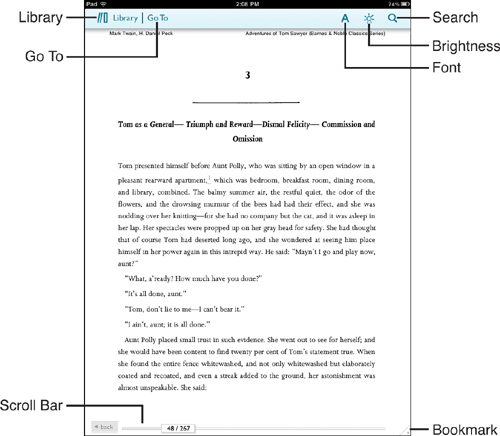
If you do not see the surrounding bars in the reading screen, just tap the page and they will appear. Before exploring some of these options, take a quick tour:
• Library: Tapping this returns you to your NOOK library.
• Go To: Tapping this opens the table of contents with links to see your notes and annotations and bookmarks. You can scroll through any of these items and click the appropriate link to go quickly to that spot in the ebook.
• Bookmark: Tapping this adds a bookmark to this page.
• Search: Tapping this lets you search for specific text in this ebook.
• Brightness: Tapping this lets you adjust the brightness.
• Font: Tapping this allows you to adjust the specific font, justification, colors, and font size.
• Scroll Bar: Tapping and holding this lets you move quickly from page to page.
Adjusting Fonts
After tapping Fonts, you see a screen like Figure 18.47.
Figure 18.47 The font options when reading regular NOOK Books.
The general purpose of this screen is to provide settings related to the reading experience in the NOOK App for regular NOOK Books. Tapping outside the Fonts screen closes it, returns you to the reading screen, and makes any changes that you have indicated.
Tapping Change Themes changes the screen, which really means text color, background color, and highlight color. You have five themes you can choose from. Tap the theme and either tap Back to adjust more font items or touch the reading screen.
Back at the Fonts screen, you can choose Use Publisher Settings. In an ebook, the publisher often provides a series of defaults (font size, type of font, and so on). Changing this option to On sets the settings to those publisher default settings. You can change it to Off at any time you want.
Tapping the A icon adjusts the font size. The current font size has an underline beneath it.
The set of icons beneath the font size determines line spacing. Think of this like single space, double space, and so on. The current setting has a line beneath that icon.
The Full Justification setting is either On or Off (and is Off by default). I have yet to see any difference in the reading screen with this option On or Off.
Depending on what the publisher of this ebook allows, you can adjust the font. You can scroll through the available list. (A check mark appears to the right of the currently selected one.) You have options between serif and sans serif fonts. What is this? Serif is a technical term that refers to the “hanging structure” on a letter. In Figure 18.47, if you look at the A icons, notice the little base at the bottom of each leg of the A? That’s a serif. Sans (French for “without”) serif fonts lack these structures. In general, most people find reading serif fonts easier on the eyes.
Note
Of the available font options, Amasis, Century Schoolbook, Georgia, Joanna, and Times New Roman are serif fonts. Ascender Sans, Gill Sans, and Trebuchet MS are sans serif fonts.
Adding Notes and Highlights in the NOOK for iPad App
Adding Notes, Highlights, and Bookmarks in the NOOK for iPad app is as easy as using your finger to select the part of the ebook you want to add a note or whatever to. Here’s how you do it:
1. Using your finger, press and hold until you see the word your finger is on become highlighted; then select the text you want to add a Note or Highlight to. (If you just want that word, you can lift your finger.) The text will be highlighted according to the Font settings’ Highlight color. As soon as you lift your finger from the selection, the Note & Highlights screen opens (see Figure 18.48).
Figure 18.48 Adding a note or highlight.
2. Tap Highlight to add the highlight and nothing else.
Tap Add Note to be taken to the Add Notes screen, where you can type in a note and tap Save Note.
If you selected a single word, the Search Dictionary is an available option. Tapping it brings up a dictionary entry for the word. Tapping outside the definition screen takes you back to the reading screen.
3. The note and highlights are available for easy access using the Go To menu from the reading screen.
Using the Go To Menu
Speaking of the Go To menu, you use this menu to access the NOOK Book’s table of contents or any note and highlights you have added.
While reading a NOOK Book, tap Go To to access the table of contents (see Figure 18.49). Tap any location in the table of contents to go to that spot in the NOOK Book.
Figure 18.49 Adding a note or highlight.
Tap Notes & Highlights or Bookmarks to access any of these that you have added to the NOOK Book. Tap the specific one you want to go to.
Using the Shop and Parents Button
We need to explore the final areas of the NOOK for Kids iPad app: Shop and Parents.
The shop piece is super easy, for tapping Shop asks for your password. Once you’ve entered it, the Safari browser opens on the NOOK Kids BN.com web page. From here on out, you can purchase ebooks just like you normally do via the B&N web page.
The Parents options provide a way to limit which books appear in the library and control password access. Tapping Parents first asks you to enter your password. You see a new screen that defaults to the Manage Kids’ Library section (see Figure 18.50).
Figure 18.50 The Manage Kids’ Library screen.
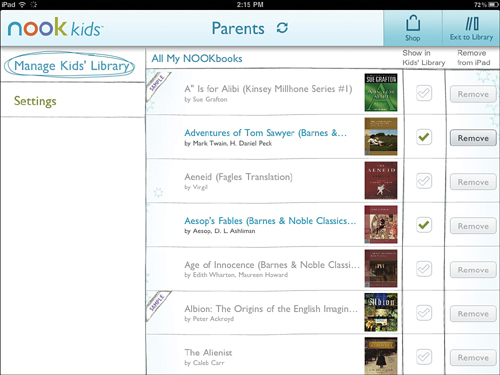
On this screen, you can control which books appear in the library and stored on the iPad. For example, if you want to allow The Aeneid to be read in the NOOK for Kids iPad app, you can tap the checkbox in the Show in Kids’ Library column.
If you want to remove a book from the library in the NOOK for Kids app, you can tap the checkbox so that the checkmark no longer appears. Additionally, you can tap Remove to remove the file from the app (you can always re-add it by downloading it again).
When you tap Settings, you get the Settings screen (see Figure 18.51).
Figure 18.51 The Settings screen.
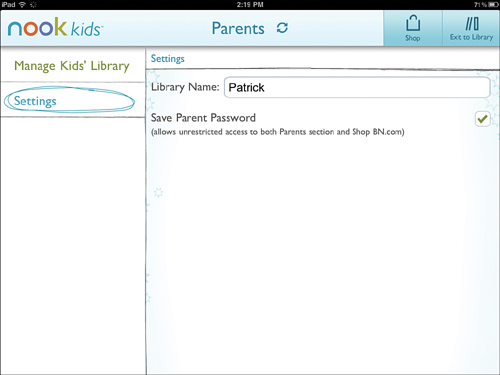
If you choose Save Parent Password, anyone accessing the Shop or Parents button does not need to enter a password. If you choose to not save the password (by removing the checkmark), anytime someone taps the Shop or Parents button they are required to enter the password. In other words, if you don’t want your kids to control what ebooks appear in the Library, do not save the password.
Also here you can change the Library Name.
As you can tell, the NOOK for Kids app for iPad is an easy to use app, but it allows you to use the Read to Me features for kids books, whether you have a NOOK Color or not.