
Chapter 10. Rooting Your NOOK Color
At the beginning of this book, I mentioned that B&N used Google’s Android operating system in your NOOK Color. Choosing Android makes business sense because it’s an open-source operating system, and B&N didn’t have to pay a small fortune to use it. However, the most exciting thing about Android for you is that it lets you easily root the NOOK Color and add new and exciting features.
The idea of rooting your NOOK Color may seem daunting or way too technical. However, I can assure you that rooting the NOOK Color to get basic Android Market apps installed is super easy, only requiring a bit of prep work and a few steps. This minimal effort (can be done inside a half-hour) is well worth the benefits, for you are turning your NOOK Color into a tablet (albeit without a microphone or camera), with access to the Android market amongst other benefits.
Note
To complete the steps in this chapter, you must have at least a 2 GB microSD card.
Note
Rooting is another term for hacking, though without the illicit connotation of hacking.
An Introduction to Rooting Your NOOK Color
B&N locked down Android on your NOOK Color to prevent you from accessing some of Android’s capabilities. However, by following a process called rooting your NOOK Color, you can open up these capabilities to make your NOOK Color more powerful and useful.
In the Android OS, root is the superuser who has access to everything in the OS. By rooting your NOOK Color, you can become the superuser on your NOOK Color.
Following are just a few of the things you can do after you root your NOOK Color:
• Add additional games.
• Use alternative browsers, PDF readers, and media players.
• Add calculator and note-taking apps.
• Access the Android Market.
These are just a few examples of the power unleashed by rooting your NOOK Color.
Before we go any further, I want to describe the various types of rooting available and the rooting method I will describe in this chapter. There are two types of rooting:
• Internal Flash: In this rooting method, you alter the memory on the NOOK Color itself. In other words, you alter the basic software on the NOOK Color.
• microSD: In this rooting method, you insert a microSD card in the NOOK Color and when you power up, the NOOK Color uses the microSD card to operate, thus leaving untouched the stock software on the NOOK Color.
I am going to show you the microSD rooting method. I am doing this for a few reasons:
• Leaving the basic NOOK Color software intact: One of the pros about using a microSD card root is that you do not void your warranty with B&N, and the likelihood of “bricking” your NOOK Color is nil.
• Easy to swap between regular NOOK Color software and your root: Want to read NOOK Books using the stock NOOK Color software? No problem. Power off. Remove the microSD card. Power on. You are now using the stock software. But wait, I want to use Evernote that I got at the Android Market. No problem. Power off. Insert the microSD card. Power on. You are now running a rooted NOOK Color.
• B&N NOOK Color software updates: Whenever B&N updates the software on the NOOK Color, you can update. If you use an Internal Flash rooting method, you have to wait for the people who develop the rooting methods to update their files. Consequently, you often have to reset your NOOK Color to factory settings. Using the microSD card means you never have to reset to factory settings to use features beyond the NOOK Color.
The con of using the microSD card root is that the system can perform somewhat slower because it is running off the microSD card.
How to Root Your NOOK Color
The experts on rooting your NOOK Color all hang out at nookdevs.com and XDA-developers.com. Everything you need to know about rooting your NOOK Color, installing applications, and hacking the NOOK Color in general is available on these sites. All the files required to root your NOOK Color are freely downloadable from nookdevs or XDA-developers.com.
Froyo, Gingerbread, Honeycomb, What?
The NOOK Color originally released using Android OS version 2.1. This is also called Eclair.
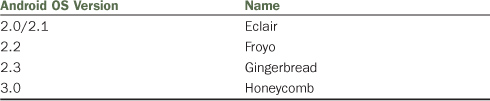
The NOOK Color firmware update 1.2.0 upgraded the NOOK Color to Froyo, which supports Flash web pages among other things. Originally, many of the roots to the NOOK Color rooted using Froyo. But now that Froyo is the basic on the NOOK Color, rooting to it seems less appealing. Honeycomb is only just released, and all the rooting options for it are considered experimental, so we will avoid it now.
We will be using a very stable root using Gingerbread, and this specific root uses CyanogenMod 7 (CM7).
Prerequisites
A few prerequisites before venturing down the path of rooting your NOOK Color. First and foremost, you obviously need to have a registered NOOK Color.
Caution
If you do not register your NOOK Color with B&N prior to rooting, you will not be able to buy books from the NOOK Color’s NOOK Bookstore™.
Second, you need a 2 GB or higher microSD card (I recommend using a 4 or 8 GB card). Any existing data on this card will be completely erased, so make sure you have it backed up. Third, you need a computer that can read that microSD card. Fourth, you need a working Wi-Fi connection for you NOOK Color. Finally, you need to have a Google account. You can get one from http://mail.google.com/mail/signup. You do not need to use it ever again, though you do need it for this process.
After you decide to experience the new functionality of your NOOK Color by rooting it, the steps required are quite easy:
1. Download the necessary files.
2. Create a disk image on a microSD card.
3. Install the microSD card disk image on your NOOK Color.
4. Enter some information into a couple of applications.
5. Install Android Market.
6. Install any additional applications you want on your NOOK Color.
Now look at each of these steps in detail.
Tip
The steps I walk you through are documented at http://forum.xda-developers.com/showthread.php?t=1000957. However, there are a few points of possible confusion on that page, so although you can use it as a reference, follow my steps here for a successful rooting experience.
Download the Necessary Files
Now download the rooting files. You can find a single zip file at http://patrickkanouse.blogspot.com/p/nook-book-updates.html. This zip file contains several files:
• generic-sdcard-v1.1.img.zip. Unzip the file and place the generic-sdcard-v1.1.img file somewhere easily accessible.
• update-cm-7.0.2-encore-signed.zip. Do not unzip this file; rather, place it somewhere easily accessible.
• gapps-gb-20110307-signed.zip. Do not unzip this file; rather, place it somewhere easily accessible.
• win32diskimager-RELEASE-0.1-r15-win32. Unzip that file. Place the contents someplace easily accessible.
• readme.txt. Provides location to retrieve updated versions for the above files if necessary.
Create a Disk Image
In this step, you will create a bootable disk on the microSD card. To do this, you will download some files, including a small piece of software (WinImager) that takes a file and creates the bootable disk.
For Linux and Mac instructions for creating a disk image, see http://nookdevs.com/NookColor_Rooting.
If you are on a PC:
1. Plug in a microSD card to your PC.
Caution
Following these steps will completely erase the microSD card, so make sure you back it up to another drive.
2. Find the win32DiskImage.exe file you downloaded in the previous section. Double-click the file, which starts the program.
3. Browse to the generic-sdcard-v1.1.img file and select it.
4. For Device, choose the drive letter of the microSD card.
5. Click Write. The disk image will be created. When it finishes, click Exit.
6. Find the update-cm-7.0.2-encore-signed.zip file and copy it to the microSD card. The microSD card is now ready to install in your NOOK Color.
Rooting Your NOOK Color
Caution
Before you proceed any further, make sure that your NOOK Color has at least a 50% battery charge.
Now we are going to actually do the rooting process, which is strikingly easy. Follow these steps:
1. Unplug your NOOK Color from your computer and power it off.
2. Insert the microSD card you created a disk image on in the previous section into your NOOK Color.
3. Power on your NOOK Color.
4. You will see a penguin and then some green text. Let it do its thing.
5. After about a couple of minutes, you will see a notice that It Is Safe to Poweroff Now. Then the NOOK Color powers off.
6. You now have a rooted NOOK Color. Turn on your NOOK Color to finish this part of the rooting process. (You may need to hold the Power button longer than usual to get your NOOK Color to turn off.)
7. Once the NOOK Color is on, tap the Settings button in the far bottom left and then tap Settings. There are four buttons there: Settings, Back (a left-pointing arrow), Search (magnifying glass), and Quick Options (a circle with an upward-pointing arrow).
8. Tap Wireless & Networks.
9. Tap Wi-Fi Settings.
10. Tap your Wi-Fi network. (Enter a password if necessary.)
11. Use the Back button to get to the Settings. Tap Display.
12. Tap Screen Timeout and select a time. (The default is 1 minute.)
13. Turn off your NOOK Color to complete this part of the rooting process.
Finishing Rooting Your NOOK Color
You have only a few more steps to complete before you can begin to download Android Market apps and expand your NOOK Color into a tablet:
1. If your NOOK Color is on, turn it off.
2. Remove the microSD card.
3. Plug the microSD card into your computer.
4. Copy the gapps-gb-20110307-signed.zip to the microSD card.
Caution
Depending on your setup, you may or may not see the microSD card with two partitions as two drives. If you see this, one is called boot and the other is called CM7 SDCARD. Place the gapps-gb-20110307-signed.zip file in the boot partition.
5. You will see the following files on the microSD card:
• gapps-gb-20110307-signed.zip
• MLO
• u-boot.bin
• uImage
• uRamdisk
• uRecImg
• uRecRam
6. Change the file name uImage to uImage.bak.
7. Change the file name uRamdisk to uRamdisk.bak.
8. Change the file name uRecImage to uImage.
9. Change the file name uRecRam to uRamdisk.
10. Eject the microSD card from your computer.
11. Insert the microSD card into your NOOK Color.
12. Turn on your NOOK Color.
13. You will see a penguin and then some green text. Let it do its thing.
14. After a few seconds, you will see a notice that It Is Safe to Poweroff Now. Then the NOOK Color powers off.
15. Turn off your NOOK Color.
16. Remove the microSD card and plug it into your computer.
17. Change the file name uImage to uRecImage.
18. Change the file name uImage.bak to uImage.
19. Change the file name uRamdisk to uRecRam.
20. Change the file name uRamdisk.bak to uRamdisk.
21. Remove the microSD card from your computer and plug it into the NOOK Color.
22. Turn on the NOOK Color. The Backup and Restore screen appears.
23. If you want this device backed up with your Google Account, tap Finish Setup. If not, clear the checkbox and then tap Finish Setup.
24. Touch the Android.
25. Either create a Google account or tap Sign In to enter your Google account information.
25. Enter your Google account username and password and tap Sign In. A message titled Important: Read This! appears.
26. Tap OK. The Choose the Apps to Install screen appears.
27. Tap the checkboxes for the ones you want to install. Tap OK.
Note
You will have an opportunity to install other apps later.
28. Tap Accept.
28. For each of the apps you selected, tap the Free button and then the OK button.
30. Tap Finish Setup.
That’s it! You have successfully rooted your NOOK Color!
Installing Applications on Your Rooted NOOK Color
Now that you have your NOOK Color rooted, you want to install applications, right? Well, it is super easy:
1. Tap the Apps button. (It’s in between the Phone and Internet buttons.)
2. Tap the Market button. The Market page opens.
3. Tap the Search button. Type NOOK and tap Go.
4. Tap the NOOK for Android by B&N app line. Tap Free and then tap OK. You will be informed that it is downloading. Tap the Back button and then My Apps to watch the progress.
5. When it is finished downloading and installed, press the Home button.
6. Tap the Apps button.
7. Tap the NOOK button.
Tip
To add an app to the Home screen, after tapping Apps, press and hold the app icon. You will be taken to the Home screen with the app there.
8. Enter your B&N account information. Your app is synched up with your B&N account. (If you have a large library, the synching can take some time.) You can now read your NOOK Books on the rooted portion of your NOOK Color.
Simple, right? And that’s how installing other apps works. Check out what the Android Market has out there!
A Few Things to Note
Now that your have rooted your NOOK Color, you will want to keep a few things in mind:
• The NOOK Color does not have a GPS, camera, or microphone, so apps that use those features will not work. (For example, you cannot make calls with the Skype app—though you can IM.)
• Many of the references in the apps and market refer to your phone. This is quite natural for Android is widely deployed on phones. This terminology will change over time as more Android tablets (for example, the Samsung Galaxy) reach the market.
• The Return and Menu options change from app to app. The menu options in particular will provide access to settings, viewing options, etc.
Unrooting Your NOOK Color
Want to go back to stock NOOK Color software? Turn off your NOOK Color and remove the microSD card.
If you previously did an Internal Flash method of rooting, here are the steps for restoring the NOOK Color back to factory settings:
Part 1: Restart and Interrupt the Starting Process Eight Times
1. Turn off your NOOK Color.
2. Turn on your NOOK Color. Do not turn away.
3. When you see the “Welcome to the future of reading” screen, press and hold the Power button. This interrupts the start up process. If the Android start up animation does not appear, count 1 or add 1 to your start up count. If the Android start up animation appears, the restarting count is reset to 0, and you’ll have to start over again.
4. Repeat the process from step 2 until you get up to 8 on the restart count.
5. The NOOK Color at this time flashes its firmware and you will see a screen that reads Installing, A New Software Update Is Being Installed. This Will Take a Few Minutes. Let the process finish.
Part 2: Reset the Device
1. With the NOOK Color off, hold the Home button and the Power button. The NOOK Color starts up. Keep holding the buttons.
2. You will see a screen to reset your NOOK Color to factory settings with two options. Press Power to exit. Press Home to continue.
3. Press the Home button. You will be given the two options again.
4. Press the Home button.
5. Your NOOK Color erases the data, deregisters, and reboots the device.
Your NOOK Color is no longer rooted.