
You can dramatically improve most photos with a simple click or two, using the Quick Fix options in Photoshop Elements. If you’re just trying to lighten up an image, remove red eye, or ditch a color cast, start with Quick Fix options. If they don’t quite do it, you can always continue to tinker with the image in Full Edit mode.
To enter Quick Fix mode, choose Edit Quick from the pop-up menu at the top of the screen. Quick Fix mode includes a few special tools, such as the Red Eye Removal, Whiten Teeth, and High Contrast tools. However, most of the Quick Fix options are in the Quick Fix panel on the right of the screen.

I recommend viewing both the Before and After versions as you work, so you can see how the changes affect your photo. To see both, choose Before & After – Horizontal or Before & After – Vertical from the View menu at the bottom of the image window.
Changes you apply using the Quick Fix tools and settings appear in the After image; the Before image is locked until you accept your changes. To accept the changes, click the Commit (check mark) button next to the quick fix category name.
One of the benefits of using a quick fix is the opportunity to preview settings quickly. Any quick fix option with a slider includes a grid icon; click the icon to display preview thumbnails for different settings. The current setting has a yellow arrow on its thumbnail. As you move the cursor over the preview options, the After image changes so you can see how your photo will look if you apply that setting. If you select one of the preview options, click the check mark that appears next to the quick fix section to accept the change—or the X to cancel it.
The quick fix tools give you quick ways to remove red eye, brighten a smile, intensify a blue sky, and create high-contrast areas in an image. The tools are pretty easy to use, once you know how they work.
My nephew can be a little mischievous, but he’s no demon. Still, when I snap a flash photo, light reflects off the retinas in his eyes, and he ends up looking a bit evil.
You can quickly exorcise such demons in Photoshop Elements. In Quick Fix mode, zoom into your photo so you can see the eyes clearly. Then, select the Red Eye Removal tool.
You can adjust the pupil size and darkening percentage, but for most photos, the defaults are fine. Just drag the Red Eye Removal tool around the eye, and release the mouse. Presto! The eye is human again.

It won’t replace a trip to the dentist, but the Whiten Teeth tool in Photoshop Elements can make dull teeth brighter.
Zoom in to the area you want to whiten, and then select the Whiten Teeth tool. I find I usually need to make the brush smaller, using the settings in the options bar.
Drag a selection over the area you want to brighten. Be careful not to include the gums or lips, as you can end up with some clownish results. If you accidentally select an area you shouldn’t have, click the Subtract From Selection button in the options bar and then click the areas you want to remove. You can go back and forth using the add and delete brushes until you’ve got the area you want. You may want to zoom in and out to get a feel for the effect. To preview the teeth without seeing the selection, click the Hand tool.
Photoshop Elements makes all the changes on a separate adjustments layer called Pearly Whites, so you can hide it in Full Edit mode if you don’t like the effect.
Sometimes pictures lie. A rich blue sky may be washed out because of lighting, angle, or reflections. You can put the blue back in that sky using the Make Dull Skies Blue tool.
Select the tool, and then brush in the selection for the sky. If you overselect, use the Subtract From Selection brush to scale it back.
That’s all there is to it. Now, that’s a quick fix!
Note
Unfortunately, this tool doesn’t turn a white sky blue. It intensifies the blue that’s already there.

Photoshop Elements creates an adjustment layer called Blue Skies, so you can continue to tweak it or turn it on and off in Full Edit mode.
The High Contrast tool is practical, but it’s also a lot of fun. This tool simulates the effect you’d get if you used a red filter lens on a camera while shooting with black and white film.
You can use this tool to convert your photo to high-contrast black and white. That can be very useful if, for example, you’re sending an image to the local newspaper and want to make sure it will print well.
So how does this get fun? Drag a selection over just part of your image to turn it into high-contrast black and white. You can make the background black and white, leaving your subject in color, or vice versa. Or convert everything to black and white except a single red rose. Or—and now you see how this can get very creative—leave the entire scene in color except the TV screen. Poof! Instant black-and-white television show.
You’re not actually losing the color in the shot. Photoshop Elements puts these changes on an adjustment layer called High Contrast Red Filter, so you can get back to your full-color photo any time you want to.
You can get very fussy with both lighting and color in Full Edit mode, but even Quick Fix mode gives you a fair amount of control. To fix both lighting and color quickly, try Smart Fix. Otherwise, play around with the lighting and color options to see what you can do.
For overall improvements to an image, try Smart Fix. It’s the first of the options in the Quick Fix panel. Smart Fix adjusts both lighting and color, and it can also improve shadow and highlight detail.
Click Auto to see what Photoshop Elements recommends. Or select one of the preview options. You can nudge the slider slightly by clicking and dragging on the preview option itself. You can also just drag the Smart Fix slider, of course.

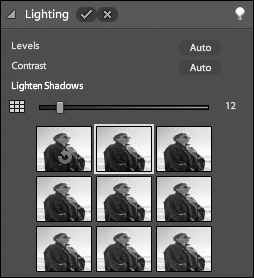
For a quick fix, the Lighting section on the panel gives you quite a bit of control. You can adjust the overall contrast of an image, lighten shadows, darken highlights, and adjust the contrast in the midtones.

We’ll start from the top. Levels, which determine tonal levels, are pretty sophisticated, and Chapter 8 covers them in more depth. However, in the Quick Fix panel, you have only the Auto option, so you’ll either like the results or you won’t.
Click it and give it a try. The Levels option individually maps the lightest and darkest pixels in each color channel to black and white. It may affect the color of the image, which can be very useful if you want to remove a color cast.
Contrast is a little more clear-cut, and I mean that literally. This option makes highlights lighter and shadows darker. Click Auto next to Contrast when the colors are right but the photo needs more contrast.
Now you’re back to having a little more control. Lighten Shadows, Darken Highlights, and Midtone Contrast each include sliders and preview options. You can move the slider yourself, or use the preview thumbnails to see the effect of different settings.
Each of these options does just what it says. Lightening shadows brings out details without affecting the highlights (and has no effect on pure black areas of the image.) Darkening highlights gives depth to the lightest areas of the image (and has no effect on pure white areas). And Midtone Contrast takes care of everything in between—adjusting the contrast within the values that are in the middle of the spectrum.
If the reds aren’t red enough—or should be yellow—use the Color options. The overall Color option adjusts both contrast and color; click Auto to apply it. You may see the Saturation or Hue slider move, or possibly both!
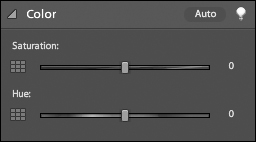
Saturation determines how vivid the colors are. Check out the preview options to see just how extreme you can get. Then move the slider where you want it.
Hue affects the color itself. You can quickly go from a fairly natural scene to one that might appear more fantasy-like. In fact, the changes are so dramatic that it’s probably best to keep the changes small. Remember that you can make a selection to affect only that area of the image.
There’s yet another way to affect the color. You can adjust the color balance to make the colors warmer or cooler, or to remove (or add) a color cast.
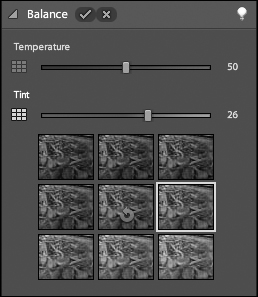
The Temperature settings make the colors redder (warmer) or bluer (cooler). Experiment with the preview options. Sometimes, you may not even realize the image is slightly off until you see how much a subtle change in temperature improves it.
Tint makes colors more green or more magenta. You can get some pretty freaky results, and if you’re feeling creative, that may be your goal. But for most purposes, you’ll only want to use this option to fine-tune the colors after adjusting the color temperature.
If you want to sharpen your image, move the Sharpen slider or check out the preview options. This feature only sharpens; you cannot use it to blur images. The slider begins all the way to the left.
Click Auto to apply the default amount of sharpening, but be prepared to undo if you don’t like the effect.

If you’re using Photoshop Elements for Windows, you can access several quick fix options within Organizer. As you browse your images, you can fix red eye or change the lighting without ever having to go into the Editor. In Organizer, click the Fix tab. (Make sure to click the tab—if you select the menu, you’ll see options that take you into Editor.)
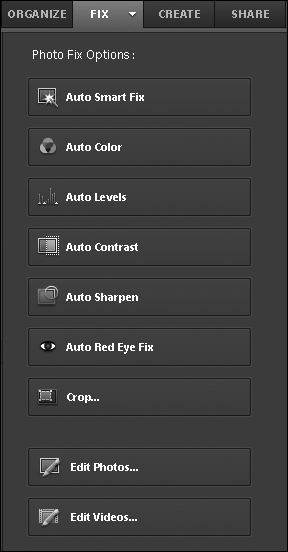
Select the photo or photos you want to fix, and then click the appropriate button. For example, to fix red eye, click Auto Red Eye Fix.
There are no sliders or preview options in the Organizer, only auto options. Still, for many photos, auto Color, Smart Fix, Levels, Sharpen, Contrast, and Red Eye Fix can do the job nicely and quickly.
To crop a photo, select it and then click Crop. Resize the crop box and move it to the area you want to keep. Click the check mark to accept the change, or the X to cancel it. Then, click OK in the Crop Options dialog box.
Photoshop Elements displays a progress bar as it makes the change you request, and then groups the edited photo with the original in a version set. To see all the images in a version set, right-click the thumbnail and choose Version Set > Expand Items In Version Set.
You can also rotate images in Organizer, so that Aunt Martha isn’t tipped on her side. Just select the image thumbnail, and then choose Edit > Rotate 90° Left or Rotate 90° Right.