
You’ve removed color cast and fixed red eye, cropped and rotated, fixed the lighting and added effects. What now? You almost certainly want to save the improved image, probably with a new file name. And then? You can print it, share it on your website or Photoshop.com, combine it with other photos in an album for the web or on a CD, purchase professional prints, load it onto a digital picture frame, or create more complex projects such as calendars and photo books. Really, there’s no reason to just keep your favorite photos on your hard drive, where you look at them every now and again. Good photos are meant to be seen!
I hope you’ve been saving your work as you go, but once you’ve finished editing, you really have little choice. It’s either save the image or lose all the work you’ve done. It’s a good idea to keep a copy of your image in Photoshop (PSD) format, retaining all the layers, so that you can return to make changes later if you want to. If you’re editing many images, I recommend storing the full PSD versions of your photos on a portable hard drive or other removable storage device. The file sizes can be quite large, and they add up quickly. To keep your computer tidy and nimble, off-site (but readily accessible) storage is a good idea.
In addition to your PSD copy, you’ll probably want to save a version of the image with a much smaller file size, so that you can share it through email or on the web, print it faster, or load it onto a digital picture frame efficiently.
The most common and flexible formats for digital images are JPEG, TIFF, and PNG. In addition to these formats, you can save files in BMP, GIF, PCX, PDF, Photoshop EPS, Pict, Pixar, Photoshop Raw, Scitex CT, TGA (Targa), and other formats. Photoshop Elements Help does a good job explaining when you might use them.
Tip
If you create a project that uses multiple pages, Photoshop Elements saves it in Photo Creations (PSE) format, so the image data is not compressed.
• JPEG (Joint Photographic Experts Group) is a standard format for sharing images on the web. This format retains all color information, but it compresses the file size by selectively discarding some image data. The higher the compression, the lower the image quality, and vice versa. Each time you save in JPEG format, the image is compressed again, so you lose more data. That’s why it’s a good idea to hold off on saving as JPEG until you’re done editing your file.
• PNG (Portable Network Graphics) is a newer but popular file format for images on the web. It compresses the image without losing any data, and it can preserve transparency in grayscale and RGB images. Unfortunately, some older web browsers don’t recognize PNG images.
• TIFF (Tagged-Image File Format) is a time-tested, high-quality bitmap image format best suited for print. TIFF is a good format to use if you’ll be importing the image into a page layout application, for example.
File compression can be a valuable thing. It’s what makes it possible to share images almost everywhere. But it often requires some compromise. You’ll see options for file compression when you save images in TIFF, JPEG, and some other formats.
There are two basic kinds of file compression: lossless and lossy. Lossless compression retains all the image data; lossy compression discards some image data and loses some detail.
You don’t need to be a file compression expert to get good results, but it’s helpful to recognize a few terms. RLE is a lossless compression technique that reduces file size in images with multiple layers containing transparency. LZW is a common lossless compression technique that works best in images with a large area of a single color. JPEG is a lossy compression technique that gives the best results with photographs. CCITT is for black-and-white images. ZIP is a lossless compression technique best used with images that contain large areas of a single color.
Once you’ve chosen a file format and file compression, saving the file is pretty easy.
To save your image:

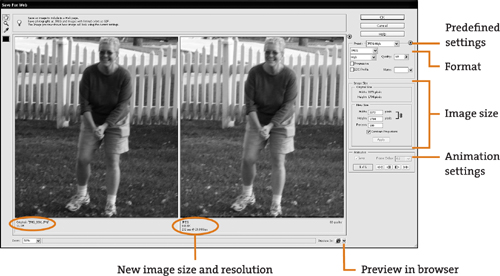
If you know the web is the destination for your image, you can optimize it as you save it from Photoshop Elements. Optimization compresses images and sets display options specifically for best results viewing on the Internet. As with everything else, there are compromises, but your goal is to attain a file size that is small enough for smooth downloading but large enough to preserve your image quality.
-
Choose File > Save For Web. The Save For Web dialog box lets you preview your image with different file settings, so you can see how they affect the quality of the image.
-
To use predefined settings, choose a preset from the Preset menu. Or, choose a format from the file format menu (GIF, JPEG, PNG-8, or PNG-24), and experiment with compression and color options.
Under the preview window, you’ll find the size of the file using the current optimization settings, and the estimated download time. The information under the preview window is updated as you make changes to the settings.
How do you choose which format to use? For most cases, JPEG is the best way to save photographs. If your image contains transparency, though, you’ll be better off with PNG-24 format, even though they are typically much larger files. If you’re working with line art, text, or illustrations with large areas of solid color, use GIF or PNG-8.
Tip
For JPEGs, the Progressive option displays the image over time in a web browser, so it originally shows up at a low resolution and then at progressively higher resolutions. Some browsers do not support progressive JPEGs.
• To preview your image at the current optimization settings in a web browser, choose one from the Preview In menu at the lower-right corner of the image window. If the browser you want to use isn’t listed there, click the arrow and choose Edit List. Then, click Find All, and when the browsers are listed, click OK.
• To see how the image is likely to look on other computers, click the triangle to the right of the optimized image preview and choose a display option. You can see how it will probably look on a Windows or Mac OS monitor, for example.
You can print your masterpiece to your home inkjet or laser printer. The Print dialog box guides you through the process for quality prints. If you want to print glossy or matte photos that feel like professional-quality prints, invest in photo paper that works with your printer.
Tip
If you’re using Windows, you can order professional-quality prints from Shutterfly or Kodak directly from Photoshop Elements. From Mac OS or Windows, you can access professional-quality prints online from vendors ranging from Kodak to Costco. Just visit the site of the vendor you prefer and upload the images when prompted.
To print directly from Photoshop Elements:
-
Save the photos with their edits. You can leave them in PSD format for printing from Photoshop Elements.
-
Choose File > Print. The open photos appear in a column on the left. If you don’t want to print one of them, select it and click Remove.
-
Select your printer.
-
Set up the printer:
In Windows, check the Printer Settings section. To change the paper type, print quality, paper tray, or other settings, click Change Settings. (Then, click Advanced Settings to see the print interface provided by your printer, if there are additional settings you’d like to change.) Click OK when you’re done there.
In Mac OS, click Page Setup at the bottom of the window, and make sure the settings are correct. If not, change them, and click OK.
-
Select the paper size.
-
In Windows, select Individual Prints for the type of print.
-
Select the print size. If you want to crop the image to fit the photo, select Crop To Fit.
-
Preview each image before printing. Click the arrows to scroll through the open images and view each in the preview window. This is your last chance to make changes to the image or the print settings.
-
When you’re satisfied with the previews, click Print!

The Print dialog box in the Organizer is the same one used in the Editor. To print from the Organizer, select the images you want to print. Then click the Create tab, click Photo Prints, and click Print With Local Printer. You can add photos to the print queue by clicking Add beneath the column of selected images, and then browsing to the photo you want to add.
If you’re using Photoshop Elements for Windows, you can easily order prints, photo books, or other products from Shutterfly or Kodak Gallery. Before you order any photo product, make sure you’ve optimized your photos and that you’ve made any edits you want to make. While it can be frustrating to print a photo to your home printer and then realize you didn’t clean up some details, it’s expensive to realize only after you’ve had your photo project professionally printed and shipped that you need to make more edits.
Ordering prints directly from a professional service is not available in Mac OS because Photoshop Elements for Windows uses the Organizer to connect with the service.
To order prints from Editor or Organizer, choose File > Order Prints > Order Shutterfly Prints, or File > Order Prints > Order Kodak Prints. You’ll be connected to the service, which walks you through creating an account (or signing in if you already have one), and then selecting and ordering your prints.
You can combine photos to create contact sheets and picture packages for printing, photo books, calendars, greeting cards, and other nifty things. If you’re using Windows, you can connect easily to Shutterfly or Kodak Gallery to have many of those creations professionally printed. But you can also print many of them directly to your own printer, whether you’re using Windows or Mac OS.
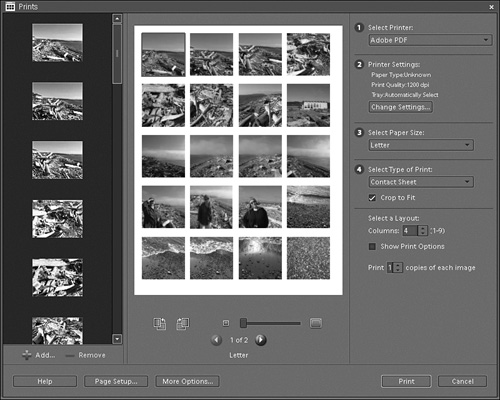
A contact sheet arranges thumbnails of multiple images on a page for efficient printing and review.
To print a contact sheet from Photoshop Elements in Windows:
-
Select the images you want to use in the Organizer.
-
Choose File > Print.
-
Select a layout.
-
If you want to display the photo date, file name, or caption, select Show Print Options and select the options you want. To add images to the contact sheet, click Add, select the images you want, and then click Done.
-
When the contact sheet preview is satisfactory, make sure your printer settings are appropriate and click Print.
Tip
You can print a contact sheet to PDF Printer if you have Adobe Acrobat installed, and then send the PDF file via email for others’ review.
To print a contact sheet from Photoshop Elements in Mac OS:
-
Choose File > Contact Sheet II.
-
In the Contact Sheet dialog box, select the folder whose images you want to include in the contact sheet (or select Use Current Open Documents), and then select options for the document size and contact sheet layout. You can include the file name as a caption.
-
Click OK to create the contact sheet. Photoshop Elements processes the images and creates one or more contact sheets (depending on the number of images selected), and adds them to the Project Bin.
-
Print the contact sheet just as you’d print a single photo.

The Picture Package feature prints multiple copies of a photo in different sizes on a single page, similar to the pages of photos sold to parents of schoolchildren.

To print a picture package in Windows:
-
Select the photo in the Organizer.
-
Choose File > Print.
-
Select Picture Package from the Select Type Of Print menu.
-
Select a layout option, and a frame style, if you want one. If you have multiple images open, you can restrict the printing to the first photo by selecting Fill Page With First Photo. With that option selected, each photo fills its own page.
-
Click Print.
To print a picture package from Photoshop Elements in Mac OS:
-
Make sure the picture you want to print is active.
-
Choose File > Picture Package.
-
In the Picture Package dialog box, specify the document size and select a layout option.
-
Select label options if you want a label.
-
Click OK. The picture package is added to the Project Bin.
-
Print the picture package as you would an individual photo.
In either version of Photoshop Elements, you can create a photo book, greeting card, or photo collage for printing to your own printer. Click the Create tab, and then click the appropriate button to begin work on your project. (Click More Options to see additional projects, such as CD or DVD jackets.) Photoshop Elements guides you through the project as you select the title page photo, layout options, themes, and other options for your project.
In Windows, you can use services from Shutterfly or Kodak Gallery to create and order professionally printed photo books, greeting cards, and calendars. Just click the appropriate button in the Create tab in the Organizer or the Editor.
There are numerous ways to share images online, whether you have your own website or are using a photo-sharing website. You can have up to 2 GB of free space for your photos on Photoshop.com. It’s easiest to upload photos to Photoshop.com in Windows, but not all that difficult to do so from Mac OS.
Sharing on Photoshop.com from Windows
The Organizer includes an Online Album wizard that guides you through the process of adding and arranging photos, applying layout templates, and even sharing the files. Online albums are optimized for viewing images on a web page. Once you’ve created an online album you can share it on Photoshop.com.
To create your album, start by clicking the Share tab in the Organizer or Editor. (You can select Online Album in the Editor, but it will open the Organizer for you to start the wizard.) Click Online Album, select Create New Album, select how you want to share it, and click Next. Add the images you want to include, and name the album.
Then click the Sharing tab. At the top of the left window are a series of templates. To select one, double-click it. You can preview different templates, but it may take a moment for Photoshop Elements to load your images each time. When you’ve found the template you like, select how you want to share the album. If you’re sharing on Photoshop.com, select whether you want to display the album in your gallery and enter the email addresses for anyone you want to notify about the album. If you’re exporting to a DVD, a CD, an FTP site, or a hard drive, fill in additional information. Then click Done.

If you’re using Photoshop Elements for Mac, you can create a Web Gallery in Adobe Bridge that you can upload to a website. Click the Share tab, and then click Web Photo Gallery. Bridge opens, with the Output panel open. Select a template and style, color palette, and appearance. Enter a title and caption for the gallery in the Site Info section. In the Create Gallery section, click Save To Disk to save the gallery on your hard drive. If you want to upload it to a website, select Upload and enter the FTP server information.
You can share files on Photoshop.com from the Mac, too. Unfortunately, there’s no direct way to do this from Photoshop Elements or Bridge. However, you can log in to Photoshop.com and upload individual images into an album.