Chapter 4: Planning for Cost Savings – Right-Sizing
In the previous chapters, we have provided all the relevant elements to be able to understand, export, analyze, and monitor your Azure cloud costs. It is now time to learn how to save money by identifying all the possible actions that can reduce your spending, while still leaving a good balance between the performance and reliability of your applications.
This is the first chapter dedicated to cost saving, and it starts, as mentioned often in the first three chapters, with changing the long-used information technology (IT) culture of overallocating servers to a strict, Lean, and Agile mentality of using just the right amount of resources.
We will learn how to tackle right-sizing for virtual machine (VM), storage, and platform-as-a-service (PaaS) services, and then prepare internal policies for on/off and on-demand automation. Lastly, we'll finish this chapter with a non-exhaustive list of logic and workflows to help you keep your resources and your costs at the right size and usage. Right-sizing is all about finding the perfect balance between performance and cost and periodically enforcing your cost/performance policy to get the most out of your cloud spending.
You'll also learn about sample logic for cost control with right-sizing, where we'll guide you to analyze, control, configure, and automate some of the cost-saving techniques we learned.
These will be the main topics of this chapter:
- Understanding right-sizing
- Enforcing on/off policies—scheduled and on-demand
- Sample logic for cost control
Upon completion of this chapter, you will have a clear understanding of the most used best practices and techniques for controlling cloud costs, along with practical examples of how to apply the newly acquired knowledge.
Technical requirements
For this chapter, you'll need the following:
- A computer with internet connectivity
- Access to the Azure portal
- Privileges to access Cost Management information (see https://docs.microsoft.com/en-us/azure/cost-management-billing/costs/assign-access-acm-data)
Understanding right-sizing
As has been mentioned, and emphasized many times since Chapter 1, Understanding Cloud Bills, cloud computing is not about overprovisioning, and right-sizing is probably the most important aspect of controlling cloud resources and costs. The impact is not simply saving money: in many cases, there is a balance between performance and spending and, more specifically, between meeting your internal customer service-level agreements (SLAs) efficiently. You need to find this balance to keep both your application managers and cost controllers happy. Let's dig into this further by dividing the scope of application—where the first step to right-sizing starts, of course—from your infrastructure-as-a-service (IaaS) resources.
Right-sizing is the process of continuously finding the right balance between resources' performance (RAM, storage, CPU cores) and the lowest possible cost for those resources. This means performing an assessment of your resources on a periodic basis, which will lead to three main actions, as follows:
- Upsize scaling of your resources vertically (VM sizing, storage, tiers, and so on)
- Autoscaling horizontally and adding nodes
- Downsize scaling (VM sizing, storage, tiers, and so on)
- Switch-off—that is, trying to limit the usage of cloud resources to just the time these are really used
Important Note:
In some cases, we will learn that right-sizing might not be the correct fit for a workload. There can be many reasons— software requirements in terms of memory or processor, or in some cases, no maintenance window can be used to downsize resources, or resources and services cannot be turned off or scaled down (such as networking services), and so on. As a result, you may find yourself in a frustrating position of using overallocated resources by design: don't worry, though, as there are ways of saving money even in this uncomfortable position, as we will learn in the upcoming chapters.
Choosing the right balance between performance and cost is also an exercise that depends on the type of cloud workload we are working on: IaaS, storage, and PaaS, which we'll cover in the next sections.
Right-sizing for IaaS
If you have migrated from an on-premises situation, chances are (from my experience) that having worked with a few large migrations of global enterprises (with numbers varying from 1,000 to 10,000 VMs), you are using 30-40% of the compute power that you bought. This typically happens because sizing servers in a private data center means buying hardware that you will probably keep for 3 to 5 years (sometimes even more); hence, overprovisioning has been a common practice and even a requirement due to long procurement times, for many years.
Additionally, systems are sized for peak performance requirements, where this peak may only be hit one-two times a week. Problem is, when you migrate your workloads and make a one-to-one match with your cloud resources, you end up with a virtual data center that is overprovisioned and overspending for no good reason.
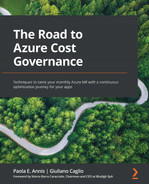
A good starting point to understand if you have overprovisioned resources is the Azure Advisor page in the Azure portal. From the main Advisor page, you can see Cost recommendations such as right-sizing or buying reservations, as illustrated in the following screenshot:
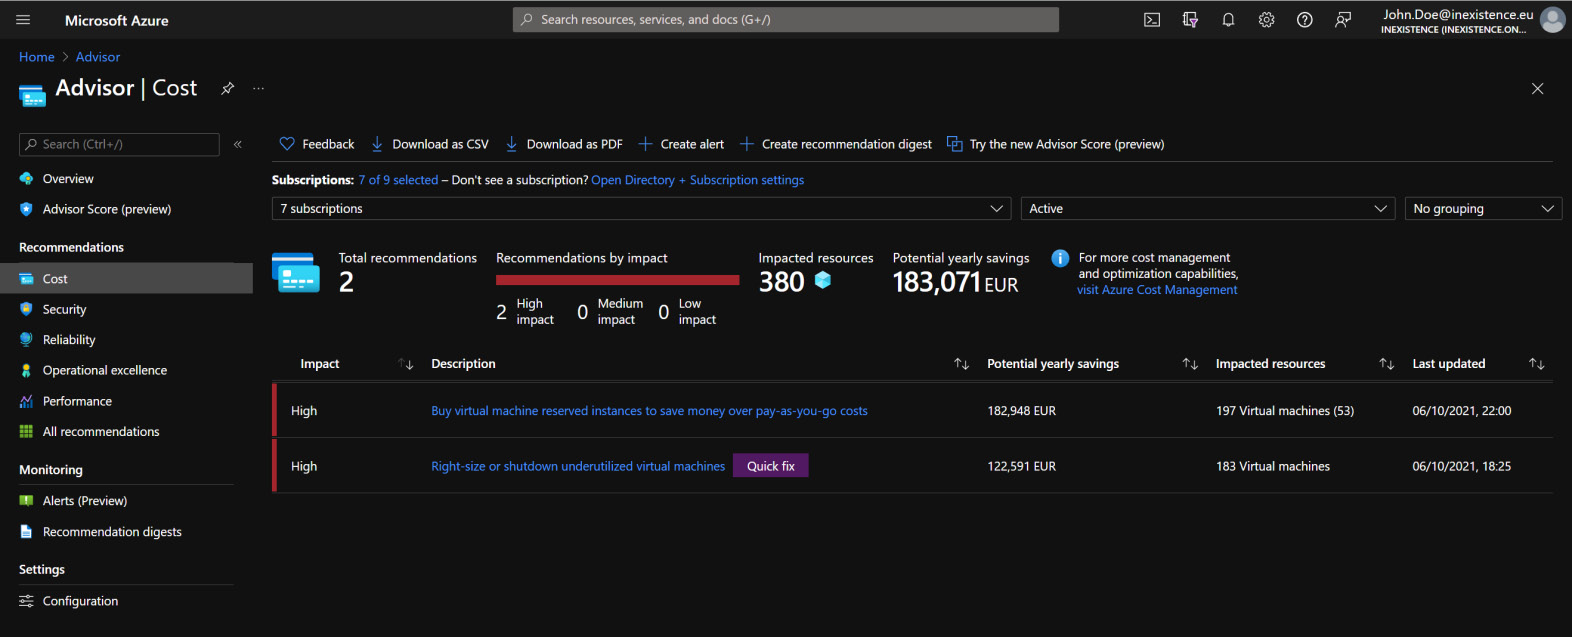
Figure 4.1 – Azure Advisor right-sizing suggestions
If you click on Right-size or shutdown underutilized virtual machines, you will get a per VM details list, which you can also export in .csv or .pdf format, which is useful for building up your business case with right-sizing and presenting all the findings. You can see this list in the following screenshot:
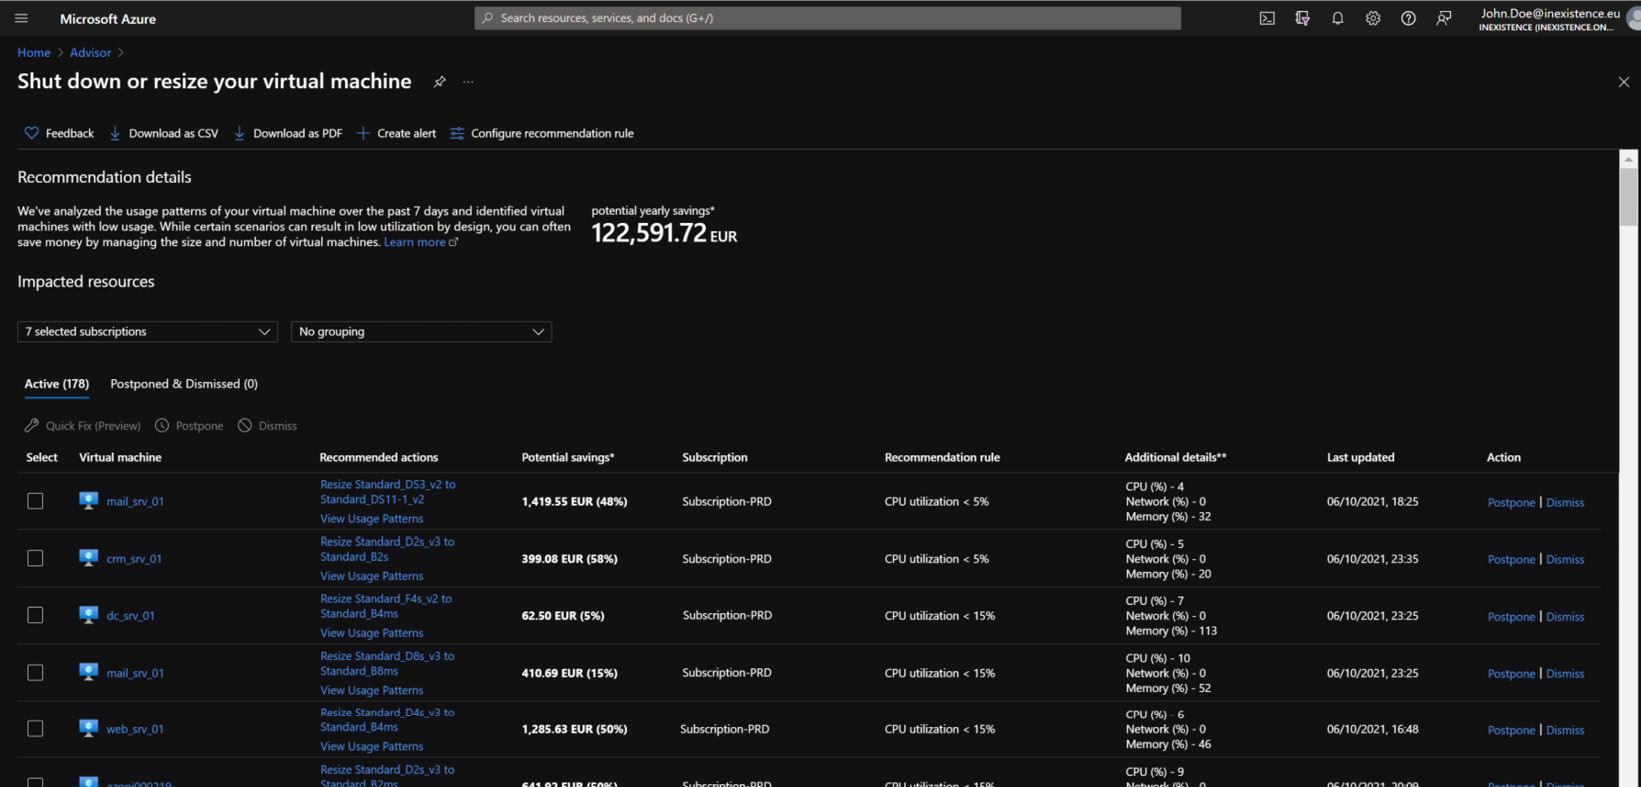
Figure 4.2 – Azure Advisor right-sizing detailed view
As you can see from the preceding screenshot, Advisor will list all the VMs that have a CPU usage below a specific percentage (the default starts at 5%, but this value can and must be changed with time). This report tells you that several resources in your virtual data center have average use of a CPU below a certain threshold, which means they are practically idle.
This reasoning pattern prompts some decisions that will vary according to your organization's policy and technical requirements. Here are some things you may want to think about:
- Pick a VM or group of VMs in the same resource group, or belonging to the same application:
- If they are non-production, you might decide to downsize in the first available downtime slot.
- If they are production, you need to contact the application manager and understand if there are specific requirements and constraints that prevent the downsize. For example, a larger VM might be needed for the number of disks or memory that the application requires. You need to make these checks before proceeding to any downsizing since they can have an impact on your SLAs and performances.
- Once you are happy with the lower size of one or more VMs, then you can schedule the moment of downsizing. If you plan to do this at the end of the month, this will give your cost controller an easier view of monthly quotas.
The VM and storage costs are typically the main chunks of spending of every customer, as you might check and evaluate with the Azure Cost Management – Cost Analysis reports that we learned about in Chapter 3, Monitoring Costs. Let's progress with our process by addressing the second largest spending item in the list: storage.
Disk right-sizing
Storage is typically also a big part of cloud spending, especially for customers who have a large IaaS footprint. There are several types of managed disks that reflect different performances, features, and, most of all, pricing, as follows:
- Ultra-disk: These are the fastest and most performing disks and, therefore, unfortunately also the most expensive. In addition, the pricing directly depends on the input/output operations per second (IOPS) and throughput that your application will require. My recommendation is to define exactly what performance (these disks were designed to address workloads such as SAP HANA or Oracle databases) you need from the storage before committing to Ultra-disk.
- Premium solid-state drive (SSD): These are the most used since they provide good and solid performance and pricing. For cost purposes, however, most of the workloads using premium disks can easily be downgraded to standard SSDs or hard disk drives (HDDs).
- Standard SSD: Great price-performance ratio, although a bit limited on the IOPS and throughput. Microsoft recommends using them for development (dev)/test and light workloads.
- Standard HDD: This is the most basic tier of disk storage. It can be used for backup and non-critical workloads with sporadic access.
In addition, you can now share your managed disks with an Azure disk pool (preview), allowing your application to access your managed disks from one single iSCSI (Internet Small Computer System Interface) endpoint. This feature is in preview (https://docs.microsoft.com/en-us/azure/virtual-machines/disks-pools) and will only work with pools of Ultra-disks or Premium/Standard SSDs—you cannot mix the two types.
Important Note:
Azure disks can be reserved as well, bringing down the cost by reserving increments of 1 disk unit for a 1-year span. We will learn about reservations in Chapter 6, Planning for Cost Savings –Reservations.
There are several options to keep managed disks at the right size, as follows:
- If you overprovisioned a Premium disk only for IOPS/throughput, you can change the disk size without stopping the VM, as much as twice per day (refer to the following for more details: https://docs.microsoft.com/en-us/azure/virtual-machines/disks-performance-tiers-portal), so during the day, when load is high, your disk can be a bigger size with related performance, while at night you can downsize to a smaller footprint.
- If your workload has spikes that affect the disk performance, you can enable disk bursting and only use additional resources when needed. See https://docs.microsoft.com/en-us/azure/virtual-machines/disks-enable-bursting for more information on this.
- If your workload has an on/off pattern, you can change the storage type to standard HDD when the VM is off, and change it back to Premium when the VM is on again. See https://docs.microsoft.com/en-us/azure/virtual-machines/linux/convert-disk-storage for more information on this.
We encourage you to read the full Microsoft documentation on what type of disk to use for your workloads, available here: https://docs.microsoft.com/en-us/azure/virtual-machines/disks-types.
Important Note:
Before resizing or changing the tier of a disk, you should make sure about its impact on the application, whether the VM supports both disk types, and any related extra cost triggered due to resizing or changing. For example, resizing to a disk that has transaction charges might incur extra fees when the disk is used, even if for a small amount of time.
The key takeaway is that you should aim to size your storage as much as possible according to your current needs, resisting the on-premises mentality of keeping extra space for growth, as the extra space in the cloud can and should be easily allocated only when you really need it. Of course, keeping a buffer of additional storage for organic growth is still a best practice but it should be measured according to real growth, and not some future extra plans where you might end up paying 20% of additional storage for no good reason.
Important Note:
Storage size is charged regardless of consumption, so if you decide to allocate a P30 disk (Premium 1,024 gibibytes (GiB) disk) while using half the space, you are still charged the full 1,024 GiB of storage!
Other reasons that may lead to storage overprovisioning can be any of these:
- Unassociated disks (for example, from VMs that were deleted)
- Aged snapshots
- Migrations of the wrong disk size—for example, a migration tool that converts a disk to 1,025 gigabytes (GB) will have the result of a 2 terabytes (TB) charge!
- Windows images and Hyper-V images can consume a lot of disk space, especially if the Hyper-V images were converted from VMware vSphere.
We will dig deeper into wasted resources in Chapter 5, Planning for Cost Savings – Cleanup, which is completely dedicated to cleaning up unutilized resources that only waste money. Let's now move on to the right-sizing of PaaS resources.
Right-sizing PaaS services
Many customers are starting to see the public cloud as a development platform, migrating their application to modern, cloud-native architecture and using cloud PaaS services that cut lots of effort from the development and operation times. However, just as for VMs, you need to properly choose the correct tier of your PaaS service to avoid extra costs and/or performance that are not aligned with your business needs.
Important Note:
To be able to reconduct every resource to the right application and application manager (or owner), you should plan to have a configuration management database (CMDB) or a setup to use the Azure native assessment and discovery tools, which allow you to track down—at the minimum—the application, its owner, and the used cloud objects.
An additional complication of using PaaS services is that they often have different tiering that depends on how the service was built or on how the application uses it. This makes it hard for an operation team to assess and downsize a PaaS service since you will need to know exactly what types of requirements your application has.
The starting point for defining the right tier is, of course, to assess the memory and CPU usage of the application and determine how changes will impact the overall performance. A subtle problem comes when you are using the cloud platform service of your choice but do not realize you are pushing it at 100% or more.
Most services have a throttling mechanism that will refuse more workloads when a tier reaches its limits. However, many other services typically have a soft limit, and therefore our strong recommendation, especially for business-critical applications, is to enforce a good monitoring tool that will allow you to constantly assess and optimize the performance tier of the platform. Many PaaS services support autoscaling, but this is not an immediate operation and there are limits to how far you can scale at once: you will need to plan for your workload type in production and when headroom is necessary to support expected workloads.
Important Note:
What happens when you downsize a PaaS tier? The problem with downsizing a PaaS tier is the fact that you are not simply scaling down resources but, in many cases, are switching to a lower tier of product, and you might lose critical features that will require you to keep a higher tier even if the performance is great.
In this section, we have learned about how to right-size VMs, their attached storage, and the tiers of PaaS services. As mentioned earlier, this might not always be the correct—or, sometimes, feasible—approach. When downsizing is too complex, we will try other means of cost savings, such as—as we will learn in the next section—scheduling your workloads to run only when used.
Enforcing on/off policies – scheduled and on-demand
Since you're reading a cloud cost-optimization book, I think you may be one of the turn off the tap when you don't need water club members.
The same best practice could and should be used with cloud resources: if you don't use a service, database, or VM, then that resource should not be running without purpose.
Usually, we can identify two types of on-off policy, as follows:
- Scheduled: We use this policy when you set a power-on time and a power-off plan, and it's always the same.
- On-demand: We use this policy when the resources are always powered off and the user starts them up only when needed.
Of course, the on-demand approach is the best, when speaking in terms of cost control, because you use the cloud resources only when needed, and for the right time. The scheduled approach, instead, may leave the resources on even if unused.
Non-production environments (test, development, quality, pre-production, quality, and so on) are best suited to an on-demand approach. Production environments are typically always-on, to ensure a proper service level, although in some cases, they might take advantage of a scheduled approach.
At first, you may think that the only benefit of shutting down services when they are not used is limited to the billing costs generated by those resources. But if you bear with me for a while, I will demonstrate that this is not entirely true and that the whole infrastructure could get some additional benefits, such as optimizing reservations, saving on resources that are linked to the primary target of an on-demand policy, and even saving license costs, as we will learn in the upcoming sections.
Saving on reservations
Reservations, as we will learn in Chapter 5, Planning for Cost Savings – Cleanup, Azure backend systems may reassign hourly the discount to any compatible resources (for example, a different VM of the same family), as per the flexibility option.
If you flagged flexibility in your purchase when you shut down (that is, VM deallocation, as per the VM states we learned about in the previous chapters) one or more resources you originally intended for reservation, the discount will automatically apply to another running resource of the same group, as follows:
- Powered-off (reserved) resources generate zero (or near zero) costs.
- Running (unreserved) resources will benefit from the reservation that is freed up on the powered-off resources.
Inducted right-sizing
When you stop a resource, all the attached (or related) resources can be right-sized since they're not used anymore. One simple example is VMs and disks: we learned that, in a cloud environment, the disk storage qualities (HDD, SSD, Ultra disks) have different price ranges. If your application normally needs Premium or Ultra disks when running, once powered off, these will no longer be used.
You may still decide that you want to keep the disks (hence, the storage cost) because it's an on-off exercise or simply a grace period for deleted VMs. As a practical example, you can imagine downsizing all the disks that are attached to powered-off VMs to Standard HDD and paying the minimum possible price. Before starting up the VMs, you will need to revert the disk tier back to the original one (to ensure correct performance when the VMs are running).
Here is a sample workflow to start/stop VMs from extending the saving with disk SKU change (an SKU is the price and feature tier of every cloud resource):
Figure 4.3 – Application start/stop script with disk saving
The example on the disk tiers teaches us that there may always be extra costs, which we can call to be inducted, that are a result of an apparently seamless change that can invalidate our savings efforts. In the same way, we may have inducted savings as a result of other operations.
A couple of other examples of inducted savings may include these:
- Log collection: These are active resources that send logs to a collector that generates costs on network, storage, and log ingestion. If the resources are stopped and deallocated, you won't have such costs.
- Planned maintenance: Having a time window in which some resources are down (and declared down to the user) allows you to plan maintenance windows (Azure maintenance or standard operations maintenance) without having to deal with the users for scheduling.
- This is not an Azure or Cloud Direct saving, but at the end of the year, cloud operations will save full-time equivalents (FTEs)—namely, the people working on those workloads—as a cloud deployment typically incurs lower operational costs due to the fact you are not managing the hardware and data center part, and in complex infrastructure, this may save a lot of FTEs.
These are just some examples to better understand what inducted costs are and the importance of evaluating everything in your applications, and not only the resources involved in serving the application.
Licenses
If you buy resources in a pay-as-you-go licensing model, having them running only for a fraction of the day will save hours and hours of license costs.
This is very important for the total project spending since usually, product licenses are bought upfront, but if you carefully plan your on-off strategy, you could switch non-production environments to a pay-as-you-go approach with tight schedules, to be sure you end up spending less than buying them upfront.
It's still worth mentioning that for Windows and SQL Server licenses (and every other license type covered by this benefit), if you have enabled Azure Hybrid Use Benefit (AHUB) (as mentioned in the earlier sections), it will cut the license cost of the workload.
Backup
Some resources cannot be backed up using Azure Backup (for example, application data files or databases on which Azure can't guarantee consistency) and require specific software to back up those items on different storage. Usually, specific third-party backup software is licensed by backed-up data size. So, the more data you back up, the more expensive the license is.
But powered-off systems are, by definition, consistent, since there's no data access or concurrent data modifications. Therefore, you can switch to Azure Backup, for example, freeing up traffic and licenses from your specialized software.
Important Note:
Please make sure that while backing up your system, once it's powered off through snapshot or copies, ensure the overall application's data consistency and the complete restore for each workload. In any case, I suggest verifying this with the software supplier.
Network storage
If your application uses network-attached storage (NAS) that can change tiering (and, therefore, cost), please consider limiting the performance and space of it whenever your application is powered off.
Azure NetApp Files (ANF) is an example of NAS that can be hot-resized (the tier can be changed with no downtime) and automated via API or AZ CLI commands to shrink the capacity pool and volumes when not in use.
The previous VM stop/start workflows may evolve as in the next diagram, where, in addition to resizing your managed disks according to your usage, you also increase and decrease ANF volumes (always tagging them properly with the latest change) to get a proper demand shaping. This behavior is not implemented yet in ANF but might be in the future, reducing all our diagrams to one simple flag of demand shaping.
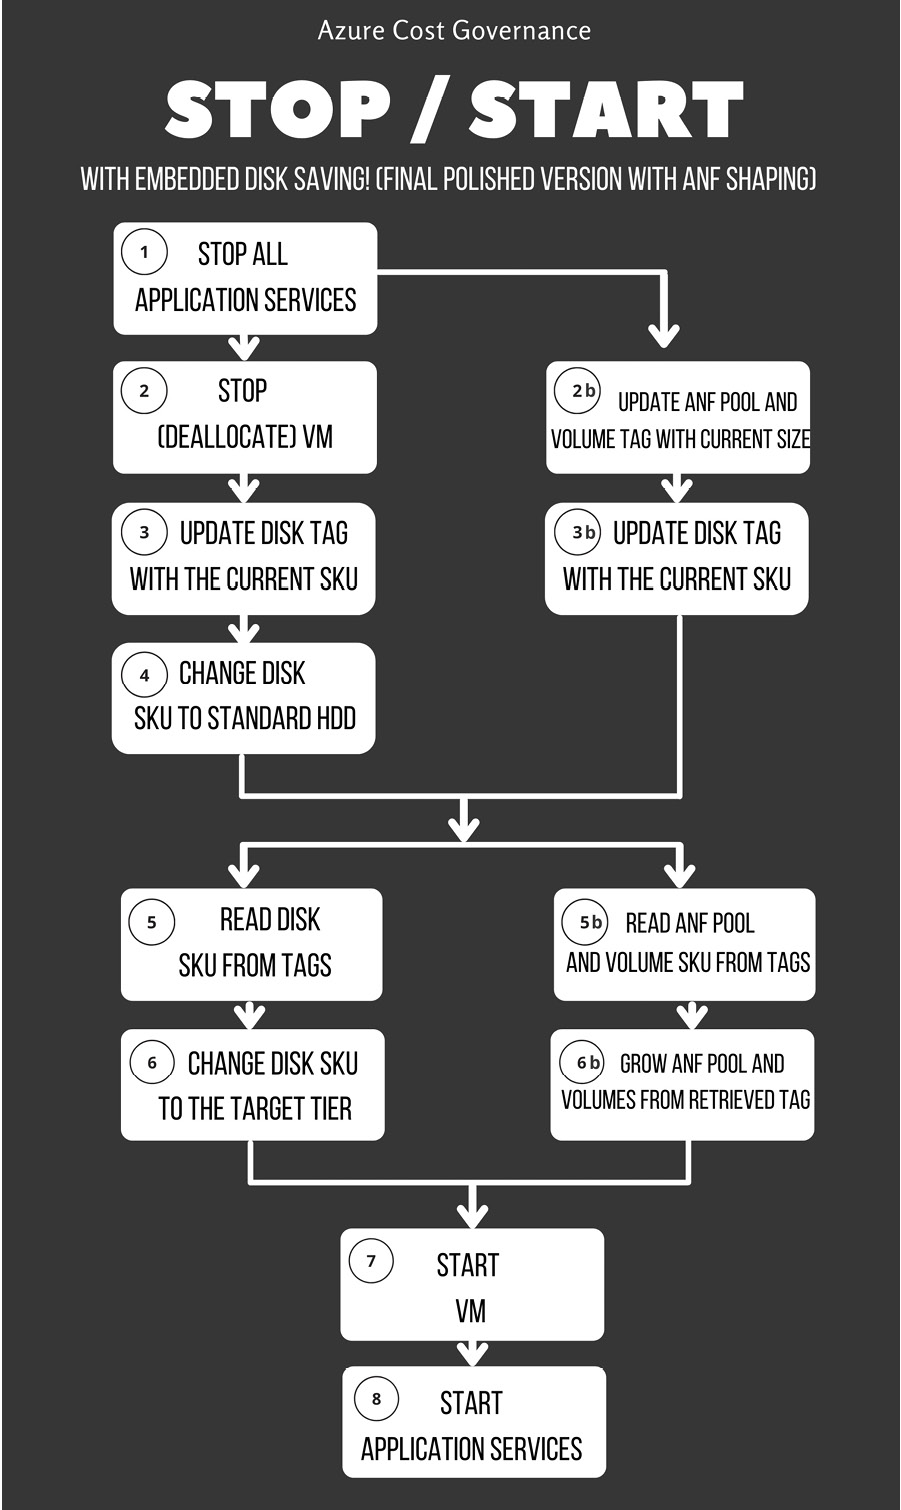
Figure 4.4 – Final stop/start workflow with ANF shaping
In the preceding diagram, we have tried to define the outcome of our start/stop workflow. You are obviously welcome to make it more complex according to your company's requirements; this should be a minimum viable product (MVP) to allow you a safe stop/start for your cloud applications.
In this section, we have learned what are the easiest and quickest targets for cost savings related to right-sizing. We have also learned how to prepare and enforce off/on and on-demand policies. We will put everything together with some real-life examples of cost control logic in the next section.
Sample logic for cost control
As you may have guessed in the previous sections, right-sizing can be overwhelming when dealing with large complex organizations and/or projects. In addition, there isn't a one-for-all approach that, once applied, saves you tons of money with little effort.
Of course, policies help to maintain control, but you need to adapt Azure resource SKUs to your workload demand, and this cannot be achieved with a static, one-time-only action. In this section, you'll understand some basic principles that may help automate tasks to control costs using AZ CLI commands, but you are free to implement them as you prefer.
Understanding what you need to control
Usually, in your cloud infrastructure, you have a lot of different objects, but don't necessarily have to create automation: some objects may simply not need intervention. So, let's start posing some questions about your workload demands that, indeed, need attention, with sample answers. The answer to the following questions is specific to your organization and application policy:
- Question 1: Based on what you learned in Chapter 2, What Does Your Cloud Spending Look Like?, about Meter Category/Subcategory analysis, what are the resources or resource types you need to optimize?
For example, Azure managed Premium disks, networks, VMs of a specific family (for example, E or M family).
- Question 2: What are the applications you want and can tackle?
Based on the top N most expensive resources, you can identify the most spending architecture/application (for example, SQL Server in PaaS of the MyCRM application).
- Question 3: If you need to model the application workload demands over time, are you able to represent them in a graph or in a timeline?
We can use some examples of application usage patterns that may help you to understand cost control. They are provided here:
- Working days peak: Your application uses a lot of resources systematically from Monday to Friday. Here is a screenshot to demonstrate this:
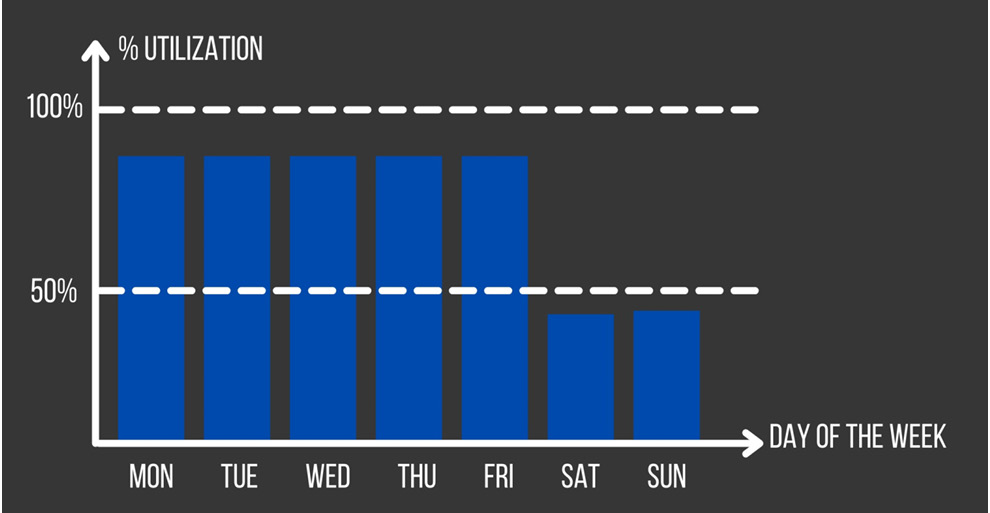
Figure 4.5 – Application usage with a peak on working days
- First days of the month peak: Your application consumes resources only in the first few days of the month. After that, it is completely idle or unused, as illustrated in the following screenshot:
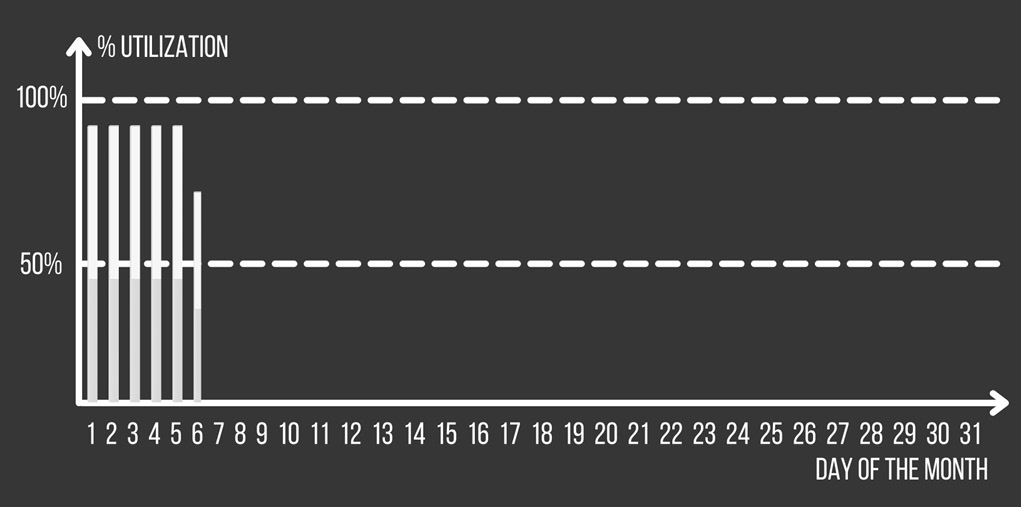
Figure 4.6 – Application usage with a peak at the start of the month
- Applications-bound demand: You have two bounded applications: one consumes the output of the other. This example is the most difficult to be spotted if you don't know your application map, but it's the most effective to be automated, as illustrated in the following screenshot:
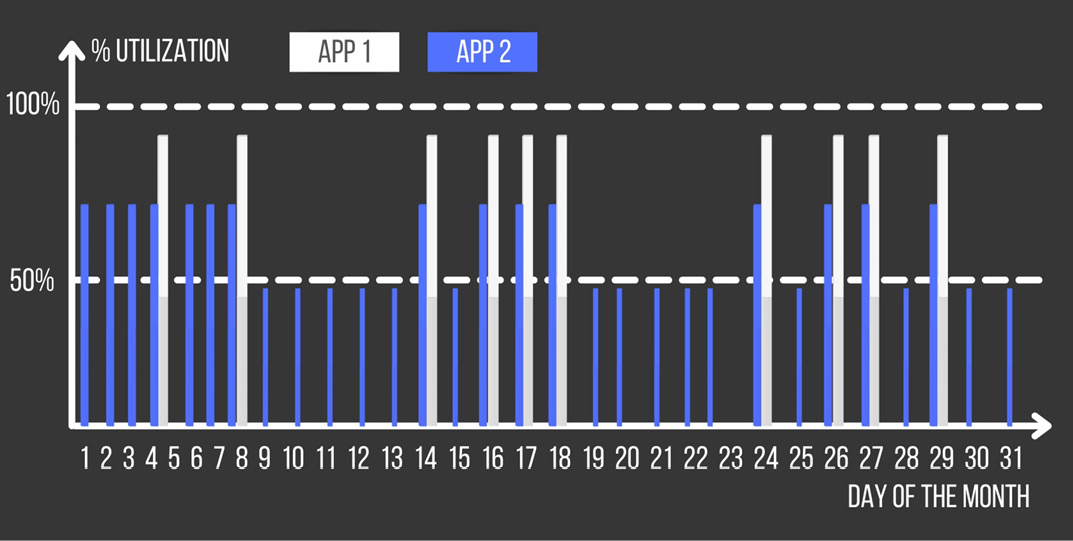
Figure 4.7 – Applications' usage/demand with bindings
- Question 4: Can you easily engage the application developer teams for support?
Depending on the application and the level of support, if the application is off-the-shelf, you will likely have supplier support. If it is a custom application, you may have the developer team's support, and if it is an open source solution, you have forums and communities to ask other developers questions.
- Question 5: What are your development/scripting skills (when using custom applications)?
C#, Java, Bash, Python, and so on.
Choosing from scheduler and orchestrator
To quickly implement the infrastructure changes when needed, you need to have a scheduler or, even better, an orchestrator able to run complex workflows, like the one we will build in the next section. This can be implemented in a variety of ways: using Azure native tools, such as Logic Apps and Functions, Azure Automation, or PowerShell scripting; by using third-party tools (Terraform, Chef, or any infrastructure as code (IaC) tool); or by using your own software tool.
Important Note:
There are many features to switch off (deallocate) VMs and other Azure services singularly. For example, you can use native automation to power off VMs, or even the new feature of Start Virtual Machine (VM) on Connect (https://docs.microsoft.com/en-us/azure/virtual-desktop/start-virtual-machine-connect). But what we often find is that an application relies on a set of different objects and services that need to start in a tangled way, which is why we'll learn about how to build an orchestrator for your application.
Let's start with understanding the scheduler part: you have a wide variety of programs that come bundled with the operating system (OS), or open source or commercial software that allows you to run a script at a precise moment.
A scheduler allows you to basically run a procedure, and this procedure needs to contain all the workflow steps, data, and configurations to perform all the tasks in the correct order. Modifying the procedure means modifying the script and retesting it in all its steps, exactly like in a software development cycle.
Important Note:
Testing your scheduler is extremely important. Your scripts and workflows need to manage all the error types in the correct way to ensure the application is correctly stopped and restarted and that you won't be exposed to any kind of data loss.
If you're automating a small number of simple applications, you may use only a simple scheduler, but if you're planning to automate many complex applications or if you plan to extend the scheduling to an on-demand interface, you need to switch from a scheduler to a proper orchestrator. The most frequent question I receive when I talk about schedulers and orchestrators is: Do I need to buy this third-party product because it supports Azure with built-in integrations? Well, 90% of the time, the answer is: No, you don't need third-party software, although it might ease the development.
Every commercial software should have an internal developer life cycle provided by the supplier, and some Azure objects may not be supported, either immediately or in the future (this may be something your workload depends on), and you might end up with a mix of supported and unsupported objects. This means implementing workarounds and complicating the workflow and its maintenance. So, commercial software might not be the answer to all your needs.
Building your own orchestrator
Since the beginning of this book, we have highlighted that you need to know your infrastructure and your applications, and you need to know how to interact with the cloud provider interfaces too (CLI commands, API, and so on). Since Microsoft brings you PowerShell cmdlets, AZ CLI commands, and APIs, you could implement your workload by yourself, keeping your integrations totally agnostic from any third-party product (and their meta-languages).
If you're brave enough, you may start thinking you can create your own custom orchestrator. It's totally true: if you're planning to use the orchestrator only for cloud cost optimization, it's quite simple, and it's totally feasible. If you think about the most complex cost-control/resource-shaping workflow, you'll end up realizing that its minimal, atomic part is something like this:
{
step_id : "<uniq id>",
step_type : "<action name>",
resource_id : "<resource id>",
parameters : [],
on_error : "<action on error>"
}
After identifying the step with a unique identifier (ID), we give it a talking name and assign the related resource ID. We also define what action will be performed in case of error.
Let's get real with an example, as follows:
{
step_id : "431d4490",
step_type : "poweroff_vm",
resource_id : "/subscriptions/……….",
parameters : [],
on_error : "goto 081f1bd3455b"
}
If you build a JavaScript Object Notation (JSON) workflow descriptor file with atomic actions such as these, you may define an entire sequence of steps to reach a target. Then, your orchestrator should only read the descriptor file to get the sequence of all the single steps one by one, and then get the step type and engage the proper action on the resource (eventually, using the optional parameters).
The most basic orchestrator to stop/start your VM is offered as an embedded feature in Azure, named StartStopV2 (https://docs.microsoft.com/en-us/azure/azure-functions/start-stop-vms/overview). This feature relies on Azure Functions and Azure Logic Apps and will allow you to use a sequenced or scheduled pattern, and define your order of stop/start and the related tagging, along with providing valuable information through Application Insights.
But let's go back to building your own logic, regardless of the tool you are planning to use to implement it, which can be a mix of all the options we are learning about.
In high-level view, this design is a for loop on all the steps and has a lot of execution methods, one for each step type, with some error-management logic, as displayed in the following workflow diagram:
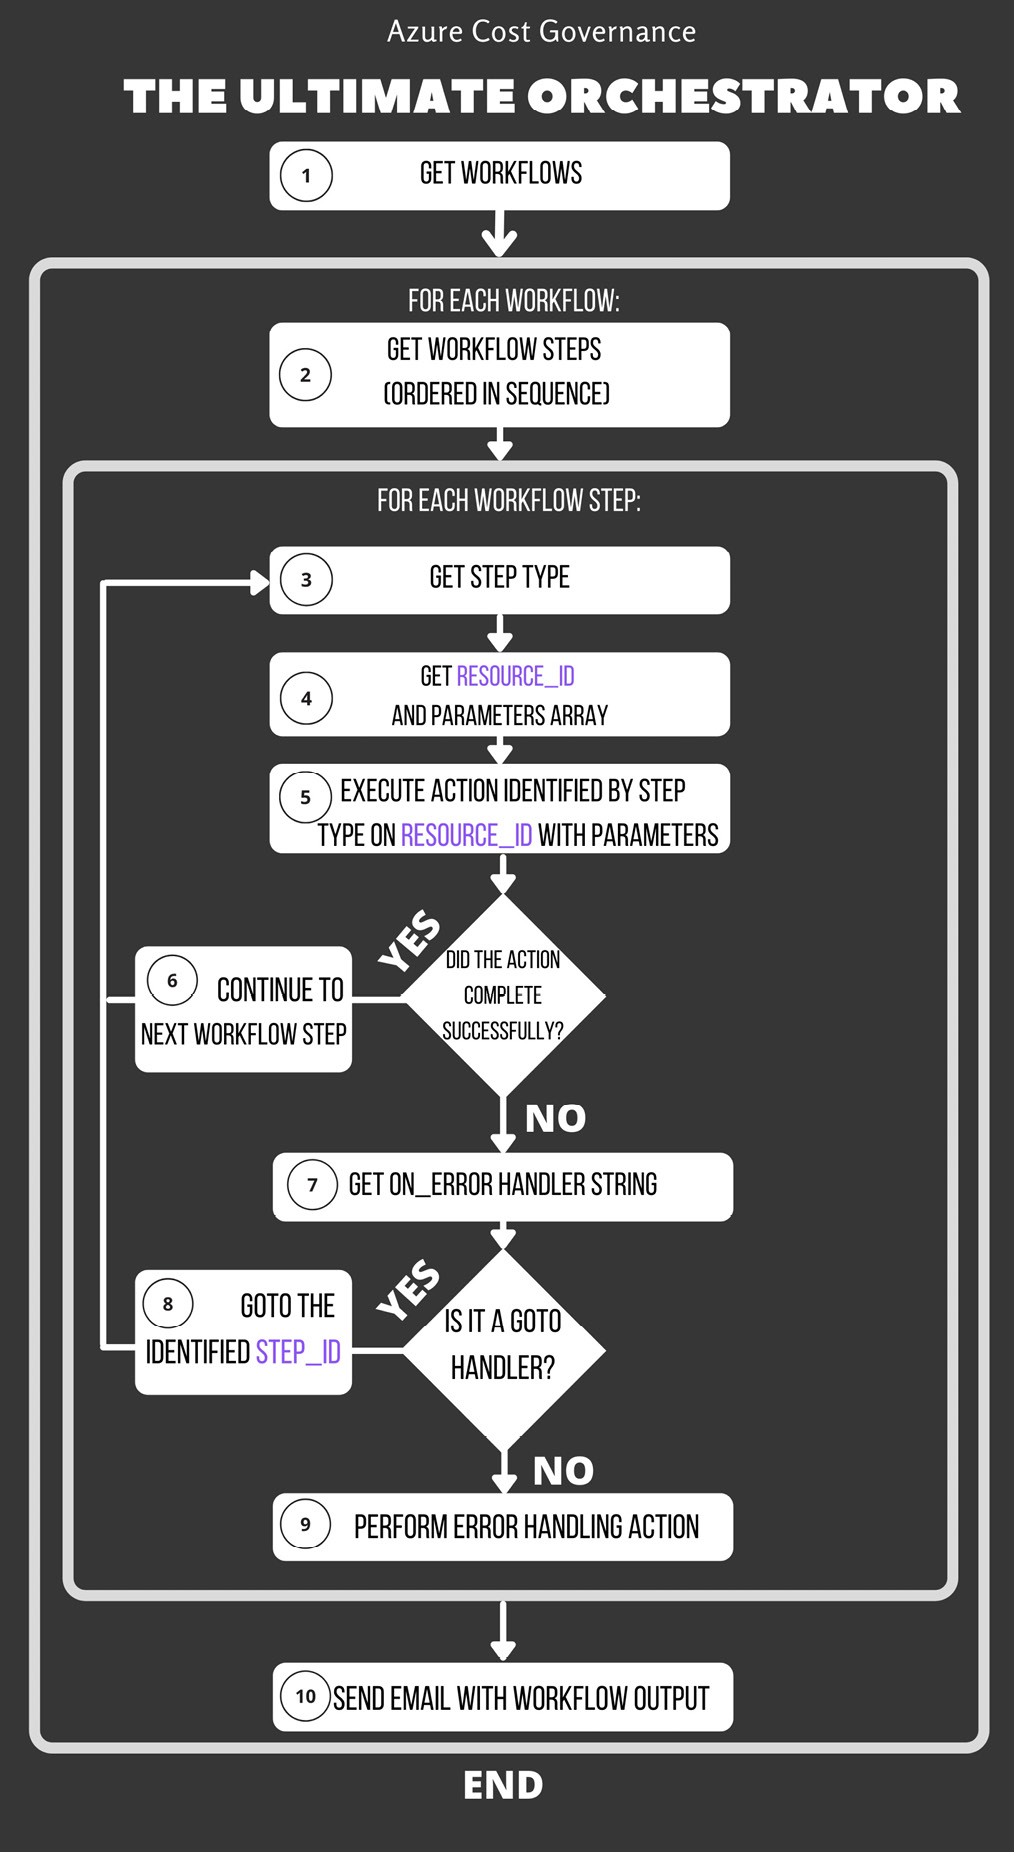
Figure 4.8 – Orchestrator core workflow
In this way, you've implemented the core portion of your orchestrator. If you couple it with a scheduler, you're more than halfway across, and you can start any complex workflow by simply defining a JSON descriptor. At this point, altering the workflow, step sequence, or creating a new automation workflow, will be as simple as editing the .json file.
Your world does not end in the cloud
Now that you have your orchestrator (either custom-built or third-party—it makes no difference at this point), you are planning to work on the following two main types of resources:
- PaaS/SaaS resources: This is where the cloud provider gives you everything you need to orchestrate the resource.
- IaaS resources: This is where the cloud provider gives you automation control only on the VMs, not on your services or applications installed in the VMs.
Let's brush up one more time on the MyCRM application from Chapter 2, What Does Your Cloud Spending Look Like?, where we learned about tagging. It was composed of the following:
- One SQL Server database in PaaS
- Two backend application servers installed on two VMs
- Two frontend application servers installed on two VMs
- One Azure firewall
- One frontend application gateway
- One backend load balancer
Let's suppose that, on weekends, the workload sinks and allows you to rescale the component to half of the SKU. Analyzing your application with the demand-shaping approach used in Chapter 2, What Does Your Cloud Spending Look Like?, it's clear that you need to start with the four VMs (the frontend and backend VMs of the following example) and the PaaS SQL server. You may start with an approach like the one in the following diagram, an MVP of the workflow:
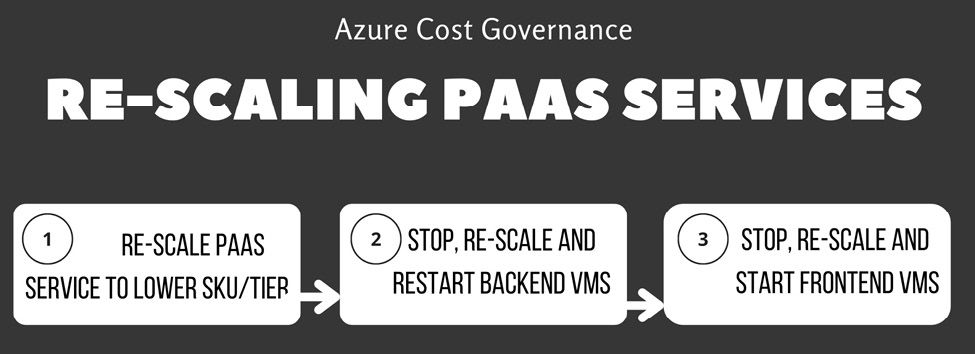
Figure 4.9 – Rescaling a SQL PaaS service (MVP)
So, this approach will work for sure, but if you must pay attention to the following points, then it's not the best approach:
- Minimize service downtime
- Minimize possible data loss or data corruption
The reason it's not the best approach is that you are trying to rescale an open database that may have queries running from the backend VMs, so when the SQL server then becomes available, you shut down the backend VMs, with dangling sessions on the frontend VMs, and so on. To avoid possible data corruption or data loss, you can move to a safer approach, as depicted here:
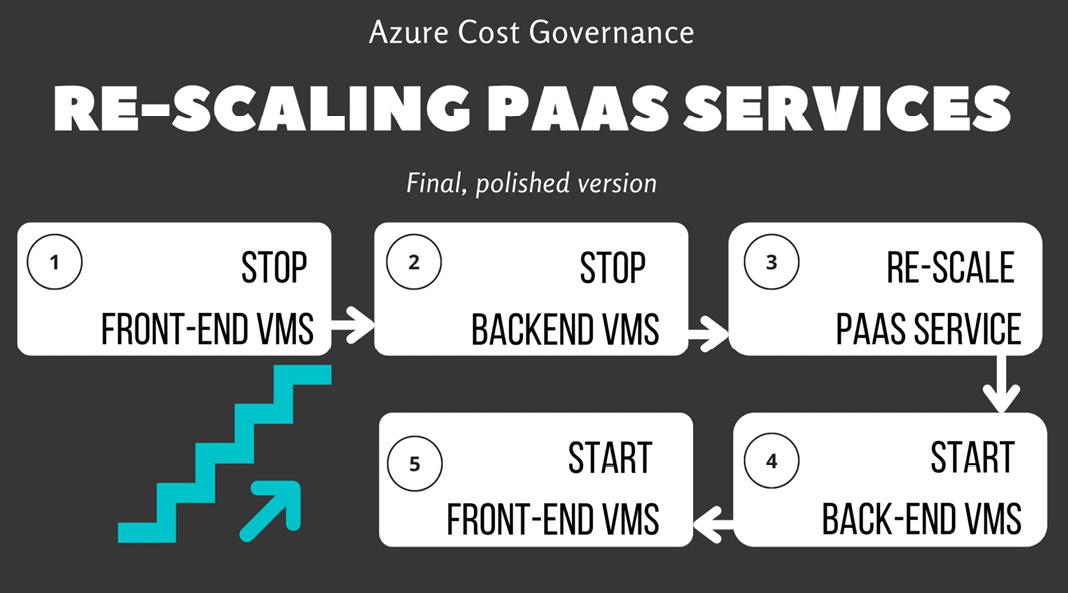
Figure 4.10 – Rescaling a PaaS service (final version)
This new version of the workflow will make sure no traffic will reach the backend and the database during all the PaaS service rescaling procedures.
Tip:
In the case of more complex applications, you may want to remove VMs from the load balancers or the application gateway balancing pools (this is called a drain procedure). This allows you to maintain the service with one system chain while you work on resizing the other chain.
We're assuming that you can start and stop the VMs and the MyCRM application, and that services start and stop correctly with their OS. Unfortunately, especially on older (legacy) applications, this is not always the case. There are applications that are composed of many services on a single node (which is a VM), and you have a start-and-stop sequence to bring it up or down successfully. To complicate our scenario a little more, suppose that 50% of the time, one crucial service does not start successfully, and you need to manage the error, correct the boundary conditions, and try to restart only that specific service.
Now, you surely start understanding the heading title: you cannot stop at what the cloud provider brings you. You need to dig deep until you get what your infrastructure or your application needs. This requires a little more development on the orchestrator to implement the following:
- Steps able to run commands and scripts in the VMs
- Steps able to check conditions (for example: Is a specific Transmission Control Protocol (TCP) port open and listening? Have you found the word starting in a logfile?)
Fortunately, Microsoft provides a way to do so, with the run-command subcommand of the AZ CLI. For more information and usage examples, refer to the official documentation at https://docs.microsoft.com/en-us/cli/azure/vm/run-command.
With those powerful commands, you can reach a very flexible orchestration boilerplate. You can assemble a very complex workflow that interacts with the services and is able to recover from an error condition. Here is a workflow diagram for our additions:
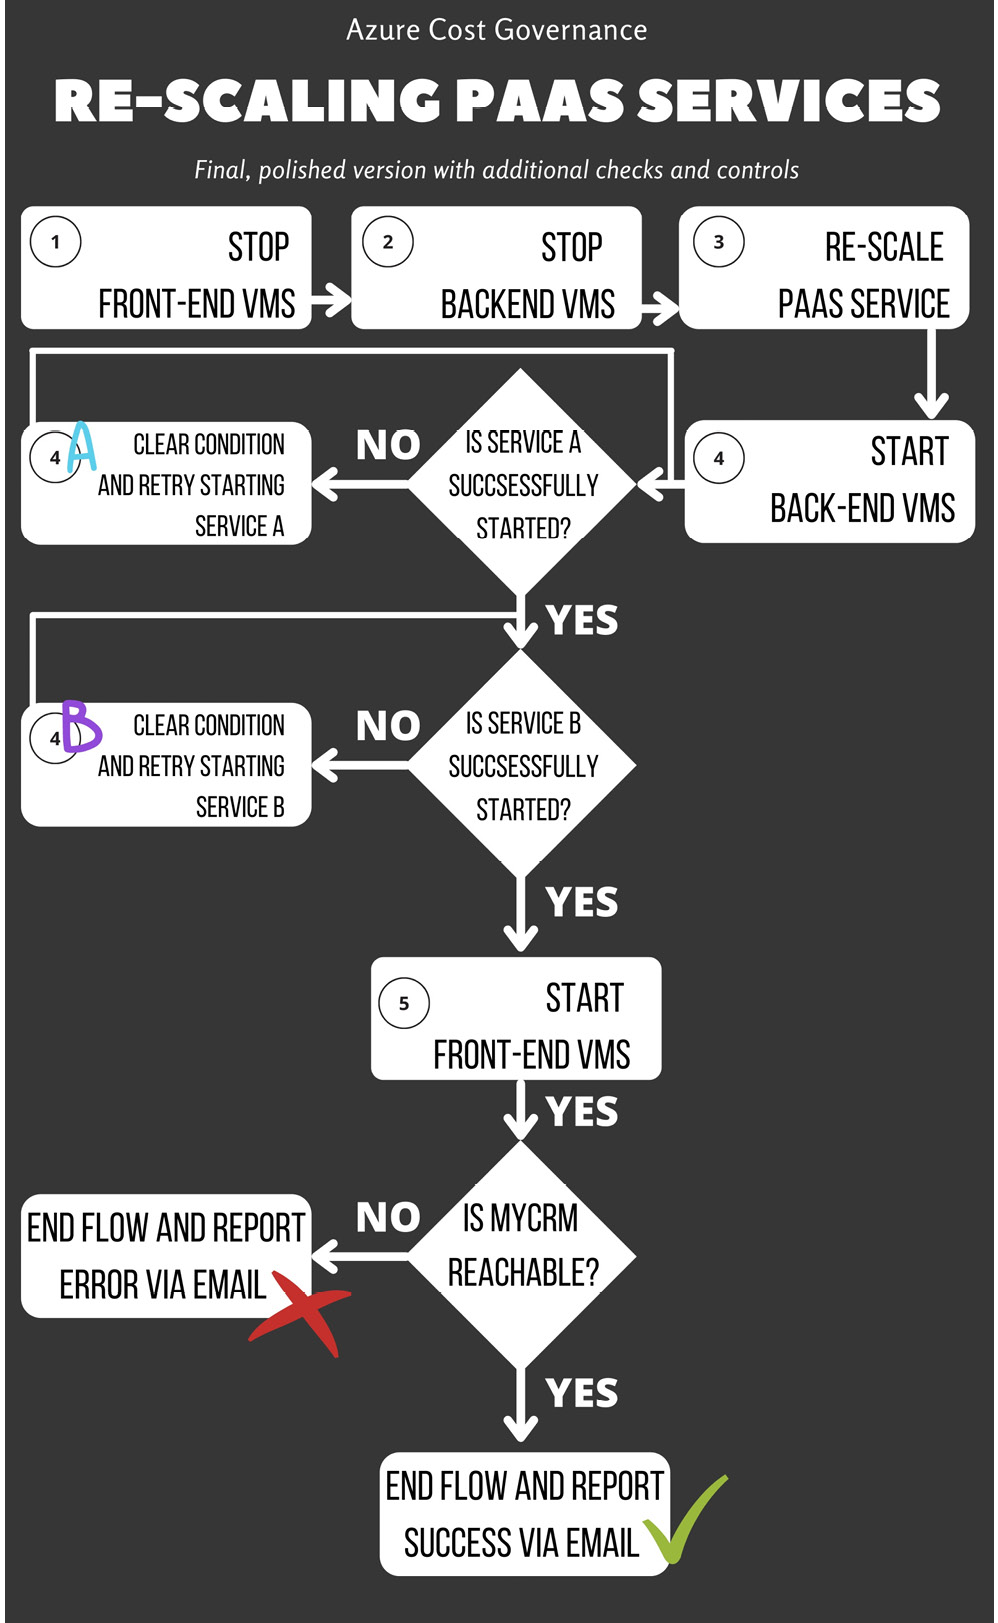
Figure 4.11 – PaaS rescaling orchestrator with additional checks
As you can imagine, we can add checks and actions on the VMs until we have a robust workflow that is able to bring the application resources up and down in a predictable way (let's assume that 98% of the starts are successful). A robust workflow should also check every possible error condition (that can be predicted) before starting any action that could fail, and after executing any further action, it should check for a successful output indicator (such as a log file line, a process in memory, an opened socket, and so on). If you plan to use Azure native tools, an Automation account with runbooks will help you keep track of everything that happens during the runtime of each automation job.
The same logic can be executed in many ways—for example, using Azure Automation and a runbook that will translate our generic workflow into your demand shaping script, or an Azure Logic App, such as the one in the next screenshot, where you can easily find pre-built connectors that will stop and start the chosen VM, and a link to an Automation account for the tier change of the PaaS service(s).
Every day at night, this Logic App will power off the frontend and the backend VM(s), then scale down the PaaS service (this can be Cosmos DB, Azure SQL, and so on) through an Automation job, then try starting the backend VM. It will then wait until the provisioning status of the backend VM is true (via the jobdone variable), then start the frontend VM, check with Application Insights whether the website is up, and send a confirmation or failure email depending on the outcome. Here is a workflow for the same:
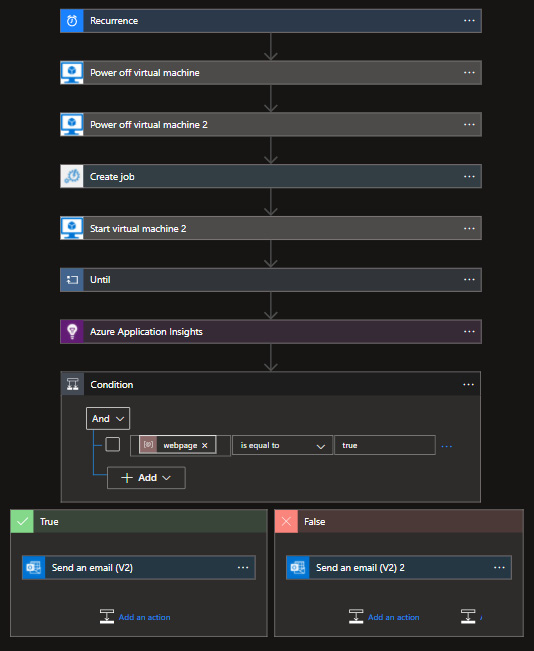
Figure 4.12 – Our PaaS scaling workflow implemented with Logic Apps
Please remember that building a robust workflow may require time and a lot of testing (because you also need to simulate the error conditions, and you may need to develop ad hoc stubs to achieve this target).
In my humble opinion, you don't have to start implementing the most complex workflow with every condition. Let's keep it simple, start from some minimal unoptimized actions, and then add steps when you are confident with all the components (tools, command, service, credentials, and so on) and error handling.
On-demand re-scaling
In the Understanding what you need to control section, we saw some examples of workloads: some were on a scheduled basis (for example, working days versus weekends), but the last one depicts a workload dependence between two business applications. This is a common example of the producer-consumer pattern (see https://en.wikipedia.org/wiki/Producer%E2%80%93consumer_problem), where one application generates data/work used by another application. There are a lot of online examples of this pattern, but the important thing is that one application (the producer) could manage the rescaling of the other one (the consumer) based on its needs.
In the previous sections, we learned about orchestrators, and we started thinking about engaging the workflows with a scheduled approach. Here, we need to add a feature to our orchestrator: a way to start a workflow programmatically (and in a secure way, of course).
For example, we could create an API to start a given workflow and check the API key of the caller to ensure that the workflow engagement is legitimate.
In this case, you may prepare two workflows, as follows:
- One to rescale to higher SKUs
- One to rescale to lower SKUs
Then, modify the two applications to call the orchestrator, engage the correct action (and wait for the workflow completion), and then continue with normal operations.
The following workflow diagram shows you the orchestrator for the producer/consumer pattern:
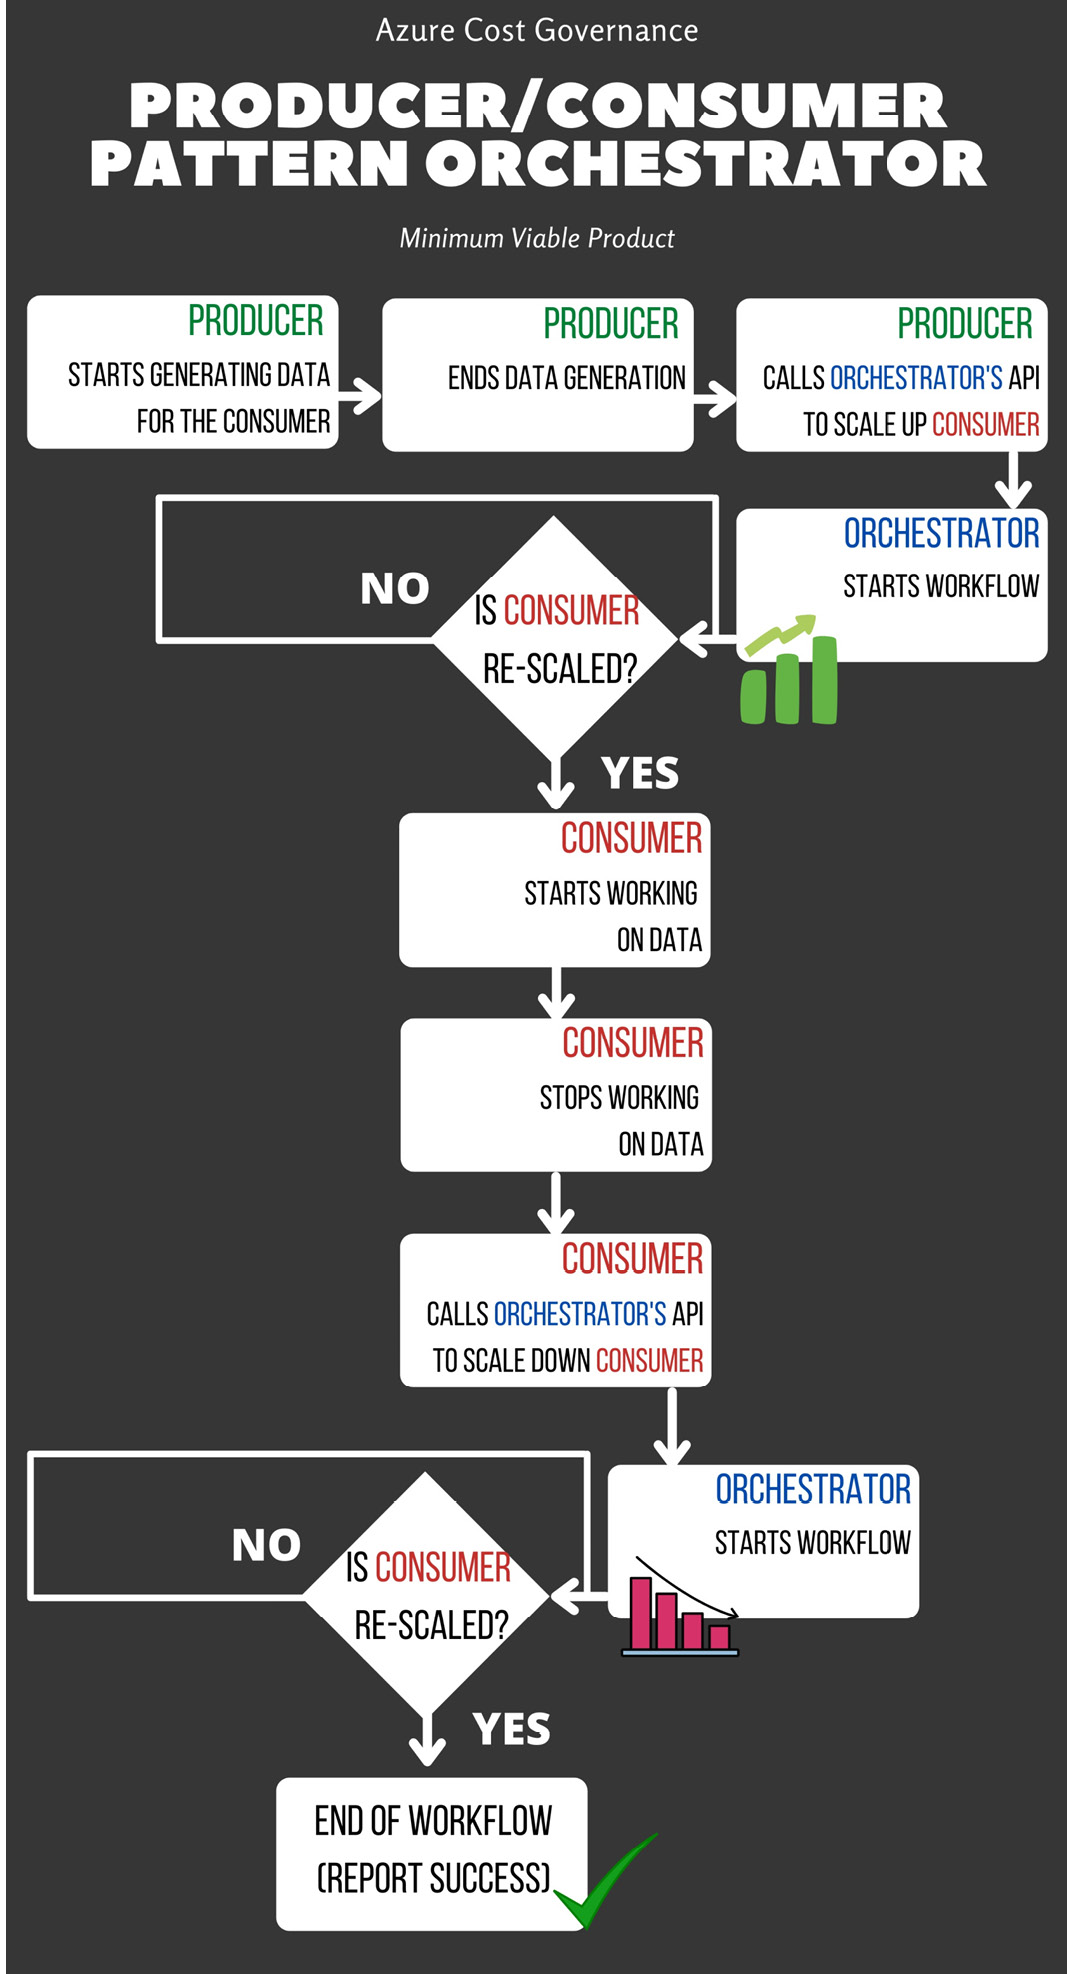
Figure 4.13 – Orchestrator for the producer/consumer pattern MVP
Tip:
Usually, rescaling to lower SKUs means that the application has stopped working on the produced data, so it may be the same application that asks the orchestrator to rescale itself down.
As usual, let's complicate our approach a little bit.
Currently, the producer can ask the orchestrator to provide more resources to the consumer when needed, but your needs may not be related only to cost saving—you may need the consumer to complete their job in a specific timeframe without overallocating resources.
Let's assume you may have three types of workloads for the consumer, as follows:
- Workload A is sequential, low-resource usage.
- Workload B involves a big, long run of parallel work.
- Workload C is sequential and very CPU-intensive.
In this case, you need to have four workflows with different SKUs for every component of the consumer (since you have different needs), as follows:
- One to rescale to SKUs according to workload A (it will use a low SKU, maximizing the saving)
- One to rescale to SKUs according to workload B (it will use expensive memory-oriented resources)
- One to rescale to SKUs according to workload C (it will use very expensive CPU-oriented resources)
- One to rescale to the lowest SKUs
Now that the orchestrator knows how to rescale objects (and you've extensively tested the workflows), you need to modify the producer to call the orchestrator and engage the correct workflow based on its specific needs in order to have the best consumer possible for that elaboration. The workflow becomes something like this:
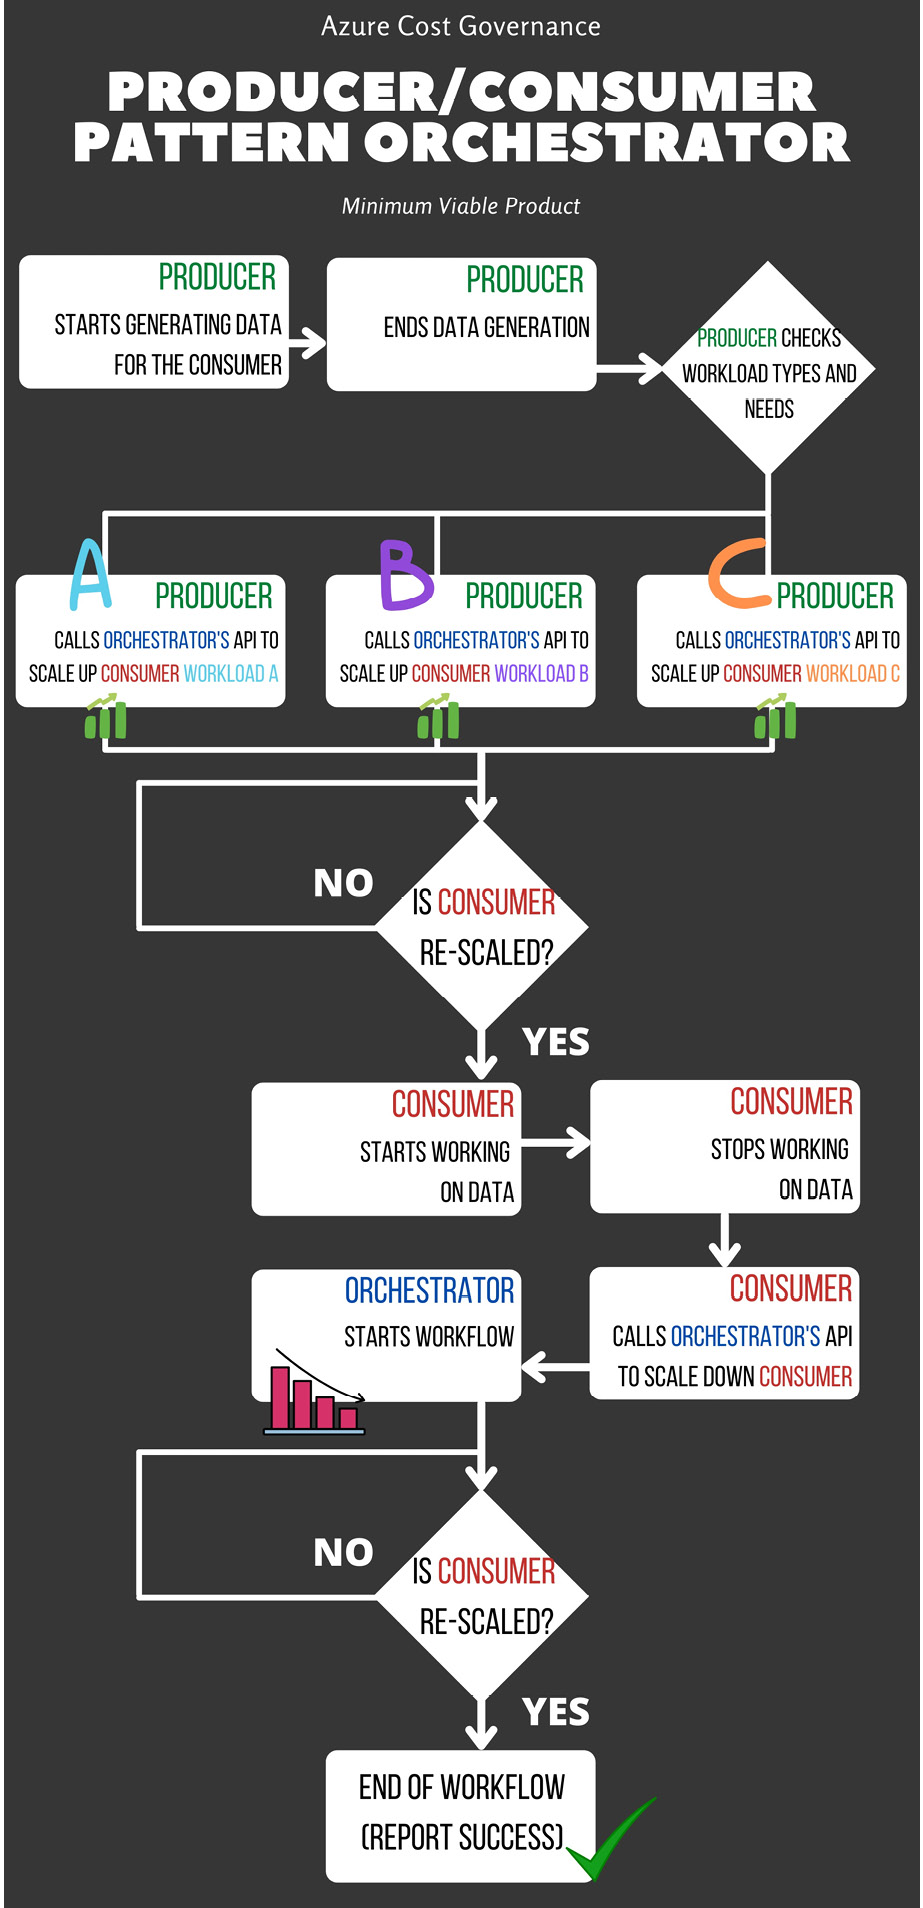
Figure 4.14 – Orchestrator for the producer/consumer pattern (final version)
At this point, you may start thinking that passing parameters and having an internal log for the orchestrator is a good and right thing to do, and you may be right: an orchestrator is a tool that can save you time and money, but as with every tool, it all depends on how it is used.
Let's return to the producer/consumer example. If the producer does not clearly understand the workload type, you may end up with the following:
- A lot of rescaling of workloads B or C and losing cost optimization
- A lot of rescaling of workload A, having delays in consuming data, and displeasing business users
Therefore, you need to carefully track who is engaging the workflow, when it's engaged, and which workflow is engaged, because sooner or later, you'll need to justify the infrastructure behavior and the performance versus the related costs.
This reasoning is overall true when dealing with VMs, but if you are using other Azure services, things definitely get easier, as outlined here:
- VM scale sets manage all this complexity for you. You can create metrics based on all the VM telemetry to create scale-in/scale-out flows.
- For PaaS services, most of them already scale in/scale out based on metrics configured by the user.
- Custom applications that use the producer/consumer pattern may take advantage of serverless code with Azure Functions (which has a durable capability) to trigger the autoscaling.
- For other services such as Service Fabric and Azure Kubernetes Service (AKS), the autoscaling is embedded in the orchestrator and will do the work for you according to your requirements and configuration.
The decisions you will need to make are only around how and when these services must scale, as they implicitly assume you are using the right tier and sizing and will only scale up and down according to traffic peak or performance issues. The same is valid for the next section, where we'll learn about horizontal scaling as a general rule, which, in many cases, is a concept already embedded in the PaaS service.
Focusing on other scale-up patterns
In the previous sections, we identified scale-up patterns that allow us to have the right computational resources when needed and shut down or scale down unused resources for cost-saving purposes.
But is vertical scaling the only way we can use our orchestrator and save money on the monthly bill? It surely is the simplest, but not the only one. In Chapter 2, What Does Your Cloud Spending Look Like?, we described vertical scaling and horizontal scaling and, depending on your application's architecture, it may be simpler to horizontally scale up the application during the day and scale it down during off-hours.
A very high-level simplification of a horizontal-scaling workload can be based on the already created workflow and ready-to-spin VMs. The precondition is that the VMs involved in this service are already behind a load balancer and are tagged with an identifying tag, as depicted here:
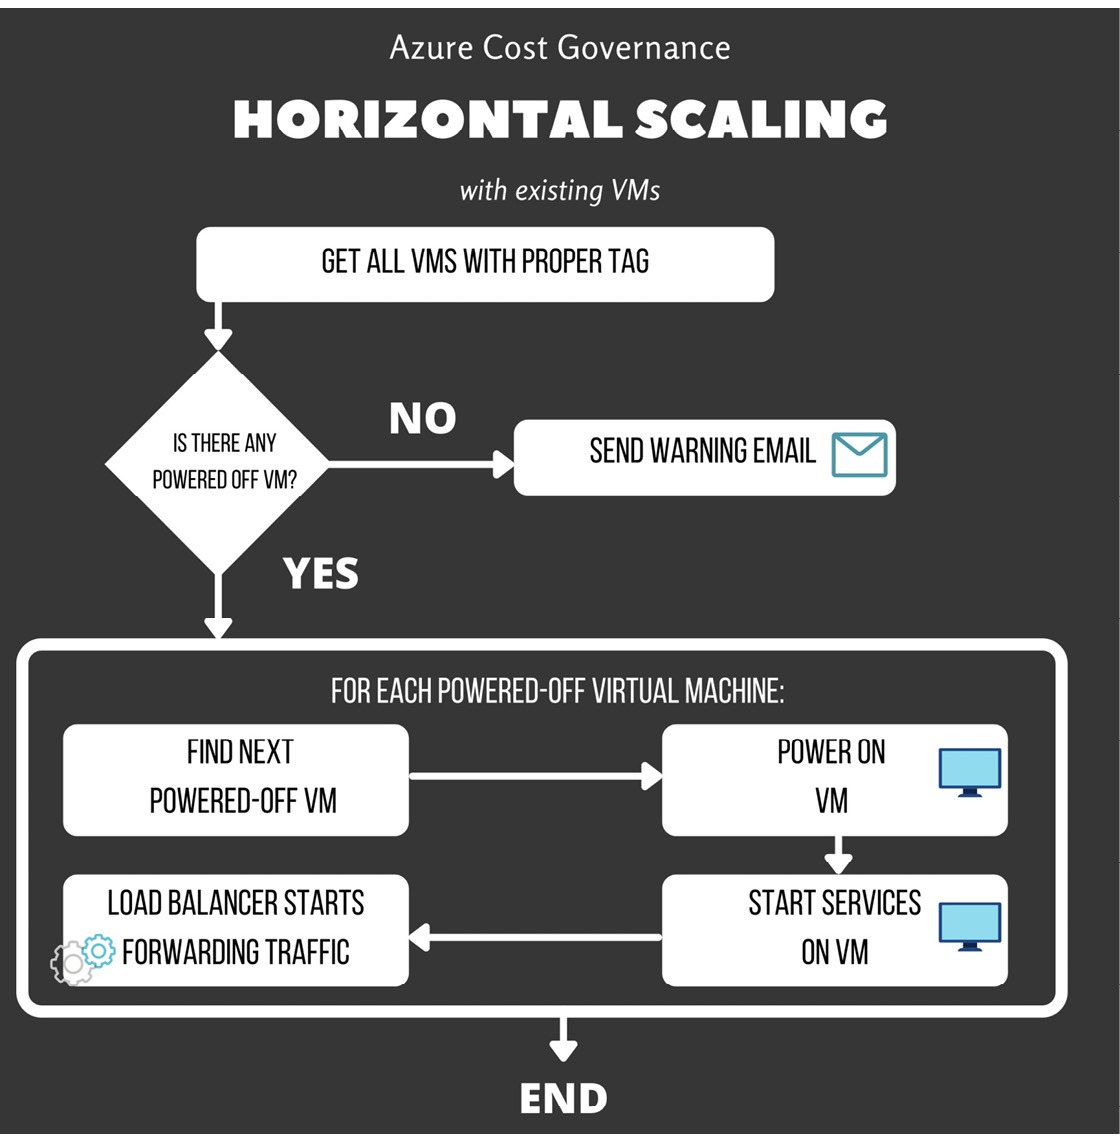
Figure 4.15 – Horizontal scaling with existing VMs
Of course, having a limited number of pre-created, ready-to-run VMs is not always applicable, but if we want to create new VMs automatically from an Azure image, the workflow only slightly changes, as we can see here:

Figure 4.16 – Adding VM images to the horizontal scaling
Please remember that we're analyzing the horizontal scaling from an orchestrator point of view. If your need is only related to VMs, you can also rely, for example, on Azure scale sets.
Scale sets allow you to manage a load-balanced group of VMs that can automatically scale up or down depending on either a manual schedule or on the workload's demand. You can find additional information about Azure scale sets in the official documentation at https://docs.microsoft.com/en-us/azure/virtual-machine-scale-sets/overview.
Drawback in rescaling PaaS and SaaS
We've already faced the fact that rescaling IaaS components means shutting down the services and the VMs, with a business service downtime for the end user. You may be starting to think that IaaS is not so practical and that switching to PaaS or SaaS will relieve you from the downtime hardships; the simple answer is: it depends.
PaaS and SaaS are run on a classical infrastructure, managed by someone else, but the principles are similar: compute, storage, network, and memory, and adding memory or compute power very often requires a restart of the resources where your PaaS service resides. Backend VMs need to be restarted, disks need to be changed from one tier to another, and containers need to be redeployed with a new configuration.
Of course, PaaS and SaaS are more flexible than IaaS and they relieve you from having to manage every single configuration in detail since, on Azure, those services have well-defined blocked tiers, and every service comes with a powerful API or cmdlet to be managed.
Changing an Azure SQL database tier can be as simple as running this command (using Azure-CLI version 2.30.0):
az sql db update -g <ResGroupName> -s
<ServerName> -n <DatabaseName> --edition
(Basic|Standard|Premium|GeneralPurpose|BusinessCritical|
Hyperscale) --service-objective <TierName>
The previous AZ CLI command has the default parameters for resizing your SQL database. An example of this is provided here:
az sql db update -g ne-rg-MyCRM -s MyCRMsqlProd01 -n MyCRMdb
--edition Standard --service-objective S1
Switching from one tier to another is far simpler than running the same server in a VM group: all we need is one API call or one command with the right parameter, and that's it. But remember that in some cases, you'll have a little downtime, and your applications need to be aware that they may lose the connection to the modified resource. Also, they need to re-establish or refresh the connection as needed, to be fully functional when the service becomes available in the new tier.
Tip:
Keep in mind that services can be unreachable or become unresponsive even in the cloud. This kind of application resilience to PaaS or SaaS services is surely useful for cost saving, but it's very important in any aspect of your infrastructure and application design because it ensures no manual intervention for reducing the business service downtime to a minimum for your users.
Typical per-resource-type cost-saving approach
In the previous sections, we mainly concentrated on the IaaS optimizations (up/down and vertical/horizontal scaling), but please keep in mind what we learned in Chapter 2, What Does Your Cloud Spending Look Like?, under the The benefits of PaaS services—demand shaping section, where we discussed some strategies to optimize the PaaS/SaaS resource SKUs to your demand with the help of some examples, such as Just-in-Time (JIT) provisioning.
Using those hints, you need to analyze every PaaS/SaaS service used by your applications to create parametrized methods for your orchestrator to operate on the different resource types. You will create a library of those methods operating on specific services, allowing you to turn the right screw at the right time, as our experienced cloud watchmaker.
Azure offers many tools, and features are added constantly to assess and respond to the performance versus sizing conversation, such as Azure Advisor or Data Migration Assistant (DMA) and Azure Migrate. These tools should be used as a best practice for any wise migration project but can be also used to assess your cloud infrastructure (especially the Azure Advisor page) continuously and periodically.
JIT provisioning
Enforcing your cost governance policy should be grounded on the concept of JIT provisioning, leaving no space for wasted resources. Many cloud teams use an IAC tool, either native, with Azure Automation and Azure Resource Manager (ARM) templates, or tools such as Bicep (https://docs.microsoft.com/en-us/azure/azure-resource-manager/bicep/overview) and Terraform. These tools require a good level of cloud skills to create the initial configuration, but have clear benefits that made them very popular with cloud teams, such as the following:
- Offloading laborious and interminable tasks
- Avoiding human error
- Allowing for a higher scale of resources and users
The importance of JIT is also in the resource decommissioning part: as we happily jump on creating Azure objects for any new user/project, we should always plan to deallocate such resources when they are no longer needed. The beauty of it is that recreating resources at this point is just one click away, so our internal infrastructure users should not be scared of our decommissioning policies.
Summary
This chapter helped us start painting a picture of cost-saving techniques that you can use to both lower your Azure costs and keep them down. We learned about the principles of right-sizing and how to deal with cloud resources with the correct mindset. Then, we explored a set of examples and workflows that can be easily applied to your Azure environment to assess, automate, and improve your costs, such as gradually building and enriching your own orchestrator that can be invoked from your application and, in fact, perform on-demand scaling and many other savings.
The next chapter will be dedicated to cleanup, which means recognizing and dealing with resources that are completely unutilized or orphaned yet paid at the end of the month.
Questions
- Where can you get a list of VMs to be right-sized?
- Which types of managed disk storage can you choose from (cheapest to most expensive)?
- Can you downsize a VM with no downtime/impact?
Further reading
- Migration best practices for costs: https://docs.microsoft.com/en-us/azure/cloud-adoption-framework/migrate/azure-best-practices/migrate-best-practices-costs
- On-resources throttling: