
Chapter 10
Design The Category Icons
Do you remember the icon from the header of the responsive article that represents the type of sight? And remember that a sight can fall into one of four categories, each with its own icon? Time to create these icons. The idea for all of them is to use basic shapes as often as possible, instead of custom vectors. While it might seem like a restriction at first, shapes are much easier to set up and modify, and you are still able to combine them into complex forms with the Boolean operations. Furthermore, we will use keyboard shortcuts as often as possible for maximum efficiency.
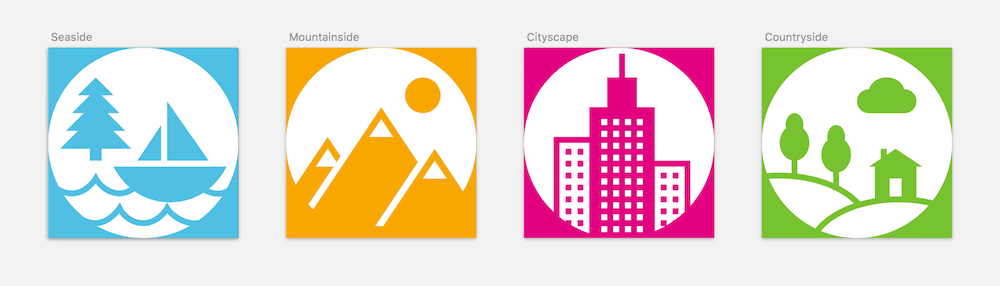
Fig. 10.1: The category icons we are going to create.
First, add a new page to house all four icons. Name it “Icons.” Each of the icons should be “64 × 64” pixels and be on its own artboard. Add the first one and change both the X and Y position to “0” for a clearly defined starting point.
The Seaside Category
Let’s start with the first icon, the one for the “Seaside” category. Be sure to use this name for the artboard. Change the background color to the blue (#55BFE1) from the category icon of the responsive article, but switch off Include in Export. Good that we saved it to the Document Colors earlier.
The first element for each icon is a white circle, the size of the artboard, which will also define its boundaries and act as a mask (Fig 10.2, left). Draw one after you have pressed O, and hold Shift to lock the ratio. The circle should start in the top-left corner. Name it “Mask.” Although the icons have an “8px” border in the article, let’s leave it out for the moment. We can add it later.
Because we want to the create a pixel-perfect icon, let’s set up a “2 × 2” grid now. To do so, click on View → Grid Settings… in the toolbar and enter a Grid block size of “2px” (Fig. 10.2, right). Thick lines aren’t necessary (insert “0” here). This grid not only allows us to place all of the elements of the icon on full pixels, but helps us to avoid blurry lines if we stick to icon sizes that are multiples or halves of 64 pixels. To employ this grid to the fullest degree, always make sure that shapes align exactly to the grid lines when you add or modify them. It’s good to assess the quality of the icon occasionally without the grid lines: You can press Cmd + G to turn them off.
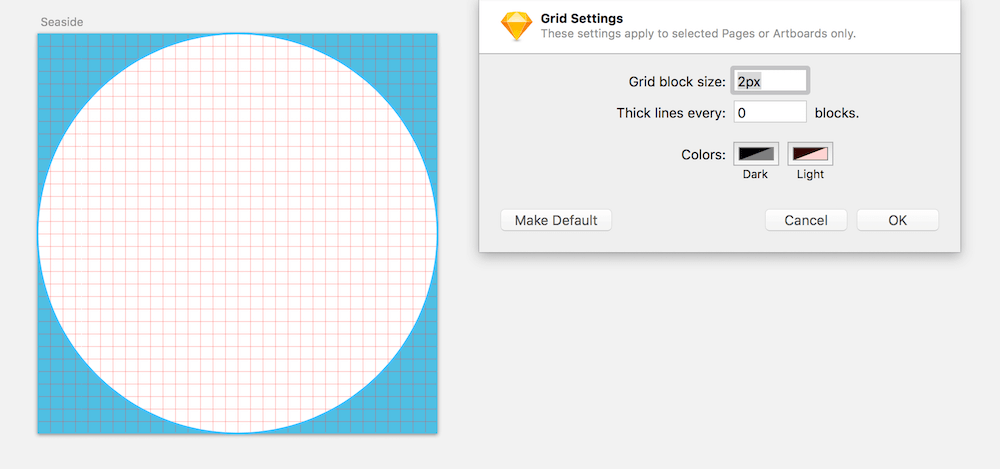
Fig. 10.2: The base for every icon is a circle, which also acts as a mask. A 2-pixel grid makes sure that all elements are placed on full pixels.
A Better View
To get a better view for what we’ll be doing, zoom in to about 800%. While it’s much easier to work on the details of the icon in this zoomed state, there is also the danger of losing a view of the overall quality. Luckily, Sketch Mirror helps here, especially if you have a second computer screen on hand. You can work on the first display in this zoomed-in state in Sketch, while the second display shows the original size.
Click on Mirror in the toolbar and the URL at the bottom-right of the dialog to open the design in the browser. There, select the “Icons” page at the top, and pick the icon or search for its name with the search function in the top-right corner to open it in a single view. Whenever you change something in Sketch now, it will immediately be reflected here. You can even set the currently selected artboard to automatically show in Mirror: Just enable Show current Artboard in the General tab of the Preferences.
The Tree
To gain some inspiration, I gave the icon search on The Noun Project1 a shot and browsed for some terms that I associate with the “seaside” theme. I landed on a boat floating on some waves and a tree representing the nature around the lake. This is the element we will begin with: It consists of three basic triangles for the branches and a rectangle for the trunk (Fig. 10.3). While Sketch offers a distinct triangle shape for the former, I much prefer to use a rectangle instead, because I’m more free to pick the alignment. Furthermore, it’s accessible with a keyboard shortcut.
For the treetop, press R and add a first rectangle with a size of “12 × 6,” aligned to the grid. Make sure that this applies to all shapes that you add from now on. Go into the vector point mode, hold Cmd and click on the upper line to add a point in the exact middle. After that, select the points to the left and right with a Shift-click. You can also drag a selection to each point, instead of Shift-clicking, if it’s hard to catch.
Now, delete these points, which will give us the desired triangle, and exit vector point mode. After that, duplicate the shape, either with Cmd + D or by holding Alt and dragging it down. In case you prefer the first method, make sure that Offset duplicated layers is switched off in the Layers tab of the Preferences, so that the duplicate stays at the same position as the original. After that, move the triangle down by 4 pixels. Either use the down arrow key or add “+4” to the Y field in the inspector. If the latter, press Esc to leave the input field.
This second triangle should be wider by 4 pixels and higher by 2 pixels. The fastest way to resize it is to hold Cmd and press the right arrow key until you’ve added 4 pixels. Keep holding Cmd and use the down arrow key in the same manner to make it 2 pixels higher. All of that can be done in the inspector, too.
Also create a duplicate of this second triangle, and modify it in the same manner: “4px” wider, “2px” higher, moved down by “4px.” Repeat the exact same steps for the fourth triangle. The last part of the tree, the trunk at the bottom, is a simple square, 4 × 4. After you have added all of the required shapes for the tree, select them and center them relative to each other with a right-click and then Align Center.
With all the parts still selected, make a Boolean operation of the type Union by pressing Alt + Cmd + U. This will add all of the shapes to a single layer and let you change the color at once to the same as the artboard’s background. Lastly, rename it to “Tree,” and move it to an X position of “4” and a Y position of “10” to leave room for the other parts.
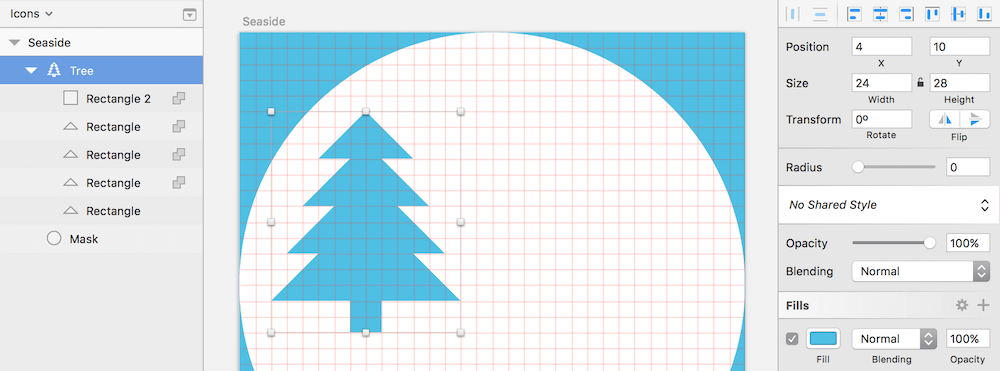
Fig. 10.3: The first element of the seaside icon: a tree.
The Boat
All right, let’s float over to the boat. It might not be obvious at first, but it also consists of three modified rectangles (Fig. 10.4). First, create a rectangle with the dimensions of “14 × 20” in the free space on the right side of the icon, for the larger sail. Enter vector point mode like before, which will select the top-left point, the starting point of the shape. However, the literal point of interest at the moment is the one in the top-right. Press Tab to jump to it, followed by Delete to remove it. Leave the vector point mode. Piece of cake.
Believe it or not, the second smaller sail is even easier. Duplicate the big sail, right-click and select Transform → Flip Horizontal. Jump to the inspector with Alt + Tab, move to the Width field with subsequent Tab presses, enter “8,” continue to the Height, and enter “12.” Press Esc to exit the field. Now, hit the left arrow key until the smart guides show that there is a gap of 2 pixels from the other sail. Also, move the smaller sail down with the down arrow key until both sails are on the same baseline. In the end, select both shapes to create another Union Boolean operation.
For the boat hull, add yet another rectangle of 38 × 12 pixels below the sails and a spacing of 2 pixels. After entering vector point mode, hold Cmd and click on the lower line to add a point in the middle. Press Tab to jump to the lower-left point, hit Delete to delete it, press Tab again, but this time in combination with Shift to go in the reverse direction until you reach the bottom-right point. Also delete it.
A triangular boat looks quite dull, so let’s fix that with a double-click on the lower point, which will change the type from a Straight to a Mirrored point. This action gives us not only a round shape but also two vector control points that define the curve. Drag either of them out to increase the roundness of it. Looks good.
Leave vector point mode and select the boat hull together with the group of sails. Center them horizontally, but then move the sails one pixel to the right so that they are aligned to the grid again. Finally, select them all together and add them to the same group with another Union operation. Change the color to match the other parts of the icon. Rename this group to “Boat,” and change the position to “22” (X) and “18” (Y). Now let’s hide it with Shift + Cmd + H, so that we have an unobstructed view for the last part of the icon.
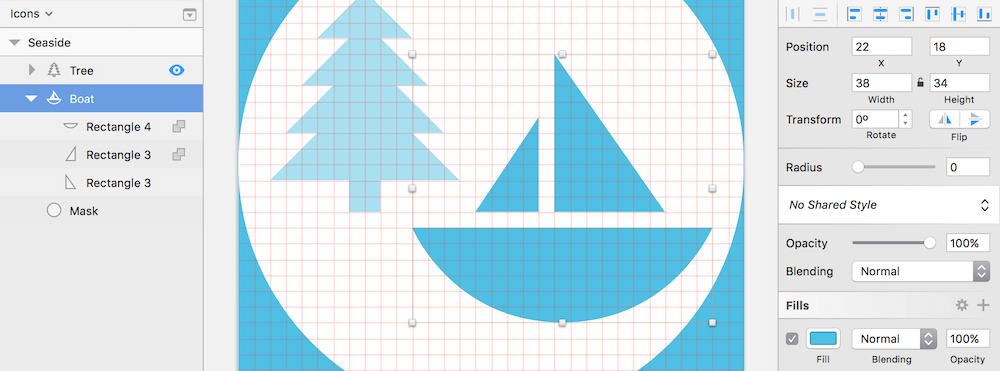
Fig. 10.4: The boat marks the second element of the icon. I’ve temporarily reduced the opacity of the tree to highlight the boat shape.
The Waves
A boat can’t float in the air; we need some water to carry it. The waves increase the difficulty level slightly, but with a few cleverly placed shapes, they’re easy to do. The waves are formed by a row of ovals with a border, which forms the actual wave line.
The starting point is a single oval. Draw one with dimensions of “16 × 12.” Add it at the left edge of the icon, below the tree, so that you have room for the subsequent copies. Hold Alt and drag a copy to the right until both of the elements touch and are on the same line. Now, press Cmd + D to add elements with the same spacing until you have a total of four ovals. Still doesn’t look like waves. A step in the right direction is to select all of these shapes so that you are able to form a Union Boolean operation. Make sure that this group is centered to the artboard horizontally.
One element is still missing, a rectangle of “64 × 28” pixels, where we can carve the ovals out to form the final waves. Move it vertically until its upper side is centered to the ovals; also, center it horizontally to the artboard (Fig. 10.5, 1). Now, drag the rectangle into the Boolean group in the layers list, but ensure that it is in the bottommost position. Finally, select all of the ovals again and change their Boolean type with a click on Subtract, the small icon next to the layers in the layers list (Fig. 10.5, 2). Now we’re getting serious.
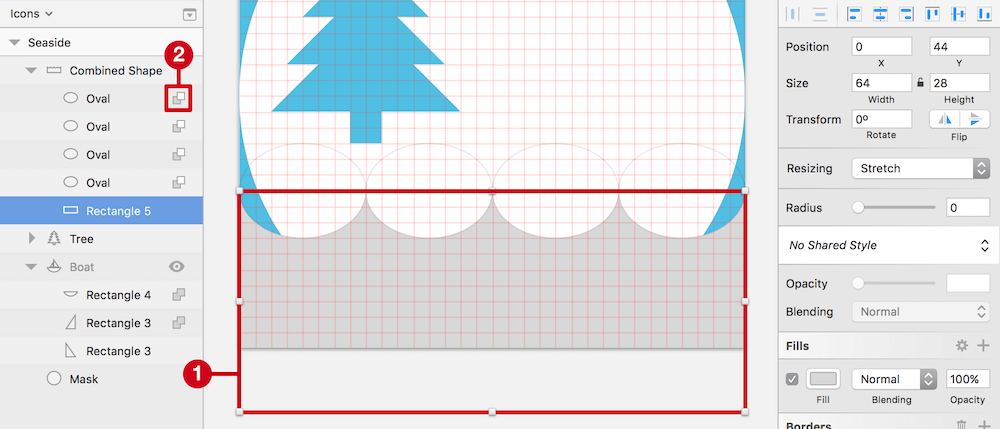
Fig. 10.5: The waves are formed by four ovals that are subtracted from a rectangle (1). Change the Boolean type with the little icons in the layers list (2).
Complete the waves by adding an Inside border with a Thickness of “2px” to the combined shape, and assign it the same color as everything else. Just like with the fill color, you can use the color picker with Ctrl + C to do this, but you’ll need to remove the fill with F first (we won’t need it anyway). Finally, name this Boolean group “Waves top,” and move it to a Y position of “42.”
To create some movement, add a second line of waves, offset to the right by “8px,” half the width of an oval. The final Y position for this second line of waves is “52,” and the name should be “Waves bottom” (Fig. 10.6). If you select the “Boat” group in the layers list now and unhide it, it will float nicely on the upper water line.
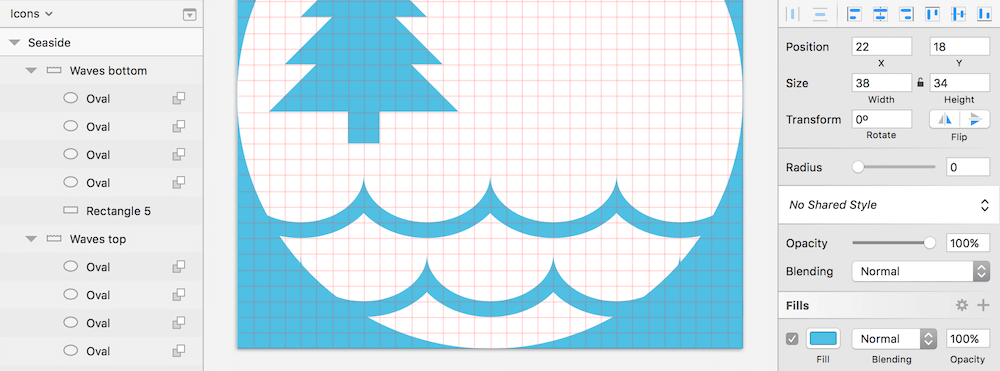
Fig. 10.6: The finished waves: two wave lines, offset by 8 pixels, create some movement.
To finish it up, combine everything into an “Icon” group so that it’s easier to grab the whole package at once. Also, change the white circle in the back to a mask with Ctrl + Cmd + M, so that everything outside of this shape is clipped; it needs to be in the bottommost position for this to work. For the finished icon, have a look at Fig. 10.1.
Pixel Preview
Before moving on to the next icon, let’s have a look at how the current one might look in the browser. Because Sketch is based on vectors instead of bitmaps, you can get fooled pretty quickly by everything looking sharp and clean no matter how much you zoom in. The reality, once the assets land in the browser, is different.
While this isn’t much of a problem for SVGs, because they are also vector-based, PNGs and JPGs often don’t look nearly as good as they do in Sketch. To remedy this, at least to a certain degree, have a look at the pixel preview regularly, with Ctrl + P. It’s not 100% accurate, especially with text, but it gives you a good idea of how your assets will look when exported. Because we’ve adhered to a strict grid for the icon, we can expect nothing less than a perfect result once the pixel preview is switched on. However, always give this mode a look occasionally. For the most accurate result, use it at a zoom level of 100% and switch off the grid.
The Mountainside Category
More and more, you are becoming an icon master. Let’s ride this wave of success and take on the second icon. This one’s for the “mountainside” category, so mountains will play a big role here. We don’t need to redo all the groundwork again; we can take the “seaside” icon as a base. Duplicate it, rename it to “Mountainside,” and remove all elements except the circle. Change the background color of the artboard to the orange that you saved to the Document Colors earlier (#F5A623).
Now for the content. The first and easiest element is the sun in the top-left, a colored circle, “12 × 12,” placed at a position of “40” (X) and “10” (Y). Be sure that it is within the “Icon” group (like all of the other elements we will create) and rename it to “Sun.”
With this easy win under our belt, let’s tackle the first mountain, which is based on a rectangle again. Create it in the same manner as the branches of the tree before: Add a rectangle, sized “40 × 30,” activate vector point mode, and create a new point in the middle of the upper side with a click. Alt ensures that it is added in the exact center. Press Shift + Tab to jump to the previous point, delete it, press Tab again to select the top-right point, and remove it, too. Name this shape “Base.”
Let It Snow
Summer hasn’t reached the top of the mountain yet, so there’s still some snow remaining at its peak. We will add it with the help of another much smaller triangle that is separate from the bigger shape. Duplicate the triangle and resize it on the canvas. Hold Shift (to maintain the aspect ratio) and drag the bottom-middle handle up until it has a size of “8 × 6.” Name it “Snow.”
With both shapes selected, perform a Subtract Boolean operation with Alt + Cmd + S, which will cut the smaller shape out from the bigger. Enter this new group with a double-click on the canvas and select the small triangle; move it down by “4” pixels (Fig. 10.7). It has snowed! Leave the group again, bring it to a position of “–6/30” in the inspector, assign it the same color as the background of the artboard, and name it “Mountain left.”
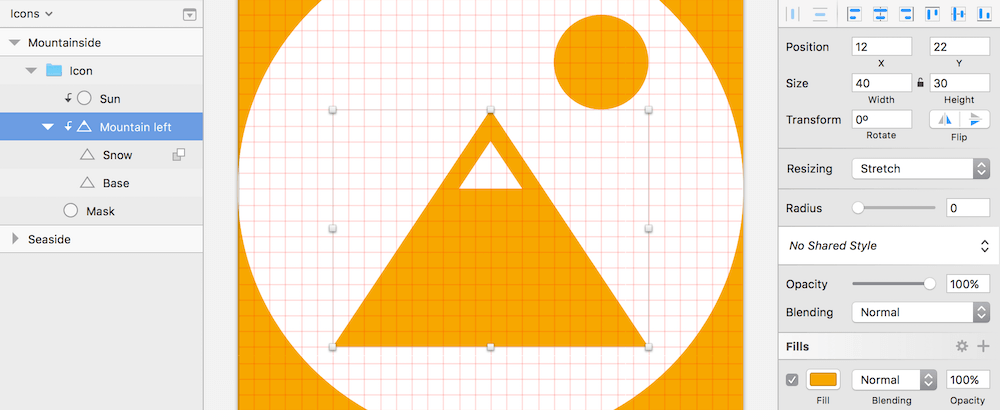
Fig. 10.7: The initial elements of the mountainside icon: a sun and the first mountain. Please note that the mountain isn’t on its final position yet, to show the full shape.
Big and Small
The second mountain on the right is just a copy, but in a different position. Duplicate the Boolean group, rename it to “Mountain right,” and set its position to “30” (X) and “34” (Y). For the third bigger mountain in the middle, we need another copy. Move it to the middle of the artboard so that we can better see what we are doing. Now, double-click on the Boolean group on the canvas, which will select the big triangle. Like before, the easiest way to retain the position and just make the shape higher is to use the middle handle at the bottom. Hold Shift to retain the ratio, and drag the handle down until the shape is 48 pixels high. Leave the Boolean group, center it horizontally, and rename it to “Mountain center.”
Everything looks fine — well, except for the fact that it’s quite hard to distinguish between the mountains. A separation line for each would help. Actually, we’ll be taking the outer shape of one mountain and inserting it in the Boolean group of another to subtract it. First, make sure that the rightmost mountain is on top in the hierarchy of the layers list (bring it up with Ctrl + Alt + Cmd + Up), followed by the middle mountain and the small one. The white circle should still be at the bottom.
To create the separation line, select the big shape of the middle mountain with a double-click on the canvas, copy it, enter the group of the left mountain with another double-click, and paste this shape here. This will insert the shapes at the same position as before but automatically applies a Subtract Boolean operation. Now, move this triangle up by “4” pixels until there is clear separation between the mountains (Fig. 10.8); this should be at a Y position of “16.” Rename it to “Separation.”
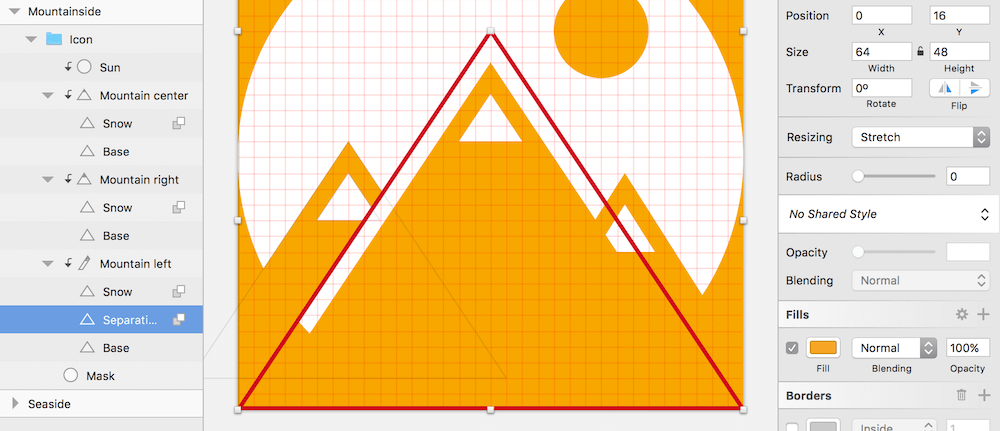
Fig. 10.8: The three mountains are completed. To differentiate them, a copy of the big mountain’s shape (red line) is inserted and subtracted from the left mountain (and subsequently also from the rightmost mountain, not depicted. See Fig. 10.1 for the finished icon).
Do the same for the big mountain. Enter the Boolean group of the rightmost mountain with a double-click, copy the “Base,” switch to the group of the middle mountain, insert the separation shape with Cmd + V, and move it up by “4” pixels (to a Y position of “30”). Also, rename it to “Separation.” Goal achieved!
The Cityscape Icon
That was fun! The third icon, for the “cityscape” category, is quite different from the other two because it consists solely of unmodified rectangles, but plenty of them. They form three skyscrapers with a bunch of windows. As before, duplicate one of the other two icons to get a solid base, remove all redundant shapes (everything except the white circle in the back), and rename the artboard to “Cityscape.” After that, change the background to the third bright color we used for the category lines of the responsive article: the purple (#E01081).
The Foundation
To start, create a rectangle with a size of “14 × 38,” which will form the leftmost skyscraper. Assign it an inside border of the icon’s color, with a Thickness of “2,” but switch off its fill with F first. Move it to a position of “10” (X) and “30” (Y), and name it “Base.” This building will be inhabited by a huge number of people: Each of them needs a window for some fresh air and light. Create the first window in the top-left with a rectangle sized “2 × 2.” Move it away “2” pixels from the border, both horizontally and vertically, name it “Window,” assign the icon color, and drag it into the “Icon” group together with the base shape of the building.
The easiest way to get the remaining windows is to the Make Grid function that you got to know earlier: Select it from Arrange in the menu bar. We need “8” rows with a Margin of “2px” and “2” columns with the same spacing. A click on Make Grid automagically adds the missing versions (Fig. 10.9). Select all of them in the layers list and create a “Windows” group, in which you should add to a “Skyscraper left” group in turn, together with the building’s shape.
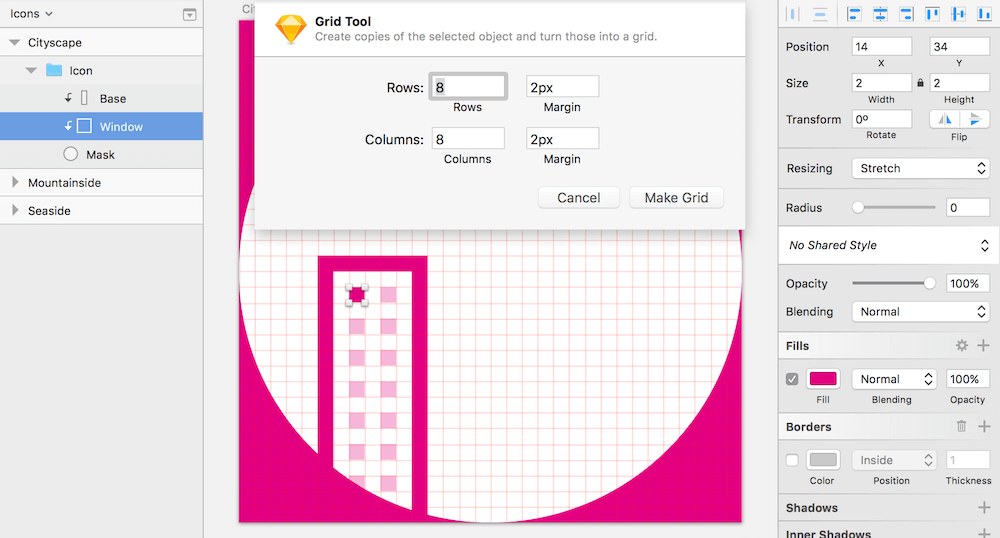
Fig. 10.9: Create the first window, and add the remaining with the Make Grid function. Please note that they are depicted in the screenshot, but with reduced opacity.
In Demand
The city is big; it needs more room for people to live. To do this, duplicate this first skyscraper and rename it to “Skyscraper right.” Press Alt + Tab to jump into the X field of the inspector, enter “42,” use Tab again to cycle to the following Y field, fill it with a value of “38,” and end with a press on Enter and Esc.
We’re still not finished; people keep moving into the city, so we need to construct another building. Luckily, we already have the blueprints, which will make its creation a snap. Add another rectangle, and drag it to a size of “22 × 44” (or set these dimensions in the inspector). The name should be “Base,” like before. Instead of a border, we need a fill with the same color as the remaining elements. Use the color picker, with Ctrl + C, to take it over from the other shapes.
To let some sunlight into the building, we will create some windows in the same manner as above: Add a first white rectangle with a size of “2 × 2,” “4” pixels away from the top-left corner of the building; name it “Window.” Select both of these shapes, and set up a Subtract Boolean operation with Alt + Cmd + S to remove the window from the skyscraper and make the background visible.
Just like before, use the Make Grid function to create the remaining windows. This time we need “10” rows and “4” columns, with a Margin of “2px” each. Because this duplication is supposed to happen in the Boolean group, these new versions will get removed from the base shape of the building (Fig. 10.10). Press Esc to leave the Boolean group, hit Cmd + R to rename it to “Skyscraper middle,” and move the skyscraper between the other two buildings, at a position of “22” (X) and “20” (Y).

Fig. 10.10: In contrast with the other buildings, the skyscraper in the middle consists of a shape with a fill, where the windows are carved out with a Subtract Boolean operation.
Finish It Up
The last two elements we need are a rectangle with a size of “10 × 10” for the upper part of the building (Y: “10”) and another one sized “2 × 8” (Y: “2”) to form the stylized antenna. They should sit on top of each other and be centered to the building. Select them together with the skyscraper and perform a Union operation, which will add the new shapes to the existing Boolean group. We’ve just made so many people happy by giving them a new home. Good job!
The Countryside Icon
If you look at all of the icons we have designed so far, you may notice a common theme: In each icon there is at least one element that has a border of “2px,” while other parts are filled shapes. This makes for a kind of familiarity and brings the icons together as a family. This is especially important if you design icons that are part of a set or need to be used in the same place. Furthermore, this mix of styles creates some variety: On one side, there are the “heavy” shapes with a fill; on the other side, you have these “light” elements to balance them off. For more tips on icon design, have a look at this brilliant article by Scott Lewis on Smashing Magazine2.
Of course, we will continue in the same fashion for the last icon: the one for “countryside,” which represents destinations in rural nature, outside the hustle of the city. For this reason, it contains some gentle hills, a cosy cabin and some trees that represent the green of nature. However, life’s not all sunshine, so we have a cloud instead of the sun from the “mountainside” icon.
Like before, duplicate one of the other icons, delete everything except the encompassing circle in the back, rename the artboard to “Countryside,” and change the color of the background to last remaining color that we’ve saved to the Document Colors in the course of the responsive article. Which hue other than green (#79C03D) could better fit this feeling we’re after?
A Good Start
Let’s start with the hills for a solid base. The first one is an oval of “60 × 36,” placed at “16” (X) and “51” (Y). Press O to create this oval, but instead of drawing it exactly with these properties, choose a random size at first. And then jump immediately into the inspector with Alt + Tab to enter these X and Y positions as well as the width and height.
Changing these properties afterwards is always easier than fiddling around on the canvas to catch the right measurements. Once I have placed shapes on the canvas, I also prefer to move and modify them with the keyboard instead of the mouse, because this is much more precise and easier to handle. Remember that you can use the arrow keys to move a shape and also hold Cmd to resize it. For bigger distances, add Shift to the mix.
Continue by giving the hill a white fill; for the border, choose the background color of the artboard. The thickness should be “2px”; for the position, select “Center.” This is also the reason why I chose an odd Y position earlier, because the border itself would be at an odd position otherwise (Fig 10.11, red lines).
To create some perspective, add another hill in the back. The first one can act as a model, so duplicate it and move it one step back in the layer hierarchy with Alt + Cmd + down arrow. The only thing we need to change with it is the position: move it to “–24” (X) and “43” (Y). The white background will ensure that they cover each other (Fig. 10.11).
Name this one “Hill back” with Cmd + R. Press Shift + Tab to jump to the other hill, but remain in renaming mode, and enter “Hill front” for this layer. Finally, make sure that both of these shapes reside in the “Icon” group so that they are masked by the circle.
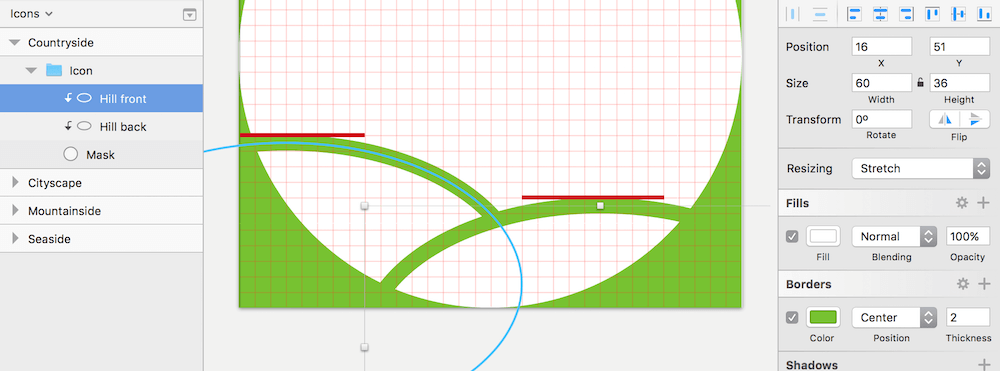
Fig. 10.11: Some gentle hills. The white fill color ensures that they cover each other. They both have an odd Y position, but due to the centered border, the shapes are aligned to the grid lines again (red lines).
Luxuriant Vegetation
Time to plant some trees in this newly created soil. Icons in a set should not only be coherent with each other, but also coherent individually. In the “seaside” icon, the pointy tree and the boat have a similar style; the “mountainside” icon has three equal mountains; and in the “cityscape” icon, we have these rectangular buildings with similar windows. The theme for the current icon is ovals, which are also the base for the trees.
I continue to emphasize that the easiest way to create icons or parts thereof is to use basic shapes and then combine them into entirely new forms. Of course, you could also draw a vector by hand with V for the plant, but two ovals do a better job because they are easier to create and their curves look way smoother. Draw a first oval with a size of “6 × 8” in the free space above the hills. Duplicate it and use Alt + Down and Alt + Right to resize it to “10 × 12.” Now, move it down by 4 pixels and select it together with the upper smaller oval, and center them horizontally by right-clicking and selecting Align Center.
The last element of the tree is the trunk, a rectangle that’s “2 × 8.” Place it at the bottom of the bigger oval so that they overlap by 2 pixels vertically. Also, center it horizontally relative to the other two shapes. After that, select all of them and perform a Union operation. This allows you to match the color of all of the layers to the artboard’s background at once. The name of this Boolean group should be “Tree.” Lastly, plant it into the leftmost hill at a position of “6” (X) and “22” (Y). In nature, it takes years for a tree to grow to a mature size; in Sketch, it’s a matter of seconds to get a second tree: press Cmd + D and change the position to “20” (X) and “26” (Y).
A Cabin in the Woods
The left hill is taken care of now, so let’s turn our attention to the right part. It should also be populated, but with a different kind of element: a small cosy cabin. Some basic shapes are enough to suggest this type of building: first, a rectangle with a size of “14 × 12,” duplicated and placed above to form the roof. Use a value of “18c” in the width field to change its size, from the center. For the height, enter “6b,” resized from the bottom to keep its position at the top of the cabin. Like before, modify it in the vector point mode to create a triangle. Enter vector point mode, insert a new point at the top side while holding Cmd, press Alt + Tab to jump to the point before, delete it, press Tab to jump to the point after, and delete it also. Lastly, combine these two shapes with Union.
People should be able to enter the building; so, we’ll need a door. Draw a new rectangle at the bottom of the cabin, with a size of “4 × 8,” but change its fill to a lighter color (not white), so that you are able to place it properly. Select it together with the Boolean group and center them horizontally. Don’t worry that neither the rooftop nor the door align exactly to the grid; it’s OK to make exceptions from time to time.
Now, drag the door into the Boolean group in the layers list. You may need to change the order for the door to be above the other shapes so that you can change the Boolean type from Union to Subtract using the small icon next to the layer’s name. Remember that big shapes should always be at the bottom. The further up a shape is in the layer hierarchy, the smaller it should be.
We’ve already enabled people to enter the cabin with a door, but they should also be able to spark a fire to create a cosy atmosphere. A chimney will help to draw the smoke away. Create it with a size of “2 × 4” pixels and align it to the top of the rest of the building. Use the arrow keys to position it 4 pixels from the left edge of the roof. Remember that you can press Alt and point there to show the distance.
To finish the cabin, move the chimney to the Boolean group, at the topmost position, name it “Cabin,” position the group at “36” (X) and “34” (Y) in the inspector so that it sits nicely on the hill, and change the color to match the rest of the icon.
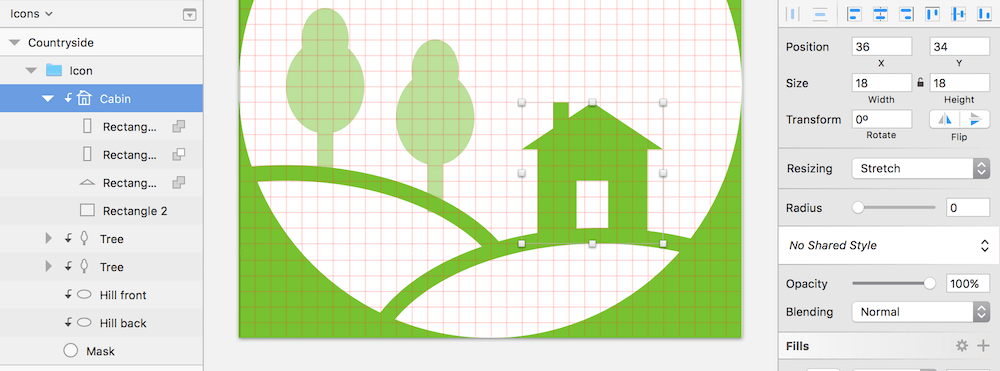
Fig. 10.12: The cabin consists of three rectangles and a triangle, combined in a Boolean group. Please note that I have reduced the opacity of the tree to highlight the house.
Cloudy Sky
There’s quite a bit of room above the existing elements now. I did it on purpose to leave some space for one last element. There’s already a sun in the mountainside icon, so I decided to have a try at a cloud instead. Add a circle with a diameter of “8px” first. Remember to hold Shift to lock the ratio and create a uniform shape instead of an ellipse. Duplicate this circle and offset it to the right by “14px” with the right arrow key and the one-time help of Shift.
Now, add a rectangle that not only connects these two ovals but also forms the bottom of the cloud. It should be “12 × 4” and should start at the center of the left circle. The smart guides show you exactly this position when you add the rectangle. Combine all of the elements so far with a Union Boolean operation (press Alt + Cmd + U).
Now for the upper part of the cloud, which is formed by another oval sized “12 × 10.” Center it to the Boolean group horizontally, but let it stick out “4px” upwards. Finally, move it into this group in the layers list, change the group’s position to “32” (X) and “10” (Y), change the name to “Cloud,” and change the color to that of the other elements in the icon. Be sure that all elements are in the “Icon” group, so that they are masked properly. Congratulations, you’ve just finished the last category icon.
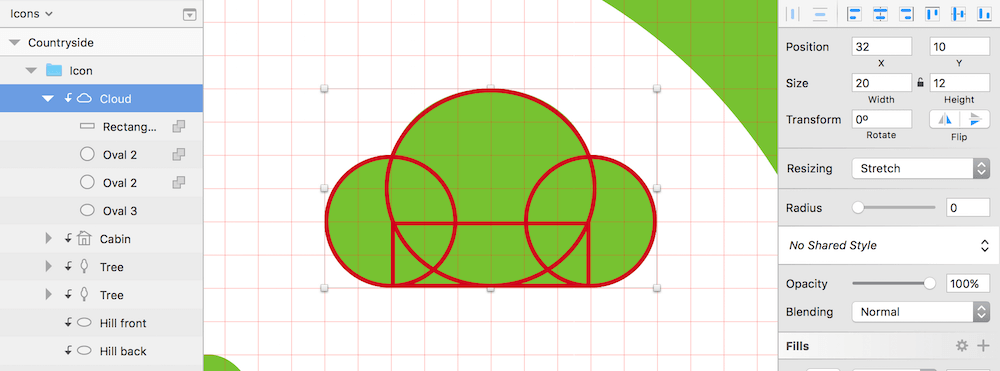
Fig. 10.13: The shapes that form the cloud are all combined with a Union operation.
With all of this design work behind us, we can a look at how to export the icons in the next chapter.