• KEY VI •
IT’S ALL ABOUT YOUR EYE LEVEL
Your eye-level line is not only important because it is where most of the vanishing points can be found, it’s useful in all kinds of amazing ways.
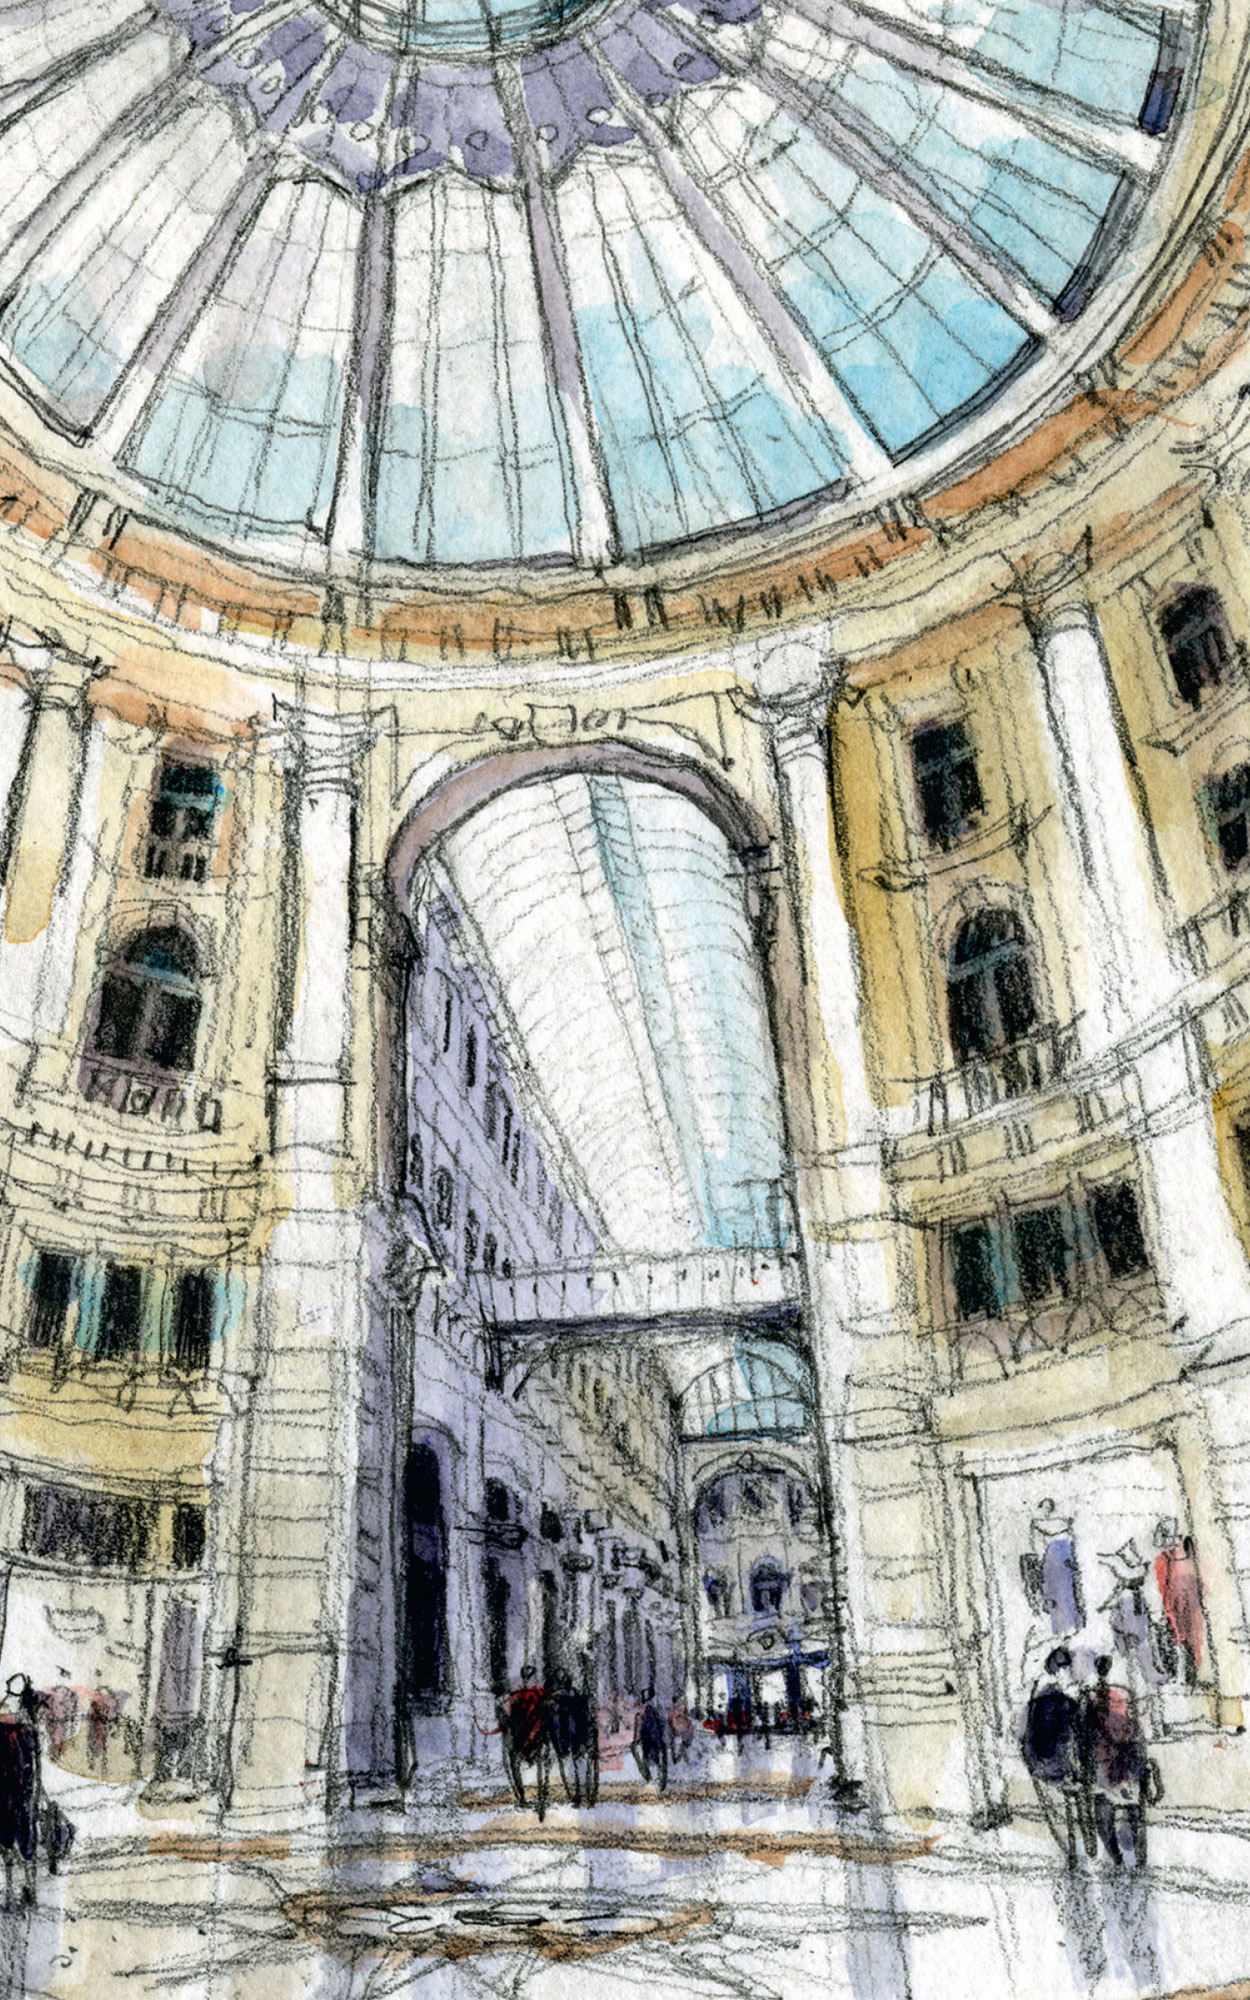
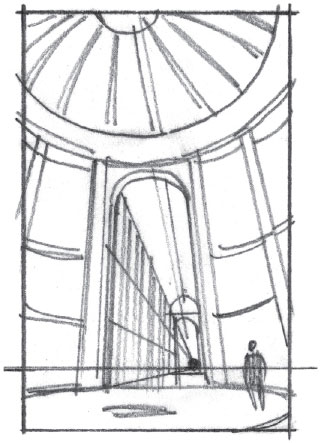
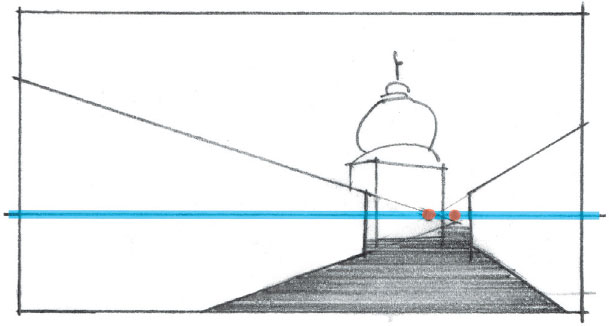
Even though the focus of this sketch is looking up to the glass dome, the eye level and vanishing point for the perspective are low and close to the ground.
STEPHANIE BOWER, USA
Passage Den Haag
8” × 5” | 20.3 × 12.7 cm; Mechanical pencil and watercolor in Pentalic Aqua Journal; About 45 minutes
 59. Think eye level, not horizon line.
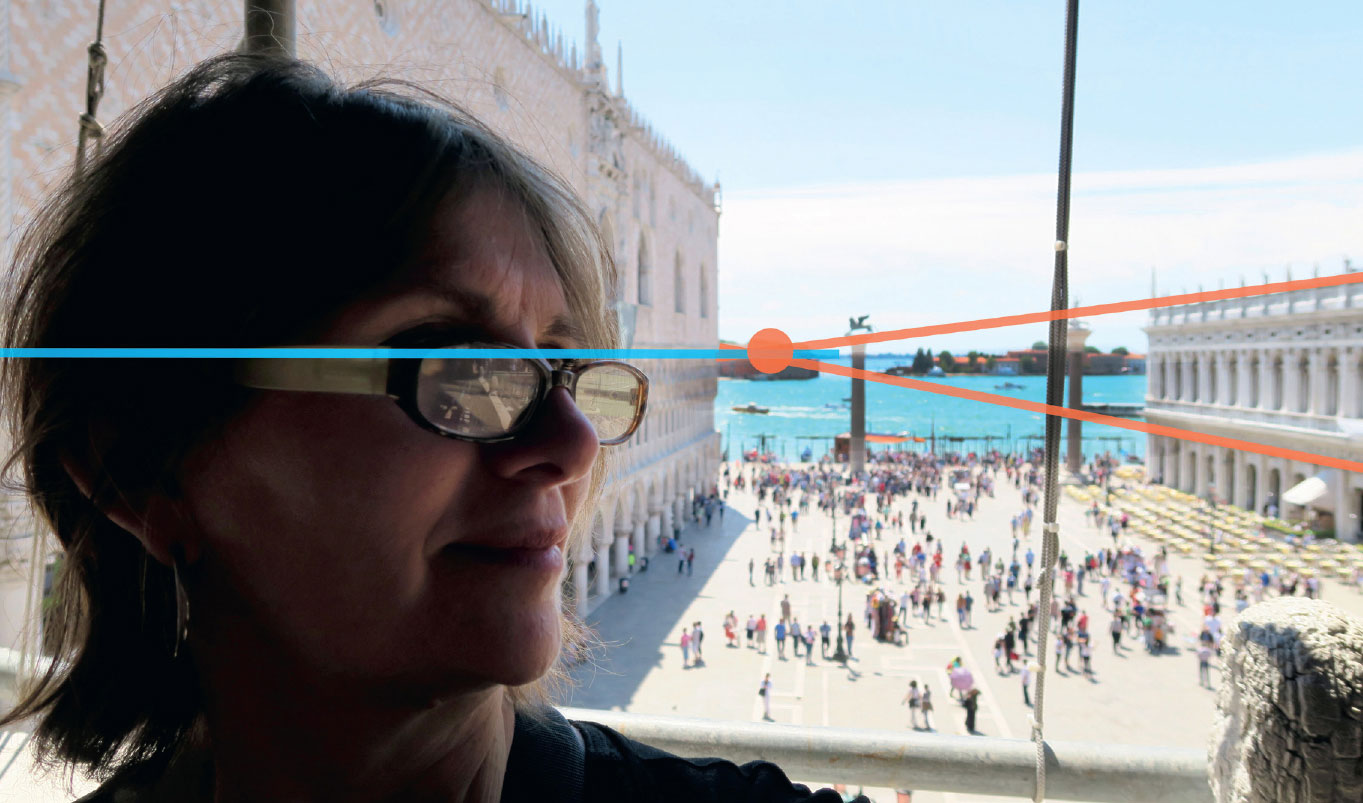
We know that when parallel lines recede from us, they appear to intersect at one point in the distance called the vanishing point (VP). That point is on what is typically called the horizon line, literally the line at the horizon where the flat ground or ocean meets the sky.
The problem with this term is that unless you are sketching at the beach, you probably won’t see the horizon. It’s more useful for sketchers to think of this important line in a different way. Lucky for us, we have a unique relationship to the horizon line—it aligns with our eye level!
Take a look at this photo from Venice. I’m standing on an upper floor looking down, and the line where the water meets the sky, the horizon line, is literally at my eye level. The VPs for the buildings are also on this line.
60. Lines appear flatter the closer they are to your eye level.
Technically speaking, this concept is called foreshortening. The closer lines and shapes are to your eye level, the flatter they appear, and they completely flatten to a horizontal line at your eye level. Knowing this is useful for drawing all kinds of things such as floor lines on buildings or courses of brick or stone. The flattening of lines indicates where you can find your eye-level line and vanishing points, too.
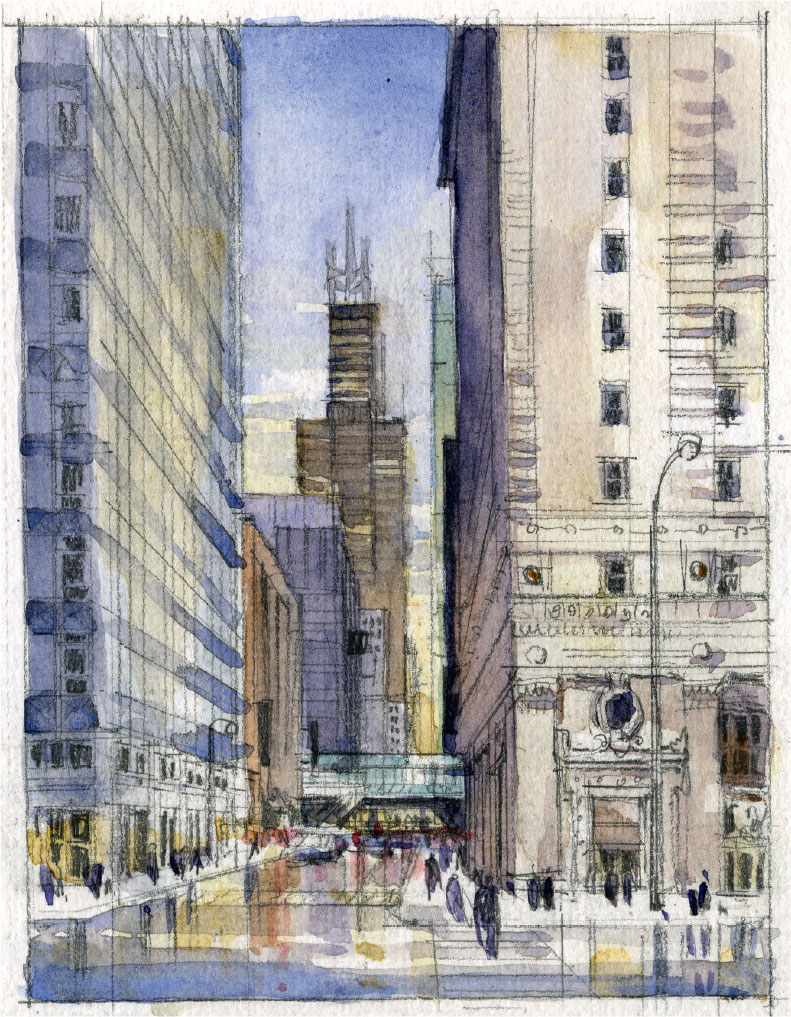
STEPHANIE BOWER, USA
Chicago
6” × 4” | 15.2 × 10.2 cm; Mechanical pencil, watercolor in Pentalic Aqua Journal. 45 minutes

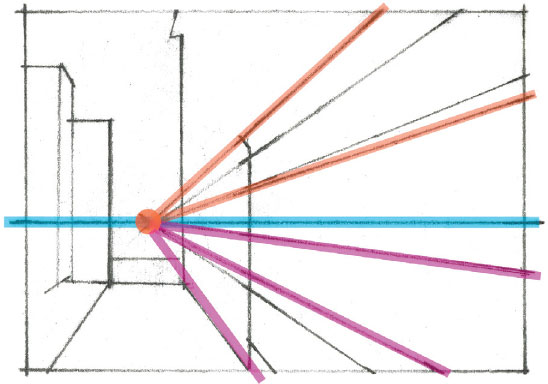
61. Lines above eye level angle down. Lines below angle up.
Once you find your eye-level line is, it’s easy to figure out where other lines go.
Lines above your eye-level line (blue) will angle down to a vanishing point (orange), while lines below your eye-level line will angle up (pink).
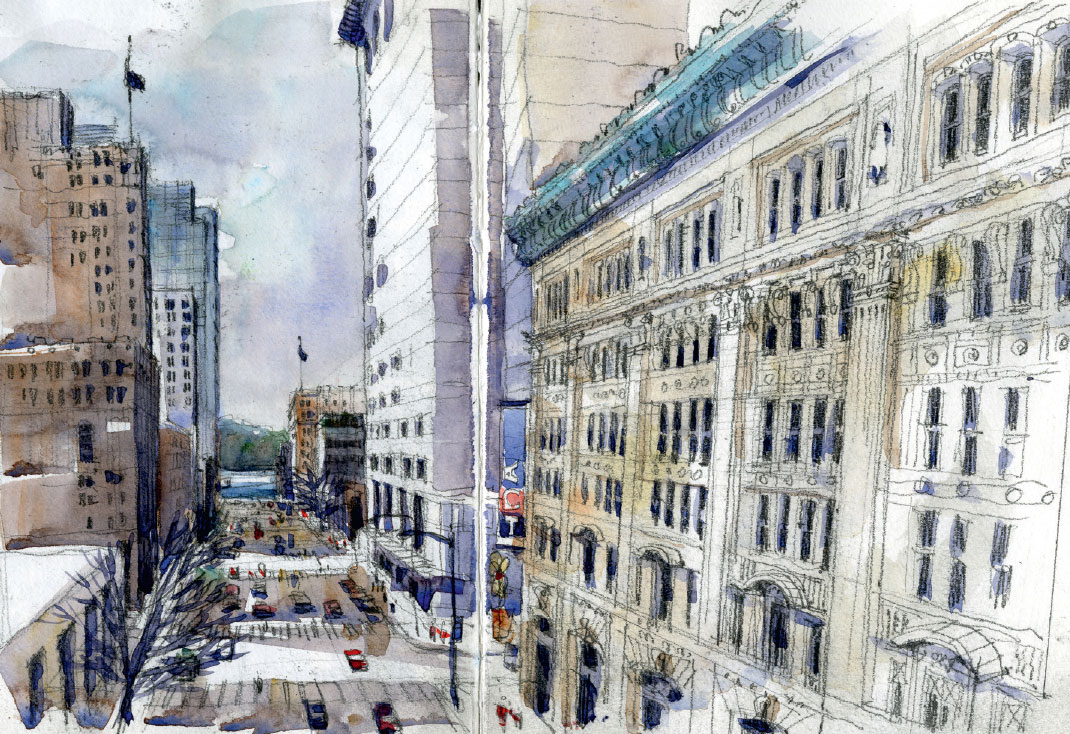
STEPHANIE BOWER, USA
Downtown Seattle
8” × 16” | 20.3 × 40.6 cm; Mechanical pencil and watercolor in HandBook sketchbook; 1.5 hours
62. Don’t bump your head!
A common error is to draw the tops of doors angling up in a street view. The top of a door is above your head and thus above your eye level—it has to angle down to the vanishing point! Drop in a person to check!
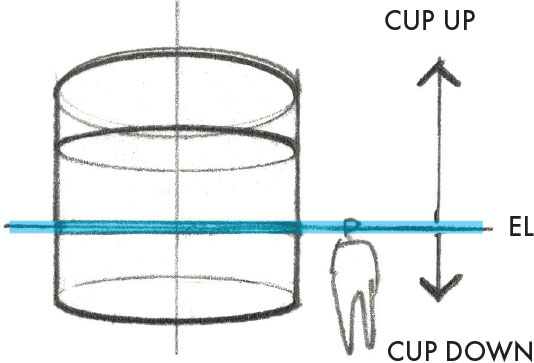
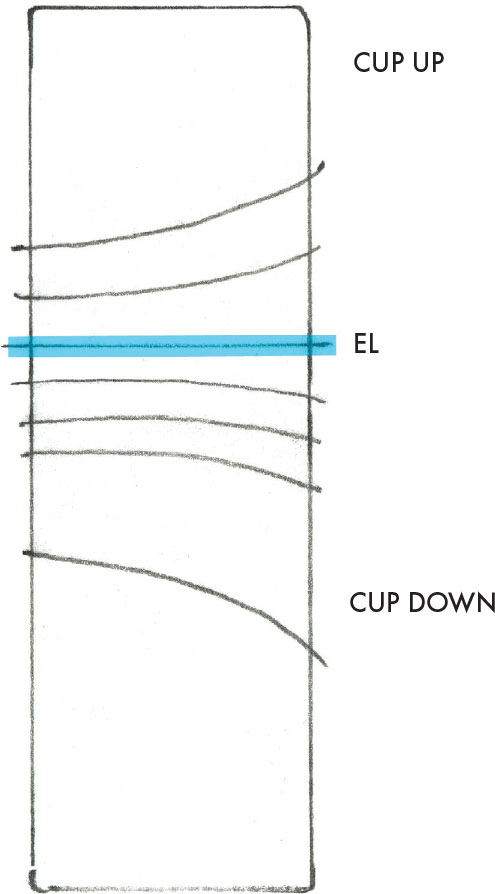
63. For curves, think cup up or cup down.
In perspective, rounded forms appear as ellipses. At your eye level, shapes flatten to a horizontal line. Use both these concepts to correctly draw curves!
If you are standing inside a curved space:
Curving lines above eye level are “cup up,” that is, they can hold water.
Curving lines below eye level are “cup down,” that is the water spills out.
If you are standing outside the curved space, it’s the opposite!
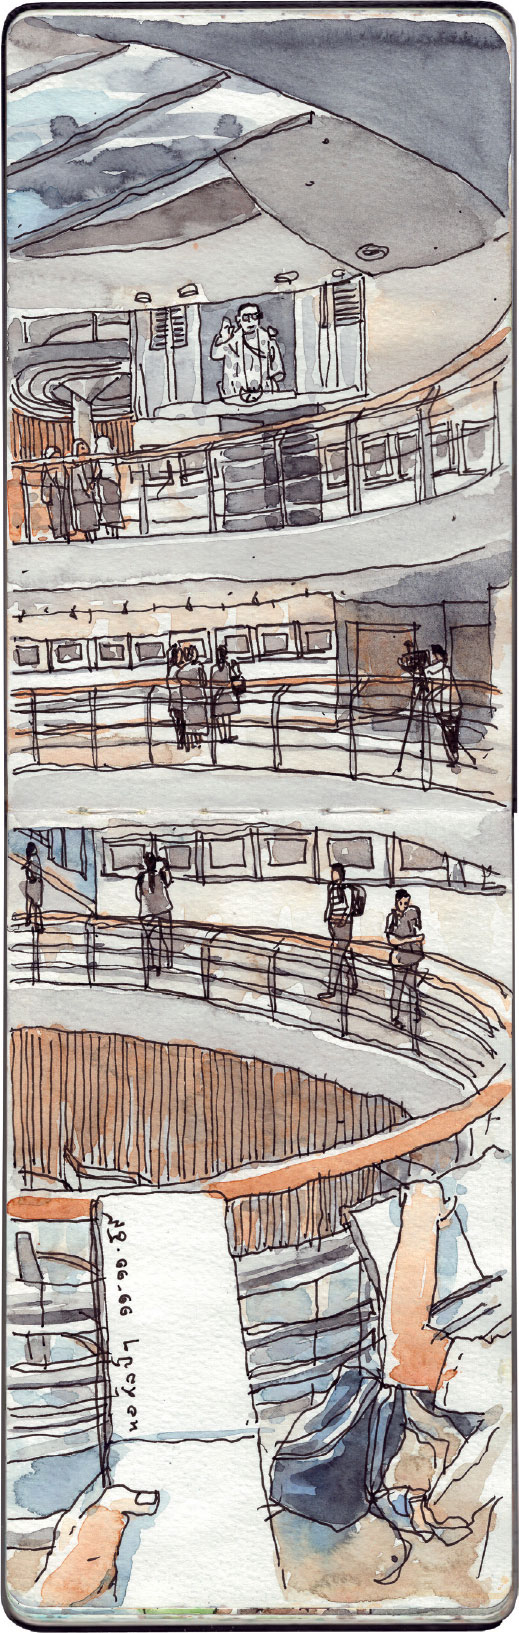
PRAYUT SAE-AUNG, Thailand
Bangkok Art and Culture Centre
16” × 5” | 40.6 × 12.7 cm; Sakura Pigma Micron 0.50 mm and watercolor in Moleskine large watercolor notebook; About 40 minutes
64. If a building face twists left or right, its VP twists left or right, too, … along your eye-level (EL) line.
Lots of modern cities are built on a grid pattern, and that makes drawing in perspective relatively easy. But what if you are in Paris or Old Delhi? Remember, lines that are parallel to each other recede to the same VP. This means that every surface that twists off the grid will generate a new VP!
If a surface twists to the right, its VP shifts to the right along your EL line.
If a surface twists to the left, its VP shifts to the left on your EL line.

At first glance, the sides of the street look parallel.
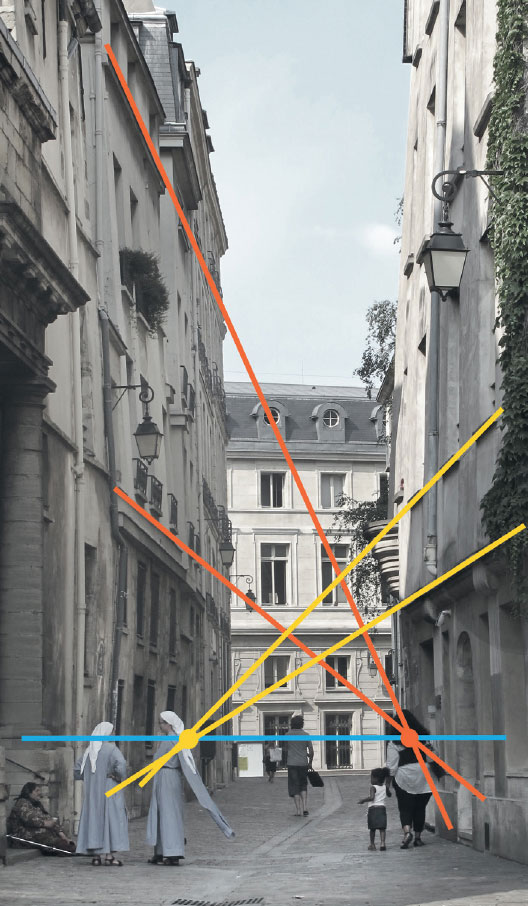
But in extending building lines and finding the VPs, we discover they are not!
65. Don’t use the ground to find your vanishing point/s.
If the ground plane is even a little bit sloped, it will throw off the location of your vanishing point! Instead use the horizontal lines on the buildings. It’s more likely that the tops of windows, decorative moldings, and roof edges will be true flat, horizontal lines receding to the VP on your eye-level line.
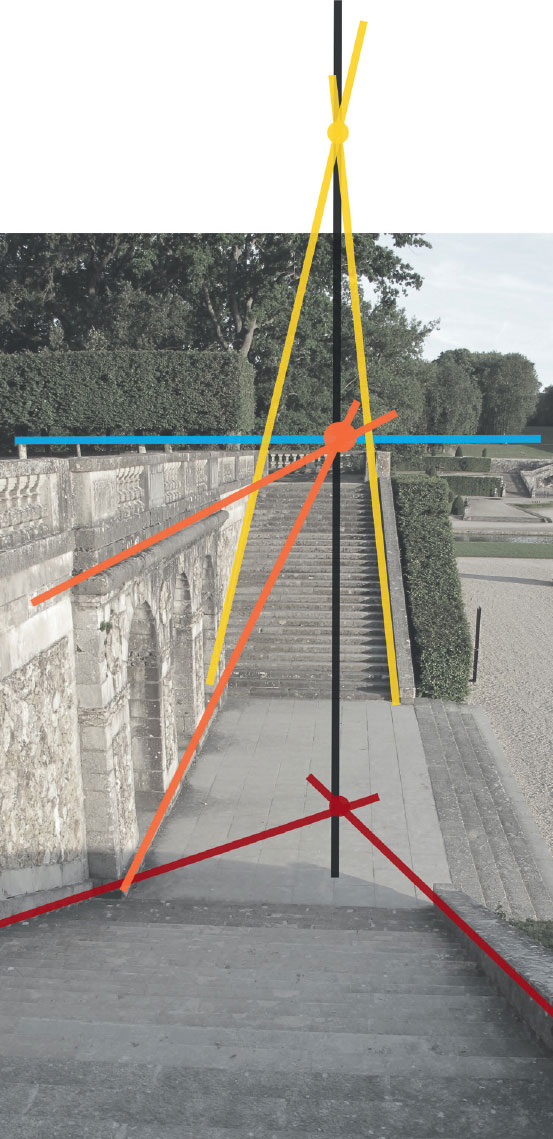
66. If a surface tilts up or down, its VP pops up or down, too, relative to your eye-level vanishing point.
A flight of stairs, a slanted roof, an uphill road … each is a surface that slopes up or down and will generate a new vanishing point up or down.
If a surface slopes up and away from you, its VP will pop up.
If a surface slopes down and away from you, its VP will pop down.
The trick is that these new vanishing points are typically directly above or below the vanishing point on your eye-level line!

1. Start by finding the vanishing point at your eye level (orange). 2. Draw a vertical line through that point (gray). 3. Extend the lines at the edges of the stair to find the vanishing point in the sky (yellow) or below the ground (red).
67. Consider your eye level when populating your sketch.
Your eye level is basically the height of your eyes above the ground. Depending on how high you are, you’ll see other people below you (aerial view), above you (worm’s-eye view), or at your eye level (eye-level view).
Aerial
In an aerial sketch looking down, other people’s heads are below your eye level. The figures closest to you are lowest and largest in your sketch, the people in the distance are smaller and their heads are higher on the page, closer to your eye-level line.
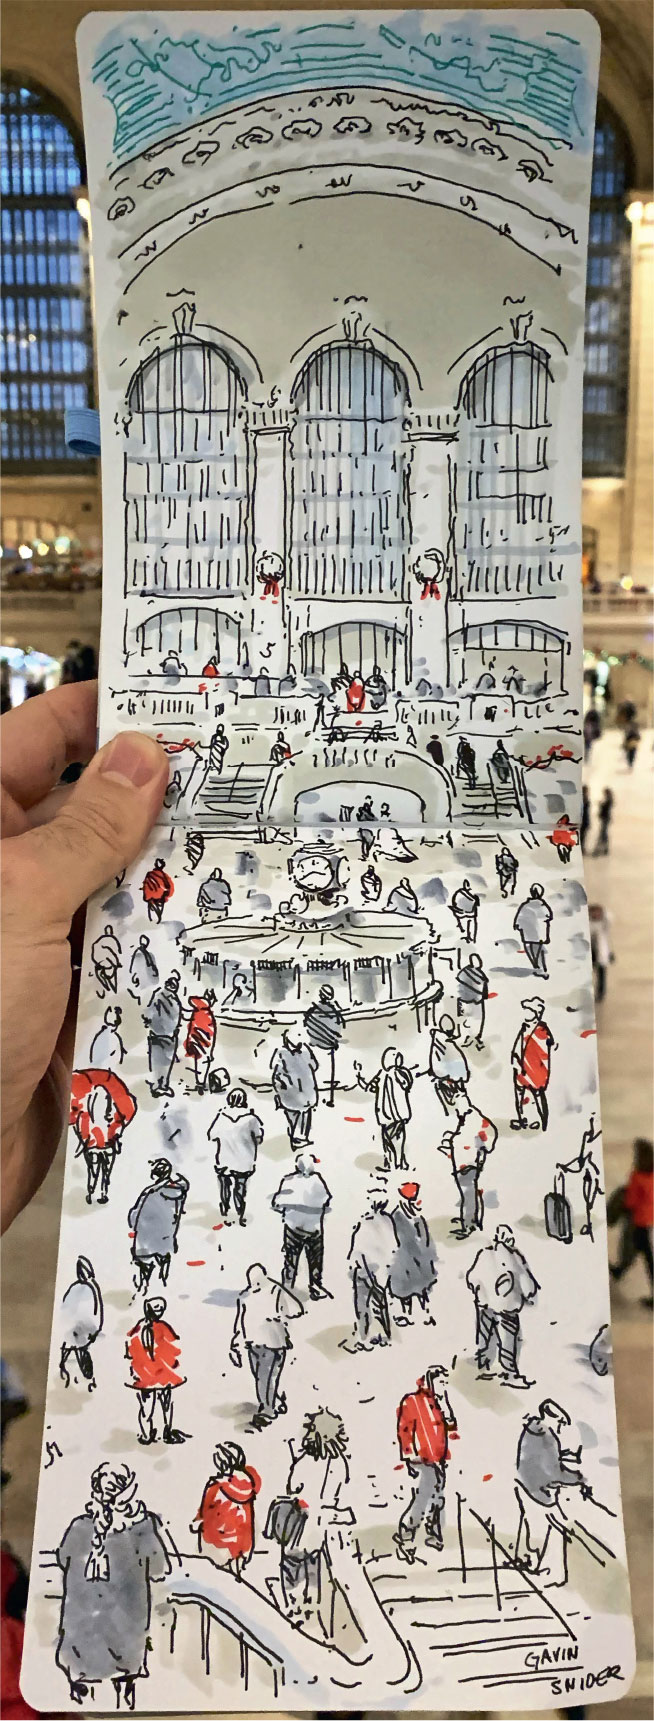
GAVIN SNIDER, USA
Grand Central Terminal, One Week before Christmas
17” × 5.2” | 43.2 × 13.2 cm; Ballpoint pen, Sharpie, Ad Markers in my twin brother Grant Snider’s Shape of Ideas Sketchbook; 1.5 hours
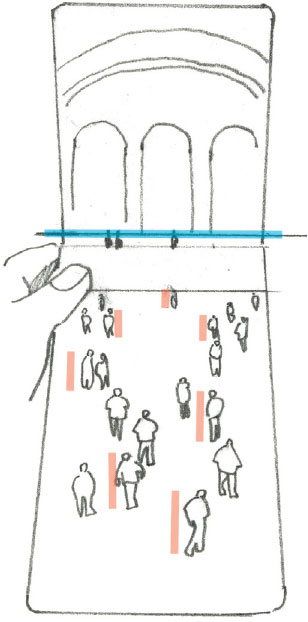
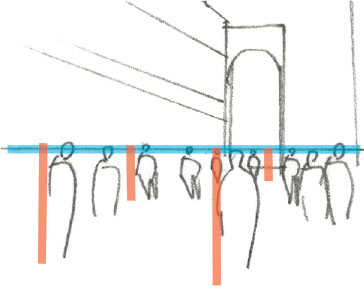
Eye Level
In an eye-level sketch, heads align at your eye-level line, no matter where the people are standing in your view, close or far away.
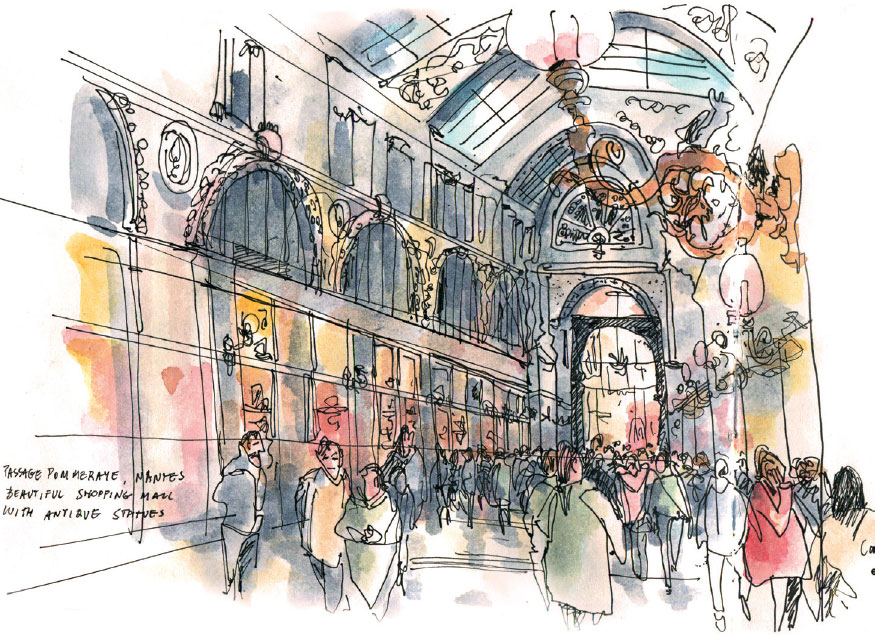
RITA SABLER, USA
Easter Shoppers at the Passage Pommeraye, Nantes
6.5” × 12” | 16.5 × 30.5 cm; Ink and watercolor; 35 minutes
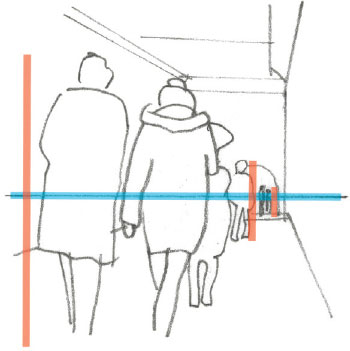
Worm’s Eye
When your eye level is lower than everyone else’s, say you are sitting, the heads of people closest to you will appear the farthest above your eye level. The figures in the distance have heads that are also above your eye level, but lower in your sketch.

ANNA WILSON, Australia
Heading Home, Tallinn
6.3” × 6.7” | 16 × 17 cm; Pen, ink, watercolor, gouache, and colored pencil on Saunders Hot Press watercolor paper; About 1 hour
68. Your eye level is probably lower than you think.
Oh, how the brain can trick us! What we actually see gets mixed with what we perceive. For example, there is a natural tendency to place your vanishing point too high because we are often looking up a bit.
This is called floating because by putting the VP too high in your sketch, you have essentially raised your eye level. You’ve sprouted wings and are hovering above the ground! Keep in mind that when you are drawing tall buildings or spaces, your eye level and VP are likely very close to where the building hits the ground, probably lower than you think!

I was sitting on the ground for this view, so the eye-level line is very low on the page. Notice the nearly flat, horizontal lines where the buildings hit the ground.
STEPHANIE BOWER, USA
Bussorah Street, Singapore
8” × 16” | 20.3 × 40.6 cm; Mechanical pencil and watercolor on Fluid watercolor block; 1 hour
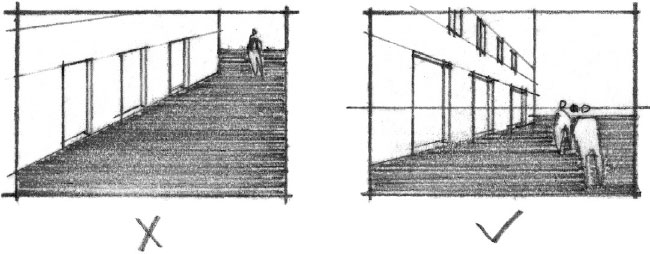
Eye level is too high—you are floating! We see too much of the ground plane.
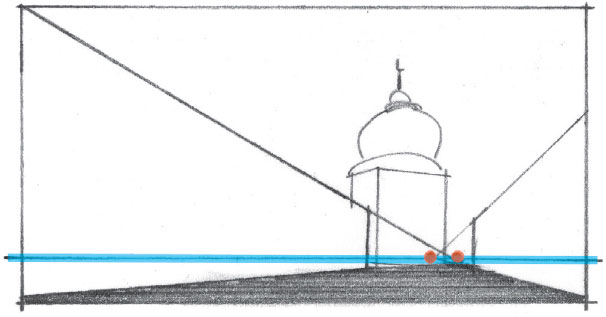
Eye level is nice and low to the ground, like you!
69. Use the “5’ Rule-r.”
Assuming an average eye level of about 5 feet (1.5 m), you can accurately add elements to your sketch using what I call the “5’ Rule-r.” Draw a line from any spot on the ground anywhere in your sketch up to the eye-level line. This is an instant 5-foot ruler in perspective!
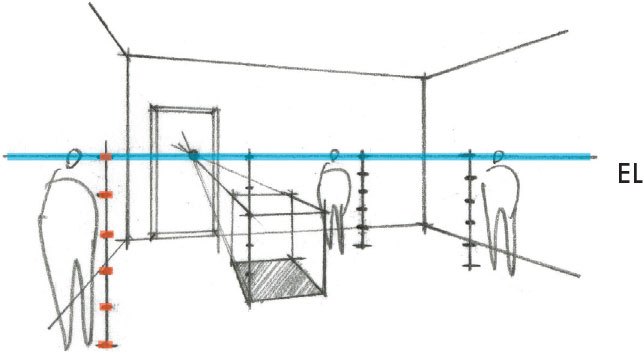
If you want to draw a table that is 3-feet (0.9 m) high, divide your 5-foot ruler into five approximately equal segments—just eyeball it. Each segment will be approximately 1-foot (30 cm) high in your perspective. Count three up and you’ve got a 3-foot-high table!
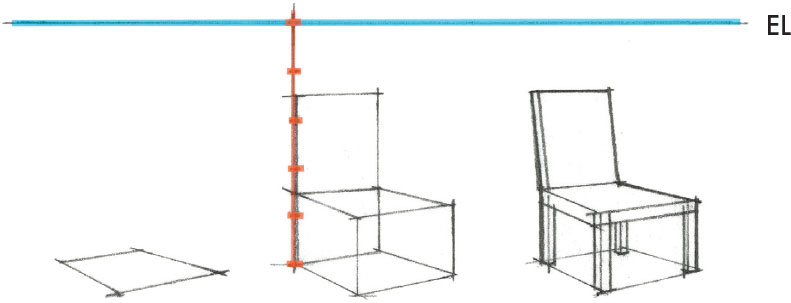
70. For furniture, start with the footprint and make a box.
Getting furniture correct is tricky, but it’s important because it tells us so much about scale. It’s easiest if you think of drawing transparent boxes. Start with the “footprint,” draw a box, then shape the furniture from the box. Use the “5’ Rule-r” to determine the correct height in perspective.
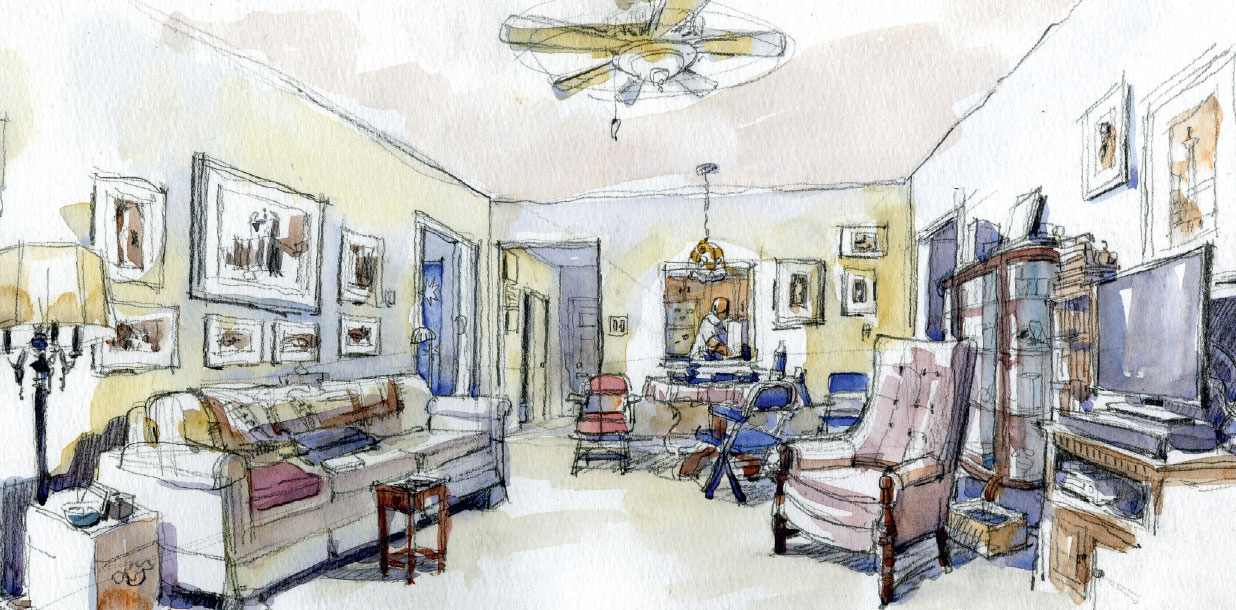
STEPHANIE BOWER, USA
Bori’s apartment in PA
8” × 16” | 20.3 × 40.6 cm; Mechanical pencil and watercolor on Fluid watercolor block; 1 hour