7. Entertain Yourself
Laptops took computing off the desk and made it more portable, but using one for enjoyable pursuits like watching movies always feels a bit like work, as if you’re going to the theater and being seated in a cubicle. The keyboard is in the way, and with most laptops you find yourself scrambling to find and plug in the power cord right as something exciting is happening in the movie.
On the iPad, the movie is right there on the screen. Your music library is a few taps away. YouTube movies are ready to be streamed. As I discuss elsewhere in the book, the iPad can be incredibly productive, but it can also be a lot of fun.
Sync Media
It is odd that we use iTunes as the central hub for syncing all information to the iPad, but during the early years of the iPod the only data to sync were music files. Since then, our music and movie libraries have grown alongside the capacities of Apple’s players, using iTunes as the storehouse for most of our digital entertainment. I’ve already covered the basics of syncing in Chapter 1, so in this section I’ll highlight sync options that pertain specifically to music, videos, audiobooks, and podcasts.
Choose which media to sync
Depending upon the size of your iTunes media library, you may have no trouble synchronizing everything to the iPad (which is the default setting). But even if there is room, you may want to be more choosy about how you fill those bytes (so you’re not stumbling over your collection of kids’ music while on a business trip, for example).
- Connect the iPad to your computer and select it in the sidebar within iTunes.
- Click the Music tab.
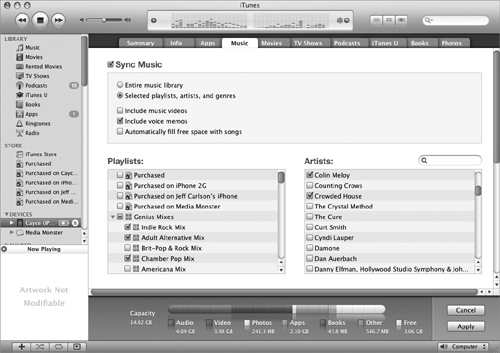
- Ensure that the Sync Music checkbox is enabled, and then choose the radio button for Selected playlists, artists, and genres (Figure 7.1).
Figure 7.1. Syncing Music in iTunes
- Choose any of the following options (or ignore them and go to the next step):
• Include music videos: You can purchase music videos from the iTunes Store, and some albums include videos as bonus material. With this box checked, the videos are copied along with the music. However, the iPad doesn’t quite know how to deal with them, surprisingly. If a video comes up when listening to an album, just the music plays. If you tap a music video in the iPad app (which could be by accident, as there’s no indication that the track is a video), you get to see the video. However, as soon as it’s done, you’ll discover you’ve been handed off to the Videos app, and therefore the next song in your iPod list won’t play. Also, you can play only one video at a time, even in the Videos app. (Didn’t anyone at Apple ever watch MTV?)
• Include voice memos: This option is a holdover from the iPhone, which includes a Voice Memos application.
• Automatically fill space with songs: You bought a 32 GB iPad and don’t want to waste any of that free space? This option packs the memory full of music beyond what you specify in the fields below.
- In the Playlists, Artists, and Genres lists, click checkboxes belonging to any items you wish to transfer to the iPad. Use the Search field above the Artists list to find artists quickly.
- Click the Apply button to sync with the new options.
Tip
Two general sync settings that appear on the iPad summary pane in iTunes let you fit more media onto the device. “Convert higher bit rate songs to 128 kbps AAC” downsamples audio to a lower quality, reducing the songs’ files sizes. “Prefer standard definition videos” leaves larger-sized HD movies on your computer and transfers only standard definition ones.
Note
The “Manually manage music and videos” option lets you drag songs and video from your library to the iPad in the sidebar, which would be fine if your media library isn’t too large. But these days, I’d rather specify playlists than micro-manage every file.
Create a smart playlist in iTunes
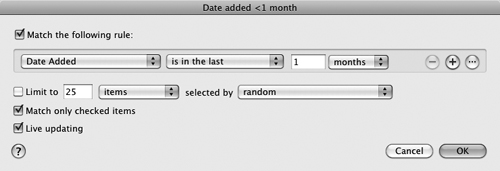
The best thing you can do for the iPod app is create smart playlists in iTunes. A normal playlist contains a fixed set of songs that you add manually. A smart playlist generates its content based on criteria you specify. For example, I sync a smart playlist that includes any media that’s been added to iTunes within the last month. Here’s how to build it:
- In iTunes, choose File > New Smart Playlist.
- Give the playlist a name.
- From the pop-up menu, choose a selector and conditions (Figure 7.2).
Figure 7.2. Creating a Smart Playlist in Tunes
- Add more selectors to determine which results appear.
- Click OK to save the smart playlist.
The next time you set up your sync criteria when the iPad is connected, choose that playlist. Each time you sync, the playlist is updated with new songs.
Play Music
If you’re familiar with iTunes, you’ll have no trouble playing music in the iPod app. That said, the iPod interface has a few peculiarities.
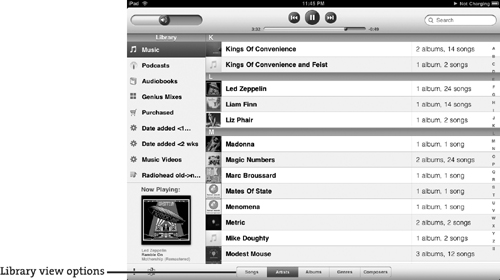
- Tap a button at the bottom of the screen to view your library by song, artist, album, genre, or composer (Figure 7.3).
Figure 7.3. The iPod interface
- Tap the name of a song to start playing it. The listing determines how you get to that point:
• Songs: The song list is arranged alphabetically, so the songs will play back in that order.
• Artists: Tap an artist’s name to view songs, arranged according to the albums on which they appear. If more than one album is listed, playback stops at the end of an album; you can get around this by tapping the Play All Songs button at the top of the list.
• Albums: Tap an album cover to view its songs, then tap a song to start playing. Albums are listed alphabetically by album title (Figure 7.4).
Figure 7.4. A track list in the Albums view

• Genres: Tap the icon for a genre to view albums and songs of that musical style. The songs are grouped by album, but playback does not stop at the end of the album.
• Composers: Tap the name of a composer to view songs he or she has composed, then tap a song to begin playing. When multiple albums appear, playback ends when the album does.
- The first song you play displays the Now Playing screen, which presents the song’s album art, full screen; tap once anywhere to reveal its controls (Figure 7.5).
Figure 7.5. Now Playing screen

In addition to offering controls for music playback and volume, the Now Playing screen includes a button to view the tracks belonging to the song’s album; you can also double-tap the screen. To return to the library view (without stopping playback), tap the button in the lower left corner of the screen.
To return to the Now Playing screen at any time, tap the album art at the lower-left corner of the library screen.
Tip
The Now Playing screen is the only location where you can rate a song. Double-tap the screen to reveal album tracks and then, just above the track list, tap a rating (from one to five stars) for the currently playing track.
Navigate songs
While you’re listening to audio, use the following controls to skip tracks, rewind, or fast-forward through a song (Figure 7.6).
Figure 7.6. Playback controls

• Tap the Play/Pause button to start or stop playback.
• Tap the Previous button once to return to the beginning of the current song. Tap it twice to play the previous song in the list.
• Tap the Next button once to skip to the next song.
• Touch and hold the Previous or Next button to rewind or fast-forward through a track; holding the button longer speeds up playback.
• Touch and drag the playhead to “scrub” to another section of a track.
Tip
For more control when scrubbing in the Now Playing screen, touch and hold the playhead and then drag your finger down. You’ll see the scrubbing speed appear beneath the bar (Figure 7.7). The farther down you drag, the more control you have when you then drag left or right. This feature is especially useful when moving through podcasts, audiobooks, or other lengthy tracks.
Figure 7.7. Scrubbing

Tip
While music is playing, but the iPad’s screen is locked or you’re in a different app, press the Home button twice to bring up a small set of playback controls. (You can disable this feature in Settings > General > Home.)
Shuffle songs
To introduce some randomness into your music listening, set your library to shuffle mode. While playing any song, enter the Now Playing screen and tap the shuffle button (![]() ).
).
Tip
Since Apple effectively obscured this feature, I think the following qualifies as a tip: When you’re in the Songs view, swipe down to reveal a Shuffle button at the top of the list. Normally the command is hidden under the playback controls.
Tip
If you own an iPhone or iPod touch, you’re probably familiar with the shake-to-shuffle feature: simply shake the device, and the accellerometer recognizes the action and switches to shuffle play mode. The iPod app on the iPad doesn’t support that feature—believe me, I tried shaking, twisting, and waving my iPad and only got strange looks from the other people on the bus. It’s possible shake-to-shuffle just didn’t make it into the initial feature set, but my guess is that the iPad is just large enough that shaking isn’t as practical when listening to music.
Repeat playback
Do you have a favorite album that begs to be repeated? In the Now Playing screen, tap the repeat button (![]() ) once to replay an album. Tap it again to replay the current song.
) once to replay an album. Tap it again to replay the current song.
Play Genius Mixes
iTunes includes a feature called Genius Mixes, which assemble playlists based on the contents of your music library. Genius Mixes show up as albums when you sync, and are accessible from the Genius Mixes sidebar item in the iPod app. Tap a mix to start playing it. Unlike when playing other albums, you can’t see (or edit) which songs are included in a Genius Mix—you just have to trust the algorithms (which often do a pretty good job, I must say).
Listen to podcasts and audiobooks
Podcasts and audiobooks use the same playback controls as other audio tracks, but they gain a couple of extra features.
• Change reading speed: Since most podcasts and audiobooks are spoken-word performances, your ears are more sympathetic to changes in playback speed. In the Now Playing screen, tap the speed indicator to the right of the scrubber bar (![]() ) to switch between 1x (normal), 2x (twice as fast), or ½x (half of normal).
) to switch between 1x (normal), 2x (twice as fast), or ½x (half of normal).
• Email link: Tap the email icon to the left of the scrubber bar (![]() ) to create a new outgoing message containing a link to the podcast.
) to create a new outgoing message containing a link to the podcast.
• Rewind 30 seconds: Did you miss what someone said? Tap the ![]() button to move the playhead back 30 seconds.
button to move the playhead back 30 seconds.
Create Music Playlists
So far we’ve been dealing with whatever gets sent over from the computer during a sync operation. The iPod app is not an old-style iPod, however. You can build your own playlists, which get synced back the next time you connect.
Build a playlist
For a handpicked playlist, do the following:
- Tap the New Playlist button in the lower-left corner of the screen (Figure 7.8).
Figure 7.8. Playlist buttons

- Enter a name for the playlist in the dialog that appears, and tap Save.
- Tap the
 button to add a song to the playlist. The track title becomes gray to indicate it has been included. You can also tap the Sources button to choose which iPod content to build from (Figure 7.9).
Figure 7.9. Building a playlist

- Tap Done to save the playlist, which appears in the sidebar.
- Reorder or remove the tracks if you wish, then tap the Done button to finish.
Create a Genius playlist
That was quite a lot of work—what if the iPod app could build a custom playlist for you? When you’re listening to any song, tap the Genius button (![]() ). A set of songs based on the first one appears in the Genius category (Figure 7.10). If no song is playing, you’re prompted to select a song in your library to use as the basis of the Genius playlist.
). A set of songs based on the first one appears in the Genius category (Figure 7.10). If no song is playing, you’re prompted to select a song in your library to use as the basis of the Genius playlist.
Figure 7.10. A Genius playlist

Tap the Refresh button to generate a new list based on the original criteria. If you enjoyed the list, tap the Save button to create a new, regular playlist.
Play Videos
I love movies, but I don’t get out to see them often enough. And while there are a few flicks I’d prefer to see with a large group of people, I’m happy to catch up on my movie watching at home on my own time. The iPad is a great for watching a movie (or TV show, or video podcast, or movie you created) when it’s most convenient.
Video sync options
Syncing video works the same as syncing music, outlined earlier in the chapter, with one helpful difference. iTunes can automatically sync items that match timely criteria, such as the five most recent unwatched movies, or the 3 least-watched items. This option applies to any video content: movies, TV shows, and podcasts (including audio podcasts, since they’re also timely items).
- Connect the iPad and then, in iTunes, go to the Movies tab.
- Click the checkbox for Automatically include, and choose a range of items to copy to the iPad (Figure 7.11). (Of course, you can also choose not to include any movies automatically.)
Figure 7.11. Movies sync options

- In the Movies area that lists all available videos, click the checkbox for any item you want copied in addition to the automatic options.
You can also choose movies that appear in iTunes playlists. Mark any of the items in the Include Movies from Playlists area.
- Click the Apply button to sync the iPad and copy the movies.
Watch a movie
Your video content is available in the Videos app on the iPad, with different categories split among panes (such as Rentals, Movies, TV Shows, Podcasts) (Figure 7.12).
Figure 7.12. Available movies

Note
Apple splits music and videos into separate apps on the iPad (iPod and Videos, respectively), but sometimes you’ll encounter crossover. For example, I have a Smart Playlist in iTunes that shows anything added within the last two weeks, and when viewing that playlist in the iPod app, I see video podcasts and recent movie additions, too. Tapping the item takes me to the Videos app, however.
- Tap a video’s icon to view more information about it.
- To begin playing the movie, tap the Play button (Figure 7.13). Depending on the content, you can optionally tap the Chapters button to jump ahead to specific sections.
Figure 7.13. Movie info

- Sit back and enjoy the movie. If you need to interact with playback, tap the screen once to make the onscreen controls appear (Figure 7.14):
• Use the playback controls to play, pause, rewind, or fast-forward. They operate similar to the music controls explained earlier, though tapping once on the Rewind or Fast-forward buttons in long movies skips the video in 5-minute increments.
• Drag the volume slider to increase or decrease the sound, or use the volume buttons on the iPad case.
• Drag the playhead to scrub through the movie.
Figure 7.14. Video controls

• When watching widescreen movies, tap the Fill Frame button to use the entire screen (at the expense of cutting off the left and right edges of the picture).
• Some movies also include language or subtitle options, which are accessed by tapping the
 button within the playback controls.
• Tap Done to return to the movie info screen.
Buy or Rent a Movie
You won’t be surprised to learn that Apple will happily sell or rent movies to help you fill your time (and your iPad’s memory). Go to the iTunes Store in iTunes on your computer, or tap the iTunes app on your iPad. Searching and purchasing movies is similar to buying other things from the iTunes storefronts, but with a few annoying restrictions.
• The iPad can play HD movies, but some titles can only be purchased in SD (standard definition), some can be rented or purchased in SD, and some can be rented in HD only on the iPad. This crazy and confusing distinction is the result of the movies’ rights holders (Hollywood studios) trying to wring profit, establish some measure of misguided control, or...well, to be honest I don’t know. What’s worse is that the availability of these options changes over time; some movies previously available for rent can only be purchased, or no longer appear in the iTunes Store. What this means for you and I is that we need to make sure we examine what we’re about to purchase or rent.
• HD movies you rented on the iPad can be viewed only on the iPad, not transferred to your computer or another device.
• After renting a movie, you must watch it within 30 days. If not, the movie is automatically deleted from your library.
• Once you begin to watch a rental, you must finish watching it within 24 hours, at which point it’s deleted.
Note
I apologize for sounding cranky, but I should be able to purchase a movie—in SD or HD, if available—and watch it wherever I want, especially if it’s within Apple’s ecosystem: buy it on my iPad, watch some of it, then finish watching the movie on my Apple TV or computer. As it is, Apple and the studios are making it difficult for people like me to give them money that I’m willing to part with in exchange for entertainment, which is a terrible business model.
Watch Your Own Movies
The iTunes Store isn’t the only source of movies, of course. Home movies you shoot and edit can be viewed on the iPad, too. Export them from your video editing software (such as iMovie or Windows Live Movie Maker) to iTunes as .m4v, .mp4, or .mov formats. Once in iTunes, movies can be synced to the iPad.
Tip
My book iMovie ’09 & iDVD: Visual QuickStart Guide covers all aspects of editing video with iMovie ’09, the most recent version as of the release of the iPad. Although it doesn’t specifically address exporting to the iPad (I couldn’t have predicted the specs a year before the iPad was released), I do talk about how to share movies for the Apple TV. In my testing, I’ve found that the Apple TV settings work well for the iPad. (In fact, the iPad’s video specs are slightly better than the Apple TV, offering 720p HD video at 30 frames per second, while the Apple TV can handle only 24 fps.)
Convert DVDs
What about movies you already own on DVD? Using software such as HandBrake (www.handbrake.fr), you can convert a movie to a digital file that can be imported into iTunes and synced to the iPad. This option is great if you’re going on a long trip and don’t want to bring along a stack of plastic discs, or for storing kids’ entertainment when you don’t want the original disc to be damaged. (The iPad, I predict, is going to become a favorite for kids and parents on lengthy car or plane trips.)
Note
It’s worth pointing out here that I’m not a lawyer, and that the practice of encoding DVDs is technically against the law in the United States due to the Digital Millennium Copyright Act (DMCA). Making digital copies of movies you’ve legally purchased seems like a legitimate fair use to me, and is far preferable to downloading questionably-ripped movies from the Internet. The Electronic Frontier Foundation provides more information about the topic (www.eff.org/IP/digitalvideo/).
Stream Video to the iPad
The iPad is a wireless device, yet you need to connect it to a computer to sync movies and other entertainment to it over the USB cable. Or do you? A few wireless options truly let you watch video almost anywhere.
Streaming video services
Members of the movie rental service Netflix can download the free Netflix app for the iPad and take advantage of the company’s growing library of Watch Now titles. The video quality is good, and can even be streamed over a 3G connection. However, be warned that streaming video is bandwidth-intensive. I used up my entire 250 MB data limit watching roughly half of one movie—you’d definitely want the unlimited data option if you plan to watch movies over 3G (see Chapter 1 for information about 3G cellular data plans).
Another popular option is the ABC Player app, which provides streaming versions of entire episodes of ABC’s television offerings. (ABC does not allow streaming over a 3G connection, however.) Episodes are typically available the day after they air on broadcast television.
Other services, such as the popular site Hulu.com, have announced plans to release iPad apps that stream their content.
Stream from another computer on your network
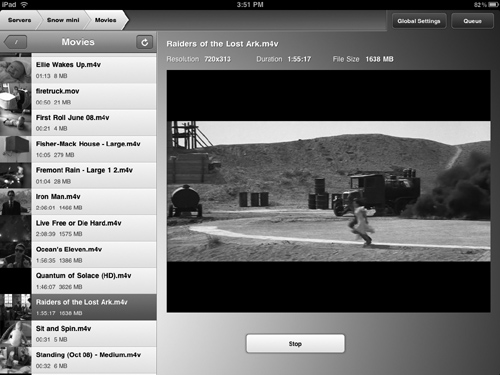
Over the years I’ve accumulated movies and TV shows that now reside on a large hard drive attached to a computer at home. Using programs such as AirVideo (Figure 7.15) and StreamToMe, I can watch any of that content while I’m at home. This essentially replicates the functionality of the Apple TV, which can stream video from another computer on the network.
Figure 7.15. AirVideo playing a movie over the network