6. Read Books
Under other circumstances, the subject of reading electronic books on a device would warrant a few paragraphs, or maybe an extended sidebar. But the iPad’s handheld form factor and large storage capacity makes it an attractive ebook reader. It wouldn’t surprise me if some people view the iPad primarily as an ebook reader that also happens to do other stuff.
Instead of packing a tote bag bursting with hardcovers on your next vacation, Apple’s iBooks app offers an attractive alternative: store digital versions of books on the iPad, and connect to the iBookstore to buy new ones when you need more.
Note that although this chapter focuses on the features of the iBooks app, that’s not the only player out there. If you previously owned an Amazon Kindle e-reader, you can download Amazon’s free Kindle app and keep your existing library. (Some people may prefer to use the Kindle software entirely, since currently Amazon offers many more titles than the iBookstore.)
The iPad can also handle other types of electronic text. Many media companies, already buffeted by a shaky economy and a slow start on confronting new technologies, are hoping the iPad will glide in and save them by offering digital versions of magazines and newspapers. That’s a lot of weight to put onto a 1.5-pound tablet, and it’s still too early to see what difference the iPad (and other tablets) will make. For now, media other than books are viewed in Safari (the companies’ Web sites) and in standalone apps, like the Wall Street Journal, New York Times, and Popular Mechanics.
Install the iBooks App
The iBooks app isn’t included on the iPad by default. In iTunes or using the App Store on the iPad, search for “iBooks.” Download and install the free app.
Note
As of May 2010, iBooks is available only to customers in the United States. As Apple negotiates deals with publishers, I’m hoping iBooks becomes available to international markets soon.
Browse Your Library
When you open the iBooks app, you see your books arranged on a faux wooden shelf (Figure 6.1). Swipe up to reveal more books as your collection grows.
Figure 6.1. The iBooks library

Rearrange or remove books
Normally, books appear in the order you add them to the library, with the most recent title appearing at the top-left location. You can move books around easily: tap the Edit button, touch and hold a title, and drag it to a new spot.
The Edit mode also exposes the Delete button (the X) at the upper-left corner. Just as you would do to remove apps from the Home screen (explained in Chapter 2), tap that button to remove the title from your library.
Tip
Books are backed up to your computer when you sync to iTunes. If you want to keep a book on your computer but temporarily remove it from the library, make sure you sync before deleting it.
Although this view is attractive, the endless bookshelf doesn’t work as well after you’ve added many titles. For more detail, tap the List view button (Figure 6.2).
Figure 6.2. Sort options in the List view

The List view presents more options for organizing the library. Tap one of the buttons at the bottom of the screen to re-order the list.
Tip
Titles in the Bookshelf list view can be re-ordered, just as they can in the main Bookshelf view. Tap the Edit button and then drag the icon that appears at the far right edge of the row.
Tip
To delete a book quickly in the List view, swipe its title left-to-right (or right-to-left), then tap the Delete button that appears.
Search for books
When the number of books in your library starts to get really out of control (or, as my step-sister would say, “A good start”), you can use the Search Books field at the top of the List view to locate a title. Start typing a title or author name to narrow the list (Figure 6.3).
Figure 6.3. Searching for books

Read a Book
To get you started, Apple includes a copy of A. A. Milne’s Winnie-the-Pooh with the iBooks app. To open a book, tap its cover.
The appearance of the book changes based on the iPad’s rotation (Figure 6.4). When viewed in portait orientation, you see one page at a time. Turn it to landscape view and the text is split over two pages.
Figure 6.4. iBooks rotation

Tip
Use the Rotation Lock switch, located just above the volume controls on the right edge of the iPad, to keep the screen from rotating if you shift and read while lying on your side or otherwise change position.
Navigate the book
It feels a little funny that I should tell you how to read a book (obviously, you’re doing a fine job reading my book), but there are a few things to note before you get absorbed by the content you’re about to read.
• Tap the middle of the screen to reveal the reading controls if they’re not visible. (Tap again to make them disappear.)
• To turn the next page, swipe right to left. Swipe left to right to go to the previous page. You don’t need to swipe the width of the page; a small swipe works the same.
For kicks, drag the page edge slowly (Figure 6.5): Apple made a point of reproducing the look of curling the page, complete with a preview of what’s on the next page (in landscape mode) or ghosted, reversed letters that would show through typical book-quality paper.
Figure 6.5. Turning pages

• Tap the right or left edge of the screen to turn the page using a faster, minimal animation.
Tip
In the iBooks preferences (go to Settings > iBooks) is the option to specify what happens when you tap the left margin. By default it takes you to the previous page, but if you don’t anticipate going backwards (you forward-thinking reader, you), tap the Tap Left Margin button and choose Next Page instead of Previous Page. You can still go to the previous page by swiping left-to-right anywhere on the screen.
• Tap the Contents button (![]() ) to view the table of contents. You can tap a chapter or section to navigate to it, or tap the Resume button (which looks like a red bookmark) to go back to where you were.
) to view the table of contents. You can tap a chapter or section to navigate to it, or tap the Resume button (which looks like a red bookmark) to go back to where you were.
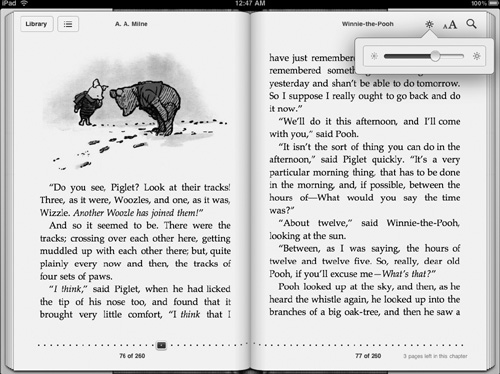
• Drag the navigation control at the bottom of the screen to jump to a specific page or chapter (Figure 6.6).
Figure 6.6. Advancing to another section of the book

Note
I love that the lower-right corner tells you how many pages are left in the current chapter. How many times have you been reading in bed, almost at the verge of sleep, but decided to push on until the end of the chapter? In iBooks, you don’t have to flip ahead to see how much further ahead the next chapter is.
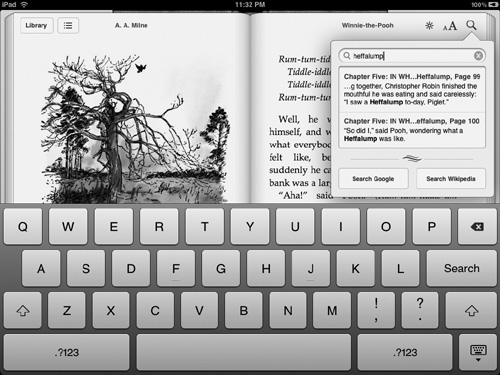
Search the book’s text
Another way to navigate a book is to look for occurrences of specific text (or, I suppose, to find out how many times an author swears throughout the text). The number of matches appears at the bottom of the results list. This feature also provides convenient Search Google and Search Wikipedia buttons to expand your search in Safari.
- Tap the middle of the screen to display the reading controls.
- Tap the Search button in the upper-right corner.
- Type a search term and tap the Search button on the onscreen keyboard, or wait a few seconds for results to appear (Figure 6.7).
Figure 6.7. Searching the book
- Scroll through the results to find the one you want, and then tap it to go to that place in the book. The term is highlighted to find it easily.
Or, tap outside the popover to dismiss it.
A slightly faster method of searching is available when you select a word or phrase on a page.
- Touch and hold to select the text you want to find.
- From the options that appear, tap the Search button (Figure 6.8). The search results popover appears.
Figure 6.8. Searching by selection

Change the Book’s Appearance
Reading is a personal experience, and iBooks offers a few options for customizing the appearance of your books.
Adjust screen brightness
The iPad’s bright screen becomes a liability when it’s flooding the bedroom with light and preventing your partner from sleeping or when it’s intimidating the pets. Tap the Brightness button to expose a slider that changes the brightness level (Figure 6.9). This control is far more convenient than adjusting brightness in the Settings app.
Figure 6.9. The Brightness slider
Note
The Brightness setting in iBooks is applied system-wide, so it sticks when you leave the iBooks app. You can open Settings > Brightness & Wallpaper to bring the backlight level up.
Change text size and font
One noticeable advantage of electronic books is that you can adjust the type size to match what’s comfortable for your eyes.
- Tap the Font button next to the Brightness button to display a popover with text options (Figure 6.10).
Figure 6.10. Adjusting text size and font
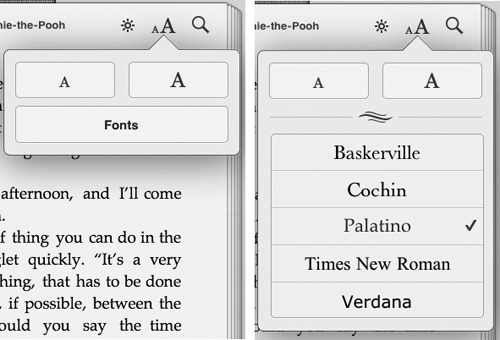
- Tap the small A button to make the text smaller, or tap the large A button to make it larger.
- Tap the Fonts button to reveal the typeface options.
- Tap one of the font names to use that for the book’s text.
- Tap outside the popover to dismiss it.
Set Bookmarks
iBooks doesn’t include the ability to make notes in the virtual margins, but you can highlight sections and create a bookmark for coming back later.
Create a new bookmark
- Select a section of text you want to bookmark.
- From the options that appear, tap Bookmark. The selection appears as if you’d marked it with a highlighter (Figure 6.11).
Figure 6.11. Creating a new bookmark

- Once the bookmark is created, tap it to view options for changing the highlighter color or removing the bookmark (Figure 6.12). The next bookmark you create shares the same color.
Figure 6.12. Choosing a highlight color

Tip
I like to categorize things by color, so the bookmark highlight options make me happy. (As does the way the bookmarks look like they’re drawn with a real highlighter pen.) I’m sure the point is to simply let you choose your favorite color, but I can imagine two people sharing an iPad using colored bookmarks to read the same book. Or marking up text for different categories in a textbook, for example.
Return to a bookmark
When it’s time to go back to something you bookmarked, do the following:
- Tap the Contents button (
 ) to view the table of contents.
 - Tap the Bookmarks button (Figure 6.13).
Figure 6.13. Bookmarks list
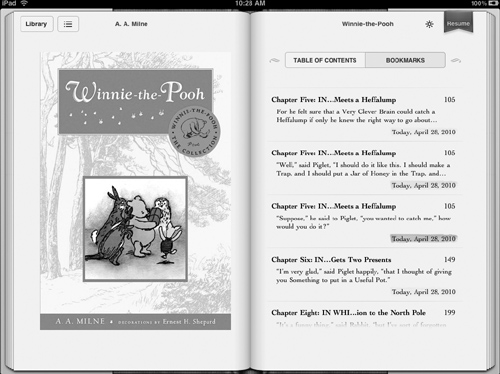
- Tap a bookmark from the list to go to that page.
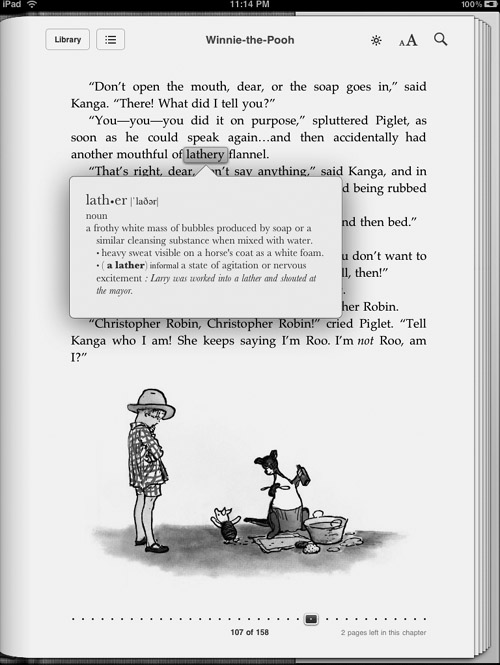
Look up Word Definitions
One of the great joys (and sometimes great frustrations) of reading is coming across unfamiliar words. iBooks offers a built-in dictionary lookup feature.
- Touch and hold a word to select it.
- From the options that appear, tap the Dictionary button. A definition appears (Figure 6.14).
Figure 6.14. Viewing a definition
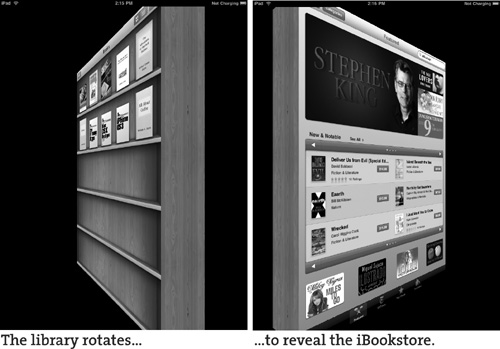
Buy Books from the iBookstore
When you’ve had your fill of Winnie-the-Pooh, Apple is ready to sell you more electronic books in its iBookstore. The store is available only from within the iBooks app, but uses your iTunes Store account.
To access the iBookstore from your library, tap the Store button. In a great bit of visual flair, the library rotates as if the store were a hidden passageway behind the bookcase (Figure 6.15).
Figure 6.15. “Put...the... candle...back!”
Browsing the iBookstore is similar to shopping at the iTunes Store:
• Tap a book title to view more information about it (Figure 6.16).
Figure 6.16. Viewing more info about a book
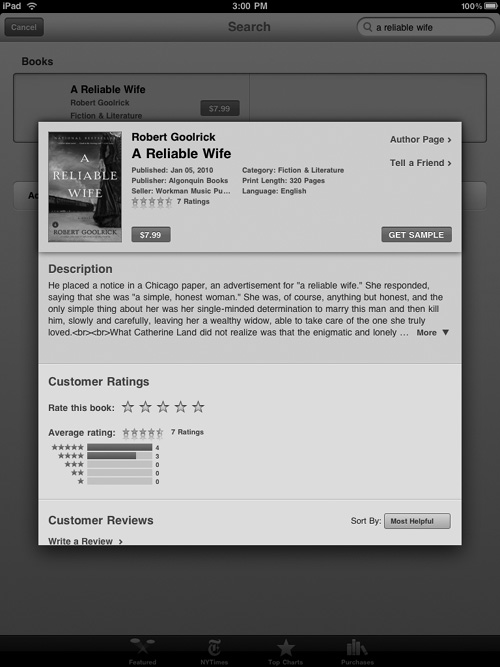
• To purchase the book, tap the price button, which changes to read “Buy Book.” Tap the button again to buy the book, which, after you enter your account and password, downloads and appears in your library.
• Tap the Get Sample button to download a sample (usually the first chapter or a sizable excerpt. It appears in your library with a Sample banner on the cover (Figure 6.17). If you like the book, tap the Buy button that appears at the top of the screen.
Figure 6.17. A sample of a book

Tip
Tap the Categories button at the top of the iBookstore screen to locate books in various genres. You can also browse the New York Times bestseller list by tapping the NYTimes button in the toolbar, or view Oprah’s Book Club titles using a link found when you scroll to the end of the page.
Tip
You don’t have to shell out money to get a taste of iBooks titles. Scroll to the bottom of the iBookstore page and tap the Free Books link to view plenty of books from Project Gutenberg.
Note
Books purchased from the iBookstore are protected by Apple’s FairPlay digital rights management (DRM) scheme, which means you can’t give the book to someone else when you’re finished reading, as you can with a print book. That also adds an unfortunate (and stupid) limitation: you can’t copy any selected text in a book purchased from the store.
Import Your Own Ebooks
Books from the iBookstore are formatted as EPUB files, an open format designed for electronic publishing by the International Digital Publishing Forum. The titles from Project Gutenberg (www.gutenberg.org) are all EPUB files, without Apple’s DRM, and are available from other sources.
If you purchase or download an EPUB file, you can add the book to your iBooks library. Drag the file to the Library section in the sidebar, or to the iTunes application icon; you can also choose File > Add to Library and locate the file. The next time you sync with the iPad, the book is added to your library.
Note
Before you purchase EPUB books online, make sure you know what you’re buying. Not every EPUB file will work with the iPad. Titles from Kobo (www.kobobooks.com), for example, are EPUB formatted, but are protected by Adobe DRM. (You can download the free eBooks by Kobo HD app to read them, but then you’re adding another e-reader to your collection.)
Other Ebook Readers
iBooks is the Apple-designed option, but of course there are other applications out there (such as a little Amazon.com offering you may have heard of). In fact, one of the most interesting developments in electronic books isn’t happening within e-readers at all—publishers are writing iPad apps, not just files, that do so much more than turn pages.
Kindle for iPad
When people think of Amazon’s Kindle, they picture the hardware: slim devices with grayscale E-Ink screens that store lots of ebooks and have great battery life. What they often forget is that Amazon offers Kindle for iPad, an app that brings the reading experience to the iPad. The app offers a cleaner look than iBooks—it’s not trying to replicate physical books and pages (although page turns do curl like paper). The Kindle for iPad app also currently offers three features you won’t find in iBooks:
View a book on several devices
Currently the only way to read an iBooks title is on the iPad, though an iPhone version of iBooks is promised with the iPhone OS 4 update coming in summer 2010. Amazon, by contrast, offers Kindle software not only for the Kindle devices and iPad, but for the iPhone, Windows, Mac OS X, and Blackberry devices. When you read a book in one location, your place is marked in other clients, too.
Larger catalog
Amazon had a two-year head start on Apple in the ebook field, so the Kindle offerings are much broader than the iBookstore (Amazon claims 500,000 titles, while Apple says it has “tens of thousands” of books). For a while at least, if you can’t find a book at the iBookstore, it’s likely you can buy it from Amazon.
Mark up text with inline notes
- Tap the screen to display the reading controls.
- Touch and hold a word where you want to add a note.
- Type a note in the field that appears, and then tap Save (Figure 6.18). A small note icon appears next to the word; tapping it reveals the text as a balloon.
Figure 6.18. Adding a note in Kindle for iPad

More important, the note is synchronized with all copies of that book on other devices.
Standalone apps
iBooks and the Kindle app are great for reading books that are mostly text, like novels or non-fiction narratives. But remember, the iPad is a computer with impressive processor and graphics performance. As a result, publishers also offer standalone apps for books that include not only the core text, but other multimedia content.
For example, many children’s books have options to read the story aloud, play games, and color on the screen (Figure 6.19). Reference works, such as The Elements: A Visual Exploration, can convey much more information than the facts and some photos.
Figure 6.19. Coloring in the Miss Spider app

Comic Books
Since its release, I can’t tell you how many reviewers (myself included) have pointed out that the iPad could be the enticement that makes them start reading comics again. Apps like Marvel, iVerse, and IDW provide the framework for reading (Figure 6.20) and then let you purchase issues within the app.
Figure 6.20. The Marvel Comics app

Read Other Text
I can’t wrap up this chapter without talking about a couple of other text circumstances that don’t fall neatly into the “books” category.
Instapaper
By far my favorite app on the iPad so far, Instapaper takes articles on Web pages and saves them for reading later.
Several times a day I run across longform pieces of text that I want to read, but if I read them all right away I can’t get any work done. So I use a bookmarklet to send the pages to Instapaper.com (see Chapter 3 for more on bookmarklets). Later, I can launch the Instapaper app on my iPad, which syncs its content with instapaper.com, and pick which ones I want to read (Figure 6.21).
Figure 6.21. Articles waiting to be read in Instapaper

Not only is it easy to find the articles I want to read later, Instapaper formats them using clean typography and without the ads and other cruft that surroundsc most content on the Web.
Read PDF files with GoodReader
In Chapter 4, I discussed handling file attachments in the Mail app, one main method of getting files onto the iPad. The operating system can open many file types, including PDF and Microsoft Word files, that you’re likely to encounter.
The problem is that you’re just getting a look at those files without much other control. With PDFs especially, that can be frustrating, because internal links don’t work, you can’t jump to a page much further into a long document, and more.
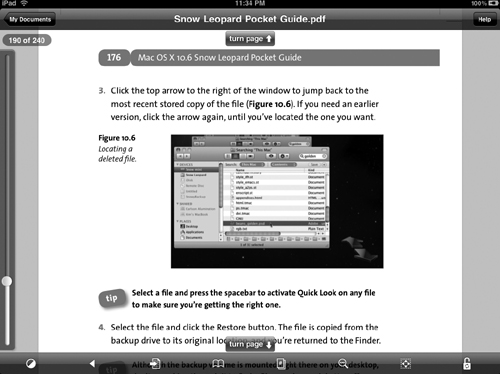
To overcome those limitations, download the PDF viewer to end them all: GoodReader (www.goodiware.com).
GoodReader is one of those apps that does so much you feel like you’re scratching the surface (Figure 6.22). You can import files (PDF, Office, iWork, audio, video) using the drag-and-drop interface in the Apps pane within iTunes, by transferring files over a Wi-Fi network, or downloading from the Web. It preserves Web links, lets you add bookmarks, password-protect files, and, so much more than I have room to go into here.
Figure 6.22. GoodReader