6. Assembling Views and Animations
UIView and its subclasses populate the iPhone’s screen. This chapter introduces views from the ground up. You learn how to build, inspect, and break down view hierarchies and understand how views work together. You discover the role geometry plays in creating and placing views into your interface, and you read about animating views so they move and transform onscreen. This chapter covers everything you need to know to work with views from the lowest levels up.
View Hierarchies
A tree-based hierarchy orders what you see on your iPhone screen. Starting with the main window, views are laid out in a specifically hierarchical way. All views may have children, called subviews. Each view, including the window, owns an ordered list of these subviews. Views might own many subviews; they might own none. Your application determines how views are laid out and who owns whom.
Subviews display onscreen in order, always from back to front. This works something like a stack of animation cells—those transparent sheets used to create cartoons. Only the parts of the sheets that have been painted show through. The clear parts allow any visual elements behind that sheet to be seen. Views too can have clear and painted parts, and can be layered to build a complex presentation.
Figure 6-1 shows a little of the layering used in a typical window. Here the window owns a UINavigationController-based hierarchy. The elements layer together. The window (represented by the empty, rightmost element) owns a navigation bar, which in turn owns two subview buttons (one left and one right). The window also owns a table with its own subviews. These items stack together to build the GUI.
Figure 6-1 Subview hierarchies combine to build complex GUIs.
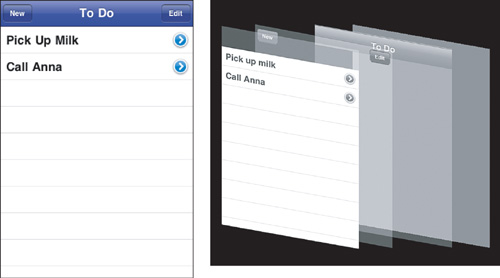
Listing 6-1 shows the actual view hierarchy of the window in Figure 6-1. The tree starts at the top UIWindow and shows the classes for each of the child views. If you trace your way down the tree, you can see the navigation bar (at level 2) with its two buttons (each at level 3) and the table view (level 4) with its two cells (each at level 5). Some of the items in this listing are private classes, automatically added by the SDK when laying out views. For example, the UILayoutContainerView is never used directly by developers. It’s part of the SDK’s UIWindow implementation.
Listing 6-1 To Do List View Hierarchy
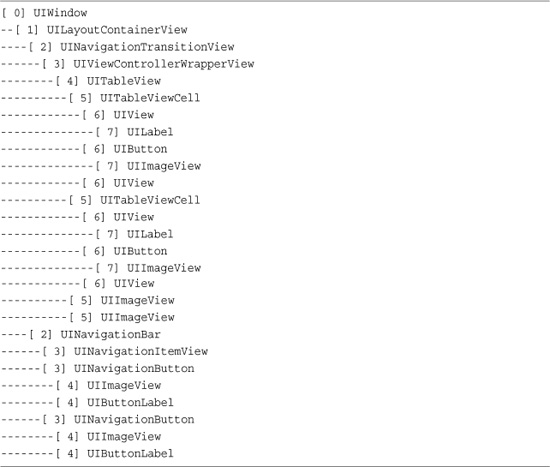
The only parts missing from this listing are the dozen or so line separators for the table, omitted for space considerations. Each separator is actually a UITableViewSeparatorView instance. They belong to the UITableView and would normally display at a depth of 5.
Recipe: Recovering a View Hierarchy Tree
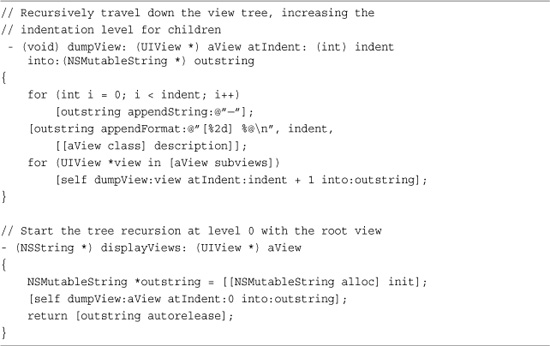
Each view knows both its parent ([aView superview]) and its children ([aView subviews]). Build a view tree like the one shown in Listing 6-1 by recursively walking through a view’s subviews. Recipe 6-1 does exactly that. It builds a visual tree by noting the class of each view and increasing the indentation level every time it moves down from a parent view to its children. The results are stored into a mutable string and returned from the calling method.
Recipe 6-1 Extracting a View Hierarchy Tree
Get This Recipe’s Code
To get the code used for this recipe, go to http://github.com/erica/iphone-3.0-cookbook-, or if you’ve downloaded the disk image containing all of the sample code from the book, go to the folder for Chapter 6 and open the project for this recipe.
The code shown in Recipe 6-1 was used to create the tree shown in Listing 6-1. The same interface and recipe appear as part of the sample code that accompanies this book. You can use this routine to duplicate the results of Listing 6-1, or you can copy it to other applications to view their hierarchies.
Recipe: Querying Subviews
Views store arrays of their children. Retrieve this array by calling [aView subviews]. Onscreen, the child views are always drawn after the parent, in the order that they appear in the subviews array. These views draw in order from back to front, and the subviews array mirrors that drawing pattern. Views that appear later in the array are drawn after views that appear earlier.
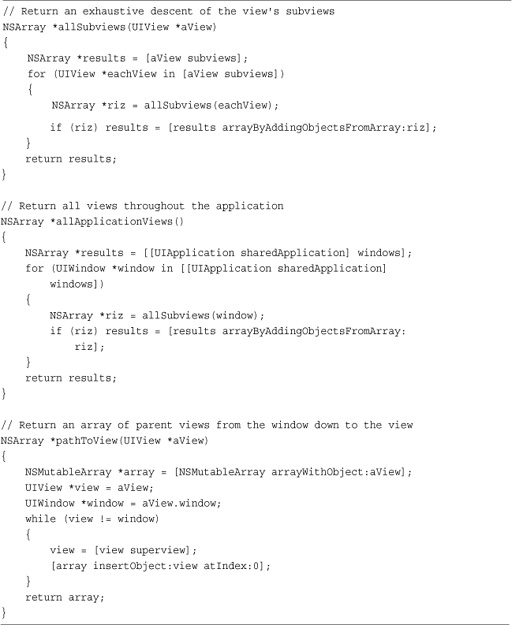
The subviews method returns just those views that are immediate children of a given view. At times, you may want to retrieve a more exhaustive list of subviews including the children’s children. Recipe 6-2 introduces allSubviews(), a simple recursive function that returns a full list of descendants for any view. Call this function with view.window to return a complete set of views appearing in the UIWindow that hosts that view. This list proves useful when you want to search for a particular view, like a specific slider or button.
Recipe 6-2 Subview Utility Functions
Get This Recipe’s Code
To get the code used for this recipe, go to http://github.com/erica/iphone-3.0-cookbook-, or if you’ve downloaded the disk image containing all of the sample code from the book, go to the folder for Chapter 6 and open the project for this recipe.
Although it is not typical, iPhone applications may include several windows, each of which can contain many views. Recover an exhaustive list of all application views by iterating through each available window. The allApplicationSubviews() function in Recipe 6-2 does exactly that. A call to [[UIApplication sharedApplication] windows] returns the array of application windows. The function iterates through these, adding their subviews to the collection.
In addition to knowing its subviews, each view knows the window it belongs to. The view’s window property points to the window that owns it. Recipe 6-2 also includes a simple function called pathToView() that returns an array of superviews, from the window down to the view in question. It does this by calling superview repeatedly until arriving at that window.
Views can also check their superview ancestry in another way. The isDescendantOfView: method determines whether a view lives within another view, even if that view is not its direct superview. This method returns a simple Boolean value. YES means the view descends from the view passed as a parameter to the method.
Managing Subviews
The UIView class offers numerous methods that help build and manage views. These methods let you add, order, remove, and query the view hierarchy. Since this hierarchy controls what you see onscreen, updating the way that views relate to each other changes what you see on the iPhone. Here are some approaches for typical view-management tasks.
Adding Subviews
Call [parentView addSubview:child] to add new subviews to a parent. Newly added subviews are always placed frontmost on your screen; the iPhone adds them on top of any existing views. To insert a subview into the view hierarchy at a particular location other than the front, the SDK offers a trio of utility methods:
• insertSubview:atIndex:
• insertSubview:aboveSubview:
• insertSubview:belowSubview:
These methods control where view insertion happens. That insertion can remain relative to another view, or it can move into a specific index of the subviews array. The above and below methods add subviews in front of or behind a given child. Insertion pushes other views forward and does not replace any views that are already there.
Reordering and Removing Subviews
Applications often need to reorder and remove views as users interact with the screen. The iPhone SDK offers several easy ways to do this, allowing you to change the view order and contents.
• Use [parentView exchangeSubviewAtIndex:i withSubviewAtIndex:j] to exchange the positions of two views.
• Move subviews to the front or back using bringSubviewToFront: and sendSubviewToBack.
• To remove a subview from its parent, call [childView removeFromSuperview]. If the child view had been onscreen, it disappears. Removing a child from the superview calls a release on the subview, allowing its memory to be freed if its retain count has returned to zero.
When you reorder, add, or remove views, the screen automatically redraws to show the new view presentation.
View Callbacks
When the view hierarchy changes, callbacks can be sent to the views in question. The iPhone SDK offers six callback methods. These callbacks may help your application keep track of views that are moving and changing parents.
• didAddSubview: is sent to a view after a successful invocation of addSubview: lets subclasses of UIView perform additional actions when new views are added.
• didMoveToSuperview: informs views that they’ve been re-parented to a new superview. The view may want to respond to that new parent in some way. When the view was removed from its superview, the new parent is nil.
• willMoveToSuperview: is sent before the move occurs.
• didMoveToWindow: provides the callback equivalent of didMoveToSuperview but when the view moves to a new Window hierarchy instead of to just a new superview.
• willMoveToWindow: is, again, sent before the move occurs.
• willRemoveSubview: informs the parent view that the child view is about to be removed.
Recipe: Tagging and Retrieving Views
The iPhone SDK offers a built-in search feature that lets you recover views by tagging them. Tags are just numbers, usually positive integers, that identify a view. Assign them using the view’s tag property, for example, myView.tag = 101. In Interface Builder, you can set a view’s tag in the attributes inspector. As Figure 6-2 shows, you specify the tag in the View section.
Figure 6-2 Set the tag for any view in Interface Builder’s attributes inspector.
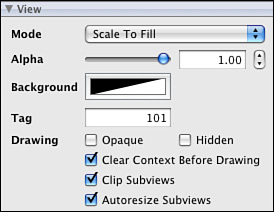
Tags are completely arbitrary. The only “reserved” tag is 0, which is the default property setting for all newly created views. It’s up to you to decide how you want to tag your views and which values to use. You can tag any instance that is a child of UIView, including windows and controls. So if you have many onscreen buttons and switches, adding tags helps tell them apart when users trigger them. You can add a simple switch statement to your callback methods that looks at the tag and determines how to react.
Apple rarely tags subviews. The only instance I have ever found of their view tagging has been in UIAlertViews where the buttons use tags of 1, 2, and so forth. (I’m half convinced they left this tagging in there as a mistake.) If you worry about conflicting with Apple tags, start your numbering at 10 or 100, or some other number higher than any value Apple might use.
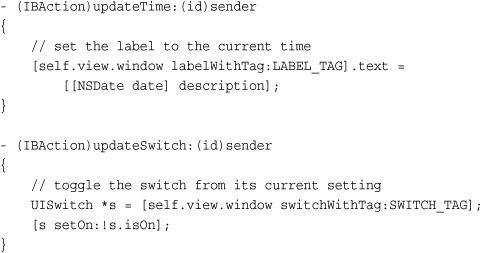
Using Tags to Find Views
Tags let you avoid passing user interface elements around your program by making them directly accessible from any parent view. The viewWithTag: method recovers a tagged view from a child hierarchy. The search is recursive, so the tagged item need not be an immediate child of the view in question. You can search from the window with [window viewWithTag:101] and find a view that is several branches down the hierarchy tree. When more than one view uses the same tag, viewWithTag: returns the first item it finds.
The problem with viewWithTag: is that it returns a UIView object. This means you often have to cast it to the proper type before you can use it. Say you want to retrieve a label and set its text.
UILabel *label = (UILabel *)[self.view.window viewWithTag:101];
label.text = @"Hello World";
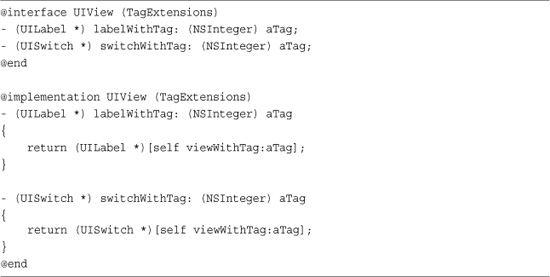
It would be far easier to use a call that returned an already typed object and then be able to use that object right away, as these calls do:
Recipe 6-3 extends the behavior of UIView to introduce a new category, TagExtensions. This category adds just two typed tag methods, for UILabel and UISwitch. The sample code for this book extends this to include a full suite of typed tag utilities. The additional classes were omitted for space considerations; they follow the same pattern of casting from viewWithTag:. Access the full collection by including the UIView-TagExtensions files in your projects.
Recipe 6-3 Recovering Tagged Views with Properly Cast Objects
Get This Recipe’s Code
To get the code used for this recipe, go to http://github.com/erica/iphone-3.0-cookbook-, or if you’ve downloaded the disk image containing all of the sample code from the book, go to the folder for Chapter 6 and open the project for this recipe.
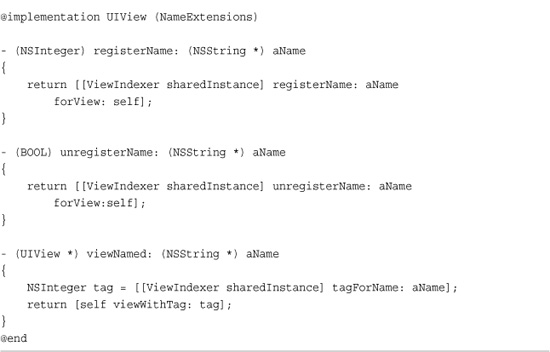
Recipe: Naming Views
Although tagging offers a thorough approach to identifying views, some developers may prefer to work with names rather than numbers. Using names adds an extra level of meaning to your view identification schemes. Instead of referring to “the view with a tag of 101,” a switch named “Ignition Switch” describes its role and adds a level of self-documentation missing from a plain number.

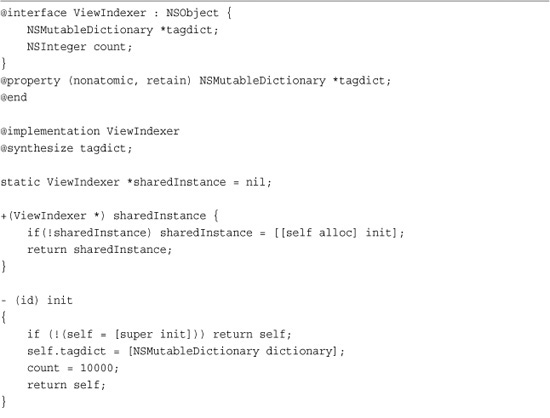
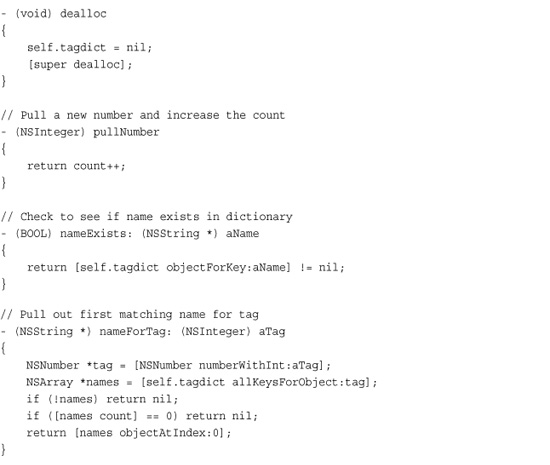
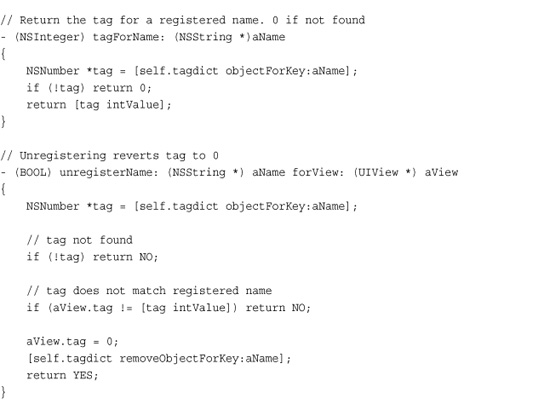
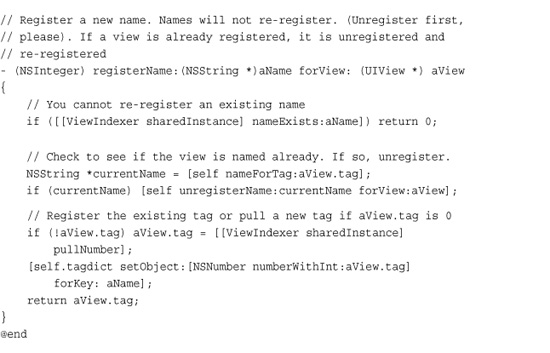
It’s relatively easy to design a class that associates strings with view tags. This custom class needs to store a dictionary that matches names with tags, allowing views to register and unregister those names. Recipe 6-4 shows how to build that view name manager, which uses a singleton instance ([ViewIndexer sharedInstance]) to store its tag and name dictionary.
Recipe 6-4 Creating a View Name Manager
Get This Recipe’s Code
To get the code used for this recipe, go to http://github.com/erica/iphone-3.0-cookbook-, or if you’ve downloaded the disk image containing all of the sample code from the book, go to the folder for Chapter 6 and open the project for this recipe.
The class demands unique names. If a view name is already registered, a new registration request will fail. If a view was already registered under another name, a second registration request will unregister the first name. There are ways to fool this of course. If you change a view’s tag and then register it again, the indexer has no way of knowing that the view had been previously registered. So if you decide to use this approach, set your tags in Interface Builder or let the registration process automatically tag the view but otherwise leave the tags be.
If you build your views by hand, register them at the same point you create them and add them into your overall view hierarchy. When using an IB-defined view, register your names in viewDidLoad using the tag numbers you set in the attributes inspector.

Recipe 6-4 hides the view indexer class from public view. It wraps its calls inside a UIView category for name extensions. This allows you to register, retrieve, and unregister views without using ViewIndexer directly. For reasons of space, the recipe omits typed name retrievals like labelNamed: and textFieldNamed:, but these are included in the sample code for the chapter.
View Geometry
As you’d expect, geometry plays an important role when working with views. Geometry defines where each view appears onscreen, what its size is, and how it is oriented. The UIView class provides two built-in properties that define these aspects.
Every view uses a frame to define its boundaries. The frame specifies the outline of the view: its location, width, and height. If you change a view’s frame, the view updates to match the new frame. Use a bigger width and the view stretches. Use a new location and the view moves. The view’s frame delineates each view’s onscreen outline. View sizes are not limited to the screen size. A view can be smaller than the screen or larger. It can also be smaller or larger than its parent.
Views also use a transform property that sets the view’s orientation and any geometric transformations that have been applied to it. For example, a view might be stretched or squashed by applying a transform, or it might be rotated away from vertical. Together the frame and transform fully define a view’s geometry.
Frames
Frame rectangles use a CGRect structure, which is defined as part of the Core Graphics framework as its CG prefix suggests. A CGRect is made up of an origin (a CGPoint, x and y) and a size (a CGSize, width and height). When you create views, you normally allocate them and initialize them with a frame, for example:
CGRect rect = CGRectMake(0.0f, 0.0f, 320.0f, 416.0f);
myView = [[UIView alloc] initWithFrame: rect];
The CGRectMake function creates a new rectangle using four parameters, the origin’s x and y locations, the width of the rectangle, and its height. In addition to CGRectMake, there are several other convenience functions you may want to be aware of that help you work with rectangles and frames.
• NSStringFromCGRect(aCGRect) converts a CGRect structure to a formatted string. This function makes it easy to log a view’s frame when you’re debugging.
• CGRectFromString(aString) recovers a rectangle from its string representation. It proves useful when you’ve stored a view’s frame as a string in user defaults and want to convert that string back to a CGRect.
• CGRectInset(aRect, xinset, yinset) enables you to create a smaller or larger rectangle that’s centered on the same point as the source rectangle. Use a positive inset for smaller rectangles, negative for larger ones.
• CGRectIntersectsRect(rect1, rect2) lets you know whether rectangle structures intersect. Use this function to know when two rectangular onscreen objects overlap.
• CGRectCreateDictionaryRepresentation(aRect) transforms a rectangle structure into a standard CFDictionaryRef, also known (via the magic of toll-free bridging) as (NSDictionary *) instances. Transform the dictionary back to a rectangle by using CGRectMakeWithDictionaryRepresentation(aDict, aRect).
• CGRectZero is a rectangle constant located at (0,0) whose width and height are zero. You can use this constant when you’re required to create a frame but are still unsure what that frame size or location will be at the time of creation.
The CGRect structure is made up of two substructures: CGPoint, which defines the rectangle’s origin, and CGSize, which defines its bounds. Points refer to locations defined with x and y coordinates; sizes have width and height. Use CGPointMake(x, y) to create points. CGSizeMake(width, height) creates sizes. Although these two structures appear to be the same (two floating-point values), the iPhone SDK differentiates between them. Points refer to locations. Sizes refer to extents. You cannot set myFrame.origin to a size.
As with rectangles, you can convert them to and from strings: NSStringFromCGPoint(), NSStringFromCGSize(), CGSizeFromString(), and CGPointFromString() perform these functions. You can also transform points and sizes to and from dictionaries.
Transforms
The iPhone supports standard affine transformations as part of its Core Graphics implementation. Affine transforms allow points in one coordinate system to transform into another coordinate system. These functions are widely used in both 2D and 3D animations. The version used in the iPhone SDK uses a 3-by-3 matrix to define UIView transforms, making it a 2D-only solution. With affine transforms, you can scale, translate, and rotate your views in real time. You do so by setting the view’s transform property, for example:

The transform is always applied with respect to the view’s center. So when you apply a rotation like this, the view rotates around its center. If you need to rotate around another point, you must first translate the view, then rotate, and then return from that translation.
To revert any changes, set the transform property to the identity transform. This restores the view back to the last settings for its frame.
myView.transform = CGAffineTransformIdentity;
Coordinate Systems
Views live in two worlds. Their frames are defined in the coordinate system of their parents. Their bounds and subviews are defined in their own coordinate system. The iPhone SDK offers several utilities that allow you move between these coordinate systems so long as the views involved live within the same UIWindow. To convert a point from another view into your own coordinate system, use convertPoint: fromView:, for example:
myPoint = [myView convertPoint:somePoint fromView:otherView];
If the original point indicated the location of some object, the new point retains that location but gives the coordinates with respect to myView’s origin. To go the other way, use convertPoint: toView: to transform a point into another view’s coordinate system. Similarly, convertRect: toView: and convertRect: fromView: work with CGRect structures rather than CGPoint ones.
Recipe: Working with View Frames
When you change a view’s frame, you update its size (i.e., its width and height) and its location. For example, you might move a frame as follows. This code creates a subview located at (0,0) and then moves it down 30 pixels to (0,30).

This approach is fairly uncommon. The iPhone SDK does not expect you to move a view by changing its frame. Instead, it provides you with a way to update a view’s position. The preferred way to do this is by setting the view’s center. Center is a built-in view property, which you can access directly:
myView.center = CGPointMake(160.0f, 55.0f);
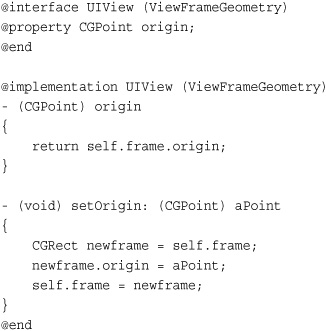
Although you’d expect the SDK to offer a way to move a view by updating its origin, no such option exists. It’s easy enough to build your own class extension. Retrieve the view frame, set the origin to the requested point, and then update the frame with change. This snippet creates a new origin property letting you retrieve and change the view’s origin.
When you move a view, you don’t need to worry about things such as rectangular sections that have been exposed or hidden. The iPhone takes care of the redrawing. This lets you treat your views like tangible objects and delegate rendering issues to Cocoa Touch.
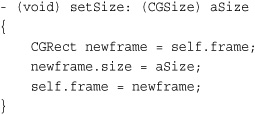
Adjusting Sizes
A view’s frame and bounds control its size. Frames, as you’ve already seen, define the location of a view in its parent’s coordinate system. If the frame’s origin is set to (0, 30), the view appears in the superview flush with the left side of the view and offset 30 pixels from the top. Bounds define a view within its own coordinate system. That means the origin for a view’s bounds, that is, myView.bounds, is always (0,0), and its size matches its normal extent, that is, the frame’s size property.
Change a view’s size onscreen by adjusting either its frame or its bounds. In practical terms, you’re updating the size component of those structures. As with moving origins, it’s simple to create your own utility method to do this directly.
When a view’s size changes, the view itself updates live onscreen. Depending how the elements within the view are defined and the class of the view itself, subviews may shrink to fit or they may get cropped. There’s no single rule that covers all circumstances. Interface Builder’s size inspector offers interactive resizing options that define how subviews respond to changes in a superview’s frame. See Chapter 4, “Designing Interfaces,” for more details about laying out items in Interface Builder.
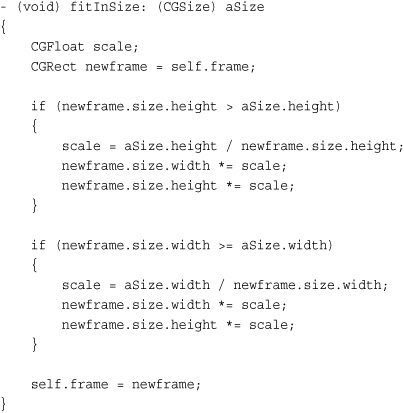
Sometimes, you need to resize a view before adding it to a new parent. For example, you might have an image view to place into an alert. To fit that view into place without changing its aspect ratio, you might use a method like this to ensure that both the height and width scale appropriately.
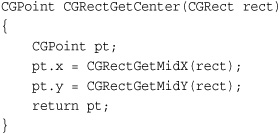
CGRects and Centers
As you’ve seen, UIViews use CGRect structures composed of an origin and a size to define their frames. This structure contains no references to a center point. At the same time, UIViews depend on their center property to update a view’s position when you move a view to a new point. Unfortunately Core Graphics doesn’t use centers as a primary rectangle concept. As far as centers are concerned, Core Graphics’ built-in utilities are limited to recovering a rectangle’s midpoint along the X- or Y-axis.
You can bridge this gap by constructing functions that coordinate between the origin-based CGRect struct and center-based UIView objects. This function retrieves the center from a rectangle by building a point from the X- and Y- midpoints. It takes one argument, a rectangle, and returns its center point.
Moving a rectangle by its center point is another function that may prove helpful, and one that mimics the way UIViews work. Say you need to move a view to a new position but need to keep it inside its parent’s frame. To test before you move, you’d use a function like this to offset the view frame to a new center. You could then test that offset frame against the parent (use CGRectContainsRect()) and ensure that the view won’t stray outside its container.

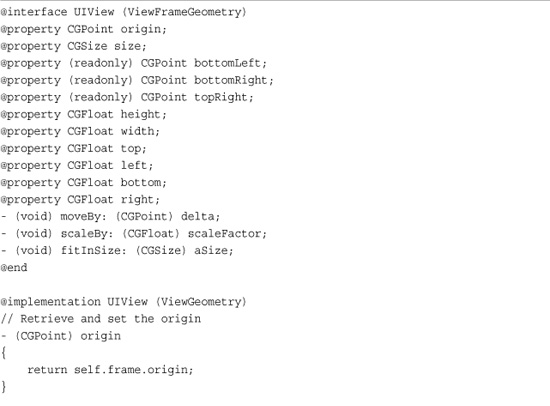
Other Utility Methods
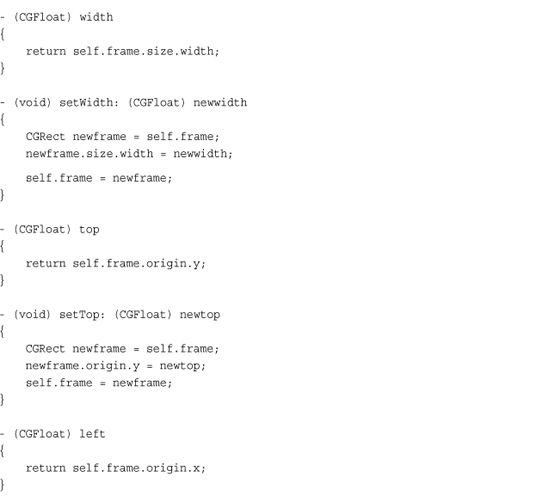
As you’ve seen, it’s convenient to expose a view’s origin and size in parallel to its center, allowing you to work more natively with Core Graphics calls. You can build on this idea to expose other properties of the view including its width and height, as well as basic geometry like its left, right, top, and bottom points.
In some ways, this breaks Apple’s design philosophy. This exposes items that normally fall into structures without reflecting the structures. At the same time, it can be argued that these elements are true view properties. They reflect fundamental view characteristics and deserve to be exposed as properties.
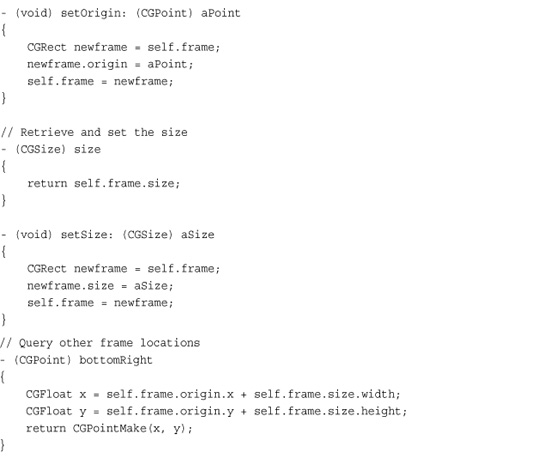
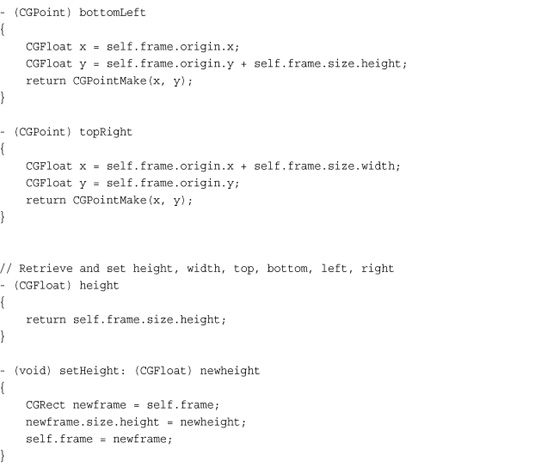
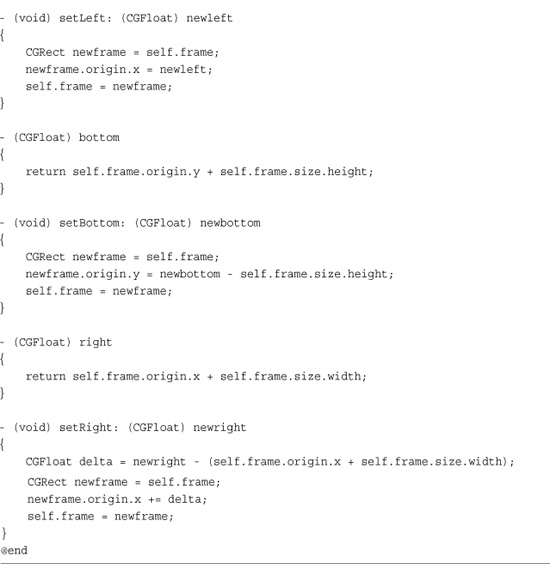
Recipe 6-5 provides a full view frame utility category for UIView, letting you make the choice of whether to use these properties.
Recipe 6-5 UIView Frame Geometry Category
Get This Recipe’s Code
To get the code used for this recipe, go to http://github.com/erica/iphone-3.0-cookbook-, or if you’ve downloaded the disk image containing all of the sample code from the book, go to the folder for Chapter 6 and open the project for this recipe.
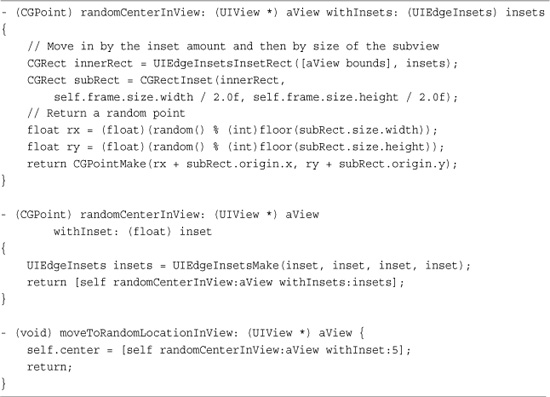
Recipe: Randomly Moving a Bounded View
When you move a view to a random point, you must take into account several things. Often a view must fit entirely within its parent’s view container so there aren’t parts of the view clipped off. You may also want to add a boundary to that container so the view does not quite touch the parent’s edge at any time. Finally, if you’re working with out-of-the-box SDK versions of the UIView class, you need to work with random centers, not random positions, as discussed earlier in this chapter. Just picking a point somewhere in the parent view fails some or all of these qualifications.
Recipe 6-6 approaches this problem by creating a series of insets. It uses the UIEdgeInset structure to define the boundaries for the view. This structure contains four inset values, corresponding to the amount to inset a rectangle at its top, left, bottom, and right.
typedef struct {
CGFloat top, left, bottom, right;
} UIEdgeInsets;
Recipe 6-6 Randomly Moving a Bounded View
Get This Recipe’s Code
To get the code used for this recipe, go to http://github.com/erica/iphone-3.0-cookbook-, or if you’ve downloaded the disk image containing all of the sample code from the book, go to the folder for Chapter 6 and open the project for this recipe.
This method uses the UIEdgeInsetsInsetRect() function to narrow a CGRect rectangle to create an inner container, which is called innerRect in this method.
It then narrows the container even further. It insets that rectangle by half the child’s height and width. This leaves enough room around any point in the subrectangle to allow the placement of the child view, guaranteeing that the view can do so without overlapping the inner bounded rectangle. Select any point in that subrectangle to return a valid center for the child view.
Recipe: Transforming Views
Affine transforms enable you to change an object’s geometry by mapping that object from one view coordinate system into another. The iPhone SDK fully supports standard affine 2D transforms. With them, you can scale, translate, rotate, and skew your views however your heart desires and your application demands.
Transforms are defined in Core Graphics and consist of calls such as CGAffineTransformMakeRotation and CGAffineTransformScale. These build and modify the 3-by-3 transform matrices. Once built, use UIView’s setTransform call to apply 2D affine transformations to UIView objects.
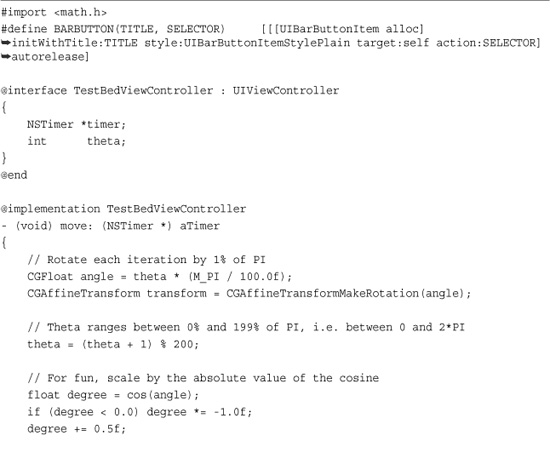
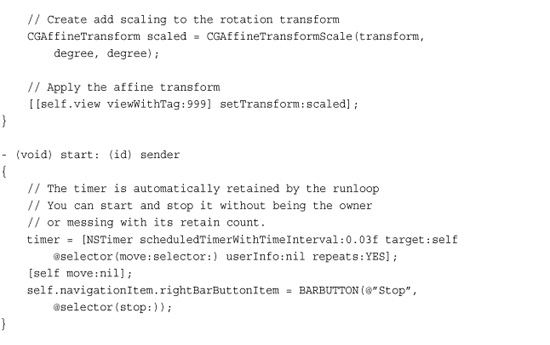
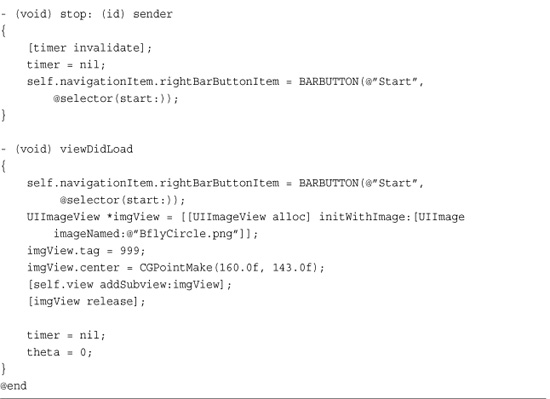
Recipe 6-7 demonstrates how to build and apply an affine transform of a UIView. To create the sample, I kept things simple. I build an NSTimer that ticks every 1/30th of a second. On ticking, it rotates a view by 1% of pi and scales over a cosine curve. I use the cosine’s absolute value for two reasons. It keeps the view visible at all times, and it provides a nice bounce effect when the scaling changes direction. This produces a rotating bounce animation.
Recipe 6-7 Example of an Affine Transform of a UIView
Get This Recipe’s Code
To get the code used for this recipe, go to http://github.com/erica/iphone-3.0-cookbook-, or if you’ve downloaded the disk image containing all of the sample code from the book, go to the folder for Chapter 6 and open the project for this recipe.
This is one of those samples that it’s best to build and view as you read through the code. You are better able to see how the handleTimer: method correlates to the visual effects you’re looking at.
Note
This recipe uses the standard C math library, which provides both the cosine function and the M_PI constant.
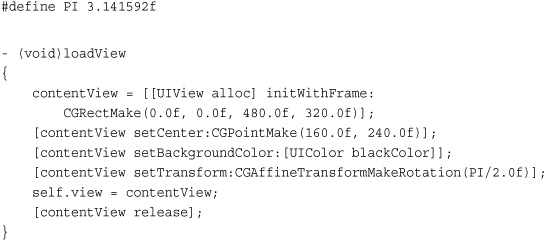
Centering Landscape Views
Use the same affine transform approach to center landscape-oriented views. This snippet creates a 480-by-320 pixel view, centers it at [160, 240] (using portrait view coordinates), and then rotates it into place. Half of pi corresponds to 90 degrees, creating a landscape-right rotation. Centering keeps the entire view onscreen. All subviews, including text fields, labels, switches, and so on rotate into place along with the parent view.
For the most part, it’s far easier using UIViewControllers to work with reorientation events than manually rotating and presenting views. Additionally, manual view rotation does not change the status bar orientation nor the keyboard orientation. Chapter 4 discusses view controllers and reorientation in depth.
Display and Interaction Traits
In addition to physical screen layout, the UIView class provides properties that control how your view appears onscreen and whether users can interact with it. Every view uses a translucency factor (alpha) that ranges between opaque and transparent. Adjust this by issuing [myView setAlpha:value], where the alpha values falls between 0.0 (fully transparent) and 1.0 (fully opaque). This is a great way to hide views and to fade them in and out onscreen.
You can assign a color to the background of any view. [myView setBackgroundColor: [UIColor redColor]] colors your view red, for example. This property affects different view classes in different ways depending on whether those views contain subviews that block the background. Create a transparent background by setting the view’s background color to clear (i.e. [UIColor clearColor]).
Every view, however, offers a background color property regardless of whether you can see the background. Using bright, contrasting background colors is great way to visually see the true extents of views. When you’re new to iPhone development, coloring in views offers a concrete sense of what is and is not onscreen and where each component is located.
The userInteractionEnabled property controls whether users can touch and interact with a given view. For most views, this property defaults to YES. For UIImageView, it defaults to NO, which can cause a lot of grief among beginning developers. They often place a UIImageView as their backsplash and don’t understand why their switches, text entry fields, and buttons do not work. Make sure to enable the property for any view that needs to accept touches, whether for itself or for its subviews, which may include buttons, switches, pickers, and other controls. If you’re experiencing trouble with items that seem unresponsive to touch, you should check the userInteractionEnabled property value for that item and for its parents.
Disable this property for any display-only view you layer over your interaction area. To show a noninteractive clock via a transparent full-screen view, unset interaction. This allows touches to pass through the view and fall below to the actual interaction area of your application.
UIView Animations
UIView animation provides one of the odd but lovely perks of working with the iPhone as a development platform. It enables you to slow down changes when updating views, producing smooth animated results that enhance the user experience. Best of all, this all occurs without you having to do much work.
UIView animations are perfect for building a visual bridge between a view’s current and changed states. With them, you emphasize visual change and create an animation that links those changes together. Animatable changes include the following:
• Changes in location—Moving a view around the screen
• Changes in size—Updating the view’s frame and bounds
• Changes in stretching—Updating the view’s content stretch regions
• Changes in transparency—Altering the view’s alpha value
• Changes in states—Hidden versus showing
• Changes in view order—Altering which view is in front
• Changes in rotation—Or any other affine transforms that you apply to a view
Building UIView Animation Blocks
UIView animations work as blocks, that is, a complete transaction that progresses at once. Start the block by issuing beginAnimations:context:. End the block with commitAnimations. Send these class methods to UIView and not to individual views. In the block between these two calls, you define the way the animation works and perform the actual view updates. The animation controls you’ll use are as follows:
• beginAnimations:context—Marks the start of the animation block.
• setAnimationCurve—Defines the way the animation accelerates and decelerates. Use ease-in/ease-out (UIViewAnimationCurveEaseInOut) unless you have some compelling reason to select another curve. The other curve types are ease in (accelerate into the animation), linear (no animation acceleration), and ease out (accelerate out of the animation). Ease-in/ease-out provides the most natural-feeling animation style.
• setAnimationDuration—Specifies the length of the animation, in seconds. This is really the cool bit. You can stretch out the animation for as long as you need it to run. Be aware of straining your user’s patience and keep your animations below a second or two in length. As a point of reference, the keyboard animation, when it slides on or offscreen, lasts 0.3 seconds.
• commitAnimations—Marks the end of the animation block.
Sandwich your actual view change commands after setting up the animation details and before ending the animation.
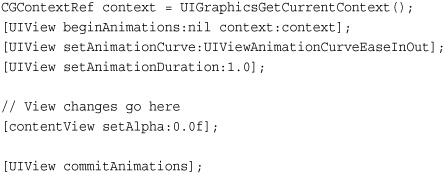
This snippet shows UIView animations in action by setting an animation curve and the animation duration (here, one second). The actual change being animated is a transparency update. The alpha value of the content view goes to zero, turning it invisible. Instead of the view simply disappearing, this animation block slows down the change and fades it out of sight. Notice the call to UIGraphicsGetCurrentContext(), which returns the graphics context at the top of the current view stack. A graphics context provides a virtual connection between your abstract drawing calls and the actual pixels on your screen (or within an image). As a rule, you can pass nil for this argument without ill effect in the latest SDKs.
Animation Callbacks
View animations can notify an optional delegate about state changes, namely that an animation has started or ended. This proves helpful when you need to catch the end of an animation to start the next animation in a sequence. To set the delegate, use setAnimationDelegate:, for example:
[UIView setAnimationDelegate:self];
To set up an end-of-animation callback, supply the selector sent to the delegate.
[UIView setAnimationDidStopSelector:@selector(animationDidStop:finished:context:)];
You see animation callbacks in action later in this chapter in Recipe 6-9, which animates a view swap.
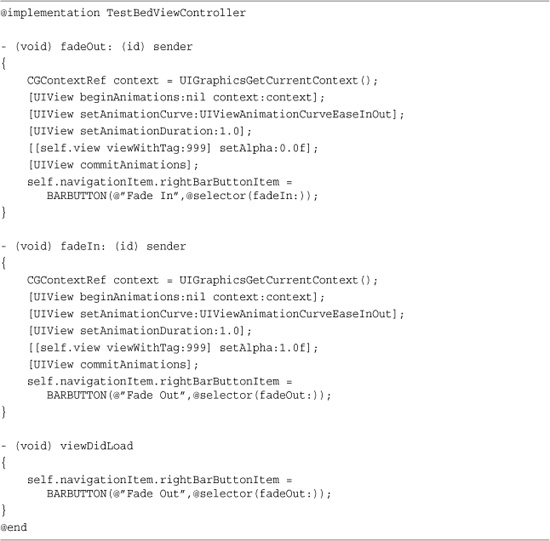
Recipe: Fading a View In and Out
At times, you want to add information to your screen that overlays your view but does not of itself do anything. For example, you might show a top scores list or some instructions or provide a context-sensitive tooltip. Recipe 6-8 demonstrates how to use a UIView animation block to fade a view into and out of sight. This recipe follows the most basic animation approach. It creates a surrounding view animation block and then adds the single line of code that sets the alpha property.
Recipe 6-8 Animating Transparency Changes to a View’s Alpha Property
Get This Recipe’s Code
To get the code used for this recipe, go to http://github.com/erica/iphone-3.0-cookbook-, or if you’ve downloaded the disk image containing all of the sample code from the book, go to the folder for Chapter 6 and open the project for this recipe.
One thing this recipe does not do is wait for the animation to finish. The change in the bar button item gets called as soon as the animations are committed, nearly a second before they end. If you tap the Fade In/Fade Out button quickly (you may want to slow the animation duration to see this better), you discover that the new animation starts up, replacing the old one, creating a visual discontinuity.
To address this, you might want to add a call to UIView with setAnimationBeginsFromCurrentState:, setting the argument to YES. This tells the iPhone to use the current state of the ongoing animation to start the next animation, avoiding that jump.
Recipe: Swapping Views
The UIView animation block doesn’t limit you to a single change. Recipe 6-9 combines size transformations with transparency changes to create a more compelling animation. It does this by adding several directives at once to the animation block. This recipe performs five actions at a time. It zooms and fades one view into place while zooming out and fading away another and then exchanges the two in the subview array list.
Recipe 6-9 Combining Multiple View Changes in Animation Blocks

Get This Recipe’s Code
To get the code used for this recipe, go to http://github.com/erica/iphone-3.0-cookbook-, or if you’ve downloaded the disk image containing all of the sample code from the book, go to the folder for Chapter 6 and open the project for this recipe.
Notice how the viewDidLoad method prepares the back object for animation by shrinking it and making it transparent. When the swap: method first executes, that view will be ready to appear and zoom to size.
Unlike Recipe 6-8, this recipe does wait for the animation to finish by providing a delegate and a simplified callback that ignores the parameters of the default callback invocation (animationDidStop:finished:context:). This code hides the bar button after it is pressed and does not return it to view until the animation completes.
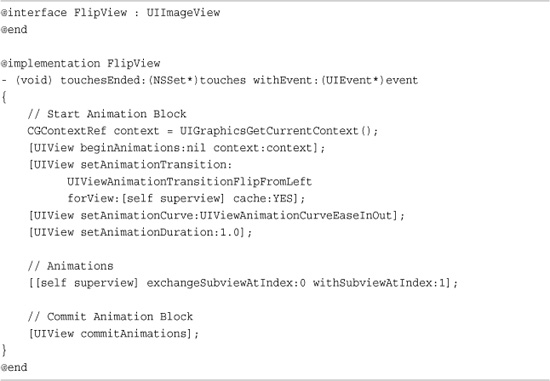
Recipe: Flipping Views
Transitions extend UIView animation blocks to add even more visual flair. Two transitions—UIViewAnimationTransitionFlipFromLeft and UIViewAnimationTransitionFlipFromRight—do just what their names suggest. You can flip views left or flip views right like the Weather and Stocks applications do. Recipe 6-10 demonstrates how to do this.
Recipe 6-10 Using Transitions with UIView Animation Blocks
Get This Recipe’s Code
To get the code used for this recipe, go to http://github.com/erica/iphone-3.0-cookbook-, or if you’ve downloaded the disk image containing all of the sample code from the book, go to the folder for Chapter 6 and open the project for this recipe.
First, you add the transition as a block parameter. Use setAnimationTransition: to assign the transition to the enclosing UIView animation block. Second, rearrange the view order while inside the block. This is best done with exchangeSubviewAtIndex:withSubviewAtIndex:. Recipe 6-10 creates a simple flip view using these techniques.
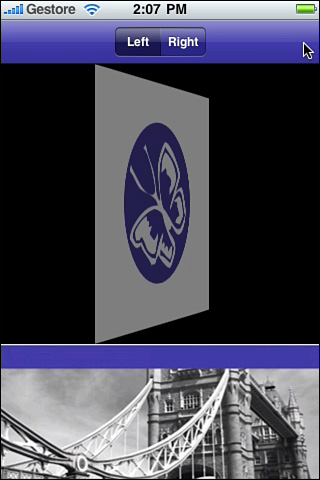
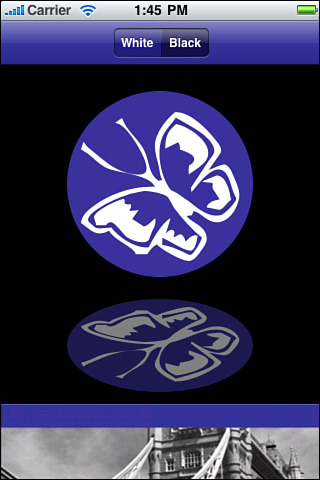
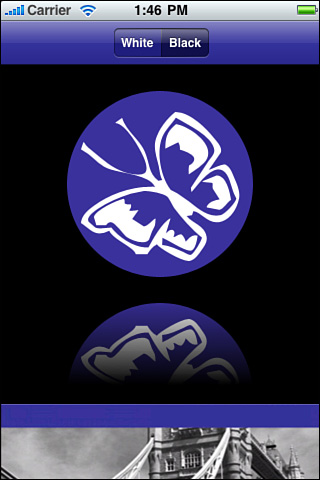
What this code does not show you is how to set up your views. UIKit’s flip transition more or less expects a black background to work with. And the transition needs to be performed on a parent view while exchanging that parent’s two subviews. Figure 6-3 reveals the view structure used with this recipe.
Figure 6-3 Use two backdrops when building a flip transition.
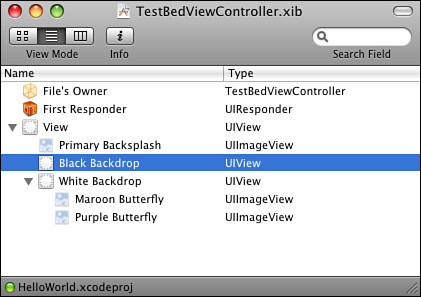
Here, you see a black and white backdrop, both using the same frame. The white backdrop contains the two child views, again using identical frames. When the flip occurs, the white backdrop “turns around,” as shown in Figure 6-4, to reveal the second child view.
Figure 6-4 Create a black backdrop when using flip transition animations.
Do not confuse the UIView animation blocks with the Core Animation CATransition class. Unfortunately, you cannot assign a CATransition to your UIView animation. To use a CATransition, you must apply it to a UIView’s layer, which is discussed next.
Recipe: Using Core Animation Transitions
In addition to UIView animations, the iPhone supports Core Animation as part of its QuartzCore framework. The Core Animation API offers highly flexible animation solutions for your iPhone applications. Specifically, it offers built-in transitions that offer the same kind of view-to-view changes you’ve been reading about in the previous recipe.
Core Animation Transitions expand your UIView animation vocabulary with just a few small differences in implementation. CATransitions work on layers rather than on views. Layers are the Core Animation rendering surfaces associated with each UIView. When working with Core Animation, you apply CATransitions to a view’s default layer ([myView layer]) rather than the view itself.
With these transitions, you don’t set your parameters through UIView the way you do with UIView animation. You create a Core Animation object, set its parameters, and then add the parameterized transition to the layer.
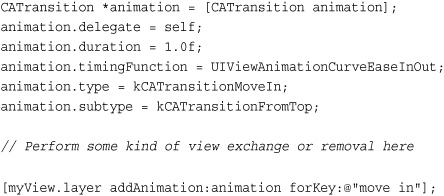
Animations use both a type and a subtype. The type specifies the kind of transition used. The subtype sets its direction. Together the type and subtype tell how the views should act when you apply the animation to them.
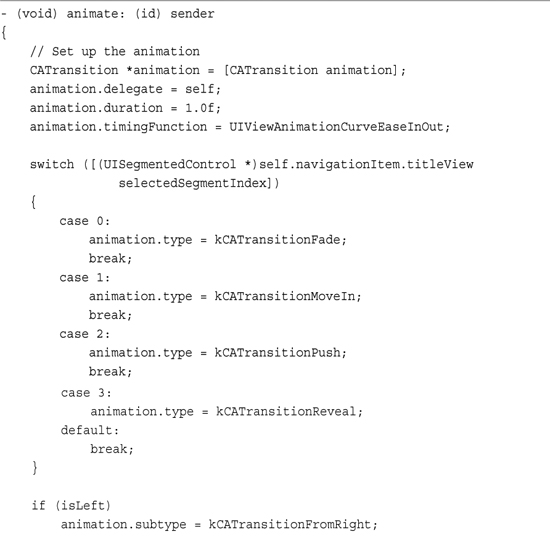
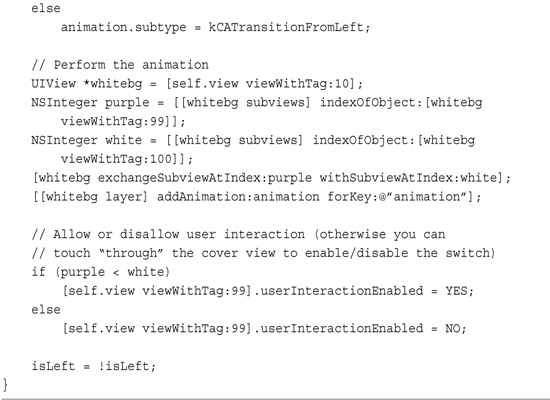
Core Animation Transitions are distinct from the UIViewAnimationTransitions discussed in previous recipes. Cocoa Touch offers four types of Core Animation transitions, which are highlighted in Recipe 6-11. These available types include cross fades, pushes (one view pushes another offscreen), reveals (one view slides off another), and covers (one view slides onto another). The last three types enable you to specify the direction of motion for the transition using their subtypes. For obvious reasons, cross fades do not have a direction and they do not use subtypes.
Recipe 6-11 Animating Transitions with Core Animation
Get This Recipe’s Code
To get the code used for this recipe, go to http://github.com/erica/iphone-3.0-cookbook-, or if you’ve downloaded the disk image containing all of the sample code from the book, go to the folder for Chapter 6 and open the project for this recipe.
Because Core Animation is part of the QuartzCore framework, you must add the Quartz Core framework to your project and import <QuartzCore/QuartzCore.h> into your code when using these features.
Note
Apple’s Core Animation features 2D and 3D routines built around Objective-C classes. These classes provide graphics rendering and animation for your iPhone and Macintosh applications. Core Animation avoids many low-level development details associated with, for example, direct OpenGL while retaining the simplicity of working with hierarchical views.
Recipe: General Core Animation Calls
The iPhone provides partial support for Core Animation calls. By partial, I mean that some standard classes are missing in action, although they’re slowly showing up as the iPhone SDK evolves. Core Image’s CIFilter is one such class. It’s not included in Cocoa Touch, although the CALayer and CATransition classes are both filter-aware. If you’re willing to work through these limits, you can freely use standard Core Animation calls in your programs.
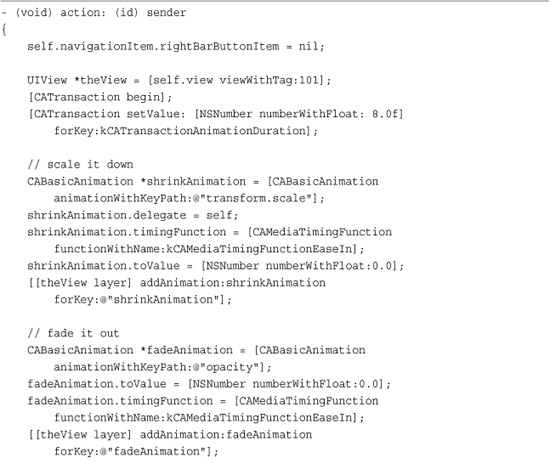
Recipe 6-12 shows iPhone native Core Animation code based on a sample from Lucas Newman (http://lucasnewman.com). When run, this method scales down and fades away the contents of a UIImageView.
Recipe 6-12 Using Standard Core Animation Calls on the iPhone
Get This Recipe’s Code
To get the code used for this recipe, go to http://github.com/erica/iphone-3.0-cookbook-, or if you’ve downloaded the disk image containing all of the sample code from the book, go to the folder for Chapter 6 and open the project for this recipe.
This code remains virtually unchanged from the Mac OS X sample it was based on. More complex Core Animation samples may offer porting challenges, but for simple reflections, shadows, and transforms, all the functionality you need can be had at the native iPhone level.
Curl Transitions
The previous two recipes introduced two important concepts: UIView animation transitions and Core Animation transitions. These approaches allow you to animate the way your application moves from displaying one view to showing another. In addition to the two flip transitions, the UIView class supports a pair of curl transitions, namely UIViewAnimationTransitionCurlUp and UIViewAnimationTransitionCurlDown. These curl-based transitions offer another way to change views, in this case curling up the view until the new view gets revealed. Figure 6-5 shows the page curl in action.
Figure 6-5 Using UIView curl animations
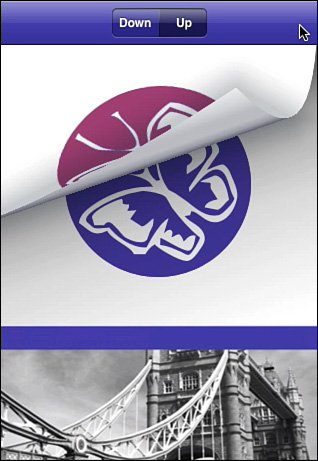
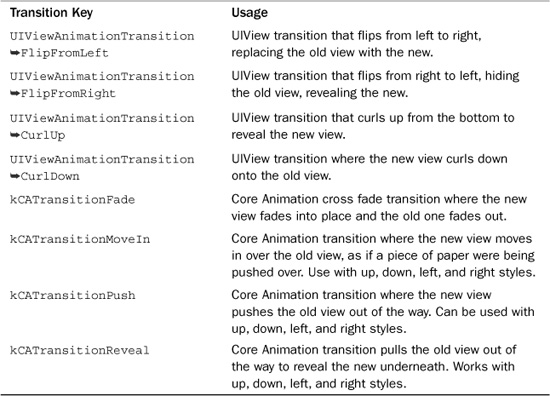
You build and apply the animation the same way you did with the built-in flip transition. Apply the transition to a backdrop that owns the two views you want to animate and exchange those views. Table 6-1 lists the transitions available on the iPhone.
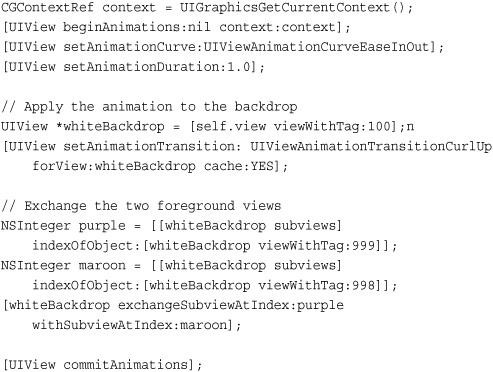
Table 6-1 Cocoa Touch Transitions
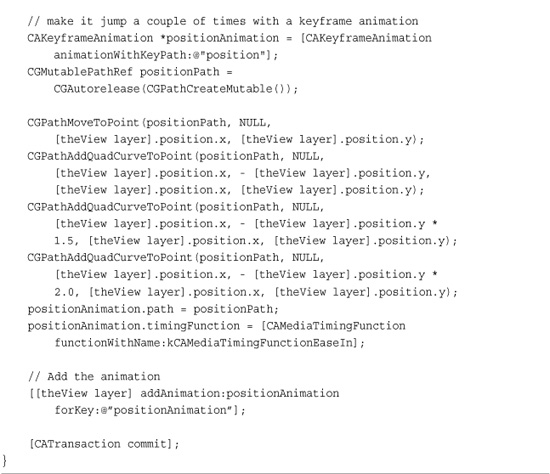
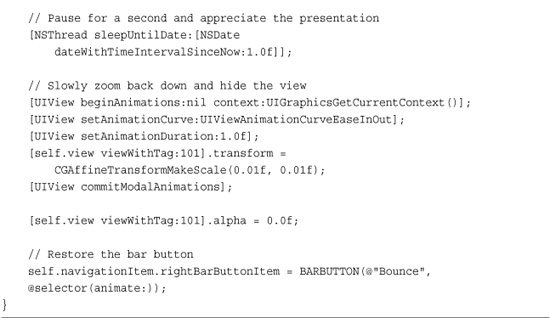
Recipe: Bouncing Views as They Appear
Apple often uses two animation blocks one called after another finishes to add bounce to their animations. For example, they might zoom into a view a bit more than needed and then use a second animation to bring that enlarged view down to its final size. Using “bounces” adds a little more life to your animation sequences, adding an extra physical touch.
When calling one animation after another, be sure that the animations do not overlap. There are two “standard” ways to create sequential UIView animation blocks without using CAKeyframeAnimation. (Core Animation keyframe animation is the preferred and more straightforward approach to doing this and is demonstrated later in this chapter.)
Neither of these is ideal; they create a bit of a programming nightmare, as control needs to keep moving between methods. Standard solutions include adding a delay so that the second animation does not start until the first ends (performSelector:withObject: afterDelay:) and assigning an animation delegate callback (animationDidStop: finished:context:) or, if you ignore the callback arguments, a simpler method like animationFinished:) to catch the end of the first animation before starting the second.
From a simple programming point of view, it’s a lot easier to build an animation that blocks until it finishes. Listing 6-2 does exactly that. It extends the UIView class to introduce a new class method called commitModalAnimations. You call this instead of commitAnimations. It creates a new runloop, running it until the animation finishes. This ensures that the commitModalAnimations method does not return control to the calling method until the animation completes. With this extension, you can place blocks sequentially in your code and need no further work to avoid overlaps.
Listing 6-2 Creating a Modal Animation by Using a Run Loop

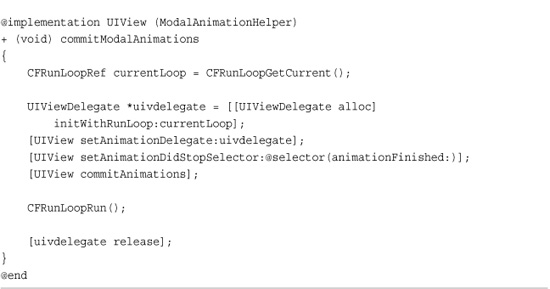
This modal approach allows you to create the bounced presentation demonstrated in Recipe 6-13. Here, each animation block ends with the modal commit. That method’s runloop prevents the next block from starting until the previous block finishes.

Get This Recipe’s Code
To get the code used for this recipe, go to http://github.com/erica/iphone-3.0-cookbook-, or if you’ve downloaded the disk image containing all of the sample code from the book, go to the folder for Chapter 6 and open the project for this recipe.
Recipe: Image View Animations
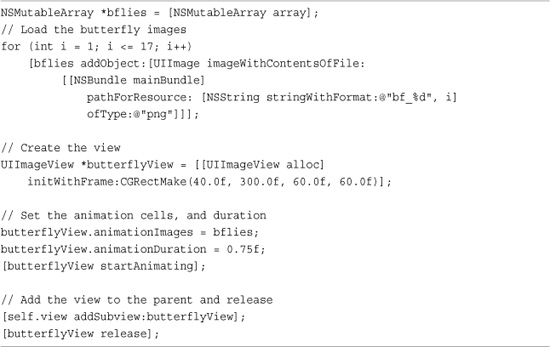
In addition to displaying static pictures, the UIImageView class supports built-in animation. After loading an array of images, you can tell instances to animate them. Recipe 6-14 shows you how.
Recipe 6-14 Using UIImageView Animation
Get This Recipe’s Code
To get the code used for this recipe, go to http://github.com/erica/iphone-3.0-cookbook-, or if you’ve downloaded the disk image containing all of the sample code from the book, go to the folder for Chapter 6 and open the project for this recipe.
Start by creating an array populated by individual images loaded from files and assign this array to the UIImageView instance’s animationImages property. Set the animationDuration to the total loop time for displaying all the images in the array. Finally, begin animating by sending the startAnimating message. (There’s a matching stopAnimating method available for use as well.)
Once you add the animating image view into your interface, you can place it into a single location, or you can animate it just as you could animate any other UIView instance.
One More Thing: Adding Reflections to Views
Reflections enhance the reality of onscreen objects. They provide a little extra visual spice beyond the views-floating-over-a-backsplash, which prevails as the norm. Reflections aren’t hard to implement, depending on how particular you want the results to be.
The simplest reflections involve nothing more than a flipped copy of the original view and, perhaps, adjusting the reflection’s alpha levels to offer a more ethereal presentation. Listing 6-3 shows a basic Core Animation-based reflection that copies the view into a new layer, flips it via a scale transform, and displaces it a set distance. Figure 6-6 shows this kind of basic reflection in action.
Listing 6-3 Creating Reflections
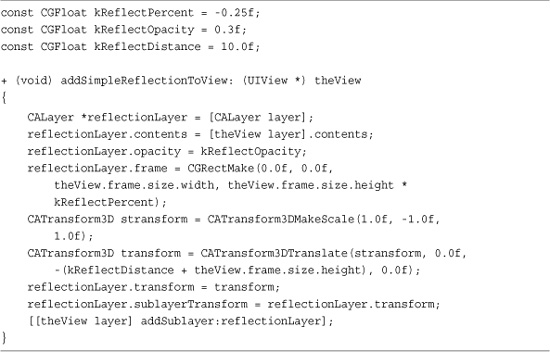
Figure 6-6 A basic Core Animation reflection uses scaling, transparency, and a slight vertical offset.
With this approach, the reflection layer travels with the view. When you move the view, the reflection moves with it.
Better Reflections
Although full-size reflections work well in simple interfaces, a better reflection fades away at its bottom. This provides a slicker, more “Apple-y” presentation. Core Graphics functions allow you to create these flipped, masked reflections shown in Figure 6-7.
Figure 6-7 Masking away the bottom of a reflected image creates a more Apple-like reflection.
This solution comes admittedly at a slightly higher cost than the basic solution from Listing 6-3. The faded-reflection solution, which you can see in Listing 6-4, relies on copying the view contents to a shortened bitmap and applying a gradient-based mask. These results, which are returned as a UIImage, are added to the original view as a new UIImageView. Using this subview approach provides another simple solution that allows the reflection to stick to its parent.
Listing 6-4 Masking Reflections with Core Graphics
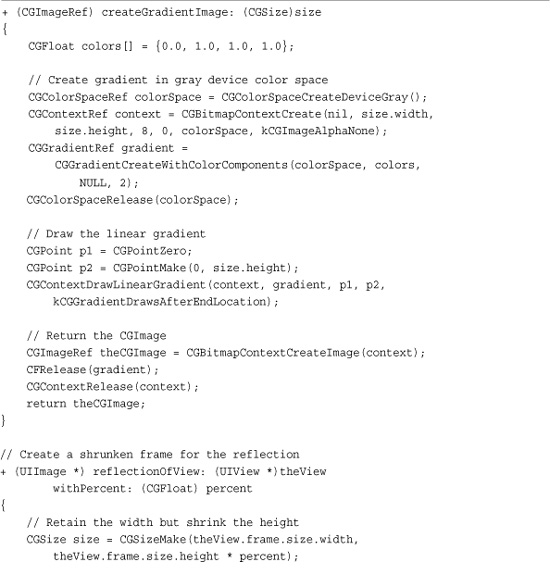
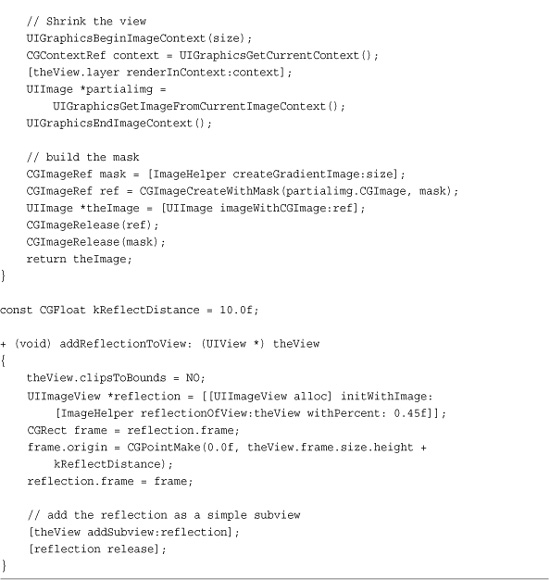
To make this reflection effect work, it’s vital that you disable view clipping. Set the view’s clipsToView to NO. That ensures the parent view won’t clip away the reflection; it remains completely viewable, even those parts that fall outside the parent’s bounds.
Summary
UIViews provide the onscreen components your users see and interact with. As this chapter showed, even in their most basic form, they offer incredible flexibility and power. You discovered how to use views to build up elements on a screen, retrieve views by tag or name, and introduce eye-catching animation. Here’s a collection of thoughts about the recipes you saw in this chapter that you might want to ponder before moving on:
• When dealing with multiple onscreen views, hierarchy should always remain in your mind. Use your view hierarchy vocabulary (bringSubviewToFront:, sendSubviewToBack:, exchangeSubviewAtIndex:withSubviewAtIndex:) to take charge of your views and always present the proper visual context to your users.
• Don’t let the Core Graphics frame/UIKit center dichotomy stand in your way. Use functions that help you move between these structures to produce the results you need.
• Make friends with tags. They provide immediate access to views in the same way that your program’s symbol table provides access to variables.
• Animate everything. Animations don’t have to be loud, splashy, or bad design. The iPhone’s strong animation support enables you to add smooth transitions between user tasks. The essence of the iPhone experience is subtle, smooth transitions. Short, smooth, focused changes are the iPhone’s bread and butter.