
Declaring Variables and Constants
Programming is largely about solving problems with math, and to do that you need to store values and represent them in your algorithms. Most programming languages share a similar approach to storing values, yet the simplicity or terseness of syntax seems to be a differentiator amongst modern languages. Swift delivers a concise yet logical syntax that creates a harmonious balance between the coder and the compiler. This chapter will show you how to create stored values in Swift as compared with Objective-C, beginning with an explanation of how the two languages differ in approach.
Note The phrase “stored value” is used interchangeably with “variable” and/or “constant” throughout this book.
Value Types and Reference Types
Objective-C, being a superset of C, deals in scalar values (such as int, float, and char), typedef wrappers around scalar values (for example, NSInteger and CGFloat), object pointer references (seminally, NSObject), and even object pointer reference wrappers around scalar values (NSNumber). This is an oversimplification, but the point to be taken here is that storing values in Objective-C can be handled in a variety of different ways. Swift, by contrast, consists of two fundamental categories: value types and reference types.
Value types include structures and enumerations. All of Swift’s basic data types—integers, floating-point numbers, booleans, strings, arrays, and dictionaries—are implemented as structures. Characters are implemented as enumerations. Classes and closures are reference types. Figure 2-1 provides a breakdown of value types and reference types in Swift. Of the types listed in the figure, you may not be familiar with tuples or closures, which will be covered in the next chapter and in Chapter 5, respectively.
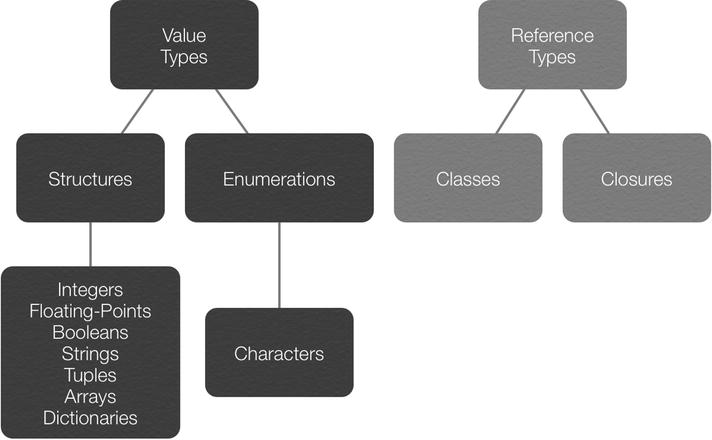
Figure 2-1. Value types and reference types in Swift
A value type is copied, such as when assigned to a variable or when passed to a method. Behind the scenes, Swift will actually only perform a copy when it is absolutely necessary to do so. But for all intents and purposes, consider that you are always passing value types by copy. Coming from Objective-C, you may be used to using the copy attribute when creating immutable properties of classes such as NSString that have mutable counterparts, to ensure that your property maintains its own state. This is automatic in Swift with all value types including String, for example.
Conversely, a reference type is always passed around by reference to the same instance. A reference type passed in to a method, for example, is the same instance referred to within the method as external to it.
Named Types and Compound Types
Swift also classifies types as being either named or compound. Named types can, well, be named when they are defined. Named types can also have methods associated with them and be extended; see Chapters 7, 8, and 9 for details. Classes, structures, enumerations, and protocols are named types. Compound types are not named, as they are defined in the Swift language itself. Function types and tuples are compound types. Function types represent closures, functions (also known as named closures), and methods (functions within a class); see Chapter 6 for details. Tuple types are comma-separated lists enclosed in parentheses.
Being aware of this lexical grouping may be of less practical importance than knowing whether an item you’re dealing with is passed around in your code as a copy or as a reference to the same instance. Just remember that only class types are passed by reference; everything else is passed by copy. Figure 2-2 provides a breakdown of named types and compound types in Swift.
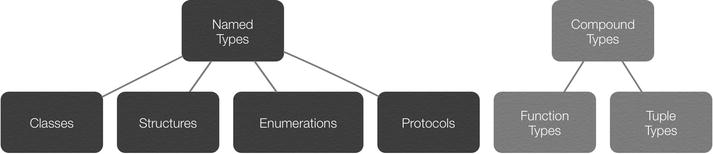
Figure 2-2. Named types and compound types in Swift
Naming
Nearly any character can be used to name a named type, including most Unicode characters but excluding mathematical symbols, arrows, and line- and box- or other invalid Unicode characters. Like Objective-C, Swift names cannot begin with a number, although they can be included elsewhere within the name. You can even use reserved words as names in Swift, simply by enclosing the name in back ticks (`); however, this is generally discouraged. Carrying forward tradition, variable and constant names should begin with a lower case letter and use camel case notation.
Objective-C offers several classes in both “regular” and mutable versions, such as NSString/NSMutableString, NSArray/NSMutableArray, and so on. In Swift, mutability is determined when you create an instance, not by choice of class. An instance is declared as being either a variable or constant, thus establishing whether it can or cannot be changed.
Variables are declared using the var keyword and are mutable. Constants are immutable and declared using the let keyword. Constants must be assigned a value when declared, with one exception: when declaring properties, a constant property can be declared without assigning a value. This is because it is init()’s job to ensure that all properties are assigned a value; see Chapter 7 for details.
Although it is possible to apply the const keyword from C to a variable in Objective-C to make it immutable, in practice this is most commonly done at the global level within a class, for example, to create string constants that will take advantage of code completion versus using literal strings which are prone to typo-based errors. In Swift, constants are used ubiquitously. Apple advises to always declare a stored value as a constant when you know its value is not going to change, because doing so aids performance and also better conveys the intended use of a stored value.
Table 2-1 shows how to create a variable and constant in Swift.
Table 2-1. Creating variable and constant stored values in Swift
Variable |
var valueThatMayChange = "Hello " |
Constant |
let valueThatWillNotChange = "Hello world" |
Declaring Type
To specifically declare the type of a stored value, follow the name with a colon and then the type annotation—for example, to create a variable named “greeting” that explicitly is of type String:
var greeting: String = "Hello world"
Unlike Objective-C, which requires the type to be explicitly declared when creating an instance, Swift can infer the type from the value assigned to the instance. You can specifically declare the type if you want to—you just don’t have to, as long as it can be inferred by the value being assigned. This helps to make Swift a type safe language. The previous greeting variable could have been created as implicitly of type String like this:
var greeting = "Hello world"
An exception to this rule is with the Character type. A Character value will be inferred to be of type String unless explicitly typed Character:
let eAcute1 = "é"
println(_stdlib_getDemangledTypeName(eAcute1)) // Prints "Swift.String"
let eAcute2: Character = "é"
println(_stdlib_getDemangledTypeName(eAcute2)) // Prints "Swift.Character"
Tip In Xcode, you can option + click on a stored value to display its type in a popup.
Similar to id in Objective-C, you can declare a variable or constant in Swift as type AnyObject to indicate that it can be an instance of any class type. Furthermore, in Swift you can declare a variable or constant as type Any to indicate that it can be of any type except a function type. Apple discourages this in favor of the code clarity achieved by being explicit about types. And in the case of constants, one plausible usage is for constant stored properties, which can be declared with assignment deferred to init(); see Chapter 7 for details.
Multiple stored values can be declared in a comma-separated list on one line. Values not explicitly declared as of a type are inferred to be of the first type specified:
var red, green, blue, alpha: Double // All values are of type Double
var firstName, lastName: String, birthYear, birthMonth, birthDay: Int // firstName and lastName are of type String; birthYear, birthMonth, and birthDay are of type Int
In Objective-C, a typedef statement can be used to define a new data type—or redefine an existing type—as another existing type. Although this is used mostly with enumerations, structures, and blocks, a typedef can be used to define any type. Swift similarly uses typealias to define an alternative name for any existing type, although note use of the assignment operator (=). Table 2-2 compares defining types in Objective-C and Swift. Table 2-2 also demonstrates that structures in Swift can have properties; even the types themselves can have properties. In this case, UInt has a min type property (see Chapter 7 for details).
Table 2-2. Defining types in Objective-C and Swift
Objective-C |
typedef NSInteger VolumeLevel; VolumeLevel volume = 0; |
Swift |
typealias VolumeLevel = UInt let volume = VolumeLevel.min |
Tip In Xcode, you can command + click on a target such as UInt to transfer to its definition. Doing so reveals that UInt is implemented as a struct of type UnsignedIntegerType. And even though you may not be familiar with all the syntax yet, it is fairly easy to discern that UInt has both max and min entries (i.e., type properties):
struct UInt : UnsignedIntegerType {
  // ...
  static var max: UInt { get }
  static var min: UInt { get }
}
Swift includes several attributes that can be used to provide additional information about a stored value being declared, which will be displayed in a popup when option + clicking on the stored value, or in an error message if applicable. While these attributes can be used with independent stored values (e.g., declared in a global scope), they are more likely to be used and encountered with properties of classes, structures, and enumerations; see Chapter 7 for additional information about these types and declaration attribute usage examples. One attribute in particular, @availability, takes two or more arguments to specify the applicable platform(s), followed by one or more additional arguments in comma-separated list. The first argument of the @availability attribute indicates the applicable platform, e.g., iOS, iOSApplicationExtension, or OSX; alternatively, an asterisk (*) can be used to indicate that the @availability attribute is applicable to all platforms. The remaining arguments will include a value assignment. Table 2-3 provides examples of using the @availability declaration attribute in stored value declarations.
Table 2-3. Examples of using the @availability declaration attribute with stored value declarations in Swift
Introduced |
@availability(iOS, introduced=1.0) var anIOSOnlyValue: Int |
Deprecated with message |
@availability(OSX, deprecated=1.0, message="anUnusedOSXOnlyTuple has been deprecated and will be removed in a future release. Use aUsefulOSXOnlyTuple(Double, String) instead.") var anUnusedOSXOnlyTuple: (Int, String) |
Obsoleted |
@availability(*, obsoleted=1.0) var anUnavailableValue: String anUnavailableValue = "Hello" // error: 'anUnavailableValue' is unavailable |
The renamed @availability argument can be used in conjunction with a typealias to indicate a custom type (such as a custom class, structure, or enumeration type) has been renamed, along with an alias to the old name so that existing code continues to work; an example will be provided in Chapter 7. @NSCopying and @noreturn attributes are also available for use with properties and functions, respectively. Chapter 6 will cover @noreturn and Chapter 7 will cover @NSCopying. The @objc declaration attribute can be used to mark an entity as being available to Objective-C source code within the same module—which is required for protocols containing optional requirements; Chapters 7 and 8 will examine these use cases.
Additional declaration attributes are available for use in Xcode projects, of which coverage is beyond the scope of this book, including @UIApplicationMain, @NSManaged, @IBAction, @IBInspectable, @IBAction, and @IBDesignable. Beginning iPhone Development with Swift (http://www.apress.com/9781484204108) provides coverage of @UIAppliationMain and @IBAction, and here are some shortlinks to additional helpful resources:
http://bit.ly/whatsNewInInterfaceBuilder
http://bit.ly/whatsNewInInterfaceBuilderTextVersion
http://bit.ly/NSManagedObjectAttribute
The @ symbol is used ubiquitously in Objective-C, as an object string format specifier (e.g., for use in -[NSString stringWithFormat:]), and to create data types such as NSString, NSNumber, NSArray, and NSDictionary using Objective-C literal syntax. Such is not the case in Swift, where @ is used only as a prefix for certain declaration attributes, as mentioned in the previous section, Declaration Attribute.
Asterisks are all but gone, save for their continued use in operators, multiline comments, and declaration attributes. Swift abstracts pointer management for reference types such that a variable or constant that refers to an instance of a reference type is not a direct pointer to an address in memory as in Objective-C, and you do not write an asterisk to indicate that a variable or constant is a reference type.
Semicolons are no longer required at the end of statements, except when including multiple statements on the same line, such as in a for loop. You can still end your statements with semicolons if you wish; however, this “syntactic noise” is discouraged.
Declaring Values
Number values in Swift can optionally use underscores to increase readability of long numbers.
Apple encourages using Int instead of UInt, even if a stored integer value is intended to be non-negative, unless you specifically require an unsigned integer type or an integer type of a specific size (Int can store any value between -2,147,483,648 and 2,147,483,647); this aids in code consistency and interoperability.
Swift’s Double represents a 64-bit floating-point number with at least 15 decimal points precision, versus Float, which represents a 32-bit floating-point number of as little as 6 decimal digits precision. Swift will infer a floating-point number as type Double unless explicitly declared as type Float:
let pi = 3.14159 // pi is inferred to be of type Double
let pi: Float = 3.14159 // pi is explicity declared as a Float
Whereas booleans in Objective-C are assigned the value YES or NO, Swift assigns true or false.
Tables 2-4 and 2-5 compare creating variables and constants in Objective-C and Swift. Recognizing that creating constants in Objective-C is far less common than in Swift, the intention is to show as close a match syntactically as possible between the two languages.
Table 2-4. Creating mutable variables in Objective-C and Swift
Objective-C |
Swift | |
|---|---|---|
Signed integer |
NSInteger x = -1; NSNumber *x = @-1; |
var x = -1 |
Unsigned integer |
NSUInteger x = 1000000; NSNumber *x = @1000000; |
var x: UInt = 1_000_000 |
Floating-point |
CGFloat pi = 3.14159f; NSNumber *pi = @3.144159f; |
var π = 3.14159 |
Boolean |
BOOL success = YES; NSNumber *success = @YES; |
var |
Character |
char a = 'a'; NSNumber *a = @'a'; |
var a: Character = " |
String |
NSMutableString *greeting = [@"Hello" mutableCopy]; |
var greeting = "Hello" |
id |
id greeting = @"Hello world"; |
var greeting: AnyObject = "Hello |
Table 2-5. Creating immutable constants in Objective-C and Swift
Objective-C |
Swift | |
|---|---|---|
Signed integer |
const NSInteger x = -1; const NSNumber *x = @-1; |
let x: = -1 |
Unsigned integer |
const NSUInteger x = 1000000; const NSNumber *x = @1000000; |
let x: UInt = 1_000_000 |
Floating-point |
const CGFloat x = 5.0f; const NSNumber *x = @1.0f; |
let π = 3.14159 |
Boolean |
const BOOL success = YES; const NSNumber *success = @YES; |
let |
Character |
const char a = 'a'; const NSNumber *a = @'a'; |
let a: Character = " |
String |
NSString *greeting = @"Hello"; |
let greeting = "Hello" |
id |
const id greeting = @"Hello world"; |
let greeting: AnyObject = "Hello |
Tip A handy keyboard shortcut to know is command + control + spacebar to pull up the special characters menu. Continuing a keyboard-driven approach, you can then just type what you’re looking for (e.g., “thumb” or “earth”), use the arrow keys to navigate, and press return to insert the selected character.
It’s worth noting that Swift’s Character type is actually a sequence of one or more Unicode scalars—also known as an extended grapheme cluster—that (singularly or combined) represent a single character. And a Swift String type is simply a sequence of those clusters. You can create characters by typing in the actual Unicode character (as seen in the previous tables), or you can use the string interpolation syntax: u{N}, where N is the hexadecimal portion of the Unicode scalar value, wherein it is also ok to omit leading 0s. For example, to represent the letter “a” (Unicode scalar U+0061), use u{61}. Additionally, a character with an accent, such as “é,” can be represented by a single Unicode scalar or a pair of scalars separately representing the “e” and the accent. And, although these two representations of “é” are made up of different clusters, they are canonically equivalent—that is, they have the same linguistic meaning—and, therefore, Swift considers them equal:
let eAcute1 = "u{E9}"
let eAcute2 = "u{65}u{301}"
println(eAcute1 == eAcute2) // Prints "true"

let string1 = "The e acute character is u{E9}"
let string2: String = "The e acute character is u{65}u{301}"
println(string1 == string2) // Prints "true"
Writing Numeric Literals
Numeric literals include floating-point and integer literals with optional exponents, binary integer literals, and hexadecimal numeric (integer or floating-point) literals with optional exponents. All of these are written the same way in Swift as they are in Objective-C. However, octal integer literals are written with the 0o (zero and letter “o”) prefix in Swift versus a 0 alone in Objective-C. Table 2-6 provides examples of writing numeric literals in Objective-C and Swift.
Table 2-6. Writing numeric literals in Objective-C and Swift
Objective-C |
Swift | |
|---|---|---|
Floating-point, integer |
CGFloat oneTwentyDouble = 1.2e2; // 120.0 NSInteger oneTwentyInt = 1.2e2; // 120 CGFloat negativeOneTwenty = -1.2e2; // -120.0 |
let oneTwentyDouble = 1.2e2 // 120.0 let oneTwentyInt: Int = 1.2e2 // 120 let negativeOneTwenty = -1.2e2 // -120.0 |
Binary |
NSInteger binary15 = 0b1111; // 15 NSInteger negativeBinary15 = -0b1111; // -15 |
let binary15 = 0b1111 // 15 let negativeBinary15 = -0b1111 // -15 |
Octal |
NSInteger octal15 = 017; // 15 NSInteger negativeOctal15 = -017; // -15 |
let octal15 = 0o17 // 15 let negativeOctal15 = -0o17 // -15 |
Hexadecimal |
NSInteger hex15 = 0xf; // 15 NSInteger negativeHex15 = -0xf; // -15 CGFloat hexSixty = 0xfp2; // 60 CGFloat hexThreePointSevenFive = 0xfp-2; // 3.75 CGFloat hexFifteenPointFive = 0xf.8p0; |
let hex15 = 0xf // 15 let negativeHex15 = -0xf // -15 let hexSixty = 0xfp2 // 60 let hexThreePointSevenFive = 0xfp-2 // 3.75 let hexFifteenPointFive = 0xf.8p0 |
Although Objective-C has long offered compile-time instance variable access control, properties and methods have lacked this feature. In recent years, Apple has also boosted encouragement of using properties instead of instance variables. As a result, access control in Objective-C has seen minimal usage as compared with other languages. Still, Objective-C’s instance variable access control directives adhere to traditional usage patterns: @public, which Apple warns should never be used as it violates the principle of encapsulation, @protected (the default) that limits access to class in which the instance variable is declared and its subclasses, and @private, which limits access to the declaring class alone.
Swift, by contrast, offers comprehensive access control, taking a somewhat avante-garde approach. Because access control is often something of an advanced interest—such as for framework and library development—and because the nature of Swift’s implementation of access control is generally more complex, with various exceptions for things like default access levels, an entire chapter (Chapter 10) is dedicated to its coverage.
A basic introduction to declaring protocol adoption is provided here. Complete coverage of protocols can be found in Chapter 8.
In Objective-C, to create a variable or constant and declare that it adopts one or more protocols, you would create the variable or constant as type id and enclose one or more protocols in a comma-separated list within angle brackets.
In Swift, you can declare that a variable or constant adopts a protocol in the same manner as declaring type. This is not generally necessary thanks to Swift’s type inference, although you do need to cast the assigned value using the as operator. Table 2-7 compares creating a stored value that is of a type that adopts a protocol in Objective-C and Swift.
Table 2-7. Creating a stored value with protocol adoption in Objective-C and Swift
Objective-C |
id <NSFetchedResultsSectionInfo> sectionInfo = [self.fetchedResultsController.sections[section]; |
Swift |
let sectionInfo = self.fetchedResultsController.sections[section] as NSFetchedResultsSectionInfo |
All this time you have been assigning a value during declaration of a variable or constant. Although constants must be assigned a value when declared (except properties, as previously noted), variables do not require value assignment during declaration. How you go about doing this in Swift is different than in Objective-C, however. In Objective-C, a variable declared without assigning a value is nil (actually a pointer to nil). In Swift, nil literally means no value.
In order for a variable (of any type) to optionally be able to store a value or be nil, its type must be marked as an optional. This is done by explicitly declaring the type followed with a ? (no space):
var anEmptyStringForNow: String?
This is a syntactic shortcut for declaring the variable of type Optional followed by angle brackets enclosing the value type:
var anEmptyStringForNow: Optional<String>
The former question mark syntax is preferred for declaring an optional. There will be plenty of opportunity to use the latter syntax while taking advantage of Swift’s generic programming capabilities to create functions and types that are more flexible and reusable than in Objective-C; see chapters Chapter 11 for details.
A variable declared as optional without assigning a value is nil. It can subsequently be assigned a value of its specified type or be set to nil again. A constant can also be declared as optional, although because a constant is immutable, this is of lesser practical value:
var myConditionalInt: Int?
myConditionalInt = 1
myConditionalInt = nil
An optional must be unwrapped in order to access its value, and this can be done explicitly, implicitly, via optional binding, or during optional chaining. To explicitly unwrap an optional, suffix it with an !, also referred to as “forced unwrapping”:
var myInt1: Int? = 1
var myInt2: Int? = 2
let sum = myInt1! + myInt2!
Operators such as + will be covered in Chapter 4.
If you are certain that an optional will always have a value, you can implicitly unwrap the optional during declaration by suffixing the type with an !, and this avoids having to force unwrap the optional to access its value every time:
var myInt1: Int!
myInt1 = 1
let myInt2: Int! = 2
let sum = myInt1 + myInt2
There are some useful syntax shortcuts for using optionals in controlling program flow that will be covered in Chapter 5.
Figure 2-3 summarizes the syntax for creating variables and constants in Swift. Italicized text indicates optional components.

Figure 2-3. Syntax for creating variables and constants in Swift
Summary
This chapter provided an overview of Swift value types and explained how to create variables and constants in Swift. Swift is designed to be a modern programming language that blends simplified syntax, powerful capabilities, and strong compiler support, to help you write more succinct and readable code that is also less prone to runtime errors. After reading this chapter and writing the example code in your Swift playground or REPL, you should be comfortable with how to declare, store, and print out values in Swift. The side-by-side nature used to compare Objective-C and Swift code in this chapter will be used throughout the book.