
In This Chapter
Hosting solution options
Setting up your servers for the Twooshes project
Uploading project files to your Web server
Before you jump in with the Twooshes project, you need to set up your servers. This chapter includes a brief overview of the Web hosting solutions available to you. I also select a Web hosting solution for the Twooshes project and walk you through the setup process. You also learn how to transfer files to your server and how to setup your domain name.
There are numerous Web hosting solutions to choose from. Here are the three most popular solutions for your consideration.
Shared Web hosting is usually the most inexpensive way to have your Web content hosted. In a shared Web hosting environment, everyone shares the same computing resources. Each user is limited to the amount of resources they can use.
Warning
This can be a major drawback if your application requires a lot of processing power, memory, bandwidth, or disk space.
However, shared Web hosting is an excellent solution for many users who host small Web sites that haven't yet gained a large audience.
To get the most Web hosting power possible, you can run your Web site on a server completely dedicated to your app. This is dedicated Web hosting. It comes in a few different flavors.
Leased: You can lease a physical server from an Internet service provider (ISP) and then manage the server yourself.
Managed: You can lease a physical server and signup for a support contract from your ISP, where someone manages and keeps an eye on your server 24/7.
Warning
This tends to be the most expensive hosting option.
Co-location: If you own your own servers, you can host it at an ISP's data center by paying a co-location lease. In this lease, you're paying for the physical space your server takes up, the electricity, the bandwidth, and the facility features like air conditioning and backup electricity generators.
Dedicated Web hosting is the most expensive hosting option, but if your site's audience grows to enormous sizes, you may need this kind of capacity.
Cloud computing is a fluffy term, but the concept of "cloud computing" or "cloud hosting" refers to computing resources that are available on demand, over the Internet, for use by a consumer. Examples of computing resources vary from Google's Gmail, to on-demand disk storage space such as Amazon's S3 (http://aws.amazon.com/s3).
Note
In the loosest sense of the term, Twitter could be considered a cloud computing resource. For example, you send the Twitter API a request over the Internet and it performs an action and sends you the results.
With cloud computing, the consumer needs no knowledge of the infrastructure required to run the computing resources. The consumer simply requests what resources they need from the "cloud" and the cloud returns the results.
Hosting in the cloud refers to outsourcing your Web server needs to cloud computing services. This way, you don't need to consider server infrastructure. Further, you can increase or decrease your server's resources on demand.
Tip
This is great for a small Web application that needs the ability to scale quickly.
It's more expensive than shared Web hosting, but it offers more flexibility, and is usually much cheaper than starting with a dedicated server.
You should always start with the smallest Web hosting solution and grow into the next largest solution. There is no reason to spend money on resources you don't need. I usually recommend individuals start with shared Web hosting. If you have less than a few hundred visitors per day, shared Web hosting works fine and is much less expensive than other hosting solutions. If your application starts to peak above approximately 300 visitors per day, you need to start preparing to migrate to a larger Web host.
Warning
If possible, get a Web host with a static IP address. Shared Web hosts usually assign a dynamic IP address. In the past, Twitter has banned large blocks of IP addresses belonging to shared Web hosts, due to Twitter API abuse originating from an IP address owned by the Web host. The consequence to this is Twitter creates collateral damage banning well behaving Twitter apps running on the same shared Web host. For this reason if your application begins to gather an audience you need to get a static IP address.
For Twooshes, I go against my own advice of starting on a shared Web host, and opt for a cloud hosting solution. This is because I predict Twooshes will receive more traffic than a shared host can handle, but not enough to warrant a dedicated Web server. The service I use is Rackspace Cloud Servers (http://rackspacecloud.com). With Rackspace Cloud Servers, I can set up a virtual server with dedicated resources and increase or decrees those resources on demand. This is great for a modestly popular Web site that may need to grow quickly.
Tip
There is really no reason to start a project with a dedicated Web server. Dedicated servers are something you grow into, not start with.
For Twooshes, I use two Rackspace Cloud virtual servers to create
Web server
Database server
Note
Splitting the application's workload horizontally, across more servers, scales to handle more traffic, for less money, than using fewer more powerful servers. However, you don't need to split these two servers right away. To save money, you could run your Web server and database server on the same virtual machine until you need more capacity. At that point, you could split the workload across two machines. However, because Rackspace Cloud allows me to increase my server's resources on demand, it's easy to grow in capacity vertically (giving the servers more power). However, you can't split your database and Web server on demand. It requires a bit of work and server downtime. I prefer to start my projects with the database and Web server on different machines, and use the smallest possible virtual machine for both servers. This is the most obvious horizontal scaling trick you can make for your Web application.
To get started, create a Rackspace Cloud Server account at http://rackspacecloud.com. After you have set up your billing information and created your account, log in to Rackspace Cloud at http://manage.rackspacecloud.com. Once logged in, you are greeted with your Rackspace dashboard.
It's time to create your Apache Web server. Follow these steps:
Click the "Hosting" tab on the left-hand navigation menu.
Click "Cloud Servers" in the drop-down menu.
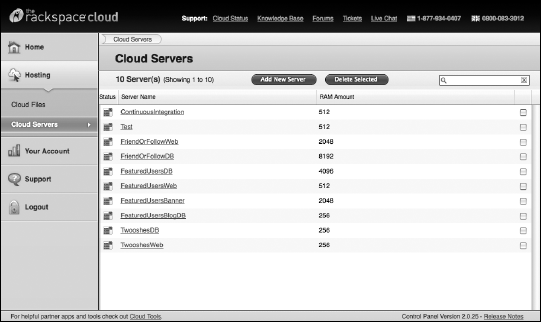
This is your Cloud Servers dashboard. Figure 11-1 is a screenshot of my Cloud Servers dashboard. Yours should look similar, but without any existing servers listed.
Click the "Add New Server" button at the top of your dashboard.
At the top of the new page, you are presented with a menu of server sizes.
Select the smallest server size (currently 256 MB).
Below the server sizes menu is a field to enter the name of your server and a menu of "Default Cloud Server Images."
Name your server anything you like.
Tip
I prefer to use the name of my project with the server type prefixed to it. So since this is the Web server I've named mine "TwooshesWeb."
For the "Default Cloud Server Images," select Ubuntu Hardy (currently listed as: Ubuntu 8.04.2 LTS (hardy)).
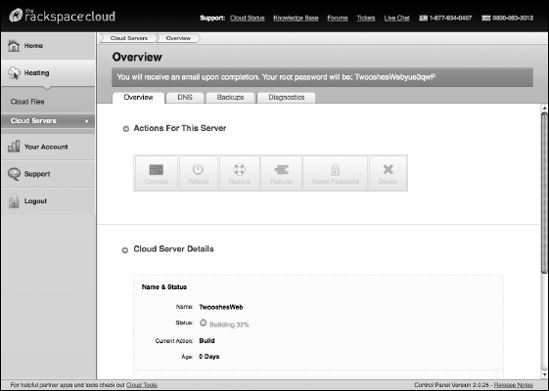
After clicking "Add Cloud Server," you are taken to your new server's dashboard, as seen in Figure 11-2. Your server takes a few moments to build.
Jot down the root password displayed at the top of the screen and go grab a cup of coffee.
Once your server is done building the status on the dashboard says "Active" and you receive an email from Rackspace with your server's IP address and root password.
When your server is built, it's time to install the Apache Web server on it.
Before you can install Apache, you must open your server's command prompt. Follow these steps:
Still logged in and looking at your server's dashboard, click the "Console" button on the "Overview" tab under "Actions For This Server," at the top of the screen.
A dialog box opens to remind you to make sure Javascript is enabled on your browser.
Click the "Open Console" button to dismiss this dialog box and continue.
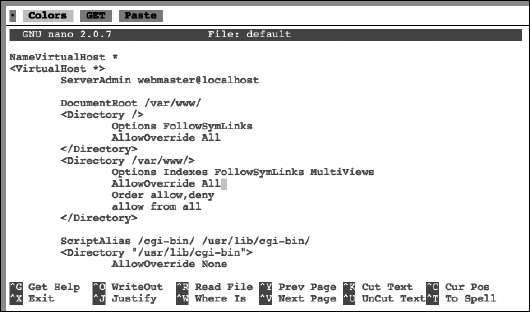
A new browser window opens, with content similar to Figure 11-3, showing your server's command line.
Tip
Sometimes, the console window opens too small. Maximize the window to be sure you can see everything.
From here, you can log in to your Web server for the first time.
Type in
rootas the login name, then enter the root password you jotted down when you created your server.Tip
You didn't write down the root password? You can look it up in the e-mail Rackspace sent you after the server finished building.
Once logged in, you are presented with a blank command prompt that looks something like this, except "TwooshesWeb" is replaced with whatever you named your server when you created it:
root@TwooshesWeb:∼#

After your command prompt is open, you can install Apache and PHP on your new server. Follow these steps:
Type the command
apt-get updatein the command prompt and press enter to update Ubuntu's install package libraries.Type the command
apt-get install apache2and press enter to install the Apache Web server.The installer stops to ask you if you want to use disk space. Type Y and press Enter.
Type the command
apt-get install php5and press enter to install PHP.The installer stops to ask you if you want to use disk space. Type Y and press Enter.
Type the command
apt-get install libapache2-mod-php5and press enter to integrate Apache and PHP.The installer stops to ask you if you want to use disk space. Type Y and press Enter.
Type the command
apt-get install php5-mysqland press enter to install MySQL module for PHP.The installer stops to ask you if you want to use disk space. Type Y and press Enter.
Type the command
apt-get install curl php5-curland press Enter to install cURL for PHP.Restart Apache by typing the command
/etc/init.d/apache2 restartand pressing Enter.
Once you've completed the installation of apache, you can test it by typing your server's IP address in your browser's address bar. You should see a blank Web page with the words "It works!" in the top left.
Note
Your server's IP address can be found on your server's Rackspace Cloud dashboard and in the e-mail you received after your server finished building.
Next, you need to setup support for .htaccess files by installing and enabling mod_rewrite. This is a requirement for the Zend Framework I use for the Twooses project. Follow these steps:
With the command prompt still open, install mod_rewrite by typing the command
a2enmod rewriteand pressing Enter.Type the command
/etc/init.d/apache2 force-reloadand press Enter to enable the module.Navigate to the Apache install directory by typing
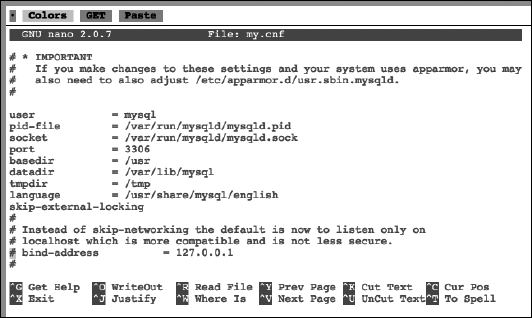
cd /etc/apache2/sites-available.Type
nano defaultand press Enter to open the configuration file.In the configuration file, replace the first two occurrences of
AllowOverride NonewithAllowOverride All.Your file should look like Figure 11-4.
Save the configuration file by pressing Ctrl+X.
When asked to "Save modified buffer?" press Y, then press Enter when presented with the filename.
Restart Apache by typing the command
/etc/init.d/apache2 restartand pressing Enter.
Now that your Web server is up, it's time to get your database server going.
Return to your "Cloud Servers" dashboard by clicking the "Hosting" tab on the left-hand navigation menu. Then click "Cloud Servers" in the drop-down menu. You should see your Cloud Servers dashboard with your newly created Web server listed.
Tip
If you want to run MySQL on a separate server, follow these steps. If you want to run Apache and MySQL on one server you can skip this process:
Click the "Add New Server" button at the top of your dashboard.
At the top of the new page you are presented with a menu of server sizes. Select the smallest server size (currently 256 MB).
Below the server sizes menu is a field to enter the name of your server and a menu of "Default Cloud Server Images." You can name your server anything you like. I prefer to use the name of my project with the server type prefixed to it. This is the database server, so I've named mine "TwooshesDB."
For the "Default Cloud Server Images," select Ubuntu Hardy (currently listed as: Ubuntu 8.04.2 LTS (hardy)).
Click "Add Cloud Server."
After clicking "Add Cloud Server," you are taken to your new server's dashboard, it looks similar to Figure 11-2.
Tip
Your server takes a few moments to build, so jot down the root password displayed at the top, and take a moment to refill your coffee.
Once your server is done building, the status on the dashboard says "Active" and you receive an email from Rackspace with your server's IP address, and root password.
Once your server is built, you can install MySQL by first opening up your server's command prompt using the following steps:
Still logged in and looking at your server's dashboard, click the "Console" button on the "Overview" tab under "Actions For This Server," at the top of the screen.
A dialog box opens to remind you to make sure Javascript is enabled on your browser. Click the "Open Console" button to dismiss this dialog box and continue.
A new browser window opens, with content similar to Figure 11-3, showing your server's command line.
Tip
Sometimes the console window opens too small, maximize the window to be sure you can see everything. From here you can log in to your Web server for the first time.
Type
rootas the login name, then enter the root password you wrote down earlier when you created your server.Once logged in, you are presented with a blank command prompt.
Install MySQL on your new server:
Type the command
apt-get updatein the command prompt and press Enter to update Ubuntu's install package libraries.Type the command
apt-get install mysql-serverand press enter to install MySQL server.The installer stops to ask you if you want to use disk space. Type Y and press enter. Next you are prompted to enter a MySQL root password.
This password is case sensitive.
Type a password you will remember and press Enter. Repeat the password when prompted.
Tip
Remember this password. You need it later.
Now you need to create your project database and a new database user that your application can use to connect to the database.
Warning
Don't use the root username and password to connect your application to your database. That is a security vulnerability. By using a different login dedicated to your Web app you can limit that accounts permissions to only what it requires. That way if the username and password is compromised, the intruder's access is limited.
Type the command
mysqladmin -p create twooshesin the command prompt (where twooshes is the name of your database).When requested, type the password you assigned to the root database user when you installed MySQL.
Type the command
mysql -pand press Enter.This logs you in to MySQL monitor and gives you a new command prompt:
mysql>Type the command
use twooshesand press Enter (where twooshes is the name of your database).This focuses your next commands on your project database.
Create the new database user by typing
GRANT ALL ON twooshes.* TO 'twooshesUser'@'%' IDENTIFIED BY 'password'; and then press Enter.Be sure to replace password with an actual password for the User.
Type
exitand press Enter to return to the server's normal command prompt.
To allow connections from other computers, you must update the my.cnf file. Here, I set up MySQL to allow access from all IP addresses. This allows your application to access the database from the Web server. It also allows you to access the database from your desktop.
Warning
This MySQL server setup isn't the most secure setup, but it is the easiest to get started with. To secure your MySQL server, you need to restrict access to only allow IP addresses from computers you know:
Type
cd /etc/mysqlin the command prompt and press Enter.The cd command changes your current directory to
/etc/mysql.Type
nano my.cnfto edit the MySQL configuration file.This opens the MySQL configuration file with nano, a Linux-based command line text editor.
With the MySQL configuration file open, find the line with the contents:
bind-address = 127.0.0.1. Comment the line out by adding a#to the front of the line.Figure 11-5 shows a screenshot of the command line with the my.cnf file open to this line.
Save the configuration file by pressing Ctrl+X.
When asked to "Save modified buffer?" press Y and then press enter when presented with the filename.
To make the new configuration file take effect, restart your MySQL server.
Type
/etc/init.d/mysql restartin the command line and press Enter.
To upload files to your Rackspace Cloud Web server you can use any secure file transfer protocol (SFTP) client you like. I prefer to user FileZilla (http://filezilla-project.org).
To log in to your Web server via SFTP:
Use your Web server's IP address as the host address.
Use your server's root username and password as the login credentials.
After you've logged in, navigate to the
/vardirectory.Your public files are to be uploaded to the
/var/wwwdirectory.By default Apache places a single
index.htmlfile in thewwwdirectory. Delete that file so it doesn't compete with theindex.phpfile you create in Chapter 12.
The first time you log in, you need to create two new folders in the /var directory:
application: Holds the core of your application files.library: Holds the Zend Framework library files.
Note
These folders will hold nonpublic files that you create in Chapter 12.
At this point, you can access your Web server using its IP address. That's fine, but you need an easy-to-remember domain name. Here's how:
Identify a domain name that is available, and buy it.
I prefer to buy my domain names from Nearly Free Speech (
http://nearlyfreespeech.net). Many people prefer the GoDaddy service (http://godaddy.com).Update your domain's nameserver records so they point to Rackspace Cloud's nameservers.
Rackspace Cloud's nameservers are
dns1.stabletransit.comdns2.stabletransit.com
Tip
Refer to your domain name host for instructions on how to update your domain's name servers. Every host is a little different.
Configure your domain name server (DNS) records at RackSpace Cloud:
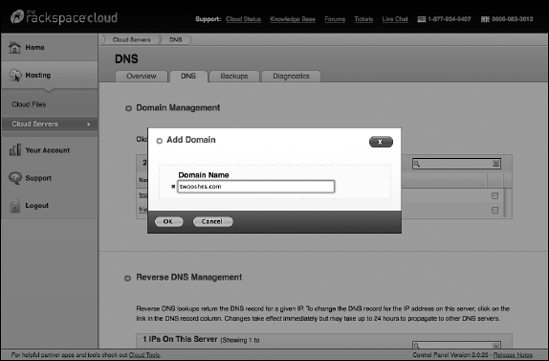
Go to your Web server dashboard and click the "DNS" tab at the top of the page. Once there, click Add Domain. A popup appears asking for your domain name, as seen in Figure 11-6.
Type your domain name in the box (excluding the "
http://"protocol) and click OK.Now your new domain is listed in the "Domain Management" box.
Click your domain name to modify the DNS records. Once on the DNS page, click the "Add" button on the top of the page.
A popup appears.
In the "Name" field, type your domain name (without the "
http://"protocol and without any trailing slashes).In the "Content" field, type the IP address to your Web server.
In the TTL field, type
60.Note
Leave the "Type" dropdown set to "A."
Click "Ok."
It may take up to 24 hours before your domain starts working, which makes it a great time to start programming your application. Read on!