11. Repairing and Improving Photos
Damage, like fashion, is often very subjective. If you show the same set of photos to five people and ask them to comment on mistakes or damage, you’ll likely get five very different answers. This is because people find different things distracting: A crooked photo may bother some, whereas others may dislike a jagged edge. Several aspects of an image can be “wrong,” but it is also impossible to have a “perfect” photo.
Because damage is so subjective, I recommend asking your clients or end customers (if possible) what needs repair. Ask them questions like, would you like anything different or can anything be better? You’ll often be surprised by their answers. Sometimes a fix will be as simple as a crop or a color correction, but more often it will involve removing something from (or adding to) the picture. The world has embraced special effects and digital enhancement. You may be surprised at how much Photoshop can do.
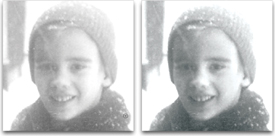
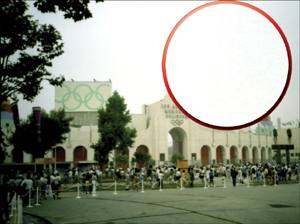
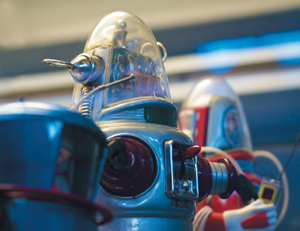
The photo on the right has had several small blemishes repaired, proper contrast restored, and a small “accident” fixed.
This chapter tackles issues like physical damage, such as rips, wrinkles, scratches, and fading as well as digital issues such as overblown skies and noise. It focuses on techniques that you can perform in less than 15 minutes. With practice you can fix 80 percent of the problems in 15 minutes; the other 20 percent you either learn to live with or spend more time on.
Image Selection
Most problems can be repaired, but not every problem is worth trying to fix. Photographers usually shoot many exposures of a subject, so they are willing to discard several that they are unhappy with. It is best to repair images that are close to their desired state; otherwise, you may spend too much time on a project (which could send it over budget in the professional world).
Working with Modern Images
The most common problems in modern photos are color or exposure issues (both of which were addressed in detail in Chapter 10, “Color Correction and Enhancement”). However, modern photos can still suffer physical damage as well as dust on the camera sensor or lens. If the print is wrinkled or creased, it’s always best to use a fresh source (either an alternate print or the negative). If the print is dusty or smudged, gently wipe it with a soft cloth, and then try to scan or rescan it. If you’re forced to work with what you have (or there are issues with a digital photo), you can attempt to fix several problems within Photoshop.

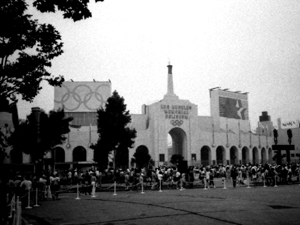
This picture was straightened, color corrected, and had missing areas filled in through cloning and healing.
Working with Historical Images
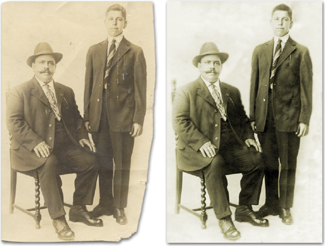
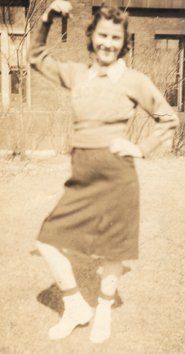
Historical photos often have more problems than modern photos. There is a much greater likelihood of physical damage. You may have to repair creases, tears, water damage, or adhesive stains (from scrapbooks). It’s likely that the photos will have faded and need a boost in contrast or toning. It is generally easiest to remove color from a historical source while repairing it. The color can then be added back in during the final stages as an overlay or sepia tone.
The Retoucher’s Toolbox
The process of repairing damage to a photo is often referred to as retouching. Because there are many different problems that can manifest in a photo, Photoshop offers several tools with which to respond. Knowing which tool to use is often a dilemma, but with a little bit of study and practice the process can be greatly accelerated. Let’s explore how the tools work and give them a try. But first, realize that most of these tools use a paintbrush behavior. Be sure your painting tools are set to Brush size and your other tools to Precise in the Preferences dialog box (Edit > Preferences). This will allow you to better see your tools as you move them in your image.
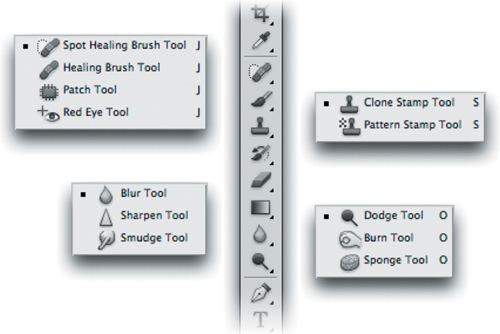
Clone Stamp Tool
The Clone Stamp tool works by replacing unwanted or damaged pixels with good pixels that you target. It’s a popular tool that is relatively easy to use and achieves accurate results. The Clone Stamp tool allows you to set a sample point (where the good pixels are taken from), and then paint into bad areas (to cover up damage or blemishes). This technique is very powerful, because the Photoshop paint engine can use soft brushes, which can soften the stamp’s edge.
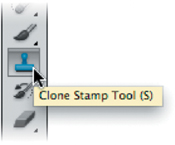
- Activate the Clone Stamp tool by pressing S. Roll over the tool’s icon and be sure you have not accidentally activated the Pattern Stamp tool.
- Select a soft-edged brush from the Options bar or Brush panel. If needed, modify an existing brush. A brush around 200 pixels wide works well.
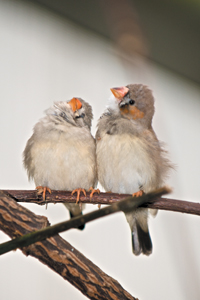
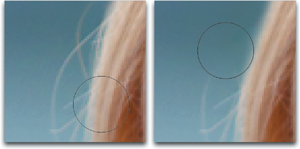
- Open the file Ch11_Clone.tif from the Chapter 11 folder on the DVD. You’ll notice a distracting dark area in the upper-right corner.
- In the Options bar, you need to specify the alignment for the clone:
• Select Aligned. The sample point and painting point move parallel as you move. If the user clones and moves the cursor to the right, the sample point moves as well. This ultimately creates more variety in the cloning, which is desirable. However, it can lead to the unwanted material being repeated into the stroke.
Tip: For Better Results When Cloning
• Try cloning at a low opacity and build up strokes.
• Try sampling from several different places to fill in an area.
• Experiment with blending modes.
• Clone to an empty layer by setting the Sample method to use All Layers.
• Deselect Aligned. If Aligned is not selected, the initial sample point is used (even after you stop and resume cloning). This option ensures that you are always sampling from the same pixels when starting a new stroke.
Choose the Aligned option for this image.
- Option-click (Alt-click) within the current document (or even another open document set to the same color mode). This defines the source point for sampled pixel data. Click in the large, tan area in the upper corner.
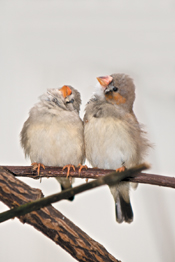
- Click and paint as if you were using the Brush tool. You can also try small dabs to get a blended look. The sampled pixels are taken from the sample point and cover the unwanted pixels. Continue cloning until the entire shadow is painted over. You may need to select a new sample point to get a realistic clone. Try blending multiple strokes together and lower the opacity of the brush for the best results.
Tip: Clone Across Layers
If you’re working with a layered image, you can clone from all visible layers by selecting Sample All Layers. This method can be used to clone to an empty layer, which makes the cloning nondestructive. If the Sample All Layers option is deselected, only the active layer is used.
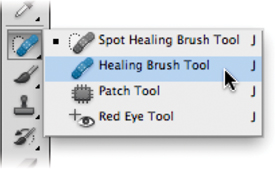
Healing Brush Tool
The Healing Brush tool (J) is an innovative and powerful tool that can be used to repair blemishes in a photo. The Healing Brush tool operates much like the Clone Stamp tool. However, instead of just moving pixels from one area to another, the Healing Brush tool clones pixels while also matching the texture, lighting, and shading of the original pixels.
Since the Healing Brush samples surrounding areas, you may want to make an initial selection around the damaged area and feather it. This will give you better results on an area with strong contrast. The selection should be slightly bigger than the area that needs to be healed. It should follow the boundary of high-contrast pixels. For example, if you’re healing a blemish on a subject’s face, make an initial selection of the skin area to avoid mixing in the adjacent background or clothing. The selection will prevent color bleed-in from outside areas when painting with the Healing Brush tool.
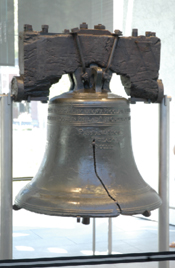
- Close any open files, and then open the file Ch11_Healing_Brush.tif from the Chapter 11 folder.
- Activate the Healing Brush tool by pressing J. (Be sure to closely examine the icon and not select the Spot Healing Brush tool.)
- Select a soft brush from the Options bar or the Brush panel.
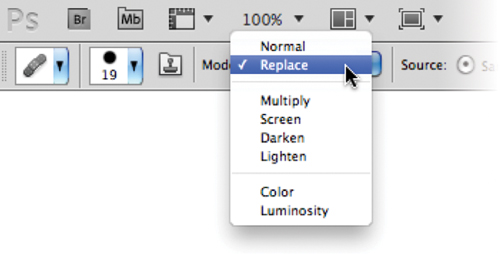
- Set the blending mode to Replace. This option preserves noise and texture at the stroke’s edges.
- Specify a source for repairing pixels in the Options bar. The standard option is to use Sampled. This takes pixels from the area surrounding the sample point. As the brush moves, the sample point also moves to ensure variety in the sampled source.
- Specify the alignment option. If Aligned is selected, the sample point and painting point move parallel as you move the stroke. If Aligned is deselected, the initial sample point is Always. The Always option ensures that you are always sampling from the same area.
- If you want to heal to an empty layer, select the Sample All Layers check box. This allows you to sample one layer, and then apply the healing to a new empty layer above. This will provide greater flexibility in your workflow. If the Sample All Layers box is deselected, only the active layer is used.
- Add a new, empty layer above the Background layer.
- Near the bottom of the bell, Option-click (Alt-click) on the striped area.
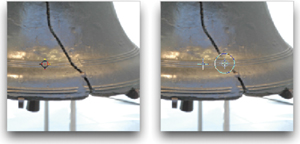
- Click and start to paint as if you were using a brush. Because the sampled pixels are drawn from before you click, it may be necessary to release and start over occasionally to avoid sampling the problem area.
- After several short strokes, release the mouse to merge the sampled pixels. Before the pixels blend, you will have a visible stroke. Afterward, the stroke should gently blend.
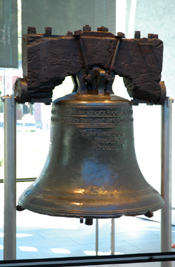
- Continue to heal the remaining crack in the bell.
Spot Healing Brush Tool
The Spot Healing Brush tool was added to Photoshop as a way to harness powerful blending technology with less work (although the Healing Brush is pretty labor-free to begin with). It can quickly remove blemishes and imperfections in photos without requiring a sample point to be set. The Spot Healing Brush tool automatically samples pixels from the area around the retouched area. Let’s give the tool a try:
- Close any open files, and then open the file Ch11_Spot_Healing.tif from the Chapter 11 folder.
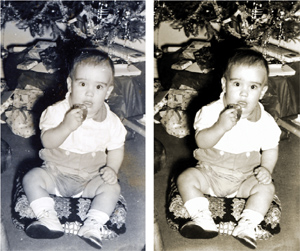
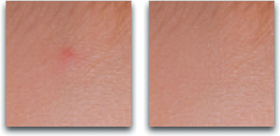
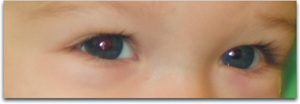
Look closely at the image; you’ll see some acne on the child’s forehead and a wet spot on her shirt. Both are easy fixes with the Spot Healing Brush tool.

- Activate the Spot Healing Brush tool from the Tools panel.
- Choose a soft-edged brush from the Options bar. Make the brush only slightly larger than the problem areas. For this image, a brush size of 25 pixels and a hardness of 25% will work well.
- Set the blending mode in the Options bar to Replace to preserve noise, grain, and hair texture at the edges of the stroke.
- Choose a Type of repair in the Options bar:
• Proximity Match. Pixels from the edge of the selection are used as a patch for the selected area. This should be the first attempt at repair; if it doesn’t look good, switch to the Create Texture option.
• Create Texture. Pixels in the selection are used to create a texture to fix the damaged area. If the texture doesn’t work, try dragging through the area one more time.
- Click once on an area you want to fix. You can also click and drag over a larger area. After fixing the acne, touch up the wet spot on the child’s shirt. If you are unhappy with the spot healing stroke, simply undo and try again with a smaller brush. You can also try stroking in different directions to modify your results.

Upon close examination, you should notice that you have healed several blemishes in the photo. If only life were so easy.
Patch Tool
The Patch tool uses the same technology as the Healing Brush tool, but it is better suited to fix large problem areas. Start using the Patch tool by selecting the area for repair and then dragging to specify the sampled area. For best results, select a small area.
The Patch tool can be used two different ways:
• Source. Make a selection in the area that needs repair, and then drag to an area of good pixels.
• Destination. Make a selection in an area of good pixels, and then drag that selection on top of the unwanted pixels.
Let’s give it a try:
- Close any open files, and then open the file Ch11_Patch.tif from the Chapter 11 folder.
- Select the Patch tool by pressing J to cycle through the tools. (It’s in the same well as the Healing Brush tool.)
- Set the Patch tool to Source.
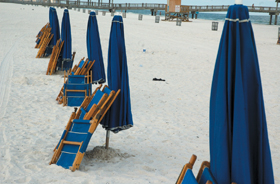
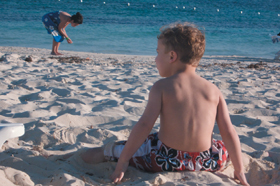
- Make a selection around the discarded shoes on the beach.
- Drag into the clear sandy area to sample pixels.
- Release and let the Patch tool blend.
- Repeat for the remaining trash on the beach.
Red Eye Tool
Red eye is caused when the camera flash is reflected in a subject’s retinas. This happens frequently in photos taken in a dark room, because the subject’s irises are open wide. There are two solutions to fixing red eye in the field:
Tip: Making Selections
Although you can make a selection with the Patch tool, you can always make a selection using any other selection tool (such as Marquees or Lassos), and then activate the Patch tool. The Patch tool behaves just like the Lasso tool (as far as selections go), but it may not offer the level of control you need.
• Use the camera’s red eye reduction feature. This will strobe the flash and adjust the eyes of your subject. This strobing will increase the time from when you click the camera’s shutter and the photo is taken.
• Use a separate flash unit that can be held to the side.
Getting it right in the field is important, but you can fix it in Photoshop as well. Photoshop offers a powerful Red Eye tool that can fix flash problems. It effectively removes red eye from flash photos of people and white or green reflections in the eyes of animals.

- Close any open files, and then open the file Ch11_Red_Eye.tif from the Chapter 11 folder.
- Zoom into the red eye area. An easy way is to take the Zoom tool and drag around the problem area.

- Select the Red Eye tool from the Tools panel or press J repeatedly to cycle through the tools.
- Click in the red eye area to remove it. If you’re unsatisfied with the results, choose undo and modify the two options in step 5.
- In the Options bar, adjust the Pupil Size to a smaller number to convert a more constrained area (30% works well for this image). Adjust the Darken Pupil setting as desired to modify how dark the pupil will be after the conversion.
Content-Aware Fill
The Content-Aware fill option is a new addition to Photoshop CS5 that provides the ability to automatically generate new textures to fill a selected area. What happens is that Photoshop randomly synthesizes similar content to fill the area based on the source image. This is a great way to remove an object or blemish from a scene. In some cases it completes the job in one step; in others it offers a great jump start and can be touched up with a little cloning or healing.
- Close any open files, and then open the file Ch11_Content_Aware.tif from the Chapter 11 folder.
Before you remove the distracting items, let’s straighten the image first.
- Choose the Ruler tool from the Tools panel (it’s located in the same well as the Eyedropper tool). Find a surface you think should be horizontal (or vertical). The edge of the sand is a good reference point.
- Click and drag along a line to measure the angle.
- In the Options bar, click the Straighten button.
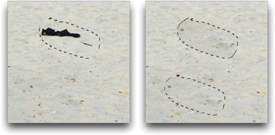
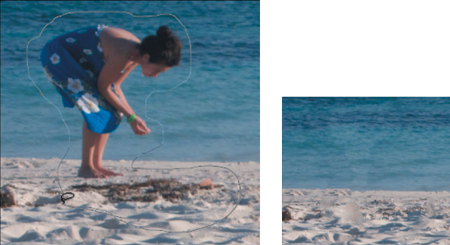
- With the Lasso tool, make a rough selection around the woman and seaweed on the beach. Make a selection slightly larger than the woman.

- Choose Select > Modify > Feather and enter a value of 5 pixels to blend the selection.
- Choose Edit > Fill or press Shift+Delete to bring up the Fill dialog box.
- From the Use menu, choose Content-Aware fill and click OK.
- Press Command+H (Ctrl+H) to hide the selection.
Try removing the beach chair in the lower-left corner and clean up any blemishes with the Clone Stamp or Spot Healing Brush.
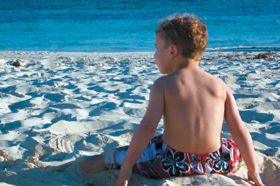
This image was finished with a little additional cloning, a Levels adjustment, and a Vibrance adjustment layer.
Tip: Try, Try Again
If you don’t like the first attempt Content–Aware fill generates, just choose Edit > Undo and apply another Content–Aware fill.
Blur and Sharpen Tools
Often, a photo will need a focus adjustment. While global changes are often implemented through blur or sharpen filters, it’s frequently necessary to lightly touch up an area by hand. To do this, you can use the Blur tool (to defocus) or the Sharpen tool (to add focus or detail). Both tools are driven by brush-like settings, which allow you to change size, hardness, strength, and blending mode. Remember that if the Caps Lock key is down, brush previews are disabled.
Tip: Nondestructive Tools
Both the Blur and Sharpen tools can be used nondestructively. Simply create a new layer to hold modified pixels. Then in the Options bar select the Sample All Layers check box. The blurring or sharpening will be isolated to the selected layer.
- Close any open files, and then open the file Ch11_Blur-Sharpen.tif from the Chapter 11 folder.
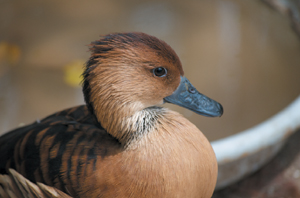
- Select the Blur tool from the Tools panel (it looks like a water droplet).
- Specify a brush size of approximately 120 pixels and a Strength of 50%. The Strength settings modify how quickly the tool alters the image. Sometimes several built-up strokes are better for a subtle look.

- Paint over an area of the edge of the white bowl to deemphasize it.
- Choose one of the tool’s blending modes. The Darken and Lighten modes are particularly useful for isolating the blurring effect to darken or lighten areas, respectively. Try the Darken mode and blur the dark floor.
- Switch to the Sharpen tool and try enhancing parts of the image. Enable the Protect Detail option in the Options bar. The duck’s bill is a good choice as well as the eyes and edges of feathers. Experiment with the Mode and Strength settings.
- Be careful not to oversharpen the image, because it will quickly introduce visible noise and distortion.
Smudge Tool
The Smudge tool simulates dragging a finger through wet paint. The pixels are liquid and can be pushed around the screen. With the default settings, the tool uses color from where you first click and pushes it in the direction in which you move the mouse. This tool is useful for cleaning up dust specks or flakes in a photo. Set the tool’s blending mode to Lighten or Darken (depending on the area to be affected), and you’ll have digital makeup to touch up the problem.
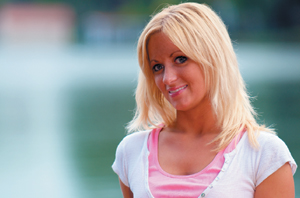
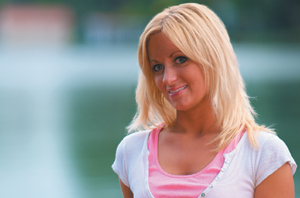
- Close any open files, and then open the file Ch11_Smudge.tif from the Chapter 11 folder.
- Select the Smudge tool from the Tools panel (it looks like a finger painting icon).
- Zoom into the model’s flyaway hair.
Using the Smudge tool’s Darken mode lets you push darker pixels over lighter pixels.
- Experiment with the Darken and Lighten modes. These are particularly useful for isolating the smudge by pushing only dark or light pixels.
- Smudge the edges of the hair pixels. Experiment by switching blending modes: You can always undo the smudge, and then change the tool’s mode and resmudge. To quickly cycle blending modes, press the Shift+= or Shift +- shortcut keys.
Tip: Smudge Tool for Historical Images Too!
The Smudge tool also works great for touching up blemishes in historicalphotos. Rips, tears, and crackscan easily be filled in using theSmudge tool’s Lighten and Darkenmodes. You can also try the Blurtool in a similar fashion.
Dodge and Burn Tools
The Dodge and Burn tools are known as toning tools. They allow you finer control over lightening or darkening your image. These tools simulate traditional techniques used by photographers. In a darkroom, the photographer would regulate the amount of light on a particular area of a print. These tools are particularly helpful when touching up faded photos, especially when repairing water damage. Let’s try out both tools:
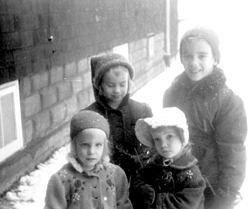
- Close any open files, and then open the file Ch11_Dodge_Burn.tif from the Chapter 11 folder.
- Duplicate the current layer because the Dodge and Burn tools are destructive. Closely examine the four faces. You should notice that the two on the right look washed out, and the two on the left are a bit dark.
- Select the Dodge tool from the Tools panel. Adjust the brush to be soft and large (approximately 80 pixels). Set the tool to adjust the Midtones.

- Paint over the shadowed faces on the left half of the picture to bring out the darkest areas a bit.
- Select the Burn tool from the Tools panel. Adjust the brush to be soft and large (approximately 80 pixels). Set the tool to adjust the Highlights and set an Exposure setting of 20%.
- Paint over the washed-out faces on the left half of the picture to restore the contrast a bit.
- Continue to touch up areas in the photos as needed. Lower exposure settings are generally more desirable.
Sponge Tool
The Sponge tool is very elegant and efficient. This toning tool can be used to make subtle adjustments in color saturation or grayscale contrast. It can also be used during conversion processes to prepare images for commercial printing or television. The Sponge tool allows you to gently desaturate (or saturate) areas by brushing over them.
- Close any open files, and then open the file Ch11_Sponge.tif from the Chapter 11 folder.
- When converting RGB images into CMYK, there is often a shift in colors. This is because RGB has a wider color gamut than CMYK, and it can display more colors. Photoshop allows you to highlight the areas that are “out of gamut” or will shift when you convert modes. Choose View > Gamut Warning. The gray areas represent out-of-gamut areas.
- Select the Sponge tool by pressing O to cycle through the tools, or choose it from the Tools panel.
- Adjust the brush to a large size and set it to have soft edges.
- Set the tool to Desaturate and adjust the flow to a lower value. It is generally better to use a slower flow and make several applications.
- Paint over the gray gamut warning areas with the Sponge tool until they disappear.
- If needed, you can switch the Sponge tool to Saturate to boost areas. If you see a gray gamut warning, you’ve gone too far.

- When you’re done, you can convert the image to CMYK by selecting Image > Mode > CMYK. CMYK conversion is covered again in Chapter 16, “Printing, PDF, and Specialized File Types.”
- To complete the image, choose File > Save As, pick a new destination, and rename the file to Ch11_Sponge_CMYK.tif.
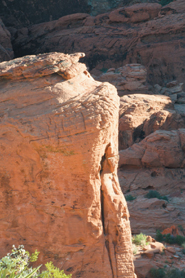
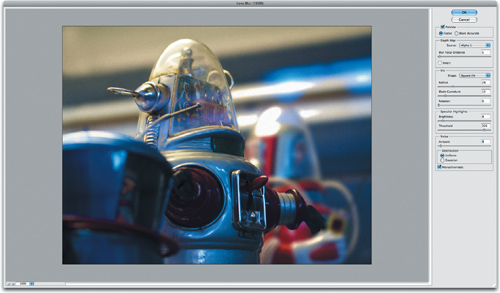
Lens Correction
The Lens Correction filter is designed to fix common flaws in an image (such as barrel distortion, lens vignettes, and chromatic aberration). The filter can be run on 8- or 16-bit-per-channel images that use the RGB or Grayscale image mode. The filter can also correct perspective problems caused by camera tilt.
- Close any open files, and then open the file Ch11_Lens_Profile.tif from the Chapter 11 folder.
- Choose Filter > Convert for Smart Filters to ensure flexibility in editing.
- Choose Filter > Lens Correction.
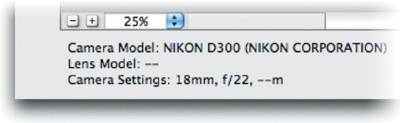
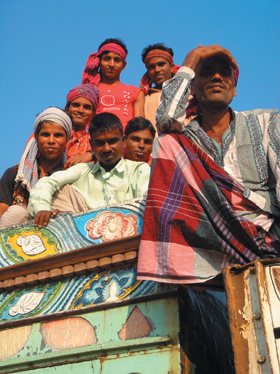
A new window opens. Look in the bottom-left corner for information about the camera and lens used for the shot (this is included in the metadata the camera wrote to the original file).
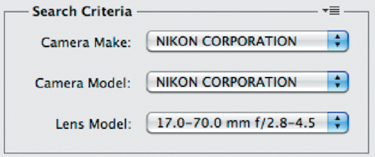
- Choose a manufacturer from the Camera Make menu. In this case choose Nikon Corporation.
- From the Camera Model menu, choose the correct camera model. In this case just choose Nikon Corporation.
- From the Lens Model menu, choose the correct lens. The closest match is the 17.0-70.0 mm f/2.8-4.5.
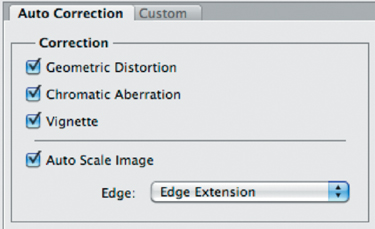
- From the Auto Correction tab, select the Geometric Distortion, Chromatic Aberration, Vignette, and Auto Scale Image options.
- Switch to the Custom tab for advanced controls.
- Click the Show Grid option at the bottom of the window.
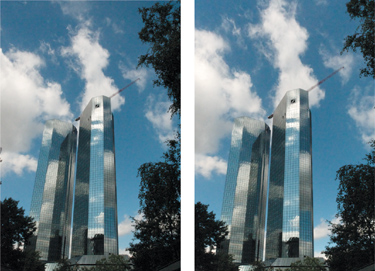
Let’s compensate for the low angle, which is causing some keystoning.
- Set the Vertical Perspective to -40.
Tip: Create Your Own Profiles?
If you want to create your own lens profiles, Adobe has a great utility. Visit http://labs.adobe.com/technologies/lensprofile_creator/ for full details.
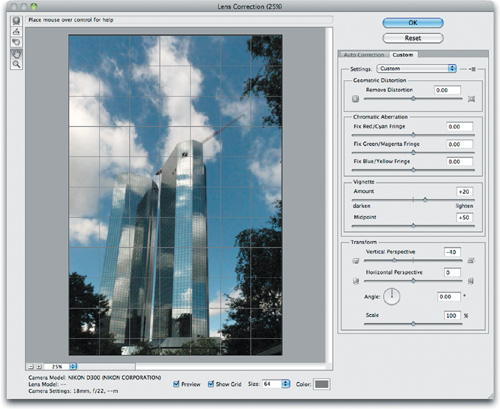
- Set Vignette Amount to 20 to further brighten the edges.
- Click OK to apply the correction.
You can double-click the Lens Correction filter in the Layers panel to open the Smart filter for future edits.
Restoration in Action
Learning how to fix damaged areas in photos is not a step-by-step process. Rather, it is learning how to identify problems and make strategic decisions about which techniques to employ to fix the image. Practice is the best path to becoming a skillful retoucher. However, you can expect good results if you know which tools to use. I have personally seen students become proficient using Photoshop’s rich suite of tools in just a few weeks.
Aspect Ratio
Often, your photos will be the wrong aspect ratio for your needs. Perhaps your picture is in the portrait aspect ratio, but the layout needs a landscape-shaped photo. The Crop tool makes this an easy fix.
- Close any open files, and then open the file Ch11_Aspect Ratio.tif from the Chapter 11 folder.
- Activate the Crop tool (C).
- Specify a target size (such as 4 inches × 6 inches at a resolution of 300 pixels per inch) in the Options bar.
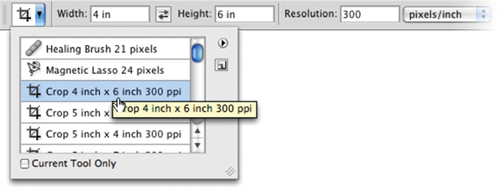
- Make the crop. Initially, you will be constrained to the image’s original area. If desired, you can go beyond a border’s edge. After releasing the initial crop, you can then grab the individual anchor points and extend the crop beyond the image’s border. This will require you to clone in material or use the Content-Aware scale command, but it allows you to include more of the original picture.
- If you have empty areas, you can clone the missing pixels using the Clone Stamp or Patch tool.
Soft Focus
Cameras are much more likely to generate a soft focus under low light. The Smart Sharpen filter has the most options of any sharpening filter built into Photoshop. It allows you to choose the sharpening algorithm as well as control the amount of sharpening in shadow and highlight areas. This filter can produce dramatically better quality, but do not expect results like you see in a TV police drama.

- Close any open files, open the file Ch11_Sharpen.tif, and zoom the document window to 100%. This will give you the most accurate view of the sharpening.
- Choose Filter > Sharpen > Smart Sharpen and select the Advanced radio button.
- Adjust the controls in the Sharpen tab:
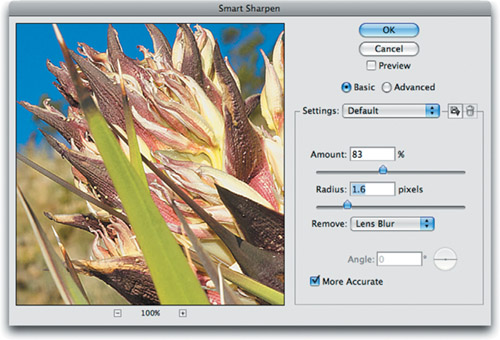
• Amount. Sets the amount of sharpening. A higher value increases contrast between edge pixels, which gives the appearance of more sharpness.
• Radius. Determines the number of pixels surrounding the edge pixels that will be affected by the sharpening. A greater radius value means that edge effects will be more obvious, as will the sharpening.
• Remove. Allows you to set the sharpening algorithm to be used:
• Gaussian Blur. Is used by the Unsharp Mask filter. It works well on images that appear slightly out of focus.
• Lens Blur. Detects edges and detail in an image. It provides finer sharpening of detail and can reduce halos caused by sharpening.
Tip: Oversaturated Colors
If you sharpen a color photo and you get oversaturated colors, switch to the Lab image mode. Apply the filter only to the Lightness channel.
• Motion Blur. Attempts to reduce the effects of blur caused by camera or subject movement. You will need to set the Angle control if you choose Motion Blur.
• Angle. Set this to match the direction of motion. It’s only available when using the Remove control’s Motion Blur option.
• More Accurate. Allows Photoshop to spend more time processing the file. It generates more accurate results for the removal of blurring.
- You can refine the sharpening of dark and light areas—try using the Shadow and Highlight tabs. These controls should be used if you start to see halos in light or dark areas:
• Fade Amount. Adjusts the amount of sharpening in the highlights or shadows regions.
• Tonal Width. Controls the range of tones in the shadows or highlights that are modified. Smaller values restrict the adjustments to smaller regions.
• Radius. Controls the size of the area around each pixel that determines if a pixel is considered a shadow or a highlight. Moving the slider to the left specifies a smaller region; moving the slider to the right defines a larger region.
- When you’re satisfied, click OK to apply the filter.
Faded Historical Photos
A common problem with old black-and-white or sepia-toned photos is that they fade over time. You can use a Levels or Curves adjustment, but both commands often introduce color artifacts into the image. A few extra steps are needed to get the best results.
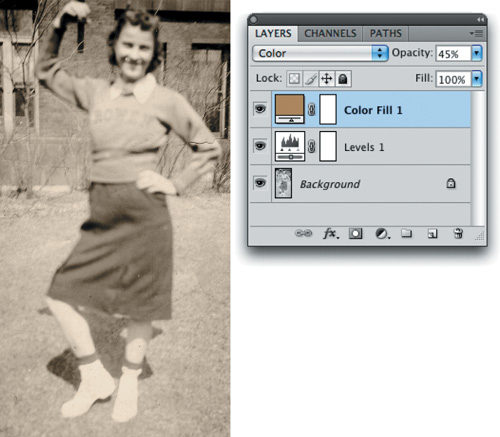
- Close any open files, and then open the file Ch11_Fading_Historical.tif from the Chapter 11 folder.
- With the Eyedropper tool, sample the color tint if you want to retain it in the finished piece.
- Leave the photo in RGB mode but strip away the color. Choose Image > Adjust > Desaturate or press Shift+Command+U (Shift+Ctrl+U).
- Perform a Levels adjustment and restore the white-and-black points. Drag the black Input Levels slider and the white Input Levels slider toward the center.
- Add a Solid Color fill layer by choosing Layer > New Fill Layer > Solid Color. Click OK. The Foreground color you previously sampled will load automatically.
- Set the Color Fill layer to use the Color blending mode. Adjust the Opacity slider as desired.

Blown-out Skies
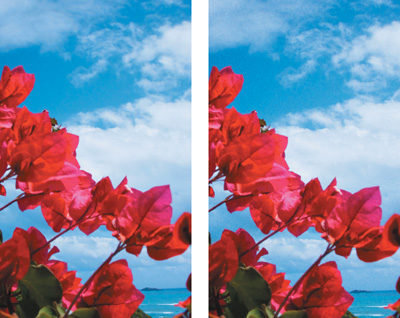
A professional photographer can spend a good part of a day waiting for the perfect sky and weather conditions. You, however, may not be as lucky. Skies will often be washed out and appear missing due to overexposure. One solution is to take pictures of the sky when it looks its best, and then use a few techniques to combine two or more images into a new composite.
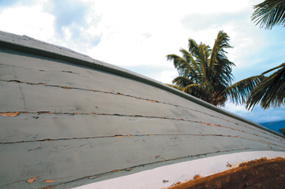
- Close any open files, and then open the file Ch11_Fix_Sky.tif from the Chapter 11 folder.
- Use the Color Range command (Select > Color Range) to choose the sky region.
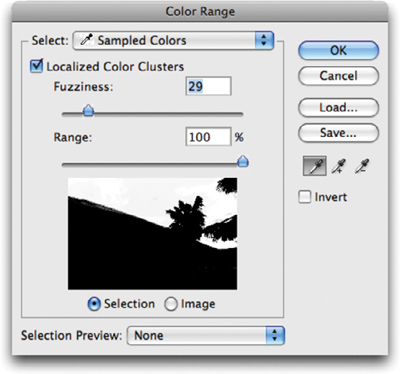
- Subtract any stray selections in the lower half of the photo by using the Lasso tool and holding down the Option (Alt) key. Alternatively, switch to Quick Mask mode for more detailed touch-up of the selection.
Tip: Shooting Skies
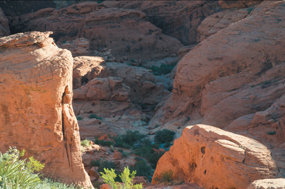
I have found the desert or the ocean to be the best place to shoot the sky. This is often because the amount of environmental and light pollution is greatly reduced. Don’t worry if this isn’t an option for you; just keep your eyes out for a great day with beautiful skies and remember to shoot some still plates for your collection.
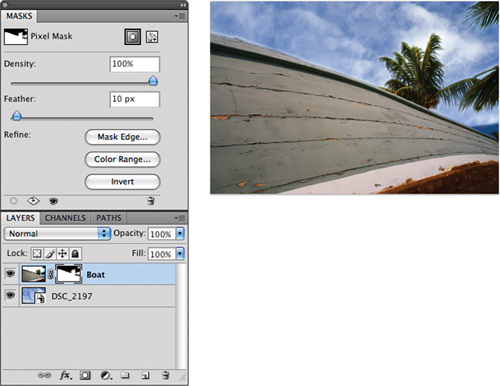
- Double-click the Background layer to float it. Name the layer Boat and click OK.
- Invert the selection by choosing Select > Inverse or by pressing Shift+Command+I (Shift+Ctrl+I).
- Click the Add layer mask button to mask the sky area.
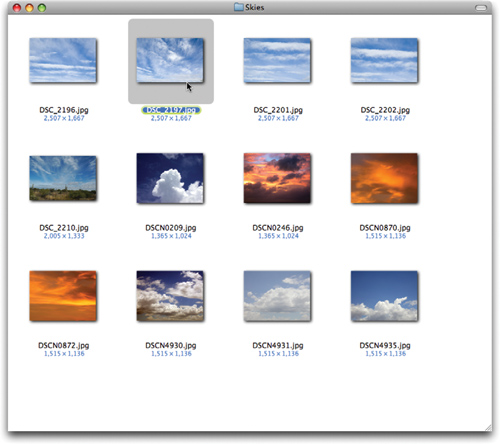
You’ll find a diverse collection of my favorites in the Chapter 11 folder in a subfolder called Skies. Match one that has the right color and time of day for this photo (try DSC_2197.jpg). Feel free to use the others for future projects.
- Choose File > Place and select the file DSC_2197.jpg. Press Return (Enter) to apply the placed photo.
- Drag the sky photo behind your masked image. Use the Free Transform command to scale and position the clouds. There will likely be fringe on the edges that will need touching up.
- Select the Layer Mask thumbnail and adjust the Feather slider in the Masks panel.
- Click the Mask Edge button and refine the mask as desired.
- Touch up any problem areas on the Layer Mask. Use the Smudge tool set to Darken mode to touch up the area around the trees on the right of the frame. You can also touch up the Layer Mask by using a paintbrush and black set to 20% Opacity. Brush over areas that need to be blended.
- Blur the sky slightly so it better matches the depth of field in the image. Use the trees for guidance. You can use the Gaussian blur filter (Filter > Blur > Gaussian Blur) set to a value of 4–6 pixels.
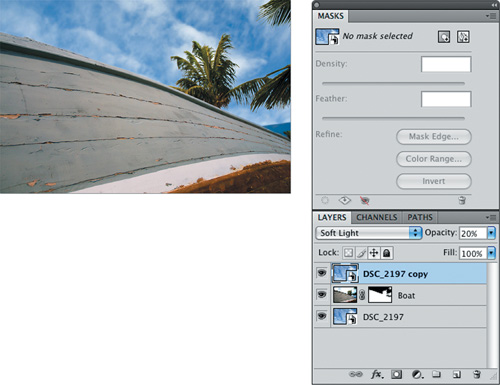
- To make the colors match better, you can place a second copy of the sky on top. Be sure just the blue sky is covering the photo. Set the blending mode to Overlay or Soft Light and lower the Opacity of the layer.
The completed image, Ch11_Fix_Sky_Completed.tif, is on the DVD if you’d like to examine it more closely.
Remove Grain/Noise
Often, distracting noise or grain will appear in your image. This is typically caused by shooting photos with a high ISO setting on a digital camera, but it can also be caused by underexposure or a long shutter speed. A lower-quality consumer camera is also more likely to exhibit noise problems. Additionally, film grain can be picked up by a scanner and cause problems as well.
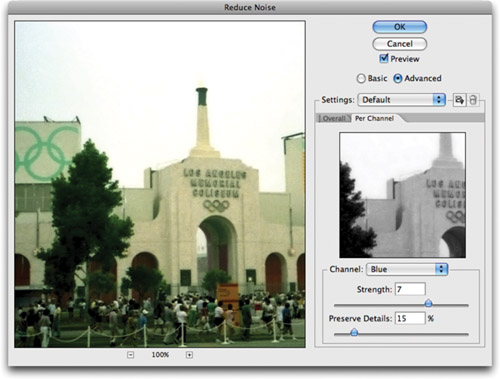
The most common type of noise is luminance (grayscale) noise where the noise does not have varying colors. This noise is usually more pronounced in one channel of the image, usually the blue channel. By adjusting for noise on a per-channel basis, higher-image quality can be maintained. Let’s give it a try:
- Close any open files, and then open the file Ch11_Remove Grain.tif from the Chapter 11 folder.
- Activate the Channels panel and view each channel separately. Click the channel’s name to isolate it. Do this for each channel.
You should notice a large amount of noise in the Blue channel.
- Activate all three channels by clicking the RGB composite channel.
- Choose Filter > Reduce Noise.
- Select the Advanced radio button to enable per-channel corrections. This allows for additional correction to be added at the channel level.
- Switch to the Blue channel within the filter’s dialog box and adjust Strength and Preserve Details as desired.
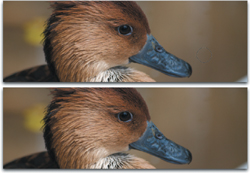
Remove Noise from a Raw File
If you have access to a raw file, then removing noise or grain is significantly easier. The Adobe Camera Raw plug-in (discussed in Chapter 10) can also clean up noise quite well. Let’s give it a try:
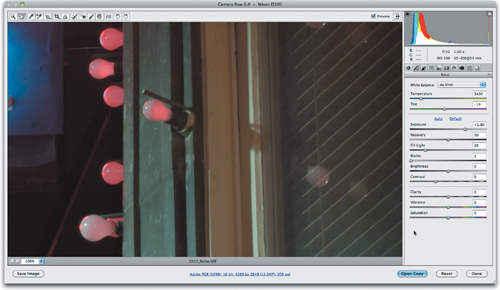
- Close any open files, and then open the file Ch11_Noise.NEF from the Chapter 11 folder.
The image opens in the Camera Raw window.
- In the Basic tab, drag Exposure to 1.80 to adjust exposure for the image.
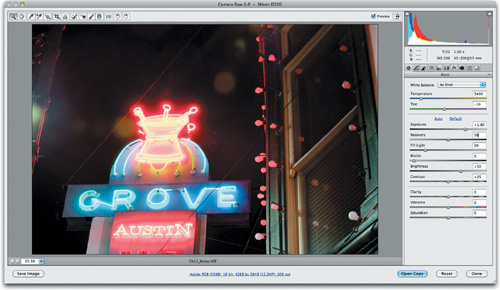
- Drag the Fill Light slider to brighten the darkest areas of the image. Try a value of 20.
- Set the Recovery slider to 50 to recover overexposed areas in the neon.
- Click the Zoom Level menu and choose 200%. It is easiest to see noise or grain at this magnification.
- Use the Hand tool to reposition the zoomed image so you can see the windows and lightbulbs on the right.
- Switch to the Detail tab (it’s the third one).
- Adjust the Noise Reduction controls to remove extra grain from the image:
• Luminance. Reduces luminance noise. Set this to 40 for this image (it’s not very noisy).
• Luminance Detail. Sets a threshold for the noise reduction. Higher values preserve detail but can produce noisier results. Lower values tend to produce cleaner results but likely remove some detail. Use a value of 35 to clean the image more.
• Luminance Contrast. Works best for very noisy photos. A value of 65 works well for this image.
• Color. Reduces color noise. The default is fine for this image.
• Color Detail. Use a higher value to protect detailed edges. A lower value preserves more color but can result in color bleeding. The default is fine for this image.
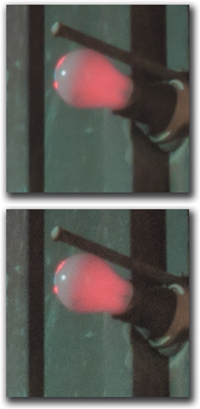
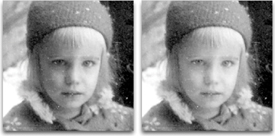
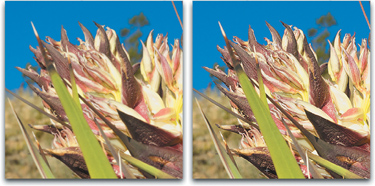
The image on the top shows the original grain. The image on the bottom has been cleaned up using the Detail tab of the Camera Raw plug-in.
- Toggle the check box for Preview to see the before and after states. This image is very subtly changed.
- Click the Zoom Levels presets list and choose Fit In View.
- Click Done to store the settings for the image.
Adding Grain
Sometimes you may want (or need) to add some noise back into a picture. This could be for stylistic purposes or to ensure that a processed image matches the grain of others from the same camera or film stock. The key here is to put the noise on its own layer so it is easier to manage and adjust.
- Close any open files, and then open the file Ch11_Add Grain.tif from the Chapter 11 folder.
- Add a new (empty) layer. Name the layer Grain.
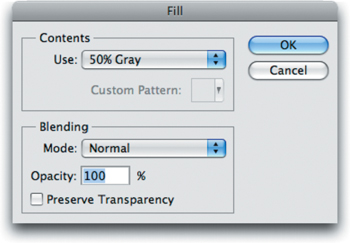
- Choose Edit > Fill and select 50% Gray.
- Generate grain by choosing Filter > Artistic > Film Grain. Adjust the three sliders as desired, and then click OK.
- Change the layer’s blending mode to Overlay mode.
- If needed, you can either duplicate the grainy layer to increase the noise or adjust Opacity as desired.
- If you want to soften the grain, run a Gaussian Blur filter on the noise layer at a low value of 1–5 pixels.
Adding Lens Blur
Selectively blurring an image can help your viewer find a focal point. Photoshop offers a realistic lens blur that also produces depth-of-field blurring. This allows some objects to be in focus while others fall out of focus. You can be very specific in regard to the blurring if you make an accurate alpha channel to serve as a depth matte. The depth matte defines how far away things are from the camera. Black areas in the alpha channel are treated as being the foreground, whereas white areas are seen as being in the distance.
- Close any open files, and then open the file Lens Ch11_Lens Blur.tif from the Chapter 11 folder.
An alpha channel has already been added to the image. It was created using the Calculations command and Quick Mask mode (see Chapter 5, “Selection Tools and Techniques”).
- Make sure the RGB composite channel is selected.
- Choose Filter > Blur > Lens Blur to run the Lens Blur filter.
- Choose the alpha channel from the Source menu. You can click the Invert box if you need to reverse the blur. For faster previews, choose Faster. When you’re ready to see the final appearance, select More Accurate.
- Adjust the Iris shape to curve or rotate the iris. Photoshop mimics how a traditional lens operates. Even if you are not an experienced photographer, you can twiddle and adjust as desired.
- Move the Blur Focal Distance slider until the desired pixels are in focus. Additionally, you can click inside the preview image to set the Blur Focus Distance.
- You can add Specular Highlights by adjusting the Threshold slider. You must set the cutoff point for where highlights occur. Then increase the highlights with the Brightness slider.
- Finally, it’s a good idea to add a little noise/grain back into the image. Normally, the blur obscures this, but putting it back in makes the photo seem more natural as opposed to processed.
Using Vanishing Point
Vanishing Point is a special plug-in that allows for perspective cloning. Essentially, a user can identify perspective planes (such as sides of a building), and then apply edits such as painting, cloning, copying or pasting, and transforming. All the edits to the image honor the perspective of the plane you are working on; basically, you are retouching the image dimensionally. This produces significantly more realistic results, but it does take some time to set up.
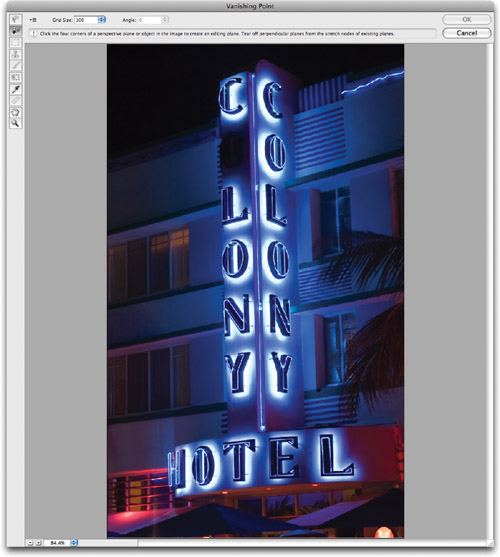
- Close any open files, and then open the file Ch11_VP.tif from the Chapter 11 folder. This photo of a sign is marred because one of the letters is burned out. With Vanishing Point you can clone or repair the sign.
- Invoke the Vanishing Point dialog box by choosing Filter > Vanishing Point. This will bring up a custom interface for defining the perspective planes, as well as tools for editing the image.
You must first specify planes to define perspective in the image. For this photo, you want to replace the burned-out letter O.
- Choose the Create Plane tool and define the four corner nodes of the plane surface. You can use the edges of the sign for guidance when creating the plane.
- After creating the four corner nodes, Photoshop allows you to move, scale, or reshape the plane. An accurate plane means accurate vanishing point effects, so take your time. If there’s a problem with a corner node’s placement, the bounding box and grid turn red or yellow. You must then move a corner node until the bounding box and grid turn blue. This means that the plane is valid.
- Grab the left edge of the plane and extend it to the left, and then repeat for the right edge. This gives you more room for cloning.
- Zoom in so you can make a more accurate selection.

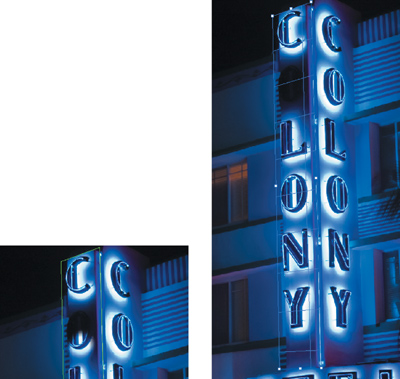
- Select the Stamp tool in the Vanishing Point window. Option-click (Alt-click) on the illuminated letter O that is on the front of the sign.
- Position your painting cursor (using the clone preview for guidance) and clone the illuminated letter over the burned-out letter.
- When you’re satisfied with the perspective cloning, click OK.
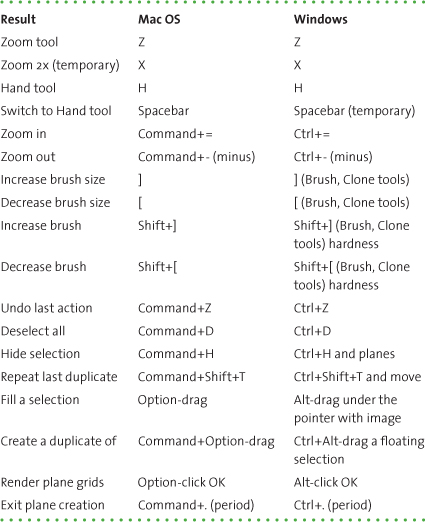
Table 11.1 shows the keyboard shortcuts to make Vanishing Point easy to use.
Table 11.1. Vanishing Point Shortcut Keys