
8
Introduction to Portrait Lighting
GOOD LIGHTING IS A CRITICAL COMPONENT of portraiture. It’s also easily identifiable, even by the casual observer. However, despite this apparent simplicity, knowing how to use light to achieve a desired look requires a deeper understanding. In this chapter, you’ll first learn how a single light source can affect your subjects. Then you’ll see how adding a second light source can refine that control.
Note that this chapter utilizes both 3D rendered portraits (courtesy of Nikola Dechev) and actual subject portraits in a studio setting. Where applicable, we chose to use rendered images to more clearly illustrate subtle lighting differences than would otherwise be possible with an actual model or mannequin. Such rendered images are especially important when the subject’s expression needs to remain identical even when light placement and size need to vary substantially.
Also note that the real-life photos aim to accentuate the effect of lighting and do not necessarily reflect ideal lighting conditions or subject appearance. Furthermore, such photos would also typically be touched up in editing software afterward, depending on artistic intent. Touch-ups might include improving skin texture, skin reflections, deep shadows, and so on. However, editing was not performed on the images in this chapter in order to demostate how lighting affects all subject traits, regardless of whether these effects are desirable.
USING A SINGLE LIGHT SOURCE
The primary source of illumination is usually called the main or key light. Although additional lights may be added to enhance a portrait, key lighting is considered independently. This is great if you’re trying to learn portrait lighting, because it means you can ease into the process one light at a time. When you decide to include additional lights, everything you’ll learn here still applies.
Only two traits control the appearance of light on a subject: its color and distribution. For this chapter, I assume you want the light to appear natural and match daylight, so we’ll focus on distribution, which refers to the positioning and intensity of light relative to a subject. For a given light source, we can separate distribution into two easily manageable characteristics: direction and apparent size. Direction refers to where the light is coming from, and it controls the location of shadows and highlights on the subject. Apparent size refers to how large a light source appears from the perspective of the subject, and it controls the amount of contrast.

FIGURE 8-1 Unflattering portrait lighting
As you’ll soon learn, FIGURE 8-1 shows a less flattering portrait because the direction and size of the light source cast harsh, unrealistic upward shadows, as compared to FIGURE 8-2, which demonstrates more traditional portrait lighting.
FIGURE 8-2 Better portrait lighting
Although these characteristics are simple and controllable, different combinations can create a wide array of effects on the subject. Lighting can become more predictable when you develop an intuition for each quality.
HARD VS. SOFT LIGHT
When photographers describe “light quality” or refer to light being “hard” or “soft,” they’re actually referring to the apparent size of the light source. This relationship is perhaps the most common cause of poor portrait lighting. TABLE 8-1 details the characteristics and common causes of hard light versus soft light.
TABLE 8-1 Characteristics and Common Causes of Hard vs. Soft Light
|
HARDER LIGHT |
SOFTER LIGHT |
|---|---|---|
LIGHT SIZE |
Smaller |
Larger |
SHADOWS/HIGHLIGHTS |
Abrupt |
Gradual |
TYPES OF SUNLIGHT |
Direct |
Overcast, shade |
TYPES OF FLASH |
Direct |
Bounced, diffuse |
As you can see from the table, the type of sunlight, flash, and studio lighting can all influence the hardness or softness of light. Although too much of anything can be harmful, portraits usually benefit from softer lighting, as you can see progressively illustrated in FIGURES 8-3 through 8-5.
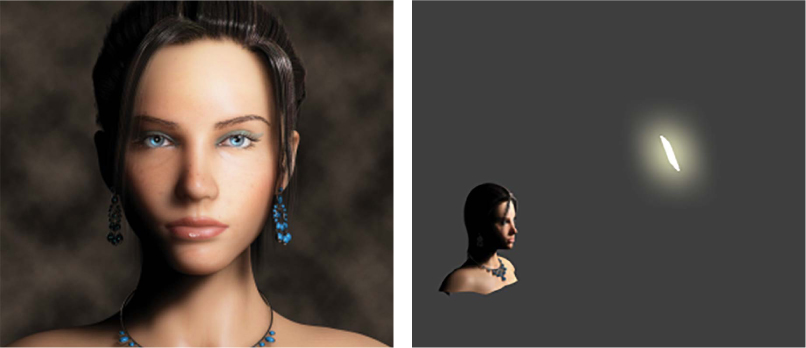
FIGURE 8-3 Hard lighting
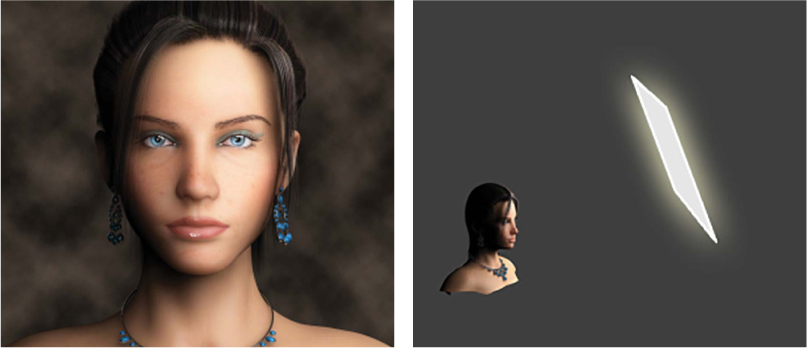
FIGURE 8-4 Softer lighting

FIGURE 8-5 Even softer lighting
The larger and smaller light sources are termed soft and hard, respectively, because of how they render the edges of shadows and highlights. A larger light source effectively “wraps” light around the subject; any given region of the subject is therefore more likely to receive at least some direct lighting, resulting in softer shadows. With a smaller light source, a given region of the subject usually receives either all or none of the direct light, producing much deeper shadows. Also note how light size is equally transformative to the highlight transitions: the harder the light, the brighter and more abrupt the hair reflections in these figures.
Light size doesn’t just control the appearance of large-scale tones; it also affects the visibility of texture, as shown in FIGURES 8-6 and 8-7. Pores, blemishes, wrinkles, and other facial details all become more pronounced with hard light. Hard light also increases the likelihood of harsh direct reflections.

FIGURE 8-6 Harder light emphasizes texture.
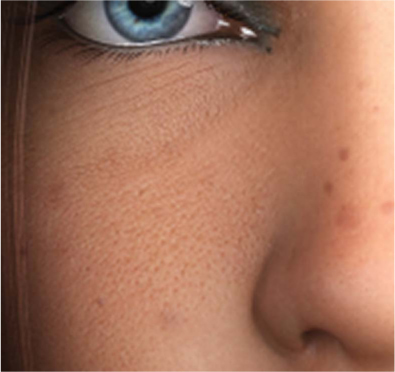
FIGURE 8-7 Softer light blends texture.
The most important trick for achieving softer light is to understand that direct light is hard, but that whenever this light bounces off or travels through objects, it becomes diffused and softer. Photographers use this concept to make the most of otherwise harsh light. Here are some tips for making hard light softer:
![]() Use a diffuser. Place a larger translucent object between your subject and the light source. This might include using a lamp shade or hanging a white sheet or curtain over an open window that receives direct light.
Use a diffuser. Place a larger translucent object between your subject and the light source. This might include using a lamp shade or hanging a white sheet or curtain over an open window that receives direct light.
![]() Use bounced or reflected light. Place your subject so that they receive only bounced or reflected light. This might include moving them a little farther from an open window (just outside the direct rays) or aiming your flash at a nearby wall or ceiling.
Use bounced or reflected light. Place your subject so that they receive only bounced or reflected light. This might include moving them a little farther from an open window (just outside the direct rays) or aiming your flash at a nearby wall or ceiling.
In either case, because you’ll end up with a lot less light, the subject might require a longer exposure time or a brighter flash.
At the other extreme, a light source can be too soft, although this is a much less common situation. Some might consider photos taken in the shade as appearing too flat, for example, because indirect light scatters in from everywhere. Such light is effectively very large and can erase all shadows. Other examples of very soft light include portraits in the fog or outside on a fully overcast day.
Just how soft is “too soft” really depends on the look you’re trying to achieve, as whether lighting is considered soft is relative and can vary depending on the photographer or application—unless the lighting is at an extreme. For example, even though FIGURE 8-5 uses very soft lighting, many might consider the result to be a desirable look for glamour portraits. This chapter therefore refers to light as being either “softer” or “harder” compared to a reference instead of trying to set a standard for what is considered “soft” or “hard” light in general.
DISTANCE AND APPARENT LIGHT SIZE
We’ve established light size correlates with the hardness or softness of light, but it’s not really the physical size of the light source that matters, just its apparent size, from the perspective of the subject. The combination of distance and size is what ultimately determines apparent size, because a small light that’s very close can easily appear larger from the subject’s perspective than a large light that’s far away.
In general, moving a light closer makes it softer, because this light strikes the subject from a broader range of angles, even if the light itself remains unchanged. Similarly, the opposite is also true: direct sunshine is hard light even though the sun is physically enormous. The sun is so distant that its light reaches us from effectively one direction.
Moving a light closer also brightens the subject. If this is your primary source of light, then the look of your portrait might not change much, other than perhaps becoming a little softer, but the exposure time or flash intensity can be decreased to compensate for this. However, if much of your subject’s light was previously ambient, then moving a light source closer can decrease the influence of other light sources (for example, ambient light). This has the potential to make the overall light harder because more of it will come from one location.
FIGURES 8-8 and 8-9 show how the distance of a light source affects a subject’s appearance. Note how the closer light source brightens the subject relative to the background while softening the lighting on the subject a little.
Closer light sources also illuminate the subject more unevenly, because different parts of the subject will become relatively closer or farther from the light. For example, the far side of the subject might only be 5 percent farther from a distant light source than the near side of the subject, but that relative distance could become 50 percent when the light source is moved up close. This would cause the far side of the subject to become much darker relative to the other parts of the subject.
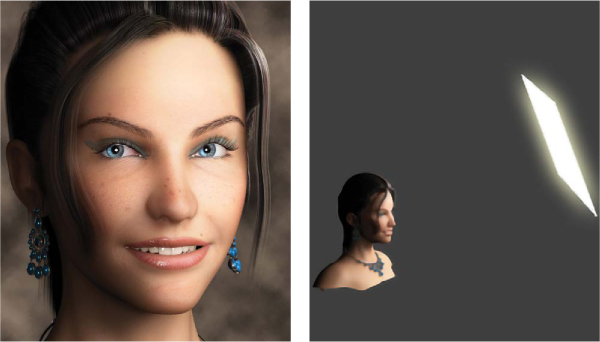
FIGURE 8-8 Subject appearance with farther light source

FIGURE 8-9 Subject appearance with closer light source
However, this uneven lighting can also be used to your advantage. A light source placed closer to the subject might be able to achieve better subject/background separation because the subject will become much brighter relative to the background. On the other hand, this can also create more separation than desired if the background and subject are already well separated.
LIGHTING DIRECTION
Finding the right lighting direction requires the photographer to strike a balance among several potentially competing considerations. Typically, this includes both portraying a sense of depth and depicting facial features in a pleasing manner.
SENSE OF DEPTH
Creating a sense of depth is a key part of capturing realistic-looking portraits, since it helps give a two-dimensional image a more three-dimensional feel. However, our sense of depth doesn’t work very well unless light is striking our subject from the right direction. FIGURE 8-10 show how various lighting directions affect perception of depth of a sphere.
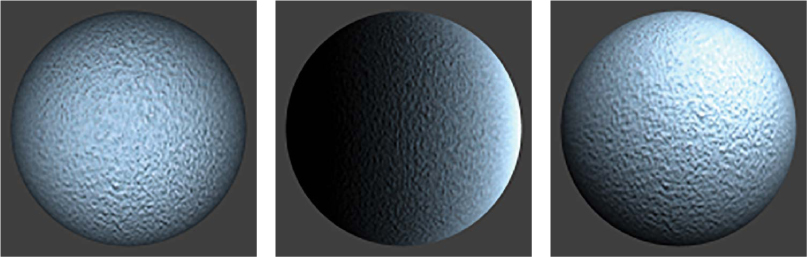
FIGURE 8-10 Front lighting (left), side lighting (middle), upper-side lighting (right)
Note how the upper-side lighting generally makes the shape appear more three dimensional than either front or side lighting. This same principle holds true for portraits, but fortunately the irregular geometry of a face can still appear three-dimensional with a wider range of lighting directions.
In addition to a person’s head as a whole, individual facial features can have unique shadows and highlights. These differences deserve special consideration. For example, this might mean preventing a subject’s nose from casting a long shadow to avoid making it seem larger than it is, or you might choose to soften the shadows underneath the subject’s eyes to make them look less tired. Upper-side lighting, or lighting from the upper left or upper right, could cause these and other undesirable effects if not carefully positioned.
REMBRANDT LIGHTING
One classical way to achieve both a sense of depth and a flattering appearance is to place the light so that it creates a triangle of illumination on the cheek farthest from the light source. This style is often called Rembrandt lighting, and we’ll refer to this shape as the key triangle.
FIGURE 8-11 shows an example of the key triangle you should aim for if a Rembrandt lighting style is desired.
You can use the key triangle as a guide to help restrict the lighting to a narrower range of angles. When the key triangle deviates from this shape, you may need to make some adjustments (shown in FIGURE 8-12). For example, when the key triangle is too wide, this means the light is too close to the subject’s forward direction, and it likely isn’t creating a sufficient appearance of depth since most shadows are hidden from the camera’s perspective.
If a key triangle is too narrow, it means the light is too far to the side of the subject, which could cause the nose to appear bigger by having it cast a longer shadow or leave a substantial portion of the face in shadow. However, this is perhaps the least adhered to of all the key triangle guidelines.

FIGURE 8-11 Illustration of how the key triangle might appear on a subject

FIGURE 8-12 Examples of how the subject appears if the light source is vertically or horizontally displaced compared to Rembrandt lighting
A key triangle that is too short can indicate that the light is too high or low, so the light is likely causing shadows underneath the eyes or a lack of shadow definition along the jaw line, respectively. Lighting from below is often used for unsightly creatures in movies or to create a frightening face when telling a scary story (like when you hold a flashlight under your chin).
Keep in mind that the exact appearance of the key triangle will vary greatly depending on the subject’s facial structure and expression, so this is only a rough guide.
![]() TECHNICAL NOTE
TECHNICAL NOTE
Loop lighting is another popular (and more commonly used) portrait style that is similar to Rembrandt lighting. It is based on the appearance of the shadow underneath the subject’s nose, which produces a “looped” diagonal shadow that doesn’t fully extend to the shadows on the far side of the face.
As with any rule, there are exceptions. For example, a side-view portrait might not need a key triangle to convey a sense of depth if additional shadows have become visible on the side of the face (such as in FIGURE 8-12).
Furthermore, Rembrandt lighting is just one style among many, and each subject is a little different. For example, you might want to forego Rembrandt lighting and choose hard side-lighting to accentuate a man’s facial hair or to convey symmetry by only illuminating half the face. The key is knowing how to use light to emphasize depth, shape, or texture, depending on your artistic intent. Short lighting and broad lighting are two other common lighting styles. These are used when the subject’s face is at an angle to the camera. Short lighting illuminates the full face and leaves the near side of the head in shadow, whereas broad lighting illuminates the near side of the head and face but leaves the far side of the face in shadow, as shown respectively in FIGURES 8-13 and 8-14.

FIGURE 8-13 Short lighting

FIGURE 8-14 Broad lighting

FIGURE 8-15 Example of an open window that could be used as soft light for a nearby subject
In sum, the usual goal of portrait lighting is to achieve softer light. This is almost always more flattering because it makes a subject’s features appear smooth and the skin texture appear softer. Achieving softer light requires making the apparent size of the light source bigger. This can be done by employing any of the following methods:
![]() Moving the light closer
Moving the light closer
![]() Increasing the light’s physical size
Increasing the light’s physical size
![]() Bouncing or diffusing the light
Bouncing or diffusing the light
Sometimes it’s possible to make the apparent light size larger using available light. For example, you can often achieve light quality that is similar to expensive equipment by photographing subjects in indirect sunlight, such as the light near large, open windows (see FIGURE 8-15).
The choice of lighting direction is definitely more subjective than just using hard or soft light. Two lighting orientations are usually considered undesirable: lighting from underneath and directly from the front. The former doesn’t appear natural, and the latter destroys the portrait’s sense of depth. In any case, you’ll generally want to portray your subject in a flattering light, but each subject is unique and may require a different treatment.
Regardless of the choices, the key is to envision your artistic intent at the start and then to adjust your lighting setup to achieve that goal.
FILL LIGHTING
Adding a second light source—usually called a fill light or fill flash—can greatly improve portrait lighting. It reduces the depth of shadows and softens the appearance of facial features, as you can see in FIGURE 8-16. Best of all, a fill light is easy to create using a simple on-camera flash or a reflector. However, a second light source can just as easily harm portraits. Controlling the location and intensity of the fill light can help you produce the portrait appearance you want.
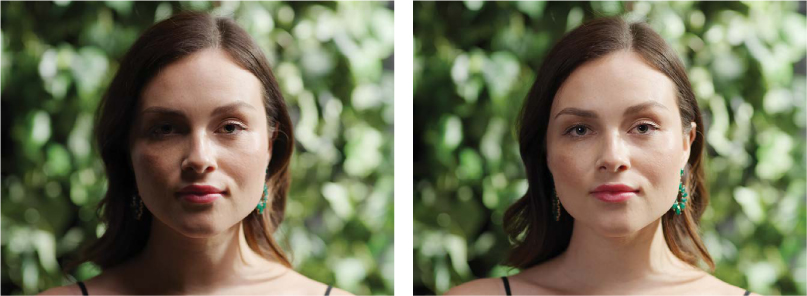
FIGURE 8-16 Harsh overhead sunlight (left), sunlight with a fill flash (right)
ADDING A SECOND LIGHT SOURCE
As you just learned, with a single light source, the most important considerations are its direction and apparent size. Although size and direction have the same effect with a second light, they aren’t typically controlled the same way as the main light. Instead, we usually adjust the relative illumination of the secondary light compared to the main light. This controls how much the second light will fill in the shadows that the main light creates, and this is precisely why a secondary light is usually referred to as the fill light or fill flash.
For example, FIGURES 8-17 and 8-18 illustrate the principle of using a fill flash to fill in the shadows created by a direct sunlight.

FIGURE 8-17 Harsh overhead sunlight
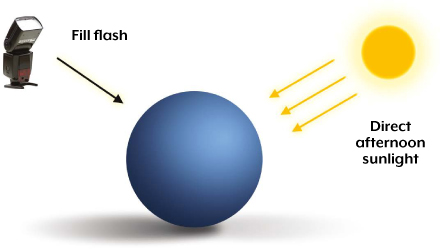
FIGURE 8-18 Using a fill flash to balance out an otherwise harshly lit subject
Perhaps the most common lighting scenario in outdoor portraiture is to use an on-camera flash as the fill light and to use sunlight as the main light. In the studio, you could also use a second flash or ambient light as the fill light and use a flash as the main light. There are many possibilities. The key is knowing how to control the qualities of your fill light, regardless of what source is being used to create it.
FLASH AND FILL LIGHT RATIOS
The terms flash ratio and fill light ratio describe the relative proportion of light coming from the main and secondary light sources, which effectively determines the overall contrast. For example, a value of 1:4 means that the fill light is one-quarter the intensity of the main light. More balanced ratios produce weaker shadows. FIGURE 8-19 shows how different fill light ratios influence the appearance of a subject.
Portraits typically appear more pleasing with a flash ratio near 1:2. At this ratio, the fill light is strong enough to produce subtle shadows, but not so strong that it eliminates shadows entirely, which could make the subject appear flat.
However, you should always be wary of rules in photography. In fact, less fill light is a popular choice for dark, low-key portraits with well-defined shadows. Similarly, more fill light might be necessary to render a brighter, high-key style, or just to provide a softer appearance (such as styles used for photographing babies). When in doubt, though, the 1:2 ratio is a safe starting point.

FIGURE 8-19 Fill light ratio and subject appearance
The terminology can be a little confusing, because a fill light ratio refers to the ratio between the secondary and primary sources of light, whereas the flash ratio refers to the ratio between the light from the flash and the ambient light. To make matters worse, sometimes the ratio describes the total light (ambient + flash) compared to the flash alone. It’s helpful to remember that, although the numbers in the ratio are sometimes reversed, the smaller number always refers to the fill light.
FILL LIGHT LOCATION
Unlike with the main light source, the simplest location for a fill light is near the camera’s line of sight (on-axis), but not so close that it appears in your image. In that position, any shadows cast by the fill light won’t be visible from the camera’s perspective, even if these shadows appear hard due to the small size of the source. Unlike with the main light source, where the goal is often to add pleasing shadows and dimensionality, the goal with fill lighting is to soften the main light without the viewer knowing this has happened. Perhaps the easiest way to achieve this type of fill light is to use a built-in or on-camera flash, as shown in FIGURE 8-20.
On the other hand, an on-axis fill light doesn’t give you any control over where it’s located and has a higher chance of producing direct reflections, which you want to avoid. To get around this, many photographers use a fill light that strikes the subject from a direction that partially opposes the main light (off-axis), as shown in FIGURE 8-21. This targets main-light shadows more efficiently than on-axis fill lighting—even if the fill light ratio remains unchanged—and is less likely to affect the overall exposure.
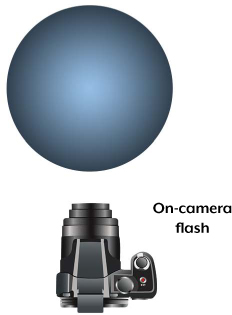
FIGURE 8-20 On-axis fill light (shadows fall behind the subject)

FIGURE 8-21 Off-axis fill light (shadows fall across the subject)
Off-axis fills have their own disadvantages, with the worst being that you have to worry about the appearance of shadows from the fill light. These need to be made sufficiently soft; otherwise, they can cause unrealistic-looking double shadows. To minimize the risk of double shadows, the apparent size of the fill light should be as large as possible.
The second shadow to the right of the subject’s nose in FIGURE 8-22 is caused by off-axis fill lighting that is too hard. The on-axis fill light in FIGURE 8-24 avoids producing double shadows, even though it is just as hard as in FIGURE 8-22. The fill light in FIGURE 8-24 still doesn’t eliminate the shadows as thoroughly as in FIGURE 8-23, though, even though it uses the same 1:1 fill light ratio.
Keep in mind that off-axis fill lighting requires a more complex lighting arrangement, and it is therefore usually reserved for portraits in a studio. An off-axis fill light isn’t technically a true fill light either, because it does not lighten all shadows visible to the camera—just those from its direction. For example, in FIGURE 8-23, the off-axis light is unable to reduce the shadows behind the hair on the upper left.
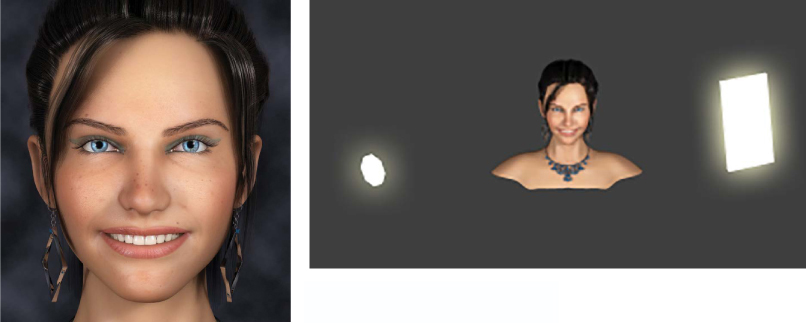
FIGURE 8-22 Harder off-axis fill light
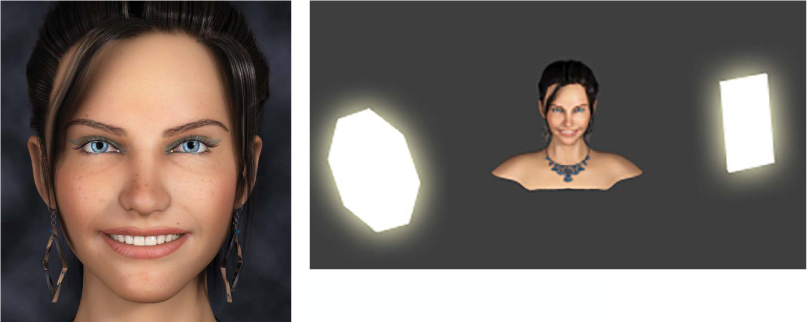
FIGURE 8-23 Softer off-axis fill light

FIGURE 8-24 Harder on-axis fill light
FILL FLASH CAMERA SETTINGS
Many people only use flash when their scene has insufficient light for a handheld photograph. Doing so misses out on what may be a more useful function: fill flash. It might seem counterintuitive, but flash is most useful in portraiture when there is plenty of sunlight. Most cameras default to using their flash as a fill flash when the subject is well lit, but only if you force the flash to fire.
Cameras usually default to a flash ratio near 1:1, but this can be substantially off because it relies on your camera’s metering system. As you learned in Chapter 6, you can fine-tune this ratio using flash exposure compensation (FEC), which modifies the amount of flash your camera would otherwise emit while leaving the other exposure settings unchanged.
![]() TECHNICAL NOTE
TECHNICAL NOTE
Well lit means that your camera doesn’t deem camera shake a threat, which usually translates into having an exposure time that is faster than about 1/60 second.
OTHER CONSIDERATIONS FOR FILL LIGHTING
Other important fill light techniques and considerations include natural fill lighting, reflectors, subject/background separation, and ambient light, as described here:
![]() Natural fill lighting Thus far we’ve focused on scenarios where natural light is the main light source and then the camera’s flash is used as the fill light. These roles could easily be reversed. For natural fill lighting, the source of natural light usually needs to be soft, such as on an overcast day or when the subject is in the shade. You also typically need an off-camera or bounced flash in order for this to produce optimal results.
Natural fill lighting Thus far we’ve focused on scenarios where natural light is the main light source and then the camera’s flash is used as the fill light. These roles could easily be reversed. For natural fill lighting, the source of natural light usually needs to be soft, such as on an overcast day or when the subject is in the shade. You also typically need an off-camera or bounced flash in order for this to produce optimal results.
![]() Reflectors Reflectors make a single light source illuminate a subject from a second direction. The reflection is always dimmer than the main light, so reflectors are most commonly used for fill light. An added benefit is that this light can have the same white balance as the main light. A disadvantage is that reflectors often don’t provide enough light. The intensity depends on the reflectivity of the reflector’s surface and its distance from the subject. To increase illumination, reflectors are usually placed as close to the subject as possible, just outside the image frame. Reflectors vary in size and color, but a common one is depicted in FIGURE 8-25. It has a silver foil surface.
Reflectors Reflectors make a single light source illuminate a subject from a second direction. The reflection is always dimmer than the main light, so reflectors are most commonly used for fill light. An added benefit is that this light can have the same white balance as the main light. A disadvantage is that reflectors often don’t provide enough light. The intensity depends on the reflectivity of the reflector’s surface and its distance from the subject. To increase illumination, reflectors are usually placed as close to the subject as possible, just outside the image frame. Reflectors vary in size and color, but a common one is depicted in FIGURE 8-25. It has a silver foil surface.
![]() Subject/background separation With natural light portraits, a fill flash can help create additional subject/background separation, when the flash is placed closer to the subject than the background. You can control the strength of this effect by moving the flash closer to your subject and/or moving your subject farther from the background.
Subject/background separation With natural light portraits, a fill flash can help create additional subject/background separation, when the flash is placed closer to the subject than the background. You can control the strength of this effect by moving the flash closer to your subject and/or moving your subject farther from the background.
![]() Ambient light All scenes have some amount of fill light that comes from ambient light, even if no fill light has been added. For example, light from the main source bounces off walls and other objects and collectively acts as a fill light. This is why shadows are never fully black and the actual amount of fill light is usually a little higher than that provided by your fill flash. However, studio lighting can still achieve very high contrast, such as in FIGURE 8-26, because ambient light can be more carefully controlled.
Ambient light All scenes have some amount of fill light that comes from ambient light, even if no fill light has been added. For example, light from the main source bounces off walls and other objects and collectively acts as a fill light. This is why shadows are never fully black and the actual amount of fill light is usually a little higher than that provided by your fill flash. However, studio lighting can still achieve very high contrast, such as in FIGURE 8-26, because ambient light can be more carefully controlled.
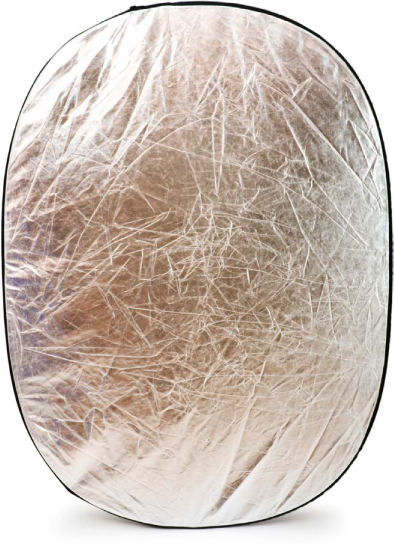
FIGURE 8-25 Handheld light reflector
Overall, the most important fill light choices are location of the light and the fill ratio. You’ll need to decide whether to place the fill near your camera’s line of sight (on-axis) or off to the side (off-axis). On-axis fill is easier since you don’t have to worry about how shadows appear, but off-axis fill provides more flexibility with placement and with control over the appearance of reflections.
You’ll also need to consider the relative strength of your fill light compared to the main light. A good starting point is typically one part fill light for every two parts main light (a 1:2 ratio), but this also depends on where your fill light is located.

FIGURE 8-26 Low ambient light
SUMMARY
This chapter reviewed the fundamentals of portrait lighting with one and two light sources. You learned why the distribution of light around your subject is key and that this distribution is controlled by the apparent size of your lights and their direction relative to the subject. You also learned that portraits are generally more pleasing with softer lighting, which you can enhance by diffusing, reflecting, or bouncing your light to effectively increase its size.
In the next chapter, we’ll explore various tips and techniques to help you achieve better results with your photography.
