
Over the course of this book, we have gone over many aspects of building games for mobile devices. The last step in our game development journey is actually releasing the game out into the wild and having people actually play it. All of those long hours of hard work have now come together into something that the masses will be able to enjoy.
When doing this, there are a number of things to keep in mind and this is exactly what we will be discussing next.
In this chapter, we will go over the process of submitting your game to the Google Play Store or iOS App Store with tips and tricks to help the process go smoother. By the end of this chapter, you will know exactly how to create developer accounts for both stores as well as how to put your game on the respective stores.
This chapter will be split into a number of topics. It will contain a simple step-by-step process from beginning to end. Here is the outline of our tasks:
- Building a release copy of our game
- Putting your game on the Google Play Store
- Putting your game on the Apple iOS App Store
Technical requirements
This book utilizes Unity 2020.1.0f1 and Unity Hub 2.3.1, but the steps should work with minimal changes in future versions of the Editor. If you would like to download the exact version used in this book, and there is a new version out, you can visit Unity's download archive at https://unity3d.com/get-unity/download/archive. You can also find the system requirements for Unity at https://docs.unity3d.com/2020.1/Documentation/Manual/system-requirements.html in the Unity Editor system requirements section. To deploy your project, you will need an Android or iOS device.
You can find the code files present in this chapter on GitHub at https://github.com/PacktPublishing/Unity-2020-Mobile-Game-Development-Second-Edition/tree/master/Chapter%2011.
Building a release copy of our game
We exported copies of our game previously in Chapter 2, Project Setup for Android and iOS Development, but there are some additional steps that we should do before actually releasing the game on an app store:
- The first step will be to confirm you are currently set to deploy your project to our mobile platform of choice. You can check this by going into the Build Settings menu by navigating to File | Build Settings.
- From there, you should see the Unity logo to the right of the Android or iOS selection. If you do not, select it and then click on the Switch Platform button and wait for it to finish reimporting the assets for the project:

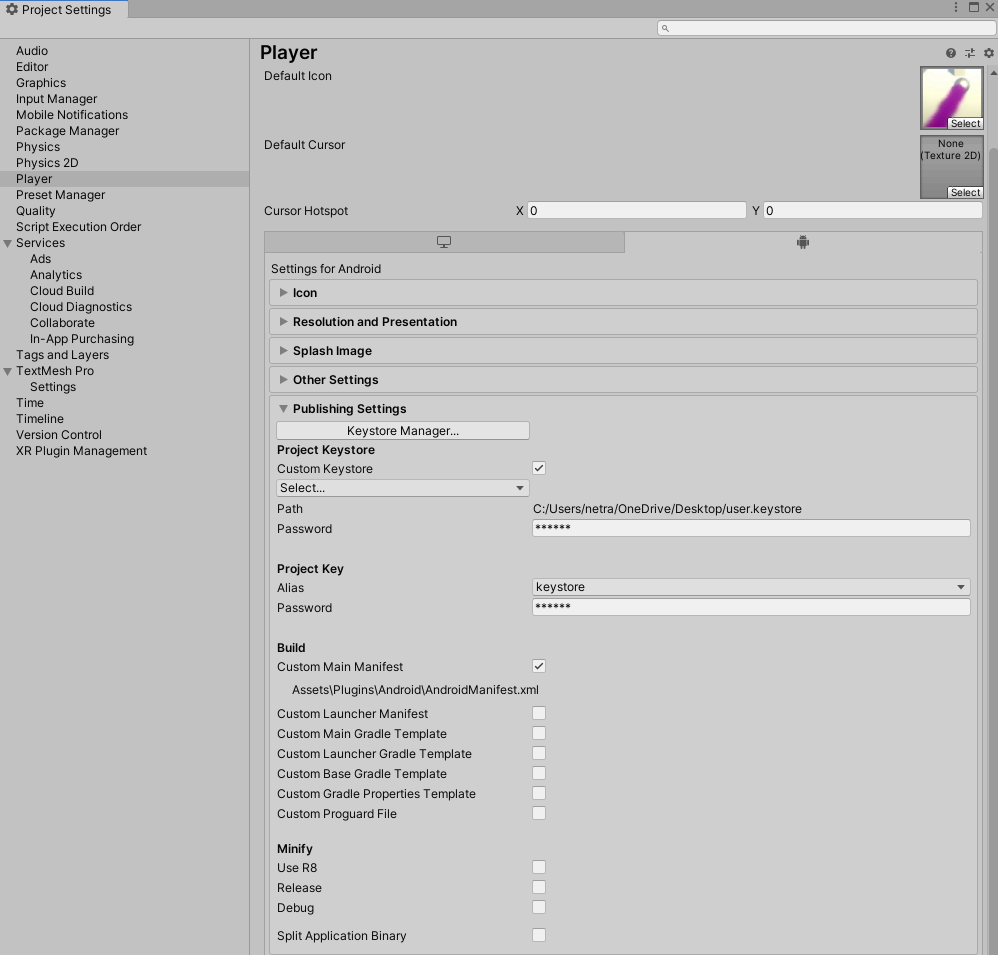
- After confirming whether we are building for Android or iOS, open up the Player settings menu by clicking on the Player Settings... button from the menu or by going to Edit | Project Settings | Player.
- If you haven't done so already, set the Company Name and Product Name values to your own values. In my case, I used John P. Doran and Endless Roller, respectively.
- You'll then see a Default Icon item. Drag and drop the Hi-ResIcon image into the Assets folder and then drag and drop it into the Default Icon slot. This will cause the Icon section of the Android settings to automatically scale the image to fit whatever device you are targeting:

Of course, you can also use your own image, and you can use transparency if you would like to.
- Under the Resolution and Presentation section, you can enable or disable different rotations and aspect ratios as desired. We adjusted the game to fit these, but this may be useful to know about as you work on your own projects or you wish to restrict users to one experience or another.
- The Splash Screen option can be used to display your own logo in addition to Unity's if you have the Personal Edition of Unity. If you have Pro, you may disable it here.
- Confirm under Other Settings that the Package Name property is not set to the default values. The general method of naming is com.CompanyName.GameName.
- Next, open up Publishing Settings. This is where we are going to be putting in information about who our game's publisher is (in this case, I'm assuming it's you). Whenever you build a game for Android, you need a Keystore, which allows you to sign off on the game, approving it for the build process. Click on the Keystore Manager button. From there, you'll be brought to a menu.
- From the menu, click on the Keystore... dropdown and then select Create New | Anywhere... and choose a location for this file:

Keep in mind where this is going to be located, as you will be using it in the future to create new versions of your game
- Then, you'll need to set a Password that you will need to know as you'll be using it over and over. Afterward, in the Confirm password textbox, you should enter the same thing as you did before.
- From there, under the New Key Values section, you'll need to add in the same information as before—the password with confirmation and then your name and other information. You can see what I put down in the following screenshot. Once finished, click on the Add Key button:

- You'll have a popup asking whether you'd like to set the new keystore as your Project Keystore and Project Key. Click on Yes. You should then see this screen:
With that, we have everything set up that we need to put the game up on the store. To start, we will discuss how to put the game on the Google Play Store before moving on to the Apple App Store.
Putting your game on the Google Play Store
Now that your game is built, you will need to actually put it up on Google's Play Store. To put games up on the Google Play store, you are required to pay a one-time $25 dollar fee. This may or may not seem like a large amount of money, but it is much cheaper than the iOS App Store and is a one-time fee, so for those who are a bit more budget-conscious, you may wish to dive into Google first and make some profit before moving on to Apple's store. We will first look at the Google Play Console before filling out all of the details needed in order to submit our game to the store. We will also discuss how to mark our game as a beta to get feedback from others before making the final submission.
Setting up the Google Play Console
The first step is to gain access to the Google Play Console. This allows you to publish an Android app on Google Play as well as Google Play Game Services if you'd like. Implement the following steps:
- Open up your web browser and go to https://play.google.com/apps/publish. This page is the Google Play Console, which allows you to add apps to the Google Play store.
- If you aren't signed in to your Google account, you'll need to sign in, otherwise, you'll be brought to a page that needs you to agree to the developer agreement:

- Scroll down and you'll see a checkbox saying, I agree and I am willing to associate my account registration with the Google Play Developer distribution agreement. Read the agreement, and if you agree, click the checkbox.
- Afterward, click on the Continue to Payment button. You will need to enter your credit card information and continue until the payment is complete. From there, you'll see a window saying that you'll receive a receipt by mail and then click on the Continue Registration button.
- You'll then need to enter in the details under the Developer Profile. This will include the developer name, the email you'd like to be contacted by, your website if you have one, and a contact number in case Google needs to contact you about your apps. You'll also be given the option to receive emails from Google Play, but it's not required for this course.
- Once you have finished, click on the Complete Registration button. If all goes well, you'll be brought to the Google Play Console:

Once you have an account, you can now start the process of actually publishing a game to the Google Play store. To start that process, we will need to add a project to our account, which is what we will be doing next.
Publishing an app on Google Play
The process of publishing an app to Google Play involves filling out a number of different fields with information about your game as well as art assets for screenshots. To do this, implement the following steps:
- Click on the PUBLISH AN ANDROID APP ON GOOGLE PLAY button. You'll be brought to a page where you need to select a Default language and then the Title of your game. Then, click on the Create button:

-
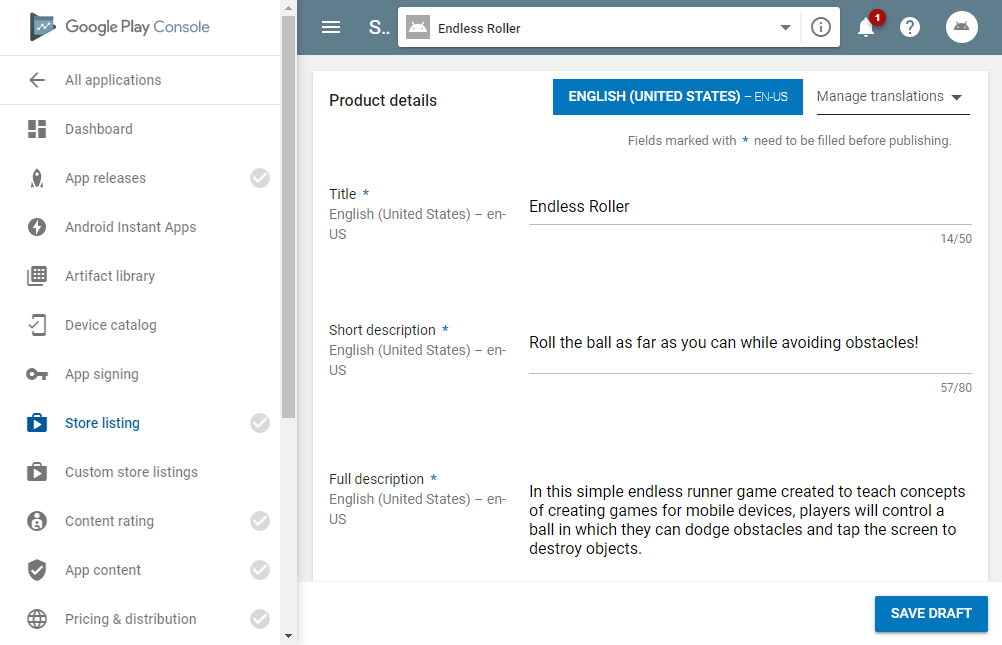
You'll then be brought to a page where you'll need to fill in information about your game, starting with a Short description and then a more detailed Full description:
- You'll then need to provide graphical assets to be used to display your game. You are required to have at least two screenshots and then some additional icons and graphics:

- You'll then need to include some more images for icons and other featured graphics. The ones with an asterisk (*) are required. You can find some already made ones in the example code with this book, but I suggest that you create your own once you've customized this game to your liking:

- Now, scroll down and you'll need to select an Application type (I picked Games) and a Category (I chose Arcade).
- Finally, confirm your contact info and check whether you have a privacy policy or not.
- Afterward, scroll all the way to the top and then click on the SAVE DRAFT button:

- Next, click on the Pricing & distribution option on the left-hand side. By default, you need to decide whether you want your app to be paid or free. I'm going to go with free, but if you click on the Set up a merchant account button, you can take payment as well.
- You'll need to scroll down and select the countries you'd like to have people be able to download your game in. Generally, unless we are doing some kind of testing or beta program, we will generally hit the Available button to allow the entire world to play:

- Scroll down and you'll need to answer whether your game is directed toward children under 13 and also state whether your game has ads or not. In my case, the app is not directed toward children and the game contains ads:

- Now, scroll down till you get to the Consent section and check the final two options after reading and agreeing to their stipulations:

- When you reach the end, scroll all the way up and click on the SAVE DRAFT button again.
- Next, we will need to bring in our APK file to the store. Click on the App releases section. From there, we need to select what version of the game we want to release. Production means that the game is completely done, but assuming we are looking for feedback and/or want to make the project better, we will want to select Beta or Alpha. I'll go ahead and select Beta and click on the Manage Beta option:

- From there, click on the Create Release button. You'll then be given the opportunity to enroll the app into Google Play App Signing. Go ahead and click on Continue and accept the terms if you would like. Afterward, you will be brought to a screen to allow you to add an APK:

- Click on the Browse Files button and go to the folder you've exported your game to. If you exported your game as we did in Chapter 2, Project Setup for Android and iOS Development, you may notice an error like the following:

Ensure that you follow the instructions in the Building a release copy of our game section.
If all goes well, you'll be brought to a screen that looks as follows:

- If you scroll down, you should see a version of the game on the screen. You'll be asked what is new in this release. I wrote Initial release and then clicked on the Save button.
- Next, click on the Content rating button. You may be required to put in a physical address. If so, click on the Account details page and fill it out, and then click on the Continue button on this page:

- From here, you'll need to enter your email address again and then select your app category. In our case, it's likely Game:

- Then, answer each of the questions offered until you arrive at the Save Questionnaire button that you will click and then click on the Calculated Rating button.
- Afterward, you should see a calculated rating for you to note:

- Scroll down all the way to the bottom and then click on the Apply Rating button. If all goes well, you should notice that the top of the screen says Ready to publish. Click on that button:

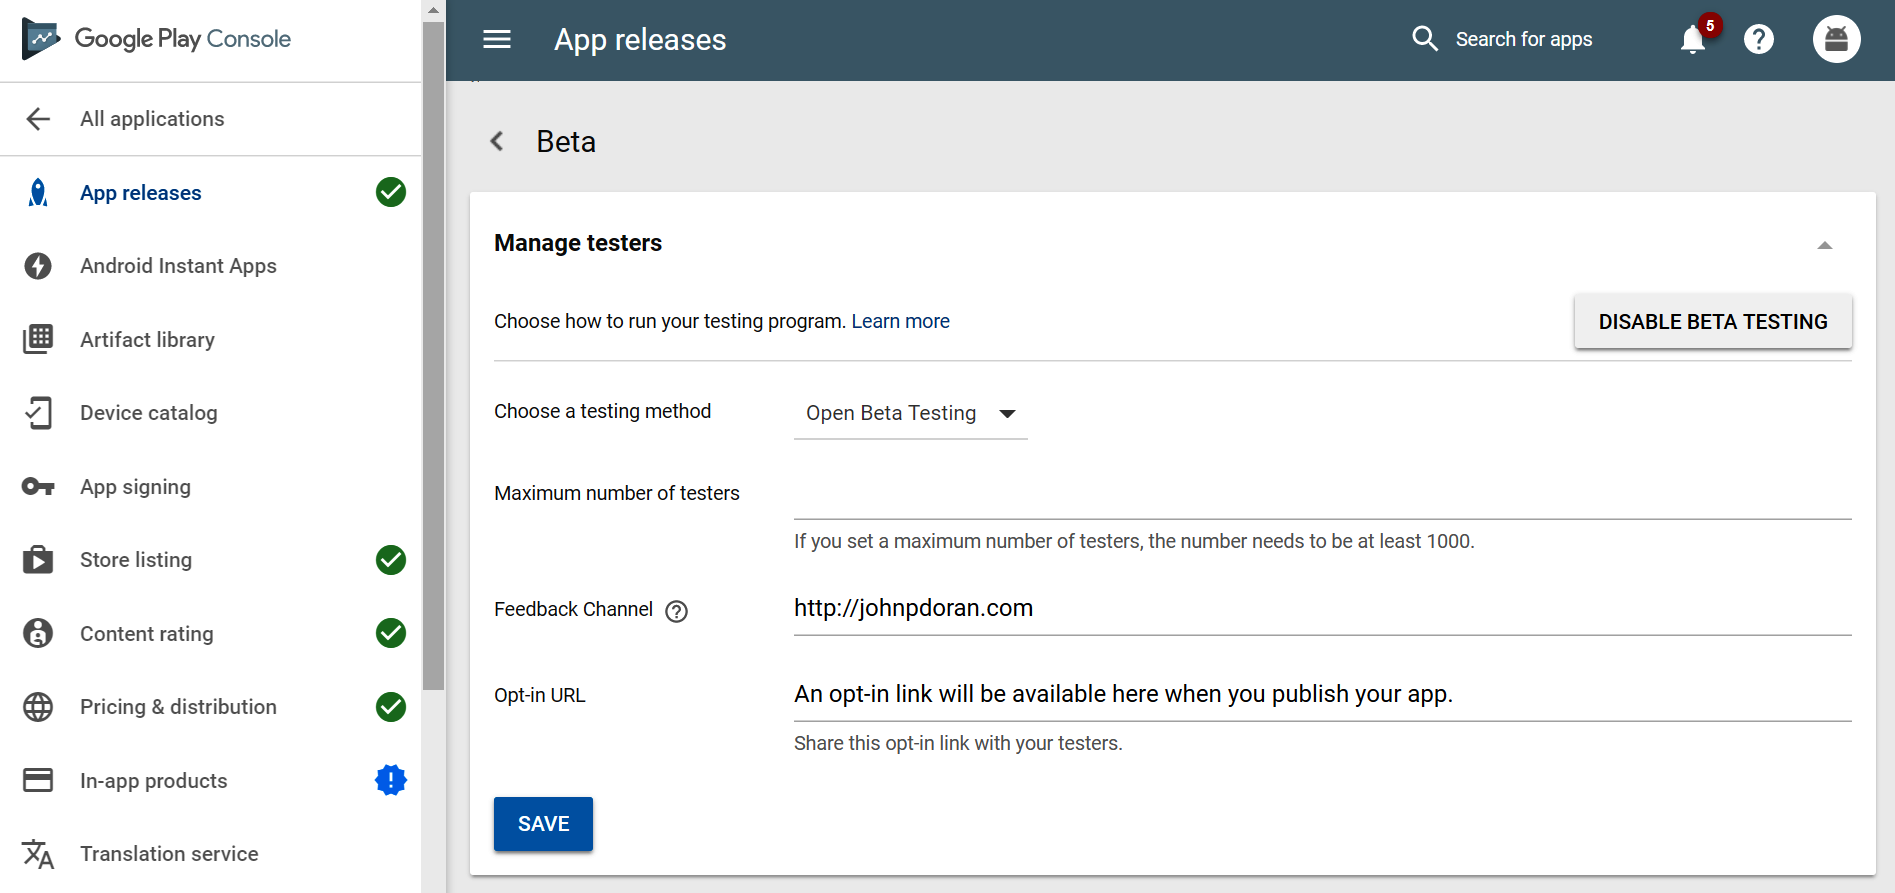
- Click on the button that says Manage Releases. From there, scroll down to the Beta section again and then click on the Manage Beta button. Here, you're able to select your method of Open Beta testing.
- Under Choose a testing method, select Open Beta Testing. Afterward, you can select a Feedback Channel to specify how you want people to provide feedback. Afterward, click on the SAVE button:
- Next, return to the App releases page and click on the Edit Release button under Beta. From there, click on the REVIEW button at the bottom of the screen:

- Finally, scroll all the way down, and you'll see the START ROLLOUT TO BETA option; click on it:

With that, our game is currently Pending publication:

After waiting a moment, your game should be published and you can share it with the world. If you go to the Manage testers section, you should notice an Opt-in URL that you can share and have others play:

And with that, we've gone over all of the steps needed to get our game on to the Google Play store. With that experience finished, we can now approach the process of getting on to Apple's iOS App Store, which we will be doing next.
Putting your game on the Apple iOS App Store
Just like the Google Play store, there is an additional fee to put your game on the App Store. Unlike the Google Play store, the fee is $99 plus tax every year. However, a lot of people believe that having their titles on iOS devices is worth the extra cost. In this section, we will go through the process of getting our game on the App Store. We will start by setting up your Apple Developer account and creating a provisioning profile. Afterward, we'll utilize the iTunes Connect tool to actually add the app to the store, and utilize Xcode to make an archive with which we can upload the project to the app store, so it can finally be reviewed for submission.
Apple Developer setup and the creation of a provisioning profile
In order to deploy an app onto an iOS device, you are required to use a Mac computer, but before we move on to the iTunes store, we first need to have all of the certificates and permissions figured out ahead of time.
Implement the following steps:
- On a Mac computer, go to developer.apple.com:

- From there, click on the Account button on the top right of the screen, fill in your Apple ID and Password, and press Enter to sign in:

If you have a two-factor identification method set up, you may need to verify that you are indeed yourself.
- From there, click on Accounts. Now, at this point, you will need to make the payment for the $99 annual fee. This process should be fairly straightforward, and once you have finished that aspect of things, you will come to a page similar to the following:

- Select the Certificates, Identifiers & Profiles screen to start the process of creating apps. If you just paid the $99 fee, you may see an error stating that The selected team does not have a program membership that is eligible for this feature. If you need assistance, please contact Apple Developer Program Support. https://developer.apple.com/support, as you can note in the following screenshot:

Don't worry, that just means that the payment hasn't processed on Apple's end yet. Try again in about 30 minutes to an hour, and the screen should work okay.
- We will need to set up some certificates to allow us to export to the iOS App Store. From the All certificates page, click on the + sign in the top-right corner of the screen:

- When the page asks what kind of certificate we need, select the App Store and Ad Hoc option under the Production section, and then click on Continue:

- Next, we need to create a Certificate Signing Request (CSR). You'll be brought to a page that goes through the process of creating one, but, in our case, we will start off by opening the ApplicationsUtilities folder on our Mac and opening the Keychain Access program.
- From there, go to Keychain Access | Certificate Assistant | Request a Certificate From a Certificate Authority...:

- Once there, fill in the information with your email address in the User Email Address property, then, for the Common Name, put in a name, and leave the CA Email Address blank. Then, under the Request is property, select Saved to disk:

- Then, click on the Continue button and select a spot to save it. I personally used my Desktop, but you can use any location you please, so long as you remember where it is later on:

- Afterward, it will state that the request has been created on the disk. Go ahead and click on Done and then return to your web browser.
- Scroll down and then click on the Continue button. From there, you'll be brought to the Generate your certificate page. Click on the Choose File button and then select the file we just created. Then, click on the Continue button:

- You'll then be brought to a screen saying that your certificate is ready. Go ahead and click on the Download button and save it to your disk:

- Afterward, double-click on the .cer file to give the data access to Keychain. You'll be asked whether you want to add the certificates; go ahead and click on Add:

- The next step is to create an App ID. To do this, go to the left sidebar and click on the iOS App IDs section. I currently have one App ID already due to Xcode opening our Endless Roller project, which we can customize by clicking on the Edit button. However, if you didn't do so earlier and have a different Bundle ID than the ones listed, let's go through the details next:

- We can create a new ID by clicking on the + button in the top-right corner of the screen.
- From there, under App ID Description, put in the name of your game—in my case, I used Endless Roller. Then, under the App ID Suffix, put in the Bundle ID in the same manner as it was in Unity. In my case, it was com.JohnPDoran.EndlessRoller. Under App Services, select the options that you are using, but, in this case, we're not, so we can just scroll all the way down and then click on the Continue button:

In this case, this would not work due to there already being an ID with this specific Bundle ID. This is because you need to have unique ones. With that in mind, I just went in and edited the original App ID to Endless Roller and then completed it.
The last aspect we will need to set up here is a Provisioning Profile. Apple defines that a "provisioning profile is a collection of digital entities that uniquely ties developers and devices to an authorized iPhone Development Team and enables a device to be used for testing." This means that it's a link between a device and the developer account that is making the project.
- To do this, click on the All button under the Add iOS Provisioning Profiles section. From there, click on the + icon in the top right. Under Distribution, you are going to select the App Store and then click on Continue:

- From there, you'll need to select your App ID. Endless Roller may be selected, otherwise, search for it in the drop-down list and select it, and then click on Continue:

- Then, select your certificate and click on Continue.
- Finally, we will need to put in a Profile Name—I'll put in Endless Roller—and then click on Continue:

- You'll be brought to a page with the profile. Go ahead and download it and keep it safe as we'll need to use it later:

With that, our provisioning profile is ready.
Adding an app to iTunes Connect
Now that we have the provisioning profile, we can actually put our app on the store. To do that, perform the following steps:
- In your web browser, go to http://itunesconnect.apple.com and click on the My Apps button:

If you intend to sell your apps, you will also be required to go to the Agreements, Tax, and Banking section and put in your banking information.
- From there, go to the top-left corner and click on the + icon to add a new app to our profile by selecting New App:

- On this menu, select iOS as your Platforms and insert the name of your game under Name. Apple requires each name to be unique, so keep in mind you will not be able to use Endless Roller again. Under Primary Language, select English (U.S.) and then select your Bundle ID. Then, under SKU, put in an identifier (I used EndlessRoller). Then, click on the Create button:

- You'll then be brought to the App Information screen. From there, change the Category to Games and then, under Subcategory, select Arcade, and then click on Save:

- Next, go to the 1.0 Prepare for Submission section and click on it to start filling in the information for the title. Start off by filling in the Description textbox with the information that you used earlier on Google Play. Then, under Keywords, put in possible things that people could search for in order to find your game:

- We'll then need to provide an app icon to be used. The image must be 1024 x 1024 in PNG format. Under Copyright, go ahead and put your name.
- Lastly, you'll need to provide some screenshots of your game to use. If you click on the iOS Screenshot Properties page, you'll see details on how your screenshots should be created (specifically, the size of the images). The one used in this chapter is for the iPhone 5.5" display, but you can also submit for the optional 5.8" one to support the iPhone X:

- Note that in the Build section, it states that you need to submit your build using Xcode. Let's go ahead and do that after we finish up the last step.
- Go into the Pricing and Availability section and select a price. In my case, I'll be using USD 0 (Free), but, as always, you can pick what you'd like. Since there's no cost under the Volume Purchase Program, go ahead and select Available with no discount since there's no reason for there to be one, and then click on the Save option:

-
Once all of the information is filled in, go ahead and open up Xcode again and your exported project (follow the same steps as in Chapter 2, Project Setup for Android and iOS Development). From there, go to Product | Archive and wait for it to finish:

- This generally takes a while, so wait for it to complete. You may be asked to use an access key. Go ahead and click on the Allow button.
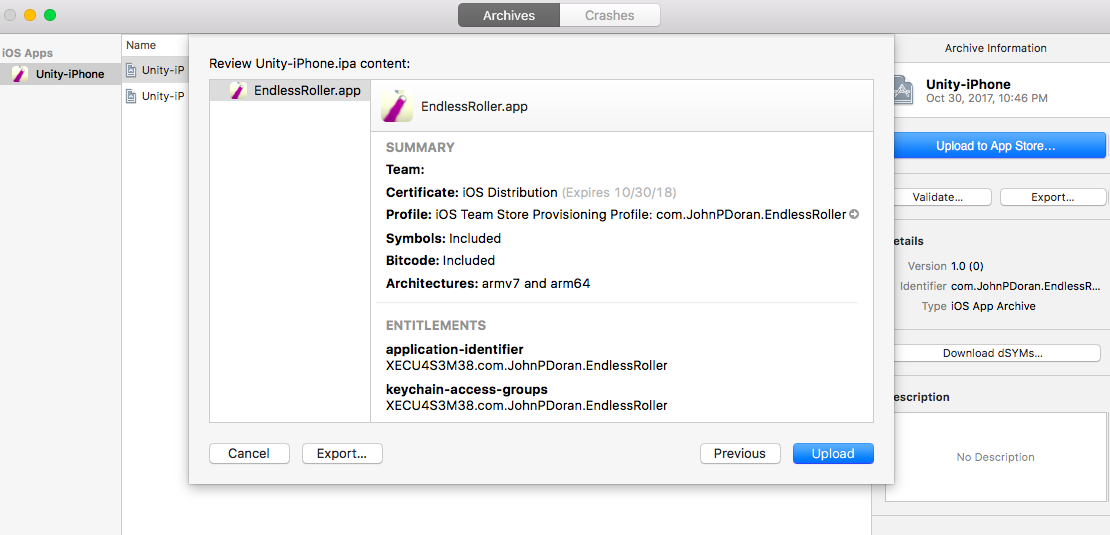
- Upon finishing, you should be brought to the following menu. Go ahead and select the Upload to App Store... button:

- You'll be asked to select some options. In general, use the default options, and afterward, it will give you an .ipa file uploaded to the store. Before uploading, it will give you one last look with information about each aspect of the project. Go ahead and click on the Upload button and wait for it to finish:
This will not show up immediately on iTunes Connect; you may have to wait for a moment (or a couple of hours) before it's updated. However, once it is ready, you'll see it under the build section we mentioned earlier.
- Once it's loaded up, you should be able to click on the Select a build button before you submit your app.
- From there, select the build we created and then click on the Done button:

-
Then, click on the Save button. Once you're finished with everything and have double-checked all of your information, you can go ahead and click on the Submit for Review button to wait for feedback from Apple.
Generally, it takes up to 3-4 weeks for first-time developers to receive feedback, although it can be longer or shorter depending on seasonal demand. As you release more and more titles, it takes less time each time around. If approved, you'll receive an email that lets you know that the app is up, or they may list details on things that need to be modified before approval for placement on the store can be given.
Summary
With that, you learned how to publish your games on both Google Play and the Apple iOS App Store. You first learned how to build a release copy of your game, then learned how to put the game on Google Play by setting up the Google Play Console, and then finally, how to publish your app on the store. You then learned how to put a copy of the iOS version of your game on the App Store and all of the setup involved there.
I hope that you've enjoyed this exploration of features and that you continue to explore the possibilities of this space. In the next chapter, we will discover one of the newest additions to mobile game development: augmented reality.