
We now have a basic game, but it's just that... basic. In this chapter, you will learn some of the secrets that game developers use to take the basic prototype of their game and turn it into something with a lot of polish that feels satisfying to play, which is known as making our games juicy.
Also known as game feel, juiciness is a kind of catch-all term for all the things that we do in a game to make it pleasing for its users to interact with. This is something that is done with most mobile games that are out there today, and lacking this kind of interactivity will make others believe our project is lacking in polish.
In this chapter, you will learn some of the different ways that you can integrate features of juiciness into our projects. We will start off by learning how to make use of animations. We will then see how we can use Unity's material system in order to add visual appeal to our objects. We will then improve the overall visual quality of our game through the use of post-processing effects. Lastly, we will use one of the most powerful tools in a game developer's toybox, the particle system, to improve feedback when the player moves in the environment.
This chapter is split into a number of topics. It contains a simple step-by-step process from beginning to end. Here is the outline of our tasks:
- Animation using LeanTween
- Adding tweens to the pause menu
- Working with materials
- Using post-processing effects
- Adding particle effects
Technical requirements
This book utilizes Unity 2020.1.0f1 and Unity Hub 2.3.1, but the steps should work with minimal changes in future versions of the editor. If you would like to download the exact version used in this book, and there is a new version out, you can visit Unity's download archive at https://unity3d.com/get-unity/download/archive. You can also find the system requirements for Unity at https://docs.unity3d.com/2020.1/Documentation/Manual/system-requirements.html in the Unity Editor system requirements section. To deploy your project, you will need an Android or iOS device.
You can find the code files present in this chapter on GitHub at https://github.com/PacktPublishing/Unity-2020-Mobile-Game-Development-Second-Edition/tree/master/Chapter%2010.
Animation using LeanTween
Currently, our game's menus are completely static. This is functional but does not make players excited about playing our game. To make the game seem more alive, we should animate our menus. Being able to use Unity's built-in animation system is great, and it can be quite useful if you want to modify many different properties at once. If you don't need precise control, if you're only modifying a single property, or if you want to animate something purely via code, you can also make use of a tweening library. If it is given a start and an end, the library will take care of all the work in the middle to get that property to that end within the time and speed you specify.
One of my favorite tweening libraries is Dented Pixel's LeanTween, which is open source and usable for free in commercial and non-commercial projects and is optimized for mobile devices and used in many games, including Pokémon Go. In the following sections, we will first install and set up LeanTween and then see how we can use it to animate our title screen UI menus.
LeanTween setup
LeanTween allows us to spin, shake, punch, move, fade, and tweak objects in many different ways with only one line of code per task. It also gives us the ability to fire custom events during the start, middle, and end of the animations, allowing us to effectively do whatever we want to create an animation in a way that is incredibly powerful once you get familiar with it.
Now that we know we want to add tweens to our project, let's start off by actually adding the LeanTween engine to our project. Implement the following steps:
- Open up the Asset Store tab by going to https://assetstore.unity.com/ in your web browser of choice. Once there, at the top of the search bar, type in LeanTween and then press Enter.
- From there, you'll be brought to a list of items with the first one being LeanTween; select it, and you will be brought to LeanTween's product page:

- Once at the project page, click on the Add to My Assets / Open In Unity button.
- Once logged in, click on Download once again, and if it doesn't happen automatically, click on the Import button.
- You should see an Import Unity Package window pop up. From there, you can check or uncheck whatever files you want to keep. We will just use the contents of the Framework folder here; however, the others may be useful to you should you wish to use them on your own.
- Once you're finished selecting what you want, click on the Import button:

- We don't need the Asset Store tab anymore, so go ahead and close it. You'll notice that now we have the files we have selected inside our Project tab in the Assets/LeanTween/Framework folder:

With that, we have LeanTween set up.
Now that we have a tweening system in place, let's see how we can actually use it!
Creating a simple tween
Made popular in animation before transitioning to game development, the process of tweening (or inbetweening) is where, given a starting and ending value, the computer will generate the intermediate frames between the two states, giving the appearance of the beginning value evolving smoothly into the second value. A tween is the information that we have to provide in order to start the tweening process.
Now that we have LeanTween included in our project, we can use it inside our code. To do that, perform the following steps:
- From the Unity Editor, open the MainMenu level by going to the Project window and double-clicking on the MainMenu scene.
- Now, move to the Scripts folder and open the MainMenuBehaviour by double-clicking on it.
- We will add the following new function, which we will use to have the object move from the left side of the screen to the center:
/// <summary>
/// Will move an object from the left side of the screen
/// to the center
/// </summary>
/// <param name="obj">The UI element we would like to
/// move</param>
public void SlideMenuIn(GameObject obj)
{
    obj.SetActive(true);

    var rt = obj.GetComponent<RectTransform>();

    if (rt)
    {
        // Set the object's position offscreen
        var pos = rt.position;
        pos.x = -Screen.width / 2;
        rt.position = pos;

        // Move the object to the center of the screen (x of 0
          // is centered)
        LeanTween.moveX(rt, 0, 1.5f);
    }

}
Before we move anything using LeanTween, we will first set the position of our object (the obj parameter) off-screen by setting the x position. It's important to note that when dealing with UI elements in Unity, by default, we are dealing with screen space, which, as you can recall from Chapter 3, Mobile Input/Touch Controls, means that we are moving in terms of pixels.
From here, we'll see that we are calling the moveX function from LeanTween. The version we are using takes in three parameters, the first being the RectTransform object we wish to move and the second being the x position to move it to. Based on how we set up the Anchors and Pivots, a position of 0 on the x axis is actually centered, so we pass in 0. Lastly, we have the amount of time (in seconds) in which we want the transition to happen.
- Now that we have this function, let's actually call it. In the Start function of the MainMenuBehaviour script, change it so that it now looks as follows:
virtual protected void Start()
{
    // Initialize the showAds variable
    UnityAdController.showAds = (PlayerPrefs.GetInt("Show Ads", 1)
      == 1);

    if (facebookLogin != null)
    {
        SlideMenuIn(facebookLogin);
    }

    // Unpause the game if needed
    Time.timeScale = 1;
}
The first thing we do is bring in the Facebook login menu to the screen by calling the SlideMenuIn function, which in turn will tween the menu to the center of the screen. LeanTween, by default, makes use of the game's Time.timeScale property to scale movement. When we leave the game from the pause menu and go back to the main menu, the game will still be paused. This ensures that the game will be unpaused by the time we want to slide this menu in. When we start building the pause menu, we'll see how we can make our tweens work even when the game is paused.
If you play the game now, you'll notice that the Facebook login screen will now move from off-screen back into the center of the screen.
Right now, the object moves in a fairly static manner. One of the ways we can add life to this tween is by giving it some additional features, such as an easeType.
- Add the following highlighted code to the SlideMenuIn function:
public void SlideMenuIn(GameObject obj)
{
    obj.SetActive(true);

    var rt = obj.GetComponent<RectTransform>();

    if (rt)
    {
        // Set the object's position offscreen
        var pos = rt.position;
        pos.x = -Screen.width / 2;
        rt.position = pos;

        // Move the object to the center of the screen (x of 0 is
         // centered)
        LeanTween.moveX(rt, 0,
             1.5f).setEase(LeanTweenType.easeInOutExpo);

    }

}
What is happening here is that the LeanTween.moveX function actually returns an object of type LTDescr, which is actually a reference to the tween that was created. To that tween, we can add additional parameters by calling additional functions onto the tween. In fact, an alternate way to write this is the following:
// Move the object to the center of the screen (x of 0 is centered)
var tween = LeanTween.moveX(rt, 0, 1.5f);
tween.setEase(LeanTweenType.easeInOutExpo);
However, most of the examples in LeanTween's documentation use the former method, chaining a number of different events to happen at once.
- Finally, we will next add the ability so that when we select a button to go to another menu, we will have the current menu slide out:
/// <summary>
/// Will move an object to the right offscreen
/// </summary>
/// <param name="obj">The UI element we would like to
/// move </param>
public void SlideMenuOut(GameObject obj)
{
    var rt = obj.GetComponent<RectTransform>();

    if(rt)
    {
        var tween = LeanTween.moveX(rt, Screen.width / 2, 0.5f);

        tween.setEase(LeanTweenType.easeOutQuad);

        tween.setOnComplete(() =>
        {
            obj.SetActive(false);
        });
    }
}
Note that this is similar to the previously written function, except now we are using also another function called setOnComplete, which can either take in a function or an expression lambda, which works basically as a function without a name and is often used in Language-Integrated Queries (LINQ). In this case, because I wanted to have access to obj, I used a lambda. What this will do is, after the object is off-screen, we will automatically turn it off; but we have the potential to do anything. This can be incredibly powerful, as we can do anything that we'd normally be able to do via code.
- Then, we will need to update the ShowMainMenu function to actually display the menus:
public void ShowMainMenu()
{
    if (facebookLogin != null && mainMenu != null)
    {
        SlideMenuIn(mainMenu);
        SlideMenuOut(facebookLogin);

        // No longer needed as menus will be animating
        //facebookLogin.SetActive(false);
        //mainMenu.SetActive(true);

        if (FB.IsLoggedIn)
        {
            // Get information from Facebook profile
            FB.API("/me?fields=name", HttpMethod.GET, SetName);
            FB.API("/me/picture?width=256&height=256",
            HttpMethod.GET, SetProfilePic);
        }
    }

}
- Save the script and dive back into the game:

As you can see, the menus will now fly in and out when on the main menu.
With the preceding example, you should be able to see just how easy it is to add motion to our projects and how it can improve the overall quality of the product, making it more enjoyable to interact with.
Adding tweens to the pause menu
Now that we have the main menu finished, let's continue doing this with the pause menu:
- Go ahead and open up our Gameplay scene. Update the PauseScreenBehaviour script to have the following implementation of SetPauseMenu:
/// <summary>
/// Will turn our pause menu on or off
/// </summary>
/// <param name="isPaused"></param>
public void SetPauseMenu(bool isPaused)
{
    paused = isPaused;

    // If the game is paused, timeScale is 0, otherwise 1
    Time.timeScale = (paused) ? 0 : 1;

    // No longer needed
    //pauseMenu.SetActive(paused);

    if (paused)
    {
        SlideMenuIn(pauseMenu);
    }
    else
    {
        SlideMenuOut(pauseMenu);
    }

    if (paused)
    {
        var result = Analytics.CustomEvent("Paused");

        if (result == AnalyticsResult.Ok)
        {
            Debug.Log("Event Sent: Paused");
        }
    }
}
Note that because PauseMenuBehaviour inherits from MainMenuBehaviour, it also can call the SlideMenuIn and SlideMenuOut functions, respectively, as long as they are marked as protected or public.
Now if we run the game, nothing will appear to happen when we hit the pause menu. This is because—as I mentioned previously—tweens are scaled by Time.timeScale, which we just changed. To fix this, we can make use of another LeanTween function called setIgnoreTimeScale, which we will set to true in both functions we wrote previously in the MainMenuBehaviour script. For one last additional polish, we will add the LeanTween.alpha function to have the menus fade in and out as well.
- Add the following highlighted code to the SlideMenuIn method:
/// <summary>
/// Will move an object from the left side of the screen
/// to the center
/// </summary>
/// <param name="obj">The UI element we would like to
/// move</param>
public void SlideMenuIn(GameObject obj)
{
 obj.SetActive(true);

 var rt = obj.GetComponent<RectTransform>();

 if (rt)
 {
 // Set the object's position offscreen
 var pos = rt.position;
 pos.x = -Screen.width / 2;
 rt.position = pos;

 // Move the object to the center of the screen (x of 0 is centered)
 var tween = LeanTween.moveX(rt, 0, 1.5f);
 tween.setEase(LeanTweenType.easeInOutExpo);
 tween.setIgnoreTimeScale(true);

 LeanTween.alpha(rt, 1, 0.5f);
 }
 }
- Add the highlighted code to the SlideMenuOut method:
/// <summary>
/// Will move an object to the right offscreen
/// </summary>
/// <param name="obj">The UI element we would like to
/// move </param>
public void SlideMenuOut(GameObject obj)
{
    var rt = obj.GetComponent<RectTransform>();

    if(rt)
    {
        var tween = LeanTween.moveX(rt, Screen.width / 2, 0.5f);

        tween.setEase(LeanTweenType.easeOutQuad);

        tween.setIgnoreTimeScale(true);

        tween.setOnComplete(() =>
        {
            obj.SetActive(false);
        });

        LeanTween.alpha(rt, 0, 0.5f);
    }
}
- Save both scripts and dive into the editor to try it out:

Perfect! We now have the screen flying in just like we wanted it to.
In the previous two sections, we learned how to create tweening events and how to apply them to different scenarios. In this next section, we will see another way that we can improve the visuals of our project through the use of materials.
Working with materials
Earlier, we always used the default material for everything in our project. This has worked out well for us, but it may be a good idea for us to talk a little bit about creating custom ones to improve the visuals of our player. Materials are instructions on how to draw 3D objects within Unity. They consist of a shader and properties that the shader uses. A shader is a script that instructs the material on how to draw things on the object.
Shaders are a huge subject that entire books have been written on, so we can't dive too much into them here, but we can talk about working with one that is included in Unity, the Standard Shader. Implement the following steps:
- First, open the Gameplay scene. Then, let's create a new folder in the Project window called Materials:

- Open up the Materials folder we just created, and then once inside, create a new material by right-clicking within the folder and then selecting Create | Material:

- Name this new material Ball.
- In the Inspector window, you'll be brought to the Shader menu with the properties for the Standard shader. Set the Metallic property to 0.8 and the Smoothness property to 0.6.
- Now, go to the Scene view and drag and drop the Ball material onto our player object:

The metallic parameter of a material determines how metal-like the surface is. The more metallic a surface is, the more it reflects its environment. The smoothness property determines how smooth the surface is; a higher smoothness will have light bounce off it uniformly, making the reflections clearer.
StandardShaderMaterialParameters.html.
Materials are only one of the ways that we can improve the visual quality of our project. In fact, one of the most drastic ways that we can modify our project's visuals is through the use of post-processing effects, which we will be looking at next.
Using post-processing effects
One of the ways that we can improve the visual quality of our game with little effort is by using post-processing effects (previously called Image Effects). Post-processing is the process of applying filters and other effects to what the camera will draw (the image buffer) before it is displayed on screen.
Unity includes a number of effects in its freely available post-processing stack, so let's go ahead and add it using the following steps:
- Open up the Package Manager again by going to Window | Package Manager. From there, go to the Packages dropdown from the top left and set it to Unity Registry. Afterward, scroll down until you see the Post Processing option and select it:

- Once selected, click on the Install button and wait for it to complete.
- Switch to the Scene window, and then, from the Hierarchy window, select our Main Camera object and select Add Component in the Inspector window and type in Post Process. Then move your mouse over the Post-process Layer selection and click to add the script to your project. The Post-process Layer component handles the blending of post-processing volumes and what the post-processing should be based on.
- Under the Post-process Layer component, change the Layer to Everything. This will make it so everything in our scene will be used in terms of blending between volumes.
- We will next need to add the Post-process Volume component to our Main Camera game object. Do this by clicking on the Add Component button and then selecting the Post-process Volume option:

Note that this component requires a profile. We can go ahead and add that next.
- We can create a new Post-processing Profile by right-clicking on the Project window, opening the Assets folder, and selecting Create | Post-processing Profile, and then naming it MobilePostProcessing:

- Go back to the Main Camera object and attach this object to the Profile property of the Post-process Volume component. Afterward, go to the Post-process Volume component and then click on the check for the Is Global property.
This will make it so the volume we have created will always be visible on our player's screen no matter where their camera is positioned in the world.
- Because Post-processing Profile is a separate file, we can make changes to it while playing the game without worrying about losing our changes. With that in mind, start the game and pause it once gameplay has started.
Now, there's a large number of possible effects that can be added to modify how the game looks.
- Next, under the section of the Post-process Volume component, you'll see a section called Overrides. Click on the Add effect... button and then select Unity | Vignette. Click on the arrow to the left of the name to open up the potential options. From there, check the Intensity property and increase it to 0.45:

Note how there now seems to be a blackened edge around the game.
- Next, enable the Smoothness and set it to 0.35 to make it even darker by clicking on the top right of the section to expand it:

Vignetting is the term used for the darkening and/or desaturating toward the edges of an image compared to the center. I like to use this when I want to have players focus on the center of the screen.
- Click on the Add effect... button again and this time, select Unity | Grain.
- Check and set the Intensity to 0.15 and you'll note that the screen has become fuzzier. While not a great idea if it is set too large, note that decreasing the Size to 0.3 and unchecking Colored will help with the appearance of things:

If you've been to a movie theater that still uses film, you may have noticed how there were little specks of things in the filmstock while playing over time. The Grain effect in Unity simulates this film grain, causing the effect to become more pronounced the more the movie is played. This is often used in horror games to obscure the player's vision.
- Another property to add is Unity | Bloom, which makes bright things even brighter. Enable the property and then set the Intensity to 10. From there, set Soft Knee to 0.6 to help brighten things up:

The Bloom effect attempts to mimic the imaging artifacts of real-world cameras, where things in areas with light will glow along the edges, thus overwhelming the camera.
- Lastly, stop the game and then go back to the Post-process Layer component and, under Anti-aliasing, change the Mode to Fast Approximate Anti-aliasing (FXAA) and then check Fast Mode:

Aliasing is an effect where lines appear jagged on the screen. This happens if the display we are trying to play our game on doesn't have a high enough resolution to display properly. Anti-aliasing attempts to reduce that appearance by attempting to combine colors nearby these lines to remove the prominence at the cost of it appearing blurrier.
There are a number of other properties to look into and adapt to get your project looking just the way you want it. Explore them and find what works well for the vision you are looking to achieve!
Adding particle effects
The game itself currently works, but it could use some more polish. One of the things we do to increase the polish of the game is to make use of particle systems. Typically used for effects that are natural or organic such as fire, smoke, and sparks, particle systems create objects that are designed to be as low-cost as possible, called particles. Due to this, we can spawn many of the particles at once with a minimal performance cost. One of the easiest types of particle systems to create is a trail to follow our player, so let's add one of those now using the following steps:
- Select Player in the Hierarchy window, and then right-click and select Effects | Particle System.
This will make this system a child of the player, which will be good for what we are going to do. - From the Particle System component, change the Start Speed to 0 and the Simulation Space to World. Then, change the Start Color to something to make it easy to see, such as purple.
- Open up the Shape section by clicking on it. Change Shape to Sphere and set the Radius to 0 (it will automatically change to 0.0001).
This is a step in the right direction. The purple particles are now following the player, as shown in the screenshot:

However, there's still a number of things we can do to improve this. Instead of just a single color, we can change it so that it randomly alternates between two colors.
- To do that, go to the right side of Start Color, and you'll see a little downward-facing arrow. Click on that and then select Random Between Two Colors. Then, change the color to one of two purple colors for some randomness.
- Then, next to Start Size, click on the right arrow, select Random Between Two Constants, and then set the values between 0.5 and 1.2.
- With that, set the Start Speed property to be a random value from 0 to 0.2.
- Then, open up the Emission section and set the Rate Over Time property to 100:
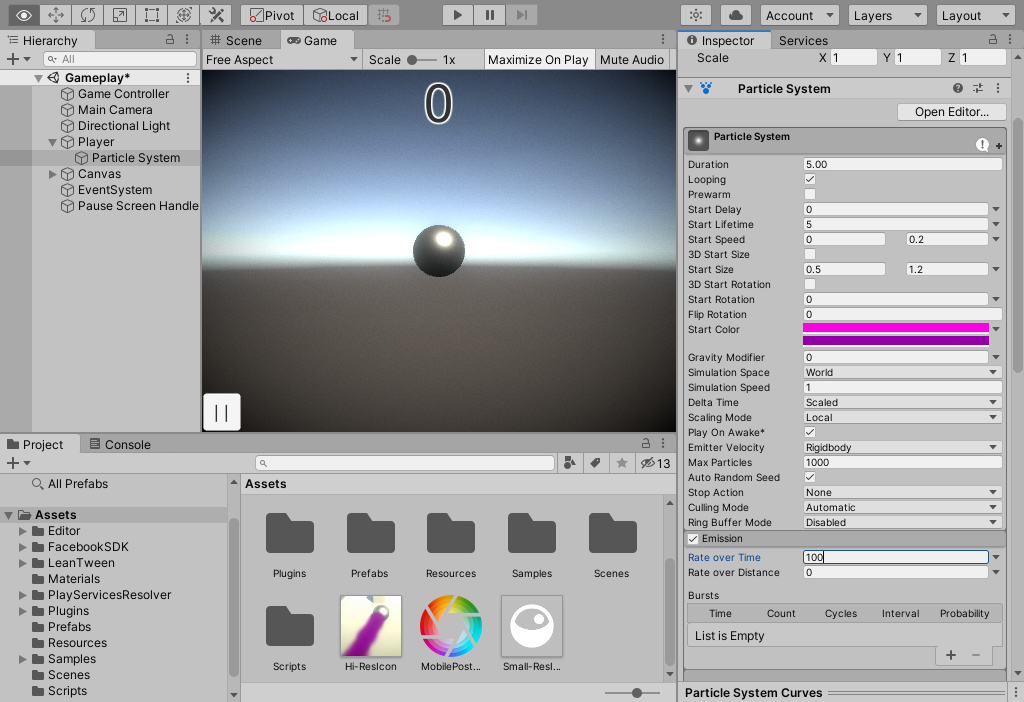
- Save the game and play:

As you can see, the particle system looks great on both our PC and mobile devices.
Of course, there are many other areas that can be improved through the use of adding particle systems. Perhaps whenever the player hits a wall, we can display some sparks; when we swipe, we could play another effect; when the player pauses the game, we could have something falling on the screen. The possibilities are endless!
Summary
We now have improved our game by a huge amount by only doing a few simple things to improve the quality of the title. We first animated our menus with a few lines of code using tweens from LeanTween and saw how a few lines of code can improve the visual quality of our UI in a number of ways. We next saw how to create materials to improve the visual quality of our ball and then used some post-processing effects to polish the contents of our screen. Finally, we discussed how to use particle effects to create a nice trail following our player.
With these concepts, you now have the skills to dramatically improve the juiciness of your game projects and can improve the game feel so that players actually enjoy interacting with your game.
By this point, our game is finally ready for the big leagues. In the next chapter, we will explore how to get our game onto the App Store.