
7
Rigid Bodies and Physics Interaction
In many game interactions, there needs to be physics. Whether you have items falling, bouncing, or just reacting to a collision in a procedural manner, you will most likely need to use Rigidbody components on your GameObjects. This component works with physics. We will first go through several use cases for the Rigidbody component. Once we’ve been through that, we will take some time to explain how we are using physics in our interactions for our project. Finally, we will show the scripting that is used to achieve these interactions in as much detail as possible. As always, the project files on GitHub will follow the structure in the Readme file. The topics in this chapter include:
- The Rigidbody component
- Collision detection
- Design and implementation
- Telekinesis and physics
The Rigidbody component
This powerful physics-focused component can be added to GameObjects to determine its position through physics. By default, just adding this component to a GameObject will put its motion under the influence of gravity. To understand how Unity uses physics, let’s take some time to look at the component.
Figure 7.1 is a screenshot of the Rigidbody in Unity. There is a Rigidbody 2D component. Do not use this component for a 3D application. The primary problem with this is that the 2D and 3D versions of the physics steps do not interact with each other. It’s best to choose one and stick with it! We will go through all the pieces to the Rigidbody component after the figure.

Figure 7.1: Rigidbody component
Mass
The Mass property of the Rigidbody refers to that object’s relationship to other object’s masses. This will not make gravity affect it differently, but it will affect collisions with other objects. For example, if two GameObjects that are identical except for their mass on the Rigidbody collide, the item with the larger mass will act as though it’s heavier. Just as in the real world, mass doesn’t cause items to fall faster. This is due to the drag of the objects.
Drag
Objects with Drag will decrease the rate at which it accelerates due to gravity. An example of this is a parachute. This object drastically decreases the acceleration of falling. For example, a skydiver has a very low drag, and when they open their parachute, the drag increases a lot. This is regardless of the rotation of the object.
Angular Drag
Angular Drag is the same concept as drag; however, it’s specifically focused on rotation values. If you have a very small value for the angular drag, the object will rotate when bumped or collided with depending on the colliding object’s oncoming angle. If you raise the value, it will rotate less.
Use Gravity boolean
The Use Gravity boolean simply allows gravity to affect the GameObject; the Rigidbody is a component of. As shown in Figure 7.2, in Edit > Project Settings > Physics, gravity is defined as -9.81, which is the same as Earth’s gravity. Adjusting the Y axis gravity setting to -9.81 will be the most familiar to the players in emulating the likeness of Earth’s gravity. If you are working with a game with less gravity and it’s the same all the time, you can set it here. You can also set the gravity in code:
Physics.Gravity = Vector3(0, 0, 0,);
The 0s should be replaced with the values of gravity that are needed, generally in the y direction.
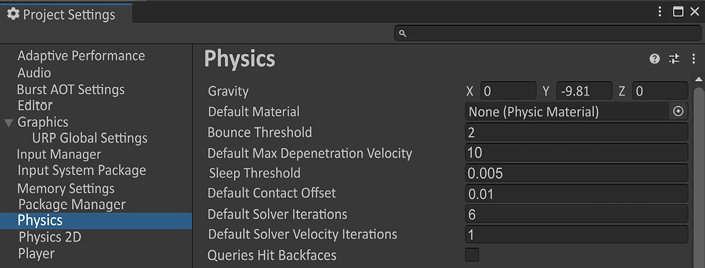
Figure 7.2: Project Settings – Physics settings
Is Kinematic boolean
When designing the level, there may be items that move around that need to affect the physics of another Rigidbody during runtime. A very simple example you could imagine is a sphere with a Rigidbody above a large cube. When you press play, the sphere would fall and hit the cube as expected. If you had the Is Kinematic boolean set to false and tried to rotate the cube, the sphere would stay put and clip through the cube. This is due to the cube not updating itself as a moving body after the sphere hit it and stopped. Setting this flag is helpful during an optimization pass, and it can be set for every known static item that still needs to have a Rigidbody component. Although, if you need to update the physics during runtime, set the ground to kinematic and when you rotate it, the sphere will react as expected and try to roll off the sloping downside of the cube.
This is a very common mistake when you start working with physics items. If during runtime your Rigidbody items aren’t moving in a way you’d expect, check to see if they should be kinematic.
Interpolate
Interpolate means to place things in between other things. In our case, we need to know if interpolating is attempting to achieve one of three parameters in our physics update.
Those parameters are:
- None: Do not interpolate or extrapolate
- Interpolate: Place the object in between the current frame and the next frame
- Extrapolate: Assume the next location from the previous frames and put it where you think it might go
Figuring out the appropriate parameters to interpolate can be complicated to answer. The reason being is that there is more than one option when addressing interpolation, therefore, making the solution not as straightforward to resolve.
There are multiple variables to account for. These variables may contain these questions such as: How is the camera moving? Is the object moving quickly? Are you worried about the collision looking correct? Are you worried about the object moving incorrectly every time as the camera follows its motion? A simple answer is if your camera follows a character using a Rigidbody, then set it to Interpolate and everything else to None.
Diving into the physics system just a little bit, this system is calculated at a fixed interval, in contrast to graphics rendering. Graphics on a game can lag slightly and pop into place, where the physics will always calculate at a fixed interval. This can cause artifacts to visually occur, such as clipping into a wall. Clipping into a wall or other game objects within your scene would be seen if a fast-moving object is being followed closely by the camera and collides with the wall or surrounding GameObjects. The object would initially clip through the wall until the physics gets updated, and it would then update as though it bounced off the wall.
In this case, you would want to choose the Interpolate option because the physics system would interpolate the in-between values as the graphics are being rendered. This doesn’t allow clipping while moving in a physics sense. It does cost some performance as it’s calculating values in different intervals than it would normally.
Extrapolate does a good job of figuring out what the values will be in the future. This is helpful for simulating a flying object, but not good for collision detection as it will assume it’s past a wall or object and clip at a higher framerate and movement. Movement being followed closely could use Interpolate or Extrapolate.
It’s best to start with Interpolate and see if it feels good for the movement of your experience. If it feels slow, try Extrapolate. Weigh the pros and cons of each with a higher speed of movement in your action sequences to determine which interpolate method you need to use.
Understanding this will allow you to choose the best option for the physics values and the graphical representation of the items you are simulating with physics.
Collision detection
When using physics to determine the position of GameObject, there need to be collision checks to determine whether your object has collided with another object, regardless of if it’s staying still or moving in the scene. This is an interesting dilemma now that you’ve learned that physics are fixed, and rendering is not fixed. The physics system can’t assume what every object is using for collision types or interpolation. We need to have several options that would best suit each GameObject’s physics needs from within the experience. There are four different collision detection types to consider: Discrete, Continuous, Continuous Dynamic, and Continuous Speculative. If you have a GameObject that is moving quickly, it may clip through GameObjects, meaning that it will not know that it has hit a collider and will keep moving through it as the physics is updated. This can be prevented through collision detection modes. Each mode has different implications on performance; however, the general guideline is that fast objects are set to Continuous Dynamic while the things they may collide with should be set to Dynamic. Other options are explained in the breakdown of each choice below.
Discrete
This collision detection mode is the best mode for performance, and it’s aptly named Discrete as it’s only checking the physics collision at fixed intervals, as mentioned previously. If you have a wall with a box collider and there is a ball moving quickly enough that its known location before the wall wasn’t colliding with it and the next fixed update was past the wall, there is no collision! This can be frustrating at first as it looks like it’s not working, or more frustratingly, it only happens intermittently as the ball may have collided with the wall when you ran the simulation a couple of times. It should be understood why this is happening so you can make different mode choices upon the needs of the physics simulation. The reason for this is that the physics update does not realize that the object was supposed to be affected by anything. The physics loop in Discrete mode will only check if the object needs to change trajectory once it’s in the loop. If you have a fast-moving object, defined as an object moving more than its height or width in distance per frame, then there may be a point at which this object is past the other object and physics will not know to react to it.
If there are no fast-moving items, Discrete is a fantastic choice. If you are planning on having fast-moving objects, then Continuous is the answer, but please read about the rest of the options as they all don’t interact with each other intuitively.
Continuous
If you choose Continuous, you may see that the object still clips through GameObjects you may not have expected it to. It is very important to understand that Continuous collision detection only checks if your GameObject is colliding with static objects. This mode is heavy on resources and should be used with caution.
Static objects are GameObjects that are in the scene with collider components on them but no Rigidbody component. They are not updated with physics. Upon describing collision detection there will be modes that will only work with static GameObjects.
An example of an object that would use Continuous mode is fast moving GameObjects that need to collide with static items only. The simplest example of this is Pachinko. This is a game where a small metal ball gets dropped from the top of the screen and falls down, hitting static items, bouncing off them. All of the items on the field are static, so there will be no clipping.
Continuous Dynamic
This mode is very similar to the Continuous mode; however, it will also work with GameObjects that use a Rigidbody component. This is a common usage within game mechanics. As you can imagine, adding the ability to work with the Rigidbody component increases the cost of resources within a game. This is more resource-heavy than the standard continuous mode.
An example of continuous dynamic is a game you might have played, Smash Hit. This game is a mobile title in which you are a player on rails moving forward. When you tap the screen, a metal ball shoots out towards the location you tapped. If it collides with glass, it shatters. The glass is dynamic and interacts where the ball hits. Those broken pieces are also dynamic and interact with the environment when falling. If it wasn’t dynamic, the ball would go right through the glass. This would make for a much less entertaining game!
Continuous Speculative
The word “speculative” suggests a sense of guessing. The system is speculating if the collision will happen.
This mode does what Continuous Dynamic does, and objects with this setting can collide with both static and dynamic GameObjects; however, it’s cheaper. There is a bit of an accuracy cost, though. Two objects that are flying toward each other may end up bouncing away from each other without even touching if they both have Continuous Speculative set. This would happen because both objects are speculating where they will be in the next frame, which makes them think they should’ve bounced off each other.
An example of this is a game called Beat Saber. This is a game where you’re in VR and you must hit blocks at certain angles to slice them properly. Having your saber’s detection set to Continuous Speculative will allow you to know that you will hit the blocks that are moving at a high rate towards you.
Understanding all the modes for collision detection will help you create the right setup for physics-based work. Take time to play with these modes in your own project to get a good sense of how they all work together.
Constraints
Now that we’ve talked about some difficult questions, let’s bring it back to a simpler topic: Constraints! This does exactly what you may think it does. If your item should not move or rotate on a specific axis, you may constrain it. An example of this is a platformer game that has moving platforms. You want them to move but maybe not along a specific axis. To ensure that the platform will not get nudged off course, you can constrain the GameObject in the x, y, or z direction so it will never update in that direction.
This was the last of the editable fields on the Rigidbody component. The last section is devoted to read-only fields for runtime debugging. Let’s take a look at what information you can gain from these fields.
Info
The Info block of the Rigidbody component is essential for working with physics and debugging the strange behaviours that can come about. Every application may have unique problems that arise. Looking at the Info object when in play, you can debug what is going on with ease. This section has many values:
- Speed: Magnitude of the velocity
- Velocity: Rate of change of Rigidbody position
- Angular Velocity: Angular velocity vector of the Rigidbody measured in radians per second
- Inertia Tensor: Diagonal matrix in a reference frame positioned at this body’s center of mass and rotated by Inertia Tensor Rotation
- Inertia Tensor Rotation: Rotation of the inertia tensor
- Local Center of Mass: Center of mass relative to the transform’s origin
- World Center of Mass: Center of mass of the Rigidbody in world space
- Sleep State: Optimization strategy to not always account for every object, with two settings:
- Awake: Physics is considering this Rigidbody
- Asleep: Physics is not considering this Rigidbody
Each of these values above has its unique purposes depending on what you are trying to watch or debug during runtime. Working with the previously mentioned platformer, you may think that your platform should be in the alignment of your character, but something pushed it out of the way just enough to not allow the character to land on it. With the Info block, you can watch the movement or velocity. If there should be no velocity in the z direction, then looking at that value will let you know if it is working as intended.
We have a strong idea of how the Rigidbody 3D component works now and can refer to these pages if there are some confusing movements when building physics-focused interactions.
Design and implementation considerations
It is very easy to try to add physics to each of your GameObjects to get movement in your interactions. Not every item specifically needs a Rigidbody to complete its movement in a manner that your interactions need to provide a fantastic experience. At the end of the day, it’s all about frames per second. Try to make any moving item without Rigidbody components, but if they’re needed, then add them.
Telekinesis and physics interaction
For our game’s first puzzle, we focused heavily on making the environment narrative the key interest point. From the moment you walk into the first room, your vision will be placed on the back door, which houses the puzzle’s solution. In the final puzzle, we need to force the player to use more brainpower on figuring out the puzzle instead of finding the answers around them. To do this, we decided to give the player the power of telekinesis that Myvari, our character, realizes she has had within her the whole time. We have three steps to get the player to this point of understanding.
Rocks Falling
Telekinesis hasn’t been seen in this game in any form yet. Some magic came from her necklace, but we need to provide some information to tell the player that she has something in her. A cinematic works well for this. We need to design the interaction.
Design
After finishing the first door puzzle, you encounter a large hallway with old statues of your past. This is a nice look into the culture of her race’s past. There is nothing to solve here; there’s just a nice walk. Behind the final statue is a tight space to walk through that leads to a cliff path. About halfway along the path, some rocks fall. This triggers a cinematic effect where Myvari defends herself from these falling rocks with her telekinesis. Looking confused, she needs to move forward to find out what is going on. Her adventurous side beckons her to push on.
Implementation
What needs to be implemented here is in two pieces. One large piece is the cinematic of the rocks and Myvari. Cinematics are when the user doesn’t have power over the interaction. This is helpful for gaining knowledge but shouldn’t be overused because the game can become like an interactive movie. Cinematics should be used with restraint. The second part is physics-based rocks as a secondary motion from the boulder falling.
The cinematic will be triggered in the same way as previously: we turn off the player’s ability to manipulate Myvari or the camera and transition to the cinematics’ animation while moving the camera to emphasize the object we want, in this case, the boulder. If you need a refresher for this, look at Chapter 6, Interactions and Mechanics, during the implementation of the tight spaces.
The physics-based rocks, however, we can’t just animate. We want them to feel as though they fell on their own. It makes the larger boulder seem like it fell, which helps sell the immersion that this location might be real.
Even though this shows the telekinesis coming from Myvari, we need to have the player perform the interaction or else it’s just an ability they can’t use. We will go over the player’s interaction next.
The Broken Pedestal
This is the first time the player gets to use Myvari’s newfound power. We need to design this puzzle so it’s impossible to miss because the player isn’t used to using this power. This pedestal is a small version of the final puzzle.
In this micro-puzzle, you need to place the fallen piece onto the pedestal to fix it. We will need to be very careful with how we design this to ensure the player’s experience explains how this works before they touch the interaction button. Let’s run through the design together.
Design
After we make it along the cliff path and across a small crumbling bridge, the bridge then falls, and the way back is impassable. The only way to go is through a large door. When we walk up to it, it will start opening into a large open cavern, water pooled in the bottom, with ruins in the background and a fall to certain doom. Directly in front of Myvari is a pedestal that is broken, but the broken piece is on the ground close to it. Looking at it, we can see that it is outlined in the same color as the power that protected Myvari from the falling rocks. We will display a UI helper showing which button to press, which we will go over in Chapter 8, User Interface and Menus. This will make interaction with her ability tied to a button to provide the player agency. When we press the button, Myvari lifts the broken piece off the ground and fits it onto the pedestal, where it affixes itself and lights up. Pressing the interaction button will then transition the open space into a night scene and some water rises up from below to reveal a pathway to the ruins.
Implementation
We know that the mechanic we want to include here is a subset of the final puzzle. To do this, we don’t want to write code just for this single item, so instead, we set it up to be a simple standalone using a public enum.
To keep this as easy to read as possible, we will ask you to take your time reading this section, which is about the final puzzle. We will be explaining some more advanced features and it all builds on itself up to the end. We are using some amazing Unity timing in this code, which will take some explanation, and breaking it up as we’ve done will help you to understand it. So, let’s move on to the final puzzle design, and then we will break down all of the pieces of this and the final puzzle’s implementation.
The Final Puzzle
We’ve made it to the big final puzzle. Luckily, we took the time to show the player what Myvari gained through stress from the boulder falling toward her. Then we learned how to use it to get here by fixing the broken pedestal. Now we have this puzzle slightly open, but allows the environment to teach the player what they need to do. Let’s dive in to see how we design this last puzzle.
Design
Now that you’ve made it to the ruins, there is some architecture in the background that lights up some runes on the pillars. This corresponds with some cables on the ground that connect to all the pillars. The puzzle consists of six pillars that connect the power to the main tree, which is in the center of the ruins and has wires connected to it. The wires are only properly connected from three of the pillars. Myvari needs to use her telekinesis to connect the correct pillars following the wires on the ground. Bringing power to the tree opens a small compartment in the tree, which houses a tiara. The tiara is revealed through a cinematic and will end the gameplay of this vertical slice. Now that we have the general idea of what we need to do, let’s move on to implementation.
Implementation
The implementation of this puzzle is the completion of the telekinesis mechanic. When we wrote this, we allowed ourselves to push into more advanced topics. To ensure this makes sense, we will go over all the topics here and break them down as much as possible. Ensure that you pay attention to the minutiae as there are bits of information here that will seem hidden or counter-intuitive at first.
Programming topics that we will be covering are:
- Execution order
- Static methods
UnityAction(delegate)- Coroutines
Let’s first go over the execution order for Unity. We haven’t spent any time talking about the nitty-gritty of how it works under the hood.
Execution order
There is an order to the execution of every frame when in runtime, or playing, inside the editor and opening a build. We would show you a screenshot of the flowchart, but it’s a bit too large. Instead, we will place a link here as well as a Google search term for you to search online to find the website and see this flowchart. I will cover the higher-level topics here and the reason why they matter within each portion that they affect.
https://docs.unity3d.com/Manual/ExecutionOrder.html
Google search term: Unity Execution Order
The major concept here is that there has to be a hierarchy of execution of certain bits of information. We needed to have a strong think about this to have a baseline of what will be dealt with at each frame. The uncomfortable truth is that there is a lot to think about. Here is the list in chronological form with highest-level terminology for the execution order, with a small snippet of information on each of them:
- Initialization: This is for
AwakeandonEnableonly. - Editor: Reset when scripts are added and not in play mode.
- Initialization: The second part of initialization is for the
MonobehaviourmethodStartonly. - Physics: This is where all physics updates will happen. It can potentially be run more than once per frame if the fixed time step is set higher than the frame update time.
- Input Events: Any non-update focused input, such as
OnMouseDown. - Game Logic: Update, coroutine logic and yielding, animation events, write properties, and
LateUpdaterun in here. These will be more apparent during implementation of the game logic further in the chapter. - Scene Rendering: Many scene-rendering functions run here in every frame to deal with culling objects from the camera, visible objects, and post rendering. We will not be breaking this down heavily, if you are curious, please read into the execution order manual for more information.
- Gizmo Rendering: Specifically, the
OnDrawGizmomethod of the Unity Editor. - GUI Rendering: The
OnGuimethod, which can run multiple times per frame. - End of Frame: Allows coroutines to be paused or yielded at the end of the frame, waiting for all of the rest to finish before starting again at the top of game logic section.
- Pausing: When the application has been paused; before the application is paused, a single frame is run.
- Decommissioning: Cleans up memory with
OnApplicationQuit,OnDisable, andOnDestroyin that order.
Before we move on to the next section, there is something you need to make sure you understand. You do not, by any means, need to understand all of the preceding list. There is a lot to learn there, and if you go to the execution order documentation you will see every method that is listed in more detail. We will be showing portions of the execution and explaining what is affecting our code during the rest of this chapter.
The key takeaway from the chronological list of higher-level sections being listed is that Unity has an order. That’s a relieving concept to wrap your head around as a developer. When you get confused about why something is happening the way it is, you can rely on this to see if it’s an execution order problem that you might be running into.
During the next sections, we will have images of the section of the execution order we had to pay attention to. This will allow you to see how it can be used for your future development work.
Now that we’ve looked at the execution order, we should get into the code. We are using three scripts to make this work with the telekinesis mechanics:
PhysicsPuzzleTrigger.csPhysicsPuzzlePiece.csFinalPuzzle.cs
PhysicsPuzzleTrigger.cs has two pieces of code that are important to know about first: the PhysicsPuzzleTrigger class and the PhysicsPuzzlePieceType enum. We will tackle the PhysicsPuzzlePieceType first as it’s much easier to get into than the trigger. We have an enum that allows us to choose which puzzle piece type it is on the GameObject. We define this as follows:
public enum PhysicsPuzzlePieceType
{
    First = 0,
    Second,
    Third,
    Intro,
    Any
}
Then, in the PhysicsPuzzlePiece.cs script, we implement it as follows:
public class PhysicsPuzzlePiece : MonoBehaviour
{
    public PhysicsPuzzlePieceType pieceType;
}
When we add the PhysicsPuzzlePiece.cs script to any GameObject, we then get a dropdown to choose which type it is. This is very useful when you want explicit items to fit together. We’re using this to use the same mechanics but allow for different puzzle types.
We said in The Broken Pedestal section above that we would explain it within the implementation of the entire mechanic. What we do is allow the Intro option to be aligned with this mechanic and be explicit for that action. Even though it’s impossible to get the final puzzle pieces in that location, this is a great practice to ensure data is consistent with your code.
Let’s get back into the PhysicsPuzzleTrigger.cs code. We start off by declaring the fields we’re used to working with so far, but then on line 12, there is something unique that has two concepts we need to go over. This is the use of static and UnityAction:
public static UnityAction<PhysicsPuzzleTrigger, PhysicsPuzzlePiece> OnPieceSlotted;
We’re going to break out of describing exactly what we’re doing with this line to explain the context of what both static and UnityAction are. After we do that, we will then proceed to how we are using them in this code for this mechanism.
Static methods
A static method, field, property, or event is callable on any class that is within the namespace without needing the using directive or inheritance. Let’s say you have one script that has a field as follows:
public class StaticTest
{
    public static int StaticInt = 10;
}
You could then have another script in the same project that, without specifically calling for that script when using or inheriting it, could access it like this:
public class UseStaticTest
{
    int BaseNumber = 0;
    int NewNumber = BaseNumber + StaticTest.StaticInt;
}
This may not look very useful by itself, but the concept is the important part to take away at this time. Static members of a class can be accessed by other classes by just using the class name before the required member.
An example of this being used commonly is keeping a count of something as the static field has only one instance. We’re using it to store a UnityAction. We need to go over that next before we get into how we are using these directly.
UnityActions
A UnityAction is a Unity-specific delegate. A delegate in C# is a sort of generic concept of a method that has a parameter list which also returns a specific type. Interestingly, a UnityAction returns void by default. A common way of explaining delegates is through the concept of the subscribe model. This means that the delegate is looking for methods to be attached to it and when something uses the delegate, it will try to run the methods attached as long as the methods are returning the same type. This is a bit abstract, so let’s look at an example. We will be using the UnityAction MathAction to add to how many times a button is pressed and then see if that new number is even or odd:
using UnityEngine.UI;
public class UnityActionTest : MonoBehaviour
{
    public Button AddButton;
    private UnityAction MathAction;
    float TimesClicked;
    void Start()
    {
        AddButton = GetComponent<Button>();
        MathAction += AddOne;
        MathAction += CheckEven;
        AddButton.onClick.AddListener(MathAction);
    }
    void AddOne()
    {
        TimesClicked++;
        Debug.Log("Clicked count : " + TimesClicked);
    }
    void CheckEven()
    {
        if (TimesClicked % 2 == 0)
        {
            Debug.Log("This click was even!");
        }
        else
        {
            Debug.Log("ThIs ClIcK WaS OdD.");
        }
    }
}
We’re using the Button class, so ensure to import UnityEngine.UI so we can use buttons from that class. Following the lines down, we made a new UnityAction named MathAction. On Start, we grabbed the button so we could add logic to it. Then we attached the AddOne and CheckEven methods to UnityAction. The += that you see is MathAction attaching itself to those methods in order.
Addition assignment operator – we’re using a special “syntactic sugar” to make the code a bit cleaner to read and less redundant. The addition assignment operator looks like this:
MathAction += AddOne
Written another way is:
MathAction = MathAction + AddOne;
You then see that we assigned UnityAction to the button’s listener. When you press the button, both of these functions will be running because UnityAction is assigned to both of them.
Before we can go further into the code, we need to cover one more topic, coroutines.
Coroutines
A coroutine allows you to spread a task over multiple frames. This is not a form of multithreading. Every action is still being run on the main thread. The power of coroutines is that they allow directable pausing through a new term, yield. Taking a look at the execution order in the figure below, you may remember seeing yield null after Update in the Game Logic section. If you don’t have the execution order up on a browser tab, look at Figure 7.3. The small note on the left says it nicely. If a coroutine previously yielded or paused, and it’s due to resume, it will resume at that point in the execution order.

Figure 7.3: Game logic of the execution order
That’s awesome, isn’t it? How does it know to resume, you ask? Good question, reader. It knows that it should resume because of the logic in the code. There is a fantastic example from the Unity Docs going over a basic fade from opaque to transparent using a coroutine. Let’s go through it quickly:
void Update()
{
    if (Input.GetKeyDown("f"))
    {
        StartCoroutine(Fade());
    }
}
IEnumerator Fade()
{
    Color c = renderer.material.color;
    for (float alpha = 1f; alpha >= 0; alpha -= 0.1f)
    {
        c.a = alpha;
        renderer.material.color = c;
        yield return null;
    }
}
I put in bold the three things that may be new to you. StartCoroutine(Fade()) is asking the application to start a coroutine with the Fade method. You will start the coroutine during the start of the game logic at the bottom of the yield statements; refer to Figure 7.3 again for this.
IEnumerator is stating that this method is iterable. Remember back to the last time you made a method. The keyword before the name is the type. We use void if it returns nothing, but since this will be iterated on, it needs to know. We let the computer know this by adding IEnumerable as the return type.
The last part is yield return null. This is tricky the first time looking over the for loop. In most cases, a return will take you out of a loop, but since we have a yield there, Unity asks if we’ve finished with everything in the method. It pauses after subtracting 0.1f from the current alpha and waits for the game logic portion to start again to do it again until it satisfies the for loop logic. Once that is completed, it no longer yields.
Summarizing this code, pressing F will fade the GameObject this script is on out from the scene. We think you have a good enough grasp of these concepts. Let’s get back to the code in our project to finish up our implementation.
Back to the code
OK…we took a little aside to explain some key concepts, but we’re back now. Let’s open PhysicsPuzzleTrigger.cs back up. The concept here is that you have telekinesis and when you move an item close to its trigger volume, it will then, on its own, move into place over a transitional period we define. We’ve seen OnTriggerEnter previously, so that isn’t surprising with a volume trigger. We do want it to move on its own, so we need to disable a bunch of fields of the Rigidbody and disable the collider. This is done on lines 28-33 in PhysicsPuzzleTrigger.cs.
Now, this is where we get to see new code. We need to set up the references to where the items need to transition from and to as this script is on several GameObjects, so we need to reference their relative positions.
Then we start the coroutine on line 40.
StartCoroutine(TransitionTween());
We have some code for changing the color of the trigger; this is temporary for debugging.
Then we have a tween loop, which is an animation term for “between” which means the change in movement in our case. We have our while loop running for as long as tweenDuration is set to, normalized from how long it has been from the start. This is defined as delta. We then Lerp the position and Slerp the rotation to the transform we want it to end with:
while (Time.time - tweenStart < tweenDuration)
        {
            float delta = (Time.time - tweenStart) / tweenDuration;
            tweenPiece.position = Vector3.Lerp(tweenStartPos, transform.position, delta);
            tweenPiece.eulerAngles = Vector3.Slerp(tweenStartRot, transform.eulerAngles, delta);
            yield return null;
        }
Finally, we see the yield return null!
We’re now paused until the next game logic loop unless tweenDuration is complete and we don’t enter the while loop, which means we have completed the tween. We set the position and angles on line 61 for the moving piece to ensure the transform is ready to be referenced in our UnityAction.
tweenPiece.position = transform.position;
tweenPiece.eulerAngles = transform.eulerAngles;
OnPieceSlotted?.Invoke(this,tweenPiece.GetComponent<PhysicsPuzzlePiece>());
Now, we move into our UnityAction:
OnPieceSlotted?.Invoke(this, tweenPiece.GetComponent<PhysicsPuzzlePiece>());
This looks interesting. Why is there a question mark there? There is a conditional operator called a “null condition operator”, which asks if OnPieceSlotted is null or not before performing the following method. This is another syntactical sugar. You could get the same result by making an if statement checking if OnPieceSlotted is null.
In the case of UnityAction, this is saying something very specific. It’s asking if anything has been attached to this action.
If there is a method assigned to this UnityAction, then please call whatever function is assigned with the following arguments; the this GameObject and the tweenPiece as the PhysicsPuzzlePiece type.
This is where some magic happens. Remember that we assigned OnPieceSlotted to be a static member of the PhysicsPuzzleTrigger class? Well, open up FinalPuzzle.cs and let’s show the power of static members.
On Start, we add a local function named OnPieceSlotted to the static UnityAction from PhysicsPuzzleTrigger.OnPieceSlotted. We know that when our player puts an object into the right position, by the end of the coroutine it needs to update which object it was. Was it the final puzzle or the intro puzzle? We defined that through our enum on PuzzlePieceType:
void OnPieceSlotted(PhysicsPuzzleTrigger trigger, PhysicsPuzzlePiece piece)
    {
        if (piece.pieceType == PhysicsPuzzlePieceType.Intro)
        {
            Debug.Log("FINAL PUZZLE INTRO SOLVED. Trigger environment transition here");
            tempBridge.SetActive(true);
        }
        else
        {
            numPiecesSlotted += 1;
            if (numPiecesSlotted >= 3)
            {
                Debug.Log("FINAL PUZZLE SOLVED! Trigger portal event");
            }
        }
    }
This local method being run from UnityAction gives us the trigger and piece tells us if we have finished the intro puzzle or if we have worked on the final puzzle. We can use any script later on in the game for this specific mechanic as it’s static and available to us. Static is not only fun with socks on the carpet shocking your siblings. It’s also magic in programming!
We just did some intermediate-level Unity programming. These tools are usable in so many situations, but they aren’t always easy to think about as the first option to the answer of your problem. Take your time and work through each section. Make some coroutines with GameObjects. See if you can make your own UnityAction within one script, as we showed above. Test static methods and see how they work, and in time these tools will become natural to you when developing your games.
Summary
What a jam-packed chapter! We went over a lot, so I think we need a small summary here. The concept of physics is already a tough subject to tackle. We’re using it for simulation in games on a small scale. We went over the Rigidbody component in its entirety and then dove deep into some brand-new C# work. For C#, we went over:
- Execution order
- Static methods
UnityAction(delegate)- Coroutines
All these new concepts are tools to use on your next project. Take as much time as needed to digest these concepts. You will see them used in almost every project that you work with.
In the next chapter, we need to add menu systems and a user interface so that the user can have more context for the gameplay.