
The terms "Texture" and "Sprite" often get confused in game development, so it's worth making the distinction that in Unity 3D a Texture is simply an image file; a big list of color data telling the interpreting program what color each pixel of the image should be. Whereas a Sprite is the 2D equivalent of a mesh, which just happens to be a single quad that renders flat against the current camera. There are also things called Sprite Sheets, which are large collections of individual images contained within a larger Texture file, commonly used to contain the animations of a 2D character. These files can be split apart by Unity's Sprite Batch tool, to form individual Textures for the animation frames.
Let's try to ignore all of these confusing naming convention overlaps, and simply talk about Textures: the image files we're importing into our application that were generated in tools such as Adobe Photoshop or Gimp. At runtime, these files are loaded into memory, pushed to the GPU, and rendered by the Shader over the target object during a given Draw Call.
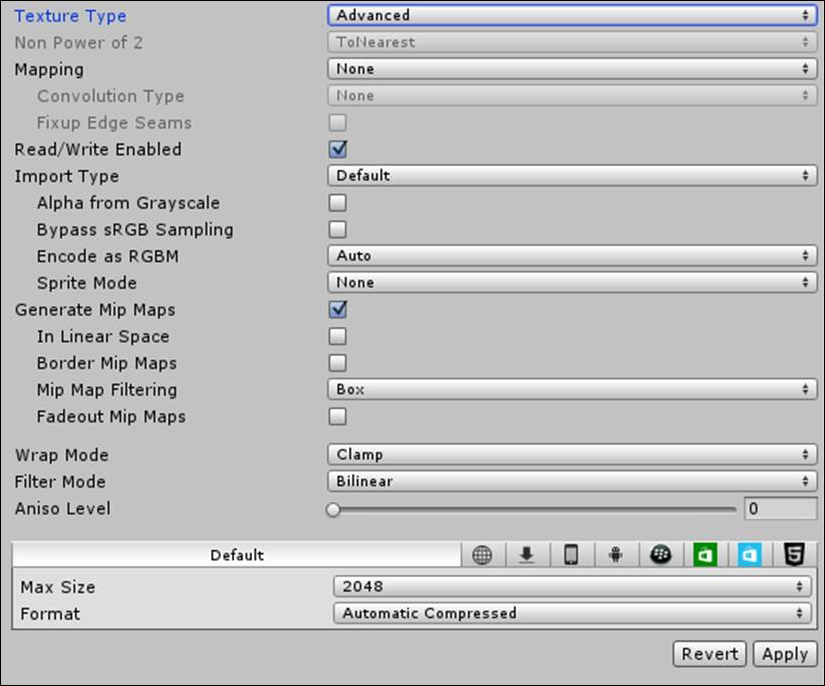
Much like Audio files, Unity provides us with a variety of compression techniques to store our Texture files more efficiently. When a Texture file is imported, there are several settings that we can manipulate. The first is Texture Type. This setting does not affect the file itself, but rather how Unity will interpret, manipulate, and compress it within the final executable we build.

With most of the Texture Type options, the only three compression options Unity exposes to us are Compressed, 16-bit, and True Color. Alternatively, if we set the Texture Type to Advanced, then we expose a larger number of settings. This gives us far more control over the interpretation of the Texture file.
This will be useful information going forward as there are several performance-enhancing opportunities to find through this particular view of a Texture file, which would not be visible ordinarily.
The number of compression formats in Advanced mode are significantly more broad and varied, but the options remain identical between Unity 4 and Unity 5. Some formats allow alpha values, whereas some do not, which restricts our choices if we wish to maintain alpha transparency in our Texture (or a fourth float data value from a Texture being used as a Heightmap!).
Some formats also cost different levels of performance during Scene initialization to decompress and push into the GPU, which can vary enormously depending on the platform we're targeting and the chosen format. Advanced mode provides the Automatic Compressed option, which tries to pick the best option for the given platform and device. We can use this option if we're not completely sure about the best format for our game, or we can spend the time to do some performance-testing with different formats to confirm the best choice(s) for the target device.
Note that the Preview Window at the bottom of the Inspector View provides some useful statistics to help us determine how effectively the currently selected compression method is behaving.
Let's explore some changes we can make to our Texture files, which might help improve performance, depending on the situation and the content of the files we're importing. In each case, we'll explore the changes that need to be made, and the overall effect they have, whether this results in a positive or negative impact on memory or CPU, an increase or decrease in the Texture quality, and under what conditions we can expect to make use of these techniques.
Also, because the Unity 5 Personal Edition has made multiple features available to us that were previously only available in the Pro Edition, some users may not be aware of some additional techniques that we can apply to our Textures to improve application performance. So, we will also cover some of these techniques toward the end of this section.
The larger a given Texture file, the more GPU memory bandwidth will be consumed pushing the Texture when it is needed. If the total memory pushed per second exceeds the graphics card's total memory bandwidth, then we will have a bottleneck as the GPU waits for all Textures to be loaded before the next rendering pass can begin. Smaller Textures are naturally easier to push through the pipeline than larger Textures, so we need to find a good middle ground between high quality and performance.
A common test to find out if we're bottlenecked in memory bandwidth is to simply reduce the resolution of our game's most abundant and largest Texture files and relaunch the Scene. If the frame rate suddenly improves, then the application was most likely bound by the Texture throughput. If the frame rate does not improve or improves very little, then either we still have some memory bandwidth to make use of, or there are bottlenecks elsewhere in the rendering pipeline preventing us from seeing any further improvement.
There would be no point rendering small, distant objects such as rocks and trees with a high-detail Texture if there's no way the player would ever be able to see that detail, or if the performance loss is too great to warrant a minor detail increase. Mip Maps were invented as a way to solve this problem (as well as helping eliminate aliasing problems that were plaguing video games at around the same time), by pregenerating lower-resolution alternatives of the same Texture and keeping them together in the same memory space. At runtime, the GPU picks the appropriate Mip Map option based on how large the surface appears within the perspective view (essentially based on the texel-to-pixel ratio when the object is rendered), and then picks an appropriately scaled Mip Map of the Texture.
By enabling the Generate Mip Maps option, Unity automatically handles the generation of these lower-resolution copies of the Texture. These alternatives are generated using high-quality resampling and filtering methods within the Editor, rather than at runtime.
The following image shows how a 1024x1024 image will be Mip Mapped into multiple lower-resolution duplicates:

The downside to Mip Mapping is that it has a negative impact on file size and loading time due to the larger combined Texture files that are being automatically generated. The final Texture file will be around 33 percent larger when Mip Mapping is enabled. There are also some situations where the Mip Mapping process is a waste of effort, so we should examine some of our Texture files to see if Mip Maps are being applied wisely.
Mip Mapping is only useful if we have Textures that need to be rendered at varying distances from the camera. If we have Textures that always rendered at a similar distance from the main camera, such that the Mip Mapped alternatives are never used, then enabling Mip Maps is just wasting space. In these cases, we should disable the Mip Mapping feature by disabling the Generate Mip Maps option for the Texture.
If only a single Mip Map alternative is used, then we should consider disabling Mip Mapping and downscaling the resolution of the original Texture file.
Additional candidates for disabling the Mip Mapping feature are:
- Almost any Texture file used in a 2D game
- User Interface (GUI) Textures
- Textures for meshes, Sprites, and Particle Effects, which always render near the camera—examples include the player characters themselves, any objects they hold or carry, and any Particle Effects which always center around the player
Unity puts a lot of effort into making things as easy to use as possible and provides us with the ability to place the project files from external tools to our Project workspace, such as PSD and TIFF files, which are often large and split into multiple layered images. Unity automatically generates a Texture file from the file's contents for the rest of the Engine to make use of, which can be very convenient, as we only need to maintain a single copy of the file through Source Control and the Unity copy is automatically updated when an artist makes changes.
The problem is that the aliasing introduced by Unity's auto-Texture generation and compression techniques from these files may not be as robust and efficient as the tools we use to generate such files, such as Adobe Photoshop or Gimp. Unity may be introducing artefacts through aliasing, and we might find ourselves getting into the habit of importing image files with a higher resolution than necessary, just to keep the intended quality level. But, had we downscaled the image through the external application first, we might suffer much less aliasing. In these cases, we may have been able to achieve an acceptable level of quality with a lower resolution, while consuming less overall disk and memory space.
We can either avoid using PSD and TIFF files within our Unity project as a matter of habit (storing them elsewhere and importing the downscaled version into Unity), or just perform some occasional testing to ensure we're not wasting file size, memory, and GPU memory bandwidth using larger resolution files than necessary. This costs us some convenience in project file management, but can provide some significant savings for some Textures, if we're willing to spend the time comparing the different downscaled versions.
Anisotropic Filtering is a feature which improves the image quality of Textures when they are viewed at very shallow (oblique) angles. The following screenshot shows the classic example of painted lines on a road with and without Anisotropic Filtering applied. Without Anisotropic Filtering, the painted lines appear blurry and distorted the further they are away from the camera, whereas the view with Anisotropic Filtering applied makes these lines more crisp and clear.

The strength of Anisotropic Filtering applied to the Texture can be hand-modified on a per-Texture basis with the Aniso Level setting as well as globally enabled/disabled using the Anisotropic Textures option within the Quality Settings screen.
Much like Mip Mapping, this effect can be costly and sometimes unnecessary. If there are Textures in our Scene where we are certain will never be viewed at an oblique angle (such as distant background sprites and particle-effect Textures), then we can safely disable Anisotropic Filtering for them to save some runtime overhead. We can also consider adjusting the strength of the Anisotropic Filtering effect on a per-Texture basis to find the magic spot between quality and performance.
Atlasing is the technique of combining lots of smaller, isolated Textures together into a single-large Texture file in order to minimize the number of Materials, and hence Draw Calls, we need to apply by exploiting Dynamic Batching. Conceptually, this technique is very similar to the approaches of minimizing Material usage you learned in Chapter 3, The Benefits of Batching.
Each unique Material would require an additional Draw Call, but each Material only supports a single primary Texture (this excludes Normal Maps, Emission Maps, and other secondary Textures). By combining all Textures into a single colossal Texture, we can minimize the number of Draw Calls used to render objects that share this Texture:

The benefits are clear; reducing Draw Calls results in reducing the CPU workload and improving the frame rate if our application is CPU-bound (or simply frees up cycles for other tasks). There will be no loss of quality, and memory consumption will be essentially identical. All we're doing is exploiting Unity's Dynamic Batching system to reduce Draw Calls. Note that Atlasing does not result in reduced memory bandwidth consumption, since the amount of data being pushed is identical. It just happens to be bundled together in one bigger Texture file.
Atlasing is a common tactic applied to User Interface elements, and in games that feature a lot of 2D graphics. Atlasing becomes practically essential when developing mobile games with Unity, since Draw Calls tend to be the most common bottleneck on those platforms. But, we would not want to generate these atlas files manually. Life would be much simpler if we could continue to edit our Textures individually, and automate the task of combining them into a larger file.
Many GUI-related tools in the Unity Asset Store provide an automated Texture-atlasing feature, there are some standalone programs scattered across the Internet, which can handle this work, and Unity itself provided a built-in Sprite Packer tool with the new UI system in version 4.6, which can be easily customized to pack Textures in different ways.
Check the Unity documentation to discover more about this useful feature, if interested:
http://docs.unity3d.com/Manual/SpritePacker.html
Either way, it is recommended to make use of an existing solution for atlas generation in order to avoid reinventing the wheel.
Atlasing does not need to apply to 2D graphics and UI elements either. We can apply this technique to 3D meshes if we happen to be creating a lot of low-resolution Textures. 3D games that feature simple Texture resolutions, or a flat-shaded low-poly art style, are ideal candidates for Atlasing in this way.
However, because Dynamic Batching only affects non-animated meshes (that is, Mesh Renderers, and not Skinned Mesh Renderers), there is no reason to combine Texture files for animated characters into an atlas. Since they are animated, the GPU needs to multiply each object's bones by the transform of the current animation state. This means a unique calculation is needed for each character, and they will result in an extra Draw Call regardless of any attempts we make to have them share Materials.
As a result, combining Textures for animated characters should only be done as a matter of convenience and space-saving; for example, in a flat-shaded low-poly art style game, where everything happens to use a common color palette, we can make some significant space savings by using a single Texture for the entire game world, objects, and characters.
The disadvantages of Atlasing are mostly in terms of development time and workflow costs. It requires a lot of effort to overhaul an existing project to make use of Atlasing, which can be a lot of work just to figure out if it is worth the effort or not. In addition, we need to beware of generating atlas files, which are too large for the target platform.
Some devices (specifically mobile devices) have a relatively low limit on the size of Textures that can be pulled into the lowest memory cache of the GPU. If the atlas is too large, then it must be broken up into smaller Textures, to fit the target memory space. If the renderer happens to need Textures from different pieces of the atlas every other Draw Call, then not only will we inflict a lot of cache misses, but also we might find that we choke the memory bandwidth as Textures are constantly pulled from VRAM and the lower-level cache.
We would probably not have this problem if the atlas was left as individual Textures. The same Texture swapping would occur, but will result in much smaller files being swapped at the cost of additional Draw Calls. Our best options at this stage would be to lower the atlas resolution or generate multiple smaller atlases to have better control over how they will be Dynamically Batched.
So, Atlasing is clearly not a perfect solution. If it is not clear whether it would result in a performance benefit, then we should be careful not to waste too much time on implementation.
In general, we should attempt to apply Atlasing to mid-range/high-quality Mobile games right from the start of the project, keeping within the Texture limit for the target platform, making per-platform and per-device adjustments as necessary. On the other hand, the simplest Mobile games will most likely function without needing any Atlasing.
Meanwhile, we should consider applying Atlasing to high-quality Desktop games, only if our Draw Call count exceeds reasonable hardware expectations, since we will want many of our Textures to maintain high resolutions for maximum quality. Low-quality Desktop games can probably afford to avoid Atlasing, since Draw Calls are unlikely to be the biggest bottleneck.
Of course, no matter what the product is, if we're ever CPU-bound by Draw Calls and we've already exhausted many of the alternative techniques, then Atlasing would be the next best technique to implement, as it can result in some impressive Draw Call savings when used properly.
It is not recommend to import non-square and/or non-power-of-2 Textures into our application, because GPUs often require the pushed Texture to be square, and a power-of-2 size results in unnecessary workload dealing with malformed Texture sizes. Unity will automatically adjust the Texture and add additional empty space in order to fit the form factor that the GPU expects, which will result in additional memory bandwidth costs, pushing what is essentially useless data to the GPU.
So, the first recommendation is to avoid non-square and/or non-power-of-2 Textures altogether. If the image can be placed within a square, power-of-2 Texture, and does not result in too much quality degradation due to squeezing/stretching, then we should apply those changes just to keep the CPU and GPU happy.
However, if we still want to use non-square Textures, there is a trick we can apply to achieve higher quality without costing any additional space. Since the way non-square Textures are packed by compression algorithms, we can often increase the bit-rate (and hence quality) of the chosen compression format for a non-square Texture and still achieve an identical imported file size and runtime overhead cost. This only costs us the time it takes to find these Textures and test a variety of compression algorithms to find the highest quality version.
Sparse Textures, also known as Mega-Textures or Tiled-Textures, provide a way of effectively streaming Texture data from disk at runtime. Relatively speaking, if the CPU performs operations in the order of seconds, then the disk will operate in the order of days. So common advice is that hard disk access during gameplay should be avoided at all costs, since any such technique risks inflicting more disk access than available, causing our application to grind to a halt.
But, Sparse Texturing breaks this rule and offers some interesting performance saving techniques. The aim of Sparse Texturing is to combine many Textures into an enormous Texture file, which would be far too large to load into graphics memory as a single Texture file. This is similar to the concept of Atlasing, except the file containing the Textures is incredibly large (for example, 32,768 x 32,768 resolution) and contains considerable detail (32 bits per pixel). The idea is to save large amounts of runtime memory and memory bandwidth by hand-picking small subsections of the Texture dynamically, and pull them from the disk just before they are needed in the game. The main cost of this technique is the file size requirement (the example resolution file would consume 4 GB of disk space!). Other costs for this technique can be overcome with a great deal of Scene preparation work.
The game world needs to be created in such a way that it minimizes the amount of Texture swapping taking place. In order to avoid jarring, "texture popping" problems, Texture subsections must be pulled from a disk with just enough time to spare that the player does not notice. This takes place in the design of the Texture file itself, by keeping common elements for a given Scene in the same general area of the Texture, and the design of the Scene, by triggering new Texture subsection loading at key moments during gameplay. If it is handled with great care and attention to detail, then Sparse Texturing can result in some impressive Scene quality and equally impressive memory savings.
Sparse Texturing was previously a Pro Edition-only feature in Unity 4, but was made available with the Personal Edition of Unity 5. Sparse Texturing requires specialized hardware and platform support, however, so this option is not available to all games. It is a highly specialized and uncommon technique within the gaming industry, which is reflected in the lack of documentation. The Unity documentation does not provide much information on Sparse Texturing, but it does provide an example Scene showing the effect at work. It can be found at the following URL: http://docs.unity3d.com/Manual/SparseTextures.html.
For Unity developers who consider themselves advanced enough to figure it out on their own, it might be worth taking the time to perform some research to see if Sparse Texturing is right for their project and whether they are willing to make the appropriate Scene changes necessary to gain the performance benefits that this feature presents.
Also known as Substances, Procedural Materials are a means of procedurally generating Textures at runtime by combining small, high-quality Texture samples with custom mathematical formulas. The goal of Procedural Materials is to greatly minimize the application footprint at the cost of additional runtime memory and CPU processing during initialization. Like Sparse Texturing, this feature was previously only available in the Pro Edition of Unity 4 and is now available in Unity 5.
This gives many users an opportunity to view their Materials from a different perspective, as Procedural Materials are a more modern approach to their games. Texture files are often the biggest disk space consumer of a game project, and it's fairly common knowledge that download times have a tremendous negative impact on the completed download rate and just getting people to try our game (even if it's free!). Procedural Materials offer us the ability to sacrifice some initialization and runtime processing power for much faster downloads. This is very important for an upcoming generation of Mobile games that are trying to compete via graphical fidelity.
The Unity documentation on Procedural Materials is far more extensive than for Sparse Texturing, so it is recommended to work through the documentation for a clearer picture of how Substances work and how they can provide us with performance benefits: