
Hour 10. Collision
What You’ll Learn in This Hour:
• The basics of rigidbodies
• How to use colliders
• How to script with triggers
• How to raycast
This hour you are going to learn to work with the most prevalent physics concept in video games: collision. Collision, simply put, is knowing when the border of one object has come in contact with another object. You will begin by learning what rigidbodies are and what they can do for you. After that, you will experiment with Unity’s powerful built in physics engine by colliding objects together. From there, you will learn the more subtle uses of collision with triggers. You will end the hour by learning to raycast.
Rigidbodies
In order for objects to take advantage of Unity’s built in physics engine, they must include a component called a “rigidbody”. Adding a rigidbody component makes an object behave like a real world solid entity. To add a rigidbody component, simply select the object that you want and click “Component->Physics->Rigidbody”. You will notice the new rigidbody component added to the object in the inspector (see Figure 10.1).
Figure 10.1. The Rigidbody component.
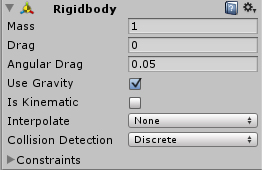
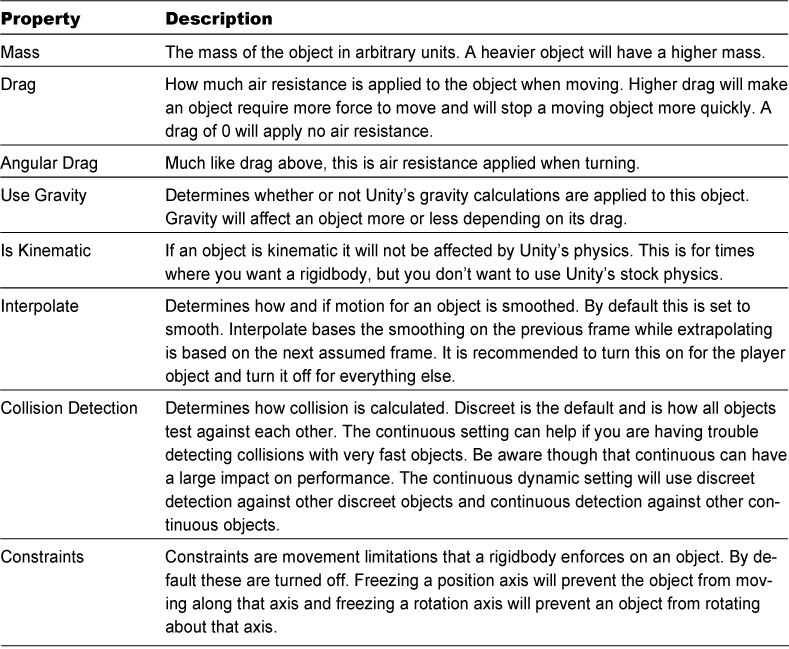
The rigidbody component has several new properties that you have not seen yet. Table 10.1 lists these properties and their description.
Table 10.1. Rigidbody Properties
Collision
Now that you have your objects moving around, it is time to start getting them to crash into each other. In order for objects to detect collision, they need a component called a collider. A collider is a perimeter that is projected around your object that can detect when other objects enter it.
Note: Collision Requirements
It is worth mentioning that objects don’t need rigidbodies to collide. All that is needed for collision is for both objects involved to have a collider object. Rigidbodies are included in this chapter because they help demonstrate topics by enabling objects to fall. Also, rigidbodies are required for trigger collision which will be covered later in this chapter.
Colliders
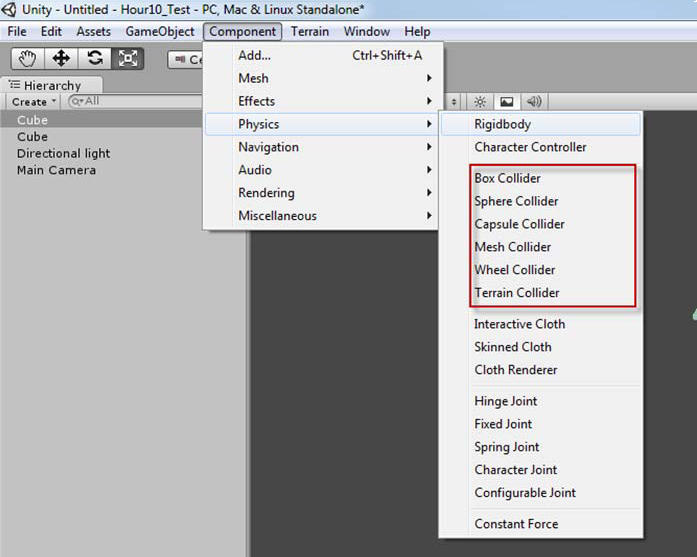
Geometric objects like spheres, capsules, and cubes already have collider components on them when created. You can add a collider to an object without one by clicking “Component->Physics” and then choosing the collider shape you want from the menu. Figure 10.2 illustrates the different collider shapes you can choose from.
Figure 10.2. The different colliders.
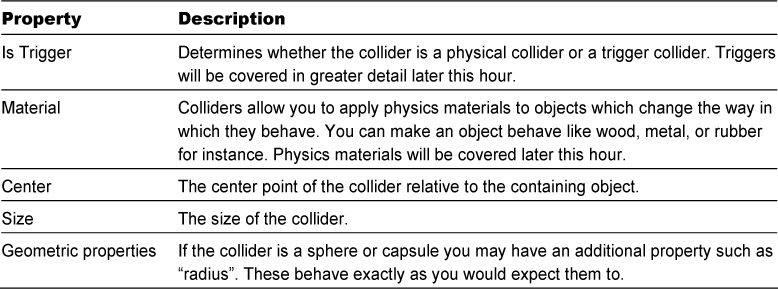
Once a collider is added to an object, the collider object appears in the inspector. Table 10.2 lists the collider properties and their descriptions.
Table 10.2. Collider Properties
Tip: Mix and Match Colliders
Using differently shaped colliders on objects can have some interesting effects. For instance, making the collider on a cube much bigger than the cube will make the cube look like it is floating above a surface. Likewise, a smaller collider will allow an object to sink into a surface. Furthermore, putting a sphere collider on a cube will allow the cube to roll around like a ball. Have fun experimenting with the various ways to make colliders for objects.
Tip: Complex Colliders
You may have noticed a collider called the “Mesh Collider”. This collider is specifically left out of the text as it is more a practice in modeling than anything. Basically, a mesh collider is a collider that has the exact shape of a 3D model. This sounds very useful, but in practice can greatly reduce the performance of your game. Furthermore, Unity puts a severe limit to the number of polygons allowed in a mesh collider. A better habit to get into is to compose your complex object of several basic colliders. If you have a humanoid model, try spheres for the head and hands and capsules for the torso, arms, and legs. You will save on performance and still have some very sharp collision detection.
Physics Materials
Physics materials can be applied to colliders to give objected varied physical properties. For instance, you can use the rubber material to make an object bouncy or an ice material to make it slippery. You can even make your own to emulate a specific material of your choosing.
To import the materials Unity makes available, click “Assets->Import Package->Physic Materials”. In the import screen, leave everything selected and click “Import”. This will bring a “Standard Assets” folder into your project that contains materials for Bouncy, Ice, Metal, Rubber, and Wood. To create a new physics material, right click on the “Assets” folder in the project view and select “Create->Physic Material”.
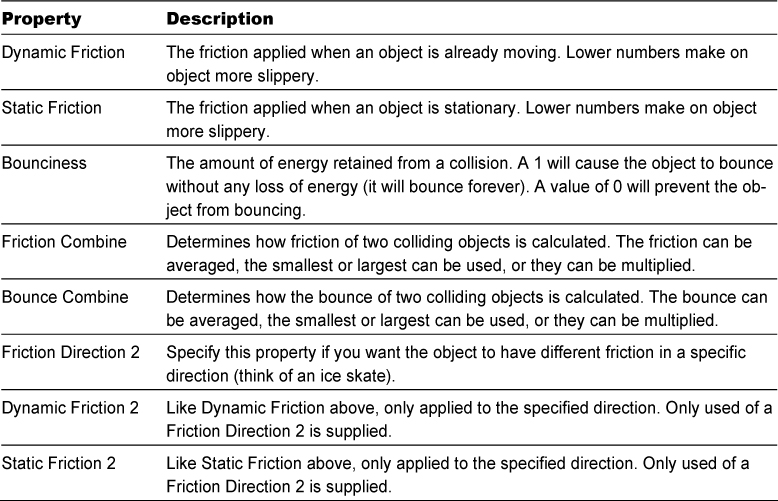
A physics material has a set of properties that determine how it behaves on a physical level (see Figure 10.3). Table 10.3 lists the physics material’s properties and their description.
Figure 10.3. The properties of physics materials.
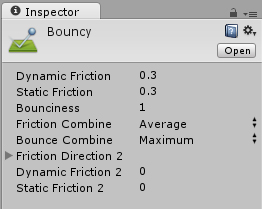
Table 10.3. Physics Material Properties
The effects of the physics material can be as subtle or as distinct as you would like. Try it out for yourself and see what kind of interesting behaviors you can create.
Triggers
So far you have seen physical colliders; colliders that react in a positional and rotational fashion using Unity’s built in physics engine. If you think back to Hour 7, however, you probably can remember using another type of collider. Remember how the game detected when the player entered the water hazards and finish zone? That was the trigger collider at work. A trigger detects collision just like normal colliders do, but they don’t do anything specific about it. Instead, triggers call three specific methods that allow you, the programmer, to determine what the collision means:
void OnTriggerEnter(Collider other) //is called when an object enters the trigger
void OnTriggerStay(Collider other) //is called when an object stays in the trigger
void OnTriggerExit(Collider other) //is called when an object exits the trigger
Using these methods, you can define what happens whenever an object enters, stays in, or leaves the collider. For example, if you wanted to write a message to the console whenever an object entered the perimeter of a cube, you could add a trigger to the cube. Then attach a script to the cube with the following code:
void OnTriggerEnter(Collider other)
{
print("Object has entered collider");
}
Note: Triggers Not Working
In order for trigger colliders to work a rigidbody must be involved. If an object without a rigidbody enters a trigger collider, nothing will happen. If you are noticing in your scene that some objects aren’t triggering the way you want, ensure that they have rigidbodies on them.
You may notice the one parameter to the trigger methods: the variable “other” of type collider. This is a reference to the object that entered the trigger. Using that variable you can manipulate the object however you would like. For instance, if you wanted to modify the above code to write the name of the object that entered the trigger to the console, you could write:
void OnTriggerEnter(Collider other)
{
print (other.gameObject.name + " has entered the trigger");
}
You could even go so far as to destroy the object entering the trigger with some code like this:
void OnTriggerEnter(Collider other)
{
Destroy(other.gameObject);
}
Raycasting
Raycasting is the act of sending out an imaginary line, a ray, and seeing what it hits. Imagine, for instance, looking through a telescope. Your line of sight is the ray, and whatever you can see at the other end is what your ray hits. Game developers use raycasting all the time for things like aiming, determining line of sight, gauging distance, and more. There are a few raycast methods in Unity. The two most common uses are laid out here. The first raycast method looks like this:
bool Raycast(Vector3 origin, Vector3, direction, float distance, LayerMask mask) ;
You will notice that the above method takes quite a few parameters. You will also notice that it uses a variable called a “Vector3”. A Vector3 is a variable type that holds three floats inside of it. It is a great way to specify an x, y, and z coordinate without requiring three separate parameters. The first parameter, origin, is the position the ray starts at. The second, direction, is which direction the ray travels. The third parameter, float, determines how far out the ray will go and the final variable, mask, determines what layers will be hit. You can omit both the distance and mask variables. If you do, the ray will travel and infinite distance and hit all object types.
As mentioned earlier, there are many things you can do with rays. For instance, if you wanted to determine if something was in front of the camera, you could attach a script with the following code:
void Update() {
//cast the ray from the camera's position in the forward direction
if (Physics.Raycast(transform.position, transform.forward, 10))
print("There is something in front of the camera!");
}
Another way we can use this method is to find the object that the ray collided with. This version of the method uses a special variable type called a RaycastHit. There are many versions of the Raycast method that utilizes distance (or doesn’t) and layer mask (or doesn’t). The most basic way to use this version of the method, though, looks something like this:
bool Raycast(Vector3 origin, Vector3 direction, out Raycast hit, float distance);
There is one new interesting thing about this version of the method. You may have noticed it uses a new keyword that you have not scene before: “out”. This keyword means that when the method is done running, the variable “hit” will contain whatever object was hit. The method effectively sends the value back out when it is done.
Summary
This hour you learned about object interactions through collision. You learned about the basics of Unity’s physics capabilities with rigidbodies. Then, you worked with various types of colliders and collision. From there, you learned that collision is more than just stuff bouncing around when you got hands on with triggers. Finally, you learned to find objects by raycasting.
Q&A
Q. Should all my objects have rigidbodies?
A. Rigidbodies are very useful components that serve largely physical roles. That being said, adding rigidbodies to every object can have strange side effects and may reduce performance. A good rule of thumb is to only add components once they are needed, not preemptively.
Q. There are several colliders we didn’t talk about. Why not?
A. Most colliders either behave the same way as the ones we covered or are beyond the scope of this text. For that reason they are omitted. Suffice to say that this text still provides what you will need to know to make some very fun games.
Workshop
Take some time to work through the questions here to ensure you have a firm grasp on the material.
Quiz
1. This component is required on an object if you want it to exhibit physical traits like falling.
2. True or False: An object can only have a single collider on it.
3. Tue or False: In order for a trigger to work, the trigger object also needs a rigidbody?
4. What sorts of things are raycasts useful for?
Answers
1. Rigidbody.
2. False. Objects can have many, and varied, colliders on it.
3. False. Whatever collides with the trigger needs to have a rigidbody.
4. Determining what an object can see and finding objects along line or site as well as finding distances between objects.
Exercise
In this exercise you will be creating an interactive application that utilizes motion and triggers. The exercise will require you to creatively determine a solution as one will not be presented here. If you get stuck and need help, however, the solution to this exercise can be found in the book assets for Hour 10 named “Hour10_Exercise”.
1. Create a new project or scene. Add a cube to the scene and position it at (-1.5, 0, -5). Scale the cube (.1, 2, 2) and rename it “LTrigger”.
2. Duplicate the cube (right click and select “Duplicate”). Name the new cube “RTrigger” and place it at (1.5, 0, -5).
3. Add a sphere to your scene and place it at (0, 0, -5). Add a rigidbody to the sphere and uncheck “Use Gravity”.
4. Create a script named “TriggerScript” and place it on both the LTrigger and the RTrigger. Create a script called “MotionScript” and place it on the sphere.
Now comes the fun part. You will need to create the following functionality in your application:
• The player should be able to move the sphere with the arrow keys.
• When the sphere enters, exits, or stays in either of the triggers the corresponding message should be written to the console.
• The name of the trigger enters (LTrigger or RTrigger) should be written to the console with the above name.
Good luck!